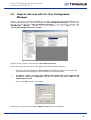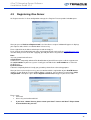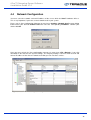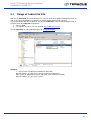
1
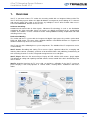
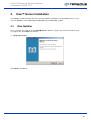
iCue™ Streaming Server Software Installation Guide V1.2 ICUE™ STREAMING SERVER SOFTWARE Installation Guide V1.2 Teracue eyevis GmbH Schlossstr. 18 85235 Odelzhausen Germany Tel: Fax: +49 (0)8134-555-10 +49 (0)8134-555-199 [email protected] www.teracue.com Document Version 1.2/120626 1 iCue™ Streaming Server Software Installation Guide V1.2 COPYRIGHT This document may not be reproduced in any form, in whole or in part, without the prior permission of Teracue eyevis GmbH. Copyright © 2014 by Teracue eyevis GmbH, all rights reserved. DISCLAIMER This publication supersedes all previous publications. Information and specification in this documentation is subject to change without notice. Please make sure you have the latest document version. User guides are located at: www.teracue.com/support If you find some points in this user guide unclear then please let us know, so we can improve this documentation. Thank you! Mail to: [email protected] All information within this document is confidential to Teracue eyevis GmbH costumers and should not be copied or distributed to non Teracue eyevis GmbH customers. TRADEMARKS iCue™ Streaming Server Software and all of its components are registered trademarks licensed to Teracue eyevis GmbH. All other logos and trademarks both marked and not, may be trademarks or registered trademarks and therefore property of their respective owners. 2 iCue™ Streaming Server Software Installation Guide V1.2 I. Information about the manual This manual should help administrators and users to make their the first steps with the iCue™ software. If you received this publication as a PDF, then it's a good idea to print it out for future reference. It is best to use this user guide directly in front of your computer, by doing so you try out everything at once. .!. Important features are marked by this sign. 3 iCue™ Streaming Server Software Installation Guide V1.2 II. Content 1. OVERVIEW ...................................................................................................................................... 6 2. REQUIREMENTS ............................................................................................................................ 7 2.1 HARDWARE ............................................................................................................................... 7 2.1.1 Storage Extension ............................................................................................................... 8 2.1.1.1 Drive Path Extension ................................................................................................... 8 2.1.1.2 Drive Path Modification ................................................................................................ 8 2.1.2 Network Interfaces ............................................................................................................... 8 2.1.3 Domain Name Server DNS ................................................................................................. 8 2.1.4 Ports .................................................................................................................................... 9 2.1.5 Redundancy iCue Server Hardware .................................................................................. 11 2.1.6 NAS Hardware ................................................................................................................... 11 2.1.6.1 General ...................................................................................................................... 11 2.1.6.2 Recording (write) per Video-/Stream-Recording ....................................................... 11 2.1.6.3 Streaming/VoD (read) ................................................................................................ 11 2.1.7 SAN ................................................................................................................................... 12 2.2 SOFTWARE .............................................................................................................................. 13 2.2.1 Configuration of Windows Components ............................................................................ 13 2.2.1.1 Switch off Windows Firewall ...................................................................................... 13 2.2.1.2 Installation Internet Information Service .................................................................... 13 2.2.1.3 Register .Net Framework for IIS ................................................................................ 15 2.2.2 Microsoft .Net Framework ................................................................................................. 17 2.2.3 User Management ............................................................................................................. 18 2.2.3.1 Local Administrator account ...................................................................................... 18 2.2.4 Monitoring Software ........................................................................................................... 18 2.2.5 Virus Scanners .................................................................................................................. 18 2.3 NETWORK................................................................................................................................ 18 3. ADS AUTHENTICATION IN ICUE™ ............................................................................................. 19 3.1 ICUE™ REGISTRY SETTINGS .................................................................................................... 19 3.1.1 Ask for the Domain Name ................................................................................................. 21 3.1.2 Ask for the organisational Unit........................................................................................... 23 3.2 ICUE™ DATABASE SETTINGS .................................................................................................... 24 3.2.1 ‘voduser’ Table of the iCue™ database ............................................................................ 25 3.2.2 ‘usergroup’ Table of the iCue™ database ......................................................................... 25 3.2.3 ‘user_usergroup’ Table of the iCue™ database ................................................................ 26 3.2.4 ‘grouppermission’ Table of the iCue™ database .............................................................. 26 3.2.5 ‘usergroup_permission’ Table of the iCue™ database ..................................................... 27 4. ICUE™ SERVER INSTALLATION ................................................................................................ 29 4.1 4.2 4.3 4.4 4.5 4.6 5. CONFIGURATION OF INTERNET INFORMATION SERVICE .................................................... 38 5.1 6. USAGE OF ‘INDEX.HTM’ FILE ..................................................................................................... 39 REDUNDANCY .............................................................................................................................. 40 6.1 6.2 7. ICUE INSTALLER....................................................................................................................... 29 REGISTER SERVICES WITH THE ICUE CONFIGURATION MANAGER ............................................... 34 REGISTERING ICUE SERVER ..................................................................................................... 35 NETWORK CONFIGURATION ...................................................................................................... 36 START SERVICES WITH THE ICUE CONFIGURATION MANAGER .................................................... 37 UPDATE OF THE ICUE DATABASE .............................................................................................. 37 FIRST STEPS ........................................................................................................................... 41 ICUE CONFIGURATION MANAGER SETTINGS .............................................................................. 42 FINAL STEPS AND USEFUL HINTS ............................................................................................ 45 7.1 CUSTOMIZE INTERNET EXPLORER ............................................................................................. 45 4 iCue™ Streaming Server Software Installation Guide V1.2 7.2 7.3 8. REDUNDANCY W AIT TIME ......................................................................................................... 46 RAID STORAGE TEST ............................................................................................................... 46 PROCEDURE FOR AN ICUE SERVER UPDATE ........................................................................ 47 5 iCue™ Streaming Server Software Installation Guide V1.2 1. Overview iCue™ is your own in-house TV station for streaming media with an integrated video archive.The iCue™ Streaming System allows the digital distribution, management and recording of TV channels and camera signals: Any video at any time on any workplace. iCue™ offers flexible video access: LIVE and ONDEMAND, whether on PC's or TV's. In-House Streaming: Network-based transmission of video signals. Video-over-IP technology is used as the distribution method for the video and audio signals. All signals are digitally transmitted on the standard data network. The network is used as a virtual AV-router: making additional cabling, amplification and video switching unnecessary. Professional Quality: The end-to-end iCue™ system with the integrated all digital signal processing enables professional DVD and DVB output. The open video standards MPEG-2 and MPEG-4/H.264 are supported in SD/HD resolutions by all iCue™ Server models. iCue™ consists of the following three system components. The individual iCue™ components can be used modularly: iCue™ Server: Recording and storing TV or camera signals, upload of video files, managing and indexing video content (metadata), provision of on-demand videos and publishing, broadcasting of own streaming channels as well as integrated management of users and rights. iCue™ Player: All-in-One PC Stream Player: Replay of LIVE, NVOD, VOD streams, plug-in option Trim&Export for cutting and exporting recorded content, remote control of the basic functionality of the iCue™ Server. iCueTV: Graphical interface for TV users with set top boxes, utilization of the iCue™ system on plasma displays, LCDs and projectors in seminar rooms, meeting rooms, auditoriums and lecture rooms. Figure 1: iCue™ Overview 6 iCue™ Streaming Server Software Installation Guide V1.2 2. Requirements The following sub-chapters describes the basic software-, hardware- and network requirements, which are needed to guarantee the operation of the iCue™ Server Software. The following requirements are the minimum and recommended requirements of the iCue™ Server Software. 2.1 Hardware Pentium 4, 3.0 GHz, 2 MB, Hyper Threading 4 GByte RAM Free Hard Disc: The needed free disc space depends on your own requirements, because each recording needs a certain disc space. You must calculate your own disc space requirements. Please calculate your personal needed disc space like follows: Disc Space in Byte = Bitrate in Bit/s ∗ Duration in Sec. 8 1 h = 60 sec . ∗ 60 = 3600 sec . 1 day = 3600 sec . ∗ 24 = 86400 sec . Example: If a 5 Mbit stream will be recorded currently 1 hour, you need per hour minimum 2.25 GByte free disc space. 5 ∗ 10 6 Bit /s ∗ 3600 Sec. = 2,25 ∗ 10 9 Byte as per SI −Prefix 8 If a 5 Mbit/s stream will be recorded currently 24 hours, you need per day minimum 54 GByte free disc space. 5 ∗ 10 6 Bit /s ∗ 86400 Sec. = 54 ∗ 10 9 Byte as per SI−Prefix 8 .!. But the hard disc must have minimum 500 GByte free disc space. .!. It is recommended that servers write/read their video files to a NAS. Concerning the requirements to the NAS manufacturer, please see the subchapter 2.1.6 on page 11. 7 iCue™ Streaming Server Software Installation Guide V1.2 2.1.1 Storage Extension It is possible to make a storage extension by adding network storage, but please note that this requires also a manual update of the upload path in the iCue Configuration Manager. 2.1.1.1 Drive Path Extension A drive path extension can be made at the iCue Server. 2.1.1.2 Drive Path Modification It is possible to change the drive path in the iCue Configuration Manager, but please note that the specified path in the database will not be updated automatically. We recommend archiving the database before changing the drive path. After the drive path modification you can upload the archived database at the iCue Server again. 2.1.2 Network Interfaces iCue supports maximum three network interfaces which are intended for: the streams and the management, the online storage (like RAID, NAS) and the offline storage (this is optional) 2.1.3 Domain Name Server DNS iCue Server supports the name resolution to a NAS, but the name resolution at redundancy systems is not supported. At redundancy iCue systems a static IP-address or a static DHCP is mandatory. 8 iCue™ Streaming Server Software Installation Guide V1.2 2.1.4 Ports 8888 554 1501, 1501 TCP TCP UDP iCue Server LBS LBS LBS 225.25.25.25:4445 UDP LBS 81 TCP Video Streams 225.25.25.25:5225 UDP iCue Announcement and Redundancy 5000-5064 UDP 8889 TCP 5678 TCP UDP/ DCOM protocol TCP Protocol XPlayer UDP control RTSP iCue Remote Control XML iCue Content Broadcast HTTP Video Streaming Live Message UDP Com and Video Streaming Port TCP SAP Announcement Microsoft . Remoting DCOM TCP Com and Video Streaming Port Reporting Multicast / Port 135 Type 3123 TCP 225.25.25.25:5226 UDP Live Message 229.29.29.29:9100 UDP Live Message 229.29.29.29:9000 UDP SNMP SNMP Trap Telnet 161 162 23 UDP UDP TCP HTTP 80 TCP SAP 224.2.127.254:9875 UDP Remote Control SSH Remote Control Remote Control Remote Control Remote Control Remote Control Remote Control FTP UDP Multicast/Unicast TCP Streaming 2323 22 225.0.0.1:1500 225.0.0.1:1501 225.0.0.1:1313 2222 16384 16385 20, 21 NTP 123 Live Message 225.25.25.25:5239 TCP TCP UDP UDP UDP TCP TCP TCP TCP UDP Description iCue Player XPlayer LBS Pump MultiCoder Announcement ElementManager Announcement Hypertext Transfer Protocol Session Announcement Protocol, RFC 2974 Secure Shell Back Channel Reset DVB-100 DVB-100 DVB-100 Video Streams TCP Video Streams TCP/ Network Time UDP Protocol MultiCoder Status UDP Message Figure 2: List of used network ports, multicast-, IP-addresses of the iCue Server = is used 9 iCue™ Streaming Server Software Installation Guide V1.2 Figure 2 listed the network ports, multicast-, IP-addresses that are used by the iCue Server, the iCue Player and the XPlayer. These ports, multicast-, IP-addresses must be available and must not be blocked within the network, by involved PCs and the IT infrastructure. Furthermore do not use the ports for your video stream, because these ports are also used from Teracue products. Port: 135 161 162 1313 1500 1501 4445 5225 5225 5226 5239 5678 9000 9100 9875 5000 – 5064 Figure 3: Network ports, which should not be used 10 iCue™ Streaming Server Software Installation Guide V1.2 2.1.5 Redundancy iCue Server Hardware In terms of running a clustered and redundant iCue Server system (e. g. 2x iCue Servers), we recommend using identically hardware for all redundant iCue Server systems. This is how Teracue has tested redundancy, and server clustering. Any other mix of hardware, software or a mix of operating systems has not been tested and will not be tested. 2.1.6 NAS Hardware Teracue is not able to recommend a specific NAS system, this has to be done by the NAS manufacturer according to the following requirements. 2.1.6.1 CIFS network file system access Each 1 GB Ethernet port should not be calculated with more than 400 Mbit/s The iCue Server needs random access to all files Add a minimum of 30% to bandwidth calculation The bandwidth should be available for 24/7 operation The bandwidth should be available even during a HD crash and rebuild The bandwidth requirements for the NAS must be guaranteed and not ‘up to’ or ‘under best conditions’ 2.1.6.2 Recording (write) per Video-/Stream-Recording iCue writes for each recording three files simultaneously Two text files with 10 kbyte One TS file is between 10 Mbyte and 100 Mbyte iCue writes files with 10 Mbyte blocks Six Mbit/s stream = 45 Mbyte/minute = Five blocks per minute 2.1.6.3 General Streaming/VoD (read) iCue reads/open up to four files simultaneously Two text files with 10kbyte Two TS files with 10 Mbyte to 100 Mbyte iCue reads files in 100 kbyte blocks Six Mbit/s stream = 45 Mbyte/minute = 50 blocks per minute 11 iCue™ Streaming Server Software Installation Guide V1.2 2.1.7 .!. SAN Teracue strongly do not recommend using a SAN system instead of a NAS. The data-access will be carried out block-based in a SAN. Because a SAN is direct connected to the server it works for the server like a local drive. At NAS the server requests at a file based data exchange whole files or parts of files of remotely storage via SMB/CIFS. A NAS is connected over an Ethernet network which has some overhead. The biggest disadvantage if a SAN is used instead of NAS, extra software needed, like Meta SAN, as an extension to the OS, which allows the servers to read and write to the same directory. Usually, a SAN configuration only allows the servers to access individual sections of the SAN. But for the load balancing with iCue, servers need access to the same directory and same files. Teracue do not recommend using a SAN system due to this extra software, because in the past this extra software lost files and also the performance was bad. Futhermore SAN managing and the maintenance can be more complicated than on a NAS. There are two main factors to specify the performance. Read and write speed and simultaneous open files. So, on a SAN system the speed will drop, if you read more files at the same time. Additional the operating system WINDOWS does not support shared storage systems. 12 iCue™ Streaming Server Software Installation Guide V1.2 2.2 Software Microsoft Windows 2003/2008 SP1 Server Following windows components are needed: Internet Information Services v6.0 or higher with version 6.0 compatibility .NET Framework v4.0 or higher (before you install iCue, please be sure whether .NET Framework is installed) 2.2.1 Configuration of Windows Components Before iCue can be installed Windows components must be adapted. 2.2.1.1 Switch off Windows Firewall Switch off the Windows Firewall via >Start >Control Panel > Windows Firewall. 2.2.1.2 Installation Internet Information Service Steps: 1. Open Server Manager with >Start >Run >ServerManager 2. Step to Roles 3. Add Role Web Server (IIS) Figure 4: Server Manager to add IIS 13 iCue™ Streaming Server Software Installation Guide V1.2 The following role services are necessary: Static Content (set by default) Default Document (set by default) Directory Browsing (set by default) HTTP Errors (set by default) ASP.NET Net Extensibility ASP ISAPI Extensions ISAPI Filters HTTP Loggin (set by default) Request Monitor (set by default) Static Content Compresion (set by default) ISS Management Console (set by default) ISS 6 Management Compability IIS 6 Metabase Compability ISS 6 WMI Compability ISS 6 Scripting Tools ISS 6 Management Console 4. Make sure that at IIS Application Development ASP is checked (see Figure 5) Figure 5: 'ASP' check-box in the Application Development item 14 iCue™ Streaming Server Software Installation Guide V1.2 5. Make sure that at IIIS options IIS 6 Compatibility is checked (with all sub categories) Figure 6: IIS 6 Management Compatibility 2.2.1.3 Register .Net Framework for IIS The steps described in this chapter are only necessary if .Net Framework 4.0 is already installed. If you install .Net Framework 4.0 after IIS installation (strongly recommended) you can skip this chapter since all steps are done automatically. Steps for Windows Server 32bit: 1. Open command line with >Start >Run >cmd 2. Register .Net Framework 4.0 with c:\windows\microsoft.net\framework\v4.0.30319\aspnet_regiis –i Steps for Windows Server 64 bit: 1. Open command line with >Start >Run >cmd 2. Register .Net Framework 4.0 with c:\windows\microsoft.net\framework64\v4.0.30319\aspnet_regiis –i 15 iCue™ Streaming Server Software Installation Guide V1.2 The following Application pools of the IIS Manager (inetmgr) must be available: ASP .Net v4.0 ASP .Net v4.0 Classic Classic .Net AppPool DefaultAppPool Figure 7: IIS Application Pools Accomplish the following configuration steps: 1. Step to Application Pools default 2. Change .NET Framework version to v4.0 3. Set Enable 32-Bit Applications to True Figure 8: Application Pool Defaults 16 iCue™ Streaming Server Software Installation Guide V1.2 2.2.2 Microsoft .Net Framework Before you install iCue™ Server make sure that .NET Framework 4.0 is installed on your system. You can check this via >Start >Control Panel >Add or Remove Programs. Figure 9: .NET Framework 4.0 If the referring .NET Framework versions are not installed on your system, please download them (dotnetfx.exe) from the following possibilities: .!. From Microsoft web page From Teracue DVD From the support area of the Teracue website: http://www.teracue.com We recommend accomplishing the Microsoft update to guarantee that all necessary updates are installed. 17 iCue™ Streaming Server Software Installation Guide V1.2 2.2.3 User Management Teracue recommends creating following user accounts at the iCue system: A local administrator account A normal user account Optional: For ADS users 2.2.3.1 Local Administrator account This account should not be used by users. The iCue services must run at this account. The authorisation ‘log on as service’ has been added to the administrator account. After an iCue update, please open the iCue configuration manager and execute the ‘Log On As’ function again. Therefore, please go to ‚File’ in the menu of the iCue configuration manager and click on ‚Log On As’. It opens a new window. Click in this window the ‘This Account’ radio button and enter the user name and password of the local administrator account in the text fields below. 2.2.4 Monitoring Software We do not recommend using monitoring software, like NAGIOS or MOM (Microsoft Operations Manager), at the server hardware of iCue Server, because the iCue services will be blocked by the monitoring software. 2.2.5 Virus Scanners When you want use a virus scanner on the server hardware of the iCue Server, please start the virus scanner only to times in which the iCue application (e. g.: recordings) are not running, because the iCue application has a high performance requirement. So, please execute the virus scanner only when iCue is offline or there is enough bandwidth and processor performance available. .!. 2.3 But Teracue do not recommend using virus scanners on the server hardware of the iCue Server, because very much files must be scanned and this causes a losing of CPU performances and unexpected errors can occur. Network Ethernet standard: 100 Base-TX (data rate 100 Mbit/s) Multicast-taugliches Netzwerk Support of IGMPv2 or higher (Internet Group Management Protocol) 18 iCue™ Streaming Server Software Installation Guide V1.2 3. ADS authentication in iCue™ Active Directory Structure (ADS) is an implementation of LDAP (Lightweight Directory Access Protocol) directory services by Microsoft. ADS provides central authentication and authorization services for Windows-based computers. The ADS allows administrators to assign policies, deploy software, and apply critical updates to an organization. ADS stores information and settings in a central database. ADS networks can vary from a small installation with a few hundred objects, to a large installation with millions of objects. If you want to connect the ADS authentication with iCue™, you should assumes an understanding of the iCue™ operation and management. Furthermore you must be well grounded in the ADS topology. 3.1 iCue™ Registry Settings To implement the ADS authentication in iCue™, you must set some registry settings on the iCue™ Streaming Server at first. Therefore please stop all iCue™ services in the Configuration Manager, go to the Windows Start menu, select ‘Run’ and enter in text field of the ‘Run’ window the command ‘regedit’. It opens the registry editor. Please go in data tree of the registry editor to the following path: HKEY_LOCAL_MACHINE > SOFTWARE > Teracue > iCue > iCueStoreManager In the ‘iCueStoreManager’ registry settings, you must configure some registry entries to enable ADS, see Figure 10. Figure 10: Registry settings to implement ADS authentication in iCue™ 19 iCue™ Streaming Server Software Installation Guide V1.2 Please change the values of the following registry entries, see Table 1. Registry entries: Authentication: LDAPServer: LdapLoginName: LdapPassword: LdapUserDN: LdapGroupDN: Value: Please set the authentication value to ‘ActiveDirectory’. The value ‘ActiveDirectory’ enables the ADS authentication in iCue™. The default value of this registry entry is ‘iCue’. The value of this entry is the name of your domain controller server. For example, in Figure 10 the name of the domain controller server is ‘inp-pdc-1’. Specifies the username of an ADS user. Please create a new ADS user with guest authorizations, because the password of this user is shown as plain text. The ADS user ‘Anonymous’ is not supported in iCue™. Enter the username into the ‘LdapLoginName’ entry. For example, in Figure 10 the username of an ADS user is ‘iCueAD2’. Specifies the password of an ADS user. Please create a new ADS user with guest authorizations, because the password is shown as plain text. The user ‘Anonymous’ is not supported in iCue. Enter the password into the ‘LdapPassword’ entry. In Figure 10 the password of the user ‘iCueAD2’ is ‘Hallo2007’ for example. Specifies the domain name of your ADS server. This value must be asked for. To ask for your domain name, please use the java tool ‘LDAP Browser/Editor’. This free java tool requires an installed java version 1.2.2 or greater on your system and it can be downloaded by http://www-unix.mcs.anl.gov/~gawor/ldap/. Please use the LDAP Browser to ask for your domain name and enter the domain name into the ‘LdapUserDN’ entry. How you ask for the domain name with the ‘LDAP Browser/Editor’ is described in chapter 3.1.1. For example, in Figure 10 the domain name of the ADS server is ‘DC=INPHASE,DC=NET’. Specifies the organisational unit. This value must be asked for. But at first your domain administrator must create a domain group, which contains following iCue™ authorization groups: Video Administrators Video Editors Video Guests Furthermore the domain administrator must integrate the ADS users into this domain groups. To ask for your organisational unit, please use the java tool ‘LDAP Browser/Editor’. This free java tool requires an installed java version 1.2.2 or greater on your system and it can be downloaded by http://www-unix.mcs.anl.gov/~gawor/ldap/. Enter the organisational unit including your domain name into the ‘LdapGroupDN’ entry. How you ask for the organisational unit with the ‘LDAP Browser/Editor’ is described in chapter 3.1.2. For example, in Figure 10 the ‘LdapGroupDN’ value is ‘OU=Teracue Gruppen,DC=INPHASE,DC=NET’. Table 1: Description of the 'iCueStoreManager' registry settings to enable ADS After you have set all registry settings, please start the iCue™ service in the Configuration Manager. 20 iCue™ Streaming Server Software Installation Guide V1.2 3.1.1 Ask for the Domain Name To ask for your domain name, please use the java tool ‘LDAP Browser/Editor’. This free java tool requires an installed java version 1.2.2 or greater on your system and it can be downloaded by http://www-unix.mcs.anl.gov/~gawor/ldap/. Please go to the ‘ldapbrowser’ folder, which you have downloaded, and execute the ‘lbe.jar’ file. It opens the java tool ‘LDAB Browser/Editor’, see Figure 11. Figure 11: The java tool 'LDAP Browser/Editor' with 'Connect' window It also opens the ‘Connect’ window of the LDAP Browser/Editor, please click in the ‘Connect’ window on the ‘New’ button to configure a new session, see Figure 11. After you have clicked the ‘New’ button, it opens the ‘New Session’ window, see Figure 12. Please type a session name in the ‘Name’ tab of the ‘New Session’ window. Afterwards switch to the ‘Connection’ tab, to set the connection parameters. Figure 12: 'Name' Tab in the 'New Session' window 21 iCue™ Streaming Server Software Installation Guide V1.2 To ask for the domain name of your ADS server, please enter in the ‘Host’ text field of the ‘Connection’ tab the name or the IP-address of your ADS server and click the ‘Fetch DNs’ button. The whole domain name of your ADS server will be shown now in the text field ‘Base DN’. Please copy the whole ‘Base DN’ entry and paste it into the ‘LdapUserDN’ registry entry of your iCue™ Streaming Server, see also chapter 3.1 on page 19. Furthermore please uncheck the check-box ‘Anonymous bind’ and enter in the text fields ‘User DN’ and ‘Password’ the username and the corresponding password of an ADS user of your ADS server. Please click the ‘Save’ button to save the settings of your session configurations. The ‘New Session’ window will be closed and a ‘Session List’ entry will be created. See Figure 14. Now you can open the connection between your client and your ADS server, to ask for the organisational unit, see chapter 3.1.2. Figure 13: 'Connection' Tab in the 'New Session' window Buttons, Text- / Check-Boxes: Host: Port: Version: Base DN: Fetch DNs: SSL: Anonymous bind: User DN: Append base DN: Password: Save: Cancel: Description: Specifies the name or the IP-address of the domain controller server. Please type in the ‘Host’ text field the name or the IPaddress of your ADS server. For example, in Figure 13 the name of the domain controller server is ‘inp-pdc-1’. Specifies the LDAP port. The default port number is 389. This port number was assigned by IANA (Internet Assigned Numbers Authority). We recommend do not changing this port number. Specifies the version of the used LDAP protocol. We recommend do not changing the version number. Specifies the domain name of your ADS server. To get the domain name of your ADS server, please click only the ‘Fetch DNs’ button. Afterwards copy the whole ‘Base DN’ entry and paste it into the ‘LdapUserDN’ registry entry of your iCue™ Streaming Server, see also chapter 3.1 on page 19. Fetches the domain name of your ADS server. Enables/Disables an encrypting protocol for SSL connection (Secure Socket Layer). Enables/Disables the usage of the ADS user ‘Anonymous’ to log on to the ADS server. Specifies the username of an ADS user to log on to the ADS server. This text field is available, when the check-box ‘Anonymous bind’ is disabled. Please type in the ‘User DN’ text field the username of an ADS user. For example, in Figure 13 the username of an ADS user of the ‘inp-pdc-1’ server is ‘iCueAD2’. Enables/Disables the appending of domain name. Specifies the password of the ADS user to log on to the ADS server. This text field is available, when the check-box ‘Anonymous bind’ is disabled. Please type in this text field the password of the ADS user. Saves the settings of your session configurations and closes the ‘New Session’ window. Closes the ‘New Session’ window without saving your settings. Table 2: Description of the 'Connection' tab in the 'New Session' window 22 iCue™ Streaming Server Software Installation Guide V1.2 3.1.2 Ask for the organisational Unit To ask for your organisational unit, please use the java tool ‘LDAP Browser/Editor’. This free java tool requires an installed java version 1.2.2 or greater on your system and it can be downloaded by http://www-unix.mcs.anl.gov/~gawor/ldap/. But before you can ask for the organisational unit, your domain administrator must create a domain group on your ADS server, which contains following iCue™ authorization groups, see also Figure 15: Video Administrators Video Editors Video Guests Furthermore the domain administrator must integrate the ADS users into these domain groups. To ask for the organisational unit of your ADS server, please go to the ‘ldapbrowser’ folder, which you have downloaded, and execute the ‘lbe.jar’ file. It opens the java tool ‘LDAB Browser/Editor’, see Figure 11. If up to now no session entry was created in the session list of the ‘Connect’ window, please create a session entry now. To create a session entry, see also the chapter 3.1.1. Please open the connection to the ADS server by selecting the session entry and by clicking the ‘Connect’ button, see Figure 14. Figure 14: 'Connect' window After the connection to your ADS server is open, the LDAP Browser/Editor shows the domain groups in a data tree. Please browse now to the domain group which your domain administrator has created, see Figure 15. For example, in Figure 15 the domain group is ‘OU=Teracue Gruppen’. Please copy the whole ‘distinguishedName’ entry (see Figure 15), which contains the organisational unit including the domain name, and paste it into the ‘LdapGroupDN’ registry entry of your iCue™ Streaming Server, see also chapter 3.1 on page 19. Figure 15: The LDAP Browser/Editor 23 iCue™ Streaming Server Software Installation Guide V1.2 3.2 iCue™ Database settings After you have set all iCue™ registry settings and after you have started all iCue™ services, basically the ADS authentication is implemented in iCue™. But before you can use the ADS authentication within iCue™ in its entirety, you must configure the permissions of the ADS user who is the iCue™ administrator. You set the permissions of this ADS user by configuring the iCue™ database. At first you must create the ADS user who is the iCue™ administrator into iCue™. Therefor open the iCue™ webpage and log on with the username/password of the ADS user who is the iCue™ administrator. As the permissions of the ADS user are not set, the iCue™ webpage has only the menu item ‘Global Channels’. Due to your log on, iCue™ creates a new database entry for this ADS user. As next you must configure the iCue™ database, please log off your ADS-user at the iCue™ webpage. Furthermore stop all iCue™ services by the iCue™ Configuration Manager on the iCue™ Streaming Server. Afterwards please go to the drive, which includes the ‘Content’ folder, and open the ‘Database’ folder. For example the ‘Content’ folder is stored on the C-drive, therefore the iCue™ database is stored at the path C:\Content\Database of the iCue™ Streaming Server. The ‘Database’ folder contains several databases, but you must only configure the database ‘icue.mdb’. Please open the database ‘icue.mdb’. If you have opened the ‘icue.mdb’, some iCue™ tables will be listed. The following iCue™ database tables are important for you, but you must only configure one of these database tables, see also Figure 16: .!. voduser usergroup user_usergroup grouppermission usergroup_permission .!. Only this database table must be configured. Configure ONLY the iCue™ database table ‘usergroup_permission’. All other tables are just for your information. Figure 16: The iCue™ database 'icue.mdb' 24 iCue™ Streaming Server Software Installation Guide V1.2 3.2.1 ‘voduser’ Table of the iCue™ database If you have logged on with the username/password of the ADS user who is the iCue™ administrator, iCue™ creates a new database entry for this ADS user. For example, in Figure 17 an ADS user called ‘iCueAD2’ has logged on the iCue™ webpage and iCue™ automatically creates a new entry in the ‘voduser’ table with the ‘id_voduser’ ID 16. .!. Do not change any entry in the ‘voduser’ database table. This chapter is just for your information. You must not change anything in this table. Figure 17: The 'voduser' table of the iCue™ database 3.2.2 ‘usergroup’ Table of the iCue™ database After you have logged on the iCue™ webpage with an ADS user, iCue™ also automatically creates in the ‘usergroup’ table a new entry with the user group in which the ADS user is a member. For example, in Figure 18 the user group ‘Video Administrators’ was created, because the ADS user ‘iCueAD2’ is a member of this user group. For information about the user group, see also chapter 3.1.2 on page 23. Please keep the ‘id_usergroup’ of the ‘Video Administrators’ in your mind or make a memo with your ‘id_usergroup’, because you need this ID to configure the database table ‘usergroup_permission’. In case of Figure 18 the ‘id_usergroup’ is 8. .!. Do not change any entry in the ‘usergroup’ database table. This chapter is just for your information. You must not change anything in this table. Figure 18: The 'usergroup' table of the iCue™ database 25 iCue™ Streaming Server Software Installation Guide V1.2 3.2.3 ‘user_usergroup’ Table of the iCue™ database iCue™ automatically creates a further entry in the ‘user_usergroup’ table, after an ADS user has logged on the iCue™ webpage. This table links the ADS-user to the corresponding user group in which the ADS user is a member. In case of Figure 19 the ADS user ‘iCueAD2’ with the ‘id_voduser’ 16 is linked with the user group ‘Video Administrators’ which has the ‘id_usergroup’ 8. .!. Do not change any entry in the ‘user_usergroup’ database table. This chapter is just for your information. You must not change anything in this table. Figure 19: The 'user_usergroup' table of the iCue™ database 3.2.4 ‘grouppermission’ Table of the iCue™ database The database table ‘grouppermission’ has predefined permissions, see Figure 20. It is not possible to extend the permissions. As the ADS user shall have administrator permissions, please make a memo of the ‘id_grouppermission’ of the group permission ‘ADMIN’, because you need this ID to configure the database table ‘usergroup_permission’. The ‘id_grouppermission’ of the group permission ‘ADMIN’ is 11. .!. Do not change any entry in the ‘grouppermission’ database table. This chapter is just for your information. You must not change anything in this table. Figure 20: The 'grouppermission' table of the iCue™ database 26 iCue™ Streaming Server Software Installation Guide V1.2 3.2.5 ‘usergroup_permission’ Table of the iCue™ database Before you can use the ADS authentication within iCue™ in its entirety, you must configure the permissions of the ADS user who is the iCue™ administrator. Therefor you must only edit the iCue™ database table ‘usergroup_permissions’. To set the permissions of your ADS user, you must know the following IDs: ‘id_usergroup’ in which your ADS user is a member (see chapter 3.2.2 on page 25) ‘id_grouppermission’ of the group permission ‘ADMIN’ (see chapter 3.2.4 on page 26) In order that your ADS user gets administrator permissions in iCue™, please create a new entry in the ‘usergroup_permissions’ database table. As next, enter in the new entry field of the column ‘id_usergroup’ the ID of the user group in which your ADS user is a member. Furthermore, please enter in the new entry field of the column ‘id_grouppermission’ the ID of the group permission ‘ADMIN’. Please store your settings by saving the iCue™ database and afterwards close the database. For example, Figure 21 defines that the user group ‘Video Administrators’, which has the ID 8, shall have administrator permissions. For your information: In the example the ADS user ‘iCueAD2’ is a member of the user group ‘Video Administrators’. In a final step, please start all iCue™ services by using the iCue™ Configuration Manager on the iCue™ Streaming Server. See Figure 22. From this moment on, your ADS user has administrator permissions and all further permission configurations can be set by using the iCue™ webpage now. .!. Configure ONLY the iCue™ database table ‘usergroup_permission’. All other tables are just for your information. Figure 21: The 'usergroup_permission' table of the iCue™ database 27 iCue™ Streaming Server Software Installation Guide V1.2 Figure 22: iCue™ Configuration Manager 28 iCue™ Streaming Server Software Installation Guide V1.2 4. iCue™ Server Installation The following section describes the iCue™ Server software installation. This installation process is the same for Windows Server 2008 32bit and Windows Server 2008 64bit systems. 4.1 iCue Installer Please execute the setup file of the iCueTM Server software. It opens the install assistant for iCue (see Figure 23). Click ‘Next>’ to continue. 1) Setup start screen Figure 23: Setup start screen Click ‘Next>’ to continue. 29 iCue™ Streaming Server Software Installation Guide V1.2 2) System name and content folder As next enter iCueSystem Name and iCue Content folder The iCue content is for example the recorded or imported video clips, the iCue images, the database and so on. The default value is ‘C:\Content\’. But if you have several local drives than drive C in your system, please change the drive. Please choose the drive for the iCue content, which has the largest free space. For example ‘T:\Content\’. .!. If another local drive exists than drive C, please use for the iCue content the local drive, which has the largest free space. Figure 24: System name and content folder Click ‘Next>’ to continue. 3) Destination location As next enter the path of the iCue binaries files location. These binary files are elementary components of iCue. The default value of the storage path is ‘C:\iCue\’. It is recommended not changing this path. Figure 25: Destination location Click ‘Next>’ to continue. 30 iCue™ Streaming Server Software Installation Guide V1.2 4) Select Components As next you can select which iCue components should be installed: iCueWeb Configuration of iCue via web browser It is strongly recommended to install this component iCueTV Selection of channels via web browser. It is recommended to install this component Amino Web browser interface for Amino STB is available. Just necessary if Amino STB's are used and iCue GUI should be shown on Amino STB. Furthermore a open web interface on an Amino STB allows to send some special java script commands (e.g. for muting, controlling volume etc.) via the Teracue software ElementManager. EMCAmino No special web browser interface for Amino STB is available (just a black web page), but as described above the open web browser in Amino enables special control functions for Element Manager (e.g. muting, volume control). Just necessary if Amino STB's are used. STB7900HD Web browser interface for STB-7900HD is available. Just necessary if STB's 7900 are used. Figure 26: Select components Click ‘Next>’ to continue. 31 iCue™ Streaming Server Software Installation Guide V1.2 5) Start Menu Folder Determine the Windows Start location of iCue. Figure 27: Start menu location Click ‘Next>’ to continue. 6) Ready to install Figure 28: Ready to Install Click ’Install’ to start installation. 32 iCue™ Streaming Server Software Installation Guide V1.2 7) Installation By launching iCue Configuration Manager you directly configure iCue services after setup. Figure 29: Completing iCue Setup Click ‘Finish’ to end installation. 33 iCue™ Streaming Server Software Installation Guide V1.2 4.2 Register Services with the iCue Configuration Manager After the successful iCue Server installation, iCue must be configured. For this configuration the iCue installer automatically opens after the installation the ‘iCue Configuration Manager’ (see Figure 30). But you can also open the ‘iCue Configuration Manager’ at a later stage by clicking on the ‘Configuration Manager’ shortcut on the desktop or by clicking on the ‘iCue.ConfigurationManager.exe’ in C:\iCue. Figure 30: iCue Configuration Manager Register the iCue Services via menu item >File >Register Services If it is necessary to start all services with a different account then do the following: .!. Click in the ‘Register’ window the ‘This Account’ radio button and enter the user name and password of the corresponding service accounts in the text fields below. To register services, you must have administrator permissions. If the administrator account is used, the authorisation ‘log on as service’ has been added to the administrator account. Please click ‘OK’ to confirm your settings. Figure 31: Log on As Finally please step to menu item >File > Register Services to start registration. 34 iCue™ Streaming Server Software Installation Guide V1.2 4.3 Registering iCue Server At ‚Register Services’ in iCue configuration manager, the ‘Register Teracue product’ window opens. Figure 32: Register iCue After you pressed ‘Ask for a Request Code’, the ‘New license request’ window will appear. It displays your request code, which is needed to obtain a license key. Please right-click on the blue marked request code and copy it. Paste it into an email along with your name and company details and send it to: [email protected] You will shortly receive an answer supplying you with your license key from our support team. Note: You can get two kinds of license: a) Full license: A full license is temporally unlimited. For identification of your full license please tell the support team the serial number of your iCue system. Usually you can find the the serial number on a sticker on the DVD case. b) Demo license: A demo is temporally limited. Usually you get 30 days demo license for testing purpose. After you have received a license key, you can continue with the registration of your iCueTM Server software. If your 'Register Teracue product' dialog is not open, you can open it via menu item >Help >Registration. Then please press button Register Version button to type in your license code: Figure 33: License code Please enter: name and license key and confirm with OK. .!. If you have a demo license, please renew your iCue™ Server and iCue™ Player demo licenses before they run out. 35 iCue™ Streaming Server Software Installation Guide V1.2 4.4 Network Configuration You must select the network card and IP-address of the server, which the iCue™ Software will use. This is very important, if you have several network cards in your system. Please step in iCue Configuration Manager to menu item >Settings >Network Card’ to open dialog below Select your desired network card and select the corresponding IP-address. Confirm your choice with OK. Figure 34: Network card selection Next you must refresh the iCue configuration manager via menu item >File >Refresh. If you click afterwards in the data tree on ‘System Settings’, the ‘Registry Settings’ Tab must show the new and correct IP-address of the chosen network card. Now you can start iCue services. Figure 35: Refresh of the 'iCue Configuration Manager' 36 iCue™ Streaming Server Software Installation Guide V1.2 4.5 Start Services with the iCue Configuration Manager To start iCue services please click the ‘Play’ button in the ‘iCue Configuration Manager’. If an iCue service is started, the service will be marked green and in the ‘Errors’ tab the Error messages disappears. Figure 36: Starting the iCue services 4.6 Update of the iCue Database Please go to the ’UpdateDatabase’ item in the data tree and click at the play button, to update all iCue databases. See Figure 37. When you have updated your iCue databases, you can be sure that all databases have all needed information. Please make an update of theses iCue databases after the installation and after every iCue Server update. Figure 37: Update of the iCue Database 37 iCue™ Streaming Server Software Installation Guide V1.2 5. Configuration of Internet Information Service The iCue server acts as a web server. For control via web browser the iCue Server supports especially adapted web sites for: iCue For Administrators. User interface for administration and configuration of iCue. iCueTV For end users. User interface to select TV channels via web browser on computer. Amino For end users. User interface to select TV channels via web browser of Amino STB's. Amino EMC For ElementManger (remote control software). Blank web page for Amino STB. This web page is not for user control, but to enable special remote control functions as volume control or muting. STB7900 For end users. User interface to select TV channels via web browser of Amino STB's. Which websites are installed is decided at iCue Server installation (see chapter 4.1). 38 iCue™ Streaming Server Software Installation Guide V1.2 5.1 Usage of ‘index.htm’ File With the file index.htm you can determine if the Teracue web site is shown automatically when the URL is typed in at web browser. Otherwise the whole Inetpub path must be entered. To prevent conflict with other webserver sites the file index.htm is not(!) installed automatically. A template of the file index.htm is located on Teracue DVD The support area of the Teracue website: http://www.teracue.com The file index.htm must be copied into the path \\inetpub\wwwroot. Figure 38: Path of index.htm Example: 1) URL to enter in web browser without file index.htm http:/<IP-address_of_your_iCue-system>/teracue/icue/login.aspx URL to enter in web browser with file index.htm (with example file below) http:/<IP-address_of_your_iCue-system> 39 iCue™ Streaming Server Software Installation Guide V1.2 Example of file index.aspx <%@ page language="C#" autoeventwireup="true" inherits="Index, App_Web_obb6tdmh" stylesheettheme="Default" %> <!DOCTYPE html PUBLIC "-//W3C//DTD XHTML 1.0 Transitional//EN" "http://www.w3.org/TR/xhtml1/DTD/xhtml1-transitional.dtd"> <html xmlns="http://www.w3.org/1999/xhtml" > <head runat="server"> <title>iCue Streaming Server</title> </head> <script language="javascript" type="text/javascript"> var language = "en"; //IE stores the language in the navigator.userLanguage property //Mozilla stores it in the navigator.language property if(navigator.userLanguage) language = navigator.userLanguage.substr(0,2); else language = navigator.language.substr(0,2); document.location.href='Login.aspx?Language=' + language; </script> <body> <form id="form1" runat="server"> <div> </div> </form> </body> </html> 6. Redundancy This chapter describes the active/active redundancy as also mentioned in the Teracue white paper. Generally Redundancy increases the operating safety. But 100-percent redundancy will never exist, because a redundant system can also fail. For 100-percent redundancy each redundant system must have another redundant system and this is unrealizable. Redundancy in this manual means: Two Server run at the same time One Storage unit (NAS) In normal operation both server works simultaneously (one as master and one as slave). The load balancing server of the master decides which server overtakes a task (recording, streaming etc.) In case of fail of the master server the slave server becomes the master server 40 iCue™ Streaming Server Software Installation Guide V1.2 6.1 First Steps 2) Independent test Test both iCue Systems separately before installing Redundancy. 3) Storage A Redundant iCue System consists of two single iCue Systems (i.e. iCueSystem PC). The whole Redundant iCue System have a common storage. A common storage consists of one or multiple storage paths. Therefore all storage paths must be full accessible (read, write, delete) by all iCueSystem PC's of the Redundant iCueSystem. Please check with Windows if: Same path Same User Same Password Please check this with UNC (= universal name convention) paths e.g. do not use drive letters. Example for UNC path: \\172.16.118.30\drive 4) Different Account A Redundant iCue System is a typical application example for starting the services on a different account. This is necessary since services in network cannot run on a local account. The log on a different account can be done in iCueConfigurationManager at menu item >File >Log On As (for example see also chapter 4.2) 5) Database Each iCue System has its own database which must be located on a local drive (not on common storage). The database are synchronized according to the data base synchronization time. 41 iCue™ Streaming Server Software Installation Guide V1.2 6.2 iCue Configuration Manager Settings 1) Configure Save Path Path: Settings > Save Paths Meaning: Path which is available for both iCueSystems all the time Note: Try if access is possible (at missing access writing is red) 2) Configure Login To Servers Path: Settings > LoginToServers Meaning: Access data for every save path Note: If access data changes this configuration must be changed, too Note 2: Login must be assigned to path which needs a share (not any sub directory) Figure 39: Login to Servers Path 3) Redundancy Wait Time Path: Settings > System Settings > RedundancyWaitTime_s Must be set to: Master: 1 second Slave: 60 second 4) Common Storage Path: Settings > System Settings > CommonStorage Must be set to 1. 5) Name Path: Settings > System Settings > Name Same name for both iCueSystems 6) ComIP Path: Settings > System Settings > ComIP Same ComIP for both iCueSystems 42 iCue™ Streaming Server Software Installation Guide V1.2 7) ComPort Path: Settings > System Settings > ComPort Same ComPort for both iCueSystems 8) Enable Loadbalancing Path: Settings > System Settings > EnableLoadBalancing Must be set to 1. 9) System Count Path: Settings > System Settings > SystemCount Meaning: Number of iCueSystems value = 0: The master stays master all the time. value > 0: The master changes every day at 24:00. Note: If the iCue RedundancySystem comprises more than 2 iCuePCSystem this value must be > 0. 10) System Index Path: Settings > System Settings > SystemIndex Meaning: Index of iCueSystem starting at 0. Note: This value must be only set if SystemCount > 0 Note 2: If SystemCount > 0 then each iCue System of the Redundant iCue System must have an unique index. 11) Database Synchronization Path: Service > StoreManagerNet > Registry Settings > DatabaseSynchronisationEnabled Must be set to 1. 12) Database Backup Path Path: Service > iCueStoreManagerNet > DatabaseBackupPath Note: The database backup path must be assigned to local drive Figure 40: Slave iCue System labelled 'Inactive' 43 iCue™ Streaming Server Software Installation Guide V1.2 .!. Note: Depending on configuration the database is saved by backup several times (once per day by default). Through the ages these back ups can occupy all your storage capacity. Therefore it is strongly recommended to delete obsolete backups every week. After configuration the services should be stopped and restarted on both iCueSystem. On the slave system an 'Inactive' label is shown (see Figure 40). 44 iCue™ Streaming Server Software Installation Guide V1.2 7. Final Steps and useful Hints 7.1 Customize Internet Explorer The Internet Explorer Enhanced Security must be disabled with the following steps: 1) Open the Server Manager with >Start >Administration >Server Manager 2) Click on Configure IE ESC Figure 41: Configure IE ESC 3) Disable Enhance Securities for User and Administrators Figure 42: IE Enhanced Securities 45 iCue™ Streaming Server Software Installation Guide V1.2 7.2 Redundancy Wait Time After installation and configuration of iCueServer the Redundancy Wait Time must be set to 1 with the following steps: 1) Open iCue Configuration Manager 2) Step to item >Root >Settings >System Settings 3) Change the parameter Redundancy Wait Time_s to 1 second Figure 43: Redundancy Wait Time 7.3 Raid Storage Test To reach maximum performance of your iCue system it is recommended to optimize the write speed to your storage (e.g. to your RAID storage). For this the following iCue parameters must be adapted: Buffer Size File Duration You can find out the best values of these parameters with help of a tool called RaidTest.exe. Please contact [email protected] to get this tool plus a description how to use it. After you find out the optimized values you must modify the Windows Registry on the iCue Server accordingly. Steps to do: 1) Open Windows registry with >Start >Run >regedit 2) Step to registry path HKEY_LOCAL_MACHINE\SOFTWARE\Teracue\iCue\iCueIndexer 3) Add the following string values: BufferSize_kbyte FileDuration_sec RaidWriteBufferSize_kbyte Example: [HKEY_LOCAL_MACHINE\SOFTWARE\Teracue\iCue\iCueIndexer] "BufferSize_kbyte"="10240" "FileDuration_sec"="60" "RaidWriteBufferSize_kbyte"="10240" 46 iCue™ Streaming Server Software Installation Guide V1.2 8. Procedure for an iCue Server Update To update your iCue Server, please follow the steps below: 1) Open the iCue Configuration Manager. Make a right-click at ‘Service’ in the data-tree and select ‘Stop All’, to stop all services of your iCue Server. This must be done for all iCue-Servers, which you have. 2) Select ‘File’ in the menu bar and click at ‘Create Backup’, to make a Backup of your iCue Server. This must be done for all iCue-Servers, which you have. 3) Make a copy of this backup and save it in a folder, which is not in the ‘iCue’ folder. 4) Unregister all Services by right-clicking on ‘Service’ in the data tree and selecting ‘Unregister All’. 5) Close the iCue Configuration Manager. 6) Uninstall iCue. Therefor open the start menu and select ‘Control Panel’. The ‘Software’ window opens. Next, please locate iCue™ which is listed under ‘Teracue iCue’ and press the ‘Remove’ button. 7) Install now the new iCue version. Execute the iCue installation setup and follow the install wizard. 8) After the installation, please open the iCue Configuration Manager. 9) Start the database update. See chapter 4.6. 10) Check your license, whether it is valid or not. Please go in the menu bar to ‘Help’ and select ‘About’. A window opens in which you find the information whether your license is valid. 11) Check the ‘Log on As’ settings, whether these settings are correct. Therefor go in the menu bar to ‘File’ and select ‘Log On As’. A window opens in which you can check these settings. 12) Check the ‘Netcard’ setting, whether the setting is correct. Select the ‘SystemSettings’ item in the data tree and check the network card setting in the ‘Registry Settings’ tab. 13) Check the ‘Logfolder’ setting, whether the setting is correct. Select the ‘LogSettings’ item in the data tree and check the path of the log folder in the ‘Registry Settings’ tab. 14) Register all Services by right-clicking on ‘Service’ in the data tree and selecting ‘Register All’. 15) Start all Services. Right-click at ‘Service’ in the data tree and select ‘Start All’. 16) Repeat steps 3 to 15 for all iCue Servers you have. 47 iCue™ Streaming Server Software Installation Guide V1.2 III. List of figures FIGURE 1: ICUE™ OVERVIEW ..................................................................................................................... 6 FIGURE 2: LIST OF USED NETWORK PORTS, MULTICAST-, IP-ADDRESSES OF THE ICUE SERVER...................... 9 FIGURE 3: NETWORK PORTS, WHICH SHOULD NOT BE USED ........................................................................ 10 FIGURE 4: SERVER MANAGER TO ADD IIS ................................................................................................. 13 FIGURE 5: 'ASP' CHECK-BOX IN THE APPLICATION DEVELOPMENT ITEM ...................................................... 14 FIGURE 6: IIS 6 MANAGEMENT COMPATIBILITY .......................................................................................... 15 FIGURE 7: IIS APPLICATION POOLS........................................................................................................... 16 FIGURE 8: APPLICATION POOL DEFAULTS ................................................................................................. 16 FIGURE 9: .NET FRAMEWORK 4.0 ............................................................................................................ 17 FIGURE 10: REGISTRY SETTINGS TO IMPLEMENT ADS AUTHENTICATION IN ICUE™...................................... 19 FIGURE 11: THE JAVA TOOL 'LDAP BROWSER/EDITOR' WITH 'CONNECT' WINDOW ....................................... 21 FIGURE 12: 'NAME' TAB IN THE 'NEW SESSION' WINDOW ............................................................................ 21 FIGURE 13: 'CONNECTION' TAB IN THE 'NEW SESSION' WINDOW ................................................................. 22 FIGURE 14: 'CONNECT' WINDOW ............................................................................................................... 23 FIGURE 15: THE LDAP BROWSER/EDITOR................................................................................................ 23 FIGURE 16: THE ICUE™ DATABASE 'ICUE.MDB' .......................................................................................... 24 FIGURE 17: THE 'VODUSER' TABLE OF THE ICUE™ DATABASE .................................................................... 25 FIGURE 18: THE 'USERGROUP' TABLE OF THE ICUE™ DATABASE ................................................................ 25 FIGURE 19: THE 'USER_USERGROUP' TABLE OF THE ICUE™ DATABASE ...................................................... 26 FIGURE 20: THE 'GROUPPERMISSION' TABLE OF THE ICUE™ DATABASE ...................................................... 26 FIGURE 21: THE 'USERGROUP_PERMISSION' TABLE OF THE ICUE™ DATABASE ............................................ 27 FIGURE 22: ICUE™ CONFIGURATION MANAGER ........................................................................................ 28 FIGURE 23: SETUP START SCREEN ........................................................................................................... 29 FIGURE 24: SYSTEM NAME AND CONTENT FOLDER ..................................................................................... 30 FIGURE 25: DESTINATION LOCATION ......................................................................................................... 30 FIGURE 26: SELECT COMPONENTS ........................................................................................................... 31 FIGURE 27: START MENU LOCATION .......................................................................................................... 32 FIGURE 28: READY TO INSTALL ................................................................................................................. 32 FIGURE 29: COMPLETING ICUE SETUP ...................................................................................................... 33 FIGURE 30: ICUE CONFIGURATION MANAGER............................................................................................ 34 FIGURE 31: LOG ON AS ............................................................................................................................ 34 FIGURE 32: REGISTER ICUE ..................................................................................................................... 35 FIGURE 33: LICENSE CODE ....................................................................................................................... 35 FIGURE 34: NETWORK CARD SELECTION ................................................................................................... 36 FIGURE 35: REFRESH OF THE 'ICUE CONFIGURATION MANAGER'................................................................ 36 FIGURE 36: STARTING THE ICUE SERVICES ............................................................................................... 37 FIGURE 37: UPDATE OF THE ICUE DATABASE ............................................................................................ 37 FIGURE 38: PATH OF INDEX.HTM ............................................................................................................... 39 FIGURE 39: LOGIN TO SERVERS PATH ...................................................................................................... 42 FIGURE 40: SLAVE ICUE SYSTEM LABELLED 'INACTIVE' .............................................................................. 43 FIGURE 41: CONFIGURE IE ESC .............................................................................................................. 45 FIGURE 42: IE ENHANCED SECURITIES ..................................................................................................... 45 FIGURE 43: REDUNDANCY WAIT TIME ....................................................................................................... 46 IV. List of tables TABLE 1: DESCRIPTION OF THE 'ICUESTOREMANAGER' REGISTRY SETTINGS TO ENABLE ADS ..................... 20 TABLE 2: DESCRIPTION OF THE 'CONNECTION' TAB IN THE 'NEW SESSION' WINDOW ..................................... 22 48