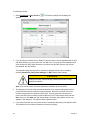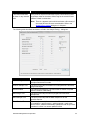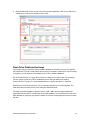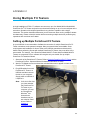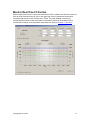
1
FITPRO+™ FIT TEST SOFTWARE VERSION 3 USER’S MANUAL P/N 6001874, REVISION K MARCH 2014 FITPRO+™ FIT TEST SOFTWARE VERSION 3 USER’S MANUAL P/N 6001874, REVISION K MARCH 2014 SHIP/MAIL TO: TSI Incorporated 500 Cardigan Road Shoreview, MN 55126-3996 USA U.S. Technical Support: 1-800-874-2811 1-651-490-2811 Fax: 1-651-490-3824 E-mail address: [email protected] Website: http://www.tsi.com INTERNATIONAL Technical Support: (001 651) 490-2811 Fax: (001 651) 490-3824 Copyright © TSI Incorporated / 2008-2014 / All rights reserved. Address TSI Incorporated / 500 Cardigan Road / Shoreview, MN 55126 / USA E-mail [email protected] Fax No. (651) 490-3824 TSI SOFTWARE LICENSE AGREEMENT This is a legal agreement between you, the end user, and TSI Incorporated. BY INSTALLING THE SOFTWARE, YOU ARE AGREEING TO BE BOUND BY THE TERMS OF THIS AGREEMENT. IF YOU DO NOT AGREE TO THE TERMS OF THIS AGREEMENT, PROMPTLY RETURN THE UNOPENED PACKAGE AND THE ACCOMPANYING ITEMS (including written materials and binders or other containers) to TSI for a full refund. TSI SOFTWARE TERMS ® 1. GRANT OF LICENSE. FitPro™ for Windows Software has been developed by TSI Incorporated to support the TSI ® ® PortaCount Pro Respirator Fit Tester Model 8030 and the TSI PortaCount Pro+ Universal Fit Tester Model 8038. It is available free of charge to all users. The user may freely copy this software and install it on multiple computers. Updates are available for free download from TSI's Web site: www.tsi.com/software. 2. COPYRIGHT. The SOFTWARE is owned by TSI and is protected by United States copyright laws and international treaty provisions. Therefore, you must treat the SOFTWARE like any other copyrighted material (e.g., a book or musical recording) except that you may either (a) make copies of the SOFTWARE for backup or archival purposes, or (b) transfer the SOFTWARE to a hard disk provided you keep the original for backup or archival purposes. 3. OTHER RESTRICTIONS. You may not reverse-engineer, decompile, or disassemble the SOFTWARE. 4. DUAL MEDIA SOFTWARE. If the SOFTWARE package contains multiple types of media, then you may use the media appropriate for your computer. 5. U.S. GOVERNMENT RESTRICTED RIGHTS. The SOFTWARE and documentation are provided with RESTRICTED RIGHTS. Use, duplication, or disclosure by the Government is subject to the restrictions set forth in the “Rights in Technical Data and Computer Software” Clause at 252.227-7013 and the “Commercial Computer Software - Restricted Rights” clause at 52.227-19. 6. LIMITED WARRANTY. TSI warrants that the SOFTWARE will perform substantially in accordance with the accompanying written materials for a period of ninety (90) days from the date of receipt. 7. CUSTOMER REMEDIES. TSI’s entire liability and your exclusive remedy shall be, at TSI’s option, either (a) return of the price paid or (b) repair or replacement of the SOFTWARE that does not meet this Limited Warranty and which is returned to TSI with proof of payment. This Limited Warranty is void if failure of the SOFTWARE has resulted from accident, abuse, or misapplication. Any replacement SOFTWARE will be warranted for the remainder of the original warranty period or thirty (30) days, whichever is longer. 8. NO OTHER WARRANTIES. TSI disclaims all other warranties, either express or implied, including, but not limited to implied warranties of merchantability and fitness for a particular purpose, with regard to the SOFTWARE and the accompanying written materials. 9. NO LIABILTY FOR CONSEQUENTIAL DAMAGES. In no event shall TSI be liable for any damages whatsoever (including, without limitation, special, incidental, consequential or indirect damages for personal injury, loss of business profits, business interruption, loss of information or any other pecuniary loss) arising out of the use of, or inability to use, this SOFTWARE. ii TSI Software License Agreement Contents ABOUT THIS MANUAL ...................................................................................... V Conventions .................................................................................................................................. v Trademarks ................................................................................................................................... v INTRODUCTION ............................................................................................... VII CHAPTER 1 INSTALLATION AND SETUP ........................................................ 1 Computer Requirements for FitPro+™ Software ..........................................................................1 Install FitPro+ v3 Software ............................................................................................................1 Start FitPro+ Software for the First Time (Program Setup) ..........................................................8 Global FitPro+ Options ...........................................................................................................9 User Configuration ................................................................................................................11 CHAPTER 2 FIT TESTING WITH FITPRO+ SOFTWARE ................................ 13 Connect the PortaCount Pro Respirator Fit Tester .....................................................................13 Start the PortaCount Pro Fit Tester and FitPro+ Software .........................................................14 Begin Fit Testing .........................................................................................................................14 CHAPTER 3 FITPRO+ SOFTWARE MENU OPTIONS .................................... 17 File Menu.....................................................................................................................................18 Report Print Settings ...................................................................................................................18 Card Print Settings ................................................................................................................19 Exit ........................................................................................................................................19 Database Menu ...........................................................................................................................19 PortaCount Menu ........................................................................................................................19 Fit Test ..................................................................................................................................19 Real Time..............................................................................................................................20 Daily Checks .........................................................................................................................21 Report Menu................................................................................................................................23 Select Report ........................................................................................................................23 Single Fit Test .......................................................................................................................23 Setup Menu .................................................................................................................................23 Global FitPro+ Options .......................................................................................................23 PortaCount Communication..................................................................................................24 Help Menu ...................................................................................................................................24 Help File Contents ................................................................................................................25 About FitPro+ Software .........................................................................................................25 CHAPTER 4 DATABASE MANAGEMENT AND OPERATION ....................... 27 Database Menu ...........................................................................................................................28 Editing Record Tables .................................................................................................................29 Edit or View the People Table ..............................................................................................29 Edit or View the Protocol Table ............................................................................................31 Edit or View the Respirator Table .........................................................................................34 Edit or View the Fit Test Table..............................................................................................36 iii Change Active (Link) ...................................................................................................................38 Manage Database Links .............................................................................................................38 Data Record Tools ......................................................................................................................42 Flash Drive Database Exchange ..........................................................................................43 Export a FitPro+ Database to the Flash Drive (XML Database) ....................................44 Import a Flash Drive Database into a FitPro+ Software Database ................................45 Export ....................................................................................................................................46 Database Copy/Merge/Move ................................................................................................47 Backup and Restore .......................................................................................................48 Delete ....................................................................................................................................49 Advanced Record Selection and Filtering ............................................................................50 Split a Database .............................................................................................................51 CHAPTER 5 CREATE, MODIFY, AND PRINT REPORTS ............................... 53 The Report Wizard ......................................................................................................................55 FitPro+ Software Printing ............................................................................................................58 FitPro+ Single Fit Test Report .....................................................................................................59 Removable Fit Test Card Options ........................................................................................59 CHAPTER 6 TROUBLESHOOTING ................................................................. 61 APPENDIX A PRINTING FIT TEST CARDS WITH AN ID CARD PRINTER .... 63 ID Card Printer Setup ..................................................................................................................63 Configuring FitPro+ Software to Print with an ID Card Printer....................................................63 APPENDIX B USING THE PORTACOUNT EMULATOR TO PERFORM FIT TESTS ....................................................................................... 67 APPENDIX C USING MULTIPLE FIT TESTERS .............................................. 69 Setting up Multiple PortaCount Fit Testers .................................................................................69 Start FitPro+ Software and Check the Connectivity of all Devices .............................................70 Fit Testing....................................................................................................................................71 Perform Daily Checks .................................................................................................................72 Monitor Real-Time Fit Factors ....................................................................................................73 APPENDIX D USING FITPRO+ SOFTWARE WITH MODELS 8020 AND 8028 .................................................................................. 75 Setup ...........................................................................................................................................75 Protocol Selection .......................................................................................................................76 Operations ...................................................................................................................................77 iv Contents About This Manual This manual describes how to install, set up, and use FitPro+™ Fit Test Software (referred to as FitPro+ software). Conventions The following conventions are used throughout this manual: Convention Description Boldface Menu options and dialog box fields and buttons are shown in boldface type. For example: Click Next>> to continue. F Keyboard key names, such as the F key, are shown in keyboard type. The “|” Character The phrase “select Database | Utilities | Convert” means pull down the Database menu, select Utilities, then select Convert on the menu. Underlined Characters Menu items can be selected with the mouse or by pressing the A key and the shortcut key for the menu or option. The shortcut key is underlined on the screen display. For example, to select the File menu, press A then F. If you do not see underlined menu items on your screen, Microsoft Windows has not been configured to show them unless you press the A key first. Trademarks Microsoft®, Windows®, Windows® XP, Windows® 7 (32 and 64 bit), Windows® 8 (32- and 64-bit), SQL Server®, Access®, and Excel® are registered trademarks of Microsoft Corporation. Adobe® and Acrobat® are registered trademarks of Adobe Systems Incorporated. UltraCard™ is a trademark of FARGO Electronics, Incorporated. FitPro™, FitPro+™, and N95-Companion™ are trademarks of TSI Incorporated. PortaCount® Pro and PortaCount® Pro+ are registered trademarks of TSI Incorporated. v TSI Web Site Please visit the TSI web site www.tsi.com to: Check for FitPro+ software updates www.tsi.com/software Receive further product training www.tsi.com/pcacademy Download application notes. Download instruction manuals. Download product brochures. Register your PortaCount Pro Respirator Fit Tester. Obtain a return material authorization (RMA) number before sending your PortaCount Pro Fit Tester in for service. vi About This Manual Introduction FitPro+™ software is intended for use with the Model 8030 PortaCount® Pro and Model 8038 PortaCount® Pro+ Respirator Fit Testers. FitPro+ Fit Test Software also supports Models 8020 and 8028 PortaCount® Plus Fit Testers. FitPro+ software features include: Supports up to four (4) PortaCount Pro/Pro+ Fit Testers running simultaneously. Full automation of the fit test process. This version uses Microsoft® Access® as the default database application. There is also optional support for server-based Microsoft® SQL Server®. User Interface in four languages including English, German, French, and Spanish. Database management tasks such as: merging, moving, copying, deleting records, exporting databases, and more. Database backup and restore. Exchange databases with a PortaCount Pro/Pro+ Fit Tester through the use of a flash drive. A wide choice of report capabilities, including one that indicates who is due for a fit test. There is also a single page report for each test subject, and custom designed reports. Daily checks for diagnostic support. A real-time fit factor display for use in respirator training. Printing of fit test reports and fit test cards (using an optional card printer). Allows fit testing using emulators that mimic actual test devices to allow users to train and familiarize themselves with common fit test problems without using a real device or tying up personnel to perform as subject. vii (This page intentionally left blank) viii Introduction CHAPTER 1 Installation and Setup Computer Requirements for FitPro+™ Software Personal computer running Windows® XP, Windows® 7 (32 and 64 bit), Windows® 8 (32- and 64-bit) operating system. Microsoft .NET version 4. The installation software will install Microsoft.NET if necessary. A 1 GHz or faster processor. Monitor with minimum screen resolution of 1280x800. 500 MB free space on hard drive. 1 USB port minimum. Use a 4-port passive USB hub (optional) to facilitate the connection of multiple PortaCount® Pro Fit Testers to the computer. A CD-ROM reader (to install the software). Install FitPro+ v3 Software This procedure assumes you are installing the software on a personal computer running Windows® 7 operating system. There may be slight variations in the screens you see, but the process should be similar enough to allow you to install the software on Windows® 8 or Windows® XP operating systems. Only an Administrator can install the FitPro+™ v3 software. Once the software is installed and set up successfully, any user can operate the FitPro+™ v3 Software. Note If necessary, disconnect the PortaCount® PRO Respirator Fit Tester from the computer USB port before starting the FitPro+™ v3 software installation. FitPro™ v2 and FitPro+ v3 software can coexist. Installing FitPro+™ v3 software and converting FitPro v2 databases to the FitPro+™ v3 software format does not alter your FitPro v2 software installation in any way. FitPro v2 software will run after you install FitPro+ V3 software. 1 1. To begin the installation, insert the CD-ROM “PortaCount® Pro Technical Reference and FitPro™ Software CD v3” into a CD-ROM drive. The CD should automatically start running after about 30 seconds. The screen shown is the first screen you will see. Note: If the CD does not start automatically, view the root folder on the CD and double-click the file “autorun.exe.” Then refer to Step 2 below. 2. When the main installation dialog box appears, click FitPro+ Fit Test Software. The following screen will be displayed. 3. Click Install FitPro+ v.3 Software. 2 Chapter 1 4. If Microsoft .NET is not already installed on your computer, the following screen appears. Microsoft .NET is required for FitPro+ v3 software. If Microsoft .NET is already installed on your computer, you will see the screen in Step 7. To install Microsoft .NET, click Install. 5. The following screen will be displayed. Check the box next to "I have read and accept the license terms." and then click Install. Installation and Setup 3 6. The following screen will be displayed when installation of .NET completes. Click Finish. 7. The Installation Wizard will begin setup. Depending on your operating system it may prompt you for permission to install the USB drivers and network adapters. At each prompt you may check the box "Always trust software from TSI Inc" and then click Install or just click Install. 4 Chapter 1 8. When installation completes, the following screen is displayed. Click Finish. 9. The Installation Wizard will prepare to install FitPro+ software. When it is ready to begin installation, the following screen is displayed. Click Next. Installation and Setup 5 10. The License Agreement is displayed. Click on the "I accept the terms of the license agreement” and then click Next. 11. The following screen will be displayed. Click Install to start the installation. 6 Chapter 1 12. The following screen will be displayed. Click Finish to complete the installation. USB Driver Installation After the successful completion of FitPro+™ v3 software installation and program setup, you can power-on the PortaCount® instrument. Once the power-on operation is complete (approximately 1 minute), connect the USB cable from the instrument to a free USB port. Windows 7 & 8 operating system users—The Device Drivers will be installed during the software installation process referenced above. Windows XP operating system users—The computer will display a “New hardware found” box at the bottom right of your screen. During the software installation process the PortaCount Fit Tester drivers were loaded onto your computer. It may be necessary to use the Found New Hardware wizard to install the drivers on Windows® XP operating system. If there are any issues with the Device Driver installation refer to the RESFT 201: PortaCount Pro-to-PC Communications instructional course located at the PortaCount Academy Online Training Center website: www.tsi.com/pcacademy. Note It is recommended that you use the same USB port on your computer each time you use the PortaCount Pro Respirator Fit Tester, as this will help to minimize any potential communication issues. Once FitPro+ software has been installed, start the software to complete the program setup as described in the following section. Installation and Setup 7 Start FitPro+ Software for the First Time (Program Setup) 1. Find the FitPro+ icon on your Windows® desktop and click on it. (You can also start FitPro+ software by selecting Programs from the Start menu. Look under FitPro+ and select FitPro+ v3.0 to start the program.) 2. When FitPro+ software starts for the first time, you are required to select a default exercise protocol from the following dialog box. These are the four most commonly used protocols for fit testing. 3. Review the options and select the desired default protocol. Then click Next. You can change the default fit test protocol at any time or add new ones (see Edit or View the Protocol Table). 4. A “PortaCount Not Detected” warning box appears. Click OK to continue. During setup, you do not need to be connected to a PortaCount fit tester. Connect the PortaCount Pro Respirator Fit Tester describes how to connect the PortaCount Pro Respirator Fit Tester to your computer and perform fit tests. (For training purposes, you may run the software using an Emulator. To use the Emulator, refer to Appendix C ). 5. When the program starts for the first time, it automatically creates and selects a Microsoft Access® database named Default. TSI recommends that novice users use this database. This database is empty, with the exception of several standard Protocols. Users who are familiar with previous versions of this program can select a different database (see Change Active (Link)) and link to it. However, previous versions of FitPlus software may have to be converted for use with FitPro+ software – see Chapter 3. Chapter 4 contains detailed information concerning the menu items in the Database menu. 6. Set the Global FitPro+ Options. There are defaults for this dialog, so you don't have to make any changes immediately, but you should review the dialog box and understand the settings. See Global FitPro+ Options, below. 8 Chapter 1 7. Set User Configuration labels (optional). User Configuration fields labels are optional fields stored in the People Table that can include additional (organization specific) information about each person. You do not have to make changes to the User Configuration, but if you wish to use this feature see User Configuration below. Global FitPro+ Options Global FitPro+ Options affect how FitPro+ software operates, note that these changes do not affect PortaCount Stand-Alone operations.* Before you do any fit testing, make sure all the options are set the way you want them. Settings remain in effect until you change them. To view or change Global FitPro+ Options, select Setup | Global FitPro+ Options or click . The Global FitPro+ Options dialog opens. The fields and buttons on the dialog are described below. Field or Button Automatic Save Description All Fit Tests Saves all fit test results whether the test is incomplete, aborted, passed, or failed. Passed Fit Tests Only The default choice. Saves only fit test records for those that pass. *The Global FitPro Options do not affect stand-alone operations. Installation and Setup 9 Field or Button Automatic Print Fit Test Report Description Automatically prints a fit test report at the end of each fit test. The report is sent to the assigned Report Printer. You can select the number of copies to be printed. Saved Fit Tests Only Prints a report for every saved fit test. Automatic Termination (Failed Overall) Change Database Configuration Fit Test Card Options Format Hide ID number during fit test Language Show Signature Lines on Fit Test Report Warn When Fit Factor is Above… 10 Do Not Print This is the default choice. Use this if no printer is available during fit testing. The report can be printed at a later time. Note: The printer must be set up before automatic reports are generated at the end of fit tests. If selected, the software automatically terminates the fit test when the Overall Fit Factor becomes impossible to achieve. The default is off. Note: Specifies what to do if an exercise fit factor is so low that passing the entire fit test becomes mathematically impossible. Click this button to change the active database. You cannot add a link to a new database with this option nor can you create a new database. Use Database | Manage Database Links for those operations (see Chapter 4, Manage Database Links for details). Click this button to display the User Configuration dialog. See User Configuration (below) for information. Click this button to set the options for printing fit test cards using an ID card printer. See Appendix A for information. Displays the formats used for dates and numbers. It is determined according to the language you have selected. Hides the ID number of the fit test subject while the fit test is progressing. The ID number is visible when entering information about a new person. Later it is replaced by asterisks(*). Select the language (and formatting) you want to use when you run the software. When you select a language, all software information is instantly displayed in that language. The available options are Español, Francais, Deutsch, English-US, English-UK, and English-24 Hour. English-US is the default language. Select to provide the single-page fit test report with an area at the bottom for the test subject and test operator to sign. This option is enabled by default. This option is enabled (checked) by default. If it is enabled, a warning message appears when the fit factor for any exercise exceeds the value you enter. The fit test continues despite the warning message. The purpose of the warning is to alert an inexperienced fit test operator that something may be wrong, such as a blocked sample tube. If this option is enabled, the value should be set at a fit factor level that will almost never occur unless something is wrong. A blocked mask sample tube will often result in fit factors well over 500,000. The default value is 100,000; however, you may have to select a higher value more appropriate for the types of respirators you use and other considerations. Chapter 1 Field or Button High Concentration Warning level Description The high concentration warning notifies you when the ambient air particle concentration exceeds the target range during Daily Checks and Fit Tests. Prolonged exposure to excessive concentration levels could degrade the performance of the PortaCount Fit Tester over time, resulting in failed daily checks or a “Low Particle Message.” By default, the high concentration warning displays when the ambient concentration is above 30,000 particles/cm3 for the Model 8030 or 8038 when testing masks with 99% efficiencies or greater, or above 1,500 pt/cm3 for the Model 8038 when testing masks with <99% efficiencies. These default values can be varied from the Global Settings screen to accommodate environments where particle concentration is necessarily elevated. To troubleshoot this warning, refer to “Chapter 6, Service and Maintenance” in the PortaCount Pro/Pro+ Respirator Fit Tester Operation and Service Manual. User Configuration The User Configuration dialog lets you configure optional fields in the People Table that store specific information about each person; fields such as department, job title, medical status, shift, and so on are most helpful. The User Configuration settings are stored in the selected database. Each database can have a unique User Configuration and the User Configuration can be copied from one database to another. The User Configuration dialog has four custom fields (Custom1…Custom4) and two additional fields (Company and Location). You can specify up to 10 Data values for each of the six fields. The Custom field names can be modified but the Company and Location field names cannot be modified. Select custom fields that do not duplicate the predefined fields in the People Table. The predefined fields are: Last Name, First Name, ID Number, Company, and Location. To add a Custom field, first type the Custom field name in one of the spaces provided. The field name you type will replace the label. Installation and Setup 11 To add (delete or change) a data value for any of the fields, click Edit next to the Data drop-down box. A dialog box appears that shows the current data values. Click Add, type the data value you want to use, and click Save. Similarly, you can delete or rename a data value by selecting it from the window and pressing Delete or Rename. You can change the custom field names and data values at any time. However changing them on this dialog box only affects future fit tests. All data stored in the Fit Test Table retain the custom field names and data values that were in effect at the time the record was created. The FitPro+ software program is now set up and ready for Fit Testing. 12 Chapter 1 CHAPTER 2 Fit Testing with FitPro+ Software This chapter describes how to connect the PortaCount® Pro Respirator Fit Tester to your computer and perform a fit test with FitPro+ software. Note: FitPro+ software must be installed according to the procedure in Chapter 1 before you can perform fit testing as outlined in this chapter. Connect the PortaCount Pro Respirator Fit Tester The Respirator Fit Tester connects to a USB port on your computer. It is recommended that you use the same USB port on your computer each time you use the PortaCount Pro, as this will help to minimize any potential communication issues. If you are using more than one PortaCount Pro Respirator Fit Tester to conduct simultaneous fit tests, refer to Appendix C, Using Multiple Fit Testers for additional information. 1. Plug the “A” type end of the USB cable shipped with the PortaCount Pro Fit Tester into a USB port on your computer. 2. Plug the “B” type end of the USB cable into the USB Port located on the back of the PortaCount Pro Fit Tester. Note: If this is the first time the PortaCount Pro® Fit Tester has been attached to your computer, you may be informed that Windows has detected new hardware and you are asked to install drivers. Refer to Chapter 6 Troubleshooting. 3. Make sure the PortaCount Pro® Respirator Fit Tester is set up and operational. See the PortaCount Pro Operation and Service Manual for instructions if you are not already familiar with setting up the instrument. 13 Start the PortaCount Pro Fit Tester and FitPro+ Software 1. Press the On/Off button to turn the PortaCount Pro Fit Tester on. 2. Wait for the instrument to display the main Activities menu (approximately 60 seconds). 3. Start FitPro+ software. 4. Select Setup | PortaCount Communication to select the module type for the appropriate PortaCount model. For more information on how to setup and verify communications refer to the section Chapter 3, PortaCount Communication. Begin Fit Testing Once FitPro+ is running, start a fit test by selecting PortaCount | Fit Test from the menu or click the icon. The Fit Test dialog box opens. The Fit Test screen can accommodate up to four simultaneous fit tests (see Appendix C, Using Multiple Fit Testers). 1. Make certain the exercise protocol shown in the Protocol field is the one you want to use. If it is not the one you want to use, exit the Fit Test and select another one from the Database | Edit | Protocol Table. See Chapter 4 for details on managing fit test exercise protocols. 2. Enter the operator's initials or name in the Operator field. This is a required field. There is a 25-character maximum, but 3 to 5 characters is recommended due to layout considerations for printed fit test reports or cards. 3. Select the test subject. Use the drop-down box, or alternatively begin typing the name of the subject. The default search value is Last Name, but you can also select a subject by: a. Selecting a different search value: First Name, ID number, Company, or Location and then using the drop-down box or begin typing. 14 Chapter 2 b. You can add someone to the People database before you start fit testing by clicking and filling in the information for the person’s record; click OK when finished. 4. When the correct subject is displayed, information is automatically filled in. (First Name, Last Name, ID Number, etc.). 5. Select an available Respirator for the subject using the drop-down box. The list of available respirators is limited by the model of the connected PortaCount Fit tester. 6. Select a Mask Size for the subject using the drop-down box. The drop-down box will include sizes entered previously for other fit tests. A new size can also be entered. 7. The remaining fields are optional. Select options from these boxes as desired. 8. Before you click START to begin the fit test, verify the Results information at the bottom of the display is correct for the protocol you selected (that is, the number of exercises is correct). Make certain the PortaCount Pro Fit Tester sample tube is connected to the respirator, and ask the test subject if he or she is ready to begin the exercise protocol immediately. Refer to the PortaCount Pro Respirator Fit Tester Operation and Service Manual if you need additional information. 9. Click START. Fit testing begins immediately and the first exercise description appears. The elapsed exercise time appears as a graphic progress bar. As each exercise completes, the result appears and FitPro+ software beeps to indicate that it is time to begin the next exercise. The exercises proceed one after another without pause. The ambient and sample values for the current exercise are displayed at the top of the Results box. Exercises that pass are highlighted in green. Exercises that fail are highlighted in red. The dialog box displays “Fit Test Completed” when the fit test is complete. The Test Status indicator displays either “Pass” or “Fail” and the Fit Test fit factor. Pass or fail is determined by comparing the overall fit factor to the Fit Factor Pass Level. The PortaCount Status indicator displays information about the PortaCount Fit Tester. If the text in either indicator is underlined, you can click on it to get additional information. Additional troubleshooting information can be found in Chapter 6 Troubleshooting as well as PortaCount Pro Respirator Fit Tester Operation and Service Manual. 10. To begin a test on another person, click New Test. 11. To redo the test on the same subject click Redo Test. 12. To exit fit testing, click Exit. 13. To print the detailed fit test record for the fit test just completed, click Print. Fit Testing with FitPro+ Software 15 (This page intentionally left blank) 16 Chapter 2 CHAPTER 3 FitPro+ Software Menu Options This chapter describes the menu options of the FitPro+™ software. The icons for the menu options that can be accessed from the toolbar are shown next to the appropriate menu option. The following table lists the menu options. You can select any of the options using the mouse or the keyboard. Menu File Database Options Report Print Settings Card Print Settings Exit Edit o People Table o Protocol Table o Respirator Table o Fit Test Table Change Active Manage Database Links o Create New Link o Remove Link Data Record Tools Fit Test Real Time Daily Checks Select Report Single Fit Test Setup Global Fit Test Options Help PortaCount Communications Help File Contents (this manual) About FitPro+ PortaCount Report Daily Check Settings 17 File Menu The File menu lets you configure certain print functions or exit the program. Report Print Settings Select this option to set up the report printer and page properties. The first dialog lets you select a report printer. Use the drop-down arrow to select another printer. Click the Report Printer Settings button to display the second dialog to set up the printer paper size, source, orientation, and margin sizes. See Chapter 5 for details on creating and printing reports. 18 Chapter 3 Card Print Settings Select this option to set up the ID card printer and ID card properties. The first dialog lets you select the card printer. The second dialog lets you set card size, orientation, and margin sizes. See Appendix A for details on ID card printer settings. Exit Select this menu option to exit the FitPro+ program; you will be asked to confirm that you wish to exit. Database Menu Refer to Chapter 4, Database Menu for descriptions of the Database menu options. PortaCount Menu The PortaCount Menu lets you start fit testing, display real-time fit factors and real-time ambient concentrations, and set up and perform daily checks. Fit Test Select this menu option to begin fit testing. Refer to Chapter 2 for a description of the procedure for running fit tests using FitPro+ software. FitPro+ Software Menu Options 19 Real Time Select this menu option to display real-time fit factors or real-time ambient concentration. The real-time fit factor display can assist in respirator training and troubleshooting. It is useful for helping a test subject experiment with strap tension and other adjustments while watching the effect their efforts have in real time. The test subject learns how each adjustment affects the fit, and learns how to achieve a fit that is comfortable and has minimum leakage. The real-time ambient concentration display assists the tester in adjusting the ambient concentration to desired levels. The Real-time Fit Factor Display can display the fit factors or ambient concentrations for up to four fit testers (see Appendix C - Using Multiple Fit Testers). The real-time fit factor feature is intended for training. It should not be used immediately before a fit test. Using the feature to help the test subject don the respirator immediately before the official fit test defeats one of the main purposes of fit testing: to prove that the test subject knows how to don the mask properly without help. Use the Real-time Fit Factor feature for training and practice only. Note: You can use the real-time fit factor display just prior to a fit test as long as you have the test subject remove the mask and put it on again (without the use of the real-time display or other assistance) before the final test. Before starting the real-time fit factor display, the PortaCount Pro Fit Tester must be on and properly connected to the computer. You must also have someone wearing a respirator that is properly connected to the PortaCount Pro Fit Testers. 1. To start the Real-Time Display, select PortaCount | Real Time or click Fit Factor Display appears. 20 . The Real-Time Chapter 3 FitPro+ software begins by instructing the PortaCount Pro Respirator Fit Tester to take an ambient concentration reading and store the value. Then the PortaCount Pro Fit Tester begins continuous monitoring of the mask concentration. You can observe the Fit Factor reading fluctuate in near real time on the line graph. (There is a 5- to 10-second delay between when a change in fit occurs and when the graph displays the change in fit factor.) The graph pauses every 5 minutes while the PortaCount Pro Fit Tester takes a fresh ambient air measurement. Click Refresh to force a new ambient reading sooner. 2. Click the Concentration box to view real-time ambient concentration. In this mode, the PortaCount Pro Fit Tester continuously measures the particle concentration through the ambient inlet port allowing the user to easily check ambient concentration in preparation for testing. 3. Click the N95-Companion box if you are using a Model 8038 and testing the fit of a respirator that is less than 99% efficient, including N95, P2, and P1 disposables. Daily Checks Select this menu option to perform daily checks of the PortaCount Pro Respirator Fit Tester (up to four instruments can be checked at once, see Appendix C -Using Multiple Fit Testers). Daily checks consist of a particle check, classifier check (this is a test performed only for the PortaCount Pro+ 8038 when the N95 feature is enabled), zero check, and maximum fit factor check. TSI strongly recommends performing daily checks every day before you begin fit testing and anytime you suspect an instrument malfunction. If the instrument passes the daily checks, it indicates the PortaCount Pro Fit Tester is in good working order. Daily check results are automatically stored in the active database (in the Daily Check Table). You can see a history of daily check results using the Daily Checks Report, see Chapter 5. Note: The PortaCount Pro Respirator Fit Tester) must be on and the warm-up period complete for the daily checks to proceed. FitPro+ Software Menu Options 21 To start Daily Checks: 1. Select PortaCount | Daily Checks or appears. . The PortaCount Daily Checks dialog box 2. If you are using a PortaCount Pro+ 8038 Fit Tester and plan to fit test respirators that are less than 99% efficiency, you must select the “Use N95” box. If you plan to fit test respirators with >99% efficiencies AND <99% efficiencies, you should run two Daily Checks, one with the N95 enabled, the other without. The pass/fail settings used by FitPro+ software for the daily checks can be viewed by selecting PortaCount | Daily Check Settings. Do NOT change these settings. Caution Changing the Daily Checks settings is not recommended. Factory settings are optimal. Note: If you set the values outside the parameters indicated, the fit test will fail. 3. The dialog box lists each of the instruments attached to the computer along with its serial number and the last time a daily check was performed. Select the check box next to the instrument serial number to perform a daily check. The test status box instructs you to remove the HEPA filter or mask from the PortaCount Pro Fit Tester sample hose and click Start. Once you click Start, the daily checks begin. The status and progress of each test appears in the dialog box. The particle check is performed first. 4. If you select “Use N95” box, the particle check is immediately followed by the classifier check. The classifier check verifies the classifier is functioning properly. 22 Chapter 3 5. After the particle check (and classifier check) is complete, you are instructed to attach the HEPA filter to the clear sample hose and click Start again. This initiates the zero check which automatically proceeds to the maximum fit factor check. 6. When all checks are complete, the test results appear in the dialog box and are stored in the Daily Check Table of the active database. 7. Click Stop if you want to stop the checks for any reason before they are complete; click Exit to close the dialog box. Note: Refer to the “PortaCount Pro Respirator Fit Tester Operation and Service Manual” for technical information regarding the daily checks. Report Menu The Report Menu lets you select reports and fit test records to view or print. Select Report Select this menu option to view, modify, or print the predefined or user-defined reports. Refer to Chapter 5 for information regarding printing and viewing reports. Single Fit Test Select this menu option to view or print an individual fit test record. When you select this option the “Edit Fit Test Table” dialog appears. Refer to Chapter 4 for a definition of the fields and buttons of this dialog box. See Single Fit Test Report for an example of the report. Setup Menu Select this menu option to change the Global FitPro+ Options and select/verify PortaCount Communications. Global FitPro+ Options Select this option to change how FitPro+ software operates. Refer to Chapter 1 for information about setting Global FitPro+ Options. FitPro+ Software Menu Options 23 PortaCount Communication Select Setup | PortaCount Communication to select the appropriate driver for the PortaCount Fit Tester. Options are: PortaCount 8030/8038 Fit Test Driver, PortaCount Emulator Fit Test Driver, or PortaCount 8020/8028 Fit Test Driver. See Appendix B for further Emulator information. See Appendix D for more 8020/8028 information. Choose the desired driver and click Select. The software automatically searches the USB ports for the PortaCount Pro Fit Tester. When the software finds a PortaCount Pro Fit Tester, the connection is automatically set. You will be notified of the number of PortaCount Fit Testers connected. If using more than one PortaCount Fit Tester, refer to Appendix C - Using Multiple Fit Testers. Note: For the automatic search to succeed, the PortaCount Pro Fit Tester must be properly connected to the computer, turned on, and the warm-up period completed. The PortaCount Fit Tester touch screen must be on the main Activities menu. The PortaCount Fit Tester USB drivers must be correctly installed. Refer to Chapter 6, Troubleshooting for details. Click the Connectivity shortcut button to reconnect a device that has been disconnected. Use the mouse to hover over this button to see the serial number of your device. Once the FitPro+ software initiates control, you will be “locked out” from performing any operations in Stand-alone mode. To switch back to Stand-alone Mode, you must exit the FitPro+ software. In the event the PortaCount Fit Tester gets disconnected from the controlling computer before it has been unlocked by the software, it can also be unlocked from the touch screen. Refer to the PortaCount Pro Respirator Fit Tester Operation and Service Manual. Help Menu The Help Menu provides online access to this manual (in PDF format) and other information, including the software version number of your FitPro+ software. 24 Chapter 3 Help File Contents Select Help | Help File Contents to open a .pdf file of this manual. About FitPro+ Software Select Help | About FitPro to display version information about the FitPro+ software as well as license agreement information and contact information at TSI. FitPro+ Software Menu Options 25 (This page intentionally left blank) 26 Chapter 3 CHAPTER 4 Database Management and Operation FitPro+™ software database management functions use the following types of data records: People Respirator Protocol Fit Test The database stores information required before Fit Testing can begin, for example: The Protocol that will be used for testing. Information about the Respirator(s) under test. Information about the Person under test. The database also stores information entered when the fit test is initiated, for example; Respirator size. Next Fit Test due date (calculated automatically, but editable by the operator). The test operator’s identity, such as their Name or initials. And finally, the database stores information about the result of the fit tests, including all of the information collected above and the pass/fail results of the test. You can create reports from the information saved in the database. You can create multiple databases if there is a need to isolate information from departments, locations, companies, etc. 27 Database Menu The Database menu options let you perform a variety of database management functions: Transfer a database between a Flash Drive and the FitPro+ software. Edit data records to correct typographical errors. Change the active database currently in use. Create or delete a database Copy a database to a specific location and filename. Export a database table to a comma-separated value (*.CSV) text file, or a custom text file. Back up a database. Restore a database from a previous backup. Split the Fit Test and/or Daily Table based on the test dates. Import FitPlus v3 and FitPro v2 databases into FitPro+ database formats. Merge one database with another using selected criteria. Move and copy individual records from one database to another. All Microsoft® Access® database files have an .mdb extension. The default database supplied with FitPro+ software is named “Default.” You can create new database files using the New Link dialog (see Change Active (Link)). The menu options of the Database menu are described below. 28 Chapter 4 Editing Record Tables To edit (or view) any of the database records (excluding the Daily Checks records), select Database | Edit and then People, Respirator, Protocol, or Fit Test. Each editor is described below. Edit or View the People Table Select Database | Edit | People or to edit or view the People Table. The Edit People Table dialog box appears. The dialog box contains all blank fields until you select a name or click New. Records in the People Table can be sorted by any of the available attributes (Last name, First Name, ID Number, Company, or Location). To add a name, click New and enter the information in the appropriate fields. You must enter First and Last Name and ID Number. The other fields are optional. Click Save to save the record. You can change any of the displayed information of an existing record by overwriting these fields. Click Save to update the record. If no changes have been made to the dialog, Save is not active. To close this dialog, click Exit. Note: If you enter an incompatible character in these fields, a warning message is displayed and the character is removed. The following table describes the buttons and fields of the Edit People Table dialog box. Button or Field Description Company The name of the company the person works for. Select the name using the down arrow or enter a value. Database Management and Operation 29 Button or Field Description Configuration Click this button to change or view the optional fields in the People Table. See User Configuration in Chapter 1. Delete Deletes the current record. A warning message first appears asking you to verify you want to delete the record. If you click Yes, the record is immediately and permanently deleted. Duplicate Creates a record with the same values in each field except Last Name, First Name and ID Number. Edit those fields as necessary and click Save. Exit Closes the dialog box. If changes were made to the current data, you are given a chance to discard or accept the changes. First Name The person’s first name. 25 character limit. Required field. Comma (,) not allowed. ID Number The person’s ID number. 11 character limit. Required field. Comma (,) not allowed. These are customizable fields. Use the field drop-down box to select preconfigured Data values. The Data values and Labels can be configured from the Configuration dialog (see User Configuration in Chapter 1.) The person’s last name. 25 character limit. Required field. Comma (,) not allowed. Label/Data Last Name Location The person’s location, such as “office,” “lab1,” etc. Select the location using the down arrow or enter a value. New Opens a blank record, so you can create a new record in the database. Note Information about the person that can affect the fit test circumstances or results, such as “wears safety goggles,” or “wears dentures.” 128 character limit. People List Click the arrow to the right of the People List field to display a list of all the records in the database file. The name string is composed of the last name, first name and ID number, separated by commas. Each name string must be unique. Alternatively, begin typing the name in the field and it will be displayed. Record Inactive Check this box to indicate a person's record should be inactive. This allows you to keep the record in the database without deleting it in case the person becomes active at a later time. Save Adds (or updates) the currently displayed information to the database. Show only inactive records Check this box if you want to display only those people whose records are flagged as inactive. By default, only active records are displayed. This selection is only available when the active database is a Microsoft® Access® database. It is not available when the active database is a SQL database. 30 Chapter 4 Edit or View the Protocol Table Select Database | Edit | Protocol Table or click Protocol Table dialog appears. to edit or view the Protocol Table. The Edit Note: Each protocol is identified by a Protocol Name and a Model Name. For example OSHA has several entries in the database corresponding to the different mask/ambient time values for Model Names 8030, 8038_N99, 8038_N95, 8020 and 8028. To change the default exercise protocol: 1 Select the correct Model Name from the drop-down box. Note: Only the models supported by the currently selected PortaCount Fit Tester Driver Module will be shown in the drop-down list. 2 Select the protocol you want as your default protocol from the Protocol Name drop-down box or begin typing the protocol name in the field and it will be displayed. (Records in the Protocol Table are listed in alphabetical order.) 3 Click Select and confirm that you want this protocol to be the default protocol. The chosen exercise protocol will remain the default protocol until you change it. FitPro+ software automatically installs protocols into each database when the database is created, so the fit test protocol you need is probably already available. If you need to add a new protocol, first verify the Model Name corresponds to the PortaCount Fit Tester and filter efficiency that you want to test. Next click New and enter information for a new protocol in the fields of the dialog box. You can also change information for any existing protocol by editing these fields. Each protocol must have a unique name. The protocol name field cannot have a comma(,). If you enter a comma in this field, a message is displayed and the comma is removed. 4 Click Save to update or save the protocol record. If no changes have been made to the dialog, Save is not active. 5 To close the dialog, click Exit. Database Management and Operation 31 The following table describes each button or field in the Edit Protocol Table dialog box. Button or Field Name Description Delete Deletes the displayed record. A warning message first appears, asking you to verify the delete action. If you click Yes, the record is deleted permanently. Exercise Name Lists all the exercises in the protocol (up to 12 exercises). 25 character limit. Required field. An empty field will cause errors, unless the field is at the end of the list of exercise names. Exclude Check the box next to the Exercise Name if you want to exclude it when calculating the fit factor. This exercise then is essentially a “time-out.” It is typically used for the OSHA 29CFR1910.134 grimace exercise. Do not exclude exercises unless you are absolutely certain they are not required for the overall fit factor result. Note: When an exercise is excluded, the value stored as the mask sample time becomes the time used for the entire exercise. No actual measurement is made. Exit Closes the dialog box. If a new record was added or field was changed, you are prompted to save or discard changes. Model Name Select the model of the PortaCount Pro Fit Tester being used: 8030, 8038_N99 or 8038_N95. New Opens a blank record so you can enter a new protocol record in the database. Next Test Due In _ months Number of months before the next fit test is due. This defaults to 12 months, although you can change it since some regulations call for 6 or 24 months. Consult the applicable regulations for additional information. Valid range is from 1 to 99. Required field. Protocol Name The exercise protocol you are currently using. Click the arrow to the right of the Protocol Name field to display a list of all the protocol records in the database. Select a new record or leave the current record information in the dialog box. Sample Timing Select View/Edit to display the Sample Timing for PortaCount (alone) dialog box. This box sets the Mask Sample Times, Mask Purge Time, Ambient Sample Time, and Ambient Purge Time. See the figure and table below. Save Saves the current information. If a new record was created, the record is added to the database. If an existing record was modified, the information is changed in the database. Select Click this button to make the current protocol the default protocol. Note: When setting the default protocol, verify the protocol Model Name is consistent with the PortaCount Fit Tester you intend to use. 32 Chapter 4 Button or Field Name Description Terminate fit test when fit factor for any exercise fails If the protocol requires all exercises to pass, check this box. Most regulations allow an exercise to fail as long as the overall fit factor passes. Default is unchecked. Note: There is a separate option which terminates a fit test early if the overall fit factor becomes unachievable. Refer to the Global FitPro+ Options dialog box in Chapter 1. The following table describes each button or field in the Sample Timing… dialog box. ` Field Name Ambient Purge Time Ambient Sample Time Exercise Name Mask Purge Time Mask Sample Time Total Exercise Time Description The time (in seconds) the ambient air is purged before an ambient sample measurement is made. The time (in seconds) the ambient air is sampled before the Mask purge time begins. The name of the exercise. This field cannot be edited. It is pulled from the Protocol Table dialog. The time (in seconds) the mask is purged before the Mask sample time. The time (in seconds) that the Mask samples air for the specific exercise. Total time (in seconds) for each exercise. The total time is the sum of: mask time + ambient purge + ambient sample + mask purge times. FitPro+ software automatically updates the total as you enter numbers in a field. You cannot update this field. Database Management and Operation 33 Field Name Total Test Time Description The cumulative time for all exercises (in minutes; seconds). You cannot update this field. Edit or View the Respirator Table 1. Select Database | Edit | Respirator or click to edit or view the Respirator Table. The Edit Respirator Table dialog appears and displays the record for the last respirator you used. 2. Records in the Respirator Table are listed in alphabetical order. Use the drop-down list of the Respirator List field to display and select any respirator record. Alternatively, begin typing the respirator name in the field and it will be displayed. 3. You can change the displayed information for any existing record by overwriting the appropriate fields. To add a respirator to the table, click New and enter information for a new respirator in the required fields of the dialog box. Click Delete to delete the currently displayed record. You will be asked to verify the deletion. Note: The Manufacturer, Model, Style, and Fit Factor Pass Level are required fields for all records and cannot have a comma(,). If you enter a comma in these fields, a warning message is displayed and the comma is removed. 4. Click Save if you add or update a record. If no changes are made to the dialog, Save is not active. 5. To close the dialog box, click Exit. 34 Chapter 4 The following table describes the buttons and fields in the Edit Respirator Table dialog box. Button or Field Description Approval Auto Description Displays the respirator approval (certification) number. If checked, the description field is automatically filled in using the information from the manufacturer, model, style and fit factor pass level fields. You may overwrite the automatic description if necessary. This box is checked by default. Deletes the displayed record. A warning message first appears, asking you to verify you want to delete the record. If you click Yes, the record is permanently deleted. Respirator description (also shown in the Respirator List field). See Auto Description, above. 60 character limit. Comma (,) not allowed. Closes the dialog box. Check this box if you are fit testing respirators that have a filter efficiency below 99%. You must use the PortaCount Pro Fit Tester with an N95-Companion (Model 8038). Examples of filter types with efficiency below 99% include: N95, R95, P95, P2, P1, Dust-mist, Dust-mist-fume, etc. Delete Description Exit Filter Efficiency Less than 99% (*N95* required) Fit Factor Pass Level Manufacturer Model New Respirator List Save Style Leave this box unchecked if the respirator is equipped with particulate filters having 99% or greater efficiency. Examples of filters with high efficiency include P100, R100, N100, P99, R99, N99, P3, HEPA etc. This box is unchecked by default. Fit factor pass level number for this respirator, such as 100 for half masks and 500 for full-face masks. Consult the applicable regulations you intend to comply with for the correct value to use. Required field. The respirator manufacturer’s name. 25 character limit. Required field. Comma (,) not allowed. Respirator model. 25 character limit. Required field. Comma (,) not allowed. Opens a new record so you can enter a new record in the database. Click the arrow to the right of the Respirator List field to display a list of all the respirator records in the database. You can select a new record or leave the current record in the dialog box. Updates the new or revised data in the database. Description of the respirator style, such as “half-face” or “full-face.” 25 character limit. Required field. Comma (,) not allowed. Database Management and Operation 35 Edit or View the Fit Test Table Select Database | Edit | Fit Test or click to edit or view the Edit Fit Test Table. The Edit Fit Test Table dialog appears. Select a new record by clicking the arrow next to the Sorted Records field. Alternatively, begin typing in the Sorted Records field until the desired record is displayed. Records can be sorted alphabetically using the “Sort by” drop-down menu; the sort can be by Last Name, First Name, ID Number, Company, Location, Test Date, or Due Date. The fields that are grayed out cannot be changed, nor can the results table. The other fields can be changed. Changing a Person’s Last name, First name, or ID number from this screen will also change them in all other data records associated with that Person (People records and Fit Test records) in order to maintain the relationship between those records in the database. Changing any other values in a Fit Test record will only affect that specific record. 36 Chapter 4 The following table describes the buttons and fields in the Edit Fit Test Table dialog. Button or Field Description Apply Custom Names Display the current custom field labels on this fit test record. Refer to Global FitPro+ Options in Chapter 1 for details on how to change these labels. Company name of the fit test subject. Deletes the currently selected Fit Test record from the database. You will be asked to confirm the deletion. Date the next fit test is due relative to the Test Date of the selected record. Closes the dialog box. If any entries were modified, you are asked whether to save or discard changes. First name of the fit test subject. ID number of the fit test subject. Last name of the fit test subject. Location of the fit test subject. Size of the mask used for the fit test. Information about the person that can affect the fit test circumstances or results. Name/initials of the operator who conducted the fit test. Overall fit factor result for the fit test. YES for a passed fit test; NO for a failed fit test. Pass level used for the fit test. Model number of the PortaCount Pro Fit Tester used for the fit test. Serial number of the PortaCount Pro Fit Tester used for the fit test. Prints a fit test card with the current record information. A special card printer must be installed for this feature to work effectively. To adjust page margins for Fit Test Cards go to File | Card Print Settings. Prints the Fit Test report to your designated printer. To adjust the page margins for Fit Test Reports go to File | Report Print Settings. Displays the fit test protocol used for this fit test. Click Protocol to view detailed exercise timing information. Protocol information is historical and cannot be modified. Displays the respirator used for this fit test. Click Respirator to view detailed information on the respirator used for this fit test. Respirator information is historical and cannot be modified. Saves any changes made to the current record. This button is active only if a change has been made to the currently displayed data. Select the attribute you want the records sorted by. Click the arrow to the right of the Sorted Records field to display all the Fit Test records in the database. Select a new record or leave the current record information in the dialog box. Date of the fit test. Optional fields: User-defined fields (custom fields) that were stored in the people table for this person at the time of the fit test. Company Delete Due Date Exit First Name ID Number Last Name Location Mask Size Note Operator Overall Fit Factor Overall Pass Pass Level PortaCount M/N PortaCount S/N Print Card Print Report Protocol Respirator Save Sort by Sorted Records Test Date User-Defined (custom) fields Database Management and Operation 37 Button or Field Description Results Table Displays the detailed exercise results for this fit test (Exercise Name, Fit Factor, and Pass (or fail)). Information is historical and cannot be modified. Fit Factor will display “Excl.” if the exercise was excluded from the fit test. Change Active (Link) Select Database | Change Active to change or view the active database link you are using for fit tests. You can also create a new database link or a new database When you select Database | Change Active, a list of the available database links is displayed. To change the active database link simply select the new database link from the displayed list. At the end of the list of available links is an option to add a new link. Use <New Link...> to link a database not listed or create a new database. You can link to an Access database or an MS SQL database. See Manage Database Links below. Manage Database Links Databases are accessed by creating “Links” to database files or server instances. These links add convenience because once they are established, the details of the Link (backing file, server address, etc.) are remembered and selecting a database is quick and easy. Select Database | Manage Database Links to create (add) a new link to an existing database, create a new database and link to it, remove an existing link, or delete both the link and the database file which backs it.. To link to an existing Access database or create a new Access database: 1. Select Database | Manage Database Links | Create New Link. The Create New Link dialog box appears. 2. Select Access Database from the drop-down list (this is the default database type). Options are Access Database and MS SQL Database. 38 Chapter 4 3. Click New Link. The Create New Link dialog appears. 4. Enter a link name. This can be any name you choose. It will become the link name for this database that appears in the Database | Change Active list and other places. It does not alter the database Filename. If you leave this field blank and browse to the file you want to link to, the database filename will become the Link name. 5. Click Browse and navigate to the folder that contains the Microsoft® Access® database you want to link to. To create a new database, navigate to the folder in which you want the database to be stored. 6. To create a new database, enter a file name in the blank File Name field and click Open. To select an existing database, select the file using the mouse and verify that the file name appears in the File Name field, and then click Open. The Create Database Link dialog box is redisplayed with the Link Name and Database File fields completed. 7. Click Save. If you created a new database you will be asked to verify that was what you wanted to do. Click Yes and the database will be created and added to the list of links. It will automatically become the active database. If you selected an existing file, you will be asked to verify that was what you wanted to do. Click Yes and the database will be added to the list of links and become the active database. Now that a link is created, you can easily select this database by its link name without browsing to a file or server each time. Database Management and Operation 39 To Link to an existing FitPro v2 MS SQL database or create a new MS SQL database on an existing FitPro v2 server instance: 1. Select Database | Manage Database Links | Create New Link. The Create New Link dialog box appears. 2. Select MS SQL Database from the drop-down list. Options are Access Database and MS SQL Database. 3. Click New Link. The Link to MS SQL Database dialog appears. 4. Enter a Link Name. This can be any name you choose. It will become the link name for this database that appears in the Database | Change Active list and other places. It does not alter the database name. 40 Chapter 4 5. Click Search for Servers. If there is an SQL server running on your computer or available on your network, they will appear in the Server list. Use the drop-down arrow to select the desired server. Note: You can also type in a specific Server name and Instance supplied to you by a system administrator. 6. For existing FitPro v2 software databases, select FitPro Login under the Security options (unless otherwise instructed by a database administrator in your organization). 7. Click Search for Databases and select the database you want to link to. If you are creating a new database you must fill in this field with the name that you want to use for the backing SQL database. 8. Click Create New Link and the database will be added to the list of links and become the active database. Now that a link is created, you can easily select this database by its link name without browsing to a file or server each time. Alternatively, you can click Create New Database and a new SQL database will be created. The database will be added to the list of links and it will become the active database. To remove a link to a database or to delete the database backing file: 1. Select Database | Manage Database Links | Remove Link. The Remove Link dialog box opens. 2. Select the name of the link you want to remove from the Link Name box using the drop-down arrow. Note: You cannot delete the active database link. You cannot delete the backing file of an SQL database. 3. Select Delete Link Only (deletes the link but retains the database) or Delete Link and Database Backing File. Note: “Delete Link and Database Backing File,” deletes both the link and the database. 4. Click Delete. You will be required to verify your action. Database Management and Operation 41 Data Record Tools The Data Record Tools feature includes a powerful tool set that allows you to manipulate records quickly and easily with a single interface. Operations that can be performed with the Data Record Tools include: Import and export XML files for Flash Drive Exchange. This is commonly used to prepare and export People, Respirator, and Protocol information to be used with a stand-alone PortaCount Fit Tester, and its import test data after performing a series of fit tests. Export records to a delimited text file for import into third party applications such as Microsoft® Excel® software. Copy records from one database to another Merge databases Split a database Delete records from a database The Data Records Tool dialog is shown in the figure below. Generally speaking, there are four steps to most operations. 1. Select a source database. This can be Access, SQL, or an XML file. 2. Select Record types to include. 3. Optionally filter the records. See Advanced Record Selection and Filtering for details. 42 Chapter 4 4. Select a destination for the records. This can be another database, a text file, an XML file on a flash drive. It can also be deletion of the records. Flash Drive Database Exchange This function lets you export the FitPro+ software database to a flash drive, so you can operate the PortaCount Fit Tester in Stand-alone and save the fit test data to a flash drive. Once fit testing is complete, you can import the fit test data into the FitPro+ software database. On the PortaCount Pro Fit Tester, data is stored on a flash drive in XML format. The exchange function copies records from FitPro+ databases into the XML (the data format used by PortaCount Pro Fit Tester). It is recommended that you verify the data after it is exported. Data Record Tools has two sections—one for exporting data and one for importing data. The fields and buttons for each portion of the dialog are described below. The flash drive XML database is limited in size to 1 MB. 1 MB is equal to approximately 420 People Records and 420 Fit Test Records in the XML database. You can minimize the size of the XML database by exporting only specific records, such as only those people who will be fit tested that day. Database Management and Operation 43 Export a FitPro+ Database to the Flash Drive (XML Database) 1. Insert a flash drive in an available USB port on your personal computer. 2. Select Database | Data Record Tools. 3. In the Record Source section, select the Database tab, and then select the database from which you want to export records. By default, FitPro+ software selects the current active database as the source database. Exporting a database does not delete or modify the original database file in any way. 4. Under Records to include select three record types: People, Respirator, and Protocol. You can optionally filter these records to create a smaller XML file. Refer to Advanced Record Selection and Filtering. Note: Inactive records are automatically excluded from the flash drive export. 5. In the Record Destination section on the bottom section of the screen, click on the Flash Drive tab. Browse to select the XML file on the Flash Drive that you want to export data to. (You may need to create a new filename.). A message indicates success or failure. 6. After you have selected a Source Database and a Destination XML file, click Export button to perform the operation. Note: You must select People, Respirator, and Protocol under Records to include before the Export button will become enabled. Only those record types will be exported to the Flash Drive file even if other types are selected. 7. Eject the flash drive from the computer and insert it in an available USB port on the PortaCount Pro Fit Tester. Verify People, Respirator, and Protocol records exist using the PortaCount touch screen. 8. Refer to the PortaCount Pro Respirator Fit Tester Operation and Service Manual for further information. 44 Chapter 4 Import a Flash Drive Database into a FitPro+ Software Database 1. Remove the flash drive from the PortaCount Pro Fit Tester and insert it in an available USB port on your computer. 2. Select Database | Data Record. Select the Record Source tab called Flash Drive. 3. Use the down arrow or Browse to display the name of the database (xxx.xml) on the Flash Drive you want to import to FitPro+ software from the Select Source XML file field. Generally, this is the same XML file you initially exported to the Flash Drive, but you can select a different filename. Importing a database does not delete or modify the Flash Drive database file in any way. Caution Importing data from Flash Drive to FitPro+ software will modify the destination database by adding new records. 4. Use the down arrow or Browse to display the FitPro+ Access or SQL database link that you want to import data to in the Select Destination Database field. Generally, this is the same database file you initially used to export to the Flash Drive, but you can import the data to any database or create a new database filename. 5. When the correct database file and XML files are displayed, click Import. A message indicates success or failure. 6. Select Database | Edit | People Table to verify the records were imported successfully. Database Management and Operation 45 This feature imports any new People, Respirator, and Protocol data. It also imports any Fit Test and Daily Check data added when the file was used on the PortaCount Pro Fit Tester in StandAlone mode. Export Some database and spreadsheet software cannot read Microsoft® Access® format. For these applications the FitPro+ data can be exported to delimited text file format. To export (transfer) data to programs that cannot read Microsoft® Access® format, select Database | Data Record Tools. 1. In the Record Source section select the Database tab and select the database from which you want to export records. By default, FitPro+ software selects the current active database as the source database. Exporting a database does not delete or modify the original database in any way. Under Records to include select any of the record types that you wish to export. You can optionally filter these records. Refer to Advanced Record Selection and Filtering. 2. In the Record Destination section, select the Text File tab. By default, the Destination filename is automatically created reflecting the source database name and record type. To select a different file, click Browse and find or create a new filename. (The file extension is added for you.). WARNING If you select the name of an existing file, the file will be overwritten. 3. Select a Column delimiter and Text encoding. The delimiter can be Comma, Tab, or Custom. A CSV file is a text file with each record from the table on one line. Each data item is enclosed in quotation marks (“) and delimited with a comma (,). Note: Microsoft® Excel® spreadsheet software can open a comma delimited file. 46 Chapter 4 4. Use Record type to export to select which table you want to export data from. This selection is limited by the Record types you chose to include from the Destination source. You can only export one table at a time, but automatic file naming makes exporting a group of record files very easy. 5. Click Export to execute this function. The data is copied from the source database to the destination file and a message appears verifying the operation. Database Copy/Merge/Move 1. To create a copy of a database select Database | Data Record Tools. 2. In the Record Source section, select the Database tab and the Source Database from which you want to copy records. By default, FitPro+ software selects the current active database as the source database. Copying a database does not delete or modify the original database in any way. 3. Under Records to include select all of the record types available. You can optionally filter these records. Refer to Advanced Record Selection and Filtering. 4. To perform a Copy operation, in the Record Destination section, select the Database tab. From the Destination Database list, select <New…> to create a new database. To perform a Merge operation, select an existing database that you want to merge the Source Database into. 5. You have the option to Select Overwrite duplicate records. By default this option is unchecked. You must check it to copy the user configuration file. Select Overwrite duplicate Database Management and Operation 47 records whenever you want to update records in the destination database with updated information from the source database. 7. If you want the records to be moved from the source to the destination database then the next step must delete the same records out of the Source database. Do not change the source database or the filter criteria. Under Record destination, select the Delete tab. Select Delete to delete the selected records out of the Source database. Backup and Restore FitPro+ software automatically creates a backup copy of your active Access® database whenever you close the FitPro+ program. The backup file is located in the same folder as the database backing file. Up to five files will be kept. For example Default_1.bak is the most recent backup of the Default database. The automatic backup is useful in case the current database becomes corrupted or is deleted by mistake. You can also use the Copy function in Data Record Tools to create a copy of your database manually. To restore the backup file follow these steps: 1. When selecting the Source database, select <New link> and browse to the folder. Set the file type to Backup files (*.bak). 2. Under Record to include, select all records. Accept the default All Records filter. 3. For the destination database, create a New Database. 4. Click on Copy. 48 Chapter 4 Delete The Delete function lets you delete records from a database. WARNING The Delete function does not provide any data validation or undo function. Any changes you make are immediately made in the Source database. It is recommended that you back up the data before deleting it. 1. To delete records select Database | Data Record Tools. 2. In the Record Source section select Source database and select the database from which you want to delete records. 3. Under Records to include select any of the record types that you wish to delete. You can optionally filter these records. Refer to Advanced Record Selection and Filtering. 4. In the Record Destination section select the Delete tab. 5. Select Delete to perform the operation. You will need to confirm the operation twice before the records are deleted. Database Management and Operation 49 Advanced Record Selection and Filtering Data Record Tools allows you to define which records you want to manage in your Source database. First decide which records to work with by selecting the check boxes under “Records to include….” Options are People, Respirator, Protocol, Fit Test, Daily Check, and User Configuration. For each record type that you select (except User Configuration) a tab appears in the Filter region. On each tab is a “Saved Selection Filter” drop-down box. There are pre-programmed filters for each tab which cannot be edited or deleted. The default filter is called All Records. Use the All Records filter if you want to include all the records from the Source database table. To further filter the record table, you can set up a user-defined filter with the procedure described below. To delete a user-defined filter, select the filter from the “Saved selection filters" box and click Delete Filter. 1. Click in the first line of the Field column. A drop-down box displays all the fields in the selected record type. Descriptions of these fields are provided in Editing Record Tables. Select the field that you would like to include in the filter. 2. Click in the Comparison column and select an operator. The available operators are shown in the table below. 3. Click in the Value column and select a value. Typically the values are text-based and the comparisons are alphabetical. Even if a field holds a number (i.e., ID Number), the comparison will be alphabetical, so, ”123” will be considered less than “23” because alphabetically, a “1” character will come before the “2” character. There are a few fields that are Date/Time values and some that are True/False. Application of Operators and Values Comparison Operator Usage Is equal to / Is not equal to Use these comparison operators when you know the exact value. Some common examples include: Boolean fields such as the N95 field in the Daily check records or the Inactive field in the People record. Here the Values are True or False. Date fields where the Value can be selected from a calendar. Fields with blank values. You can use the “equal to” Comparison and leave the value field blank. That will match all records that have a blank value in the selected Field. Conversely, to find all records non-blank values in the selected Field, use the “is not equal to” Comparison and leave the Value field blank. 50 Chapter 4 Application of Operators and Values Comparison Operator Usage Is greater than / Is less than / Is greater than or equal to / Is less than or equal to Starts with These comparison operators are good choices when working with Date ranges. Use this comparison operator when working with complex pattern matching. In its simplest tasks, it can be used to find records with field values starting with a specific letter or string of letters. For more advanced pattern matching, additional wildcard characters can be used. Common examples include: Place a percent symbol (%) at the beginning of the Value entry to match a string of characters in the middle of a word. The underscore character (_) will match any single character A list of characters of a range of characters can be selected by placing them within brackets ([]), i.e. “[a,c,g]” (matches fields starting with a, c, or g) and “[a-d]” (matches fields starting with a, b, c or d). Adding an exclamation mark (!) inside brackets ([]) will find all values that do not match the given character string 4. Optionally, you can click in the Logic column to create an additional filter criteria. Options are AND or OR. Selecting either value will add another line and you can build another logic criterion. Although it is possible to use both AND and OR in a single filter, it is seldom useful. For best results create filters using either AND or OR. 5. When selecting filter criteria, verify the results by clicking Preview Selection. The Preview Table will display a sample of the records. Underneath the Record table is a summary of the number of records resulting from the filter. 6. When you are done building your filter criteria, you may want to save the filter so that you can reuse it. Type a name for in it the “Saved selection filters” box. Select the Save Filter button. Split a Database It is sometimes useful to split up a database when it is too large to manage or the FitPro+ software performs database functions slowly. You can split up the database by any convenient criteria. This example will show how to split fit test and daily check records by date. 1. By default, the active database is selected as the Source Database. To split a different database, click Browse to find the database you want to split. 2. Under Record to include select all records. 3. On the Fit Test tab select Test Date for the filter Field. Select is less than for the Comparison Operator. Select a date for the Value. Select Preview Selection and verify the records selected by the filter. Database Management and Operation 51 4. On the Daily check tab select Test Date for the Field. Select is less than for the Comparison Operator. Select a date for the Value. Select Preview Selection and verify the records selected by the filter. 5. Do not filter any of the other record types. 6. For Destination database select New Link from the drop-down list. Create a new database. 7. Select Overwrite duplicate records. 8. Select Copy and wait for Copy status to complete. Confirm the copy completes. 9. Next prepare to delete the records out of the Source database. Under “Records to include” unselect People, Respirator, Protocol, and User configuration. Only fit test records and daily check records should be selected. Do not change the Source database or the filters. Under Record destination, select the Delete tab. Select Delete to delete the selected records out of the Source database. 52 Chapter 4 CHAPTER 5 Create, Modify, and Print Reports The report function lets you view data in a report (tabular) format. FitPro+ software provides eight pre-defined reports and the option of creating many custom reports. The pre-defined reports are: People Report Respirator Report Next Due Report Past Due Report Daily Checks Report Fit Test Report Fit Test Card Multi-Respirator Fit Test Card Custom Report The pre-defined reports are the most commonly used. They can be modified to some extent to accommodate user criteria. The custom reports let you select a unique report name, select the database table, fields that should appear in the report, data selection criteria, fields to sort data, and the order of fields in report. 53 To access the reports function: 1. Select Report | Select Report or click . The Report Selection dialog appears. The name of the database file used for the reports is shown in the Report Details window. By default, this is the active database. Click Select Database to choose another database. The reports that are available are shown in the Report List window. Click on a report name in this list and the number of records for that report is shown in the Report Details window. The following table describes the fields and buttons in the Report Selection dialog. Button or Field Name Description Create New Report Create a custom report using the Report Wizard (see below). The wizard lets you select the type of data and its presentation in the report. Delete Report Active only when you have selected a custom report. Click it to remove all information about the report. The pre-defined reports cannot be deleted. Exit Closes the dialog box. 54 Chapter 5 Button or Field Name Description Modify Report Displays dialogs that let you modify the report highlighted in the Report List window. You can change the filter used to select records and the sorting order of the records. Report List The names of the pre-defined and custom reports (if there are any). Report Details Shows the report database (link) and number of records contained in the report highlighted in the Report List window. The number of records changes depending on the database file and the report selected. Select Database Opens a dialog box that lets you choose another database for report purposes. Note: Selecting another database in this dialog box does not change the active database used for fit testing. View Report Displays the report. In the case of fit test reports and fit test cards, displays the first report in the set. Click to view the next report in the set. Click to view the previous report in the set. Use the magnifier to zoom in or out on the report. Click Exit to return to the Select Report dialog. Click Print to print the report. Click Print Setup to view page settings. Refer to FitPro+ Software Printing for further details. The Report Wizard The Report Wizard guides you through the process of modifying a pre-defined report and the creation or modification of custom reports. You can start the Report Wizard by selecting Custom Report in the Report List and then clicking Modify Report. If you are modifying an existing report, the Wizard will skip to step 4 below. The first three steps occur only when you create a new custom report. 1. Report Title Enter a name for the report then click Next>>. 2. Select Database Table Lists the record tables in the database that you can select to generate reports. Click the name to select the corresponding table then click Next>>. Create, Modify, and Print Reports 55 3. Select Fields to Include in Report Displays all available fields from the selected record table in the Available Fields column. a. To add fields to the report, select the field you want to use and then click Add. The field appears in the Selected fields list (filled top to bottom). b. To remove a field from the Selected fields column, select it and then click Remove. c. To rearrange the order of the fields, click on the down arrow for the column and then select the field you want for that column. d. Click Next>> when finished. (continued on next page) 56 Chapter 5 4. Criteria to Select Records The Criteria to Select Records dialog lets you select the records you want to appear in the report. a. To include all records in the report, click All records. b. To include selected records only, click Selected records and then choose the field you want to use for filtering in #1 Select Records. You can select criteria such as Company, Last Name, etc. c. Then select the filtering operation, such as “equal to” or “greater than.” d. And finally, the specific filter criteria, such as true/false. You can include a second criteria by clicking AND or OR and completing the #2 Select Records section. e. Click NONE to use no second criteria. f. Click OR to select records that satisfy the first or second criteria. g. Click AND to select records that satisfy the first criteria and the second criteria. h. When finished selecting criteria, click Next>> to continue. Create, Modify, and Print Reports 57 5. Select Fields to use for Sorting This dialog lets you select a set of fields on which to sort the records. The order of the fields in this column determines the sort order of the fields in your report. a. To add a field for sorting, highlight the field name in the Available fields column and click Add. You can add up to four fields for sorting. Any fields you add to the list appear in the Selected fields column. b. To remove sort fields, highlight them in the Selected fields column and click Remove. The name moves back to the Available fields column and is not used for sorting. c. Click Next>> to continue. d. On the last dialog of the wizard, clicking Next>> will cause the wizard to save the report settings and close. The new Report will appear in the report list. e. Clicking Exit will cause the Wizard to close without saving the new report. Note: For more information and examples on creating and modifying custom reports refer to the RESFT305: Reports: Modification & Creation instructional course located at the PortaCount Academy Online Training Center website: www.tsi.com/pcacademy FitPro+ Software Printing You can select and save default report and card print settings such as printer selection, page orientation, and margins. Select menu File | Report Print Settings or File | Card Print Settings to display the Page Setup dialog to set those defaults. If you have elected to automatically print Fit Test reports on the Global FitPro+ Options form, at the end of a Fit Test the report will be printed automatically from the selected report printer. If you have also elected to print a Fit Test card, a Fit Test card will be printed automatically from the selected card printer. 58 Chapter 5 FitPro+ Single Fit Test Report Removable Fit Test Card Options Each Single Fit Test Report will be printed with a Fit Test card at the bottom of the report. TSI does sell Stock Card Forms which come with a thin plastic punch-out card so that this fit test card can easily be removed (p/n 803X-CRDFRM). The stock card forms sold through TSI are compatible with most commercially available ink-jet and laser printers, though a laser printer is recommended. The Company Name field located at the bottom of the Removable Fit Test Card can be customized through the Fit Test Card Options dialog in the FitPro+ software: 1. Select Setup | Global Fit Test Options. 2. Click Fit Test Card Options. 3. Enter the company name if desired. No other portion of the fit test card dialog affects the fit test report. Margins must be managed through File | Report Print settings. Refer to Chapter 3 - Report Print Settings for more details. Following is an example of the Single Fit Test report. Create, Modify, and Print Reports 59 (This page intentionally left blank) 60 Chapter 5 CHAPTER 6 Troubleshooting This chapter lists a series of symptoms, their possible causes and recommended solutions for problems encountered when using FitPro+ software. Additional information on using the PortaCount Pro Fit Tester may be found in the Operation Manual. Symptom Possible Causes Solution When a PortaCount Fit Tester is plugged into your computer, a message appears from your operating system similar to: “Windows® has detected new hardware” and you are asked to install drivers. Connectivity issue between PortaCount Fit Tester and computer – NDIS drivers are not installed. Windows 7 & 8 users: The Device Drivers will be installed during the software installation process referenced above. Windows® operating system shows that a USB device is not recognized when the hub is plugged in. Connectivity issue between USB hub and computer. FitPro+ software does not show a connection to all PortCount Fit Testers or the Connectivity icon displays a broken connection. USB connectivity issue PortaCount Fit Tester is not in External Control Mode. 3. Reselect the Connectivity button USB Hub has all LED’s flashing on and off. Connectivity issue between the hub and computer. 1. Re-boot computer. Windows XP users: The computer will display a “New hardware found” box at the bottom right of your screen. During the software installation process the PortaCount fit tester drivers were loaded onto your computer. It may be necessary to use the Found New Hardware wizard to install the drivers on Windows® XP operating system. If there are any issues with the Device Driver installation refer to the RESFT 201: PortaCount Proto-PC Communications instructional course located at the PortaCount Academy Online Training Center website; www.tsi.com/pcacademy. 1. Verify whether your USB hub requires a driver and install it. 2. Power all PortaCount Fit Testers down. 3. Plug hub in. Verify the computer recognizes the hub. 4. Power cycle the PortaCount Fit Testers and reconnect them to the hub. or 1. Verify the PortaCount Fit Tester touch screen is set to the main Activities menu. 2. Reseat all USB connections. . 4. Reboot the PortaCount Fit Tester that is not connecting. 61 Symptom Possible Causes Solution Message “to use the PortaCount Fit Tester remotely, unlock the instrument” PortaCount Fit Tester is busy with an operation initiated from the PortaCount touch screen 1. Use the PortaCount Fit Tester touch screen to return the PortaCount Fit Tester to the main Activities menu. Then reinitiate External Control Mode by using the connectivity button on FitPro+ software. or 2. Reboot the PortaCount Fit Tester. 62 Chapter 7 APPENDIX A Printing Fit Test Cards with an ID Card Printer ID Card Printer Setup TSI Incorporated does not guarantee that the FitPro+ fit test card printing features will function properly with each of the wide variety of ID card printers available on the market. Use of an ID card printer other than the models recommended by TSI is done at your own risk. TSI believes that FitPro+ card printing features will work with most Windows-compatible ID card printers, and recommends using the Fargo Persona C30e, DCT1000 or comparable printer. Most card printer manufacturers will provide the necessary print settings with their product. For Card Printer Supplies and Specifications please refer to the Card Printer manufacturer. Refer to the installation and setup instructions provided by the Card Printer manufacturer. FitPro+ software does not support color printing, be sure that the proper printer ribbon type has been selected under the printer settings. TSI recommends using the Fargo card printers with “K - Premium Resin” black only ribbon. Configuring FitPro+ Software to Print with an ID Card Printer 1. Start FitPro+ software on your computer. Select Setup | Global FitPro+ Options. 2. From the Global FitPro+ Options dialog, click Fit Test Card Options. The Fit test card options dialog appears. Note: The first time you do this, you will get an Install Card Printer dialog message. Read and follow the directions in that message and click OK. 63 3. Enter your company name. Text entered in this field will appear in Fit Test cards printed with an ID card printer. It will also appear in the removable card printed at the bottom of Fit Test reports. 4. If you want to print a card at the completion of every test, you can select Automatically print… This option is disabled by default. Alternatively, Fit test cards can be printed at any time from the Edit Fit Test Table dialog described in Chapter 2. Fit test cards can only be printed one at a time. There is no batch printing function. Automatic card printing does not affect Automatic report printing. Refer to Chapter 3 to set up automatic report printing. 5. In order to select the card printer and configure the card layout click Change Settings. These settings will affect only Fit Test cards printed with an ID printer. It does not affect Fit test reports. Refer to Chapter 5 for details on printing Fit test reports. 6. The Report Preview dialog appears. Click the Page Setup button. Use the Assigned Card Printer drop-down box to select the card printer you have connected. 64 Appendix A 7. Click Card Printer Settings. This opens the Page Setup dialog. Select the card size from the Paper | Size list. Select Landscape for orientation and select margins. Click OK button. 8. Card printing should now be functional. To print a test card, click Print button on the Report Preview dialog. You should see a print confirmation window pop up briefly and a sample card should print. Printing Fit Test Cards with an ID Card Printer 65 (This page intentionally left blank) 66 Appendix A APPENDIX B Using the PortaCount Emulator to Perform Fit Tests FitPro+™ software includes an PortaCount Emulator module allowing you to gain familiarity with how FitPro+ software operates without connecting to an actual device or tying up personnel to perform practice fit tests. With the emulator, you can train and familiarize yourself with FitPro+ software operations and experience common fit test issues you might encounter when performing actual fit tests. Note: You cannot perform Daily Checks or show Real-time fit Factors with the PortaCount Emulator. 1. To start the Emulator, click Setup | PortaCount Communications or click the USB icon The Select PortaCount Module dialog opens. . 2. Select PortaCount Emulator Fit Test Driver from the PortaCount Module Type drop-down box and click Select. The PortaCount Emulator Config dialog box opens. 67 3. Select the number of PortaCount Fit Testers you want to emulate (1 to 4) and the model number (8030 or 8038), and click OK. An emulator dialog box appears for each of the PortaCount Fit Testers and you will see a dialog indicating the number of emulators that includes their serial numbers. You can verify the number of emulators by hovering the pointer over the Connectivity icon . You can change the number of emulators you are using at any time. 4. Select a Fit Test Condition for each of the PortaCount Fit Tester emulators (you can select only one condition for each emulator). You can change the conditions when desired. Note: On a fit test report, the serial number of the Emulator always has the form "803x_EMU_n," where x is 0 or 8 (indicating model 8030 or 8038) and n is the number of the emulator (1 to 4). Fit tests performed using the Emulator module are not saved to the database. 68 Appendix B APPENDIX C Using Multiple Fit Testers A single installation of FitPro+™ software can connect to up to four Model 8030 or Model 8038 PortaCount Pro® Fit Testers and perform synchronized fit testing on up to four test subjects at the same time. Operation with multiple instruments is very similar to operation with a single instrument. This section describes differences you will encounter when running multiple fit testers simultaneously. Please review this section before connecting multiple devices or performing any operations with more than one fit tester. Setting up Multiple PortaCount Fit Testers A 4-port USB hub is recommended to facilitate the connection of multiple PortaCount Pro Fit Tester connections to the personal computer. Many commercial hubs are available. Some require power and installation of drivers. Refer to the USB hub manufacturer directions for details. When performing fit tests with multiple PortaCount Fit Testers, they must all be of the same model. For instance, if one PortaCount Model 8030 Fit Tester and three Model 8038 Fit Testers are connected, FitPro+ software will recognize only one model. Set up multiple PortaCount Fit Testers as follows: 1. Start each of the PortaCount Fit Testers. Refer to Start the PortaCount Pro Fit Tester and the PortaCount Pro/Pro+ Operators Manual for detailed instructions on setup. 2. Wait for TSI Splash screen to end and the main Activities menu to appear on each of the PortaCount Fit Testers. 3. Plug USB cables from each PortaCount Fit Tester to a USB hub and then connect the hub to your computer. Supply power to USB hub if it requires it. Note: If this is the first time you have attached the PortaCount Pro Fit Tester to your computer, you may be informed that Windows® has detected new hardware and you are asked to install drivers. Refer to Chapter 6 Troubleshooting. 69 Start FitPro+ Software and Check the Connectivity of all Devices 1. Launch the FitPro+ software on your personal computer. 2. On the main FitPro+ software display, select the USB icon 8030/8038 Fit Test Driver. and select PortaCount 3. When more than one PortaCount Fit Tester is connected, a pop-up (see figure) will indicate the numbering scheme for the PortaCount Fit Testers. The order may be changed by clicking on the up or down arrow next to the serial number. For example, you might want to order them according to the operator's left to right. This will be helpful in identifying units during the daily check and fit tests. Note: If using a PortaCount Fit Tester with version 2.9 firmware or greater, a lock screen should appear on the PortaCount Fit Tester display. Older firmware will not show the lock screen. This lock screen indicates the PortaCount Fit Tester number which makes it easy to coordinate the instruments. 4. Hover over the Connectivity icon PortaCount Fit Testers connected. 70 . It should display the serial number for each of the Appendix C Fit Testing A new “dashboard” style Fit Test interface gathers all fit test data entries on a single screen for more efficient testing. The fit test screen adjusts scale according to the number of PortaCount Fit Testers that are connected. Person 1 corresponds to PortaCount 1, Person 2 to PortaCount 2 and so on. The fields can generally be filled out as normal. However, for those users operating the model 8038, all test subjects must use a respirator of similar efficiency (N95 or N99). A Mixture of N95 and N99 respirators cannot be tested at the same time because the protocol timings vary. After filling in the fields, press Start. The Test status and results and PortaCount Fit Tester Status are all reported independently of one another. If a fit test fails, the tests may terminate independently of one another if “Terminate early” was selected in Global FitPro+ Options. The Print button prints all tests (one per page). Using Multiple Fit Testers 71 Perform Daily Checks 1. When more than one PortaCount Fit Tester is connected, the daily check screen will allow each of them to be selected independently. Note: If N95 is enabled, it will be enabled for all of the devices. 2. Select all PortaCount Fit Testers due for daily check. 3. Daily checks are performed serially. The first PortaCount Fit Tester to be checked will be displayed above the instruction field in the upper-right-hand corner. Follow the displayed instructions for this PortaCount Fit Tester. 4. Click Start. 5. As the test progresses, status messages and additional instructions will be displayed for this unit. When the test completes, the next PortaCount Fit Tester to be checked will be displayed above the instruction field. 72 Appendix C Monitor Real-Time Fit Factors When multiple PortaCount Fit Testers are connected to FitPro+ software, the real-time screen will scale to show information from all units. In the upper-right corner is status and concentration information gathered from each PortaCount Fit Tester. The graph displays a colored line representing the fit factor of each test subject. Concentration check can be enabled to show concentration readings on all instruments at the same time. Refer to Chapter 3 - Real Time. Using Multiple Fit Testers 73 (This page intentionally left blank) 74 Appendix C APPENDIX D Using FitPro+ Software with Models 8020 and 8028 This section provides information for the users of PortaCount® Respirator Fit Tester Models 8020 and 8028. These models were previously supported with FitPlus™ v3 software. Setup 1. Power on the PortaCount Plus Fit Tester. Connect it to your personal computer using a direct COM port connection or USB to serial converter. 2. Launch FitPro+™ software. Select Setup | PortaCount communication. For the PortaCount Fit Tester Module Type select the PortaCount 8020/8028 Fit Test Driver. You will be prompted to configure the COM port. 3. Configure the COM port that the PortaCount Fit Tester is connected on. The Test button will confirm that you have a connection on the selected COM port. If you do not know which COM port you are using, try the Search function and the computer will attempt to find the PortaCount Fit Tester on one of the available COM ports. 4. Click Save. Informative messages about the COM port and PortaCount Fit Tester configuration will be shown. You will also be notified whether the Fit Tester that you are using is configured to test N95 or N99 respirators. For example, Model 8020 without the N95-Companion will be able to test N99 respirators but not N95 respirators. If you wish to test N95 respirators, first plug in the N95-Companion fit tester and restart FitPro+ software. 75 Protocol Selection Protocol timings are different between PortaCount Fit Tester models so this is important to do if you are switching between different Models. 1. Select Database | Edit | Protocol Table and view the Model Name drop-down list. Because you selected to use the PortaCount Fit Tester 8020/8028 Fit Test Driver, the list of available Model Names is 8020 and 8028. Select the appropriate Model Name for your PortaCount Plus Fit Tester. 2. Next, select the protocol you want to use. These include ANSI, CSA, HSE and OSHA. 76 Appendix D Operations Operations such as Fit testing, Daily Checks, and monitoring Real-time Fit factors are similar between PortaCount models 8020, 8028, 8030, and 8038. Refer to Chapters 2 and 3 for further details of these functions. Differences are described below: Low alcohol warnings are not supported with Model 8020 and 8028. During the Daily Check a classifier check will not be performed on Model 8028. The N95 checkbox will be unavailable for any function. Unlike Model 8038, Model 8028 cannot switch automatically between N95 and N99 respirator testing. The instrument must be reconfigured first as described above. FitPro+ software does not support multiple simultaneous fit tests to be run with Model 8020 and 8028. Using FitPro+ Software with Models 8020 and 8028 77 TSI Incorporated – Visit our website www.tsi.com for more information. USA UK France Germany Tel: +1 800 874 2811 Tel: +44 149 4 459200 Tel: +33 4 91 11 87 64 Tel: +49 241 523030 P/N 6001874 Rev K India China Singapore ©2014 TSI Incorporated Tel: +91 80 67877200 Tel: +86 10 8219 7688 Tel: +65 6595 6388 Printed in U.S.A.