1
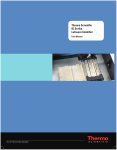
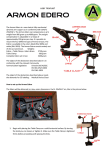
Thermo Scientific
8-Channel Handheld
Screw Cap Capper/
Decapper
User Manual
1
Table of Contents
1
2
3
4
5
6
Decapper Overview and Compatibility ...................................................................... 3
Parts ......................................................................................................................... 5
Basic Operation ........................................................................................................ 6
Maintenance and Service ......................................................................................... 9
Disposal .................................................................................................................. 10
Warranty ................................................................................................................. 11
2
1
Decapper Overview and Compatibility
1.1
Designed for use with:
1.1.1 Thermo Scientific Matrix 2D ScrewTop tubes (blue buttons and
trigger)
• 4906: Thermo Scientific Matrix ScrewCap Tray, empty, 5
trays/case
• 4477: Thermo Scientific Matrix ScrewCap Tray, colorless caps,
5 trays of 96 caps/case
• 3740: 1.0 ml Thermo Scientific Matrix 2D ScrewTop tubes,
bulk, 480/case
• 3741: 1.0 ml Matrix® 2D ScrewTop tubes, 5 racks of 96
tubes/case
• 3742: 1.0 ml Matrix 2D ScrewTop tubes, uncapped, 5 racks of
96 tubes/case
• 3743: 500 µl Matrix 2D ScrewTop tubes, bulk, 480/case
• 3744: 500 µl Matrix 2D ScrewTop tubes, 5 racks of 96
tubes/case
• 3745: 500 µl Matrix 2D ScrewTop tubes, uncapped, 5 racks of
96 tubes/case
• All tubes are sterile with a V-bottom design. Colored cap options
are available with all product configurations. Please contact your
sales representative for details.
1.1.2 Thermo Scientific Nunc Cryobank 2D barcoded tubes (black
buttons and trigger)
• 374082: 500 µl Nunc™ Cryobank 2D barcoded tubes, 2 racks
of 96 tubes/case
• 374086: 500 µl Nunc Cryobank 2D barcoded tubes, 10 racks of
96 tubes/case
• 374084: 1.0 ml Nunc Cryobank 2D barcoded Tubes, 2 racks of
96 tubes/case
• 374088: 1.0 ml Nunc Cryobank 2D Barcoded Tubes, 10 racks
of 96 tubes/case
• 374066: 500 µl Nunc Bank-It 2D Barcoded Tubes, 2 racks of 96
tubes/case
• 374074: 500 µl Nunc Bank-It 2D Barcoded Tubes, 10 racks of
96 tubes/case
• 374070: 1.0 ml Nunc Bank-It 2D Barcoded Tubes, 2 racks of 96
tubes/case
• 374078: 1.0 ml Nunc Bank-It 2D Barcoded Tubes, 10 racks of
96 tubes/case
• 374017: Racked Cryobank Caps, 10 racks of 96 caps/case
3
•
All tubes are sterile with a U-bottom design. Colored cap options
are available with all product configurations. Please contact your
sales representative for details
1.2
Hazards and Precautions
1.2.1 There are no known hazards associated with the Thermo Scientific
8-Channel Decapper when it is operated in accordance with the
instructions in this manual
1.2.2 If the equipment is used in a manner not specified by the
manufacturer, the protection provided by the equipment may be
impaired
1.3
Environmental Operating Conditions
1.3.1 Operating Temperature: 10-35 ⁰C (50-95 ⁰F)
1.3.2 Relative Humidity: 10-95% non-condensing
4
2
Parts
2.1
Included in this packaging should be the following:
1)
2)
3)
4)
5)
6)
7)
Thermo Scientific 8-Channel Decapper
Power Supply (for charging battery or for operation with AC current)
Desktop Stand
Rack of Matrix or Nunc Caps (depending upon model ordered)
Operation Manual
Certificate of Warranty and Warranty Registration Card
Power Adapters for International Use
2.2
If any of the above parts are missing, please contact your Thermo Fisher
Scientific representative or their authorized distributor
2.3
All critical parts of the Thermo Scientific 8-Channel Decapper are
identified below
5
3
Basic Operation
3.1
Power Requirements
3.1.1 Power supply input: 100 V-240V AC, 50/60 Hz, 0.5 A
3.1.2 Power supply output: 12.0V DC, 1.0 A, constant voltage
3.1.3 Explanation of symbols on power supply:
3.2
•
for indoor use only =
•
Class 2 power supply =
•
DC Symbol =
Decapping Technique
3.2.1 Hold the decapper loosely with a 75⁰ angle between the forearm
and upperarm to minimize potential muscle strain
75⁰
3.3
Charging the Decapper
3.3.1 Before first-time use, charge the decapper by plugging the power
supply into the recharge socket at the base of the handle.
3.3.2 Simply plug the other end into a standard 100- 240 volt, 50-60 Hz
wall socket and allow the unit to charge up to 2 hours at which time
the unit will be fully charged
6
3.3.3 For added ease and convenience, the decapper features:
•
A bi-color LED on the front of the handle that indicates the level
of battery charge
o LED alternatively blinking Red & Green = Charging
o Solid Green = In operation or charge complete
o Blinking Red = Low battery
•
Special circuitry that makes it impossible to overcharge the
battery and that allows the decapper to be charged or partially
charged at any convenient time
3.3.4 For long-term storage, it is recommended that the decapper
remain connected to the charger to ensure the instrument is ready
for operation
3.4
Decapping
3.4.1 Place the decapper over row of tubes to be decapped, making sure
that the ejector plate is parallel with tops of caps
TIP: Line up the cap
driver closest to the
recharge socket with the
tubes that are closest to
you. The other drivers and
tubes will then line up
3.4.2 While lightly pushing down on caps, toggle the “
” button on the
handle to make sure all of the caps have been seated properly into
the cap drivers
3.4.3 Once all of the caps are seated, push the “
until the tubes are decapped
7
” button on handle
3.5
Capping/Recapping
3.5.1 Apply the caps from the cap tray onto the cap drivers. Line up the
decapper with the row of tubes to be recapped, making sure the
ejection plate is parallel with the tubes
” button to cap. DO NOT push caps on. Let the caps
3.5.2 Push the “
screw onto the tubes on their own
3.5.3 Once the caps are securely on the tubes, squeeze the ejection
trigger to remove the caps from the cap drivers
3.6
Ejecting Caps
3.6.1 Once the tubes have been decapped, line up the decapper with an
empty row on the cap tray
3.6.2 Insert caps into cavities in cap tray
3.6.3 Squeeze ejection trigger
3.6.4 Lift decapper away from the tray while still holding ejection trigger
down
8
4
Maintenance and Service
4.1
Decontamination
4.1.1 The entire 8-Channel Decapper can be cleaned with most common
laboratory disinfectants but must not be submerged in liquid
4.1.2 This instrument contains electrical components that cannot be
autoclaved
4.1.3 Steps to disinfect:
• Wet a cloth with the desired disinfectant
• Wipe down decapper making sure not to drip disinfectant into
the inner cavity
4.1.4 Suggested Disinfectants:
• Alcohol Wipes
• 5% Bleach Solution
• RNase Away
• DNA Away
4.2
Service/Maintenance
Service the decapper after 30,000 cycles, 2500 racks, or 1 year of
continuous use, whichever occurs first.
9
5
Disposal
The disposal of the decapper is the responsibility of the customer and must be
done in an environmentally responsible manner
10
6
Warranty
6.1
A 12-month warranty is included with the decapper purchase
6.2
A preventive maintenance and service package is available from Thermo
Fisher Scientific (or appointed distributor). Details are available on
request. Please see cover page for customer service details
11
NOTES
12
Thermo Fisher Scientific, Inc.
81 Wyman Street
P.O. Box 9046
Waltham, Massachusetts 02454-9046
United States
Thermo Fisher Scientific
Matrix Liquid Handling Products
22 Friars Drive
Hudson, New Hampshire 03051
United States
Technical Support:
North America
Tel: 800.345.0206
Email: [email protected]
Hours of Operation: 8:00 AM to 7:00 PM ET
Europe
Tel: +44(0) 161 486 2112
Email: [email protected]
Hours of Operation: 08:30 to 17:00 GMT
N10336