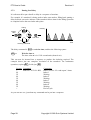
1
Quin Systems Limited Programmable Transmission System User’s Guide Revision 2 December 1995 (MAN414) Copyright Notice Copyright 1995 Quin Systems Limited. All rights reserved. Reproduction of this document, in part or whole, by any means, without the prior written consent of Quin Systems Limited is strictly prohibited. Software Version This manual reflects the following software versions. • Host software version 3.1 or higher. • Servo Module device driver version 18 or higher. • Servo Module firmware version 27.8 or higher. • MiniPTS firmware version 1.7 or higher. Important Notice Quin Systems reserves the right to make changes without notice in the products described in this document in order to improve design or performance and for further product development. Examples given are for illustration only, and no responsibility is assumed for their suitability in particular applications. Although every attempt has been made to ensure the accuracy of the information in this document, Quin Systems assumes no liability for inadvertent errors. Suggestions for improvements in either the products or the documentation are welcome. Revision 2 PTS User’s Guide Contents 1. Introduction 3 2. General Description 4 3. Section A: Single Axis Control 3.1 Scope of this section 3.2 Description of PTS-1 3.3 Setting Up the PTS-1 3.4 Motion 3.5 Error Handling 3.6 Differences Between Linear and Rotary Machines 3.7 Single Line Sequences 3.8 Sequences That Can Be Saved 3.9 Linking the PTS to External Switches or a PLC 3.10 Speed Control 3.11 Profiles 3.12 Automatic Referencing 6 6 6 7 15 21 23 25 29 34 45 47 52 4. Section B: Multi-axis Control 4.1 Scope of this section 4.2 Description of the Multi-axis Systems 4.3 First Steps 4.4 Changing Channels 4.5 Simultaneous Motion 57 57 57 58 59 60 5. The Programmable Transmission System 5.1 Software Gearbox 5.2 Maps 5.3 Setting Up the Software Gearbox 5.4 Saving Maps 5.5 Mapping 5.6 Software Line Shaft 61 61 63 64 68 69 72 6. Tension Measurement Considerations 6.1 Tension Control using a Dancing Arm 6.2 Tension Control using S-wrap rollers 6.3 Tension Control using a Linear Roller 6.4 Tension Control using a Loop 6.5 Tension Control using a Loadcell 73 73 74 75 75 75 7. The Programming Environment 7.1 The Program Structure 7.2 Filename Conventions 7.3 Maintaining a Program History 7.4 Getting Started 7.5 Continuing Work on an Existing Application 7.6 Off-line Program Editing 7.7 On-line Programming Procedure 7.8 Good Programming Techniques 7.9 Programming Tips 76 77 78 78 79 80 80 81 82 84 Copyright © 1995 Quin Systems Limited Page 1 PTS User’s Guide 8. Revision 2 Discussion of Worked Examples 8.1 Worked Example 1 Page 2 86 86 Copyright © 1995 Quin Systems Limited Revision 2 1. PTS User’s Guide Introduction The of this manual is to give the user an accurate but concise picture of the scope of the PTS (Programmable Transmission System) and its application to industrial machine design. The manual is designed to be used by operators and engineers as a guide to the PTS system although it does expect the PTS to have been correctly installed. A full guide to the installation procedure is outlined in the PTS Installation Manual and the MiniPTS Installation Manual. The manual provides a guide and a quick reference but is by no means an exhaustive document. A full reference and detail of all the functions is provided in the PTS Reference Manual and the MiniPTS Reference Manual. Copyright © 1995 Quin Systems Limited Page 3 PTS User’s Guide 2. Revision 2 General Description The PTS provides a novel method of designing machines. The PTS range controls from 1 to 48 servo motors, depending on the model, and can be used to replace commonly used mechanical components such as geartrains, clutches, brakes and indexing boxes. The required motions in the machine can now be driven directly by servo motors, resulting in stiff low inertia mechanics capable of outstanding performance with high accuracy. Unlike a traditional gear or chain transmission, all end motions can be programmed to produce any uniform or cam-like action within the capability of the motor used. Recent developments in servo motor technology have increased this capability to new heights making motions with very high accelerations possible in a continuous machine cycle. Page 4 Copyright © 1995 Quin Systems Limited Revision 2 PTS User’s Guide This manual covers the full range of PTS products, which are divided into two groups: • Single axis Controller Only the first section of this manual applies to the single axis controller system. This section also applies to individual channels of the multi-axis systems. • Multi-axis MiniPTS, PTS-4, PTS-12 All sections of the manual apply to these systems. They allow separate although simultaneous control of motions as described in the first section. They are also capable of synchronising a group or groups of motions to mimic a mechanical transmission in a machine. Motions can be run in parallel on different motors, or sequenced one after another. MiniPTS QUIN QUIN PTS-4 QUIN PTS-12 Copyright © 1995 Quin Systems Limited Page 5 PTS User’s Guide Revision 2 3. Section A: Single Axis Control 3.1 Scope of this section This section applies to the Single-Axis Controller, and to any individual axis of the multi-axis PTS systems. The prompts shown in this section refer to the single-axis controller. In the case of the multi-axis systems the prompts are prefixed by the current channel number but are otherwise identical. 3.2 Description of Single Axis Controller The Single Axis Controller controls a single servo motor via a ±10 V velocity command signal connected to the motor’s amplifier (drive). The position of the motor is fed back to the controller to provide closed-loop control. The position of the motor is measured in counts. These are derived from pulses from the shaft encoder, which are multiplied by four inside the controller. Velocity is also obtained from the encoder pulses and measured in counts/second. Acceleration or change in velocity is controllable 2 Motor/encoder Motor Power and is measured in counts/second . All commands described in the following section are entered from a terminal, or an IBM PC or compatible machine running a communication program, connected to the RS232 socket. Please refer to the TRC Installation Manual for more details. Position (Encoder Signal) Drive Amplifier Controller (Analogue) Speed Output Page 6 Control Inputs/Outputs or P.L.C. Copyright © 1995 Quin Systems Limited Revision 2 PTS User’s Guide 3.3 Setting Up the PTS 3.3.1 First Steps It is imperative to read the Installation Manual, particularly the section on Guards and Limit Switches before you attempt to switch on any of the units. Assuming the QUIN PTS is correctly connected to the motor, drive, encoder and terminal, switch on power to the PTS. NOTE : All the commands used in this manual are highlighted by a box, as in ST , and should be followed by a carriage return <CR>. If the commands are not entered correctly, then it is likely that the ‘E’ error will be returned, followed by the prompt. Just enter the command again. Just as in tuning the system, system definitions can only be changed when the PTS is set to privileged mode. Type in the following: PM <CR> You will then be prompted to provide the password. If you have not yet entered your own password, then the default is just a carriage return. Enter Password: <CR> O.K. Acknowledgement if the password is correct 3.3.2 Setting the Clock Although not essential it is useful to set the internal clock in the PTS to the current time. The command is as follows : TS hh:mm:ss Set time to ‘hh’ hours, ‘mm’ minutes and ‘ss’ seconds. The setting can be checked by displaying the setting of the clock in the PTS: DT Displays current time in hh:mm:ss format. Copyright © 1995 Quin Systems Limited Page 7 PTS User’s Guide 3.3.3 Revision 2 Setting Up PTS Limit Switches Before commencing with any motion control it is important to set up position limit switches at the extremes of the motion. This is of course in addition to external hardwired switches outside the limit switches just mentioned, which should be wired directly to the drive power circuits, cutting all power to the motors should they be activated. If the resultant motion of the mechanical system is rotary rather than linear, and it is difficult to place limit switches appropriately, then the motor should be disconnected from the mechanical system. This is assuming that the encoder is mounted on the rear of the motor, such that closed-loop control may be maintained. Without limit switches in place it must be expected that the motor could run at full speed at any time until all the settings have been made. Once setting up is complete the motor can be reconnected to the mechanical system. Encoder Ballscrew Motor Limit switch 1 Limit switch 2 The PTS has digital inputs digital outputs - either per axis or shared between 4 axes. Any inputs on a given controller module can be used for limit switches for its axes. The command to define a limit switch function on an input is DL . DL n ± Define a limit switch input. The limit switch may be activated when the input line goes high (+ve or +24 V) or goes low (–ve or 0 V). Examples: DL 6 – This defines a limit switch on input 6 active low (–). DL 7 + This defines a limit switch on input 7 active high (+). If the limit switch is activated the PTS switches to the motor off state, removing torque to the motor. A relay contact in the PTS also closes when it goes to motor off, and this can be wired to a brake or drive inhibit signal if required. The “Ln” (n=line number) limit switch detected error message is then displayed on the terminal. Once a limit switch is activated, the mechanics must be physically moved away from the switch in order to proceed. Page 8 Copyright © 1995 Quin Systems Limited Revision 2 3.3.4 PTS User’s Guide Servo Loop The terminal should now show a prompt of either of the following: : This means the servo loop is open (motor off). PTS Drive Motor 0V Position is measured Encoder > This means the servo loop is closed (position control). PTS Drive Motor ±10 V command Position is controlled Encoder Both of these are valid and merely indicate the status of the unit. To proceed you need to be in position control mode. This is achieved by typing in the following: PC This will ensure that the servo loop is active and the controller is in position control mode. The prompt should now be the ‘>’ character. If it returns to a motor off prompt, or the motor accelerates rapidly to maximum speed in one direction, then it is likely that the encoder is wired the wrong way round and should be reversed. Please refer to the PTS Installation Manual for more details. Now that the controller is in position control mode the closed loop is active and the loop can be tuned for the particular motor, drive and mechanics connected (refer to the PTS Installation Manual). This must be done before proceeding further. Copyright © 1995 Quin Systems Limited Page 9 PTS User’s Guide 3.3.5 Revision 2 Offset in the Drive Quite often there will be a certain amount of analogue offset in the drive amplifier. This is difficult to adjust out permanently. However, the PTS is able to measure the effect of the analogue offset and adjust the position offset accordingly. This is achieved by using the ID command. If this command is always entered after the unit is switched on, then the offset in the drive will not matter, even if it has changed in between times. Page 10 Copyright © 1995 Quin Systems Limited Revision 2 3.3.6 PTS User’s Guide Preparing for Initialisation When the PTS is switched on, it assumes that where it is switched on is the zero position until told otherwise. For most applications it is necessary to initialise the encoder to some external reference point. This can be the marker signal on the encoder, or a proximity detector detecting a datum point on the machine or product, to which the machine needs to reference. Motor Lug belt with proximity switch Linear encoder with reference marker The encoder marker signal is connected to the Z and /Z inputs on the encoder connector. If some other zero position signal is used, then it can be connected to any of digital inputs 1-4. In the following examples input 1 is used. Reference input signal from proximity switch 1234 Copyright © 1995 Quin Systems Limited Page 11 PTS User’s Guide 3.3.7 Revision 2 Setting Up a Reference Input To select input 1 as a reference input you need to define a reference input. Type in one of the following: DR 1 – This command defines the reference on input 1 on a falling edge (i.e. the signal switching from high voltage to zero volts). DR 1 + This command defines the reference on input 1 on a rising edge (i.e. the signal switching from zero to high voltage). Page 12 Copyright © 1995 Quin Systems Limited Revision 2 3.3.8 PTS User’s Guide Saving Parameters Once the reference line has been defined it should be saved in non-volatile memory to save repeating the exercise next time the PTS is switched on. There is only one save command SP and it saves ALL PTS parameters at their current values. For this reason it must be used with care. Saving parameters is only possible in privileged mode. SP Save Parameters This command saves all PTS parameters to non-volatile memory. When the parameters are saved a number will be displayed on the screen. This number is the checksum value calculated by the PTS on the stored parameters. The PTS uses this value when it is next switched on to check the non-volatile memory. If the memory is not working properly then next time the PTS is switched on the error message ‘F’ will be displayed on the screen. Otherwise the number can be ignored. You can remain in privileged mode for the entire session, but it is a good idea to return to normal mode to prevent the possibility of overwriting a previous setup. NM Normal Mode This command returns the PTS to the normal protected state. Once in normal mode most setup commands will be ignored and return the error message ‘R’, which means that you are trying to use a restricted command. Copyright © 1995 Quin Systems Limited Page 13 PTS User’s Guide 3.3.9 Revision 2 Initialisation You can now initialise the position to the proximity switch. Lug belt IN+ Initialises the motor to the zero position in the positive direction (clockwise). Proximity switch Lug belt IN– Initialises the motor to the zero position in the negative direction (anticlockwise). Proximity switch The motor now accelerates up to the set speed of 1024 counts/second (default) at an 2 acceleration of 1024 counts/second (default) until the proximity switch is detected. At that point, the position is immediately set to zero, and the motor decelerates at 2 1024 counts/second until it stops. 2 The velocity of 1024 counts/second and the acceleration of 1024 counts/second can be changed by using the SV and SA commands respectively. These will be described later. The motor now moves back to where the zero position was detected. During initialisation the prompt changes to ‘I’ which indicates that the PTS is initialising. When initialisation is complete the ‘>’ prompt is displayed. CAUTION : The default settings for the velocity and acceleration can easily be changed, although it is a good idea to maintain a low velocity during initialisation in case the reference detector is not triggered. In an application where the motion is rotary, the motor would just continue to run in the direction given in the IN command. In a linear application, it is vital that limit switches are set up prior to initialisation, as the motor could run into the end stops if the reference point is not detected. Page 14 Copyright © 1995 Quin Systems Limited Revision 2 3.4 PTS User’s Guide Motion Before dealing with motion it is important to understand how to stop. 3.4.1 Stopping The motion can be stopped at any time. There are three main methods of stopping: Stop. This command causes the motor to decelerate at the preset ramp rate until it comes to a halt. ST ST Velocity Time Abort. This command performs an emergency stop, using the reverse torque of the motor as a brake. AB Velocity AB Time Motor off. This command puts the PTS directly into the motor off state, where the motor position is no longer controlled. This allows the motor to be stopped by an external brake if required. MO Velocity MO Motor freewheels or is braked externally Time The stop commands can be typed in at any time during initialisation or motion, and they will terminate any command or sequence that is currently being executed. In just the same way as the initialisation, the rate of stopping with the ST command can be altered with the DC command, as will be seen later. Copyright © 1995 Quin Systems Limited Page 15 PTS User’s Guide 3.4.2 Revision 2 Moving With the motor at absolute position zero, it can now be moved to any position required. The PTS can generate its own motion profile, which will be either trapezoidal or triangular in shape, depending on the distance moved. Velocity Velocity Distance = area under curve Set velocity Actual peak velocity Distance = area under curve Time Time This is the basic method of moving the motor to position with the PTS. The move command takes the form: MA ± nn For a move to an absolute position relative to zero. The parameter ‘nn’ is an absolute position value between 0 and 4,000,000. MR ± nn For a move to a position relative to the current position. The parameter ‘nn’ is a relative position value between 0 and 8,000,000. For positive positions, the ‘+’ sign can be omitted for simplicity if preferred. Here are a few examples: MA 4000 This command moves the motor to a position 4000 counts in the positive direction from the reference point. MA 0 This command returns the motor to the reference point. MA –332 This command moves the motor to a position 332 counts in the negative direction from the reference point. During the move, the prompt on the screen changes from a ‘>’ to an ‘M’. When the move is complete, the prompt returns to a ‘>’ character. The change in prompt feature is used throughout to indicate the current status of the PTS. Page 16 Copyright © 1995 Quin Systems Limited Revision 2 PTS User’s Guide Another type of move that is useful is the relative move. Instead of moving to an absolute position, you can move a set increment relative to the current motor position: MR 500 This command moves the motor 500 counts from the current position MR –200 This command moves the motor 200 counts backwards from the current position. With the commands learnt so far, it is possible to put in a series of commands to move forwards, backwards and stop: System : > > > I > > M > > M > > M M S > Command PC Position Control ID IN+ Initialise Offset Initialise Position MA10000 Move Absolute MR600 Move relative MA0 Move Absolute ST Stop Copyright © 1995 Quin Systems Limited Comments Switch on the servo loop Servo loop on Correct for drive offset Move to reference position Initialising At reference position Move to position 10,000 counts Moving Move completed Move a further 600 counts Moving Move completed Return to the reference position Moving Decelerate to a stop Stopping Stopped. Page 17 PTS User’s Guide 3.4.3 Revision 2 Acceleration and Velocity All the previous move profiles have been calculated using the default acceleration and 2 velocity values (1024 counts/second and 1024 counts/second respectively). The SV command is used to alter the set velocity, and the SA command is used to change the acceleration or ramp rate for a move. The SA and SV commands have the following syntax: SA nn Set acceleration. This command sets the acceleration and deceleration ramp rates. SV nn Set velocity. This command sets the maximum velocity during a move. Velocity SV SA SA Time Here are a few examples: 2 SA 10000 Set acceleration/deceleration to 10,000 counts/second . SV 20000 Set velocity to 20,000 counts/second. If the above moves are now tried again, they will take place in a much shorter time. Once you have changed SA and/or SV , all subsequent moves are calculated with the latest settings. The stop deceleration may also be set: DC 15000 Page 18 2 Set stop deceleration to 15,000 counts/second . Copyright © 1995 Quin Systems Limited Revision 2 3.4.4 PTS User’s Guide Changing Velocity on the fly A very useful feature, which will be explored in other ways later, is the ability to change the velocity of the profile while the motor is moving. The SV command is simply entered while the prompt is ‘M’ . Example: System Command > MA10000 M SV2000 > Comments Start a move to position 10000 counts Change the velocity to 2000 counts/second Move completed The maximum speed can be raised or lowered during the move, resulting in a stepped velocity profile with no sudden changes in the motor speed. Velocity SV 2000 Distance = total area = 10000 counts 2000 Time Copyright © 1995 Quin Systems Limited Page 19 PTS User’s Guide 3.4.5 Revision 2 Setting the Position Window If the motor stops with the ‘M’ prompt still being displayed, without returning to the ‘>’ prompt, the PTS is reporting that it cannot complete the move to within the range set by the set window command. The set window SW command does not affect the accuracy of the move but simply prevents the next operation following the move from being carried out until the motor is within a set number of counts of the position requested. To return to the normal prompt ‘>’ then type either ST or AB . The value of the window can be changed, but only in privileged mode. The command has the following syntax: SW nn Set the position window to ‘nn’ counts. Example: SW 12 Set the window on the final position to be 12 counts (default 10). The incompletion of a move often happens if you have forgotten to type in ID after switching on the PTS, so that the position offset is larger than the window allows. Page 20 Copyright © 1995 Quin Systems Limited Revision 2 3.5 PTS User’s Guide Error Handling If for any reason the move cannot be fully accomplished, one of several errors may have occurred. 3.5.1 The Concept of Position Following Error If during the move, the short error message ‘G’ appears, or the longer ‘motor position error’, followed by a ‘:’ prompt, then the PTS is reporting that it cannot follow the move and it has switched the servo loop off (motor off). Assuming that the encoder is wired the correct way round as warned earlier the error could be for four main reasons: • The acceleration or velocity is too high for the motor to follow. This is easy to remedy by lowering the acceleration and/or velocity. • There is a fault with the motor/drive or encoder. This could be because the motor or drive is not on or enabled, or the encoder may not be counting correctly. This can diagnosed by using the DM command while in motor off. Refer to the section in the Installation Manual on testing the encoder for more details. • The control loop tuning is incorrect. Please refer to the section in the Installation Manual on tuning the motor for more details. • The mechanics are too stiff or heavy. This is outside the parameters controllable by the PTS and requires some additional design work on the machine itself, or a different choice of motor and drive to get sufficient power to drive the additional load. 3.5.2 Position Following Error The position following error is triggered when the difference between the demand position and the actual position exceeds a preset value. This value is set with the SE command: SE nn Set maximum position error. This command sets the maximum allowed difference between the demand and actual position to nn encoder counts. Example: SE 900 This sets the allowable position following error to 900 counts. The default value is 800 counts. Copyright © 1995 Quin Systems Limited Page 21 PTS User’s Guide 3.5.3 Revision 2 Timeout Error If during the move the error message ‘T’ appears, or the longer ‘motor timeout’, followed by a ‘:’ prompt, then the PTS is reporting that the encoder has stopped turning during a move, and has switched the servo off (motor off). This occurs if the motor is stuck, or if the motor or encoder is not functioning. The main reason for having the timeout error condition as well as the position following error is so that if the SE set value has to be larger than is desirable because the mechanics make it hard to tune the PTS, the timeout error can still be set to a small value to detect a jam in the mechanics. The timeout value is set with the TO command: TO n Set timeout value. Set the maximum time allowable for the position to remain stationary during motion. The value n is in units of 1/256 seconds (about 4 ms). Example: TO 3 This sets the maximum time that the encoder is allowed to stop during a move to about 12 ms. The default value is 32, about 125 ms. Both the SE and TO values should be set as small as possible to maximise safety and minimise damage to product or machinery if something goes wrong. In both cases when triggered, the servo loop is switched off, and also a voltage free contact is closed. This relay can be wired to a brake or to the enable input on the drive amplifier, so that the motor is disabled when the PTS goes into the motor off state. Page 22 Copyright © 1995 Quin Systems Limited Revision 2 3.6 PTS User’s Guide Differences Between Linear and Rotary Machines Two pulleys connected by a lug belt is a simple example of a rotary machine. The motion of the motor can be continuously in one direction. Lug Pulley Pulley Belt Lug A ball screw mounted on the end of a servo motor is an example of a linear machine. The motor is constrained to operate only within the length of the screw. Ballscrew Motor The count range of the move commands of ±4,000,000 counts is usually more than adequate for most linear systems. For a rotary system though, if you had done thousands of forward moves and you then wanted to return to the original reference zero position, you could well be out of range. As most rotary actions repeat themselves on a cyclic basis, it is reasonable to assume that if you wish to move back to zero position, you only need to move to the zero position in the current cycle. This is certainly the case with the lug belt example. In a typical example of a belt having three lugs, the machine cycle can be defined either as one index length (1/3 of the belt rotation) or a number of indexes. In this example, three indexes make one complete rotation of the belt. You need to set the length of the cycle to accomplish one or a number of complete indexes of the lug belt. Each index will be equal to the distance between lugs, measured in encoder counts. 1 index Copyright © 1995 Quin Systems Limited Page 23 PTS User’s Guide 3.6.1 Revision 2 Set Bounds The command to set the length of the machine cycle is set bounds SB . The set bounds command has the following syntax: SB nn Set the machine cycle repeat length to nn encoder counts. If the distance between successive lugs on the lug belt in this example is, say, 7500 counts, then the value of SB can be set to 7500 counts, 15000 counts, or 22500 counts ... etc., as required. Example: SB 7500 Set bounds value of the position counter to 7500 counts. You can carry out the following sequence: System > > M > > M M > > Command SB7500 Set Bounds MR7500 Move relative MR33956 Move Relative AB Abort MA0 Move Absolute Comments Set position bounds to 7500 Index the lug belt Moving Index completed Index the lug belt again Moving Emergency stop Stopped Move back to beginning of cycle If you use the command MA7500 instead of MA0 as the last instruction, the lug belt will now move forwards to the beginning of the next machine cycle from wherever it stopped, instead of moving backwards to the beginning of the current machine cycle. Although this example may seem trivial, this setup is the basis for enabling the PTS to recover from an error condition such as a jam during the current operation. Page 24 Copyright © 1995 Quin Systems Limited Revision 2 3.7 PTS User’s Guide Single Line Sequences Up until now you have been entering one command at a time, which is adequate for experimentation but does not cater for an automatic sequence of moves. In the case of the lug belt for example, the indexing needs to be continuously repeated in the forward direction without operator intervention. A simple sequence to move forwards then backwards is shown below, and just consists of the same commands as before put into a line, or string of commands, with separators or delimiters between each command. + Move forwards Velocity Move backwards Time – System Command > MA12000 / MA0 M M > Comments Move fwd. 12000 counts and return to zero Moving forwards Returning Arrived back at reference position In this case the separator is a ‘/’ character, but other non-alphanumeric characters can be used, such as a full stop ‘.’ for example. 3.7.1 Repeating Sequences As many motions are repetitive it is important to be able to create an automatic loop for repeating functions. This is achieved by using the RP repeat command at the end of a line sequence: RP n Repeat the current command line n times. If the repeat count ‘n’ is omitted, the command line is repeated indefinitely. RP 3 Repeat line 3 times RP 5 Repeat line 5 times RP Repeat indefinitely (until end repeat ER or abort AX ) Copyright © 1995 Quin Systems Limited Page 25 PTS User’s Guide Revision 2 In order to carry out 5 indexes of the lug belt, the following sequence could be used: System Command > MR7500 / RP4 M M M M M > Comments Index once and repeat 4 times (5 in total) Index 1 Index 2 Index 3 Index 4 Index 5 Finished The above sequence will make the motor perform 5 indexes of either a triangular or trapezoidal shape, depending on the velocity or acceleration previously selected. The sequence can be up to 255 characters long, which allows many commands to be executed automatically one after another: A typical example is using a forward and backward repeating sequence to make the ballscrew mimic a cam driven reciprocating motion. Example: SA100000 / SV20000 / MA12000 / MR–2000 / SV3000 / MA0 / RP2 This sequence also includes the setting and resetting of the velocity, so that the forward and first part of the reverse is at high speed, and the remaining return travel is at slow speed. The cycle then repeats twice more, going forwards fast and subsequently slowing down. SV 20000 + Forward 12000 Velocity Time Return to zero at SV 3000 – Reverse –2000 Page 26 Next cycle Copyright © 1995 Quin Systems Limited Revision 2 3.7.2 PTS User’s Guide Display Position Although the PTS always knows where it is, it is often useful to display the current position on the terminal. The command to display the position value is DP and it can be typed at any time, whether stopped or moving: System Command > MA10000 M > DP 10001 > M DP 6321 M > MA0 Comments Move to position 10000 counts from zero Moving Display position Current position (its accuracy depends on mechanics) Return to zero Returning Display position while moving Current (instantaneous) position At zero position DP can also be included in sequences like the previous example: SA100000 / SV20000 / MA12000 / MR–2000 / DP / SV3000 / MA0 / DP / RP2 The above sequence will print the position of the motor at approximately 10000 counts, at the end of the forward move, and again when it has returned to zero. This method can be used as a visual check on the accuracy of the machine. Remember that the position is displayed as soon as the motor is within the set window range at the end of the move. If the set window SW is a large value, then the position reading displayed by the DP function may differ from the target position of the preceding move command by up to the window value. Copyright © 1995 Quin Systems Limited Page 27 PTS User’s Guide 3.7.3 Revision 2 Putting In a Delay It is often useful to put a dwell or delay in a sequence of motions. For example, if a starwheel is being used to index cans under a filling head, putting a delay between successive indexes of the starwheel allows time for the filling operation to complete before the next index takes place. Filling Velocity Empty cans Full cans Index Fill Index Fill Index Fill Index Time Indexing starwheel The delay command is WT or wait for time, and has the following syntax: WT n Wait for time n. The time value n is in 1/256 second units (about 4 ms). This can now be inserted into a sequence to produce the indexing required. The example shows just one complete revolution of the starwheel. For continuous operation, replace RP 3 with just RP . System Command > MR3300 / WT128 / RP3 M W M W M W M W > Comments Index, wait for 1/2 s and repeat 3 times Index 1 Waiting Index 2 Waiting Index 3 Waiting Index 4 Waiting End of cycle As you can now see, just about any command can be put into a sequence. Page 28 Copyright © 1995 Quin Systems Limited Revision 2 3.8 PTS User’s Guide Sequences That Can Be Saved After experimenting with a number of sequences, it is much more convenient to call them with a single command, and to be able to combine sequences together to form more complex operations. To enter a sequence to be called by a single command you enter privileged mode, then use the enter sequence function: ES n Enter Sequence number n. Example: ES 1 Enter sequence 1. The following example shows the starwheel sequence being entered for single command execution: System > S1: S1: > Command ES1 MA3300 / WT128 / RP3 <CR> Comments Enter sequence 1 The indexing sequence required Type a carriage return to end sequence Ready The sequence can now be run with the single execute sequence command XS 1: System Command > XS1 M W M W M W M W > Comments Execute sequence 1 Index 1 Wait Index 2 Wait Index 3 Wait Index 4 Wait End of sequence Copyright © 1995 Quin Systems Limited Page 29 PTS User’s Guide 3.8.1 Revision 2 Multi-line Sequences More than one command line may be entered as a stored sequence. Example: System > S2: S2: S2: S2: S2: S2: > Command ES2 SA30000 / SV5000 MA15000 MR1000 / MR–1000 / RP2 WT256 / DP MA0 <CR> Comments Enter sequence 2 Set acceleration and velocity Move to position 15000 counts Oscillate 3 times Wait 1 second then display position Return to zero End sequence Ready As shown in this example, it does not matter whether commands are all on one line or on separate lines, unless there is a repeat loop in the sequence. The repeat command RP only applies to the one command line it terminates. In this way, a number of different loops can exist in one sequence. Sequence 2 can now be run with the XS 2 command: System Command Comments > M M M M M M M W 15000 M > Execute sequence 2 Moving to position 15000 Six oscillations Page 30 XS 2 Waiting for one second Display current position Return to zero End of sequence Copyright © 1995 Quin Systems Limited Revision 2 3.8.2 PTS User’s Guide Nesting Sequences You can combine independent sequences to form more complex operations, rather than writing one large sequence. Example: System Command > ES3 S3: XS1 / XS2 / RP S3: <CR> Comments Enter sequence 3 Execute sequence 1 then sequence 2 and repeat indefinitely End sequence This ‘nesting’ of sequences (calling sequences from within sequences) also has the benefit of allowing small sections of the complete operation to be changed without having to re-enter all of the commands for the complete sequence. CAUTION: While it is quite possible to write a sequence that calls itself, this is not allowed. This is because each time the XS command is executed, the system pushes the current sequence state on the stack to allow it to return to this state when the new sequence ends. If the new sequence called is the same as the current sequence, then it never ends, because it again calls itself, and eventually the system runs out of memory. This is called infinite recursion. Copyright © 1995 Quin Systems Limited Page 31 PTS User’s Guide 3.8.3 Revision 2 Listing Sequences Having now entered the sequences it is useful to list them to remind yourself of their contents. The command list sequence LS is used: System Command Comments > S1 S2 S3 > List sequences currently stored in the PTS LS To review the contents of specific sequences: System Command Comments > LS 1 S1: MA3300/WT128/RP3 > List sequence 1 LS 2 S2: SA30000/SV5000 S2: MA15000 S2: MR1000/MR–1000/RP2 S2: WT256/DP S2: MA0 > List sequence 2 LS 3 List sequence 3 Ready Ready S3: XS1/XS2/RP > Page 32 Copyright © 1995 Quin Systems Limited Revision 2 3.8.4 PTS User’s Guide Saving Sequences The sequences you have now entered can be saved in non-volatile memory with the same SP save parameters command used previously to save the reference input line definitions: System Command > PM Password:<CR> O.K. > SP 96 > Comments Enter privileged mode Press return (default) Acknowledgement Save parameters Checksum (value will differ after any setup change) Ready All three sequences have now been saved, but so also has every other parameter entered, such as SA and SV . Next time the PTS is switched on, the sequences will be there already and can be run directly with the XS 1, XS 2 or XS 3 commands. Copyright © 1995 Quin Systems Limited Page 33 PTS User’s Guide 3.9 Revision 2 Linking the PTS to External Switches or a PLC In all the previous examples, the PTS needs to be initialised before running a motion sequence. This was accomplished previously by calling the indexing sequence after running the initialisation sequence. It may be desirable instead to control the PTS externally, either with switches or a PLC which could be supervising the whole machine. The initialise function and the indexing function can now be allocated to individual input lines. Assuming input 1 has already been defined as the reference signal with the DR command, input 2 could be used for the start initialise sequence signal, and input 3 as the start index sequence signal. PLC PTS Reference Input 1 Page 34 Output A Input 2 Output B Input 3 Copyright © 1995 Quin Systems Limited Revision 2 3.9.1 PTS User’s Guide Defining Inputs The define input DI command tells the PTS which input line activates a particular function. DI n± Define an action on a rising (+) or falling (–) electrical input signal. A rising input occurs when the voltage goes from 0 V to 24 V. A falling input occurs when the voltage goes from 24 V to 0 V. The line number ‘n’ defines by which input line (1 to 7) the action is going to be triggered. This command is restricted so it can only be used in privileged mode. Example: System Command > PM Enter Password:<CR> O.K. > > DI2– / IN+ Comments Enter Privileged mode Press carriage return Acknowledgement Input 2 going from high to low will start the initialisation Input 3 can be defined in much the same way, so that the index motion can be triggered externally by the PLC. Example: DI 3– / MR3300 Input 3 going from high to low will index once. Input 3 could instead be made to trigger a complete sequence: Example: DI 3– / XS1 Input 3 going from high to low will trigger sequence 1. Copyright © 1995 Quin Systems Limited Page 35 PTS User’s Guide 3.9.2 Revision 2 Setting Outputs The set output SO and clear output CO commands allow individual outputs on the PTS to be set or cleared: Example: SO n Set Output ‘n’ high (24v) The line number n is in the range 1-7. CO n Clear Output ‘n’ low (0v) These commands can be added to the initialise function to signal to an external PLC when the initialisation has completed. Example: DI2– / SO 1 / IN+ / CO 1 When input 2 goes low, set output 1 high, initialise forwards, then clear output 1. PLC PTS Output A Input 2 Time SO1 Input A Output 1 IN+ CO1 Input A Output 1 This acknowledgement back to the PLC could also be added to the indexing sequence to report that the motion requested is complete. Example: DI3– / XS1 / SO 1 / WT3 / CO 1 Input 3 going low will trigger sequence 1, then set output 1, wait for 12 ms, then clear output 1 again. PLC PTS Input 3 Output B Time XS1 SO1 Input A Output 1 Input A WT3 / CO1 Output 1 12 ms pulse This sequence also shows that a pulse can be sent to a PLC, by using the wait for time WT command, so that the output is cleared ready for the next sequence, yet stays high long enough for a PLC to see it. Page 36 Copyright © 1995 Quin Systems Limited Revision 2 PTS User’s Guide Output 1 could, in fact, be used in two different sequences acting as a ready line back to the PLC. You would not, though, be able to share input lines between different sequences in the same way. NOTE: If the previous definitions are now saved, then every time the PTS is switched on, input 2 starts the initialise function, and input 3 starts the index cycle. The definitions are saved with the SP command as used before. NOTE: Each time that inputs 2 and 3 are redefined, the previous definition is replaced. This is why the DI command is restricted, and can only be used in privileged mode, to prevent accidental deletion of an existing input line definition. As the last two definitions have not yet been saved with the SP command, you can recall the previous definitions with the RD read data command. If you try to define an input line which is already used for a different input function, the ‘U’ error message is returned. 3.9.3 Defining a Stop Input It may be necessary to stop the motion in case of a fault condition. This can be done simply by triggering the stop command from another input, say input 4. Example: DI 4– / ST Define input 4 to stop the motion. The PLC can now initialise and start the motion just by switching outputs, and it can detect that the motion is complete by scanning an input line. If necessary it can also stop the motion at any time with another output signal. Copyright © 1995 Quin Systems Limited Page 37 PTS User’s Guide 3.9.4 Revision 2 Error Reporting The PTS as discussed already can detect most machine faults on its own and shut down the motion. The position following error, timeout error and limit switch error automatically turn the servo loop off, and a voltage free relay contact on the PTS changes state. This relay can be wired through to a brake or drive disable function if required. If the PTS has found such a fault because, for example, a product has caused a jam, the machine operator or PLC must be told so that it can take action before carrying on with another index. The error reporting can be achieved by defining one of the output lines as the error function, so each time a PTS error condition arises, the output line will change level. Example: DE 2– Define error to set output 2 low, 0 V DE 2+ Define error to set output 2 high, 24 V PLC Time PTS ERROR Output 2 Input B Input C Operator Clear Output C Input 5 Output B Input 3 PC / MA0 XS1 If line 2 is wired to a PLC and it receives the error signal, the PLC may want to take some actions of its own. When these are completed, the PLC could wait for the machine operator to press a button, then issue a command to the PTS to return to the beginning of the cycle. The process can then carry on as before with the index being triggered from input 3. A suitable sequence may look like this: DI5–/PC/MA0 Input 5 turns servo loop back on, then moves the motor to the zero position. This will only work if the controller and encoder power supplies are not switched off when the fault was detected, so that it can keep track of the motor position while the fault is cleared. Page 38 Copyright © 1995 Quin Systems Limited Revision 2 3.9.5 PTS User’s Guide Listing Line Definitions Having now implemented a two way interface between a PLC and the PTS, it is useful to display a summary of the current definitions of the 7 input and 7 output lines. This is achieved with the LI list input LO list output line definitions commands: LI List input line definitions. The result is printed on the terminal: System Command > LI Inputs: 1: – R 2: – I SO1/IN+/CO1 3: – I XS1/SO1/WT3/CO3 4: – I ST 5: – I PC/MA0 6: – L 7: + L LO Comments List inputs command Reference input Initialise Index Stop Restart Limit switch input (active low) Limit switch input (active high) List output line definitions. Outputs: 1: 2: + E 3: 4: 5: 6: 7: > Error output line Even though output one is being used in one of the sequences as the ready signal to the PLC, its status is not permanent and is therefore not shown on this display. Copyright © 1995 Quin Systems Limited Page 39 PTS User’s Guide 3.9.6 Revision 2 Reading Inputs In order to test the operation of the input connections or the PLC, it is very useful to be able to read the current state of the input lines. This is achieved with the RI read input command. This command can be used in two ways, either to read the state of a specific input line, or to show the state of all inputs. RI n Read input line ‘n’ and display its state. System Command Comments > Read all inputs Line numbers Input line status (0 = low , 1 = high) Line maskstatus (M =masked , E= enabled) RI 1 2 3 4 5 6 7 8 0 1 1 1 1 1 1 1 E E M E E E E E > Page 40 Copyright © 1995 Quin Systems Limited Revision 2 3.9.7 PTS User’s Guide Using Inputs in Sequences It is often very useful to be able to scan an input in a sequence before commencing with the next action. This reduces the number of input lines necessary, as one line can be used for checking at different stages in the sequence. If the line is scanned only at the relevant time then there will be no inadvertent triggering of a function. Using an input line in this manner is called wait for input WI and can be put into any sequence. Example: WI n± Wait for input ‘n’ to go high (+ve, +24 V) or low (–ve, 0 V). The use of wait for input can best be described by way of an example. Consider the starwheel example described earlier. Filling Empty cans Full cans The indexing starwheel 1 2 1 2 Initialise position 1 2 First can enters 1 First index 2 2 1 3 2 Wait for filling to complete 3 4 Second index Copyright © 1995 Quin Systems Limited 3 1 First can exits Wait for filling of second can Page 41 PTS User’s Guide Revision 2 The following sequences and parameter values could be used: SB 13200 Set the machine cycle length to 13200 counts (4 × 90° indexes of 3300 counts each). S1: CO1 / IN+ / SO1 Sequence 1 (S1) to initialise. S2: MR3300 / WI 3– / RP2 Sequence 2 (S2) to do one 90° index then wait for filling operation to complete, WI 3–, and repeat another 2 times (total 270°). S3: XS2 / MA13200 / WI 3– / RP Execute above sequence, then do last 90° index to complete one revolution, wait for next filling operation to complete, and repeat indefinitely. S4: XS1 / XS3 Sequence to run start and control entire machine cycle. DI2– / XS4 Define Input line 2 to run entire machine cycle. DI3 Undefine previous definition of input 3, which will now be used to sense completion of the filling operation. NOTES: 1. The above sequence now uses WI3– instead of WT128 as used previously. This is preferable as the loop is now properly closed on the filling operation and the cycle can recommence as soon as the filling is complete. If the filling cannot complete for any reason then the machine cycle will be suspended until it can proceed. 2. The precaution has been taken to include at least one absolute move in the sequence, to ensure that there are no accumulated errors, which may arise if only relative moves are used. 3. Input 3 can be used from more than one sequence. Page 42 Copyright © 1995 Quin Systems Limited Revision 2 3.9.8 PTS User’s Guide Imitating a Cam Switch Applications like the indexing starwheel need the motion to interact with other elements in the machine. For example, the filling head valve may need to be switched on just prior to the can arriving underneath and inhibited from inadvertent operation during indexing. This used to be accomplished with a cam switch, just like you might find inside a washing machine, except geared to the starwheel motion. The PTS has the very powerful facility of being able to mimic up to 7 individual cam switches related to the position of the encoder. This function is called position trigger, and uses the PO command. A high or low electrical pulse can be created on any of the 7 output lines, and the switching of the pulse can be accurately aligned to an absolute position in a cycle. In the starwheel example, the filler may need to be switched on at position 3000 counts for the first index and off again at 3320 counts. Position zero Position 3000 Position 3300 Position 3320 Output line 0 3000 3320 This all sounds reasonable, except that only one pulse can be generated per cycle of the machine on each output line. The previous setup, having the bounds set to four index cycles, would require four separate output lines to give four position trigger outputs through the complete machine cycle. As the cycle is exactly the same for every index (1/4 turn), there really is no need to define the cycle for a complete revolution, but only over one single index. NOTE: Whenever a cycle length is defined for any machine, always try and define it over the smallest sub-element of the motion, if possible. This greatly simplifies programming the system, and the use of the input and output lines. Copyright © 1995 Quin Systems Limited Page 43 PTS User’s Guide Revision 2 The cycle can be redefined in length by using the set bounds SB command. It was previously set to 13200 counts for the starwheel application. If the set bounds SB is now set to 3300 counts, the absolute position returns to zero after each 1/4 turn of the starwheel. Position zero Position 3000 Position 3300 –> 0 Position 3320 –> 20 Output line 1 cycle 0 20 3.9.9 3000 3300 20 –> 0 Position Trigger The command for defining the filling inhibit output signal is PO position trigger: PO n± / activate position / deactivate position where ‘n’ is the output line number, and the two position values define the range of positions over which the output signal is true. Example: The starwheel again PO 1– / 20 / 3000 Set output line 1 low (0 V) between absolute position 20 counts and absolute position 3000 counts. NOTE: This definition has exactly the same meaning as setting output line 1 high between absolute positions –300 counts and 20 counts. Once a position trigger output is defined, it will remain active until it is undefined. It does not matter what motion commands are subsequently used, the position trigger activates at the predefined positions. To undefine a position trigger output, simply enter the PO n command without any sign or position values: PO 1 Page 44 Undefine position trigger on output line 1. Copyright © 1995 Quin Systems Limited Revision 2 3.10 PTS User’s Guide Speed Control The PTS can be used as a very accurate closed-loop speed controller. The velocity control VC mode produces a very similar motion profile to that produced when a move command has been entered. The only difference is that the move has no end point, unless one of the stop commands is entered. The velocity is measured in counts/second and is constantly monitored using the normal closed-loop feedback from the position encoder. As the encoder is still used in velocity control VC mode, the current position of the motor is continually updated in the normal way. If the bounds are set to match the cycle of a machine, then however long the machine has been running in VC mode, it can still be stopped and moved to a defined position in the current machine cycle. To run the motor at a constant velocity, SV needs to be set to the required velocity, as with a normal move command. SA can also be used to preset the ramp rate used when accelerating to the required velocity. The command to enter the velocity control mode is VC : VC ± Enter velocity control mode. Accelerate motor to speed set with SV and maintain it until it is changed with SV or one of the stopping commands is entered: ST , AB or MO . Velocity SV 500 SV SA Time Copyright © 1995 Quin Systems Limited Page 45 PTS User’s Guide Revision 2 The velocity can be altered without stopping simply by entering the SV command while in motion. Example: System Command > VC + V V SV 500 V 5635 V > DP ST Comments Run at constant velocity forwards Prompt indicating velocity control mode Change velocity to 500 counts/second while moving Display current position Current position Decelerate to a stop Stopped NOTE: In fact most commands can be entered while the machine is in motion. Speed change is one very frequently used, but many others are useful, such as display position DP or read inputs RI for example. Page 46 Copyright © 1995 Quin Systems Limited Revision 2 PTS User’s Guide 3.11 Profiles 3.11.1 Calculating a Profile So far in this manual, position moves with the MA or MR commands have followed a trapezoidal or triangular velocity profile, depending on the speed, acceleration, and distance moved. These profile shapes are often not ideal for high performance machinery, as the sharp changes in speed cause very high changes in acceleration. This leads to excessive vibration and premature wear in the machine mechanics. The PTS provides facilities for defining other velocity profiles as well. These profiles are user-defined, and may follow a mathematical function, such as a sinusoidal or parabolic curve, or may be completely arbitrary. This facility is called the Software Cam. A velocity profile is defined simply as a table of positions against time. The PTS allows the user to enter a profile table in either absolute or relative position formats. In absolute position format, the profile is defined as a list of successive cumulative positions, relative to the start position of the profiled move. In relative position format, the profile is defined as the change in position, in encoder counts, at each time step, relative to the previous position in the table. Please refer to the PTS Reference Manual for more details. The profile table entries in each case are simply a list of signed integer values, in encoder counts. The time taken for the PTS to complete a profile is determined explicitly by the number of entries in the profile table, and one other parameter, the profile velocity, which is discussed later. The profile is made to execute in a predetermined time by defining it over the required number of steps. As an example, we shall define a sinusoidal velocity profile over a two second period with a maximum (instantaneous) velocity of 10240 counts per second. This example shows the use of the relative position format in entering a profile. Velocity 10240 counts/second 0 0 1 Copyright © 1995 Quin Systems Limited 2 Time seconds Page 47 PTS User’s Guide Revision 2 The profile period is first divided into a number of equal time steps. The profile table requires one entry for each time step. The shortest time step usable on the system is 1/ 256 second, about 4 ms. The profile velocity, in ticks per second, is set using the PV command.In this example, we shall use eight time steps for the complete profile, giving a time interval of 1/4 second per step. This corresponds to a profile velocity value of 4. The intermediate velocity values along the required curve can be calculated in this case, since the required profile is a known mathematical function. However, they are in general quite arbitrary. Velocity counts/second 10240 9461 7241 3919 0 0 0.25 0.50 0.75 1.00 1.25 1.50 1.75 2.00 Time seconds The required profile table entries represent the area under the curve, in encoder counts, for each of the eight steps. These areas can be determined by integration, but only from a mathematical function. A simpler technique, numerical integration, can be used with arbitrary profiles as well. We shall use this technique here. Velocity counts/second 10240 9461 7241 3919 1 2 3 4 5 6 7 8 0 0 0.25 0.50 0.75 1.00 1.25 1.50 1.75 2.00 Time seconds Page 48 Copyright © 1995 Quin Systems Limited Revision 2 PTS User’s Guide The approximate area for each step is equal to the average velocity over the step multiplied by the time interval for the step. This gives the following results: Step number 1 2 3 4 5 6 7 8 Total distance = Value 490 1395 2088 2463 2463 2088 1395 490 12,872 counts. Calculation (3919 + 0) ÷ 2 × 0.25 (7241 + 3919) ÷ 2 × 0.25 (9461 + 7241) ÷ 2 × 0.25 (10240 + 9461) ÷ 2 × 0.25 (10240 + 9461) ÷ 2 × 0.25 (9461 + 7241) ÷ 2 × 0.25 (7241 + 3919) ÷ 2 × 0.25 (3919 + 0) ÷ 2 × 0.25 These are the values to be entered into the profile table on the PTS, using the enter profile EP command, described later. Note that to define the profile as in the above table, as changes in position at each time step, the system nust be put into the relative position format as mentioned earlier. This is done with the set display options word DW command. Please refer to the PTS Reference Manual for more details. The alternative ‘absolute position’ format measures each step end-point from the original start, and can be more convenient when a spreadsheet is used to create the file of values. Copyright © 1995 Quin Systems Limited Page 49 PTS User’s Guide 3.11.2 Revision 2 Profile Velocity The time interval for each time step is set by the PV profile velocity command. PV nn Set profile velocity When a profile is executed, the system steps through the profile table at a rate determined by the value of PV . The shortest time step between profile entries is 1/ 256 second, about 4 ms. For the multi-axis systems, the rate is entered as ticks per second, 1 to 256. (The basic single-axis servos expect a power-of-2 exponent, 0 to 8: thus PV5 = 2**5 = 32 ticks/second). The PV value can be changed to shorten or lengthen the time taken for the profile. This may be before or during the profile execution. Example: PV 4 Set time increment between profile points to 1/4 second. If the profile velocity is set to a higher number than you have chosen for your table of values, then the speed of the profile is increased, to a maximum of 256 steps per second. (For the single-axis controller, each time PV is increased by one, the speed doubles. Conversely, if PV is set lower, the speed is reduced, halving each time PV is reduced by one. This gives a degree of speed and acceleration control of a profiled motion ). NOTES: 1. 2. Page 50 SA and SV are not applicable to profiled motions. Internally the PTS calculates a point every 1/256 second. If points have only been entered in coarse increments, as in the example, then the PTS creates a straight line of points between each point entered. The more points entered, the more smoothly a curved profile will be followed, although more memory space will be consumed. Copyright © 1995 Quin Systems Limited Revision 2 3.11.3 PTS User’s Guide Enter Profile Once the velocity values have been calculated for the shape required, they can be entered using the enter profile EP command. EP n Example: System > 1: 2: 3: 4: 5: 6: 7: 8: > Enter profile number ‘n’. Command EP 1 15 28 37 40 37 28 15 <CR> Comments Enter profile 1 Enter point 1 Point 2 Point 3 Point 4 Point 5 Point 6 Point 7 Type carriage return to end the profile The time between entered points can be entered before or after entering the profile, and may even be changed while the profile is running. This is performed by the PV profile velocity command. 3.11.4 Free Memory A number of different profiles can be entered into the PTS, depending on the amount of free memory (each point uses 4 bytes of memory). It is therefore useful to find out how much memory space is available. The command to display the free memory space is the FM free memory command. Example: System Command > FM 13677 > Comments Display free memory available PTS returns number of bytes available Copyright © 1995 Quin Systems Limited Page 51 PTS User’s Guide Revision 2 3.12 Automatic Referencing 3.12.1 Introduction When the PTS was switched on, the position needed to be initialised in order to reference the encoder counts to a datum position on the machine. It is very useful to be able to continually check the encoder position against the datum without stopping the motion. This gives a number of benefits: • The encoder signal can be continually verified to check correct operation and if required apply automatic correction. • If the cycle length of the machine does not quite match an exact number of encoder counts, then the PTS can apply automatic correction to maintain alignment with the datum. • If instead the datum used is on the product, rather than on the machine, then the cyclical motion can be kept in continual alignment with the product. A typical example of this is a registration mark on a bag which is used to maintain position with respect to the printed pattern on the bag. Page 52 Copyright © 1995 Quin Systems Limited Revision 2 3.12.2 PTS User’s Guide Setting Up the Reference Position The reference input has already been set up (see earlier). When the PTS was initialised, the datum point became the absolute zero position. This also corresponds to the start and end of a cycle on a rotary machine. As the cycle length is set by the bounds as shown earlier, then the boundary between one cycle and the next should coincide with the datum point. This is best shown with a number of examples: Lug belt Proximity switch Encoder positions 0 Bound 7500 Bound 7500 Proximity switch Cycle Cycle Using the previous example of a lug belt with three lugs, the proximity detector used for initialisation is the datum. The bounds in the example were set to the distance between successive lugs of 7500 counts, which is equivalent to 1 index of the belt. After each index, the position returns to zero at the boundary, and this should be coincident with the next lug aligning with the proximity detector. It may not quite line up, as it is difficult to manufacture a belt where the distance between the lugs is exactly uniform. Auto-referencing compares the position of the boundary with the occurrence of a signal from the reference input, in this case the proximity detector. Copyright © 1995 Quin Systems Limited Page 53 PTS User’s Guide 3.12.3 Revision 2 Measuring Reference Error It is useful to first measure what reference error may occur. This is achieved by activating the auto-reference facility with the RM command. RM 1 Reference mode on. This switches on auto-referencing and enables current reference inputs. This is described more fully later. This mode is switched off with the RM 0 command. Once RM is on then any motion can be started. While the motor is running the most recently measured reference error can be displayed with the DF command. DF Display last measured reference error in counts. The reference error is defined as the difference between the expected encoder zero point (as defined by the bounds value) and the position where the reference input was detected (the proximity detector). The measured error is automatically updated and the value stored every time the proximity detector is triggered. DF allows you to observe the value stored. Example: System > > V 0 V 2 V V V > NOTE: Command RM1 VC + DF Comments Enable auto-referencing Set belt running at constant velocity Display last measured reference error DF etc. RM0 ST Disable auto-referencing Stop RM , DF and other reference commands can also be entered at any time, even while the motor is moving. Page 54 Copyright © 1995 Quin Systems Limited Revision 2 3.12.4 PTS User’s Guide Correcting the Reference Error The measured reference error can be used to alter the measured encoder position, thus aligning the encoder to each reference signal from the datum. The various options for the action taken when the reference input signal is detected are controlled using the RW reference word command. RW 1 Switches ON auto-correction RW 0 Switches OFF auto-correction NOTE: The RW command is different from those previously described. Although RW looks like a decimal number as shown in the previous example, it is in fact entered as a BINARY number. Thus RW 1 is the same as RW 00000001 and RW 0 is the same as RW 00000000. Each BIT in the binary word represents a different function. The Auto-correction function just described is enabled and disabled by BIT 0 of RW . Copyright © 1995 Quin Systems Limited Page 55 PTS User’s Guide 3.12.5 Revision 2 Limiting the Correction The auto-correction can be controlled in many ways. For example, a useful option is to be able to correct for the proximity detector or registration mark on a printed bag only within a small range of encoder counts from the boundary between cycles. This offers the following benefits: • Filtering out extraneous signals outside that range, such as other marks on printed film around the registration mark. • Only comparing the boundary with the nearest registration mark. For example, if the bounds on the lug belt are set to cover 3 lugs, then it is important to only correct on every third lug, not on every one. The maximum range of counts around the boundary within which correction will take place is set with the SR command. The SR command also sets the maximum correction value allowed. SR nn Set range around boundary to ‘nn’ counts. The limiting function is enabled with RW , by setting bit 1 to 1. Example: RW 11 Set auto-correction on with bit 0, and limit the maximum correction to SR with bit 1. RW 1 Set auto-correction on with bit 0 as before, with values exceeding SR being discarded. Any reference errors larger than SR will either be ignored, or the PTS can correct up to the maximum value set by SR and wait until the next reference signal to apply the remainder of the correction. This function is enabled by setting BIT 1 of RW . There are many functions and options with referencing, which are described in more detail in the PTS Reference Manual. Please refer to the section on Reference Commands. Page 56 Copyright © 1995 Quin Systems Limited Revision 2 PTS User’s Guide 4. Section B: Multi-axis Control 4.1 Scope of this section This section of the manual refers to the multi-axis systems, from the four channel MiniPTS to the 48 channel PTS-12, and in particular covers the multi-axis or multichannel capabilities. Familiarity is assumed with the single channel operation covered in section A. All prompts for these systems are preceded by the axis or channel number that is currently being programmed. The multi-axis PTS units otherwise can perform all the single axis functions described in section A. 4.2 Description of the Multi-axis Systems The range of QUIN multi-axis Programmable Transmission Systems currently comprises the MiniPTS, the PTS-4 and the PTS-12, the number denoting the maximum number of axis cards in a particular system. The models come in 3 frame sizes: MiniPTS QUIN QUIN PTS-4 QUIN PTS-12 Copyright © 1995 Quin Systems Limited Page 57 PTS User’s Guide Revision 2 The frames are available to be either bolted to a flat vertical surface or as 19" rack mounting systems. For more details please refer to the appropriate Installation Manual. Internally these systems can be thought of as having multiple Single-axis Control units inside, one for each motion controlled or monitored. The software structure is partitioned to operate individual control tasks for each axis, with input and output lines allocated per axis; each motion thus operates independently until synchronisation between motions or groups of motions is required. The MiniPTS implements this multi-axis software using one common processor; the larger models use one processor per axis or per 4 axes. The whole is synchronized by a host task, which responds to user input and coordinates the axes: the larger models place this software in a separate processor linked through the high speed data link known as a bus. Although this may seem more complicated, it is in practice just the same to use as a single-axis controller, with extra commands to support the multi-axis facilities. 4.3 First Steps The same precautions of using guards and limit switches should be taken, as described in Section A. On power up, the prompt should show one of the following: 1: Servo loop inactive – motor off on channel (axis) 1. 1> Servo loop active – position control on channel 1. Note that the prompt character is now preceded by the current channel number. It is possible to put in your own Autostart sequence which can override the above if required. It executes automatically when the system powers up. This is described later in this section. All the single channel functions described in section A can be implemented in the same way, except that the channel number precedes all of the prompts returned by the PTS. Page 58 Copyright © 1995 Quin Systems Limited Revision 2 4.4 PTS User’s Guide Changing Channels It is possible to change to work with another channel at any time, even if the channel you are currently on is in the middle of a motion. Changing channel is achieved with the CH change channel command. CH n Change working channel to ‘n’. The channel number n ranges from 1 to a maximum of 48, depending on how many channels (or axes) are in the particular system you are working with. Example: System Command 1> 1> CH2 2: 2: PC 2> Comments Channel 1 prompt Change to channel 2 Prompt for channel 2 Turn on position control on channel 2 Copyright © 1995 Quin Systems Limited Page 59 PTS User’s Guide 4.5 Revision 2 Simultaneous Motion The functions available on channel 2 are identical with those of channel 1 and can be entered in the same way even if motor 1 is still running. Motor 2 can now be set running in a completely different mode of operation to Motor 1, and then if there is a third channel in your system this too can be set in operation simultaneously. Example: System 1> 1M 2> 2V 3> 3P 3M 3W 3M 3> 3> 1M 1M 1S 1> 2V 2V 2> Command MA10000 / MA0/ RP CH2 SV20000 / VC+ CH3 XP2 / XS3 Comments Set motor 1 to reciprocate Switch to motor 2, leaving motor 1 running Run motor 2 in velocity control mode Switch to motor 3, leaving 1 and 2 running Run profile 2 and sequence 3 on motor 3 Executing profile 2 Executing sequence 3 (as an example) ST CH1 Stop motor3 Switch to channel 1 Motor 1 still moving Stop motor 1 Motor 1 stopping Switch to channel 2 Motor 2 still moving Stop motor 2 ST CH2 ST There are many possibilities of motion on all the different axes due to the flexibility of the PTS parallel processing capability. The next subject to be covered can form the basis of many high speed machines. This is the Software Gearbox, the heart of the Programmable Transmission System. Page 60 Copyright © 1995 Quin Systems Limited Revision 2 5. PTS User’s Guide The Programmable Transmission System The Programmable Transmission System is the technique of being able to synchronise a group or several groups of motions together to form a machine transmission system. By driving the final motions as directly as possible, each with its own servo motor, a very accurate low-inertia high speed transmission can be achieved, with the ability to change the motion profiles to suit different requirements of the machine. 5.1 Software Gearbox The Software Gearbox can be described in much the same way as a mechanical gearbox. A typical mechanical transmission may comprise a set of gears as shown. Slope = gear ratio Slave Master Slave position Master position In a gearbox one gear is driven by an input shaft and one or a number of the other gears are attached to output shafts. The input gear will be referred to as the master and any output gear in mesh will be referred to as a slave. In a gearbox, the gear ratio is proportional to the number of teeth on the master gear compared to the number of teeth on the slave. The teeth normally being the same size, the ratio is also proportional to the relative diameters or circumferences of the two gears. Copyright © 1995 Quin Systems Limited Page 61 PTS User’s Guide Revision 2 With a belt transmission, then the ratio of input to output is simply proportional to the diameters or circumferences of the pulleys. Slope = pulley ratio Slave Master Slave position Master position The Software Gearbox defines the ratio between the input (master axis) and output (slave axis) in exactly the same way. The circumference of the either the master or the slave axis has already been used before in Section A to define a cycle. This is called the bounds value. For example, one cycle of the input gear (master) must complete at the same point as one cycle of the output gear (slave), even if the cycles are not the same length. If the cycles are the same length then the gear ratio is 1:1 or unity. NOTE: If the resolution or gearing of the encoders is different for each axis, this MUST be taken into account when determining the BOUNDS of the master and slave axes to achieve the required ratio. The bounds as before are used to set the cycle length in terms of encoder counts. The master and slave cycles can be represented by the axes of a simple graph whose lengths are equal to their respective bounds. The increments along the axes will therefore be encoder counts, starting from position zero in each case, and ending at their respective bound values. The graph thus defines the relative positional relationship between the 2 axes. A fixed ratio between a master and slave is given by a straight line on the graph. Slope = ratio Slave position Master position Page 62 Copyright © 1995 Quin Systems Limited Revision 2 5.2 PTS User’s Guide Maps If the ratio is 1:1 in terms of encoder counts, then the axes will be of equal length and the angle of the graph defining the relative positions will be 45°. The graphs of master/slave positional relationships are known as maps, and these can be stored in the PTS. A set of maps are often used to define a transmission involving a number of motions. A great benefit of this type of transmission is to be able to store different sets of maps in order to provide different transmission systems for a particular machine. Copyright © 1995 Quin Systems Limited Page 63 PTS User’s Guide 5.3 Revision 2 Setting Up the Software Gearbox The procedure for creating a simple Software Gearbox transmission between two motions is outlined here. • Set up the bounds on both master and slave channels. • Enter the required map for the slave channel. • Link the slave axis to the master axis. • Execute the map on the slave axis. The procedure will be described in more detail by working through a simple example. This example implements a simple 2:1 ratio between two encoders, each producing 4000 counts per revolution, and it uses channel 1 as the master axis. 5.3.1 Setting the Bounds The bounds must be set on both the master and slave channels before commencing with linking the channels together. Example: System 1> 1> 2> 2> Command SB4000 CH2 SB8000 Comments Set the bounds on channel 1 to one revolution Change to channel 2 Set the bounds on channel 2 to two revolutions As the example is only a simple linear ratio, you do not necessarily need to define the cycle length of the master over a complete revolution, since the ratio is constant. For example, a roller or conveyor belt which has a uniform surface can be started and stopped in any position, and therefore you only need to define the ratio between master and slave axes. The minimum requirement is to define the ratio of the master bound to the slave bound. Example: System 1> 1> 2> 2> Command SB100 CH2 SB200 Comments Set the bounds on channel 1 to 1/40 of a revolution Change to channel 2 Set the bounds on channel 2 to 1/20 of a revolution If you decide to only define the cycle over part of a revolution, it must be remembered that absolute position only applies within the range of the bounds defined. So if you need to know the position of channel 1 or 2 to the nearest revolution, then you must set the bounds to a complete revolution. Page 64 Copyright © 1995 Quin Systems Limited Revision 2 5.3.2 PTS User’s Guide Entering a Map It is possible to enter a slave encoder position for every master encoder position, thus forming the line of the graph in a map. This makes the synchronisation very accurate and allows very fine control of the profile of the map graph, as will be described later. NOTE: – MAP SIZE LIMIT OF STANDARD SRV-1 BASED PTS The maximum length of the MASTER axis in any MAP is limited to 14000 counts. This should be borne in mind when entering a large MAP. In most cases this does not create a problem, but if a very high resolution MASTER encoder is needed over a LONG cycle, then a MASTER MAP DIVIDE function can be used to reduce the size of the map table. This is described in the PTS Reference Manual. However, entering every point for a large map is extremely tedious for just a simple ratio. Fortunately the PTS can linearly interpolate between entered positions, reducing the number of positions that need to be entered manually. In the case of a simple ratio, as the map graph is a straight line anyway, only the first and last points need to be entered. The distance between entered points, in master axis encoder counts, is set by the MS map step command. MS nn Set the MAP STEP to ‘nn’ counts. Using the master bounds setting of 4000 counts from the first example, enter a map step of 4000 counts. The MS map step always relates to the master axis, but applies to the map executed on the slave axis. A map is entered at the step value of the current axis, which would usually therefore be the slave to be used. However, the step value can be defined inside the map - see the Reference Manual. Example: System Command 2> MS 4000 2> Comments Set the map step to 4000 counts To enter the map, it is now only necessary to enter the first and last points. Entering a map is rather like entering a profile, as described in section A. After executing the EM n or enter map number ‘n’ command, you will be prompted by the system with the first master position. Type in the equivalent required slave position. Copyright © 1995 Quin Systems Limited Page 65 PTS User’s Guide Revision 2 The next prompt will be the next position along the master axis as defined by the map step MS command. Example: System 2> M1 0: Command EM 1 0 M1 4000: 8000 M1 8000: <CR> Comments Enter map 1 First master Position Enter first slave position Next master position Enter required slave position Next master position Type carriage return to end map entry 2> This example enters a 4000 point map, defining a 2:1 ratio between channel 2 and an as yet unspecified master channel. There may be a pause of up to a few seconds between entry while the PTS calculates the intermediate points between the position increments entered. 5.3.3 Link the Slave to the Master Having now created a map for the slave channel 2, the slave must be informed which other channel is the master. This is done with the map link command ML . ML n Map link to channel n. This links the current channel to the specified master channel ‘n’. The ML command must be entered on the slave channel. Example: System Command 2> ML 1 2> Page 66 Comments Link this channel (2) to channel 1 as a master. Copyright © 1995 Quin Systems Limited Revision 2 5.3.4 PTS User’s Guide Execute the Map The last step in synchronising a slave channel to a master is executing the map. This is achieved by the execute map command XM n, where ‘n’ is the number of the particular map to be executed. The execute map command must be entered on the slave channel, ensuring that the master axis is stopped. Example: System Command 2> XM 1 2X Comments From the slave channel, execute map 1 Channel 2 goes to the mapped state If the encoder positions on the master and slave channels are not lined up prior to executing the map, then the slave motor moves until the positions align according to the map defined, and then goes into the map state. NOTE: Other options are available to cater for the MASTER axis moving prior to executing a map. This facility is called the SOFTWARE CLUTCH, and is controlled by the MW or MAP WORD function described later. Example: System Command 2> XM 1 2X 2X Comments From the slave channel execute map 1 The slave motor aligns its position to the master The slave goes to the mapped state. All the time channel 2 is mapped to a master channel, the ‘X’ prompt is displayed indicating that channel 2 is cross-linked to a master axis and is in the mapped state. Most commands can still be entered while executing a mapping, except for other move commands. For example, DP display position, RI read inputs and DF display reference error can be used in the mapped state. The speed and acceleration commands may be entered while in mapping, but have no effect on the slave motor. The values entered are however stored for future use in any later move commands. Copyright © 1995 Quin Systems Limited Page 67 PTS User’s Guide 5.4 Revision 2 Saving Maps Saving maps is achieved in exactly the same way as saving any other parameter, sequence or profile, by using the SP save parameters command as described in Section A of this manual. The same precautions have to be taken, because when the SP command is executed, all parameters are saved including all the maps that have been entered. As the maps can contain a large amount of data, the save operation may take considerably longer than previously. Only the map positions entered are stored, so if a MS map step of greater than one is used while entering the map, then much less non-volatile memory space is used. For the standard multi-axis PTS systems each entered point uses 2 bytes of non-volatile memory, and the system has a maximum of approximately 30,000 bytes of free memory when switched on. (The working points are calculated when the map is transferred or first executed; the limit then is 30000 bytes each axis, for expanded maps). The MiniPTS uses 4 bytes per entered point, to a maximum of about 20000 bytes of memory in total and 10000 bytes per map; no expansion occurs up until an interpolation at runtime. The FM command as described in Section A can be used to ascertain the free memory available at any particular time. Page 68 Copyright © 1995 Quin Systems Limited Revision 2 5.5 PTS User’s Guide Mapping Having linked a slave channel to a master and then executed a map, the two axes are now synchronised. All that is necessary is to switch to the master channel and execute any commands. The slave channel follows the master according to the map being executed on the slave. Example: System Command 2> CH1 1> SV5000 / VC+ Comments Switch to the master axis, channel 1 Set the master velocity to 5000 counts/second and run at that velocity 1V Motor2 should now follow in the same direction at twice the velocity, about 10000 counts per second. This can be observed by switching back to channel 2 and measuring the velocity with the DV display measured velocity command. Example: System Command 1V CH2 2X DV 10240 2X Comments Switch back to the slave, channel 2 Display measured velocity Measured slave velocity The motion can be stopped at any time in the normal way by switching back to the master channel and stopping the master motor. As the master motor stops, the slave remains synchronised to it. Example: System 2X 1V 1S 1> 1> 2X Command CH1 ST CH2 Comments Switch to the master axis, channel 1 Stop the master motor Stopping Stopped Switch to the slave axis, channel 2 The slave is still mapped to the master Copyright © 1995 Quin Systems Limited Page 69 PTS User’s Guide 5.5.1 Revision 2 Stopping or Disengaging the Map To disengage the map and stop the synchronisation all that is needed is to switch to the slave channel and execute the ST stop command. Example: System Command 1> CH 2 2X ST 2> Comments Switch to the slave axis, channel 2 Stop synchronisation Motor2 stopped (not synchronised) The map can be re-engaged at any time by executing the map with the XM execute map command used previously, again making sure that the master axis has come to a rest (unless the Software Clutch is in operation). Example: System 2> 1V 1> CH 2 2> 2M 2X 5.5.2 Command CH 1 ST XM 1 Comments Switch to the master axis, channel 1 Stop master motor if still moving Motor1 stopped Switch to the slave axis, channel 2 Execute map 1 Channel 2 aligning to channel 1 Channel 2 in mapped state Changing Maps A powerful feature of the PTS is its ability to run different maps, to implement different transmissions between motions. Before a new map is executed, it is vital to check if the values of the SB bounds required for the new map are different. If the bounds required are different, then the slave must be unlinked from the master axis, and the new bounds values entered, before re-linking the slave back to the master. Unlinking a slave from a master is achieved with the UL command. Page 70 Copyright © 1995 Quin Systems Limited Revision 2 Example: System 2> 2> 1 1> 2> 2> 2> 2M 2X PTS User’s Guide Command UL CH 1 SB 300 CH 2 SB 900 ML 1 XM 2 Comments Unlink channel 2 from the master Switch to channel 1 (master) Change the master bounds Switch to channel 2 (slave) Change the slave bounds Re-link channel 2 to channel 1 Execute new map Executing new map Copyright © 1995 Quin Systems Limited Page 71 PTS User’s Guide 5.6 Revision 2 Software Line Shaft A line shaft between machines can be easily copied by the PTS. Instead of the master channel controlling a motor, it can be connected to just an encoder, perhaps mounted on a remote machine. By setting the master channel to motor off and then linking the slave in the normal way, the slave will now be synchronised to the remote encoder as though there was a line shaft between the two machines. Turning the encoder on the master channel will cause the slave to follow according to the map executing on the slave. As 1:1 maps are often used, particularly to replace line shafts between machines, this has been made a special case called map zero. Map zero is a predefined map for a ratio of 1:1 between master and slave. It is executed just like any other map, but does not need to be defined by the user. In this example, channel 1 is the SLAVE and channel 2 the MASTER: System Command 1> ML 2 1> XM 0 1X Comments Map link channel 1 (slave) to channel 2 (master) Execute map zero, a 1:1 map Channel 1 is mapped to channel 2 The SM command may be used to scale the output of a map table before it is used for the slave channel. For example the master encoder above might have 2500 line resolution against a slave of 1024: Example: System Command 1> SM1024/2500 1> XM0 1X Page 72 Comments Scale the slave axis, channel 1 Start mapping Mapped Copyright © 1995 Quin Systems Limited Revision 2 6. PTS User’s Guide Tension Measurement Considerations The principle of tension control using the PTS (and the Tension Controller itself), is relatively straight forward. The material, whose tension is to be controlled, is driven both before and after a device which is used to measure the tension. Motion software in the controller speed-matches one drive to the other with a speed ratio. The tension measurement is compared to a set point and the tension error is then used to modify the ratio to correct the arm position. The example in section 8 includes axes linked for tension control, and illustrates the programming commands. The ability of the machine to maintain a consistent tension depends on the performance of the machine in driving the material (before and after the tension measurement). The ability of the machine also depends on the way in which the tension is measured. The following considerations should be made when designing a tension system. There are 5 basic ways in which tension can be controlled. Each is described below together with a list of the pros and cons. 6.1 Tension Control using a Dancing Arm A dancing arm (in its simplest form) consists of a single roller supported (and free to rotate) at one end of a cantilevered arm which itself can pivot about its other end relative to the machine frame. A torque is applied to the arm. It is this torque which is resisted by the material and which therefore produces its tension. This is probably the simplest mechanical solution and probably the lowest-cost solution. The tension signal can be produced from a potentiometer which is driven at the arm pivot by its rotation. As well as providing tension to the material, the movement of the arm can be used to provide a buffering or accummulating effect. In the latter case, the change in tension in relation to the arm angle, can be kept small. This can be achieved by using a counterbalance weight, a spring whose variation in length is small relative to its length, an air spring or a hair spring. The length of the arm will depend on how much buffering is required or whether the arm position needs to be respecified while the machine is running in order to provide a new tension set-point. The swept volume of an arm can be significant: a dancing arm is not the most compact solution. The amount of arm movement also depends on how well the material can be driven or how significant are the eccentricity or slip effects. Smaller arms are less linear than larger arms since the angle of the material around the roller can change more with arm rotation. This can be reduced by positioning the idler rollers further away from the dancing arm roller. This, though adds to the amount of space required by the overall system. Copyright © 1995 Quin Systems Limited Page 73 PTS User’s Guide Revision 2 Whatever length of arm is used, the arm itself will only rotate through a fraction of a revolution. If the potentiometer is directly driven at the arm pivot, then the voltage swing will only be a proportion of the overall voltage across the potentiometer. The PTS will accept a swing of up to +/-10V. This swing should be as high as possible (within the 20V limit) to provide the best resolution of the arm position. This could be achieved by applying a large voltage across the potentiometer such that its resultant angular movement producesa healthy swing. To make use of the full range of the PTS’s AtoD, a bipolar power supply should be used. If one is not used, then the arm resolution is immediately halved since the input can only swing through 0 to 10V. If a large voltage is applied across a potentiometer to provide a good output swing, some over voltage protection should be fitted to its output to prevent anything outside of +/-10V being applied to the PTS input. This could be achieved using Zener diodes and resistors. A 10V 1.3W Zener diode with a 1k resistor will suffice. An alternative way of increasing the voltage swing is to gear up the arm pivot shaft to the potentiometer such that the potentiometer moves through a greater angle for a given anagle of movement of the dancing arm. This may eliminate the need for a larger voltage source but does introduce the possibility for backlash in its drive. A potentiometer should ideally allow complete rotation of its shaft without any mechanical stops. This allows the potentiometer to be set up without worrying about its end stops being broken if incorrectly adjusted. The type of potentiometer track should be chosen to provide long life. Plastic tracks have been used in a number of applications. The mass of the dancing arm is important. If the arm is stationary, then its position reflects the tension in the material. If the arm is accelerating, then there is an additional tension in the material which is required in order to accelerate the arm. This leads to an inaccurate tension measurement if the arm mass (inertia) is too high. Counterbalance weights can only increase this effect and are therefore not a preferred solution. The choice of roller diameter again has an influence on the arm inertia. A minimum diameter may be called for since the product may be damaged if bent through a tight radius. Too small a diameter will result in the roller having to run fast which may exceed its bearing capabilities. Some mechanical damping has been found to improve overall tension control. An air spring automatically provides this damping and also allows the amount of tension to be adjusted by varying the air pressure from a regulator. 6.2 Tension Control using S-wrap rollers This solution is similar to the dancing arm above in that an arm is rotated to measure the material tension. Many of the points above apply equally well to an S-wrap arrangement. However, it does have a number of advantages over a dancing arm. Page 74 Copyright © 1995 Quin Systems Limited Revision 2 PTS User’s Guide Mechanically, the arm is balanced since it can be made to rotate about its centre of gravity. It weight therefore is not relevant. However, its inertia still is. Since an S-wrap arm is generally more compact than a dancing arm, its inertia is probably less than that of a dancing arm. The angle of wrap of the material around the rollers is less. This may be beneficial to some materials. The arrangement is inherrently more rigid than a dancing arm which would need additional mass to provide better stiffness. An S-wrap arm does require 2 rollers which increases the number of mechanical parts. The idler rollers can be positioned such that the arm movement is reasonably linear, even in a compact space. (A linear arm provides a linear relationship between arm angle and tension). An S-wrap arm can be made to rotate through a greater angle than a dancing arm. This minimises the need for potentiometer gearing or high voltages across the potentiometer. 6.3 Tension Control using a Linear Roller This is really a dancing arm without the arm. Instead, a roller is allow to move vertically and may or may not be counterbalanced. This type of measurement can provide a lot of roller movement and is good for accumulation. Some form of linear position sensing is required e.g. an LVDT or a linear potentiometer. 6.4 Tension Control using a Loop Tension control also includes situations where the material must remain slack as a loop under its own weight. This is to allow product to be transferred from one process to the next if the two processes are not synchronised. Feedback on the loop height can be provided by an ultrasonic sensor which can vary the speed ratio in exactly the same way as described above, in order to maintain a constant loop height. Some material is perhaps too delicate to be wrapped around a roller. 6.5 Tension Control using a Loadcell A loadcell is a very accurate way of measuring tension but can be expensive. Mechanically it can provide the simplest solution, whereby a single roller can be supported on one or more loadcells. An amplifier is required to provide a suitable voltage swing. This range can be selected (within limits) but is generally unipolar. Unlike any of the tension control solutions above, a loadcell does not provide any buffering. A small change in speed ratio produces a large change in tension. A loadcell should not be considered if the position (and hence speed) control of the drive motors is not good. Copyright © 1995 Quin Systems Limited Page 75 PTS User’s Guide 7. Revision 2 The Programming Environment Although an application can be developed interactively, using a dumb terminal connected to the serial port of the Quin Controller, it is better practice to use a PC instead of a dumb terminal. This PC should be running the windows-based PTS Toolkit software, supplied by Quin and which will provide a flexible working environment, offering the following features: 1. The application program is saved as a master copy on the PC. 2. A history of program versions can be maintained. 3. Sections of existing programs can be copied into new programs. 4. Programs, program sections and individual command lines can be commented. 5. A terminal window and a text editor window can be open at the same time, allowing text to be cut and pasted backwards as well as forwards. 6. Motors can be tuned interactively and their performance monitored graphically using a built-in scope facility. A full description of how to use PTS Toolkit is given as a help file within PTS Toolkit itself and in the handbook supplied with the product. In order to master the windows-based programming environment for the PTS, a knowledge of using windows applications is also required. This can be gained from manuals supplied with the PC. Page 76 Copyright © 1995 Quin Systems Limited Revision 2 7.1 PTS User’s Guide The Program Structure The structure of an application program for a Quin Controller is unlike that of a conventional “high level” program (written in ‘C’ for example) and its execution is certainly unlike that of a PLC program. This radical approach to programming has been taken to provide a number of benefits. It is important to undertand the “hows” and “whys” of Quin programming before actually spending any time developing an application. A failure to understand these basics could result in an application program being written which provides the necessary functions but fails to provide sufficient positioning accuracy or response time for example. A Quin motion program is based around the use of 2-letter mnemonic commands which will have been introduced earlier in this User’s Guide. These commands can be used to specifiy controller settings which either remain constant throughout the application or can be made to execute as and when the application demands. Some of these commands apply to individual channels (axes) whereas others apply globally to the complete PTS system. The 2-letter mnemonic commands can provide both low and high level functions. A single command can be used, for example, to simply change the state of a digital output, whereas another single command can be used to initialise a machine axis which requires specific motions, input recognition and internal counter adjustments being made automatically. It is important to fully understand the range (if not the specific details) of the built-in features which are available with the PTS and not to attempt to program a facility which is in fact already present. If the user is capable of writing programs in high-level languages and has a full understanding of motion control, then it can be tempting to try and construct a Quin Application program using PTS variables, for example, instead of using the existing mnemonic commands. This should be avoided since the mnemonic command set within the PTS provides a collection of debugged and flexible routines which have been developed to provide solutions to the majority of motion control applications over a number of years. Using the built-in commands keeps the application program more compact and allows it to be understood more clearly by others who were not involved in its writing. The programming examples in this guide all follow the same format. Although this need not be rigidly adhered to when developing an application, it has become a defacto standard and as such a format file NEW.PTS is included on the application disk available for use with this manual. This file provides the basic structure for the layout of a new program and includes headings for all the various sections within the program. Copyright © 1995 Quin Systems Limited Page 77 PTS User’s Guide 7.2 Revision 2 Filename Conventions The following filename convention should be used in order to identify particular filetypes on the PC. .PTS A textfile containing a commented program for a PTS Controller .MAP A textfile containing a list of position values for use as a map table .PRO A textfile containing a list of position values for use as a profile table .PAN A textfile containing an uploaded configuration for the operators panel A full description of the content and structure of each filetype is given later. Before developing any PTS software on the PC, create a specific directory for each application in order to group all the files together and thereby keep them separate from any other work. This will then allow the 8 character filename to be more explicit. Reserve the last 2 characters in the 8 character filename for the program version number. Keeping previous versions allows backtracking. If, for example, the application is for a printing press, the initial PTS program filename might be: PRINT_00.PTS A subsequent version of the same program would then be: PRINT_01.PTS 7.3 Maintaining a Program History As an application is developed, the application program will necessarily undergo a number of changes. These changes may be additions, modifications or fixes to problems. It is suggested that the Program History section of the program file .PTS is maintained conscientiously as the application is developed. Page 78 Copyright © 1995 Quin Systems Limited Revision 2 7.4 PTS User’s Guide Getting Started The following step-by-step procedure is suggested as being the best way to program the PTS systems. It allows the PTS to be programmed either offline or online and makes full use of all the programming environment features. 7.4.1 Off-line Programming Procedure Start PTS Toolkit running. Refer to section xx above if required. Once PTS Toolkit is running, select FILE OPEN TEXT FILE... PTSmotion will present a dialogue box, allowing the required text file to be selected. The procedure at this point will depend on whether a new application is being started or whether an existing application is to be worked on. 7.4.2 Starting a new Application If a new application is being started, select the file NEW.PTS from the Application Pack floppy disk supplied. This file contains the basic structure for a new application program. Since this file will be required again for subsequent applications, don’t work directly with this file. Instead, save it with its new application name (e.g. PRINT_00.PTS). Make sure that the directory for the application programs exists. If the directory doesn’t exist at this point, switch to the windows FILEMANAGER and create the directory. Switch back to PTS Toolkit and save the file using the commands: FILE SAVE AS The SaveAs dialogue box will appear. Select the new directory and specify the new filename e.g. PRINT_00.PTS in the filename box. Note that the version number has been set to 00. Copyright © 1995 Quin Systems Limited Page 79 PTS User’s Guide 7.5 Revision 2 Continuing Work on an Existing Application If an existing appliction is to be worked on, first select the appropriate application directory. The file type in the filename box is automatically set to .PTS and therefore any .PTS file in this directory will be displayed. Choose the filename with the latest version number. It may be necessary to use the scroll bar to search downwards. Having selected the latest file, it should then be saved with the next version number. This will make sure that any modifications are made to a separate file and will allow modifications to be backtracked if required. This is done as follows. Select: FILE SAVE AS The SAVE AS dialogue box will appear. If the latest program file name was PRINT_04.PTS, for example, specify PRINT_05.PTS in the filename box. The directory will already be correct. 7.6 Off-line Program Editing In opening a text file within PTS Toolkit, a PTS Note text editor window will be created. This is similar to the windows Notepad editor and allows the PTS program to be edited off-line. Refer to the on-line help file for a detailed description of how to use PTS Note. The program should be saved to disk periodically. This can be done using the FILE SAVE commands in the pulldown menu or by clicking on the floppy disk icon. This will save the program with the pathname shown at the top of the PTSnote text editor window. It will overwrite the existing file. It is often useful to view existing application programs while creating a new application. More than one PTSnote window can be opened at any one time. These windows can be split or tiled on the screen and text can be copied from one window to another. Refer to the on-line help file for full details. Page 80 Copyright © 1995 Quin Systems Limited Revision 2 7.7 PTS User’s Guide On-line Programming Procedure PTSmotion allows a terminal window to be opened alongside one or more PTSnote text editor windows. This provides an RS232 connection from a serial port on the PC to the programming port (PORT A) on a PTS. (Refer to the PTS Toolkit User Manual for information on a suitable serial lead). TOOLS TERMINAL The COM ports can be selected from the OPTIONS menu. With a terminal window open, it is possible to communicate directly to a PTS and to make changes to parameters and to any existing program on the PTS. While this is very convenient and allows parameter values to be changed immediately on the PTS for testing and experimentation, it is important that any on-line changes which need to be kept should be made to the program text file in the PTSnote window. This will maintain a master copy of the program on the PC. It is normal programming practice to make more significant changes in the PTSnote window and to then copy them into the terminal window. This then ensures that the master copy is maintained and that the program in the PTS is kept up-to-date with it. (Refer to the PTS Toolkit help file for information on how to do this. It is good practice, having high-lighted the text in the PTSnote window and selected copy, to click in the PTSnote window to de-select the text. This will prevent the text being replaced or deleted inadvertently if any other key is pressed instead). The above copying and pasting method is useful when making changes to a specific sequence. If a number of changes have been made throughout the program file, it is more convenient to use the File, Download facility. This will download the complete program file from the PC to the PTS and overwrite any existing program in the PTS. Make sure that the PTSnote file has been saved before downloading since the download option will download the disk file and not the text as shown in the PTSnote window. Copyright © 1995 Quin Systems Limited Page 81 PTS User’s Guide 7.8 Revision 2 Good Programming Techniques The following suggestions should be considered when writing programs for the PTS. 1. Keep sequences short. Although the PTS is happy to accept long sequences, it is easier to write a program, prove it out and track down programming problems if the sequences are kept short. A sequence should be used for a specific function like “Machine Start”. If there are a number of ways in which the machine could start, then use a sequence for each possible start condition. Worked example 1 shows that 3 sequences were used to start the machine. 2. Keep the sequence numbers in ascending order within the .PTS file. During a program download from the PC, the PTS will accept sequences in any order. However, to make the program easier to read and to be able to find specific sequences easily in a listing, the PTS sequences should be written into the file in ascending order. 3. Group the sequence functions together. Up to 255 sequences can be defined in a PTS. Since an application never needs this many, it is useful to use this overall range of sequence numbers to allow specific ranges to be used for specific functions. For example, sequence numbers 1 to 90 could be used for product selection, sequences 91 to 99 as error sequences, 100 to 199 for starting, inching and stopping and sequences 200 to 255 for initialisation and power-up. The allocation is arbitrary and should suit the application but the grouping makes for a tidy and easy to read program. Sequences are able to execute other sequences. It makes sense to allow these sequence calls to be within the group to prevent the sequence executions jumping backwards and forwards within the .PTS file. 4. Use 3 character variable names. Although the PTS will accept single-character and two-character variable names, the variable useage is more meaningful if 3 characters are used. 5. Comment why the program is written the way it is. Using the 2-letter mnemonic commands makes the program easy to understand because the choice of mnemonics reflects the function of the command. It is possible to understand what an uncommented program is doing but not why it has been written in such a way. The comments for the sequences and individual sequence lines should describe why specific parameter values and bit settings have been used. 6. If the application uses a PLC, then use it to handle the logic side of the application. A PTS is able to handle logic and can perform motion control and logical operations concurrently. However, it simplifies the system if the logic is grouped into the PLC and the motion control and real-time PTS operations are performed by the PTS. Page 82 Copyright © 1995 Quin Systems Limited Revision 2 PTS User’s Guide 7. Use digital I/O between a PTS and a PLC to handshake. Where a PLC is used in an application to trigger digital inputs on the PTS to perform specific motion tasks, allocate a PTS output to signal back to the PLC when the PTS is busy actioning the request and therefore when it is complete. Serial data links such as Modbus or Data Highway are of value for initial setup, but are too slow in this context for most real-time controls. 8. On the PTS (as opposed to the Mini-PTS) select the useage of specific inputs carefully. Choose inputs on a specific channel to be configured with defined inputs which run commands required on that particular channel. For example, if the speed of channel 2 needs to be incremented, choose an input on channel 2 to be configured with a defined input to execute the IP command. Some commands (like the reference input definition DR) must be specified on the respective channel. The use of debounce should also be taken into account since the DB command applies equally to all inputs on one channel (except not to DR and DS inputs). Don’t mix inputs which don’t require debounce with inputs which do on the same channel. 9. Declare variables in the autostart sequence. Before a sequence is executed, the PTS firmware will parse it to check it for obvious errors (like the sequence calling itself for example). If the sequence were to contain a statement SV$SPD before $SPD had been given a value, then it would not be able to execute. It is therefore good practice to declare variables in the autostart sequence by setting them to arbitrary values. See sequence 255 in worked example 1. Variables which are defined as associated variables in the operator’s panel, can be initialised on startup by selecting this option in the attribute menu. These variables don’t then need to be declared in the autostart sequence. 10. Define trigger variables in the autostart sequence, not as saved parameters. The definitions should be after each variable has been given its initial value; further definitions cover any trigger variables which are operator’s panel associated variables which are initialised on startup. This is because, when the PTS starts up, variables which are initialised on startup in the operator’s panel are written to with their saved values. If these variables are already defined as trigger variables, then the commands attached to these trigger variables will be executed on startup. This generally is not required. 11. ML commands can be in the autostart sequence, provided the channel bounds are fixed parameters. But note that ML for a differential map has a clean-up function for wrapped-around bounds, so may then be needed later. 12. Use upper case for the PTS program in the .PTS file. It is often necessary to search through a program file for occurances of specific commands. By forcing the search to be made specifically on upper case, the search will not select any comment characters. Copyright © 1995 Quin Systems Limited Page 83 PTS User’s Guide 7.9 Revision 2 Programming Tips 1. If an operation is required to take place at a particular point in a machine cycle, configure a position trigger output to switch on at this point and wire the output to an input on the PTS. Configure a defined input on the PTS to execute a command (or sequence) when the input becomes active. This approach is far more efficient than using a wait command and also allows phase advance to be applied to the position trigger output: refer to the PA command in the PTS reference manual for more details. Later firmware will allow the use of a virtual i/o bit. 2. If the display mode (DM) is not showing any reference errors when reference signals are known to be coming in, check to see if the SR reference window is active. This will filter out the reference signals if they come in outside of the SR window. The commands WF/DF/RP can also give a useful check. 3. If the display mode (DM) is showing too many reference errors per machine cycle, and the reference errors are varying, check to see if the marker pulse has been configured as a valid reference input with the DZ command. Electrical noise or a faulty sensor can give similar symptoms. 4. Don’t use variables with the following names: $V1, $V2 ....$V50 These are reserved for access from Modbus and Data Highway. $NUM, $MST, $MTR, $M00, $M01...$M99, $S00, $S01..$S99, $SIZ, $VMD, $ASM, $MSB, $SSB, $NPT, $VSM, $F00, $F01..$F99,$W01..$W99. These are reserved for use by the PTS map generator. Certain functions of the map generator also use $A01..$A99, $B01..$B99, $C01..$C99, $X01..$X99, $Y01..$Y99, $Z01..$Z99. 5. Don’t attempt to save parameters on the PTS (using the SP command) while sequences are being executed or if inputs are changing state. It is important to save a coherent set of values, fit to run from power-up. 6. In expressions, perform multiplications before divisions. Expressions are used to perform arithmetic operations on variables and constants. These both hold integer values. When a division is performed on two integers, any remainder is lost. By performing divisions on larger numbers, the remainder represents a smaller proportion and therefore the accuracy is improved. It is important to make sure, however, that during the evaluation of a lengthy expression, the intermediate result never exceeds 2 billion. The values are held as signed 32-bit numbers and an overflow could occur. In this case, perform divisions before the end of the expression to keep the intermediate result within 2 billion. 7. Don’t write to a trigger variable in the same trigger variable’s definition. For example $SPD>$SPD=1 Will force the trigger variable to execute continuously. Page 84 Copyright © 1995 Quin Systems Limited Revision 2 PTS User’s Guide 8. Don’t attempt to use the same digital input for more than one function by reassigning it. It is possible to undefine a limit switch input, for example, and to redefine it as a defined input or vice versa. However, since the current input configuration cannot be tested, it is possible for a program to attempt to undefine a limit input with a DI command if it has got “out of step”. This will stop a sequence with an error. If the same external signal has to be used for more than one function, link the signal to two inputs and define each input to perform a specific function. 9. The RM commands are not saved. If referencing is required on a channel at some point, then set RM to 1 in the starting sequence, usually after successful IN or IB, and use the reference word (RW) bit 0 to enable/disable the reference correction. 10. If maps are being written for the PTS, choose the map step carefully. If the map requires any short or steep acceleration ramps, choose a map step value which allows the ramp to be defined with several points. If only a few points are used, the acceleration ramps become a succession of step changes in velocity. Increasing the number of points unnecessarily will use up too much memory. 11. Make sure that channel commands are correctly used prior to I/O commands. On the PTS, the I/O is allocated per channel and II, CO, SO commands for example must be preceeded by the relevant CH command. This is less important with the Mini-PTS where the I/O is global. Many input definitions (like DR) and output definitions (like PO) still require the use of the correct channel command. 12. Use a short wait command (eg. WT32) between the PC command and the ID. This will allow the drive time to enable and for the motor to hold its position (and be stopped) before the ID command calcuates the require offset to the command signal to provide a small position error at standstill. 13. A logical AND can be performed on two or more inputs by using two II commands. For example CH1/II1+/II2+/VC+ will run channel 1 at a constant speed if both inputs 1 and 2 are high. 14. A logical OR can be performed on two or more inputs by using the II command on separate lines. For example CH1/II1+/VC+/BK CH1/II2+/VC+/BK Channel 1 will run at a constant speed if either input 1 is high or input 2 is high. The BK command at the end of the first line prevents the second line from executing if the first line has already executed. Copyright © 1995 Quin Systems Limited Page 85 PTS User’s Guide 8. Revision 2 Discussion of Worked Examples One of the best ways of learning is by example. The remaining section of this guide provides a discussion of worked examples. For each example, there is an introduction to the application followed by an explanation of how and why the PTS program has been written. 8.1 Worked Example 1 This example discusses the following PTS features. - the map generator - the operator’s panel - the use of trigger variables - position mapping - speed mapping - the use of a virtual channel - tension control - referencing - error handling - the use of variables and expressions - conditional program flow - defined inputs - logical operations - message handling The above features were required in order to control the motions and provide the operations of a printing machine which also included the control of unwinding and rewinding spools containing the print web. A Mini-PTS was used for the application. Page 86 Copyright © 1995 Quin Systems Limited Revision 2 PTS User’s Guide The figure shows a layout of the machine. Each major component of the machine is identified in the drawing. The machine unwinds paper tape from one spool and rewinds it, under controlled tension, on to the other spool. During this operation, printing can be performed on the tape. The direction of the tape can be reversed and its speed and tension can adjusted in process. The printing operation position synchronises to the motion of the tape and the print drum profile is calculated by the Mini-PTS to suit the print length and pitch settings as specified in the Operator’s Panel. . Spool Ch 3 Encoder Ch 4 Print Drum Ch 2 PEC Spool Ch 1 S-Wrap Some of the above PTS features will now be discussed 8.1.1 The Map Generator The Map Generator is an optional software module for either the Mini-PTS or the PTS. Its purpose is to calculate a position map from the values of specific PTS variables. Refer to the instruction manual for the Map Generator for details on exactly how to use this software. The software can only be used with the appropriate software key. Sequence 10, in the worked example, recalculates new values for the Map Generator variables prior to the map generation being triggered with the $MTR=1 command at the end of the sequence. The sequence uses PTS expressions to calculate new values for the master and slave variables $M01, $M02, $M03, $M04, $S01, $S03. These values are based on the values of the variables $LEN, $REG, $ECM and $PCM which are all specified through the Operator’s Panel. In this application, $ECM and $PCM are variables whose values are set through the Operator’s Panel. They represent the encoder counts per mm and the printdrum counts per mm, respectively. Since these need to be specified to an accuracy of 2 decimal places to provide sufficient accuracy in the expressions in sequence 10, a scale factor of 100 is used in the panel configuration. Refer to the Operator’s Panel Reference Manual for more details on scaling. A value of 65.79, for example, specified through the panel will write the value 6579 to a variable when a scale factor of 100 is used. Having scaled the value of one of the variables in this way, it is then necessary to divide the expression by the same scale factor to produce the correct result. This division is deliberately done at the end of the expression in order to provide the highest accuracy. See tip number 6. Copyright © 1995 Quin Systems Limited Page 87 PTS User’s Guide Revision 2 The map generator software takes a few seconds to calculate a new map: it runs at a lower priority than motor control, so takes longer if the motor task is busy. It is important to know when the generation is complete. Variable $MST is used for this purpose. When the map generation is complete, the map generator software writes to $MST either with an error code or with a value of 0 if the generation was completed successfully. By setting $MST up as a trigger variable, a sequence can be made to run when the map generation is complete. (In this case sequence 201). Sequence 10 also sets $MST to -1 prior to running the map generator. This value can never be set by the map generator itself and hence the value of $MST must change. Trigger variable $MST is undefined before setting its value to -1 to prevent anything being triggered. 8.1.2 The Operator’s Panel This machine is operated entirely from an Operator’s Panel. There are no pushbuttons. Associated variables in the Operator’s Panel configuration are defined as trigger variables in the PTS program. These trigger variables are not saved using the SP command. Instead, the trigger variables are defined when the autostart sequence (255) runs. This is to prevent the trigger sequences running on start-up because the associated variables are initialised on startup as part of the panel configuration.. See point 10 in the Good Programming Techniques section. The Application Pack disk contains the operator’s panel setup for this application TENRIG02.PAN. This can be downloaded to a PTS which has a software key to enable the Operator’s Panel feature. 8.1.3 Trigger Variables These are used to allow requests from the operator’s panel (from function keys and parameter adjustments from the display pages) to make the relevant motion changes through the PTS program. The commands following the trigger variables are both sequence executions and specific mnemonic commands. 8.1.4 The Use of a Virtual Channel A virtual channel has many uses. It can be used to simulate the presence of a motor for testing. It can be used as a master channel to which a slave has been mapped, thereby performing a single-axis motion profile whose cycle time is more adjustable than using a profile alone. In this application, the virtual channel is used to avoid a particular problem. Page 88 Copyright © 1995 Quin Systems Limited Revision 2 PTS User’s Guide The figure shows the machine layout. The print drum needs to be synchronised to the motion of the web. This is monitored by the encoder which is driven by the web. Instead of the print drum being position mapped directly to the encoder, it is position mapped to a virtual channel which itself is speed mapped to the encoder. This is done for the following reason. During printing, the print characters on the print drum must contact the paper. If the web is disturbed in any way during printing, then the encoder will be affected. If the print drum is directly mapped to the encoder, this would feed back to the motion of print drum. This would provide a closed loop with positive feedback! By speed mapping the virtual channel to the encoder, it is possible to apply speed averaging using the BT command. This averaging then filters out any encoder disturbances and the print drum channel can then be mapped to the now steady virtual channel. This use of a virtual channel can be extended to applications where a servodriven machine has to be synchronised to the motion of a large conveyor which, because of its size, will not necessarily be running smoothly. Providing, the amount of speed averaging is not excessive, these variations in conveyor speed can be filtered out without compromising the accuracy of the position synchronisation. 8.1.5 Tension Control This application makes use of the major tension control features. Their implementation in this application will now be discussed. Since the diameters of the unwind and rewind spools change as the paper is wound from one spool to the next, the speed ratio between the spools must vary. In order to keep the tension arm at a constant position, as this ratio changes, it is necessary to use integral gain in the tension loop. No differential term is used in this application. This is generally only required when the motors are poorly tuned and the use of a non-zero differential term then prevents the motor reacting to its own position errors. If servomotors are used and the inertias are well matched then the motor should be able to run and change speed with the minimum variation in following error. As a follow-on from the above point, it is also important that the following error does not change significantly with motor speed. If it did, then the motor would lag behind as the machine ramps up and the tension loop proportional gain would then be required to re-position the arm. Velocity feed forward should be used in the position loop for the slave (and the master if it is driven). This position loop tuning must be done prior to attempting to tune the tension loop. In an unwind/rewind application where integral gain must be used, it is also important to disable the integral term when the master is stopped. This is to prevent the arm stopping with a tension error which would then be integrated up by the integral gain term. The effect of this would be to slowly change the SM while the machine was stopped in an attempt to correct the arm position. Changing SM would not correct the arm position if the master is stopped and the net result would be an incorrect SM ratio when the master did in fact start up. This integral term disabling is done in sequences 111 and 112 by clearing bit 2 in the analogue word. Copyright © 1995 Quin Systems Limited Page 89 PTS User’s Guide Revision 2 The sense of the tension loop depends on the direction of web travel. Bit 7 is therefore inverted when the direction of the master is reversed. See sequence 102 and 104. In one direction, the slave must drive faster for a given tension error. In the other direction it must drive slower to correct the same tension error. Bit 6 in the analogue word is not direction sensitive. Once the control words have been fixed and for a given web wrap orientation on the spool (clockwise or anticlockwise), bit 6 can be fixed. This application uses the automatic SM calculation routine by having bits 4 and 5 set in the analogue word prior to executing the map on the slave when the machine is initialised in sequence 200. The high and low limits (AH and AL) for the analogue signal must be set on both the master and slave channels if both bits are set in the analogue word (later firmware uses the slave channel values and analogue port for both the measurements). The spools are driven at a speed specified by the value of the SS parameter when searching for the high and low limits while calculating the SM at startup. This value of SS specifies an angular velocity. The web speed (and hence the speed at which the arm moves) depends on the diameter of the spool. The value of SS has been chosen to provide an acceptable arm speed in the worst case when the spool is full. The value of DC is set deliberately high to prevent the spool (and hence arm) running on significantly while decelerating once the high or low point has been sensed. The value of SA is also used during these moves. The analogue error output facility is enabled using the AE command. This output signal, in this application, is linked back into a digital input on the Mini-PTS which has a defined input configured on it in order to run the tension error sequence 99. This allows the machine to shutdown cleanly and to display the appropriate high or low error message on the operator’s panel by comparing the analogue input to its setpoint. 8.1.6 Referencing A proximity is fitted to the machine to provide a once per revolution (once per print cycle) signal from the print drum. The proximity switches on when the print characters are at top dead centre. This allows it to initialise when it is off print. Printing takes place when the print characters are at bottom dead centre. The map is generated such that it is symmetrical and starts at a point half-way through the printing. The positioning of the reference proximity and the shape of the map forces an MF value to be set which is equal to half the bounds. Page 90 Copyright © 1995 Quin Systems Limited Revision 2 PTS User’s Guide As well as defining the zero position for the print characters on the print drum, the reference proximity also serves another function. The motor produces 4096 encoder counts per revolution. There is a gear reduction (provided by a single timing belt) of 76:30. This results in 10376.5333 encoder counts per revolution of the print drum. A non-integer value for a cycle length is typical in applications. Since a bound value can only be set to an integer value, a bound value of 10376 counts (without referencing) would result in a drift of 0.5333 counts per cycle. The use of referencing prevents this drift. The target for the print drum proximity is approximately 5mm long. The signal from the proximity therefore comes in at a different point in the cycle depending on which direction the machine is run. In order to compensate for this, a reference offset is applied to this channel when the machine is reversed. See sequence 104. 8.1.7 Error Handling The Mini-PTS handles tension errors by using the analogue error output AE as described above. The first line in sequence 201 tests the status variable $MST which is written to by the map generator software, an error message is reported and the sequence execution is aborted. 8.1.8 Conditional Program Flow The IF statement is used in a number of sequences to select appropriate error messages, to call specific sequences and to pause sequence execution until a particular requirement is met. Sequence 112 tests the machine speed by using the IF statement to keep the test looping (using the repeat command) until the speed is less than a critical value. Example Program 1: TENRIG02.PTS # Channel Definitions # 1 Right Hand Spool (Speed mapped to CH3 with tension loop) # 2 Print Cylinder (Position mapped to CH5 with map1) # 3 Left Hand Spool (Master) # 4 Encoder (Driven by web) # 5 Virtual axis (Speed mapped with averaging to CH4) # Program History # Date # Mar 95 # Apr 95 # # # Jun 95 Initials GCB GCB GCB Modification First written to specification Tuning modified Tension alignment problem solved Maximum speed increased Wind on function added Copyright © 1995 Quin Systems Limited Page 91 PTS User’s Guide # Operator Panel Variables # $DIR # $DSP # $ECM # $INC # $LEN # $MAX # $PCM # $POS # # $PRI # $REG # $RUN # $SPD # $STP # $TEN Revision 2 Web direction (1 = L to R) Display page 1, #field 3 Default Speed Setup menu 1 (Operation) Encoder counts/mm (x100) Setup menu 2 (Engineering) Inch start/stop machine Function key F2 Print length (mm) Setup menu 1 (Operation) Maximum speed (counts/s) Setup menu 2 (Engineering) Print counts per mm (x100) Setup menu 2 (Engineering) Position of print (rel to mark) Display page 1, field 4 Setup menu 1 (Operation) Print option (0=NO, 1=YES) Display page 1, field 2 Registration pitch (mm) Setup menu 1 (Operation) Run machine Function key F3 Current Required Speed Display page 1, field 1 Stop machine Function key F4 Tension set-point Display page 2, field 1 # Message List (Unqueued using associated variable $MSG) # 1 “Aligning tension arm” # 2 “Driving to print drum proximity” # 3 “Calculating print drum profile” # 4 “Calculating start-up ratio” # 5 “Machine initialised” # 6 “Machine running” # 7 “Machine inching” # 8 “Machine stopping” # 9 “Machine stopped” # 10 “Emergency stop contactor out” # 11 “Emergency stop released” # 12 “Tension error - high limit reached” # 13 “Tension error - low limit reached” # 14 “Machine power up complete” # 15 “Error generating map” # 16 “Channel 1 motor error” # 17 “Channel 2 motor error” # 18 “Channel 3 motor error” # PTS Variables # $AYC # $DEA # $DEC # $F00 # $F01 # $F02 # $F03 # $M00 # $M01 # $M02 # $M03 # $M04 # $M05 # $NEW # $NUM # $S00 # $S01 # $S02 # $S03 # $S04 Page 92 Current reading of AC Current reading of DA Snapshot speed of CH3 used in stopping Function code for printing (1 = constant velocity) Function code for limp (3 = sine-squared) Function code for limp (3 = sine-squared) Function code for printing (1 = constant velocity) Master position (start of map = 0) Master position (end of print) Master position (at half-cycle point) Master position (start of print) Master position (end of cycle = SB) Master position (end of map definition = 0) Set to force map recalculation if map parameter is #changed Map number Slave position (Start of map =0) Slave position (end of print) Slave position (at half-cycle point) Slave position (start of print) Slave position (end of cycle = SB) Copyright © 1995 Quin Systems Limited Revision 2 PTS User’s Guide # Sequence Definitions # 10 # 91 # 92 # 93 # 99 # 100 # 102 # 104 # 110 # 111 # 112 # 113 # 150 # 160 # 162 # 164 # 170 # 200 # 201 # 255 New Map Calculation Channel 1 error sequence Channel 2 error sequence Channel 3 error sequence Tension error sequence Start Machine Start machine (Right to Left) Start machine (Left to Right) Stop Machine Stop machine if not printing Stop machine if printing Check if master slowed down Inch start/stop machine Inch start machine Inch start (Right to Left) Inch start (Left to Right) Inch stop machine Initialisation sequence Continuation of initialisation after map generation Autostart sequence PM # Prepare for download ED # For edit mode # Global parameters AS255 # Run 255 on power-up DB0 # For quick action on analogue error DW00100000 # For absolute maps # Channel 1 Parameters (RH Spool) CH1 AC850 AH1300 AI41 AL400 AO4 AP40000 CW01010000 DC40000 KP300 KV1300 KF1660 KM0 OM325 MW00010000 SA40000 SB100000 SF1 SS8000 SV5000 # Set point # High limit # Integral gain for tension loop # Low limit # To allow PEC sensitivity signal on CH4 # Proportional gain for tension loop # Positive direction clockwise # For alignments # Position loop proportional gain # Position loop velocity feedback # Position loop velocity feedforward # Allows constant output signal ... # ... fixed by OM # Speed mapping # For alignments # Bound value not important # To allow analogue output on ch4 # For alignments # For jogging # Channel 2 Parameters (Print Cylinder) CH2 AV4 CT64 CW01100000 DC20000 DZ0 KP300 KV1300 # To smooth MB change # Ramp for startup # Positive direction clockwise # For alignments # Marker pulse not required # Position loop proportional gain # Position loop velocity feedback Copyright © 1995 Quin Systems Limited Page 93 PTS User’s Guide Revision 2 KF1660 MF5184 MW00010000 SA20000 SB10376 SS1000 SV5000 TO128 # Position loop velocity feedforward # To correspond with zero position # Speed mapping # For alignments # Rounded down: referencing is required # For alignments # For jogging # Prevents TO errors when MB changed # Channel 3 Parameters (LH Spool) CH3 AC850 AH1300 AL400 CW01010000 DC40000 KP300 KV1300 KF1660 MW00010000 SA40000 SB100000 SS8000 SV5000 # Set point # High limit # Low limit # Positive direction clockwise # For alignments # Position loop proportional gain # Position loop velocity feedback # Position loop velocity feedforward # Speed mapping # For alignments # Bound value depends on registration length # For alignments # For jogging # Channel 4 Parameters CH4 CW01100000 SB40000 # Positive direction anti-clockwise # Nominal bound value # Channel 5 Parameters CH5 BT4 MW00010000 VM1 # Speed averaging to smooth encoder jitter # Always speed mapped # Runs as a virtual master/slave # New Map Calculation ES10 $MSG=3 # "Calculating print drum profile" $MST> # Undefine to allow preset value to be given $MST=-1 # Preset to -1 prior to running mapgen $MST>XS201 Continue map generation $M00=0 # Master start position $M01=((($LEN/2+5)*$ECM)/100) # Half print distance (+5mm window) $M02=($REG*$ECM/200) # Half registration distance $M04=($REG*$ECM/100) # Registration distance $M03=($M04-$M01) # Start of print (+5mm window) $M05=0 # End of map definition $S00=0 # Slave start position $S01=((($LEN/2+5)*$PCM)/100) # Half print distance (+5mm window) $S02=5188 # Half bound value $S03=(10376-$S01) # Start of print $S04=10376 # Bound value $F00=1 # Constant speed for printing $F01=3 # Sine-squared for limp $F02=3 # Sine-squared for limp $F03=1 # Constant speed for printing $NUM=1 # Map number CH2/ST # Make sure map isn't being used $MTR=1 # Trigger map generator Page 94 Copyright © 1995 Quin Systems Limited Revision 2 PTS User’s Guide # Channel 1 error sequence ES91 GF # Stop all motors # Channel 2 error sequence ES92 GF # Stop all motors # Channel 3 error sequence ES93 GF # Stop all motors # Tension error sequence ES99 CH1/$DEA=DA # Read DA value CH1/$AYC=AC # Read set-point IF ($DEA>$AYC)/$MSG=12/EL/$MSG=13 # Display appropriate message # Start Machine ES100 IF ($DIR==0)/XS102/EL/XS104 # Determine correct direction # Start machine (Right to Left) ES102 CH1/AW1xxxx1xx # Correct sense of tension loop & integral CH2/RF0 # Initialises in R to L direction CH3/SV($MAX*$SPD/100)/VC+ # Start machine $MSG=6 # "Machine running" IF ($PRI==1)/CH2/XM1/EL/CH2/ST # Map print drum on clutch if required # Start machine (Left to Right) ES104 CH1/AW0xxxx1xx # For correct sense of tension loop CH2/RF945 # Compensates for size of target CH3/SV($MAX*$SPD/100)/VC# Start machine $MSG=6 # "Machine running" IF ($PRI==1)/CH2/XM1/EL/CH2/ST # Runs CH2 on clutch if required # Stop Machine ES110 $MSG=8 IF ($PRI==0)/XS111/EL/XS112 # "Machine stopping" # Stop off-print if printing (cycle stop) # Stop machine if not printing ES111 CH3/ST # Stop machine CH1/AW1xxxx0xx # Turn off integral gain $MSG=9 # "Machine stopped" # Stop machine if printing ES112 CH3/$DEC=DV # Read current master speed IF ($DEC<0)/$DEC=($DEC*-1) # Take modulus in case its going backwards IF ($DEC>8000)/CH3/SV8000 # If greater than 8000 then reduce to 8000 IF ($DEC>8000)/XS113/RP # Wait until speed is less than 8000 CH3/WI1:1+/ST # Wait until off-print then stop CH1/AW0xxxxx0xx # Turn off integral gain $MSG=9 # "Machine stopped" Copyright © 1995 Quin Systems Limited Page 95 PTS User’s Guide Revision 2 # Check if master slowed down ES113 CH3/$DEC=DV # Read current master speed IF ($DEC<0)/$DEC=($DEC*-1) # Take modulus in case its going backwards # Inch start/stop machine ES150 IF ($INC==1)/XS160/EL/XS170 # Start or stop machine # Inch start machine ES160 IF ($DIR==0)/XS162/EL/XS164 # Use correction sequence for direction # Inch start (Right to Left) ES162 CH1/AW1xxxx1xx CH2/RF0 CH3/SV2000/VC+ $MSG=7 IF ($PRI==0)/CH2/ST # Correct sense of tension loop & integral # Initialises in R to L direction # Set jog speed then run # "Machine inching" # If not printing, make sure CH2 not mapped # Inch start (Left to Right) ES164 CH1/AW0xxxx1xx CH2/RF945 CH3/SV2000/VC$MSG=7 IF ($PRI==0)/CH2/ST # Correct sense of tension loop & integral # Compensates for size of target # Set jog speed then run # "Machine inching" # If not printing, make sure CH2 not mapped # Inch stop machine ES170 $MSG=8 CH3/ST CH1/AW0xxxxx0xx $MSG=9 # "Machine stopping" # Stop machine when F3 released # Turn off integral gain # "Machine stopped" # Initialisation sequence ES200 CH3/II1:8-/$MSG=10/BK # E-stop contactor out CH1/ST/PC/WT32/ID # Enable drive for RH spool CH2/ST/PC/WT32/ID # Enable drive for print cylinder CH3/ST/PC/WT32/ID # Enable drive for LH spool CH5/PC/XM0 # Speed mapped to encoder CH2/RW0 # Prevent any referencing CH2/MW00010000/SM2775/7958/XM0 # Speed map to match web speed $MSG=4 # "Calculating start-up ratio" CH3/SS8000 # Slow speed for start-up calculation CH1/SS8000 # Slow speed for start-up calculation CH1/MI1:7 # To prevent tension errors CH1/ST/AM1/AW11110001/XM0 # Calculate ratio CH1/EI1:7 # To allow tension errors $MSG=1 # "Aligning tension arm" CH1/DC100000 # High decel for small decel distance CH1/ST/AW11000001/SS1000/XM0 # Accurate alignment CH1/DC40000 # Normal decel value $MSG=2 # "Driving to print drum proximity" CH1/DC40000 # For normal running CH3/SV8000 # Slow speed for initialising CH3/VC+ # Run web forwards (right to left) CH2/WI1:1-/WI1:1+/WI1:1# Wait for prox to switch on CH3/ST # Stop web CH2/ST/SV1000 # Take out of mapping CH2/VC-/WI1:1+/WI1:1-/ST # Drive off proximity Page 96 Copyright © 1995 Quin Systems Limited Revision 2 CH2/RW00001000/RM1/IN+ CH2/RV5/RW1 IF ($NEW==1)/XS10/EL/XS201 PTS User’s Guide # Initialise to proximity # Running referencing commands # Calculate new map if required # Continuation of initialisation after map generation ES201 IF (($NEW==1) && ($MST!=0))/$MSG=15/BK # Stop if new map not correct $NEW=0 # New map not required next time CH5/SB$MSB # Set new master bound $MSG=1 # "Aligning tension arm" CH1/ST/AW11000001/SS1000/XM0 # Accurate alignment CH2/MP$MSB/MW1/SM1/1 # Tell slave new bound master bound then map $POS>CH2/MB($POS*$MSB/360) # To allow CH2 phase change as degrees $MSG=5 # "Machine initialised" # Autostart Sequence ES255 $SPD=$DSP # Set required speed to default speed CH1/$AYC=AC # Current set-point CH1/$DEA=DA # Current DA CH1/ML3 # Fixed master/slave relationship CH2/ML5 # Fixed master/slave relationship CH5/ML4 # Virtual master/slave always mapped to 4 CH2/RM1 # Referencing required on print drum CH4/RM1 # Referencing required on encoder (PEC) $NEW=1 # Force new map generation $DEC=9000 # Declare value for $DEC $MST> # Continue map generation $INI>XS200 # To initialise machine $INC>XS150 # To inch start/stop machine $RUN>XS100 # Start machine $STP>XS110 # Stop machine $SPD>CH3/SV($MAX*$SPD/100) # To set speed as % of maximum $TEN>CH1/AC(($TEN*9)+400)/CH3/AC(($TEN*9)+400) $REG>$NEW=1 # Force map generation during init next time $LEN>$NEW=1 # Force map generation during init next time CH3/II1:8-/$MSG=10/EL/$MSG=14 # Startup message # Input Definitions CH2/DR1:1+ CH3/DI1:7+/GF/GX/XS99 CH3/DI1:8-/GF/$MSG=10 CH3/DI1:8+/$MSG=11 # Reference input for print cylinder (prox) # Tension error # If E-stop contactor drops out # E-stop released # Output Definitions CH1/AE1+ # Tension error output GO # To take out of edit mode Copyright © 1995 Quin Systems Limited Page 97 PTS User’s Guide Page 98 Revision 2 Copyright © 1995 Quin Systems Limited Revision 2 PTS User’s Guide Index : prompt > prompt 1:1 mapping 9 9 72 A AB abort absolute position format absolute zero position acceleration alignment move analogue offset auto-correction auto-referencing autostart sequence 15, 25, 45 15 47 53 18 67 10 55 53 58 B binary number bounds brake 55 24, 44, 45, 53, 62, 70 8, 15 C cam switch 43 CH 59 change channels 59 changing velocity while moving 18, 46 clear output 36 clock set 7 CO 36 combined sequences 31 command string 25 cycle length 24, 43, 52, 53, 62 cyclic system 23 D dancing arm datum DE define error output input function limit switch input position trigger output reference input delay 73 52 38 38 35 8 44 12 28 delimiter demand offset DF DI display input state measured velocity position reference error time DL DM DP DR drive inhibit drive offset DT DV dwell 25 10 54 35 40 69 27 54 7 8 21 27 12 8 10 7 69 28 E E error message EM emergency stop enable relay enter map profile sequence EP error messages E F G L R T U error reporting error signal errors during a move ES execute command on external signal commands while moving map sequence external switches Copyright © 1995 Quin Systems Limited 7 65 15 22 65 51 29 51 7 13 21 8 13 22 37 38 38 21 29 35 46, 54, 67 67, 70 29 34 Page 99 PTS User’s Guide Revision 2 F F error message fault condition filename convention filtering out extra reference signals FM following error free memory 13 38 78 56 51, 68 21 51 G G error message 21 I I prompt ID IN initialise demand offset initialise position 14 10, 20 14 10 14 L L error message LI limit on auto-correction limit switches line shaft linear interpolation linear machine linear ratio link slave axis to master axis list input and output definitions sequence loop LS lug belt Page 100 11 61 65 51, 68 66 15, 45 21 8, 9, 15, 21, 38, 72 22 9 16 45 16 16 23 16 65 58 30 67 N 8 39 56 8 72 65 23 64 66 39 32 25 32 23 M M prompt MA machine cycle map alignment move link size limit step word Map Generator map zero marker signal master axis master map division memory space ML MO motor errors motor off motor off relay motor runaway move absolute at constant velocity relative move profile move range MR MS multi-axis system prompts multi-line sequence MW 16 16 23 67 66 65 65 67 87 72 nested sequences new application NM normal mode numbered sequence 31 79 13 13 29 O offset On-line Programming Operator’s Panel 10 81 88 P parallel operation parameter save password pause PC PLC control PM PO position control position error position mapping position offset position switch 60 13 7 28 9 34 7 43, 44 9 21 63 20 43 Copyright © 1995 Quin Systems Limited Revision 2 position trigger output position window power supplies privileged mode product registration profile velocity Program Structure Programming Tips prompt characters : > I M X PTS Toolkit software PV PTS User’s Guide 43 20 38 7, 37 52 47, 50 77 84 9 9 14 16 67 76 50 R R error message RD read data from nvm read input(s) recursion reference correction reference error reference input reference mode reference options reference position reference word relative position format relay repeat command line repeat in a sequence restricted command reversed encoder RI RM RO rotary machine RP runaway RW 12, 52, 22, 13, 55, 13 37 37 40 31 55 54 53 54 55 53 55 47 38 25 30 37 9 40 54 54 23 25 9 56 S SA save parameters saving input line definitions maps 14, 18, 50 13, 33 sequences SB SE separator set acceleration bounds map step position error profile velocity reference correction limit timeout velocity window set bounds in mapping set output set position control mode setting the clock simultaneous motion slave axis SO software cam software clutch software gearbox SP 13, speed control SR ST 15, 25, stop stop on external signal stored sequence string of commands SV 14, SW switch channels S-wrap rollers 33 24, 44, 70 21 25 67, 33, 37, 45, 70, 15, 70, 18, 46, 20, 18 24 65 21 50 56 22 18 20 64 36 9 7 60 61 36 47 70 61 68 45 56 72 72 37 29 25 50 27 59 74 T T error message tension control time between profile points time set timeout TO trapezoidal move triangular move trigger variables TS 22 73, 89 50 7 22 22 16 16 88 7 37 68 Copyright © 1995 Quin Systems Limited Page 101 PTS User’s Guide Revision 2 U U error message UL unlink using inputs in sequences 37 70 70 41 V VC velocity velocity control velocity profile vibration virtual channel 45 18 45 47 47 88 W wait for input wait for time wear WI worked examples WT 41 28 47 41 86 28 X X prompt XM XS 67 67, 70 29, 30, 31 Z zero position Page 102 11, 14, 53 Copyright © 1995 Quin Systems Limited