1
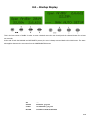
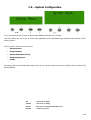
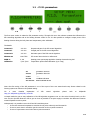
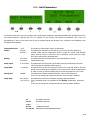
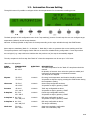
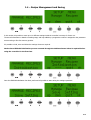
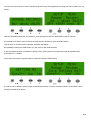
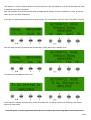
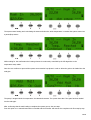
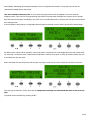
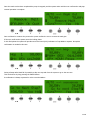
User Manual
Version 2.6.62
The objective of the project described in this manual is the mashing schedule and process automation for “all grain” beer
production with a single vessel (BIAB/RIMS) system.
“Open Ardbir” is largely inspired by the original project formerly “Braudino” by Stephen Mathison and then further
upgraded and modified by Mike Wilson under the “Mike’s Brewery” appellation.
The micro controller “Arduino Uno” is, like in the original project, at the core of the automation process and can be
used in both a fully automatic or manual mode. The controller automates all the phases from mashing in the grain to
boiling the wort, this includes any required hop additions. The controller delivers all these capabilities in a simple easy to
follow and logical manner for beginner and advanced home-brewers alike. The system interacts and can be programmed
via 4 Push Buttons, and an LCD feeds back all the relevant information the user needs in all the phases, whether used
while setting or running the system. The “Original Braudino” shield was developed in order to connect a Temperature
Probe; SSR relay for controlling a heating element; Pump Relay; Signal Buzzer; along with the LCD display and 4 Push
Buttons. This original shield is what has been referred to above as having been modified and upgraded by Mike Wilson.
From a HW perspective the code should be adapted in order to support the correct LCD display 16x2 or 20x4. This option
is configurable inside the sketch. In order to enable one or the other display the user should modify the sketch through
the Arduino IDE searching for (Ctrl+f) LCD* as the search string and then apply the modifications below in both sections:
// SETTING LCD*****
// Select your LCD
// LANGUAGE ITA
#include "LCD16x2_ITA.h"
//#include "LCD20x4_ITA.h"
// LANGUAGE ENG
//#include "LCD16x2_ENG.h"
//#include "LCD20x4_ENG.h"
…...
// SETTING LCD*****
lcd.begin(16,2);
// lcd.begin(20,4);
User should remove // before the #include and lcd.begin statement for the correct size LCD and add // before the
incorrect size LCD.
Moreover it’s possible to select Italian or English language in the same way modifying the first LCD section
The same procedure should be repeated in order to select the HW version of the controller Shield.
The proper section for this type of settings is the following:
// SETTING PCB*****
// Select your PCB Version
#include "Pcb_Brauduino_DanielXan.h"
//#include "Pcb_Brauduino_Original.h"
Finally some mandatory additional libraries are needed in order to properly compile the sketch.
These libraries can be easily downloaded from the Arduino official site: http://arduino.cc
Onewire: http://playground.arduino.cc/Learning/OneWire
PID_v1: http://playground.arduino.cc/Code/PIDLibrary
WARNING:
First step to be performed in order to guarantee the right system operation is the system
configuration and reset of EEPROM in order to correctly manage recipe storing. Please
read the proper section for the right parameter configuration
Let’s see the step by step configuration taken through the push button and display menus:
1/18
0.0 – Startup Display
This is the boot screen of ArdBir. In order to enter a desired menu the user should push the selected button for at least
two seconds.
At the end of both the MAUNAL and AUTOMATIC process, the user is always returned back to this initial menu. The same
also applies whenever the user exits from the CONFIGURATION menu
UP
DOWN
START
ENTER
---MANUAL program
AUTOMATIC program
SYSTEM CONFIGURATION
2/18
1.0 – System Configuration
A user can access the set up menu by pressing the ENTER push button for 2 seconds.
This menu allows the user to set up all the basic parameters and configurations that decide the final behavior of the
brewing system.
The set up menu allows the user to access
•
PID parameters
•
Unit parameters
•
Process Automation Set Up
•
Recipe Management
•
Credits
By selecting the UP and DOWN push buttons the user can scroll through menus and a selection can be confirmed by
pressing ENTER.
UP
DOWN
START
ENTER
Sub-menu scrolling
Sub-menu scrolling
Exits from CONFIGURATION menu
Confirm Selection
3/18
1.1 - P.I.D. parameters
The first menu section is related to PID parameter tuning. Through this menu the relevant constant that influences the
PID controlling algorithm and so the heating element control is set. It is also possible to configure output power of the
heating element during the boil phase and temperature probe calibration.
The details:
Constant P
-100 100
Proportional part of the PID control algorithm.
Constant I
-100 100
Integral part of the PID control algorithm.
Constant D
-100 100
Derivative part of the PID control algorithm.
Window ms
1000-7500
PID control time window in millisecond.
PWM %
0-100
Heating power percentage applied to heating element during boil.
Calibration
-5,00° 5,00°
Temperature probe offset calibration (0,10° step)
UP
DOWN
START
ENTER
UP+DOWN
parameter increase
parameter decrease
----Confirm selection
Exit from PID menu
Note: that fine tuning of the PID parameter is out of the scope of this user manual and many factors related to the
brewing system can influence the optimal setting.
For
a
more
detailed
explanation
http://en.wikipedia.org/wiki/PID_controller
of
PID
control
algorithm
please
refer
to
Wikipedia
A simple method to get an easy calibration of the PID algorithm suggests to set to 0 the value Ki and Kd and try to fine
tune only the Kp that allows the PID to get as close as possible to set point trying to minimize the difference between
actual temperature and set point.
Subsequently it is possible to tune the kI and kD considering that:
• In case the measured temperature overshot the set point reduce Kp and Increase kD
• In case to much time is needed to get the controller to the set point increase kI
• In case of a permanent error below the set point increase kI
4/18
1.2 – Unit Parameters
Through this section the user can configure the overall system parameters and global variables that will affect the end to
end system behavior. Typically this set up is specific for the brewery and should be performed once. There are
dependencies in some of the choices and so not all reported values are allowed, some consistency and validation rules
are applied automatically.
Temperature Unit
°C/°F
It’s possible to select either Celsius of Fahrenheit.
Sensor
Internal
External
This parameter should be set according to the sensor's physical placement.
Internal means that the temperature probe is inside the Vessel, while External
means that the sensor is external in the recirculation circuit (near the pump).
This choice will influence pump behavior.
Boiling
90°-105°C
194°221°F
This parameter sets the boiling point. It is automatically set in both
measurement units.
Pump Cycle
5-15 minutes
This parameter sets the pump cycle duration once the temperature has been
reached during the automatic mashing cycle.
Pump Rest
1-5 minutes
This parameter sets the rest pump time between one cycle and another. This rest
period is also influenced by temperature so in case there is a drop of temperature
in order to preserve enzyme integrity the pump will start again for a new cycle.
During Boil
ON/OFF
This parameter indicates whether the pump is ON or OFF during boil.
In the case of selecting an external sensor the choice is always disabled.
Pump Stop
80°-(105)°C
176°-(221)°F
This parameter controls the maximum working pump temperature.
In the selectable range it is equivalent to the 'Boiling' temperature parameter
set.
In the case of selecting an external sensor the choice is always disabled.
UP
DOWN
START
ENTER
UP+DOWN
parameter increase
parameter decrease
----Confirm selection
Exit from System Parameter menu
5/18
1.3 - Automation Process Setting
Through this menu it’s possible to configure all the relevant parameters for the automatic mashing process.
The basic principle of this configuration menu is the “step mashing” process. For each step the user can configure target
temperature (SetPoint) as well as step duration.
Moreover it’s always possible to skip some of the steps according to the recipe schedule through the START button.
Some steps are mandatory (Mash In – A-Amylase 2 - Mash Out) in order to guarantee the correct mashing work flow.
The system performs some integrity checks and tries to avoid user mistakes during configuration: if some input values
are not logical (e.g. a step with lower SetPoint than the previous one) the step is automatically skipped.
The only exception is the first step after “Mash In” where the temperature can be set up to 3.5°C lower.
Here is the full steps list:
PHASE
Mash-In
TEMPERATURE
20°-75°C
68°-167°F
DURATION
-----
DESCRIPTION
The strike temperature for the “Mash In” start phase should be
entered.
No duration is foreseen since unless the grains are added (and
confirmed) the temperature is maintained constant.
This step can’t be skipped.
Phytase
25°-55°C
77°-131°F
1-140min
First step, both temperature and duration should be entered.
It’s possible to skip the step by pressing the START button during
the temperature setting
Glucanase
35°-50°C
95°-122°F
1-140min
Second step configurable as above.
It’s possible to skip by pressing START
Protease
45°-60°C
113°-140° F
1-140min
Third step configurable as above.
It’s possible to skip by pressing START
B-Amylase
50°-70°C
122°-158°F
1-140min
Fourth step configurable as above.
It’s possible to skip by pressing START
A-Amylase 1 60°-76°C
140°-168,75°F
1-140min
Fifth step configurable as above.
It’s possible to skip by pressing START
A-Amylase 2 60°-76°C
140°-168,75°F
1-140min
Fifth step configurable as above.
This step is mandatory
Mash-Out
1-140min
Sixth step completely configurable.
Mash out is mandatory step.
75°-80°C
167°-176°F
6/18
PHASE
N° Hop additions
DURATION
DESCRIPTION
This parameter indicates how many hop additions are foreseen during
the boil phase. Up to 10 are allowed.
Boil Duration
1-180min
This parameter sets the total boil time required and starts timing only
after boiling temperature is reached.
Hop(x)
0-180min
This parameter set the time that the hops will remain on the boil.
The setting it must to be done from the first hops to the last entered.
This operation must be repeated for all hops expected
Example for the management of hops:
If you do a boil for 60 minutes, and you want to have 4 hops in boiling for 5, 10, 15, 50 minutes you have to set:
Num of Hops: 4
Boil time: 60
Hop 1:
50
Hop 2:
15
Hop 3:
10
Hop 4:
5
The counting time is a countdown and time indicated for the hops indicates exactly how much remains in boil
UP
DOWN
START
ENTER
UP+DOWN
parameter increase
parameter decrease
Next Step
Confirm selection
Exit from Automatic Process Setting Menu
7/18
1.4 – Recipe Management and Saving
In this section it's possible to save up to 10 different settings inside the controller's memory for future use.
The stored information is related to mashing steps, and hop additions, a progressive number is assigned to the parameter
sets according to first free memory position.
It’s possible to load, store and delete the settings whenever required.
Notice that a EEPROM initialization process accessed through the dedicated menu below is required before
using the controller for the first time.
Once the EPPROM initialization has been performed it’s possible to start saving the settings operations.
8/18
The user can enter a name in order to identify the specific recipe using alphanumeric string with max 10 chars (a-z ,0-9,
space).
With the UP/DOWN push button it's possible to scroll through the char list, and ENTER is used for selection.
It's possible to correct the name of the recipe while entering characters, press the START button.
This will allow us to move back one position and make the change.
By repeatedly pressing the START button you can return to the initial character.
It 'also provided a shortcut to facilitate the placing of the missing spaces to complete the name by simultaneously
pressing the UP + DOWN.
At the end the full name composed must be confirmed using the START button.
In order to load or delete a specific recipe the ENTER push button is used for selection while the confirmation is done
through the START push button.
9/18
Below are the details of a recipe loading screenshot:
And a recipe deletion screenshot:
UP
DOWN
START
ENTER
UP+DOWN
Parameter Increase
Parameter decrease
Confirm Operation Loading /Saving/ Deleting /Recipe Name
Selection Confirmation
Exit from recipe automation menu
10/18
2.0 – Manual Process
The Manual Process allows the user the full control of the entire mashing process by allowing the manual selection of
temperature settings, and the switching ON/OFF of both pump and the heating element at will.
Temperature control will be performed automatically through the PID control that will try to reach the manual set point.
The LCD display will report the manual SetPoint temperature and current temperature. An automatic timer is started
when the measured temperature reaches the set point. Any set point change will reset the timer if the set point
temperature is 2°C greater than measured temperature. The 2°C hysteresis has been added in order to avoid the timer
resetting due to small temperature changes.
During the boil phase that starts when temperature reaches the values configured in the system settings menu, only the
current temperature is reported on the LCD and it’s possible to regulate the heating element power with UP/DOWN
button, the % of power used is shown on the LCD.
UP
DOWN
START
ENTER
UP+DOWN
Temperature/Power Increase
Temperature/Power Decrease
Heating Element ON/OFF
Pump ON/OFF
Exit from Manual Process
11/18
3.0 – Automatic Process
The automatic process: Automation is the real “core” of the system and the controller executes in sequence all the steps
previously configured in the Automatic Process Settings menu.
3.1 – Delayed Start
It’s also possible to program the brew day through a delayed start so the user can fill the vessel with water and decide to
postpone the initial heating phase.
The controller asks if the user wants to postpone the start and if “Yes” the amount of delay required in minutes should be
entered.
In the case of the immediate start being selected the controller's normal sequence will be started.
12/18
3.2 – Recovery of previous brew session
If a previous run has for some reason been aborted, the system will asks the user if he wants to recover the previous
process. In an affirmative case the system will restart exactly from the step where the process had been aborted,
otherwise the system will start from the first mashing step.
3.3 – Water addition
The first step is “Mash In” and the system asks explicitly if the proper amount of water has been added into the vessel:
A positive answer to this question allows the process to continue otherwise the user is returned to the initial menu.
In order to allow proper wort recirculation the pump is initialized and primed with a few short ON – OFF cycles.
13/18
This operation is useful to expel air bubbles from around pump circuits and impellers. At the end of this phase the pump
is started and the water recirculated.
After this operation the automatic process starts operating and the heating element is switched on in order to heat the
water up to the set strike temperature.
In the case of a delayed start having been programmed the user is requested to enter the value of the delay in minutes.
Once the delay has been programmed and confirmed the system enters into a standby mode:
A countdown will be displayed on the LCD:
At the end of the standby period an alarm sounds and notifies the user that the process has started and the heating
element is switched ON.
From this point on all the operations follow the same common processes regardless of the initial choice.
14/18
The system starts heating and recirculating the water and when the strike temperature is reached the system enters into
a paused/loop status.
While waiting for the confirmation the heating element is continuously controlled by the PID algorithm so the
temperature stays stable.
Once the user confirms to proceed the system enters another loop phase in order to allow the grain to be loaded into the
malt pipe.
The pump is stopped while the temperature is maintained constant. The system then asks if the grain has been loaded
into the malt pipe.
After confirming that the malt loading is complete the system goes to the next step.
From this point on no manual intervention is needed and the controller will execute the complete work flow step by step
15/18
automatically maintaining the mashing temperature for the configured time duration. The pump cycle will also be
controlled accordingly during this period.
One note related to the pump rest: In some cases a programmed rest will be skipped or last more than the
configured value. This is due to the programming logic where the pump starts working at the set point for the specific
step and enters its rest time accordingly to the value set in its initial setting menu, however this rest time is also linked to
the heating process.
If the temperature drops below a configurable threshold both the heating element and the pump will be started again.
An alarm buzzer sounds and an indication of the pump status is reported on the LCD display when the rest period starts.
For each step a countdown timer is started when temperature reaches its set point. A beep will sound to advise the user
5 seconds before the step ends.
Before the Mash Out step the process will stop with a prompt in order for the user to check for full starch conversion.
This next step is called the “Iodine Test” and the temperature settings are maintained the same as the previous
step.
The phase will be completed by pressing START.
16/18
Once the mash out has been completed the pump is stopped, and the system waits until the user confirms the malt pipe
removal operation is complete.
Once confirmed to continue the process the system notifies the user to remove the malt pipe.
If the user confirms the system enters the boiling phase.
In this final phase the system will provide sound and visual (LCD) indications of hop addition requests. No explicit
confirmation is needed in this case.
During all steps after Mash IN it’s possible to skip one step and force the system to go to the next one.
This can be done by long pressing the ENTER button.
A confirmation is always requested in order to avoid mistakes.
17/18
It's also possible to put the automatic mode in PAUSE by holding down the START button for a few seconds
To resume automatic operation you press and hold down the START button again.
At the end of the entire process the system defaults back to its initial settings.
During the process the push buttons will be used for the following operations
UP
DOWN
START
START
ENTER
UP+DOWN
Parameter Increase
Parameter decrease
Step confirmation
PAUSE/START (long press)
Selection confirmation/Step Skip (long press)
Exit Automatic Menu
18/18