1
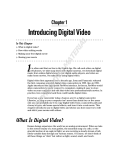
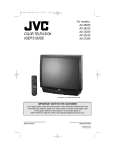
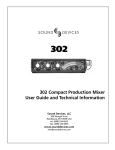
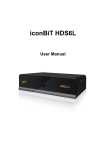
05 3781 ch04
4/28/05
11:25 AM
Page 99
C HAP TE R
4
Lights, Camera, Action!
The incredible, morphing PC never ceases to amaze me.
Clever software programmers and hardware engineers just
keep finding new and exciting roles for it to fill. In this chapter you’ll discover how video gear you might already own,
combined with editing software, a CD or DVD burner, and
some attachments, can transform your home PC into a moviemaking studio.
All the magic starts by getting your home videos off tape and
onto your PC’s hard disk. After mastering the basic skills
needed to accomplish this, you’ll learn how to
• Edit video clips
• Stitch clips together to create compositions
• Add titles and transitions
• Make a variety of enhanced video files and discs
designed to play on a PC or DVD player
05 3781 ch04
100
4/28/05
11:25 AM
Page 100
Family Computer Fun
Here’s a roadmap of what lies ahead:
• Learn how to capture video using a digital
camcorder or analog VHS/Hi8 gear and
store it on your PC’s hard disk
• Learn how to transfer old analog video
tapes to a digital camera
• Learn how to edit digital video clips using a
program called MyDVD (free trial version
available)
• Create a Video CD (VCD) or DVD using MyDVD
with menus that will play on a DVD player
Skills and Gear Check
If you know how to operate a PC, digital camcorder, Hi8 analog camcorder, or VHS player,
you’re ready to go.
Materials
For the projects in this chapter you’ll need
• A modern Windows XP personal computer.
Video editing and production is a powerhungry task for your PC. The more power
you have, the less time it takes to apply edits
and special effects. Ideally, you should have
a Pentium 4 processor operating at 3GHz or
higher or a laptop with a Pentium M processor running at 1.8GHz or higher.
• High-speed connection to the Internet to
download the trial MyDVD software.
• A standard USB 2.0 high-speed port (this
applies to VHS or Hi8 tape users who will
be directed to purchase a video recording
adapter).
• A standard high-speed FireWire (also called
1394 or i.Link) port for digital camcorder users.
$
Open Wallet
Alert
This chapter contains projects that require
the purchase of gear needed to link a digital camcorder, VHS player, or Hi8 camcorder
to a PC.
Digital video camcorder owners are looking
at an investment of around $40 if their PC
is not already equipped with a FireWire
port. Add about $20 if your digital camcorder did not include a FireWire cable
(you’ll learn all about this later).
VHS or Hi8 analog tape users are looking at
a potential investment of around $30 for a
USB 2.0 adapter (if their desktop PC does
not have this built in). Analog tape users will
also need around $100 to $200 for a
video-capture device (which can be an
external box or an internal adapter card).
That said, analog tape users who purchase
or own a digital camcorder can use patch
cables costing less than $10 to transfer all
their VHS and Hi8 tapes to digital tapes
and then pursue the digital camcorder projects in this chapter.
In either case, to go for the ultimate home
movie and to produce DVD discs, you must
have a DVD burner installed in or connected
to your PC. Check your desktop or laptop; if
it’s brand new, you might have one already
built in. If not, get ready to spend from
$100 to $200 to add this feature.
There’s no way to avoid these investments,
but I’ve made every effort to select modestly priced sample products.
05 3781 ch04
4/28/05
11:25 AM
Page 101
CHAPTER 4
Lights, Camera, Action!
101
• Built-in or externally connected CD and/or DVD burner to create final productions
that can be played on a PC or DVD player.
• Blank CD and/or DVD discs.
Analog Versus Digital Video
If you boil it down to the roots, the world of video is divided into two camps—analog and
digital. (Beyond that, you have multiple standard and high-definition video standards
and plenty of digital video file formats.)
Analog camcorders and VCRs record video and
audio input in a form that differs from the codes
used in digital video. I could launch into a science
lesson, but let’s cut to what you need to know right
now: Each time you make a copy of an analog tape,
you lose quality. And time, moisture, sunlight, and
so on gradually deteriorate analog tapes. That’s why
going digital rocks. You can convert analog video to
a format based on a digital code and, in effect, stop
the march of time. And tapes made with a digital
camcorder, of course, are digital from the get go.
Some digital camcorders use the same tapes as
those needed for a Hi8 analog camcorder. New digital tape camcorders typically use the mini-cartridge
format. But here’s the kicker—whatever size tape
your digital camcorder employs, images and sound
are recorded using a digital code.
Digital video offers lots of advantages, including
• Video and sound can be duplicated without
loss of quality
• Better overall image quality
• Ability to quickly capture and transfer from a
digital video camcorder to your PC where you
can edit it easily
What’s the downside? Whether your source tapes
are analog or digital, when you capture them to
your PC, they create very large files. For example,
it can take more than 4GB to store one hour of
DV-AVI-quality video (the highest recording setting
note
If your family video
memories are on VHS
or Hi8 tapes, you’re in trouble! Imagine
discovering one day that your baby’s
first steps, your wedding, your son or
daughter’s first T-ball home run are lost
forever. Experts tell us that traditional
analog video tapes (VHS, Super VHS,
VHS-C, and Hi-8) may deteriorate to
the point of being unwatchable in as
little as 10 years.
The tools and techniques in this chapter can be applied to help preserve
your old VHS or Hi8 camcorder video
treasures and create new digital heirlooms stored on CDs or DVD discs.
note
Today, digital video
camcorders use three
ways to save movies. Until very recently
the world of digital video camcorders
included models that recorded movies
directly to either tapes or miniature DVD
discs. Most models today record to
either MiniDV or Digital8 cassette tapes.
New models that write video files to onboard hard disks are also now coming
to market. These cutting-edge models
make it even more convenient to quickly
transfer digital video files to a PC.
05 3781 ch04
102
4/28/05
11:25 AM
Page 102
Family Computer Fun
used today with PC video recording software, and the format recommended if you plan
to edit your video files). File sizes vary by format. For example, the MPEG-2 format delivers high quality video with much smaller file sizes. However, DV-AVI is the preferred format for PC-based video editing.
Project: Use FireWire to Connect a Digital Camcorder
to a PC
There’s a lot to love about the technology we call FireWire. First, it makes it super easy
to patch your digital camera and PC together. Next, the digital information stored on your
camcorder’s tape can move to your PC’s hard disk at a fast clip using this link. And last,
software designed to take advantage of a FireWire connection allows your PC and mouse
to remote control your digital camcorder (more about this later).
In this project digital camcorder users will learn how to
• Identify a FireWire (also called 1394 or i.Link) port
• Purchase and install a FireWire adapter card into a desktop PC or laptop (if not
already factory installed)
• Use a FireWire cable to link a digital camcorder to a PC
Time
If you own a PC with a factory-installed FireWire
port, it will take less than a minute to patch your
digital camcorder to your PC. If you need to purchase an adapter card for your desktop or laptop
PC, figure about one hour for desktop users (after
you go to the store and buy the adapter card) to
install the card and about 30 minutes for laptop
users to install a PC card on their systems.
Step 1: Check Your PC for FireWire
Follow these steps to determine if your PC has a
FireWire port.
1. Before you do anything, grab the owner’s
manual that came with your PC and see if it
lists a FireWire, 1394, or i.Link port on your
PC. If it does, great. Move on to the next section. If not, you’ll need to inspect your PC first
hand.
note
FireWire was developed by Apple
Computer as a way to transfer digital
information between a computer and
peripherals at high speeds. One of its
key advantages is that it’s designed so
the computer can instantly recognize
when a device is connected to it (“auto
detect” and “plug-and-play”).
note
I know it’s goofy, but
this port goes by one of
three names. The Apple crowd prefers
FireWire, with the international engineering community defaulting to the 1394
name selected by the Institute of
Electrical and Electronics Engineers
(IEEE) standards group. Sony uses the
i.Link name to identify this port on their
PCs and digital camcorders. For simplicity, I’ll stick to the FireWire name (it
sounds cooler, and the folks at computer stores all know what this means).
05 3781 ch04
4/28/05
11:25 AM
Page 103
CHAPTER 4
Lights, Camera, Action!
103
2. Look over the front and back of your PC and see if you find a rectangular port with
one curved end at the top. A laptop FireWire port takes a mini form. Both of these
ports are shown in Figure 4.1. If you have a FireWire port on your PC, jump to
Step 3: Find or Buy a FireWire Cable. If not, proceed to Step 2: Purchase and Install
a FireWire Adapter.
FIGURE 4.1
A standard desktop PC FireWire port (left) looks like a rectangle with one of the short sides taking a somewhat
curved shape (note the symbol that identifies the port). Due to size limitations, many laptop designs use mini
FireWire ports (right).
Step 2: Purchase and Install a FireWire Adapter
If your PC doesn’t already have a FireWire port, don’t fret. Modestly priced FireWire
adapter cards can be found in your local computer or office supply store. Prices for desktop cards run around $30, with PC card adapters for laptops going for about $60.
Examples of desktop and laptop FireWire adapters are shown in Figure 4.2.
Desktop users can add a FireWire adapter card in two ways—have one professionally
installed or install it manually. Either way, you’ll need to purchase the card. If you’re not
sure what to look for, take this book to your local computer or office supply store and
show the sales clerk Figure 4.3. Lots of choices are available from companies such as
Adaptec, Belkin, IOGear, Startech, and Orange Micro.
05 3781 ch04
104
4/28/05
11:25 AM
Page 104
Family Computer Fun
FIGURE 4.2
On the left is an ADS Technologies PYRO 1394 Port PC card adapter for a laptop. On the right is a CompUSA
PCI card designed for desktop PCs that adds three FireWire plugs.
If the notion of fiddling with your PC’s innards makes your heart race and your face go
pale, take your PC to a computer repair shop and pay them to do it (many mainstream
retailers, such as Best Buy and CompUSA, can do this job in a flash). If you’re willing and
able to be your own mechanic, installing an internal adapter card is fairly quick work,
but the details of doing so are beyond the scope of this book.
In a nutshell, you must cut off all power to your PC, remove the case, and insert the new
FireWire card into an open PCI slot (if your PC has one available). Generally, the only tool
required is a Phillips screwdriver, which may be needed to open the case and to remove
the metal plate that covers an empty expansion slot. After installation, you’ll need to
restart Windows and provide it with the drivers it needs to recognize your card. The
instructions that came with your adapter card should provide the necessary details for all
parts of this process.
If you own a laptop, the job is much simpler. Obviously, if you have a FireWire port
already, you’re good to go (refer to Figure 4.1). If not, don’t feel bad. It’s not a feature
found on most laptops.
The good news is your laptop should have one or two PC card slots (thin credit card-sized
slots that can accept expansion cards). Consult your user’s manual to confirm where your
slots are located on the laptop. PC card slots can be used to hold lots of goodies, from wireless network adapters to cards that add functions such as USB and FireWire ports.
If you need to purchase a FireWire PC card, take this
book to your local computer or office supply store
and show the sales clerk Figure 4.3 and point to the
PC card example. Companies that make FireWire PC
cards include Adaptec, ADS Technologies, CompUSA,
IOGear, Star Tech, and SIIG.
Follow the manufacturer’s instructions to the letter
when installing the card. You might be asked to
install driver software before you insert the card.
caution
Wait! Be
sure to
check your manufacturer’s warranty
statement to ensure that opening the
case and installing a card does not
void your warranty.
05 3781 ch04
4/28/05
11:25 AM
Page 105
CHAPTER 4
Lights, Camera, Action!
105
Step 3: Find or Buy a FireWire Cable
A FireWire cable is required to link your digital camcorder to your PC or laptop’s FireWire
port. The first logical step is to see if your digital camcorder or FireWire adapter card
came with a FireWire cable. For desktop users, your cable should look like the one on the
left in Figure 4.3, with the laptop version having a mini-plug at each end, as exhibited in
the cable on the right.
FIGURE 4.3
Two forms of the FireWire cables are shown in this photo. The one on the left is designed for desktop PCs,
with the one on the right for laptops. If one didn’t come with your PC, laptop, or digital camcorder, expect to
pay around $20 for a quality cable.
FireWire cables are not hard to find, but it’s
important to get the right one for your situation.
Most desktop PC FireWire cables have a large
connector at one end designed to be inserted on
the PC side, with a mini-plug at the other end for
insertion into the digital video camcorder. Most
PC laptop card adapters opt for the mini-port, so
you’ll need a mini-to-mini style FireWire cable.
Do your homework before you hop in the car
and spend your money at the computer or office
supply store.
tip
If you’re shopping for a new
video camcorder, make sure
it has a FireWire port. It’s a good time
to buy because digital video camcorders are readily available for $300
and more.
caution
FireWire
technology
transfers a lot of data at very high
speeds. The quality of the cable you
use has a bearing on the quality of the
signal. Cheap cables might diminish
signal quality. Go for a high-quality
cable from makers such as Belkin and
Dynex and expect to pay around $30
and more.
05 3781 ch04
106
4/28/05
11:25 AM
Page 106
Family Computer Fun
Project: Recording Your Analog
Videos to Digital Cassette Tapes
If you have a digital camcorder and also have old
analog video cassette tapes you want digitized to
your PC, you can put your digital camcorder to work
as a middleman.
At first glance, this might seem like jumping
through an extra hoop. You might be thinking,
“Why not just buy an external USB-connected
adapter box to work with my old analog tapes?”
The motive for this project is clear—transferring
your analog tapes to a digital camcorder enables
you to take advantage of the benefits of the
FireWire link.
Time
This is open ended, depending on the number of
tapes you have to convert and how much video is
on each tape.
Step 1: Locate the Adapter Cable for Your
Digital Camcorder
caution
Before you
get started,
it’s important to understand that there will
be a slight loss of quality from the original
analog video tape when transferring to
your digital camcorder. I think the upside
of digitizing the material and having the
benefits of the PC-to-digital camcorder
link make the tradeoff and sometimes
lengthy time investment acceptable.
tip
If your videos are on Hi8
analog tapes that are the
same size as the ones your digital
camcorder uses, you might be in luck.
Some digital camcorders, my Sony
model for example, can identify and
play back an older Hi8 analog tape.
With this feature you can take advantage of the FireWire link to transfer
your analog videos directly to your PC
without the need for a capture device
like the one used in the next project,
“Capturing Analog Video to Your PC.
Before you begin, check the operating guide that came with your digital camcorder. In most
cases your digital video camcorder came with an adapter cable with red, white, and yellow
standard composite plugs at one end. The red and white connectors correspond to left and
right stereo sound. These are the same standard plugs used for a stereo system. The yellow
plug is what the engineers call a composite video line. At the other end of the cable is
some form of connector designed for your specific camcorder, as shown in Figure 4.4.
After you’ve got this cable, you’re set to get started. (If for some reason this cable has
come up missing, check with you camera’s manufacturer about ordering a replacement.)
Step 2: Connect Your Analog Source to Your Digital Camcorder
With your adapter cable in hand it’s time to connect your analog source (VHS player, Hi8
analog camcorder, and so forth) to your digital camera.
Set your VHS player or Hi8 analog camcorder next to your digital video camcorder. Use the
factory-supplied adapter cable to attach the audio and video plugs in the back or front of a
VHS player (look for the set of plugs labeled Video Out and Audio Out). Connect the yellow
composite video plug to the Video Out connector on the back of your VHS player. If a Hi8
camcorder is the source, consult its operating guide and attach the plugs accordingly.
05 3781 ch04
4/28/05
11:25 AM
Page 107
CHAPTER 4
Headphone style connector
compatible with a Sony digital camcorder
Lights, Camera, Action!
107
Composite (RCA) plugs, which provide connections
for video (yellow) and stereo audio (red and white)
FIGURE 4.4
This cable connects a Sony digital video camcorder to a VHS player or Hi8 camcorder.
Step 3: Record Your Videos
Now it’s time to move your analog video to its new digital home.
1. After the patch cable link is established between your VHS player or Hi8 analog
camcorder and a digital camcorder, turn on both.
2. Place the old analog tape in the VHS or Hi8 unit, and a blank tape in the digital
camcorder.
3. Make sure your digital camera is set to record video not from its lens but from the
cable link you’ve established. (Consult your camera’s manual, if necessary.)
4. Press play on the VHS or Hi8 side. When the
camera’s viewfinder displays the video you
want to record, press its Record button.
5. At this point, you can kick back and wait for
the recording to finish. This is a “real-time”
process, so if you have a half hour of video to
record, it will take a half hour. (Make sure
you have enough tape.)
6. When you’re done, stop both analog playback
and digital recording.
note
Some VHS and Hi8
camcorders offer
S-Video connectors (they are round in
shape). If your digital camcorder has an
S-Video jack, use a standard S-Video
cable to link the VHS or Hi8 player/
camcorder to the digital camera, and the
red/white audio cable for the audio side.
Why bother? S-Video (short for Super
Video) technology will send a higher quality video stream to your digital camcorder.
05 3781 ch04
108
4/28/05
11:25 AM
Page 108
Family Computer Fun
When you finish, you’ll have a digital tape reproduction of your old analog tape(s), and
that’s a great preservation step in and of itself. This new digital duplicate tape may now
be used for the various digital camcorder projects in this chapter.
Project: Capturing Analog Video to Your PC
Not ready to buy a digital camcorder? No worries, mate! This portion of the chapter
walks you through some of the easiest and least expensive solutions I’ve discovered to
date to meet your needs and produce enjoyable digital video.
This section opens with an exercise to decide what approach you will use to link your
analog VHS/Hi8 tape sources to a PC. Based on that decision you will do one of the following activities:
• Determine if your PC has a USB 2.0 port, and purchase an adapter card if needed
(PC Card USB 2.0 adapter for laptops). Use the USB 2.0 port to link to an external
analog video recording box (that you may also have to purchase).
• Purchase and install an internal PCI video recording card and follow the product’s
instructions for linking to an analog video source.
Time
If you opt to manually install a PCI video recording card figure on about 30 to 40 minutes.
For those who intend to use an external video capture box (via a USB 2.0 connection) figure about the same amount of time (more if you need to install a USB 2.0 adapter card).
Step 1: Pick a Video Capture Device
Your first challenge is deciding how you want to connect a VHS tape player or Hi8 analog camcorder to your PC or laptop. For desktop users, it all boils down to two choices:
• Buy and install a PCI video recording card designed to accept analog video and
audio patch cables/connectors.
• Or go for an external USB 2.0-connected recording box designed to accept analog
video and audio patch cables that, in turn, connect to a VHS player or Hi8 analog
tape camcorder. If your PC does not have USB 2.0 ports, you’ll also need to buy a
USB 2.0 PCI card.
Based on my experience, I recommend that desktop and laptop users go for the USB
external video recording box option. It’s easier to work with and video capture quality is
good. Another nice benefit is the external box may be easily moved around and used on
multiple PCs.
Although plenty of quality competing products are out there, you should select the one
that works best for your needs. I have selected Adaptec’s VideOh! DVD external
05 3781 ch04
4/28/05
11:25 AM
Page 109
CHAPTER 4
recording box for this project (see Figure 4.5). It’s
a product that has received good reviews and
does the job as well as any in its price range.
Competing products worth checking out come from
companies such as ADS Technologies, AVerMedia,
Belkin, Canopus, Pinnacle, Plextor, and TDK.
If, however, you decide to go with an internal PCI
Video recording card solution, jump to Step 4:
Install a Internal PCI Video Recording Card.
Lights, Camera, Action!
109
note
As an added bonus,
whether you opt for an
internal card or external box, most
video capture products come bundled
with video-editing software that
enables you to make VCDs and SVCDs
(using a standard CD burner) and
DVDs (assuming you own a DVD/CD
combo burner). What a deal!
FIGURE 4.5
Adaptec’s VideOh! DVD external video recording solution is one of many on the market today. It connects an
analog video source, such as a VCR, to a USB port on your PC.
Priced just under $100, this solution is designed to capture and convert any analog video
source into digital video files. To speed delivery of the digitized video to your PC’s hard
disk, this product exploits the speed of USB 2.0 technology.
The VideOh! DVD package also includes a full version of Sonic’s MyDVD, which is the
very consumer–friendly, step-by-step oriented software program that will be used in this
chapter to record, edit, and produce home videos on Video CDs and DVDs.
05 3781 ch04
110
4/28/05
11:25 AM
Page 110
Family Computer Fun
Step 2: Locate a USB 2.0 Port on Your PC
This step assumes you’ve made the decision, as I suggest, to go with an external USB 2.0
connected recording box solution. Follow the steps below to determine if your PC has
USB 2.0 ports.
Determining whether your PC has USB 2.0 ports on it can be a little tricky. Although your
PC, if it’s less than five years old, certainly has USB ports, the older USB 1.0 ports are
identical in appearance to the second generation USB 2.0 versions (see Figure 4.6).
FIGURE 4.6
USB 1.0 and USB 2.0 ports are physically identical. Some manufacturers add a + to the symbol shown here
that indicates it is a USB 2.0 port.
Because any modern PC will have at least two ports that look like this, the first step is to
consult the documentation that came with your system to make sure they are of the USB
2.0 variety. If they’re not, you’ll need to purchase and install a USB 2.0 PCI expansion
card for a desktop PC or a PC card product for a laptop, as discussed in the next step.
What Is USB?
USB stands for universal serial bus and is a feature found on most PCs made after
1995. USB ports (openings into which you plug a USB cable connected to a USBcompatible product such as a printer or digital camera) are usually found on the back
of a PC, though many modern PCs include them on the front as well.
To make matters a little more confusing, there are now two versions of USB. USB 1.0
transfers data at 12 million bits per second. USB 2.0 boosts the speed to 480 million
bits per second (that’s 60 megabytes per second). Although the standards are compatible and use the same ports, connecting a USB 2.0 device to a USB 1.0 port forces it
to use the slower speed, which might impact its performance. To obtain the best video
results you must use the fast USB 2.0 technology (especially if you plan to record captured video to DVD).
Step 3: Install USB 2.0 Card (If Needed)
If your PC only has USB 1.0 ports and you find yourself faced with installing a USB 2.0
PCI card, don’t fret. It’s a simple procedure many can do themselves (especially with the
help of a tech-head friend or family member). The process is almost exactly the same as
installing a FireWire card, which I covered in the section, “Purchase and Install a
05 3781 ch04
4/28/05
11:25 AM
Page 111
CHAPTER 4
Lights, Camera, Action!
111
FireWire Adapter,” later in this chapter. If, however, you have no interest in mucking
with your PC’s innards, most retail electronics chains that sell these cards can install
them. Just bring in your copy of this book and show their PC salesperson Figure 4.7.
FIGURE 4.7
Desktop owners can add USB 2.0 ports using a PCI card, such as the SIIG model shown on the right. For laptop PCs, the Adaptec brand PC card shown on the left combines two USB ports with two FireWire ports.
Step 4: Connect the Adaptec VideOh! DVD USB Box to Your PC
Whether you had to buy a USB 2.0 adapter card or have a PC with the ports already
built-in, the next step is to connect your capture device (Adaptec’s VideOh! in this case)
to one of the available ports. After that, we’ll establish a link to your analog tape source
(VHS player or Hi8 camcorder). If you use a USB 2.0
capture box other than the VideOh!, don’t worry.
For laptop owners, it’s a
You should find that the procedure I describe here
breeze to purchase and
then slip a PC card into the side of
is consistent with your device.
your laptop. Go to a computer or office
I’m not going to duplicate the information provided
supply store and ask for a PC card
in the installation manual for the VideOh! DVD box.
USB 2.0 adapter for your laptop.
Instead, here’s a run down of the basic steps you
Purchase one and follow the instructions provided with the product.
can expect with products like the VideOh! DVD box:
tip
1. Software installation—Some USB products
(and internal cards for that matter) require
software to be installed before you connect
the hardware to a PC. VideOh! DVD’s installation calls for the insertion of the program disc
containing a driver (a software program that
helps Windows XP recognize and work with
the product) in the PC’s CD drive before making any physical hardware links.
note
If you use an internal
(PCI) video capture card
(see Step 4 of this project), the only real
difference from the text I’ve provided here
is that you’ll connect your VHS or Hi8
player directly to the card (or to a special
adapter cable that connects to it).
05 3781 ch04
112
4/28/05
11:25 AM
Page 112
Family Computer Fun
2. Power—Connect electrical power to the capture device using the provided adapter.
3. Patch the VHS/Hi8 player to the external recording box—Carefully study Figure
4.8. VideOh!, and other like products, provide an audio/video patch cable to connect it to a VHS or Hi8 analog source and, in turn, to the PC or laptop’s USB 2.0
port. While it may look tricky, it’s actually a very simple setup.
VCR
Video capture box
USB cable
Composite
audio/video cables
PC with USB 2.0 ports
FIGURE 4.8
Connecting a VCR to a PC-connected video capture device allows you to transfer old VHS or Hi8 tapes to
your PC.
4. Making the USB link—Connect the VideOh! DVD box to the PC. Insert the USB
cable supplied with the product in the back of the recording box and the other end
in an empty USB 2.0 port on the PC.
After these connections are made and you turn on both your PC and the VideOh! DVD
box, Windows XP automatically detects it as a new device. If the manufacturer dictated
that you install the included software prior to this point you should be set to go. If not,
use the product’s documentation to install any necessary software or drivers.
If all goes well, the process ends with a small dialog box on the Windows XP desktop
announcing that the product is installed and ready to use.
05 3781 ch04
4/28/05
11:25 AM
Page 113
CHAPTER 4
Lights, Camera, Action!
113
Step 4: Install a PCI Video Recording Card
Those of you opting to use an external capture box can skip this step and move on to the
video capture projects in this chapter. If want to go with an internal adapter card, it’s a
relatively straightforward process.
Installing a PCI video capture card involves the same process discussed previously relative to adding a FireWire card to a desktop PC. If you need to go this route, refer to the
step “Purchase and Install a FireWire Adapter Card,” in this chapter. Follow the installation instructions for the card you select.
Good general purpose PCI video capture cards for desktop PCs include products from ADS
Technologies and Pinnacle Systems.
Project: Install Sonic MyDVD
Whew! However you reached this point in the chapter, you should now be set to capture
some video (analog or digital) to your PC and really start having some fun. The remaining
projects in this chapter use the MyDVD video capture, editing, and disc production software package from Sonic.
If you purchased the Adaptec VideOh! external capture box, MyDVD is included. Follow
the instructions provided in the product’s installation guide to install MyDVD. The same
applies to those who purchased an internal PCI video capture card bundled with MyDVD.
After you install MyDVD, jump to the next project.
If you are a digital camcorder user or you installed a PCI analog video capture card that
did not include MyDVD, follow the steps below to download and install the free 14 day
trial version of MyDVD.
Time
Budget about one hour to download and install the free trial version of MyDVD. Your time
initially will vary based on the speed of your Internet connection because the MyDVD
trial software download is about 150 megabytes.
Step 1: Download MyDVD
Follow the steps here to visit the Sonic website, find the free trial download link, and
download the program’s Zip folder to your PC’s hard disk.
1. Connect to the Internet and point your browser to http://www.sonic.com. When
the main page opens, go to the top area and click the Support link. On the Support
page, find the Quick Links area and click the Downloads link.
2. A small Get Support for Your Sonic Products dialog box appears. Use the Choose
Your Product drop-down menu and select MyDVD.
05 3781 ch04
114
4/28/05
11:25 AM
Page 114
Family Computer Fun
3. The Downloads screen appears with a quick
registration fill-in-the-blank set of boxes for
your name and email address. Enter your
information and click the big red Submit button to begin the download.
4. A progress dialog box displays, showing the
estimated time to download the 147MB file.
note
Zip folders are digital
packages containing
one or more compressed files. Many software manufacturers offer downloads of
their products compressed into Zip
files/folders so they can be more quickly
transmitted via the Internet to your PC. It’s
a great technology that’s been around for
years, and is supported in Windows XP.
Step 2: Install the Trial Version of MyDVD
When the download completes, use Windows Explorer to navigate to find a folder named
MyDVD_Trial-1. This is a Zip folder containing compressed files.
1. The icon for the Zip folder might appear as a folder with a cute little zipper on it.
Highlight the folder with your mouse and right-click.
2. When the drop-down menu appears, search for the Extract All option and click it,
as shown in Figure 4.9. This initiates the Extraction Wizard. Click the Next button
and the Select a Destination dialog box appears.
FIGURE 4.9
When you find the MyDVD_Trial-1 Zip folder, right-click its icon and select Extract All from the drop-down
menu.
3. Use the Browse button to navigate to your downloads folder and click the Next
button to start the extraction process. Note the Extracting progress bar displayed at
the bottom of the Select a Destination Wizard window.
4. When this step completes, an Extraction Complete dialog box appears with the
default of Show Extracted Files checked. Click the Finish button and the screen
refreshes to show the Windows Explorer utility and a MyDVD_Trial-1 folder (now
without the zipper). Double-click the folder and the set of now decompressed files
appears.
05 3781 ch04
4/28/05
11:25 AM
Page 115
CHAPTER 4
Lights, Camera, Action!
115
5. Find and click the Setup file to start the full
installation of MyDVD.
6. Follow all onscreen menus and prompts to
complete the installation.
note
After downloaded and
installed, you may use
the MyDVD trial version for 14 days or
up to 50 uses, whichever comes first.
7. The first time the program runs, a prompt
screen appears asking you to register online.
Follow the steps to register for support and
updates.
Step 3: Get to Know MyDVD
With Sonic MyDVD installed it’s time to get acquainted with what I’ve found to be one of
the most intuitive video capture, edit, and production software packages for consumers
I’ve experienced to date. Using MyDVD (free trial or full version bundled with the Adaptec
VideOh! box) and a CD or DVD burner, you have a wide range of output options, including the production of VCDs and DVDs.
What the Heck Are VCDs and SVCDs?
Your home DVD player has a lot of tricks up its sleeve you might not know about,
including the ability to play video files burned on to CD. These hidden talents are due
to the fact that nearly all DVD players sold in North America are made in Asia. In that
part of the world, rental movies for years before the advent of DVDs were burned on
CDs using the VideoCD (VCD) and Super VideoCD (SVCD) formats.
As a PC owner with a CD burner, you can take cheap CD blanks, video editing software,
and a standard CD burner and make your own VCDs. The video is closest in quality to
a VHS tape, so it won’t look as good as a DVD, but it’s still a great way to make an
inexpensive disc you can play on most family DVD players.
Discs burned in the SVCD format bump up the resolution to deliver quality closer to a
DVD, but not all DVD players support them, so check your owner’s manual.
The MyDVD software selected for this chapter can create VCDs or DVDs.
Follow these steps to become familiar with the basic working menus and features of
MyDVD:
1. Go to the Windows XP desktop and look for the MyDVD icon and double-click it.
(You can also open the Start menu and select All Programs, Sonic, MyDVD, Start
MyDVD.) A clear and simple-to-understand Welcome to Sonic MyDVD! splash page
appears, as shown in Figure 4.10.
2. Move your mouse to the upper-right area of the welcome window and mouse over
(highlight without clicking) the DVD-Video option and then the Video CD selection.
As you do, the information displayed in the main part of the window changes to
reflect the differences between a VCD and a DVD. Take a few minutes to read the
information for each option.
05 3781 ch04
116
4/28/05
11:25 AM
Page 116
Family Computer Fun
FIGURE 4.10
MyDVD’s welcome screen serves as the launch pad for VCD or DVD projects.
3. MyDVD offers three major activities: Create or Modify a DVD/Video CD Project,
Record Direct-to-VCD/DVD, and Edit an Existing VCD/DVD Disc. In this chapter we
will work exclusively with the Create or Modify feature. After you’ve mastered the
exercises below, I encourage you to return and learn about the other two main
project areas, especially the very convenient Record Direct-to-VCD/DVD that allows
you to dump the contents of a video tape directly to a blank CD or DVD.
4. For some extra homework, I also recommend examining the Tutorial resource,
which can teach you a lot about MyDVD that I don’t get into in these pages.
Project: Record Digital Video Clips Using MyDVD
This project shows digital camcorder users how to capture and edit video clips using
MyDVD. This is a key step leading to the production of a VCD or DVD.
Time
Figure one hour to familiarize yourself with the Capture dialog box functions and to
record and edit three segments of about five to eight minutes each.
Step 1: Get Set Up
I’ve already covered the basics for hooking up your digital camcorder to your PC, but
there are a couple of extra nuggets you’ll need to do to kick things off.
1. Before you do anything, make sure you’ve connected your digital camera to your
PC via its FireWire cable.
05 3781 ch04
4/28/05
11:25 AM
Page 117
CHAPTER 4
2. Turn the camera on and place it in playback
mode. If this is the first time you have ever
connected your digital camcorder to your PC,
allow Windows XP a few moments to detect
the camera. The end of that process results in
a dialog box announcing the product is ready
to use.
3. With your digital camcorder turned on and
linked to the PC, start up Sonic MyDVD (refer
to the previous project if you don’t remember
how).
Lights, Camera, Action!
117
note
The steps in this project touch the surface
of what a program like MyDVD, and
other comparable consumer videoediting packages, can do. The purpose
here is to whet your appetite as to the
possibilities of recording and editing
video on a PC. If you enjoy the experience, I strongly encourage you to spend
a lot of quality time experimenting with
MyDVD’s range of editing, special
effects, and menu building features.
Step 2: Start a New MyDVD Project
When you reach the opening Welcome screen of MyDVD, move to the upper-right area
and highlight the Video CD selection. Next, click the Create or Modify a Video CD Project
link. The main project screen now appears, as shown in Figure 4.11.
FIGURE 4.11
MyDVD’s main project screen opens with a default menu and text. The left channel holds the key commands
to record video, import videos previously recorded, add a slideshow, and add submenus.
Take a moment to look over the layout. The largest area holds the background and text
elements making up the onscreen menu you’ll build for your VCD. Below that is a toolbar
area with a Preview play arrow and a large red Burn button. Note the series of numbered
05 3781 ch04
118
4/28/05
11:25 AM
Page 118
Family Computer Fun
buttons that look like a telephone keypad (we’ll see later what they do). On the far left
edge are the key command icons to record/capture video, get videos, add a slideshow of
photos, and add submenus.
Step 3: Capture a Video Clip
At this stage your digital video camcorder should be turned on. Move your mouse to the
Capture icon showing a video camcorder and click it to display the Capture dialog box.
The Capture dialog box contains a set of controls and settings buttons that will define
your recording session, as shown in Figure 4.12.
FIGURE 4.12
MyDVD’s digital camcorder Capture dialog box offers VCR-like buttons to remote control a digital video camcorder and a large red Start Capturing button.
Here’s a run down of the key elements:
• A large preview window with VCR-like control buttons directly below. As a digital
camcorder owner using a FireWire link, you have the advantage of being able to
use these controls to remotely operate your camcorder.
• A Grab Frame camera icon you may click to capture a still image from a single
frame of video. These still images can be saved as JPEG photos and inserted into
video clips (an editing feature not covered in this chapter, but one you may pursue
at a later date). To grab a frame, just play your video. When you see a spot you
want to capture as a still image, click the Grab Frame icon and use the Save As
dialog box to name and save the file in a folder. This function is disabled when you
are capturing video to your PC.
• A details pane at the bottom edge of the dialog box contains lots of very helpful
information. A running clock of the capture time and file size being created is
05 3781 ch04
4/28/05
11:25 AM
Page 119
CHAPTER 4
displayed. My favorite features are the Record
Time Available and Drive Space Available
readouts that dynamically report on the
amount of hard disk space available for your
video files. This feature enables you to monitor how much video your hard drive can
accommodate (remember, video files are
large).
Follow these steps to capture a video clip:
1. Before clicking the red Start Capturing button,
Lights, Camera, Action!
119
tip
Before you click the Start
button to begin the capture
process use the play, fast forward,
and/or rewind onscreen remote controls to position your digital camcorder’s tape to the exact spot where
you want to start recording.
tip
As you add clips to build
the structure for a VCD or
DVD, be sure to consistently stop and
save your work. Click the File dropdown menu at the top toolbar and
select Save As. Use the Save Project As
dialog box to give the project a name
and save it to an existing or new folder.
click the Record Settings button that brings
up the Settings dialog box. Go to the Record
Settings area and click the Quality drop-down
menu and select DV format. This records
video at the highest quality setting and is a
good move if you plan to edit your clips or produce a DVD. Also ensure that the Record drop-down menu is set for Video and
Audio. Click the OK button to return to the Capture dialog box.
2. When you find the spot in your video at which you want to begin recording, click
the red Start Capturing button and your digital video camcorder should spring to
life. For test purposes, record a five to eight minute sample video clip and then
click the red Stop Capturing button.
3. A Save As dialog box appears asking you to give your clip a name and store it. Use
the New Folder icon (find the symbol of a file folder at the top with a starburst pattern on the edge) and create a folder to hold the clips for this project. Give the
folder an applicable name, such as VCD Test Videos. Then give the clip a name
and save the file.
4. When the Capture Complete dialog box appears announcing that the file has been
saved, click the OK button, which returns you to the Capture dialog box.
5. Before we record another clip for our test, click and drag the Capture dialog box to
the side and look at the main menu template. You’ll see an icon in the center of
the menu with the file name shown below it (see Figure 4.13). Cool! You are beginning to build a multi-clip menu-driven VCD. Later, when you insert your finished
VCD into a DVD player, this opening menu will be displayed on your TV screen
(more about this later).
6. Now return to the Capture dialog box and record one or two more clips, giving
each a meaningful name and storing them in the VCD Test Videos folder. When
you finish capturing/recording video clips, click the Finish button on the lowerright corner of the Capture dialog box.
05 3781 ch04
120
4/28/05
11:25 AM
Page 120
Family Computer Fun
Video clip
FIGURE 4.13
After saving a recorded video clip, MyDVD automatically inserts an icon on the menu for your VCD project.
With video clips captured to your PC, you’re ready to really put MyDVD to work. The
next project focuses on capturing video from an analog source (like a VHS tape). If
that’s not a something you intend to do, skip ahead to the project, “Edit Video Clips
Using MyDVD.”
Project: Record Analog Video Clips Using MyDVD
In the previous project I walked your digital camcorder cousins through the steps to
record several video clips and set the stage for the creation of a VCD. This project will
guide you through the same steps using the MyDVD program to capture video from a PCI
analog video card or the VideOh! USB-connected recording box.
Time
Figure one hour to familiarize yourself with the Capture dialog box functions and to
record and edit three segments of about five to eight minutes each.
05 3781 ch04
4/28/05
11:25 AM
Page 121
CHAPTER 4
Lights, Camera, Action!
121
Step 1: Get Set Up
Follow these steps to prepare for the recording of
an analog video clip using a PCI analog video capture card or the VideOh! external box:
1. PCI analog video card users should follow
their product’s instructions, and use the
cables provided, to connect an analog tape
source to the card. VideOh! users can refer to
Step 4 of the project “Capturing Analog Video
to Your PC” in this chapter. Consult the product’s guide, if necessary.
2. With your analog tape source (VHS or Hi8
camcorder) turned on and linked to the PC,
go to the Windows XP desktop and doubleclick the MyDVD icon, or click Start, All
Programs, Sonic, MyDVD, Start MyDVD.
Step 2: Start a New MyDVD Project
When you reach the opening Welcome screen, move
to the upper-right area and highlight the Video CD
selection. Next, click the Create or Modify a Video CD
Project link. The main project screen now appears
(refer to Figure 4.11 in the previous project).
At this point many of the steps necessary to capture
a clip with MyDVD are similar to those in Step 2 of
the project “Record Digital Video Clips Using
MyDVD” in this chapter. I have provided the basics
(especially the differences) here, but you should
refer to that section if you want more detail on the
MyDVD interface and features, such as Grab Frame.
Are You
Hooked Yet?
Digital camcorder owners
interested in a free alternative to Sonic MyDVD can take advantage of Windows XP’s built-in Windows
Movie Maker program. It’s a remarkable
video production program, considering
it comes bundled with the Windows XP
operating system at no additional
charge. While it lacks the ability to burn
VCDs, SVCDs, and DVDs that can be
played on your DVD player and it does
not work with external USB-connected
video recording solutions such as the
VideOh! Product, Windows Movie
Maker is a great tool for capturing digital video, editing it, and burning video
files to a disc (playable on any PC). It
can even compress capture video to a
point where you can send it to friends
and family over the Internet via email.
(In my experience, the program also
works quite well with most internal PCI
video capture cards.)
To use Windows Movie Maker, click
Start, All Programs, Accessories,
Entertainment, Windows Movie Maker.
Spend some time with the Help tutorials to learn how to use this program
with your FireWire connected digital
camcorder.
Step 3: Capture a Video Clip
Now that you’re ready to capture some video, move your mouse to the Capture icon showing a video camcorder and click it to display the Capture dialog box (refer to Figure 4.12).
Note that the VCR-controls on this screen are disabled when capturing from an analog
source. Then follow these steps to capture some video clips:
1. Press the Play button on your analog tape source. Don’t worry about recording at
this stage. Do you see video playing back in the preview window? If not, click the
Record Settings button and look closely at the Video section of the Record Settings
05 3781 ch04
122
4/28/05
11:25 AM
Page 122
Family Computer Fun
tab (see Figure 4.14). The Source drop-down menu offers two choices for analog
tape users—Video Composite or Video S-Video. If your selection matches the cable
type you are using, you should see the video playing in the preview window.
2. With the Record Settings tab still displayed, make sure the Record drop-down
menu is set to Video and Audio and the Quality drop-down menu is set to Good (1
hour)—which, by the way, is your only option. If you like, but I don’t recommend it,
you can disable the preview during recording. You would only do this if your PC is
too weak to record and display a preview at the same time.
FIGURE 4.14
The Record Settings dialog box allows you to choose your capture source and the quality with which MyDVD
should record the video.
3. Stop your VHS or Hi8 source and, using the manual controls on the VHS or Hi8
analog camcorder, position the tape to the spot where you want to start recording.
4. When you are set to go, press the Play button on your analog tape source and
quickly click the large red Start Capturing button on the Capture dialog box. The
button now changes to a Stop Capturing mode as the video is being recorded
and saved to your PC’s hard disk. When you have captured the desired amount,
click the Stop Capturing button, followed by manually stopping your tape
source.
5. Follow the onscreen dialog boxes to give the captured video clip a name and save
it in a directory. Close the Capture dialog box and the main MyDVD screen appears,
showing your video clip automatically inserted into the menu work area (refer to
Figure 4.13).
05 3781 ch04
4/28/05
11:25 AM
Page 123
CHAPTER 4
6. Repeat the video clip capture process to create two or more clips in preparation for the
VCD disc project.
At this point you are ready to join with your digital
camcorder cousins to work on the “Edit Video Clips
Using MyDVD” project.
Lights, Camera, Action!
123
tip
As you add clips to build the
structure for a VCD or DVD,
be sure to consistently stop and save
your work. Click the File drop-down
menu at the top toolbar and select
Save As. Use the Save Project As dialog
box to give the project a name and
save it to an existing or new folder.
Project: Edit Video Clips Using MyDVD
In this project we’ll use a handful of MyDVD’s key video-clip editing tools to add a transition to the front and back of each clip and add a text title.
Time
Figure about 30 minutes to edit three clips.
Step 1: Open the Edit Window
With your main project menu displayed (per the previous video capture projects), doubleclick one of the captured video clip icons and a MyDVD dialog box double-checks to
ensure you want to enter the scene window where you can automatically or manually
detect scenes. Click Yes and the Mark Scenes for Editing dialog box appears. For our
exercise to create a simple VCD, I’m going to ask you to skip this step. You may always
return at a later time and learn what this dialog box can do. For now, click the Cancel
button to enter the Edit window.
Step 2: Add Transitions and Other Effects
The Edit window, as shown in Figure 4.15, is packed with tools and features to explore
fully at a later date.
The key elements shown here include
• A filmstrip-like horizontal box at the bottom displaying the first frame of the video
clip to be edited.
• Three special effects enhancement tabs at the upper right: Fades and Dissolves; an
image adjustment tab (lightning bolt icon) offering a drop-down menu with numerous choices, including a handy image brightness and contrast wizard; and a text
overlay wizard tap that makes it easy to insert floating text.
• On the far left vertical toolbar area are two tools worth noting for future editing
sessions: Get Media (which allows you to insert other video clips or still images in
the filmstrip tray) and the Add Audio icon (which facilitates inserting background
music files in formats such as .mp3.)
05 3781 ch04
4/28/05
124
11:25 AM
Page 124
Family Computer Fun
Adjust video quality
Add a fade or dissolve
Add text
Add onscreen text to a clip
Dissolve transition
Captured video clip
FIGURE 4.15
MyDVD’s Edit window uses wizards to help place transitions before and after a clip, add text, and adjust
brightness and contrast.
For our simple exercise, follow the onscreen instructions to place a fade or dissolve at the
front and back of your clip and add a floating text title. Click OK and the edits are
applied to the video clip. Repeat the process for the other captured clips. Each time you
complete the cycle, you are returned to the main menu screen (refer to Figure 4.13). At
this stage you are ready to create your first VCD.
Project: Create a VCD Using MyDVD
Now it’s time to take all of your work from the previous two projects and burn a VCD that
will play in a DVD player. When the finished disc is inserted into a DVD player, the TV
screen will present the menu with video icons you designed earlier.
05 3781 ch04
4/28/05
11:25 AM
Page 125
CHAPTER 4
Materials
To complete this project you’ll need
• CD or DVD burner installed in your PC or
externally connected
• MyDVD program installed
• DVD player that accepts VCDs
Lights, Camera, Action!
125
note
The default opening
menu background will
vary based on the version of MyDVD
you use. The screen images in this
chapter are based on the MyDVD 5.2
program bundled with the Adapter
VideOh! At the time of this writing, the
free trial download offered by Sonic
was MyDVD 5.0.
Time
If you followed the instructions above and recorded two or more clips of five to eight
minutes in length, budget about one hour to edit the VCD menu screen and text, burn a
VCD disc, and test in your DVD player.
Step 1: Edit the VCD Menu
Just like any DVD, when you play a finished VCD in a DVD player, the first thing that
appears is a menu. In this case, the menu is the default background that appeared as
you built your sample project to this point. The default background may be acceptable,
but the title text needs to be added.
Follow these steps to change the opening menu’s background and the text:
1. Move your mouse to the menu bar at the top of the screen and click the Edit Style
icon. This brings up the rich and powerful Edit Style dialog box (see Figure 4.16).
2. Check out the far left vertical channel populated with a series of background templates. Use the scroll bar to see the entire set. Find one you like, click on it, and
the new background is automatically applied, as shown here. For my menu I
changed the background from a solid tone to the Birthday Kid template that automatically changed the title and video clip text.
3. Don’t be shy. Click around and see what all the functions can do. For example, find
the Menu Options area on the left and click the Animated buttons checkbox. When
your disc is played on a DVD player the video icons will play a few seconds of the
video—it’s a great special effect.
4. When you have finished exploring the Edit Style dialog box, click the OK button to
return to the main menu work screen. All of your changes are now implemented
and displayed.
5. To change the main title text move your mouse pointer over any part of the top text
and it automatically highlights and is bounded by a box. Position your mouse
pointer on a letter and click. A blinking cursor now appears. Delete the default text
and replace it with your title.
05 3781 ch04
126
4/28/05
11:25 AM
Page 126
Family Computer Fun
FIGURE 4.16
The Edit Style dialog box is a sight to behold! You can select templates for menu backgrounds, change text
styles at will, and apply other special effects.
6. With the cursor still blinking and the main title framed in a box, click the Edit Style
link at the top of the screen to once again bring up the Edit Style dialog box (refer
to Figure 4.16). Move to the Change Text area and click the font drop-down menu
showing Arial Black as the default.
7. Keep exploring other features, and don’t miss the Select custom music track option.
This feature allows you to add background music from digital MP3 music files on
your PC’s hard disk.
8. After you play with the Edit Style dialog box, click the OK button at the bottom and
you are returned to the main work screen.
If you’re happy with the look of your main menu, you’re ready to burn a VCD.
Step 2: Preview and Burn a VCD
Before we burn a menu-driven VCD, be sure to save all your hard work. Follow these
actions to preview and then burn your first VCD disc.
1. Move to the bottom horizontal toolbar area and click the large black Preview arrow
button. Depending on the nature of your menu, an Information dialog box might
appear. For example, if you use animated video clip icons, this dialog box informs
you that in preview mode, the animations will not be reproduced. Click the OK
button.
05 3781 ch04
4/28/05
11:25 AM
Page 127
CHAPTER 4
Lights, Camera, Action!
127
2. The keypad at the bottom is now activated to simulate what will happen when
you insert a VCD into your DVD player (see Figure 4.17). Click the Number 1 button
and the first clip plays. Click the numbers for your other video clips to test drive
the final composition.
FIGURE 4.17
The VCD Preview Mode presents a numeric keypad to simulate how each video clip will be played when the
finished VCD is played in a DVD player.
3. At last it’s time to burn a VCD. Click the large black square Stop button to end the
preview mode.
4. Pop a blank standard recordable CD-R into your PC’s CD burner. Be sure to use a CDR and not a CD-RW blank, which are often less-compatible with set-top DVD players.
5. Before you click the Burn button, look at the bottom far left corner of the screen
where an icon for a disc is presented. Notice that the drop-down menu there tells
the program if you are using a 650 or 700MB blank CD. Make sure you’ve selected
the correct disc type. Today the majority of CDs offer 700MB of storage, but the CD’s
label usually indicates its capacity.
6. Okay, here we go! Click the big red Burn button
and a Safety dialog box appears telling you that
the project must be saved before burning. Click
the Yes button and in a flash the Make Disc Setup
dialog box appears. The settings shown should
correspond to your burner. Leave the default settings unchanged and click the OK button.
note
Moments after inserting a blank CD-R in
your burner, Windows XP might present
a generic dialog box asking what program you want to use to burn the disc.
If this happens, click the Cancel button
and return to the MyDVD screen.
05 3781 ch04
128
4/28/05
11:25 AM
Page 128
Family Computer Fun
7. Loading and Checking Media dialog boxes
flash by quickly and the burning process
should start. On the main menu, a burn
progress horizontal bar is presented at the
bottom of the screen area.
8. When the burn process completes, the CD
drive should eject the disc.
note
The time it takes to
burn your VCD (and
this applies to DVD production as well)
depends on the size of the source
video files, the speed of the CD or DVD
burner, and the power of the PC’s brain
to manage the whole process.
Step 3: Play Your VCD in a DVD Player
Playing a VCD in your DVD player is a different ball game than playing a commercial
movie DVD. When you load a commercial DVD, your player quickly presents a menu of
clickable chapter choices. Later, the DVDs you’ll make in this chapter will do just that,
too. When you insert a VCD into a DVD player designed to accept this format, the
machine will think about it for a few moments and might display VCD on its LCD screen.
Press the Play button on your DVD player and you should see the menu appear on the
TV screen.
VCD Compatibility
I can’t guarantee the VCD you just made will play in every DVD machine on the planet.
The key is to look at your DVD player’s documentation to see if it supports VCD discs.
For example, I have three DVD players at home. Our newest model, a Samsung, plays
everything under the sun, except my VCDs. Our older Pioneer and inexpensive Audiovox
DVD players, on the other hand, love our VCDs. If the VCD you just made fails in your
DVD player, try it on other systems. For a comprehensive compatibility listing see
http://www.videohelp.com/dvdplayers.php.
If your player does not play VCDs, it might support the higher resolution SVCD format
discs. Unfortunately, MyDVD does not create SVCDs, so you’ll need to look for a video
editing and disc production software package that does. See the “Are You Hooked Yet?”
sidebar at the end of the chapter to find a listing of other products to investigate.
Remember the telephone keypad numbers bit as we composed our VCD and took it for a
preview test drive? Here’s why that was important. Instead of using the arrow controls
on the DVD player’s remote control to highlight and then click a chapter icon (as you
would with a DVD), you must enter the number corresponding to the clip you want to
view. Look at your DVD’s remote control and press the number corresponding to the clip
you want to view and then press Enter.
VCDs are fun, but the video quality might disappoint you. For me, VCDs are great as rainy
day projects for kids or to make low-cost souvenirs. For video discs you’ll really want to
watch and keep, you need to step up to the world of homemade DVDs.
05 3781 ch04
4/28/05
11:25 AM
Page 129
CHAPTER 4
Project: Make a Homemade DVD
Using MyDVD
To use MyDVD to create and burn a DVD disc, you
must have a DVD burner and blank DVD discs,
making this one of the few projects in this book
where it’s very possible you won’t have the necessary hardware.
If you have a modern PC, there’s at least a fair
chance it came with a DVD burner already
installed. If so, or if you’ve already upgraded your
PC to include one, you are in great shape! If not,
find your wallet. To play in this sandbox you’ll
need around $100 to $200 dollars, which is actually considerably cheaper than just a year or two
ago when a good PC DVD burner could cost more
than $400.
Lights, Camera, Action!
129
note
When it comes to CD
burners, it’s a simple
world of one universal recordable (CD-R)
and rewritable (CD-RW) format.
Unfortunately, DVD blanks come in one
of two formats: DVD+ and DVD- (with
the usual “R” or “RW” separating recordable from rewritable discs).
Although early DVD burners usually only
supported one of the two formats, most
recent drives can handle either “+” or “-”
discs. That said, although most set-top
DVD players can read both, check your
player’s manual to see if it favors one
recordable DVD format over the other.
After you’re set with a DVD burner and blank discs, you’ll find that recording a DVD isn’t
much different from the steps we just followed to create a VCD.
Materials
For this project you’ll need
• MyDVD software installed
• Built-in DVD burner or external USB 2.0 or FireWire-connected alternative
• Blank DVD discs
• Recorded video clips and a DVD menu project created via MyDVD’s DVD project
wizards
Time
Budget about two hours to repeat the same steps used to create and burn a VCD disc.
Obviously, you’ll start by selecting a DVD project instead of a VCD project at the opening
of the MyDVD program. Your burning time will vary depending on the length of your
video clips. For your first DVD production, I strongly suggest you work with a collection of
short video clips, ideally about five minutes each. The key at this stage of your training is
to quickly learn and experience the overall process.
Step 1: Open a DVD Project with MyDVD
Click the MyDVD icon on your desktop, or click Start, All Programs, Sonic, MyDVD to open
the program. On the main menu, select the Create or Modify a DVD-Video Project option.
05 3781 ch04
130
4/28/05
11:25 AM
Page 130
Family Computer Fun
The sequence of steps is essentially the same as
with a VCD, so you should refer to the previous
project if you need a refresh on any of the steps.
That said, here are some key points I want you to
know at the outset:
• When you record video clips from your digital video camcorder for a DVD project, use
the highest quality setting available to you.
Digital camcorder users should select the DV
format. Analog tape source users should
select Best MPEG-2 6.0 Mbps (refer to
Figure 4.14).
note
Until recently, singlelayer, single-sided DVD
discs ruled the world of DVD recording
on a PC. This technology offers discs
with a capacity of 4.7GB of storage
that can be made to hold one hour of
video recorded at the highest quality.
The new kid on the block is the duallayer DVD (burners and discs) that
effectively double the fun with a whopping capacity of 8.54GB when recording to DVD+R DL discs. You can create
up to two hours of home brew video at
the highest quality level on a single
dual-layer disc.
• Your homemade DVD’s menu, I’m happy to
report, should behave in the same way as a
commercial DVD. When the finished product is
played on a DVD player, the TV screen will show chapter buttons you may highlight and click using your player’s remote control.
• You will be able to store a full hour of the highest quality video your PC can produce on a single-layer DVD disc, with up to two hours on a dual-layer disc. It may
be possible to program MyDVD and other editing programs to double the time on
both single- and dual-layer DVD blanks, but I don’t recommend it. Trust me, go for
the top video quality settings.
With these exceptions noted, the experiences you gained making a VCD will make following MyDVD’s steps for making a DVD disc easy to tackle.
Step 2: Play Your DVD in a DVD Player
This step assumes you have successfully produced a DVD using MyDVD. When you
insert your homemade DVD into a DVD player, a menu should appear with chapter buttons you can click with the remote control to start playback. That’s great, but the real
thrill is the video quality. Depending on the original source of the video and the settings you used to capture it, your homemade DVDs should look much better than your
VCDs. In fact, I like to say that my DVDs pass the wife test—when my wife saw the
first homemade DVD I made nearly three years ago, she did not ask why the video
looked funny. Instead, she directed me to start transforming all our old VHS and Hi8
tapes to DVDs ASAP.
05 3781 ch04
4/28/05
11:25 AM
Page 131
CHAPTER 4
Lights, Camera, Action!
131
Buying a DVD Burner
There are two ways to add a DVD burner to an existing desktop PC. You can install a
DVD burner in a desktop PC or pay a computer repair shop to take care of this for you.
If neither of these options sound appealing, a really convenient alternative (that’s also
ideal for laptop users), is to go for an external USB 2.0- or FireWire-connected model.
Although a little pricier, its much easier to connect an external burner to your PC’s USB
2.0 or FireWire port than it is to install an internal drive. Plus, they’re portable and can
be taken from PC to PC.
As I mentioned earlier in this project, the latest technology for DVD burners at the time
of this writing is the dual-layer DVD format. If you’re going to buy a drive today, it’s a
good idea to make sure the one you choose supports this feature. A host of products
are available from $100 and up from HP, Memorex, Lacie, Benq, NEC, Samsung, and
Pioneer.
Taking the Next Step
For me, making homemade video discs is one of the most rewarding personal computer
experiences I’ve had yet. Take it from me, it’s easy to become an addict! You can have
hours of fun making VCDs or DVDs using old home movies, or get your kids in the act by
creating music videos or sophisticated homework presentations.
At the beginning of the chapter, I touched on the theme of home movie preservation. Let
me share a family story that might inspire you to apply the skills learned in this chapter.
About 18 years ago, my wife Carolyn took a box of her father’s family vacation 8mm reel
films from the 1950s and early 1960s to a service bureau that transferred them to VHS
tapes (then the state of the art). About two years ago I digitized the whole lot and
burned a set of DVDs which we distributed to her brother and mother. What an experience! Movies that for years sat in a box collecting
dust are now modern DVD big-screen productions
After word gets around
that you know how to
our family can enjoy for decades to come.
make DVDs, your popularity will expand
Breathing new life into old family videos is just
rapidly! My wife told a friend at work
the tip of the PC video fun iceberg! Home digital
about our home PC video studio. Her
movie making does much more than just preserve
son is serving in Iraq and his girlfriend
wanted to send home videos he could
the past. My son Jeff has produced sophisticated
play on the platoon’s DVD player. What
skateboard DVDs and productions documenting
a joy it was for us to take her VHS
his band’s live concerts. And you should see the
tapes and turn them into DVD discs.
looks on the faces of his friends and their parents
She mailed the discs to the soldier and
when we hand them souvenir DVDs of each
his entire platoon could watch them on
performance.
their DVD player.
note
05 3781 ch04
132
4/28/05
11:25 AM
Page 132
Family Computer Fun
What’s next? A moment ago I mentioned my
wife’s friend and her son serving in Iraq.
Thousands of remotely stationed military folks are
staying in touch with the home front using laptop
computers and video/audio web cameras. It’s all
part of an amazing array of products and services
available today that can leverage the power of
your PC and the vast reach of the Internet to bring
loved ones and friends closer together. Get ready
to dive into the world of webcams and Internet
phone services!
Are You
Hooked Yet?
To discover other great videoediting software, go to the
Featured Software section of the
Personal Computing area of the Intel
website. You’ll find listings and links to
great programs the Intel home personal
computing team suggests for average
consumers to try.
To find this resource, turn on your PC,
connect to the Internet, and go to
http://www.intel.com. On the opening
page, look for the Personal Computing
selection and click that button. Now
look for the Featured Software button
and click it. You’ll see a page with categories, such as gaming, video, photography, and more. Click the Video link and
then the link for Video Editing to view
the current list of suggested software.