1
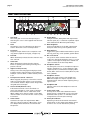
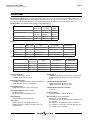
302
302 Compact Production Mixer
User Guide and Technical Information
Sound Devices, LLC
300 Wengel Drive
Reedsburg, WI 53959 USA
tel: (608) 524-0625
fax: (608) 524-0655
www.sounddevices.com
[email protected]
page 2
302 Compact Production Mixer
User Guide and Technical Information
T
he 302 is the essential portable mixer for production companies and camera operators wanting to take control
of their audio. The 302 is stunning in size, flexibility, control and performance; it is the most compact and costeffective battery-powered professional audio mixer in its class.
With important features to accommodate nearly any over-the-shoulder production, the 302 can interface with any
professional microphone, wireless system, or camera /recorder input. Its microphone inputs share the same superb
circuitry of all Sound Devices field production tools.
With many of the controls of the flagship 442 mixer the 302 has a complete feature-set in a compact, functional
design. All controls are accessible on its three main surfaces. The high-efficiency power circuitry runs the mixer from
either three internal AA batteries or external 5-18 VDC.
The 302 is part of Sound Devices family of field production audio tools, which includes mixers, preamplifiers, computer interfaces, recorders, and accessories.
TABLE
OF
CONTENTS
Quick Start Checklist . . . . . . . . . . . . . . .3
Powering
Interconnection
Setting Output Gain Structure
Setting Input Levels
Monitoring
Front Panel Descriptions . . . . . . . . . . . .4
Input Panel Descriptions . . . . . . . . . . . .5
Output Panel Descriptions . . . . . . . . . .5
Input Channels . . . . . . . . . . . . . . . . . . .6
Mic/Line Level Selection
Gain / Trim
Faders
Microphone Powering
Phantom Power Basics
T-Powering
High-Pass Filters
Input Channel Limiters
Peak and Limit LEDs
Polarity Reverse - Channel 2
Stereo Linking of Channels 1 and 2
Outputs . . . . . . . . . . . . . . . . . . . . . . . . .8
XLR Outputs
Inputs 4 & 5
Output Limiters . . . . . . . . . . . . . . . . . .9
Link (Stereo Operation)
Tone Oscillator / Slate Microphone . .9
Tone Oscillator
LIM (Dual-Mono)
Slate Microphone
Headphone Monitoring . . . . . . . . . . . .10
Source
Scale
The Meter . . . . . . . . . . . . . . . . . . . . . . .10
HP Monitor Selection
Headphone Level and Overload LED
Ballistics
Power Switch and LED
Internal Batteries
External DC Sources
Powering . . . . . . . . . . . . . . . . . . . . . . . .11
Illumination Intensity
Power Metering
Power Consumption
Entering the Setup Menu
Setup Example
The Setup Menu . . . . . . . . . . . . . . . . . .12
User Default
Output Limiter Adjustment
Specifications . . . . . . . . . . . . . . . . . . . .13
Warranty & Approvals . . . . . . . . . . . . .15
Warranty
FCC Statement
CE Conformity Statement
Appendix A - Accessories . . . . . . . . . . .16
Appendix B - Metering & Gain Matching
Appendix C - Setup Menu (v 1) . . . . . .17
16
302 Compact Production Mixer
User Guide and Technical Information
page 3
QUICK START CHECKLIST
Proper setup of sound sources and input devices is quick and easy with the 302. Follow the steps outlined below for
basic interconnection.
Powering
1. Insert three AA-batteries with + side first into the mixer battery tube.
2. Switch on the mixer power by sliding the power switch to INT. The power LED will illuminate solid green with
good batteries.
Interconnection
1. Connect the output XLR connectors of the 302 to the destination recorder, camera, or other input.
2. Connect microphones or other signal sources to the input XLR connectors.
3. Switch phantom or T-power on, as required by the microphones.
Setting Output Gain Structure
1. Determine the required input level of the destination. If a line level connection is required, no further output
level adjustment is needed on the 302. If the input level requires less than line level, such as microphone or a -10
dBu level, adjust the master output level accordingly (see Output Level Control).
2. Turn on the 302’s tone oscillator. Adjust the input sensitivity on the destination device so that the 302 output
is at an average level with sufficient headroom to accommodate signal peaks. For many digital cameras and
recorders, this is often a range between -20 and -12 dBfs as read on the recorder or camera’s peak meter. With
analog devices running nominal levels near 0 VU is typical.
Setting Input Levels
1. Select the overall level, mic or line for the input channel.
2. Set the channel fader to the unity gain position.
3. Raise the gain control (trim) so that signal indicates on the mixer.
Monitoring
1. Connect headphones to the headphone connector located on the input panel.
2. Set the headphone source to ST to monitor stereo program. Raise the headphone volume level to the required
level. NOTE: The 302 headphone output is capable of producing ear-damaging levels. Turn down levels before
switching source.
3. Monitor individual sources by moving the headphone selection switch to the 1, 2, or 3 positions.
page 4
302 Compact Production Mixer
User Guide and Technical Information
FRONT PANEL DESCRIPTIONS
4
2
5
1
7
3
10
9
8
6
11
12
14
13
15
16
18 17
1.
Gain (Trim)
The coarse gain control. Sets the input range so
that fine gain control can be applied with the channel fader.
10. Output Meter
Sunlight-viewable, 40-segment LED output meter
indicates peak, VU, or combination peak/VU output
levels. Calibrated in dBu when peak-reading.
2.
Fader
The primary control for adjusting gain during operation. Allows fine control over input levels.
11. Meter Brightness
Controls the brightness of the LED output meter.
Each push selects among four brightness levels.
3.
Pan Switch
Assigns the input channel to the output bus. Leftonly, Center (equal left and right), or Right-only.
12. Meter Ballistics
Toggles among the available meter ballistic options:
VU-only, peak-only, combo peak/VU, peak-hold/VU.
4.
Peak LED
When illuminated, indicates that the channel is very
near overload.
5.
Limiter LED
When illuminated, indicates that the channel
limiter is operating and reducing channel gain to
prevent overload.
13. Mic / Tone Switch
Two-position switch activates either the slate microphone in the left–momentary position, or a tone
oscillator in the right–latched position. Additional
options available in the User Setup Menu.
6.
7.
8.
9.
High-Pass Filter (Low Cut)
Three-position switch engages the high-pass shelving filter. Used to reduce excessive low frequencies.
12 dB per octave at 80 Hz or 160 Hz. Center position
is off.
Polarity Reverse Switch – Channel 2
When engaged, the polarity of channel 2 is reverse
(180° out-of-phase) with respect to input channels
one and three. Useful to flip the stereo image when
using MS stereo techniques.
Stereo Link LED (Channels 1 & 2)
Indicates that channels 1 and 2 are linked as a
stereo pair. Engaged via a user setup. In L/R stereo
link channel 2 fader controls overall stereo level.
When in MS position channel 1 fader controls Mid,
channel 2 fader controls the amount of stereo (side)
information.
Limiter Switch
Activates both input and output limiters. ON is
dual-mono limiter operation, LINK is stereo operation. Output limiter threshold controlled in User
Setup menu.
14. Headphone Selector
Sets the signal source sent to headphones. Options
include: channel PFL 1, 2, 3; left output bus; right
output bus; Mono (summed left and right); STereo
master; RTN - stereo monitor return; MS-mono; MSstereo; RTN-MS.
15. Headphone Volume
Adjusts the overall volume of the headphones.
NOTE: the headphone output is capable of eardamaging levels. Take care when adjusting among
signal sources.
16. Headphone LED
Indicates overload of the headphone circuit and
RTN circuit.
17. Power Switch / LED
Three-position switch selects between internal
battery power or external DC sources. Power LED
illuminates when power is on. LED flashes when
voltage reaches low limit (see Powering).
18. Battery Check Button
Depressing indicates both internal and external
battery levels on the output meter. Battery level is
shown for two seconds after button pressing.
page 5
302 Compact Production Mixer
User Guide and Technical Information
INPUT PANEL DESCRIPTIONS
22
20
21
23
19
19. Transformer-Balanced Inputs
Can be used unbalanced by grounding pin-3 to
pin-1 of the XLR connector. Pin-1 = ground; pin-2 =
‘hot’; pin-3 = ‘cold’.
NOTE: Use T-Powering only for T-Powered microphones.
20. Mic/Line Channel Switch
Selects the input level of the adjacent connector.
Mic level has 40 dB more gain than line level.
22. Phantom Voltage Selection
Selects between 48 V or 12 V phantom voltage
for the input channels. The three-position switch
uses two positions for 12 V—there is no difference
between these positions.
21. Phantom/DYNamic/T-Power Selection
Selects the microphone powering type of the adjacent input. DYN position turns off all microphone
powering. Mic powering is selected per input.
23. Headphone Output
1/8-inch TRS stereo headphone output. Can drive
headphones from 8 to 2000 ohms to required monitoring levels.
OUTPUT PANEL DESCRIPTIONS
24
31
26
32
29
24. XLR Master Outputs
Active-balanced outputs. Pin-1 = ground; pin-2 =
‘hot’; pin 3 = ‘cold’. Can be unbalanced by using pin2 for signal and pin-1 for ground.
25. Output Attenuation LED
When illuminated, indicates that the XLR output
connectors are set for a level other than the factory default of line level. See User Menu to set XLR
output levels.
26. Return Level (Channel 4/5 Level) Control
Adjusts the gain of the return feed to balance program and monitor signals in headphones.
30
27
25
28
27. Channel 4/5 Activation LED
When illuminated, indicates that the return connector is now set as an input 4 and 5 connections.
28. Tape Out / Mix Out
Unbalanced stereo output on TA3-type connector.
Same program as master output. Pin-1 = ground,
pin-2 = left, pin-3 = right. Also used to link to the
Mix In of a 442 or 302.
29. Return (Channel 4/5) Input
Unbalanced stereo 1/8-inch input connector for
return monitor audio. 1/8-inch wired tip = left, ring
= right, sleeve = ground. Connection used for inputs
4 & 5 when selected in Setup Menu.
page 6
30. Mix In
An input to the master bus designed exclusively
to link the Tape Out/ Mix Out of 302, 442, MixPre,
or MP-2 to the 302 for additional inputs. Pin-1 =
ground, pin-2 = left, pin-3 = right. Shell of TA3 connector must be grounded to pin-1 to open connection.
302 Compact Production Mixer
User Guide and Technical Information
Accepts alkaline and lithium cells or NiHM rechargeable cells.
32. DC Input
Accepts DC voltages from 5 - 18 V for mixer powering. Four-pin Hirose connector wired pin-4 positive
(+), pin-1 negative (-). Ext DC is completely isolated
(floating) from the rest of the circuitry.
31. Battery Tube
Holds three-AA batteries for internal powering.
INPUT CHANNELS
The inputs of the 302 consist of three, full-featured
microphone preamplifiers. Each channel has a wide gain
range to accommodate nearly all signal types. The 302
easily accepts signals from low-sensitivity ribbon and
dynamic microphones, medium level wireless and condenser mic outputs, and “hot” line-level signals.
302 input channels are transformer-balanced. The isolation characteristics of transformers are superior to other
balancing techniques for the hostile and uncontrolled
environments of field production. Transformers provide galvanic isolation from the driving source, meaning there is no direct electrical connection. Signals are
“transformed” magnetically. The input transformers in
the 302 use premium magnetic core material to achieve
high signal handling capability (especially at low
frequencies) while keeping distortion to a minimum.
Because of their inherently high common mode impedance, transformers are unrivaled by any other type of
input for common-mode noise rejection.
The inputs of the 302 can be used balanced or unbalanced. When unbalancing, ground pin-3 to pin-1 of
the XLR connector. There is no change in gain between
unbalanced and balanced connections into the 302.
Mic/Line Level Selection
The Mic/Line switch on the input panel is used to select
the input level for each channel. Taking into account all
gain stages, the 302 has up to 75 dB of available gain
from mic input to line output. When in the LINE position, the input channel sensitivity is reduced by 40 dB.
Faders
While both the gain and the fader control the gain of
a given channel, the fader is the primary channel level
control used in operation. The gain can be thought of
as a “coarse” gain adjustment to be adjusted during
setup, and the Fader is a “fine” level adjustment to
be adjusted while recording. With a properly set gain
control, the fader can be set to a nominal 0 (unity) level.
With the fader at unity, the dynamic range of the mixer
is maximized. There is a wide range of control for the
input, allowing for smooth level changes with adequate
control of attenuation and gain.
Microphone Powering
Phantom powering and T-powering are methods of
providing power to microphones by applying a voltage
using the same wires that carry the audio signal. The
302 produces phantom or T-power for microphones
requiring power.
Condenser microphones require power for various parts
of their operation, including impedance converters,
preamplifier circuitry, and in some cases, to polarize microphone capsules. The 302 can provide either phantom
power or T-power to each channel and is selected per
channel.
If neither phantom or T-power are required, for instance with dynamic microphones, it is good practice to
turn off microphone powering.
Phantom Power Basics
Gain / Trim
Like traditional mixing consoles, the 302’s microphone
preamp gains are set via the gain control. The gain, or
trim, adjusts the input sensitivity of a channel input so
that the channel fader can be set to operate in a usable
range. Once set, the gain is typically kept at the set level
and all mixing is done on the channel fader. The gain
adjustment features a pop-up knob so that it can be adjusted easily and then hidden from the mixing surface.
Phantom powering is a fixed DC voltage between 12
and 48 volts. This voltage is resistively applied to pin-2
and pin-3 of an XLR connector relative to pin-1. (Note
that as there is no voltage difference between the signal pins -2 and -3—a dynamic mic can operate just fine
in the presence of phantom powering.)
When phantom is selected, the 302 can provide up to 10
mA to each input at 48 V, sufficient for the most powerhungry condenser microphones. When acceptable,
using 12 V phantom is recommended to extend battery
page 7
302 Compact Production Mixer
User Guide and Technical Information
runtime. Many microphones do not require 48 V phantom and can be properly powered from 12 V phantom
power. The phantom voltage level is globally selected
for all inputs - either 12 V or 48 V.
Microphones draw differing amounts of current based
on their design. Many phantom-powered mics will
operate at 12 V with no difference in performance as
compared to operating off of 48 V. As the mics draw
the same current no matter what the phantom voltage,
operating at 48 V consumes four times the power as 12
V with no performance gain! This excess power draw
can make a significant difference in battery life and is
the reason the 302 allows the user to select the phantom voltage.
It is generally good practice to turn off phantom power
when not using a phantom powered mic, as phantom
power can capacitively couple noise into the mic inputs
with poor mic cables. Also, turn phantom power off
when using ribbon microphones since an improperly
wired cable can permanently damage the microphone.
The DYN (dynamic) position applies no voltage to the
microphone input.
The 12 V / 48 V phantom voltage switch sets the overall
phantom voltage selection. It does not apply this voltage to an input, only sets the phantom voltage available.
T-Powering
T-powering is a microphone powering scheme used by
several European condenser microphone manufacturers. Today, T-powered microphones are not as common
as phantom powered microphones, but many are still in
regular use. Unlike phantom power, T-power resistively
applies 12 V between the signal pins -2 and -3. T-power
can be selected for each input. The 302 provides positive
T-power, where pin-2 on the XLR-3 connector has +12
volts relative to pin-3. When using “red dot” T-powered
microphones (reverse polarity T-power) use a polarity-reversing adapter on the input, otherwise damage
to the microphone may occur. Do not apply phantom
power to T-powered microphones.
NOTE: Phantom and T-powering are not interchangeable. Use T-powering only for T-powered microphones.
High-Pass Filters
Each channel of the 302 has a two-position high-pass filter. High-pass (or low-cut / low roll-off) filters are useful
for removing excess low frequency energy in audio signals. Wind noise is a common unwanted low frequency
signal and a high-pass filter is effective for reducing
wind noise. For most audio applications engaging the
high-pass filter is beneficial, since little usable audio
information exists below 80 Hz, especially for speech
reproduction.
The 302’s high-pass filters features a 12 dB/octave slope
with either 80 Hz or 160 Hz corner (- 3 dB) frequencies. The 160 Hz settings can be used when aggressive
filtering is required. The 302’s high-pass circuit is unique
because of its placement before any electronic amplification. Most mixer’s high-pass circuits are placed after
the mic preamp, where all of the high-energy low-frequency signals get amplified. Because the 302’s circuit
cuts low-frequency signals before amplifying, higher
headroom is achieved in presence of signals with a lot
of low-frequency energy.
Where possible, attempt to equalize at the sound
source with microphone selection, use of windscreens,
microphone placement, and on-board microphone
filtering. Many microphones have on-board high pass
filters, and the high-pass filters on the 302 can be used
in conjunction with the microphone’s filters to increase
the filter’s slope.
The high-pass filter can be removed by placing it in the
center position.
Pan Switches
The pan switches assign an input channel’s audio signal
to the outputs. Inputs can be sent to the left, right,
or both outputs equally. The 302 features excellent
“off-attenuation” of the channels in the left and right
positions.
Input Channel Limiters
The input channel limiters act solely as “safety” limiters,
and are enabled when the output limiters are enabled
via the “LIM” switch on the front panel. (See Setup
Menu to defeat Channel Limiters entirely.) In normal
operation with a properly set gain structure, the threshold of the channel limiter will rarely be reached. If extremely high input signal levels are approached, such as
in high SPL environments or with misadjusted settings,
the channel limiter(s) will activate to prevent the input
channel from clipping. Without a channel limiter, “hot”
signals could overload the channel and cause distortion.
It is recommended that the channel limiters be used at
all times. Below the factory-set threshold (just below
clipping), the limiter has no effect on audio. There is no
user-adjustments to the channel limiter thresholds.
When input channels 1 & 2 are linked as a stereo pair,
their channel limiters also link to perform the same gain
reduction to both channels equally. Each channel has an
orange limiter LED which illuminates in proportion to
the amount of limiting. If the orange LED for a channel
comes on regularly, it is recommended to turn down the
Gain.
page 8
Peak and Limit LEDs
Each channel has an indication of peak signal activity.
When a channel approaches 3 dB below its clipping
level, the red Peak LED illuminates. If the red Peak LED
for a channel comes on often, it is recommended to
turn down the Gain.
The channel limiter LED will illuminate when the input
limiter is active.
Polarity Reverse - Channel 2
Engaging the polarity reverse switch inverts the polarity
of channel 2. Polarity reversal is often used to quickly
reverse the stereo field in MS recording. The normal
position is OFF, with polarity reversal occurring when
the switch is in the ”Ø” position.
NOTE: Be advised that an audible pop occurs when the
polarity switch changes states.
302 Compact Production Mixer
User Guide and Technical Information
trols the overall level of both inputs. The channel gain
and high-pass controls still function on each channel.
In X/Y Stereo linking, the input limiters for channels 1
and 2 are linked to operate identically on each signal.
MS Stereo - When MS stereo linking is set in the User
Menu, input channels 1 and 2 are linked as an MS (midside) stereo pair. MS is a popular stereo configuration
because of its good spatial placement, mono-compatibility, and surround compatibility.
The 302’s MS matrix uses the channel 1 input as the Mid
signal and channel 2 as the side signal. The channel 2
fader controls overall gain. Channel 1 fader and channel
2 pans are disabled. The Gain Trims and high-pass filters
still act individually. The Gain Trim controls for inputs
1 and 2 can be used to vary the Mid and Side levels respectively. Using the channel 2 gain trim is an effective
way to control stereo spread.
Inputs 4 & 5
Stereo Linking of Channels 1 and 2
Stereo linking allows input channels 1 and 2 to be
controlled as a single, stereo input. This is useful when
stereo microphones or stereo line level signals are used
with the 302 and the operator wants a single knob for
controlling the overall signal.
There are two modes of operation for stereo linking,
X/Y link and MS stereo. In both cases, input channels 1
and 2 are used for the inputs. Stereo linking is selected
in the User Setup menu.
X/Y Stereo Link - Input channels 1 and 2 can be linked
as a stereo pair to simplify control with stereo microphones. X/Y stereo linking is set in the User Menu.
When in X/Y stereo link operation, channel 1 and 2 pan
controls still control signal routing. Channel fader 2 con-
When additional input channels are needed, such as
when multiple wireless receivers are used, the Return
connector can be set as the channel 4 and 5 input connector. This functionality is set in the User Menu (see
User Menu).
Several options are available for channels 4 and 5.
Either or both inputs 4 and 5 can be sent to the left,
right, or left and right output bus. The input sensitivity
of channels 4 and 5 are controlled by the trim control
adjacent to the connector. Note, this unbalanced input
is suitable for aux or line level devices only. There are no
microphone preamps on channels 4 and 5.
To indicate that the Return connector is now input
channels 4/5, the 4/5 Input LED on the output panel
illuminates.
OUTPUTS
The 302 is a two-bus mixer. Since each input can be
“hard panned” between the left and right output bus
the 302 is easily used in either stereo or dual-mono
operation. Because dialog is often recorded in mono,
each output connector can be used to feed a separate
camera or recorder. XLR Outputs and Tape Outputs are
both sent from the master output bus and share the
same program content.
The 302 has no master level control. The master bus is
factory-set to unity gain, or “0” dB.
XLR Outputs
The master XLR outputs are active-balanced connections, each capable of driving long lines. The master
output level from the factory is set at unity gain, where
+4 on the meter (peak-viewing) corresponds to +4 dBu
signal level at the master XLR output.
The 302 features a unique master output level adjustment. This can be thought of as a master level control
which is placed after the output meters. With this, it is
possible to make the 302’s meter correspond directly to
the recorders meters. By adjusting the attenuation level
in the setup menu (see Setup Menu for adjustment)
the output level of the 302 can be adjusted to anything
from line level to microphone level. Output levels are
set depending on the device (camera, recorder, transmitter, etc.) that the outputs are connected. This control
is ideal since the gain structure can be precisely set for a
given piece of equipment.
page 9
302 Compact Production Mixer
User Guide and Technical Information
When the output level is set to a level different than
the factory default of Line, the Output Attenuation LED
on the output panel illuminates. This is a quick reminder
that the XLR output is not line-level. See Appendix C
for more information on output attenuation and meter
matching.
Tape Out (Mix Output)
The 302 has an unbalanced, two-channel tape level output on a single locking TA3-type connector. Tape output
program is identical to XLR output program, although
they are isolated from each other. The 302 tape output
is typically used to interface the 302 mixer with consumer-type inputs such as MiniDiscs, DATs, and compact
cassette recorders. The tape output is also used to feed
wireless transmitters when the masters are connected to
cameras or recorders. The tape output is isolated from
the main output – devices connected to the tape out
have no effect on the master outputs.
The Tape Out is also used when linking the 302 to another 302 mixer or Sound Devices 442 Field Mixer. Using
the XL-1 cable supplied with the 442, connect the 302
Mix Output to the 442 Mix In connection. All three of
the 302 inputs appear at the 442 master outputs.
OUTPUT LIMITERS
In addition to the limiters on each input channel, the
302 has a software-controlled limiter for the output
buses. Output limiters are used to prevent overload of
recorders, cameras, and wireless transmitters connected
to the 302. The output limiter on the 302 is a optoisolator-based peak limiting circuit. Its threshold of operation is set in the User Menu. The output limiter can be
set in one of two positions, Link or LIM.
Link (Stereo Operation)
When set in the link position, the output limiter acts
identically on each output bus. If one output makes the
limiter engage, the other bus will follow suit. This is
very useful when using the 302 in stereo—limiter operation will not affect the stereo image.
LIM (Dual-Mono)
When using each output bus separately the output
limiter should be set to the ON position. This position
engages each output limiter separately. They will act on
each respective output bus independently of the other.
While all dynamics processing “distorts” the audio signal, overloading a
circuit is usually far more objectionable. For most applications the limiters are a significant benefit and should be enabled.
TONE OSCILLATOR / SLATE MICROPHONE
A single 3-position switch controls both the tone oscillator and the slate microphone. The tone/slate switch
is located in the upper right corner, protected from
inadvertent engagement by the end panel. When the
tone oscillator or slate microphone is engaged program
is interrupted to the master bus.
Tone Oscillator
Tone is used to set gain structure between the 302 and
the next device in the signal path. The tone oscillator
uses the locking position of the switch.
From the factory, the tone oscillator is set to output a 1
kHz tone at 0 dBu to the outputs (when the outputs are
set to Line level). In the Setup Menu, the tone frequency
and output level can be adjusted and tone can be defeated.
When engaged, the 302 tone oscillator attenuates the
headphone output by 20 dB to save the operator’s ears.
This feature can be defeated in the Setup Menu.
Pressing the battery check button when the tone oscillator is active sets the left output to cycle between 0
and -20 dB. This is helpful to verify proper left and right
channel connection. Turning off the tone oscillator or
pressing the battery check button again stops the output cycling.
When adjusting the output attenuation in setup mode, activating the
tone oscillator will output a full-scale tone to aid in gain structure setup.
Slate Microphone
The slate microphone is used to audibly notate scenes at
the mixer location. Its audio performance is not suitable
for critical recording applications; it should only be used
for documenting scenes to tape. The slate mic uses the
momentary switch position.
In the Setup Menu, a one second 400 Hz tone can be set
to precede the slate microphone. The slate microphone
signal is sent to all outputs. In the Setup Menu, the slate
microphone can be disabled to prevent unintended activation. Also, the switch assignments of slate and tone
can be reversed for convenience.
page 10
302 Compact Production Mixer
User Guide and Technical Information
HEADPHONE MONITORING
The 302 has a flexible headphone circuit capable of
selecting a variety of audio signals for listening in
headphones. Most professional headphones ranging in
impedance from 8 ohms to 1000 ohms can be used with
the 302.
PFL 3 - same as above, but for channel 3 input.
NOTE: THE 302 IS CAPABLE OF PRODUCING EAR-DAMAGING LEVELS IN HEADPHONES. TURN DOWN THE
HEADPHONE VOLUME BEFORE SELECTING A MONITORING SOURCE.
ST - Stereo monitoring of master output bus. This is the
primary monitoring path.
The headphone level control adjusts the overall volume
sent to the headphones. The level control adjusts both
the left and right headphone outputs simultaneously.
M-MS - Monitoring of the mono signal of an MS stereo
signal.
HP Monitor Selection
RTN-MS - Monitoring of discrete MS return signal in
headphones as decoded stereo signal.
Several signal sources can sent to the headphones. The
front panel rotary switch selects the signal.
PFL 1 - PFL solo monitoring of the channel one input
signal. Channel is monitored in mono. Pre-fade,
post limiter, post high-pass. Useful for setting the
channel gain.
PFL 2 - same as above, but for channel 2 input.
L - Left output bus, monitored dual-mono.
R - Right output bus, monitored dual-mono.
M - Summed mono of left and right output bus.
RTN - Stereo return from the RTN monitor input path.
ST-MS - Monitoring of discrete MS signals in headphones as decoded stereo signal.
Headphone Level and Overload LED
The headphone level knob controls overall headphone
level to the phones. The adjacent LED indicates that
the headphone circuit is overloading. The LED will also
illuminate with an overloaded RTN signal.
THE METER
The meter on the 302 provides a great deal of audio
signal information for the operator. The ability to view
peak level (PPM), average levels (VU), or a combination
of both is unique to Sound Devices LED-based meters. In
addition to the flexibility to provide multiple meter ballistics, the meter does not have the inherent limitations
of LCD and mechanical meters— sluggish indications in
cold temperature with LCD’s and fragility with mechanical meters. The 302 meters share the same technology
and software programmability used in Sound Devices
larger 442 field mixer.
Source
The meter can display
levels of the output bus,
the PFL levels or levels
from the RTN inputs. Default operation is always the
output bus except when PFL’s are selects via the rotary
switch. This operation can be altered via the setup
mode.
Scale
The 302’s numerical meter scale is calibrated for dBu in
peak operation, and for VU in VU operation. The 302’s
scale is designed for today’s quiet recording devices,
providing maximum resolution between -30 to 0 dBu
(-50 to -20 dBFS). This allows the user to record with a
full 12 to 20 dB of headroom while in the fine-resolu-
tion green-colored part of the meter. Additionally, the
meter color changes to orange at 0 dBu and then red at
+8 dBu. These color changes correspond to -20 dBFS and
-12 dBFS respectively, which are commonly used recording levels for today’s recording devices.
Ballistics
The 302 output meter can indicate several different
selections of ballistics. The available choices that are
selected with the front panel meter ballistics button can
be selected via a User Setup. To move from one setting
to the next depress the meter ballistics button. Settings
include:
VU - calibrated to show average loudness of audio
signals. Useful when connecting to analog recorders
or in combination with peak readings. VU meters
are too slow to be used as the sole metering with
digital devices.
Peak - important setting used to know the absolute
peak signal level to prevent overload of downstream devices. Peak-only is commonly used in
Europe, but is being replaced by the PPM/VU combination metering.
Peak with VU combination - a very informative setting
which for many users is the default used with the
302. Indicates the absolute peak level as well as the
“loudness” of the signal.
page 11
302 Compact Production Mixer
User Guide and Technical Information
Peak-Hold with VU - similar to Peak/VU combination,
but with the peak level being held for 1500 ms.
Useful when a peak signal is encountered while the
operator is not viewing the meters - peak held long
enough to know if signal exceeded desired levels.
Illumination Intensity
The output meter can be set for comfortable viewing
in all lighting conditions. Four levels of brightness are
available by depressing the meter intensity button.
POWERING
The 302 can be powered from either internal batteries or from external DC. The power-efficient 302 can
operate from three AA alkaline batteries for nearly a
production day (without phantom powering). While
many users prefer external DC sources supplying both
their mixer and wireless receivers, the use of internal
batteries is perfectly feasible for both operation and
backup with the 302.
ground loop and interaction among devices sharing the
same DC source.
Power Switch and LED
The battery check button indicates battery voltages
of internal and external power supplies on the output
meter. The left meter shows the internal battery voltage
and the right meter shows the external battery voltage.
Since many different battery types are available for external use, the external DC metering can be customized
for a given battery in the Setup Menu. The power meter
is read from left to right, with the highest voltage indicated with LED’s lit all the way to the left (green).
The 3-position power switch selects between internal
batteries, external DC, or off. Because of the power supply design of the 302, the unit takes approximately 10
seconds to fully stabilize its power supply after powerup. Additionally, there is sufficient capacitance in the
circuit to toggle between internal and external without
disruption in audio.
The power LED illuminates solid green to indicate good
power. When the power source falls below the threshold voltage (see chart below) the power LED begins
to flash. Once flashing changing the power source is
recommended.
Internal Batteries
The 302 uses a unique battery tube to hold 3-AA batteries. This robust tube is sealed to prevent any battery
leakage from ruining the internal circuitry. The threaded-nickel cap extends beyond the panel to make battery
changes easy and quick. In normal operation the battery
compartment extends no farther than adjacent XLR connectors.
The DC connector is a Hirose 4-pin female. This locking connector mates to Hirose P/N HR10-7P-4P (Sound
Devices p/n XL-H). Pin-4 is the positive voltage and pin-1
is negative.
Power Metering
Power Consumption
The 302 can vary in the amount of current it draws. Several functions of the 302 directly affect current draw in
different ways. The following list highlights the larger
current drawing functions (listed from highest to lowest
current draw).
Note: Remove batteries when the unit is stored.
• Microphone powering - the main source of current beyond the idle current draw. (See Phantom Power) 48 V
phantom can draw copious amounts of current out of
the batteries depending on what model microphone is
used. Two phantom powered microphones draw twice
as much current as one. Microphones vary widely in
their current draw depending on type and phantom
voltage applied.
External DC Sources
• Output drive level - higher output drive levels into
multiple, low-impedance inputs increases current
draw.
For extended mixer runtime use an external DC source.
The 302 can be powered from any DC source with a
voltage range of 5 V to 18 V. If using an AC-DC transformer make certain its voltage falls in the 5 - 18 V
range and can supply at least 4 watts. If an over voltage
is applied to the mixer an internal poly fuse is opened
to prevent mixer damage. The fuse is reset when the
voltage is removed. In addition, the external DC supply is isolated (floating) from the circuitry to minimize
• Headphone output circuit - high headphone output
levels increase current draw.
• Meter brightness - current draw is slightly increased
with higher illumination intensities.
Experimentation is recommended to determine battery
life for each individual setup and application.
page 12
302 Compact Production Mixer
User Guide and Technical Information
THE SETUP MENU
The 302 has 18 available setup features (see Appendix
for Setup Chart). Setups, typically set-and-forget features infrequently changed, are easily accessed directly
on mixer’s the front panel.
To save new values to memory, the PK/VU button must
be repeatedly pressed until the last setup is reached. At
that point the meters will scroll and the new values will
be saved to memory.
Entering the Setup Menu
User Default
A memory location is available to store user-defined default settings. The user default is helpful to save a new
“baseline” of settings different than the factory default
settings. To save a user default perform the following:
To access the setup menu perform the following steps:
1.
Turn off the mixer, if already on.
2.
Depress and hold the Peak/VU selection switch
while switching power on.
3.
The setup mode is now enabled.
The mixer will not pass audio when in the setup menu.
When in the setup menu the left meter (L) position
indicates the selected setup feature. The right meter (R)
position indicates the values selected for the setup. Use
the PK/VU button advance from one setup to another.
If the intended feature is passed, setup mode must be
re-entered since you can only step forward through the
menu.
To adjust values, the meter brightness button (left) and
the battery check button (right) allow selection among
setup values. Some setups have multiple values while
others have only two values.
1.
Hold down both the meter brightness button and
battery check button while powering the mixer.
2.
The current settings will be saved as the user default.
The user default settings can be recalled from the setup
menu by applying the user default restore (see setup
menu).
Output Limiter Adjustment
Output limiter thresholds are adjustable between +4
dBu and +20 dBu in 1 dB increments. The threshold level
is shown on the lower (right) meter string by illuminating LEDs. Because LEDs are spaced every 4 dB, a combination of flashing and solid adjacent LEDs indicate
limiter levels between the numbered LEDs. Factory
default is 20 dBu. Each press of the battery button or
meter brightness control changes the threshold by 1 dB.
Three possible LED indications show threhold value:
•
Single solid LED - actual value indicates threshold.
•
Flashing LED next to a solid LED - indicates that the
threshold is one dB above or below the solid LED
value.
•
Two solid LEDs - threshold value is even number
value between the two indicated values.
Setup Example
The following steps show how to change the tone oscillator frequency from the factory default of 1 kHz to 100
Hz.
1.
Enter the setup menu by holding down the PK/VU
button while powering the mixer.
2.
Press the PK/VU button six times until the left meter
LED is at the -16 position (see Appendix - SETUP
MENU).
3.
To move among parameter values, press the brightness LED and battery check LED until the 100 Hz
position is selected (-24 LED).
4.
Press the PK/VU button multiple times until the
meters perform their scrolling dance. This saves all
parameter into memory.
Two examples are shown below, a setting of +10 dBu
and +11 dBu thresholds.
both “8” and “12” LEDs
solid indicates +10 dBu
limiter threshold
“8” flashing and “12”
solid indicates +11 dBu
limiter threshold
page 13
302 Compact Production Mixer
User Guide and Technical Information
SPECIFICATIONS
Measurement settings (unless otherwise specified): Gain controls for the channel being measured at mid point, all
other channels gains fully down; pan switches centered; low-cut off; inputs in ‘mic’ position; outputs in ‘line’ position. Mic input driven with 150 ohm source. Outputs measured with 100k ohm load. Temperature at 25º C.
Maximum Gain, typical (trim, fader, master, phones RTN fully up):
XLR Input
Mic Setting
XLR Input
Line Setting
RTN /
ch 4/5
XLR output @ factory (line) setting
75 dB
35 dB
20 dB
XLR output attenuated
0 - 16 dB
2 dB steps
40 to 56 dB,
2 dB steps
25 - 41 dB,
2 dB steps
Tape output TA3-type
61 dB
21 dB
6 dB
Headphones, 1/4-in and 1/8-in
95 dB
55 dB
30 dB
Inputs:
Impedance:
(Ohms Actual)
XLR, mic setting
2.5k
XLR, line setting
Mix In
Return & ch 4/5
Type:
For use with:
Max Input Level:
transformer-balanced
< 600 ohm mics
0 dBu (0.78 Vrms)
16k
transformer-balanced
< 2k ohm outputs
+40 dBu (80 Vrms)
4.2k
unbalanced, stereo
302, 442 Mix Out (1.8k)
+6 dBu (1.5 Vrms)
10k
unbalanced
< 2k ohm outputs
+30 dBu
Outputs:
Impedance:
(Ohms Actual)
Type:
For use with:
Max Output Level:
XLR, factory Line setting
150
active-balanced
>= 600 ohm mics
+20 dBu (7.8 Vrms)
XLR, mic (lowest) setting
150
active-balanced
< 2k ohm outputs
-36 dBu
Tape out / mix out TA3
1.8k
unbalanced, stereo
> 6k ohm inputs
+6 dBu (1.5 Vrms)
Headphones - 1/8-inch
200
unbalanced, stereo
8 - 2k ohm phones
+20 dBu (7.8 Vrms)
Frequency Response:
20 Hz - 30 kHz, +0.2, -0.5 dB,
-1 dB @ 5 Hz and 50 kHz typical
Equivalent Input Noise:
-126 dBu (-128 dBV) maximum (22 Hz - 22 kHz bandwidth, flat filter, trim control fully up)
Input Clipping Level:
0 dBu minimum (trim control fully down)
Line Output Clipping Level (1% THD):
20 dBu minimum
18 dBu minimum with 600 ohm load
Dynamic Range:
115 dB minimum (trim fully down)
THD + Noise:
0.007% typical (1 kHz, +4 dBu at Line out)
0.009 max (50 Hz to 20 kHz, +18 dBu at Line out,
fader fully up)
Output Noise:
-100 dBu (-102 dBV) maximum (22 Hz - 22 kHz bandwidth, flat filter, master gain fully up, faders fully
down)
Common Mode Rejection Ratio:
120 dB minimum at 80 Hz, mic input
100 dB minimum at 10 kHz, mic input
L/R Gain Matching, Mic In to Line Out:
+/- 0.1 dB
High-Pass Filters:
Switchable 80 Hz or 160 Hz, 12 dB/oct
Mic Powering (each mic selectable):
Dynamic (no power applied),
12 V Phantom - though 680 ohm resistors, 10 mA per
mic available,
48 V Phantom - through 6.8k resistors, 10 mA per
mic available, 12 V T-Power - through 180 ohm resistors, 10 mA per mic available.
page 14
302 Compact Production Mixer
User Guide and Technical Information
Input Limiters:
+18 dBu threshold, 20:1 limiting ratio, 1 mS attack
time, 200 mS release time.
Power Consumption:
130 mA @ 4.5 V, internal batteries, idle, no phantom
55 mA @ 12 V external DC, idle, no phantom
Temperature:
Operating: –20°C to 60°C, 0 to 95% relative
humidity; (non-condensing)
Storage: –40°C to 85°C
Metering:
40-segment (2 x 20), sunlight-viewable
Selectable Peak, VU, or Peak (with or without peak
hold) + VU ballistics.
Output Limiters:
Affects the outputs of the mixer.
Threshold selectable from +4 dBu to +20 dBu,
1 dB steps, 20:1 limiting ratio, 1 mS attack time, 200
mS release time.
Weight:
0.85 kg, (1.8 lbs) unpackaged with three alkaline AA
batteries
Power supply:
Internal ±16 V (bi-polar) regulated audio rails, 2.4 - 6
V range internal batteries,
Isolated (floating) external DC input jack, 5-18 V
Locking 4-pin Hirose connector, pin-4 = (+), pin-1 =
(-), use Hirose #HR10-7P-4P (DigiKey# HR100-ND) for
locking mating DC connector.
Dimensions:
47 mm x 214 mm x 114 mm (H x W x D)
1.8” x 8.4 x 4.5”
302 Compact Production Mixer
User Guide and Technical Information
page 15
WARRANTY & APPROVALS
Warranty
Sound Devices, LLC warrants the 302 Production Mixer against defects in materials and workmanship for a period
of ONE (1) year from date of original retail purchase. This is a non-transferable warranty that extends only to
the original purchaser. Sound Devices, LLC will repair or replace the product at its discretion at no charge. Warranty claims due to severe service conditions will be addressed on an individual basis. THE WARRANTY AND REMEDIES SET FORTH ABOVE ARE EXCLUSIVE. SOUND DEVICES, LLC DISCLAIMS ALL OTHER WARRANTIES, EXPRESS
OR IMPLIED, INCLUDING WARRANTIES OF MERCHANTABILITY AND FITNESS FOR A PARTICULAR PURPOSE. SOUND
DEVICES, LLC IS NOT RESPONSIBLE FOR SPECIAL, INCIDENTAL, OR CONSEQUENTIAL DAMAGES ARISING FROM ANY
BREACH OF WARRANTY OR UNDER ANY OTHER LEGAL THEORY. Because some jurisdictions do not permit the exclusion or limitations set forth above, they may not apply in all cases.
For all service, including warranty repair, please send the 302, along with proof of purchase date to:
Sound Devices, LLC
Service Repair
300 Wengel Drive
Reedsburg, WI 53959 USA
FCC Statement
This device has been tested and found to comply with the limits for a class B digital device, pursuant to part 15 of
the FCC rules. These limits are designed to provide reasonable protection against harmful interference in a residential installation. This equipment generates, uses, and can radiate radio frequency energy and, if not installed and
used in accordance with the instructions, may cause harmful interference to radio communications. However, there
is no guarantee that interference will not occur in a particular installation.
CE Conformity Statement
Declaration of Conformity
According to ISO/IEC Guide 22
Manufacturer’s Name:
Sound Devices, LLC
Manufacturer’s Address:
Sound Devices, LLC
300 Wengel Drive
Reedsburg, WI 53959 USA
declares that the product: 302 Production Mixer
is in conformity with:
Document No.
Description
EN55103-1 (1997)
Emissions standard for product family audio devices for professional use
EN55103-2 (1997)
Immunity standard for product family audio devices for professional use
EN55022 (1995)/
Radiated and Conducted emissions, Class B
CISPR 22 (1997)
EN61000-4-2 (1995)/
ESD - 6kV contact, 8kV air-discharge
IEC1000-4-2 (1995)
EN61000-4-3 (1995)/
Radiated RF Immunity, 3 V/m, 80% 1 kHz amplitude modulation
IEC1000-4-3 (1995)
EN61000-4-4 (1995)/
EFT/Burst, I/O lines, ± 0.25 kV to ± 1.0 kV
IEC1000-4-4 (1995)
EN61000-4-6 (1996)/
Conducted RF Immunity, 3 V, 80% 1 kHz amplitude modulation
IEC1000-4-6 (1996)
Tested by:
L. S. Compliance, Inc. Cedarburg, Wisconsin
March 26, 2003
Matthew Anderson
Director of Engineering
page 16
302 Compact Production Mixer
User Guide and Technical Information
APPENDIX A - ACCESSORIES
Several high-value accessories are available for the 302 mixer, including a carry-case, cables, and power accessories.
For a full list of Sound Devices products and accessories, visit our web site www.sounddevices.com/products.
CS-302 Carry case designed exclusively for the 302 mixer. Features a bottom-side pouch that accepts an NP-type
battery and leather shoulder strap. Accepts Portabrace RM-multi and RM-deluxe accessories and AH-2 harness (not included).
XL-1 . . TA3-F to TA3-F link cable for 302-to-302 and 302-to-442 linking; 6-inch.
XL-3 . . 3.5 mm to TA3-F link cable for MixPre/MP-2 Tape Output to 442 Mix In; 12-inch.
XL-4 . . Bag of four (4) TA3-F-type connectors.
XL-H . . Bare Hirose connector, (Hirose p/n HR10-7P-4P) to mate with locking 4-pin DC power jack.
XL-NPH NP-type battery cup with 12-inch cable with Hirose 4-pin locking power jack at equipment end. For use
with 302, 442N, 442, and MixPre.
APPENDIX B - METERING & GAIN MATCHING
The 302 includes a unique output attenuator circuit
which is adjusted via “user setups”. This can be thought
of as a master gain control which comes after the 302’s
output meter. This circuit allows the user to match the
302’s output level to any recording device. When properly set, dynamic range of the system is maximized and
the 302’s meters will “match” the recorder’s meters.
full-scale tone output function. “Full scale” is the same
as “clipping level.” To activate this full scale tone, turn
on the tone switch while in setup mode #1. Be extremely careful when doing this, as a full-scale tone is
extremely loud and can hurt the operator’s ears. Make
sure to turn down the headphone level and the level
going to any amplifiers, etc. from the 302.
For simple interconnection the following three setting
are identical to setting the output switch on the 442
mixer to “Line”, “Tape”, or “Mic.”. 0 dB – Line , 14 dB
– Tape , 40 dB – Mic .
The failsafe way to set proper levels is as follows:
However, to tailor the 302’s outputs exactly to the recording device, the 302’s output can be attenuated from
full line-level in steps of 1 dB from 0 to 16 dB (line/tape
levels), then 40 to 56 dB (mic levels). So if 40 dB of attenuation is “too hot” for a given device’s mic input,
the attenuator could be set to 50 dB or more.
3. Turn down headphones and any amplifiers connected to the 302’s other outputs.
When interconnecting the 302 to any recording device,
the best way to set the level between them is to match
the 302’s output clipping level with the recorder’s input
clipping level. When this is done and the recording
device’s input gain controls are kept fixed, two things
will happen: (1) The dynamic range of the recording is
maximized. (2) All level metering can be done via the
302’s meter.
6. Adjust the 302’s Output Attenuator via the up/down
buttons until the recorder is just shy of clipping as
indicated on its meter.
The recorder’s level meter can be ignored since the only
way for the recorder to clip is for the 302 to clip. The
302’s meters match the recorder’s meters in that the clip
points match. Because most recorder’s meter ballistics
and scale are different, it is impossible to make the 302
meter exactly match a given recorder’s meter. However,
this is irrelevant if the clip levels match.
To facilitate matching the clipping levels of the 302’s
output to the recorder’s clip level, the 302 includes a
1. Connect 302’s XLR outputs to recording device.
2. Enter setup mode #1 (see “Setup Mode” section).
4. Turn on the tone oscillator via its switch.
5. Turn the recording device’s input gain control to its
detented point (or half-way if no detent).
7. If the 302’s Output Attenuator is at 0 dB and the
recorder is not to its clip level, increase the recorder’s
gain control until it is to the clip level.
8. Fix the recorder’s gain controls with tape so that
they do not get bumped.
9. Exit the 302’s setup menu by pressing the PK/VU
switch until the startup sequence happens. Note:
The setup menu must be exited in this manner or
else the setting will not be saved.
10. It is recommended that the 302’s limiters be turned
on at all times, as they will not activate until just
before clipping.
page 17
302 Compact Production Mixer
User Guide and Technical Information
APPENDIX C - SETUP MENU (V 1)
Below is the chart of setups for the 302. See Setup Menu on page 12 for instructions on how to enter and navigate
the setup menu.
Setup
Setting (value on R meter)
[factory default bold/underlined]
Description
-30
XLR Attenuation Level
Line-level (0), add the indicated values on left
and right meter for attenuation amount
Selects the amount of attenuation from Line level
on the XLR outputs.
-26
Output Limiter
Threshold Adjustment
1 dB increments from +4 to +20 dBu, level
shown on meter
Sets the output limiter threshold in dBu. see page
12 in User Guide for more details.
-24
Stereo Link,
Channels 1 /2
OFF (-30), Stereo Link (-26), MS Link (-24)
Links inputs 1 and 2 as a stereo pair, either X-Y or
MS stereo
-22
Input Limiter Defeat
OFF (-30), ON (-26)
When ON, input limiters remain OFF at all times
-20
RTN L to Channel 4
Input
OFF (-30), L-only (-26), R-only (-24), L+R (-22)
Routes RTN-Left signal to the master bus with the
set pan assignment.
-18
RTN R to Channel 5
Input
OFF (-30), L-only (-26), R-only (-24), L+R (-22)
Routes RTN-Right signal to the master bus with
the set pan assignment.
-16
Tone Oscillator
Frequency
1000 (-30), 400 (-26), 100 (-24), Hz
Selects the frequency of the sine wave tone
oscillator
-14
Tone Oscillator Level
OFF (-30), -20 dBu (-26) -10 dBu (-24), 1 dB
increments to +8, 0 dBu is default
Selects the output level of the tone oscillator in
dBu at LINE level
-12
Slate Mic ON/OFF
ON (-30), Tone + Slate (-26), OFF (-24)
Activates the slate mic. Tone and slate offers a
400 Hz tone preceding the slate mic.
-10
Metering Source
ST & PFL (-30), Follows headphone switch position (-26), STereo only (-24)
Selects the metering source. PFL levels are show
on the left meter
-8
VU Reference Level
0 dBu (-30), +4 dBu (-26), +8 dBu (-24)
Selects 0 VU-to-dBu reference level
-6
Split-Ear Monitor
OFF (-30), ON (-26), Program Mix (-24)
Assigns summed-mono RTN signal to left headphone output and R program to right headphone
output. Active in RTN position.
-4
Headphone
Attenuation w/Tone
ON (-30), OFF (-26)
Reduces the headphone level by 20 dB when
tone oscillator is activated
-2
External Battery
Voltage Reference
1 (-30), 2 (-26), 3 (-24), 4 (-22), 5 (-20), 6 (-18),
see voltage metering chart below
Selects the external DC range of the voltage
check function and power LED flash point
0
Meter Ballistics Select
VU | PPM | VU-PPMHold | VU-PPM (-30),
PPM | VU-PPMHold | VU-PPM (-26),
VU | VU-PPM-Hold | VU-PPM (-24),
PPM | VU-PPM (-22), VU | VU-PPM (-20)
Selects meter ballistics choices selected when toggling the front panel meter ballistics switch
4
Master Peak LED
Threshold Adjust
1 dB increments from +4 to +20 dBu, level
shown on meter
Sets the signal level where the “20” LED illuminates. Used to set an alternate peak level
8
Slate / Tone Switch
Normal (-30), reversed (-26), tone only (-24),
slate only (-22)
Changes the functionality of the slate / tone
switch. Switch can be defeated by engaging
setup -14 and setup -12
12
Default Restore
OFF (-30), User Default (-26) Factory (-24)
Resets setup menu to either the stored default or
the factory values
High
Voltage
LED Flash
Point
Low
Voltage
1
2
3
4
5
4.5
13.0
17.0
8.5
14.0
7.0
3.4
11.5
11.5
5.75
11.4
5.7
3.0
11.0
11.0
5.5
10
5.0
6
17.0
11.5
5.0
Setting
Voltage
Metering Chart
Meter
Pos.
Power Source
Internal batteries
12 V NiCad, NiMH, Li, etc.
Expanded range of setting #1
6 V NiMH, Li, etc.
12 V Lead Acid
6 V Lead Acid
Full range of DC input, with
cutoff for 12 V NiCad, etc.
factory setting