1
Installing the Amplifier
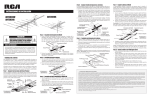
1. Mount the amplifier on the antenna
mast, about 12 inches below the antenna. Position the U-bolt and mounting bracket as shown. Then install
washers and tighten the nuts securely.
2. Use the 3-ft. length of coaxial cable,
and attach one end to the amplifier’s
F-connector labeled TO ANTENNA.
Attach the other end of the cable to
the antenna’s lead-in terminals, using
the supplied 300-to-75 ohm matching
transformer if necessary.
•
Antenna Terminals
Transformer
Mast
Washers and
Nuts
Coaxial Cable
Mount Bracket
•
Amplifier
U-bolt
Drip Loop
Input from
Antenna
Fig. 1 Models 10G201 & 10G202
Output to
Power
Supply
Be sure to fully seat the weather boots
provided on the coaxial cable over their
corresponding F-connectors.
Note: If the supplied 3-ft. coaxial cable is
not long enough to reach from the antenna
terminals to the amplifier’s TO ANTENNA
terminal, save this shorter cable to use for
the power supply to TV coax connection.
To use your own cable, measure the length
from the antenna’s terminals to the amplifiers antenna input, and use a length of
coax long enough to allow you to secure
it to the mast and attach it to the amplifier.
3. To route the cable from the amplifier into the house, choose a length
of cable long enough to reach from
the amplifier to your TV or receiver.
•
Electronics stores have various precut
lengths of cable with weatherboots and
connectors in place. If you choose to
assemble your own coaxial cable, use
a weatherboot at the amplifier’s connections.
2
•
•
thread a screw (not supplied) into the
hole until its head extends about an 1/8
inch from the wall.
Notes:
If you use a power rotator for your
antenna, leave enough cable slack for
unrestrained rotation of the upper section.
Leave a slight amount of slack (called a
drip loop) where the cable enters your
house.
2. Align the power supply’s keyhole slot
with the screw head and slide the power
supply down.
Be sure to weatherproof all connections,
using plastic electrical tape or a coaxial
sealant.
Caution: Do not reverse the TO TV and
FROM ANTENNA connections. Voltage is
present at the FROM ANTENNA terminal,
which might damage an improperly connected receiver.
Installing the Power Supply
Notes:
• The power supply is designed for indoor
use only. You can either place the power
supply on the floor, or mount it on the
wall.
• Do not mount the unit to any electrical
equipment or your TV set. If you choose
to mount the power supply, find a location for it near the TV or FM receiver, and
close to a standard AC outlet.
1. Drill a hole at the desired location and
Attach one end of a 75-ohm coaxial
cable to the amplifier’s F-connector
labeled TO POWER SUPPLY.
Wall
Leave a slight amount of slack (called a
drip loop) where the cable attaches to the
amplifier.
From
Antenna
Note: Do not splice the cable or install
any in-line devices such as splitters
or filters between the amplifier and its
power supply. You can install a grounding block, which dissipates DC current
and provides a connection point for a
static discharge ground rod.
Fig. 2 Models 10G221 & 10G222
•
antenna mast. Use standoffs to secure
the cable to the building as you route
the cable to your TV.
4. Use either standoffs or weather resistant
electrical tape to secure the cable to the
Power
Supply
TV or Analog
to Digital
Converter Box
3. Connect the coaxial cable (either the supplied 3-ft. length, or your own cable) from
the amplifier to the power supply’s FROM
ANTENNA terminal. Do not overtighten
the connector.
4. Connect one end of a short length of
cable to the power supply’s TO TV terminal.
5. Connect the other end of the short cable
directly to your analog or digital TV, or an
analog to digital converter box.
6. Insert the AC adapter’s plug into the
amplifier’s jack.
7. When all connections are made and
double-checked, plug the AC adapter
into a standard AC outlet.
Caution: To prevent electric shock, match
the wide blade of the AC adapter’s plug to
the wide slot of a standard AC outlet and
insert the plug fully.
To TV
Amplifier’s
Jack
Drip
Loop
AC
Adapter
To Amplifier’s
Jack
3