1
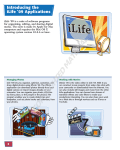
Wrrite Sourc
S ce On
nlinee
Man
nual fo
or Teacchers and
a Ad
dminisstratorrs
© Hougghton Mifflin Harcourt
V
Version
3
Ju
une 2012
Write Source Online User Manual
Contents
1.
Introducing Write Source Online .................................................................................................... 1
1.1
1.2
2.
Accessing Write Source Online ....................................................................................................... 3
2.1
2.2
2.3
2.4
3.
Launch Your Portfolio ......................................................................................................................... 19
Select and Customize Your Avatar...................................................................................................... 19
Customize Profile Questions for Students.......................................................................................... 21
Answer Profile Questions ................................................................................................................... 22
Manage Your Portfolio ....................................................................................................................... 23
Close Profile and Preferences............................................................................................................. 23
Bookshelf...................................................................................................................................... 24
5.1
5.2
5.3
5.4
5.5
5.6
5.7
5.8
5.9
5.10
5.11
5.12
6.
Choose Background Color and Theme ............................................................................................... 10
Launch Profile ..................................................................................................................................... 11
View Your Class................................................................................................................................... 11
View and Manage Active Assignments............................................................................................... 12
Access Class Profile and Portfolio Moderation................................................................................... 13
Launch Bookshelf................................................................................................................................ 13
Launch Portfolio ................................................................................................................................. 14
Launch Net text .................................................................................................................................. 14
Launch GrammarSnap ........................................................................................................................ 15
Launch Links ....................................................................................................................................... 15
Launch File Cabinet............................................................................................................................. 16
Launch Interactive Whiteboard Lessons............................................................................................. 16
Launch Essay Scoring .......................................................................................................................... 17
Return to Dashboard .......................................................................................................................... 18
Profile and Preferences ................................................................................................................ 19
4.1
4.2
4.3
4.4
4.5
4.6
5.
Log on to New Account ........................................................................................................................ 3
Log on as Returning User...................................................................................................................... 4
Establish Single Sign On Connection .................................................................................................... 4
Account Management .......................................................................................................................... 7
The Write Source Dashboard ....................................................................................................... 10
3.1
3.2
3.3
3.4
3.5
3.6
3.7
3.8
3.9
3.10
3.11
3.12
3.13
3.14
4.
Features of Write Source Online .......................................................................................................... 1
Using This Manual ................................................................................................................................ 2
Open Bookshelf .................................................................................................................................. 24
Open eBook ........................................................................................................................................ 25
Change View of eBook........................................................................................................................ 25
Navigate Between Pages .................................................................................................................... 26
Use Table of Contents in Bookshelf.................................................................................................... 27
Find Information................................................................................................................................. 27
Highlight Text in eBook....................................................................................................................... 28
Add Notes to Page .............................................................................................................................. 28
Show eBook on Interactive Whiteboard ............................................................................................ 29
Listen to Audio Narration ................................................................................................................... 29
Print Pages from eBook ...................................................................................................................... 30
Close eBook ........................................................................................................................................ 31
Net text ........................................................................................................................................ 32
6.1
6.2
6.3
6.4
6.5
View Net text Activities ...................................................................................................................... 32
Preview Net text Activity.................................................................................................................... 33
Create Assignment.............................................................................................................................. 34
Create Custom Assignment ................................................................................................................ 38
Close Net text ..................................................................................................................................... 39
Write Source Online User Manual
7.
GrammarSnap .............................................................................................................................. 40
7.1
7.2
7.3
7.4
7.5
8.
Creating and Managing Assignments ........................................................................................... 44
8.1
8.2
8.3
8.4
8.5
8.6
8.7
8.8
8.9
8.10
9.
Launch GrammarSnap........................................................................................................................ 40
Preview GrammarSnap Activities....................................................................................................... 40
Select GrammarSnap Activities for Assignments ............................................................................... 41
Create Assignment Using GrammarSnap ........................................................................................... 42
Close GrammarSnap........................................................................................................................... 43
Create Write Along ............................................................................................................................ 44
Create Assignment ............................................................................................................................. 46
Add Activities to the Assignment ....................................................................................................... 48
Assign Activities.................................................................................................................................. 51
Manage Peer Reviews ........................................................................................................................ 53
Publish Assignment ............................................................................................................................ 55
Edit, Copy, or Delete Assignment....................................................................................................... 56
Review Student Progress.................................................................................................................... 57
Accept or Reject Student Submissions............................................................................................... 58
Feedback and Grading........................................................................................................................ 59
Portfolio........................................................................................................................................61
9.1
9.2
9.3
9.4
Open and Manage Your Portfolio ...................................................................................................... 61
Save Write Alongs in Portfolio ........................................................................................................... 61
Manage Peer Reviews ........................................................................................................................ 62
Close Portfolio .................................................................................................................................... 63
10. Interactive Whiteboard Lessons................................................................................................... 64
10.1
10.2
10.3
10.4
10.5
10.6
Launch Interactive Whiteboard.......................................................................................................... 64
Display Interactive Whiteboard Lesson.............................................................................................. 64
Download Lesson ............................................................................................................................... 65
View Lesson Online ............................................................................................................................ 66
Features of Interactive Whiteboard Lessons ..................................................................................... 66
Close Interactive Whiteboard ............................................................................................................ 75
11. File Cabinet...................................................................................................................................76
11.1
11.2
11.3
11.4
11.5
11.6
Launch File Cabinet ............................................................................................................................ 76
Search by Category............................................................................................................................. 77
Search by Keyword............................................................................................................................. 77
View Key Descriptive Information...................................................................................................... 78
Add Resources to Personalized Folder............................................................................................... 78
Close File Cabinet ............................................................................................................................... 80
12. My Links........................................................................................................................................81
13. Class Administration..................................................................................................................... 82
13.1
13.2
13.3
13.4
13.5
13.6
13.7
13.8
Launch Class Administration .............................................................................................................. 82
Add Students to a Class...................................................................................................................... 83
Manage Class Connections................................................................................................................. 85
Edit Student Details and Reset Passwords ......................................................................................... 86
Add Customized Groups..................................................................................................................... 88
View and Change Students’ Permissions ........................................................................................... 91
View and Moderate Students’ Comments ......................................................................................... 92
View Comments Reported by Other Teachers................................................................................... 94
14. Access and Entitlements............................................................................................................... 97
14.1
14.2
Allocate Products to Class .................................................................................................................. 97
Monitor Availability of Product Licenses............................................................................................ 99
15. System Administration ............................................................................................................... 101
Write Source Online User Manual
15.1
15.2
15.3
15.4
15.5
15.6
15.7
15.8
15.9
15.10
15.11
15.12
15.13
Administrator Wizard ....................................................................................................................... 101
Manually Create Teachers or Students in Batches of Ten................................................................ 102
Create and Import Teachers, Classes or Students in Batch Lists ...................................................... 105
Update Existing Students or Teachers via Batch Import .................................................................. 113
Activate and Deactivate Student or Teacher.................................................................................... 115
Add New Class .................................................................................................................................. 117
Assign Permissions for Editing Profiles ............................................................................................. 119
Assign a Teacher to Class.................................................................................................................. 121
Add or Remove Students from Class ................................................................................................ 123
Allocate Products to Class ................................................................................................................ 125
Print or Email Class Details ............................................................................................................... 127
Delete a Class.................................................................................................................................... 128
Assign School Site Administrator to School...................................................................................... 130
Write Source Online User Manual
1. Introducing Write Source Online
Write Source Online enables students to develop their writing skills and learn grammar using a fun set of
tools and games. Students can share their work with their peers and comment on one another’s work.
They can build up a portfolio of their work and choose the items they want to share with their peers.
Students and teachers can personalize their Write Source Online environment in a variety of ways.
Students can enjoy building their skills in writing, grammar, and communication.
Teachers can create assignments, provide samples, and moderate their students’ activities. There is a
suite of interactive whiteboard lessons, and a virtual file cabinet, where teachers can easily store and
access their resources.
Administrators can register classes, teachers, and students. They can order products and allocate them
to classes.
Administrators, teachers and students who use other HMH online products, such as Journeys for Grades
K–5 (on ThinkCentral) and HMH Literature for Grades 6 12 (in Holt McDougal Online), can now access
them from Write Source.
1.1 Features of Write Source Online
Write Source Online provides the following features:
Dashboard: the point of access from the login screen, from which you can access all the features of
Write Source Online.
Profile and Avatar: allows students to create a customized personal profile, which they can share
with others.
Bookshelf: access to Write Source eBooks, with audio, for students and teachers.
Net text: a structured approach to teaching and learning writing skills.
GrammarSnap: a fun, engaging, interactive set of grammar lessons, videos, practice activities, and
quizzes.
Class Administration: allows teachers to manage classes and resources.
Interactive Whiteboard Lessons: allow teachers and students to interact with multi media
elements, resulting in a rich and engaging learning experience.
File Cabinet: a comprehensive library of printable resources that you can customize into lesson
packets for your students. Thousands of resources for each grade level are organized and indexed in
the File Cabinet, and you can easily locate documents using a variety of search methods.
My Links: approved external websites for reference and further support.
Write Source Online User Manual
1
1.2 Using This Manual
This manual is designed for reading online or for printing. When you print it, for best results, print on
both sides of the pages. The headers and page numbers are designed to appear on the outside margins.
If you prefer to read it online, it is easy to
navigate if you use the Web Layout View
and Document Map in Microsoft Word.
On the View tab, click Web Layout in the
Document Views group, and select
Document Map in the Show/Hide group.
Write Source Online User Manual
Figure 1 1. Selecting Web Layout view and Document Map
2
2. Accessing Write Source Online
Write Source Online is designed for ease of use, whether you are signing into the system for the first
time or returning to the system to continue your work throughout the year.
In this section, you will find out how to:
Sign in as a new user
Return to the system and sign in again
Register for single sign on access to all HMH product platforms
Depending on how your system administrator designed your school’s registration process, the first time
you sign in to the system you will either self register or sign in and update a new account that has
already been created for you.
2.1 Log on to New Account
1.
2.
3.
4.
5.
6.
7.
8.
9.
10.
Click the link provided for you in your new user email to navigate to the account details screen.
Confirm your name.
Confirm your email address.
Choose a password and type it.
Retype your password.
Click the link to read the Terms and Conditions, and then click Close.
Select the check box to accept the Terms and Conditions.
Read the Privacy Policy and then select the check box to accept it.
Read the Copyright Statement and then select the check box to accept it.
Click Save.
Figure 2 1. The Registration screen
Write Source Online User Manual
3
2.2 Log on as Returning User
The Write Source Online system remembers your account details so that you can log on quickly each
time you return to the system.
1.
2.
3.
4.
Navigate to the homepage.
Click Login.
Enter your username and password.
Click Login.
Figure 2 2. Login screen
2.3 Establish Single Sign On Connection
If you use other HMH online products, such as Journeys for Grades K–5 (on ThinkCentral) and HMH
Literature for grades 6 12 (on Holt McDougal Online), you can access them from Write Source as a single
sign on user. Administrators must have already registered teachers and students for the other products.
2.3.1
Register as a single sign on user
1. When you log on to
Write Source, you see a
row of available
products at the bottom
of the screen. Above the
Write Source Bookshelf
carousel, click View All
to open the Bookshelf.
Write Source Online User Manual
4
2. Roll over the image for a
Holt McDougal Online or
a ThinkCentral book on
the Write Source
Bookshelf, and
information displays to
the right side.
3. Click the image of the
product or click View
this Book on the lower
right.
4. A welcome screen
opens, allowing you to
link your Write Source
account and other HMH
accounts.
Click OK.
5. When prompted, enter
your previously created
username and password
for ThinkCentral or Holt
McDougal Online.
6. On the account linking
confirmation screen,
click OK.
Write Source Online User Manual
5
You are now logged onto your
ThinkCentral or Holt McDougal Online
account with your paired credentials, and
you will have full functionality in those
systems. In future sessions, you will not
have to link your accounts again. You will
automatically be logged into your
ThinkCentral or Holt McDougal Online
account after clicking a title from the
Bookshelf.
Notes
If teachers or students change their password, this change does not break the single sign on link
among the different accounts.
If teachers or students change their username, they must re establish the single sign on link using
the updated username.
Single sign on linking goes one way: from Write Source Online to the other accounts. You cannot link
from ThinkCentral, for instance, to Write Source Online.
Single log out means that logging out of Holt McDougal Online or ThinkCentral will also log you out
of Write Source Online.
You can find information for registering for ThinkCentral and Holt McDougal Online on HMH’s Product
Support site.
Write Source Online User Manual
6
2.4 Account Management
Administrators and teachers can de link accounts through the single sign on system.
Teachers can de link their own account
from the single sign on system in the
Your Account screen.
1. Click the Remove Single Sign On
Link check box to de link your
account. The next time you access
an HMOF or TCK eBook, you will
have to re link your accounts.
2. Administrators can de link individual
student accounts.
Click the Users tab and select the
student from the list.
This opens the Edit a User screen.
Click the check box next to Remove
Links to de link the student’s
account.
Write Source Online User Manual
7
3. Teachers can de link individual
student accounts. Click the My Class
List View icon on the dashboard.
4. Click the Edit link for the student
whose account you wish to de link.
5. This opens the Edit a User window.
Click the check box next to Remove
Links to de link the student’s
account.
Administrators and teachers can
de link whole class accounts.
Click the Classes tab and select
the class name from the list.
Write Source Online User Manual
8
This opens the edit window. On
the Class Details tab, click the
check box next to Remove
Students’ Links and then click
Save to de link accounts for all
students in the class.
Administrators can de link
teacher accounts. Click the
Users tab and select the teacher
from the list.
This opens the Edit a User
window for the teacher’s
account. On the User tab, click
the check box next to Remove
Links to de link the teacher’s
account.
Write Source Online User Manual
9
3. The Write Source Dashboard
After logging on to Write Source Online, the dashboard is your first screen. Here you can access the tools
and applications that compose Write Source Online. With customizable themes and colors and simple
icon based controls, the dashboard is designed to ensure that you can easily navigate the Write Source
Online environment. The dashboard also provides a quick view of your active assignments to help you
keep track of the activities of your students.
In this section, you will find out how to:
Select a background color and theme for your dashboard.
View your active assignments list and manage individual assignments.
Access your profile and portfolio through your Avatar.
View your class network to manage class interactions.
Launch the Write Source Online applications and tools.
Return to the dashboard from any other screen.
3.1 Choose Background Color and Theme
You can customize the appearance of your dashboard by choosing the background color and theme
image that will display on your screen.
Click your Avatar to launch
your Profile page.
Click Customize Theme
under your Avatar.
Click the forward or
backward arrow in the top
section of the screen to
browse the available
themes.
Write Source Online User Manual
10
Click Set Theme to select
the image that is showing as
your theme.
Click Yes to confirm that you
do want to set the theme.
Click the forward or
backward arrow in the lower
half of the screen to browse
the available background
colors.
Click Set Background to
select the color that is
showing as your
background.
Click Yes to confirm that you
do want to set the
background.
Click the X in the upper right
corner of the Themes and
Backgrounds screen to
return to the Profile page.
Click the dashboard icon in
the upper left corner of the
screen to return to the
dashboard.
3.2 Launch Profile
You can launch the Profile screen from the dashboard, allowing you to customize your Avatar and the
theme and background color of your dashboard. This screen also allows you to answer some personal
questions to help build your Profile and to launch your online Portfolio.
On the dashboard, click your Avatar to launch your Profile. See the Profile and Preferences section of
this User Guide for more information on using the Profile.
3.3 View Your Class
The Class Administration feature allows you to view and edit individual student permissions and view
their Profiles and Avatars. You can also view and edit class details, define groups of students within the
Write Source Online User Manual
11
class for differentiated instruction, and add students to the class. There are two ways of accessing Class
Administration.
1. On the dashboard, click the My Class icon below the Avatar to launch the Class Administration
screen, as shown in Figure 3 1.
2. Click Manage Class at the top of the Active Assignments list.
See the Class Administration section of this User Guide for more information on using the Class
Administration feature.
Figure 3 1. The My Class icon
3.4 View and Manage Active Assignments
The active assignments for your class are listed in the middle of your dashboard, allowing you to scroll
through them quickly for a high level view of what your students are working on. You can also launch
the assignments, add sample essays, and monitor the progress of your students.
1. Use the vertical scroll bar in the Active Assignments list to view all open assignments for your class.
2. Click Manage Assignment next to an assignment name to view the student’s progress on the
assignment.
3. In the dashboard, click the View Net text and Manage Write Alongs link below an assignment to
view the table of contents for that assignment.
Write Source Online User Manual
12
Figure 3 2. Active Assignments list
3.5 Access Class Profile and Portfolio Moderation
The Class Profile and Portfolio Moderation feature allows you to enable or disable moderation on your
students’ peer review comments, and to review and respond to student comments.
On the dashboard, click the Teacher Moderation icon to launch the Class Profile and Portfolio
Moderation screen, as shown in Figure 3 4.
See the Class Administration section of this User Guide for more information on using the Class Profile
and Portfolio Moderation screen.
Figure 3 3. The Teacher Moderation icon
3.6 Launch Bookshelf
The Bookshelf provides access to the Write Source Online eBooks available to you for your class(es).
Write Source Online User Manual
13
On the dashboard, click the View All link above the Write Source textbook icons to launch the Bookshelf,
as shown in Figure 3 4.
See the Bookshelf section of this User Guide for more information on using the Bookshelf.
Figure 3 4. The View All link to the Bookshelf
3.7 Launch Portfolio
Your online Portfolio allows you to store and share sample essays with your students. You can launch
your Portfolio not only from within the Profile screen, but also directly on the dashboard.
On the dashboard, click the Portfolio icon to launch your online Portfolio.
See the Portfolio section of this User Guide for more information on managing your
Portfolio.
3.8 Launch Net text
The dashboard enables you to launch Net text directly and browse all the available activities. These
interactive writing units can then become the basis of the assignments that you create for your class.
On the dashboard, click the Net text icon to launch Net text, as shown in Figure 3 5.
See the Net text section of this User Guide for more information on using Net text.
Figure 3 5. The Net text icon
Write Source Online User Manual
14
3.9 Launch GrammarSnap
You can launch GrammarSnap from the dashboard to explore the interactive grammar activities, which
can be incorporated into your student assignments.
From the dashboard, click the GrammarSnap icon to launch GrammarSnap, as shown in Figure 3 6.
See the GrammarSnap section of this User Guide for more information on using GrammarSnap.
Figure 3 6. The GrammarSnap icon
3.10 Launch Links
You can launch a Links screen from the dashboard that provides you access to partnership sites and
tools.
On the dashboard, click the Links icon to launch the Links screen, as shown in Figure 3 7.
Figure 3 7. The Links icon
Write Source Online User Manual
15
3.11 Launch File Cabinet
The File Cabinet stores thousands of printable lesson resources, such as assessments, worksheets, and
other tools that you can use to build lesson packets for your students. You can launch the File Cabinet
directly from the dashboard.
On the dashboard, click the File Cabinet icon to launch the File Cabinet, as shown in Figure 3 8.
See the File Cabinet section of this User Guide for more information on using the File Cabinet.
Figure 3 8. The File Cabinet icon
3.12 Launch Interactive Whiteboard Lessons
The Write Source Online collection of interactive whiteboard lessons can be launched and browsed from
the dashboard.
On the dashboard, click the Interactive Whiteboard icon to see the available interactive whiteboard
lessons, as shown in Figure 3 9.
See the Interactive Whiteboard section of this User Guide for more information on using the interactive
whiteboard lessons.
Write Source Online User Manual
16
Figure 3 9. The Interactive Whiteboard icon
3.13 Launch Essay Scoring
The Holt McDougal Online Essay Scoring provides access to a series of writing resources, including tips,
interactive graphic organizers, model essays, and rubrics. You can launch this writing tool directly from
the dashboard.
On the dashboard, click the Essay Scoring icon to launch Holt McDougal Online Essay Scoring, as shown
in Figure 3 10.
Figure 3 10. The Essay Scoring icon
Write Source Online User Manual
17
3.14 Return to Dashboard
Icon based navigation makes it easy for you to return to the dashboard from any other screen, helping
ensure that you never get lost in the Write Source Online virtual world.
On any screen of Write Source Online, click the Desktop icon in the upper left corner to return to the
dashboard, as shown in Figure 3 11.
Figure 3 11. The dashboard icon
Write Source Online User Manual
18
4. Profile and Preferences
You can customize Write Source Online to create a personal learning environment. On the Profile and
Preferences screen, you can change the appearance of your personal avatar, develop your Profile by
answering personal questions, and launch your Portfolio.
In this section, find out how to:
Launch your Portfolio.
Select and customize your Avatar.
Customize the About Me questions for students.
Answer the About Me questions.
Manage your Portfolio.
Close Profile and Preferences.
4.1 Launch Your Portfolio
To launch your Portfolio, click the Avatar icon on the dashboard.
4.2 Select and Customize Your Avatar
1. Click your Avatar in the upper left
corner of the teacher or student
dashboard to launch the Profile and
Preferences screen.
Write Source Online User Manual
19
2. To change the appearance of the
Avatar, click Customize Avatar.
3. On the Avatar page, you can change
your Avatar’s appearance, or have
the site generate a random Avatar for
you.
To generate a random Avatar, click the
icon under the image of the Avatar. To
save the new Avatar as your own, click
Save.
Write Source Online User Manual
20
To customize your Avatar, select physical
and clothing options from the menu.
Click the attribute you want to change or
add, and then make your selection. To
see additional choices, use the arrows to
scroll through your options.
When you finish customizing your Avatar,
click Save.
4.3 Customize Profile Questions for Students
Click the My Class icon on the
dashboard.
Click Edit Class Details on the
upper right side of the My Class
screen.
Write Source Online User Manual
21
Click the Profile Questions tab at
the top of the screen.
Select the question type from the
dropdown list.
Type the question in the question
text box.
When you finish, click Cancel to
exit without saving, click Save
and Close to save and exit the
Class Details screen, or click Save
and Next to save and continue.
4.4 Answer Profile Questions
1. To answer the About Me questions,
go to the Profile screen. Click Answer
this question.
2. Type your answer in the text box.
3. Click Save to submit your answer.
Click Cancel to exit without saving.
Write Source Online User Manual
22
4.5 Manage Your Portfolio
You can launch your Portfolio from the Profile and Preferences screen.
Click Manage Portfolio.
Click Manage.
Review the documents in your
Portfolio. See the Portfolio section of
this User Guide for more information
about how to make a document
public or private, or how to choose
which documents are included in
your Portfolio.
4.6 Close Profile and Preferences
To close your Profile, click any of the icons on the left of the
screen. This brings you to the feature that you have selected.
For example, if you click the Home icon, it brings you back to
the dashboard.
Figure 4 1. Icons left side of screen
Write Source Online User Manual
23
5. Bookshelf
From the Bookshelf, you can access the Write Source curriculum resources you will need to prepare for
teaching classroom and online writing lessons for your students. For you, these resources include both
teacher and student editions of the curriculum as well as skills books and other teacher resources. Your
students can use their version of the Bookshelf to access student editions. All the Write Source resources
in the Bookshelf are designed for printing, online reading, or even displaying on an interactive
whiteboard for use in the classroom.
In this section, you will find out how to:
1. Open the Bookshelf to view all available Write Source teacher and student edition eBooks.
2. Select and open an eBook.
3. Change the zoom percentage and view the eBook in single or two page spreads.
4. Navigate between pages.
5. Use the table of contents and search feature to locate portions of the eBook.
6. Annotate the eBook by highlighting text and adding electronic sticky notes.
7. Switch to interactive whiteboard mode to position the controls at the end of the screen and support
whole class instruction.
8. Toggle the eBook’s audio track on and off.
9. Print single or two page spreads from the eBook.
10. Close the eBook and return to the Bookshelf.
11. Close the Bookshelf.
5.1 Open Bookshelf
On the Bookshelf, you can browse all the teacher and student edition Write Source curriculum materials
that are available for your class.
1. On the teacher dashboard, click the View All
link above the three Write Source textbook
icons to launch the Bookshelf.
Write Source Online User Manual
24
2. Rest your cursor over any eBook in the
Bookshelf to see details about that eBook in
the right panel of the screen. You will see the
title of the book, product and edition type,
discipline, language, and a brief description.
5.2 Open eBook
Opening an eBook displays the eBook in a new window from which you can read, print, or even display it
on an interactive whiteboard.
1. On the Bookshelf, hover over an eBook to view its details in the right panel of the screen.
2. Click View this Book in the right panel to open the eBook, as shown in Figure 5 1.
Alternatively, you can click a book icon in the Bookshelf to open it without reviewing the details in the
right panel of the screen first.
Figure 5 1. An eBook’s details displayed in the right panel of the Bookshelf
5.3 Change View of eBook
The Write Source eBooks are designed for comfortable online reading. You can alter the zoom
percentage to enlarge or make the pages smaller, and you can view the eBook as a series of single pages
or in two page spreads.
Write Source Online User Manual
25
On an open eBook, click the Zoom in
make pages smaller.
or Zoom out
Click the Single Page View
or Two Pages View
book as single pages or in two page spreads.
icon at the top of the screen to enlarge or
icons at the top of the screen to view the
Figure 5 2. An eBook displayed in two page spreads
5.4 Navigate Between Pages
The controls in the eBook allow you to move forward or backward as you read an eBook.
From an open eBook, click the Next Page
or Previous Page
icons in the lower right corner of
the screen.
If you want to jump to a particular page, enter the page number in the page number text box in the
lower right corner of the screen.
Figure 5 3. eBook screen with the page number box selected
Write Source Online User Manual
26
5.5 Use Table of Contents in Bookshelf
To quickly locate and jump to a particular area of an eBook, you can use the book’s table of contents.
To access the table of contents of an eBook, click the Table of Contents icon in the upper left
corner of the eBook screen.
Click any of the page numbers in the Table of Contents itself to jump to those pages in the book.
Figure 5 4. An eBook Table of Contents with hyperlinked page numbers
5.6 Find Information
To find a particular section of an eBook, you can do a keyword search of the page titles in the book.
To access the Search feature, click the Search icon at the top of the eBook screen.
In the Search pane that appears on the left side of the eBook screen, type a keyword in the Search box,
as shown in Figure 5 5.
Select a page title from the list of relevant pages that appears in the Search pane when you type the
keyword.
Click Close in the upper right corner of the Search pane to close it.
Write Source Online User Manual
27
Figure 5 5. The Search pane on the left side of the eBook screen
5.7 Highlight Text in eBook
When you read an eBook online, you can highlight key text to help you find it later.
Click the Highlight
icon at the end of the eBook screen.
Hold down the mouse as you drag to highlight text.
Figure 5 6. The Highlight tool
5.8 Add Notes to Page
While you read an eBook, you can record ideas or questions that you want to remember in electronic
sticky notes that you attach to a page.
Click the Notes
icon at the end of the eBook screen.
Click the page where you want to place the note and type your sticky note.
Click the green checkmark at the end of the sticky note to attach it to the page.
Write Source Online User Manual
28
Note: After you attach it to the page, the sticky note is shown as an
icon on the page. You can
hover over this icon to read your note, and you can click the icon to edit your note.
Figure 5 7. An electronic sticky note
5.9 Show eBook on Interactive Whiteboard
By switching to interactive whiteboard mode when reading an eBook, you position the controls at the
end of the screen, which optimizes the view for whole class instruction on an interactive whiteboard.
Click the Whiteboard icon at the end of the eBook window to switch to interactive
whiteboard mode.
Click the Whiteboard icon again to switch back to online reading mode.
5.10 Listen to Audio Narration
Most of the eBooks have an audio recording. You can turn the audio on or off on any section of text in
an eBook. This is particularly useful for the following situations:
Students in lower grades who are learning to read.
Pronunciation of unfamiliar words for all grades.
Students who have a reading or visual disability.
To listen to any section of an eBook, click the Audio icon next
to the text.
To fast forward or rewind the audio, click the slider at the end
of the screen.
Write Source Online User Manual
29
To turn the audio off, click the Pause icon in the audio progress
bar in the lower center of the eBook screen.
Figure 5 8. An eBook page, showing the audio icons on the left margin, and the volume controls at the end of the screen
5.11 Print Pages from eBook
You can print pages from an eBook as single pages or two page spreads. NOTE: Some eBooks cannot be
printed.
1. Click the Print icon at the top of the eBook screen.
2. Click Single Page or Two Page.
3. Click Print.
Write Source Online User Manual
30
5.12 Close eBook
Closing an eBook returns you to the Bookshelf, where you can browse to find another book. Click Close
on the upper right of your browser.
Note: Because the eBook is displayed in a pop up over the Bookshelf, closing the eBook will return you
to the Bookshelf.
Close Bookshelf
Unlike the eBook screen, which appears in a pop up over the Write Source Online screen, the Bookshelf
appears within the Write Source Online screen. To close the Bookshelf, you need to select another
feature, such as the dashboard, in Write Source Online.
To close the Bookshelf and return to the dashboard, click the dashboard icon on the
upper left corner.
Write Source Online User Manual
31
6. Net text
Using Net text, you can preview and choose from a library of interactive writing activities that you can
use to build targeted assignments for your students. Net text activities include readings and prewriting
tasks as well as a guided writing project that is structured to support students through each stage of the
writing process. You can use Net text to provide customized sample essays as well as feedback and
reviews for your students as they move through an assignment. Students can also review one another’s
work.
In this section, you will find out how to:
Launch and view Net text activities.
Preview a Net text activity.
Launch the Create Assignment wizard from within Net text to create an assignment containing the
Net text activities you have previewed.
Create a custom assignment from within Net text.
Close Net text.
6.1 View Net text Activities
For each grade and in both English and Spanish, Net text provides a series of writing activities that you
can use to build student assignments.
1. Click the Net text icon on the
dashboard.
Write Source Online User Manual
32
2. Hover over one of the Net text activity
icons to view key details about it.
These appear in the right hand pane.
The details include the suggested
grade, language, and description, and
a list of the assignments in which this
activity is already used.
6.2 Preview Net text Activity
1. Click View this Net text or click the
Net text activity icon.
or
2. The left hand pane of the Net text
table of contents screen also shows
the activity details. Click one of the
linked writing stages in the right hand
pane of the teacher table of contents
to preview that section of the activity.
Write Source Online User Manual
33