1
Teacher
User’s Manual for
The Fountas & Pinnell
Benchmark Assessment Online
Data Management System
Copyright © 2009 Heinemann. All rights reserved.
Table of Contents
Overview ................................................................................................................................ 4
Access and System Requirements ...................................................................................... 5
Customer Service ............................................................................................................................................. 5
System Requirements ...................................................................................................................................... 5
Security .............................................................................................................................................................. 5
User’s Manual .................................................................................................................................................... 6
Product Tour...................................................................................................................................................... 6
Getting Started....................................................................................................................... 7
Registration ....................................................................................................................................................... 7
Logging In ........................................................................................................................................................ 10
Password Reminder ....................................................................................................................................... 12
Managing Your Account ..................................................................................................... 13
Update Account Information.......................................................................................................................... 13
Add Product Keycodes .................................................................................................................................. 14
Expired Product Keycodes ............................................................................................................................ 14
General Help ........................................................................................................................ 16
Logging Out ......................................................................................................................... 17
Terms of Use and Privacy Policy ....................................................................................... 18
Classes ................................................................................................................................. 19
Overview .......................................................................................................................................................... 19
View a Class List ............................................................................................................................................. 19
Add a Class...................................................................................................................................................... 20
Edit a Class ...................................................................................................................................................... 22
Delete a Class .................................................................................................................................................. 24
Add Students ................................................................................................................................................... 26
Import Students............................................................................................................................................... 29
Using an existing class roster ....................................................................................................................... 30
Choosing existing students from the database ............................................................................................ 32
Edit a Student .................................................................................................................................................. 34
Delete a Student .............................................................................................................................................. 35
Customize Columns ....................................................................................................................................... 36
Sorting.............................................................................................................................................................. 39
Sort Order ..................................................................................................................................................... 39
Export Class Data ........................................................................................................................................... 40
Print the Class List ......................................................................................................................................... 42
Assessments ....................................................................................................................... 43
Overview .......................................................................................................................................................... 43
Sorting.............................................................................................................................................................. 43
Sort Order ..................................................................................................................................................... 43
Class Assessment Summary: Benchmark Assessments .......................................................................... 44
Benchmark Level .......................................................................................................................................... 45
Key ................................................................................................................................................................ 46
Print the Class Assessment Summary ......................................................................................................... 48
Student Assessment Summary: Benchmark Assessments....................................................................... 49
Benchmark Levels ........................................................................................................................................ 50
Set Recommended Placement Level ........................................................................................................... 51
Key ................................................................................................................................................................ 51
Comments .................................................................................................................................................... 53
Print the Student Assessment Summary ...................................................................................................... 53
Add a Text Reading ........................................................................................................................................ 55
A.) F&P Benchmark – Assessment Data Profile .......................................................................................... 55
Step 1 of 3 ................................................................................................................................................ 55
Teacher User’s Manual: Fountas & Pinnell Benchmark Assessment Online Data Management System ©
2
Step 2 of 3 – Book Levels A-K ................................................................................................................. 56
Step 2 of 3 – Book Levels L-Z .................................................................................................................. 57
Step 3 of 3 ................................................................................................................................................ 58
B.) Other Reading Record – Assessment Data Profile ................................................................................ 59
Step 1 of 2 ................................................................................................................................................ 59
Step 2 of 2 ................................................................................................................................................ 60
Edit a Text Reading ......................................................................................................................................... 62
Delete a Text Reading ..................................................................................................................................... 63
Optional Assessment Summary .................................................................................................................... 64
Add an Optional Assessment ........................................................................................................................ 65
View the Class Assessment Summary: Optional Assessments ................................................................ 67
Edit an Optional Assessment ........................................................................................................................ 67
Delete an Optional Assessment .................................................................................................................... 68
Export Optional Assessment ......................................................................................................................... 69
Print an Optional Assessment ....................................................................................................................... 69
Reports ................................................................................................................................. 71
Overview .......................................................................................................................................................... 71
Student Report – Assessment Levels .......................................................................................................... 72
Table ............................................................................................................................................................. 72
Graph ............................................................................................................................................................ 72
Steps to view ................................................................................................................................................ 73
Student Report – Comprehension................................................................................................................. 75
Table ............................................................................................................................................................. 75
Graph ............................................................................................................................................................ 75
Steps to view ................................................................................................................................................ 76
Class Report – Assessment Levels .............................................................................................................. 78
Log ................................................................................................................................................................ 78
Table ............................................................................................................................................................. 78
Graph ............................................................................................................................................................ 79
Steps to view ................................................................................................................................................ 79
Class Report – Comprehension .................................................................................................................... 81
Table ............................................................................................................................................................. 81
Graph ............................................................................................................................................................ 81
Steps to view ................................................................................................................................................ 82
Class Report – Class Profile .......................................................................................................................... 84
Table ............................................................................................................................................................. 84
Graph ............................................................................................................................................................ 84
Steps to view ................................................................................................................................................ 85
Print Reports ................................................................................................................................................... 87
Teacher User’s Manual: Fountas & Pinnell Benchmark Assessment Online Data Management System ©
3
Overview
The Fountas & Pinnell Benchmark Online Data Management System allows you to
track and analyze assessment data and view reports on student progress based
on pre-determined reading goals.
Assessment Data
You can quickly create classes, import student rosters, and add assessment data
for each student. The data can then be viewed in a number of different ways,
including graphs, charts and print-outs. Any Optional Assessments administered to
the student can also be recorded and printed.
You can import class rosters from an external file, or move students from one class
to another within the system. Students moved within the system will retain all of
their associated assessment data.
Text Level Goals
You can set Text Level Goals for any date range, allowing you to easily compare
actual results with expected results when viewing reports. These goals define
whether students are performing below, on, or above level.
Reports
Reports from Assessment data can be generated with individual or class data and
can be displayed as graphs or tables. These reports allow you to analyze
assessment data, identify patterns, and track progress over time.
Teacher User’s Manual: Fountas & Pinnell Benchmark Assessment Online Data Management System ©
4
Access and System Requirements
Access the Fountas & Pinnell Benchmark Assessment Online Data Management
System at https://fpdms.heinemann.com/benchmark.
There are three levels of subscription: Teacher, School Administrator, and District
Administrator.
Teacher: ISBN 978-0-325-02836-1
School Administrator: ISBN 978-0-325-02837-8
District Administrator: ISBN 978-0-325-02838-5
Each Teacher subscription costs $100 per user, per year, and includes unlimited
access for school and district administrators.
Customer Service
For more information, visit www.heinemann.com or call Customer Service at 800225-5800.
System
Requirements
Client Side Hardware Configuration:
Windows® based client configuration:
2GHz Processor
1GB Memory
Macintosh® client configuration:
1.83 GHz Processor
1 GB Memory
Common:
High-speed internet connection (Minimum 256kbit/s)
1024x768 minimum screen resolution
Adobe® Flash® Player 8
Client Side Software Configurations:
Windows XP, with Microsoft® Internet Explorer 6.0
Windows XP, with Microsoft Internet Explorer 7.0
Windows XP, with Firefox® 2.x
Windows Vista, with Microsoft Internet Explorer 7.0
Mac OS 10.4, running Safari® 2.0.1
Mac OS 10.4, running Safari 3.0
Mac OS 10.4, running Firefox 2.x
Security
We use security systems designed to prevent unauthorized access to, or
disclosure of, information you provide to us, and we take all reasonable steps to
secure and safeguard this information. Our Site's password protected section
requires users to give us unique identifiers, such as a username and password, to
retrieve their own information. Moreover, all systems that store personally
identifiable information are designed to be secure and isolated from direct
connection to the Internet, and we provide access to our databases containing
personally identifiable information on a need-to-know basis only. Houghton Mifflin
Harcourt Publishing Company employees (and employees of our affiliates and Site
Vendors) are required to acknowledge that they understand and will abide by our
policies with respect to the confidentiality of personally identifiable information.
Our security systems are therefore structured to deter and prevent hackers and
others from accessing information that you provide to us. We also use software
Teacher User’s Manual: Fountas & Pinnell Benchmark Assessment Online Data Management System ©
5
programs to monitor network traffic to identify unauthorized attempts to upload or
change information, or otherwise cause damage. Please understand, though, that
this information should not be construed in any way as giving business, legal, or
other advice, or warranting as fail-proof, the security of information provided by or
submitted to Houghton Mifflin Harcourt Publishing Company. Due to the nature of
Internet communications and evolving technologies, we cannot provide, and we
expressly disclaim, assurance that the information you provide us will remain free
from loss, misuse, or alteration by third parties who, despite our efforts, obtain
unauthorized access.
User’s Manual
Access the Teacher User’s Manual through the Log In screen of the application:
Click on the “Teacher” hyperlink to launch the Teacher User’s Manual PDF in a
separate window. You can save the User’s Manual to your hard drive from this
window.
Product Tour
View a five-minute tour of the Fountas & Pinnell Benchmark Assessment Online
Data Management System by clicking on the “Take a product tour” link on the Log
In screen:
The tour will launch in a separate browser window.
Teacher User’s Manual: Fountas & Pinnell Benchmark Assessment Online Data Management System ©
6
Getting Started
Registration
To register as a new user, click on the “Register Now” link on the Login page.
This will take you to the User Registration screen:
Teacher User’s Manual: Fountas & Pinnell Benchmark Assessment Online Data Management System ©
7
1.) Choose the User Type “Teacher” from the following choices:
Teacher
School-Level Administrator
District-Level Administrator
Note: User Types are associated with each Product Keycode, and you will only be
granted a level of access that matches the Product Keycode. If you select a level
of access beyond what your Keycode provides, you will receive an error message
when you attempt to save the registration information.
2.) Enter your first and last names.
3.) Enter the Product Keycode provided. This keycode is valid for one school
year.
4.) Enter and confirm a valid e-mail account.
5.) Enter and confirm a password. The password is case-sensitive and must be
at least six alphanumeric characters long.
6.) Select the state for your school from the State dropdown list.
7.) Select the district for your school from the alphabetical District list. To narrow
down the choices that appear, begin entering your district’s zip code into the Zip
Code text field. Only the districts associated with a zip code that begins with the
numbers you enter will appear in the list.
8.) Select your school from the School dropdown list.
Note: If your District or School does not appear in the available list, e-mail
Customer Service by clicking on the link provided above the School dropdown list.
You will be asked to provide the following information in order to add your district
and/or school to the list:
District details:
State
District Name
District ID
District Zip Code
School details:
State
District Name
School Name
School ID
School Zip Code
9.) Read the Terms of Use document, available from the “Terms of Use” link on
the Registration screen. If you have read and agree to them, click on the checkbox
next to the statement “I have read and agree to the Terms of Use.” This will
activate the Save button.
Teacher User’s Manual: Fountas & Pinnell Benchmark Assessment Online Data Management System ©
8
10.) Click the Save button to complete your registration. If any portion of the
registration process is incomplete, a message will appear above the Registration
area indicating any necessary corrections.
Click the Cancel button at any time to leave the User Registration screen without
saving any of the data you entered. A warning message will appear, prompting you
to confirm that you want to cancel the registration. Click the OK button. You will
then be returned to the login screen.
Teacher User’s Manual: Fountas & Pinnell Benchmark Assessment Online Data Management System ©
9
Logging In
To log in the Fountas & Pinnell Benchmark Assessment Online Data Management
System:
1.) Enter your registered e-mail account in the E-mail text field on the Log In
screen.
2.) Enter the password associated with that registered e-mail account in the
Password text field.
3.) Click the Continue button.
Teacher User’s Manual: Fountas & Pinnell Benchmark Assessment Online Data Management System ©
10
Remember My Login
Once the “Remember my Login” check box is selected, the most recent e-mail
address to log into the application from that computer will automatically appear in
the E-mail text field, along with its associated password in the Password text field.
You will no longer have to enter this information every time you launch the
program.
To change this preference:
1.) Click on the check box next to Remember my Login to remove the checkmark.
2.) Log in to the application.
3.) The program will “forget” that e-mail and password, and the E-mail and
Password fields will be empty when you logout.
You can change this preference at any time.
Teacher User’s Manual: Fountas & Pinnell Benchmark Assessment Online Data Management System ©
11
Password Reminder
If you forget your password, click on the “Did you forget your password?” link on the
Log In screen. The Retrieve Password screen will load:
1.) Type your registered e-mail address into the E-mail text field.
2.) Click the Continue button.
Teacher User’s Manual: Fountas & Pinnell Benchmark Assessment Online Data Management System ©
12
Managing Your Account
Update Account
Information
You can view and edit your account information on the My Account screen,
accessible via the My Account link in the upper right on any screen while you are
logged in:
The account’s User Type and current keycodes will be visible, but they cannot be
changed.
Editable information includes:
First Name
Last Name
E-mail account
Password
Teacher User’s Manual: Fountas & Pinnell Benchmark Assessment Online Data Management System ©
13
You can also add a new Product Keycode on this screen if your current keycode
has not yet expired, as described in the next section.
Click the Save button to save any changes that you make to the information in My
Account
Click the Cancel button to leave My Account without saving any of the data you
entered. A warning message will appear, prompting you to confirm that you want to
cancel. Click the OK button. You will then be returned to the last screen you
viewed.
Add Product
Keycodes
You can add a new Product Keycode to your account to extend access to the
product for another year.
Type in the new product keycode into the text field, then click the Add button. The
new keycode will then appear in the “Current Keycodes” list.
Expired Product
Keycodes
If your product keycode has expired, you will not be able to log in the system, and
you will need to obtain a new product keycode.
Once you obtain a new product keycode, go to the Log In screen.
1.) Enter your E-mail address.
2.) Enter your Password.
3.) Click the Continue button.
Teacher User’s Manual: Fountas & Pinnell Benchmark Assessment Online Data Management System ©
14
A screen will load notifying you that your keycode is no longer valid. You can add a
new product keycode to your account on this screen:
4.) Enter the new Keycode in the text field.
5.) Click the Continue button.
If the new product keycode is valid, the keycode will be added to your account, and
you will be logged in to the system.
Teacher User’s Manual: Fountas & Pinnell Benchmark Assessment Online Data Management System ©
15
General Help
Access general help at any time through the Help link, which appears in the upper
right on any screen while you are logged in.
This popup includes a link to the Teacher User’s Manual.
Click the Close button to close the window.
Teacher User’s Manual: Fountas & Pinnell Benchmark Assessment Online Data Management System ©
16
Logging Out
Log out of the application at any time by clicking the Log Out link in the upper right
on any screen while you are logged in.
1.) Click the Log Out link.
2.) A confirmation popup will appear, asking you to confirm that you want to exit.
3.) Click the OK button to exit. This will log you out of the application and take you
to the Log In screen.
Click the Cancel button to remain logged into the application. This will close the
confirmation popup and return you to the screen you were viewing when you
clicked the Log Out link.
Teacher User’s Manual: Fountas & Pinnell Benchmark Assessment Online Data Management System ©
17
Terms of Use and Privacy Policy
You can access the Terms of Use and the Privacy Policy through the links at the
bottom of any screen:
Teacher User’s Manual: Fountas & Pinnell Benchmark Assessment Online Data Management System ©
18
Classes
Overview
You can create classes and add students’ names, along with basic demographic
data, either manually or by importing data from another file. For each class, enter
dates for the beginning and end of the school year, and set text level goals for
each assessment period. You can view and sort class lists, selecting the data
categories of your choice. You can also edit, print, and export your class list.
When you log into the application, you will see the Classes screen. Instructions
and your district and school names are listed at the top of the screen. Classes are
associated with a specific school year, so changing the School Year dropdown list
choice will affect what class lists you are able to view.
View a Class List
To view a class list:
1.) Select the appropriate school year from the School Year dropdown list.
2.) Select the appropriate class from the Class dropdown list.
Teacher User’s Manual: Fountas & Pinnell Benchmark Assessment Online Data Management System ©
19
Add a Class
Click the Add Class button on the Class List screen to add a new class.
Class Profile: Step 1 of 2
Teacher User’s Manual: Fountas & Pinnell Benchmark Assessment Online Data Management System ©
20
You will see the Class Profile: Step 1 of 2 screen.
1.) Enter a class name in the Class Name text field.
2.) Click the check box next to each of the Grade(s) associated with your class.
3.) Choose your school year from the School Year dropdown list.
4.) Adjust the Start and End Dates of your school year by clicking on the
calendar icon, then clicking a date on the calendar popup:
On the calendar popup, the single arrow will move forward or backward one
month at a time, while the double arrow will move forward or backward one year
at a time.
5.) Click the Next button.
Class Profile: Step 2 of 2
Teacher User’s Manual: Fountas & Pinnell Benchmark Assessment Online Data Management System ©
21
You will see the Class Profile: Step 2 of 2 screen.
1.) Enter a Start Date and End Date for each assessment period that your
school/district has established. (For example, if your district conducts assessments
3 times per year, your first assessment period might be September 1 to November
30; your second assessment period might be December 1 to March 31, etc.)
2.) Enter the text level goals for each assessment period. Click on the
Independent and/or Instructional Level dropdown lists to select text level goals
for that assessment period.
Text Level Goals: Use Text Level Goals to establish Below Level, On
Level, and Above Level criteria for the students in this class. You can
change these goals during the year and from year to year as needed. You
do not need to enter both Instructional and Independent level goals.
The program displays three empty rows of Text Level Goals for your convenience.
You do not have to fill in all (or any) of them. You can add additional rows by
clicking the plus (+) symbol to the left of the Text Level Goals chart. This will add
an empty row below the existing rows.
3.) Click the Save button to save this new class and return to the Class List
screen.
Click the Save & Add button to save this new class and go to a blank Class
Profile: Step 1 of 2 screen, where you can immediately enter another new class.
Click the Back button on this screen to view or edit the information on the Class
Profile: Step 1 of 2 screen. Return to the Class Profile: Step 2 of 2 screen by
clicking the Next button again.
Click the Cancel button on either screen to leave the Class Profile without saving
any of the data you entered. A warning message will appear, prompting you to
confirm that you want to cancel. Click the Yes button. You will then be returned to
the Class List screen.
Edit a Class
Edit an existing class by clicking on the Edit Class button on the Class List screen:
1.) Choose an existing class from the Class dropdown list.
Teacher User’s Manual: Fountas & Pinnell Benchmark Assessment Online Data Management System ©
22
2.) Click the Edit Class button.
You will see the Class Profile: Step 1 of 2 screen populated with the information of
the class you chose:
3.) You can edit the information on this screen or click the Next button to view the
Class Profile: Step 2 of 2 screen, populated with any Text Level Goals that had
been set for the class:
Teacher User’s Manual: Fountas & Pinnell Benchmark Assessment Online Data Management System ©
23
4.) You can edit the existing Text Level Goals on this screen. You can also add
additional Text Level Goals by clicking the plus (+) symbol to the left of the Text
Level Goals chart. This will add an empty row below the existing rows.
5.) Click the Save button on the last available Class Profile screen to save your
edits and return to the Class List screen.
Click the Save & Add button to save your edits and go to a blank Class Profile
screen, where you can immediately enter data for another class.
Click the Back button on the Class Profile: Step 2 of 2 screen to view or edit the
information on the previous screen. Navigate forward again by clicking the Next
button.
Click the Cancel button on any screen to leave the Class Profile without saving
any of the edits that you made. A warning message will appear, prompting you to
confirm that you want to cancel. Click the Yes button. You will then be returned to
the Class List screen.
Delete a Class
You can delete a class from the same screens on which you edited class data.
When you are editing an existing class, the Delete Class button will be available.
1.) To delete a class, follow the steps to Edit a class.
2.) On either Class Profile screen, click the Delete Class button:
Teacher User’s Manual: Fountas & Pinnell Benchmark Assessment Online Data Management System ©
24
A warning message will appear, prompting you to confirm that you want to delete
the class.
Note: Deleting a class does not delete students or their associated assessment
data. Student information is retained in the system’s database, and you can import
it into different classes. Read the “Import Students” section to learn how to import
student information.
Teacher User’s Manual: Fountas & Pinnell Benchmark Assessment Online Data Management System ©
25
Add Students
Add students to a class by clicking the Add Student button on the Class List page.
This button will only be active after you choose an existing class from the Class
dropdown list on the Class List page.
Teacher User’s Manual: Fountas & Pinnell Benchmark Assessment Online Data Management System ©
26
Add the following required information:
1.) Enter the student’s first and last names in the appropriate text fields.
2.) Select the student’s grade level from the Grade dropdown list.
3.) Enter the student’s ID in the Student ID text field. The student ID can be up to
16 alphanumeric characters.
Note: Do not use a Social Security Number for a student’s ID.
4.) Select the student’s gender by clicking on the appropriate radio button.
You may also add the following optional information:
5.) Enter the student’s date of birth by clicking on the calendar icon, then clicking
a date on the calendar popup that appears. On the calendar popup, the single
arrow will move forward or backward one month at a time, while the double arrow
will move forward or backward one year at a time.
6.) Select the student’s race/ethnicity from the choices in the Race/Ethnicity
dropdown list. This list includes:
Asian/Pacific Islander
Black
Hispanic
White
Native American/Alaskan
Multiracial
Other
7.) Select the student’s primary language from the choices in the Primary
Language dropdown list. This list includes:
English
Spanish
Other
8.) If the student is participating in a Free or Reduced Lunch program, click on
the check box to select it.
9.) If the student is an English Language Learner, click on the check box to
select it.
10.) If the student is participating in Special Education Services, click on the
check box to select it.
11.) If the student is receiving Additional Reading Services, click on the check
box to select it, and add any appropriate explanatory text in the
Services/Programs Descriptions text field.
Teacher User’s Manual: Fountas & Pinnell Benchmark Assessment Online Data Management System ©
27
12.) Click the Save button to save this new student data and return to the Class
List screen.
Click the Save & Add button to save this new student data and go to a blank
Student Profile screen, where you can immediately enter data for another new
student.
Click the Cancel button to leave the Student Profile without saving any of the data
that you entered. A warning message will appear, prompting you to confirm that
you want to cancel. Click the Yes button. You will then be returned to the Class
List screen.
Teacher User’s Manual: Fountas & Pinnell Benchmark Assessment Online Data Management System ©
28
Import Students
Import student information into an existing class by clicking the Import Students
button.
The Import Students: Step 1 of 2 screen will appear:
Teacher User’s Manual: Fountas & Pinnell Benchmark Assessment Online Data Management System ©
29
Select how you would like to import students into the class. Your options include:
1.) Using an existing class roster
2.) Choosing existing students from the system’s database
You can download an Import Template file by clicking on the “Download Import
Template” link on this screen that appears next to the two import options. This will
download a file called “class-import-template.csv” that contains directions and
example students that you can follow to import your own students. A screenshot of
the file can be seen below:
Using an existing class roster
1.) Click the radio button next to the “Using an existing class roster file” (unless it
is already selected), and click the Next button.
2.) When the Import Students: Step 2 of 2 screen appears, click the Browse
button:
Teacher User’s Manual: Fountas & Pinnell Benchmark Assessment Online Data Management System ©
30
3.) Select your import file from the “select file” window that pops up, and click the
Open button:
The student information from that file will populate the “Students from file” table on
the left hand side of the screen, as shown below:
Any errors from the importing process will appear in the Errors box below the
student tables.
4.) Select the student(s) that you want to import by clicking on their row(s) to
highlight them. You can select more than one row at a time by holding down the
Shift or Ctrl key on your keyboard while you click rows.
Teacher User’s Manual: Fountas & Pinnell Benchmark Assessment Online Data Management System ©
31
5.) Move the highlighted student(s) to the “Students to add to class” table by
clicking the right arrow button:
Unhighlighted students will remain in the “Students from file” table.
6.) Click the Import button to import the student(s) and their associated
information into your class:
You can click the Back button to return to the Import Students: Step 1 of 2 screen,
or click the Cancel button to leave the Import Class screen and return to the Class
List screen. You will not import any students by clicking the Back or Cancel
buttons.
Choosing existing students from the database
1.) Click the radio button next to “By choosing existing students from the
database”, and click the Next button.
2.) You have several options for searching for students in the database:
School and Grade
Student Name
Student ID
Note: The Student Name and Student ID fields will search on part or all of a name
or ID. All students that contain the characters that you type (in the same order) in
their name or ID will appear in the “Students from database” results list on the left
hand side of the screen.
Teacher User’s Manual: Fountas & Pinnell Benchmark Assessment Online Data Management System ©
32
3.) Click the Search button to view results of your search. The search results will
populate the “Students from database” table. The example below shows a search
performed on a partial Student ID:
4.) Select the student(s) that you want to import by clicking on their row(s) to
highlight them. You can select more than one row at a time by holding down the
Shift or Ctrl key on your keyboard while you click rows.
5.) Move the highlighted student(s) to the “Students to add to class” table by
clicking the right arrow button:
Unhighlighted students will remain in the “Students from database” table.
6.) Click the Import button to import the student(s) and their associated
information into your class, as shown below:
Teacher User’s Manual: Fountas & Pinnell Benchmark Assessment Online Data Management System ©
33
You can click the Back button to return to the Import Students: Step 1 of 2 screen,
or click the Cancel button to leave the Import Class screen and return to the Class
List screen. You will not import any students by clicking the Back or Cancel
buttons.
Edit a Student
Edit an existing student by clicking on the Edit button next to a specific student on
the Class List screen:
1.) Choose an existing class from the Class dropdown list.
2.) Click the Edit button next to the student you wish to edit.
You will see the Student Profile screen populated with the chosen student’s
information, as shown below:
Teacher User’s Manual: Fountas & Pinnell Benchmark Assessment Online Data Management System ©
34
You can edit all of the information on this screen.
Click the Save button to save the edits to this student’s information and return to
the Class List screen.
Click the Save & Add button to save the edits and go to a blank Student Profile
screen, where you can enter a new student profile.
Click the Cancel button to leave the Student Profile without saving any of the edits
you made. A warning message will appear, prompting you to confirm that you want
to cancel. Click the Yes button. You will then be returned to the Class List screen.
Delete a Student
You can delete a student from the same screens on which you edited student data.
When you are editing an existing student, the Delete Student button will be active
and available.
1.) To delete a student, follow the steps to Edit a student.
2.) On the Student Profile screen, click the Delete Student button:
Teacher User’s Manual: Fountas & Pinnell Benchmark Assessment Online Data Management System ©
35
A warning message will appear, prompting you to confirm that you want to delete
the student.
Note: Deleting a student from a class does not delete the student’s associated
assessment data. Student information is retained in the system’s database, and
you can import it into different classes with the “Import Students” function.
Customize Columns
Teacher User’s Manual: Fountas & Pinnell Benchmark Assessment Online Data Management System ©
36
Customize the columns that you see in your class list by clicking the Customize
Columns button on the Class List screen.
Teacher User’s Manual: Fountas & Pinnell Benchmark Assessment Online Data Management System ©
37
On the Customize Columns screen, you can choose up to eight columns to appear
in your Class List view. If you already have eight choices selected, the remaining
choices will be grayed out and unavailable. You may need to deselect a choice to
select other choices.
Your choices include:
First Name
Last Name
Grade
Student ID
Gender
Date of Birth
Race/Ethnicity
Primary Language
Free/Reduced Lunch
English Language Learner
Special Education Services
Additional Reading Services
Services/Programs Description
Benchmark Independent Level
Benchmark Instructional Level
Recommended Placement Level
Click the Save button to save your customized column choices.
Teacher User’s Manual: Fountas & Pinnell Benchmark Assessment Online Data Management System ©
38
Click the Reset to Default button to return the column choices to the application
default, which includes:
First Name
Last Name
Student ID
Gender
Date of Birth
Benchmark Independent Level
Benchmark Instructional Level
Recommended Placement Level
Click the Cancel button to leave the Customize Columns screen without making
any changes. You will then be returned to the Class List screen.
Note: Your choices are retained between sessions. When you log back in, your
customized column choices will be selected on the Customize Columns screen.
Sorting
Sort the summary data by clicking on the “Sort Option” link.
Sort Order
In the Sort Order popup, you can choose up to three levels of sorting, as shown below:
1.) Click on the yellow “Sort Option” link to open the Sort Order popup.
Teacher User’s Manual: Fountas & Pinnell Benchmark Assessment Online Data Management System ©
39
2.) Choose the order in which you would like to sort the data, using the following available
options:
Last Name
First Name
Student ID
Gender
Grade
Race/Ethnicity
Primary Language
Free Reduced Lunch
English Language Learner
Special Education Service
Additional Reading Service
Services/Programs
Benchmark Independent
Benchmark Instructional
Recommended Placement
3.) Select from the options listed in the dropdown menus for as many as three categories.
4.) Click the OK button in the popup to sort the data in the chosen order.
Click the Cancel button in the Sort Order popup if you do not want to change how the data is
already sorted.
Export Class Data
You can export class data from the class list by clicking on the Export Class
button:
Teacher User’s Manual: Fountas & Pinnell Benchmark Assessment Online Data Management System ©
40
1.) Click on the Export Class button.
2.) Click the OK button in the Export Class confirmation window that appears,
indicating the class to export. (Or click the Cancel button if you would not like to
export the class; this will close the export confirmation window and return you to
the Class List screen.)
3.) The “select location” window will pop up. Select the location where you would
like to download the exported file and click the Save button:
The system will save the file to your chosen location with the default name “classexport-[classname].csv”. You can change this name in the “select location” window
before you click the Save button.
Teacher User’s Manual: Fountas & Pinnell Benchmark Assessment Online Data Management System ©
41
Note: The exported class data includes student information and all of their
associated assessment data.
Print the Class List
You can print the class list as it appears on the screen by clicking on the Print
Class button, as shown below:
Click on the Print Class button.
Select your printer from the “Print” window that pops up, and click the Print button.
This printout will include the following headers:
Fountas & Pinnell Benchmark Assessment
Class List: [Class Name]
Date Printed: [date]
The printed Class List will include only the information and columns that are shown
in the Class List view online.
For example, if you have customized the Class List screen’s columns to show only
Last Name, Grade, Gender, Primary Language, and Recommended Placement
Level, then the class printout will show only those columns of information.
Teacher User’s Manual: Fountas & Pinnell Benchmark Assessment Online Data Management System ©
42
Assessments
Overview
You can enter students’ assessment data from Recording Forms and/or
Assessment Summary Forms after administering individual reading assessments.
For each student, add as many text readings as needed per assessment
conference during a specific assessment period.
You can view and print an individual student’s assessment summary, or you can
view and print a class assessment summary, including all students’ benchmark
levels and associated data.
Sorting
Sort the summary data by clicking on the “Sort Option” link.
Sort Order
In the Sort Order popup, you can choose up to three levels of sorting, as shown below:
1.) Click on the yellow “Sort Option” link to open the Sort Order popup.
2.) Choose the order in which you would like to sort the data, using the following available
options:
First Name
Last Name
Date
Book Title
Genre
Book Level
Accur.
Teacher User’s Manual: Fountas & Pinnell Benchmark Assessment Online Data Management System ©
43
Comp.
Benchmark Level
SC
Fluency
Rate
Writing
View PDF
5.) Select from the options listed in the dropdown menus for as many as three categories.
6.) Click the OK button in the popup to sort the data in the chosen order.
Click the Cancel button in the Sort Order popup if you do not want to change how the data is
already sorted.
Class Assessment
Summary:
Benchmark
Assessments
Teacher User’s Manual: Fountas & Pinnell Benchmark Assessment Online Data Management System ©
44
Access the Class Assessment Summary screen by clicking on the Assessments
tab at the top of the screen.
1.) Confirm that the appropriate School Year is selected in the School Year
dropdown list at the right side of the screen.
2.) Choose the appropriate class from the Selected Class dropdown list at the left
side of the screen.
3.) The Selected Student dropdown list should display “All students.”
The Class Assessment Summary table will populate with any benchmark
assessment data that has been recorded for the students in that class. To view all
of the information in the table, you may need to scroll down.
You can sort the records by any data category by clicking on the appropriate
column header. The default sort is by assessment date.
Benchmark Level
The Class Assessment Summary view defaults to showing both Independent and
Teacher User’s Manual: Fountas & Pinnell Benchmark Assessment Online Data Management System ©
45
Instructional Level assessment records, as seen below:
Only the Level(s) with a checkmark in the check box will appear in the Class
Assessment Summary table.
To view only Independent or Instructional Level assessment records, click on the
check box next to the Level that you do not wish to view in the table to uncheck it.
Click on the check box again to replace the checkmark.
Key
Key information to interpret the Accuracy, Comprehension, Fluency, and Writing
scores that appear in the table is available through several links next to the Key
icon and header. These links are located in the lower left corner of the Class
Assessment Summary screen.
Clicking on a link will cause that particular key window to slide into view with the
relevant information for interpreting the data in the table. To view all of the
information in the key window, you may need to scroll down. Clicking a different
Key link will refresh the window with that key’s information.
Teacher User’s Manual: Fountas & Pinnell Benchmark Assessment Online Data Management System ©
46
Click the red “X” button in the upper right corner of the key window to close it.
Key information found in the key windows is as follows:
Accuracy:
BOOK LEVELS A-K
Accuracy Benchmark level
95 - 100% Independent
90 - 94%
Instructional
Below 90% Hard
BOOK LEVELS L-Z
Accuracy
Benchmark level
98 - 100%
Independent
95 - 97%
Instructional
Below 95% Hard
Comprehension:
(E)
(S)
(L)
(U)
Excellent Comprehension
Satisfactory Comprehension
Limited Comprehension
Unsatisfactory Comprehension
BOOK LEVELS A-K
Comprehension Scoring Guide
6 - 7 Excellent Comprehension
5
Satisfactory Comprehension
4
Limited Comprehension
0 - 3 Unsatisfactory Comprehension
BOOK LEVELS L-Z
Comprehension Scoring Guide
9 - 10 Excellent Comprehension
7 - 8 Satisfactory Comprehension
5 - 6 Limited Comprehension
0 - 4 Unsatisfactory Comprehension
Fluency:
0 Primarily word by word; does not reflect meaningful syntax; no stress on
words or inappropriate stress; monotone voice; no phrasing; slow.
1 Primarily in two-word phrases with some three- or four-word groupings
and some word by word; some awkward representation of syntax; almost
no stress on words and/or some inappropriate stress; mostly monotone
voice; slow almost all of the time.
2 Primarily in three- or four-word phrase groups with some smaller
groupings; preservation of author's syntax; little or no expressive
interpretation; mostly appropriate stress on words; combination of slow
reading and good pace.
3 Primarily in large, meaningful phrase groups; preservation of author's
syntax; appropriate stress on words in almost all reading; smooth delivery
Teacher User’s Manual: Fountas & Pinnell Benchmark Assessment Online Data Management System ©
47
with some expressive interpretation; appropriate pace with only a few slow
downs.
Writing:
0
1
2
3
Reflects no understanding of the text.
Reflects limited understanding of the text.
Reflects partial understanding of the text.
Reflects complete understanding of the text.
Print the Class Assessment Summary
You can print the Class Assessment Summary screen by clicking on the Print
button, as shown below:
Click on the Print button.
Select your printer from the “Print” window that pops up, and click the Print button.
This printout will include the following headers:
Fountas & Pinnell Benchmark Assessment
Class Assessment Summary: [Class Name]
Date Printed: [date]
The printed Class Assessment Summary screen printout will include all of the
information and columns that are shown in the Class Assessment Summary view
online, and will be arranged in the same chart format.
Teacher User’s Manual: Fountas & Pinnell Benchmark Assessment Online Data Management System ©
48
Student Assessment
Summary:
Benchmark
Assessments
You can access the Student Assessment Summary: Benchmark Assessments
screen by choosing a specific student from the Selected Student dropdown list on
the Class Assessment Summary screen.
The Student Assessment Summary: Benchmark Assessments screen shows a
variety of data for the chosen student, including:
Student ID
Grade
Gender
Benchmark Independent Level
Benchmark Instructional Level
Recommended Placement Level
Text Readings/Assessment Data
Teacher User’s Manual: Fountas & Pinnell Benchmark Assessment Online Data Management System ©
49
Comments
On this screen, you can:
Add a Text Reading in the Assessment Data Profile screens
Switch view to the Optional Assessments screen
View assessment data
Edit assessment data
Set the student’s recommended placement level
Add comments to the student profile
View keys for the onscreen data
Print the student summary screen
Access the Student Assessment Summary screen by clicking on the
Assessments tab at the top of the screen.
1.) Confirm that the appropriate School Year is selected in the School Year
dropdown list at the right side of the screen.
2.) Confirm that the appropriate class has been chosen from the Selected Class
dropdown list at the left side of the screen.
3.) Choose a student name from the Selected Student dropdown list.
The Student Assessment Summary table will populate with any assessment data
that has been recorded for that particular student. To view all of the information in
the table, you may need to scroll down.
You can sort the records by any data category by clicking on the appropriate
column header. The default sort is by Date.
Benchmark Levels
The highest book level reached for each benchmark type (Independent and
Instructional) automatically appears at the top of the Student Assessment
Summary screen, as shown below:
These will appear as soon as assessment data profiles for text readings are added
for the student. If no Independent or Instructional Level readings have been
entered for the student yet, a dash (-) will appear until assessment data have been
Teacher User’s Manual: Fountas & Pinnell Benchmark Assessment Online Data Management System ©
50
added.
Set Recommended Placement Level
A recommended placement level can be chosen for the student in the
Recommended Placement Level dropdown list on the Student Assessment
Summary screen:
Click on the dropdown list to choose a Recommended Placement Text Level for
that student. The system will automatically save the value you choose, displaying it
on the Student Assessment Summary screen as well as the Class List screen for
that student (if that column is set to display).
Key
Key information to interpret the Accuracy, Comprehension, Fluency, and Writing
scores that appear in the table is available through the links next to the Key icon
and header. These links are located in the lower left corner of the Student
Assessment Summary screen.
Clicking on a link will cause that particular key window to slide into view with the
relevant information for interpreting the data in the table. To view all of the
information in the key window, you may need to scroll down. Clicking a different
Teacher User’s Manual: Fountas & Pinnell Benchmark Assessment Online Data Management System ©
51
Key link will refresh the window with that key’s information.
Click the red “X” button in the upper right corner of the key window to close it.
Key information found in the key windows is as follows:
Accuracy:
BOOK LEVELS A-K
Accuracy Benchmark level
95 - 100% Independent
90 - 94%
Instructional
Below 90% Hard
BOOK LEVELS L-Z
Accuracy
Benchmark level
98 - 100%
Independent
95 - 97%
Instructional
Below 95% Hard
Comprehension:
(E)
(S)
(L)
(U)
Excellent Comprehension
Satisfactory Comprehension
Limited Comprehension
Unsatisfactory Comprehension
BOOK LEVELS A-K
Comprehension Scoring Guide
6 - 7 Excellent Comprehension
5
Satisfactory Comprehension
4
Limited Comprehension
0 - 3 Unsatisfactory Comprehension
BOOK LEVELS L-Z
Comprehension Scoring Guide
9 - 10 Excellent Comprehension
7 - 8 Satisfactory Comprehension
5 - 6 Limited Comprehension
0 - 4 Unsatisfactory Comprehension
Fluency:
0 Primarily word by word; does not reflect meaningful syntax; no stress on
words or inappropriate stress; monotone voice; no phrasing; slow.
1 Primarily in two-word phrases with some three- or four-word groupings
and some word by word; some awkward representation of syntax; almost
no stress on words and/or some inappropriate stress; mostly monotone
voice; slow almost all of the time.
2 Primarily in three- or four-word phrase groups with some smaller
groupings; preservation of author's syntax; little or no expressive
interpretation; mostly appropriate stress on words; combination of slow
reading and good pace.
Teacher User’s Manual: Fountas & Pinnell Benchmark Assessment Online Data Management System ©
52
3 Primarily in large, meaningful phrase groups; preservation of author's
syntax; appropriate stress on words in almost all reading; smooth delivery
with some expressive interpretation; appropriate pace with only a few slow
downs.
Writing:
0
1
2
3
Reflects no understanding of the text.
Reflects limited understanding of the text.
Reflects partial understanding of the text.
Reflects complete understanding of the text.
Comments
Add student notes in the Comments field on the Student Assessment Summary
screen.
1.) Type your comments in the Comments text field.
2.) Click the Save button in the Comments area.
Saved comments will be visible on the Benchmark Assessments and the Optional
Assessments view for the chosen student. You can add or edit comments in either
view.
Print the Student Assessment Summary
You can print the Student Assessment Summary screen by clicking on the Print
button, as shown below:
Teacher User’s Manual: Fountas & Pinnell Benchmark Assessment Online Data Management System ©
53
Click on the Print button.
Select your printer from the “Print” window that pops up, and click the Print button.
This printout will include the headers:
Fountas & Pinnell Benchmark Assessment
Student Assessment Summary: [Student Name]
Benchmark Independent Level
Benchmark Instructional Level
Recommended Placement Level
Date Printed: [date]
The Student Assessment Summary screen printout will include all of the
information and columns that are shown in the Student Assessment Summary
view online, and will appear in the same chart format.
Teacher User’s Manual: Fountas & Pinnell Benchmark Assessment Online Data Management System ©
54
Add a Text Reading
Add a text reading to a student’s assessment data profile by clicking the Add Text
Reading button on the Student Assessment Summary: Benchmark Assessments
screen:
Two types of Text Reading can be chosen:
A.) F&P Benchmark
B.) Other Reading Record
Either type can be entered in the Assessment Data Profile that loads when you
click the Add Text Reading button.
A.) F&P Benchmark – Assessment Data Profile
Step 1 of 3
Teacher User’s Manual: Fountas & Pinnell Benchmark Assessment Online Data Management System ©
55
1.) The F&P Benchmark radio button is selected by default, located next to the
Assessment Type header.
Note: The Assessment Type of a text reading cannot be altered once the
Assessment Data Profile has been saved.
2.) Choose the date that the assessment was administered by clicking on the
calendar icon, navigating to the date (if needed) by using the arrows in the
calendar popup, and clicking on the day.
3.) Choose the radio button for the genre of the book that was used to administer
the assessment: fiction or nonfiction.
4.) In the dropdown list, choose the Text Level of the book used to administer the
assessment. The book name will automatically appear next to the Text Level
dropdown list once the Genre and Text Level are chosen.
Step 2 of 3 – Book Levels A-K
5.) Enter an Accuracy score in the text field. The score should be a number
between 0 and 100.
6.) Enter the Comprehension scores by clicking in the appropriate radio buttons
and check box for:
Within the Text
Beyond the Text
Additional Understanding
The total comprehension score (out of 7) will appear automatically next to the
Total header in the Comprehension scoring area. The options are:
Excellent (6-7)
Satisfactory (5)
Limited (4)
Unsatisfactory (0-3)
The Benchmark Level will also appear automatically once the Accuracy and
Comprehension scores are filled in, since it is automatically calculated based on
Teacher User’s Manual: Fountas & Pinnell Benchmark Assessment Online Data Management System ©
56
those two scores. The Benchmark Level options are:
Instructional
Independent
Hard
Step 2 of 3 – Book Levels L-Z
5.) Enter an Accuracy score in the text field. The score should be a number
between 0 and 100.
6.) Enter the Comprehension scores by clicking in the appropriate radio buttons
and check box for:
Within the Text
Beyond the Text
About the Text
Additional Understanding
The total comprehension score (out of 10) will appear automatically next to the
Total header in the Comprehension scoring area. The options are:
Excellent (9-10)
Satisfactory (7-8)
Limited (5-6)
Unsatisfactory (0-4)
The Benchmark Level will also appear automatically once the Accuracy and
Comprehension scores are filled in, since it is automatically calculated based on
those two scores. The Benchmark Level options are:
Instructional
Independent
Hard
Teacher User’s Manual: Fountas & Pinnell Benchmark Assessment Online Data Management System ©
57
Step 3 of 3
7.) Enter the number of self-corrections the student makes in the SelfCorrections text field. This is a required field.
8.) Choose a radio button for the student’s Fluency score for this text reading.
This score applies to Text Levels C-Z only, and is required.
Note: For text levels A and B, the Fluency score is not recorded, and the radio
button options will be grayed out and inactive:
9.) Enter the number of words per minute for the text reading in the Rate text field.
This field is not required but is recommended for Text Level J and above.
10.) Choose a radio button for the student’s Writing score for this text reading, if
desired.
11.) Click the Save button to save this new F&P Benchmark text reading and
return to the Student Assessment Summary: Benchmark Assessments screen.
Click the Save & Add button to save this new text reading and go to a blank
Assessment Data Profile screen, where you can immediately enter another new
text reading.
Click the Back button on the Step 2 of 3 screen or the Step 3 of 3 screen to view
or edit the information on the previous screens. Navigate forward through any
Teacher User’s Manual: Fountas & Pinnell Benchmark Assessment Online Data Management System ©
58
remaining screens again by clicking the Next button.
Click the Cancel button on any of the three screens to leave the Assessment Data
Profile without saving any of the data you entered. You will be returned to the
Student Assessment Summary: Benchmark Assessments screen.
B.) Other Reading Record – Assessment Data Profile
Step 1 of 2
1.) Click the Other Reading Record radio button, located next to the Assessment
Type header, to select Other Reading Record.
Note: The Assessment Type of a text reading cannot be altered once the
Assessment Data Profile has been saved.
2.) Choose the date that the assessment was administered by clicking on the
calendar icon, navigating to the date (if needed) by using the arrows in the
calendar popup, and clicking on the day.
3.) Choose the radio button for the genre of the book that was used to administer
the assessment: fiction or nonfiction.
4.) In the dropdown list, choose the Text Level of the book used to administer the
assessment.
5.) Type the Book Title in the text field next to the Text Level dropdown list.
Teacher User’s Manual: Fountas & Pinnell Benchmark Assessment Online Data Management System ©
59
Step 2 of 2
6.) Enter the Comprehension score by clicking in the appropriate radio button for:
Excellent
Satisfactory
Limited
Unsatisfactory
7.) Enter an Accuracy score in the text field. The score should be a number
between 0 and 100.
The Benchmark Level will appear automatically once the Comprehension choice
and Accuracy score are filled in, since it is automatically calculated based on those
two items. The Benchmark Level options are:
Instructional
Independent
Hard
8.) Choose a radio button for the student’s Fluency score for this text reading.
This score applies to Text Levels C-Z only, and is required.
Note: For text levels A and B, the Fluency score is not recorded, and the radio
button options will be grayed out and inactive:
9.) Click the Save button to save this new Other Reading Record text reading and
return to the Student Assessment Summary: Benchmark Assessments screen.
Teacher User’s Manual: Fountas & Pinnell Benchmark Assessment Online Data Management System ©
60
Click the Save & Add button to save this new text reading and go to a blank
Assessment Data Profile screen, where you can immediately enter another new
text reading.
Click the Back button on the Step 2 of 2 screen to view or edit the information on
the previous screen. Navigate forward again by clicking the Next button.
Click the Cancel button on either screen to leave the Assessment Data Profile
without saving any of the data you entered. You will be returned to the Student
Assessment Summary: Benchmark Assessments screen.
Teacher User’s Manual: Fountas & Pinnell Benchmark Assessment Online Data Management System ©
61
Edit a Text Reading
Edit an existing text reading by clicking on the Edit button in any record row,
located on the Student Assessment Summary: Benchmark Assessments screen:
1.) Click the Edit button in the row of the text reading record that you would like to
edit. You will see the Assessment Data Profile: Step 1 screen populated with the
information of the chosen text reading.
Note: The Assessment Type of a text reading cannot be altered once the
Assessment Data Profile has been saved.
2.) You can edit the existing information on this screen and/or click the Next
button to view the Assessment Data Profile: Step 2 screen.
3.) You can edit the existing information on this screen and/or click the Next
button to view the Assessment Data Profile: Step 3 screen, if available.
Note: An Assessment Data Profile: Step 3 screen will only be available if the text
reading was saved as an F&P Benchmark text reading.
4.) Click the Save button on the last available Assessment Data Profile screen to
save your edits and return to the Student Assessment Summary: Benchmark
Assessments screen.
Click the Save & Add button to save your edits and go to a blank Assessment
Data Profile screen, where you can immediately enter a new text reading.
Click the Back button on an Assessment Data Profile screen to view or edit the
information on the previous screen. Navigate forward again by clicking the Next
button.
Click the Cancel button on any screen to leave the Assessment Data Profile
without saving any of the edits you made. You will then be returned to the Student
Assessment Summary: Benchmark Assessments screen.
Teacher User’s Manual: Fountas & Pinnell Benchmark Assessment Online Data Management System ©
62
Delete a Text
Reading
You can delete a text reading while you are in Edit mode. When you are editing an
existing text reading, the Delete Text Reading button will be active and available,
as shown below:
1.) To delete a text reading, follow the steps to Edit a Text Reading.
2.) On any Assessment Data Profile screen, click the Delete Text Reading
button.
A warning message will appear, prompting you to confirm that you want to delete
the text reading.
Note: Deleting a text reading is permanent. The assessment data is NOT retained
in the system’s database and cannot be retrieved after deletion.
Teacher User’s Manual: Fountas & Pinnell Benchmark Assessment Online Data Management System ©
63
Optional
Assessment
Summary
To access the Student Assessment Summary: Optional Assessments screen,
choose a specific student from the Selected Student dropdown list on the Class
Assessment Summary screen, then click the Optional Assessments link on the
Student Assessment Summary screen.
Teacher User’s Manual: Fountas & Pinnell Benchmark Assessment Online Data Management System ©
64
The Student Assessment Summary: Optional Assessments screen shows a variety
of data for the chosen student, including the following:
Student ID
Grade
Gender
Optional Assessments Data
Comments
On this screen, you can do the following:
Add an Optional Assessment
Switch view to the Benchmark Assessments screen
View optional assessment data
Edit optional assessment data
Print the onscreen records
Add comments to the student profile
Export the optional assessment data
Add an Optional
Assessment
Add an optional assessment to a student’s assessment summary by clicking the
Add Optional Assessment button on the Student Assessment Summary:
Optional Assessments screen.
Teacher User’s Manual: Fountas & Pinnell Benchmark Assessment Online Data Management System ©
65
1.) Choose the System from which this Optional Assessment originates, either
System 1 or System 2.
The System 1 radio button, located next to the System header, is selected by
default.
2.) Choose the date that the optional assessment was administered by clicking on
the calendar icon, navigating to the date by using the arrows in the calendar
popup, and clicking on the day.
3.) Choose the Optional Assessment from the Optional Assessment dropdown
list.
4.) Enter the score information in the Score text field.
5.) Click the Save button to save this new Optional Assessment and return to the
Student Assessment Summary: Optional Assessments screen. Or, you can click
the Save & Add button to save this new Optional Assessment and go to a blank
Optional Assessment Data Profile screen, where you can immediately enter
another new Optional Assessment:
Teacher User’s Manual: Fountas & Pinnell Benchmark Assessment Online Data Management System ©
66
Click the Cancel button to leave the Optional Assessment Data Profile without
saving any of the data you entered. You will then be returned to the Student
Assessment Summary: Optional Assessments screen.
View the Class
Assessment
Summary: Optional
Assessments
You can view and sort optional assessments for all students in a class on the
Class Assessment Summary: Optional Assessments screen.
1.) Confirm that the appropriate School Year is selected in the School Year
dropdown list at the right side of the screen.
2.) Choose the appropriate class from the Selected Class dropdown list at the left
side of the screen.
3.) The Selected Student dropdown list should display “All students.”
The Class Assessment Summary: Optional Assessments table will populate with
any optional assessment data that has been recorded for the students in that
class. To view all of the information in the table, you may need to scroll down.
You can sort the records by any data category by clicking on the appropriate
column header. The default sort is by assessment date.
Click on the column header “Optional Assessment” to sort the information in the
table by optional assessment type:
Edit an Optional
Assessment
Edit an existing optional assessment by clicking on the Edit button in any record
row located on the Student Assessment Summary: Optional Assessments screen:
1.) Click the Edit button in the row of the optional assessment record that you
would like to edit. You will see the Optional Assessment Data Profile screen
populated with the information of the chosen optional assessment:
Teacher User’s Manual: Fountas & Pinnell Benchmark Assessment Online Data Management System ©
67
2.) You can edit the existing information on this screen.
3.) Click the Save button on the Optional Assessment Data Profile screen to save
your edits and return to the Student Assessment Summary: Optional Assessments
screen. Or, you can click the Save & Add button to save your edits and go to a
blank Optional Assessment Data Profile screen, where you can immediately enter
a new optional assessment.
Click the Cancel button to leave the Optional Assessment Data Profile without
saving any of the edits you made. You will then be returned to the Student
Assessment Summary: Optional Assessments screen.
Delete an Optional
Assessment
You can delete an Optional Assessment while you are in Edit mode. When you are
editing an existing Optional Assessment, the Delete button will be active and
available, as shown below:
1.) To delete an Optional Assessment, follow the steps to Edit an Optional
Assessment.
Teacher User’s Manual: Fountas & Pinnell Benchmark Assessment Online Data Management System ©
68
2.) On the Optional Assessment Data Profile screen, click the Delete button.
A warning message will appear, prompting you to confirm that you want to delete
the Optional Assessment.
Note: Deleting an Optional Assessment is permanent. The assessment data is
NOT retained in the system’s database and cannot be retrieved after deletion.
Export Optional
Assessment
You can export Optional Assessments by clicking on the Export button, as shown
below:
1.) Click on the Export button.
2.) Click the OK button in the Export confirmation window that appears. (Or click
the Cancel button if you would not like to export the Optional Assessments; this
will close the export confirmation window and return you to the Student
Assessment Summary: Optional Assessments screen.)
3.) The “select location” window will pop up. Select the location where you would
like to download the exported file and click the Save button.
The system will save the file to your chosen location with a default name. You can
change this name in the “select location” window before you click the Save button.
Print an Optional
Assessment
You can print the Optional Assessments by clicking on the Print button, as shown
below:
Teacher User’s Manual: Fountas & Pinnell Benchmark Assessment Online Data Management System ©
69
Click on the Print button.
Select your printer from the “Print” window that pops up and click the Print button.
The printed Optional Assessments will include all of the information and columns
that are shown in the Optional Assessments view online, and will appear in the
same chart format.
Teacher User’s Manual: Fountas & Pinnell Benchmark Assessment Online Data Management System ©
70
Reports
Overview
Generate student and class reports in either graph or table format to analyze
assessment data, identify patterns, and track progress over time. Reports include
Student and Class Reading Assessment Levels, Student and Class Reading
Comprehension, and a Class Profile indicating the distribution of students at
different benchmark independent or instructional levels at any given point in time.
Access the Reports area by clicking on the Reports tab at the top of the screen.
The screen you will initially see is blank, as shown below:
The Reports screen defaults to the Students report choices, so the Students tab
will appear “forward”:
To see Class reports, click on the Classes tab (located next to the Students tab) to
bring the Class report choices forward.
All student and class reports offer you the choice of viewing Instructional or
Independent Level data:
Teacher User’s Manual: Fountas & Pinnell Benchmark Assessment Online Data Management System ©
71
Student Report –
Assessment Levels
Below is an example of the same Student Assessment Levels report in a table
format and in a graph format:
Table
Graph
To view a Student Assessment Levels report, confirm that the Students tab is
forward.
Teacher User’s Manual: Fountas & Pinnell Benchmark Assessment Online Data Management System ©
72
Steps to view
1.) Choose the appropriate School Year from the school year tabs at the bottom
of the reports area:
2.) Select the appropriate class from the “Select a Class” dropdown list.
3.) Select the student for whom you would like to view the report from the “Select
a Student” dropdown list.
4.) Select the report option “Assessment Levels” from the “Select a Report”
dropdown list.
5.) Confirm that you are viewing the expected Level (Instructional or Independent)
in the “Show data for” area.
6.) Confirm that you are viewing data within your expected date range in the
“Show data between” area. The dates default to the school year.
7.) Click on either the Table icon or the Graph icon to view the report type of your
choice:
The graph report comes with a key to easily interpret the information displayed on
the graph:
The points on the graph also have dynamic rollover states, so if you roll the cursor
over a point on the graph, the following data will appear:
Date Administered
Book Title and Text Level
Genre
Accuracy score
Fluency score
Comprehension score
Teacher User’s Manual: Fountas & Pinnell Benchmark Assessment Online Data Management System ©
73
Teacher User’s Manual: Fountas & Pinnell Benchmark Assessment Online Data Management System ©
74
Student Report –
Comprehension
Below is an example of the same Student Comprehension report in a table format
and in a graph format:
Table
Graph
To view a Student Comprehension report, confirm that the Students tab is forward.
Teacher User’s Manual: Fountas & Pinnell Benchmark Assessment Online Data Management System ©
75
Steps to view
1.) Choose the appropriate School Year from the school year tabs at the bottom
of the reports area:
2.) Select the appropriate class from the “Select a Class” dropdown list.
3.) Select the student for whom you would like to view the report from the “Select
a Student” dropdown list.
4.) Select the report option “Comprehension” from the “Select a Report”
dropdown list.
5.) Confirm that you are viewing the expected Level (Instructional or Independent)
in the “Show data for” area.
6.) Confirm that you are viewing data within your expected date range in the
“Show data between” area. The dates default to the school year.
7.) Click on either the Table icon or the Graph icon to view the report type of your
choice:
The graph report comes with a key to easily interpret the information displayed on
the graph:
The bars on the graph also have dynamic rollover states, so if you roll the cursor
over a bar, the following data will appear:
Date Administered
Book Title and Text Level
Genre
Comprehension score
Teacher User’s Manual: Fountas & Pinnell Benchmark Assessment Online Data Management System ©
76
Teacher User’s Manual: Fountas & Pinnell Benchmark Assessment Online Data Management System ©
77
Class Report –
Assessment Levels
Below is an example of the same Class Assessment Levels report in a log format,
in a table format, and in a graph format:
Log
Table
Teacher User’s Manual: Fountas & Pinnell Benchmark Assessment Online Data Management System ©
78
Graph
To view a Class Assessment Levels report, confirm that the Classes tab is forward.
Steps to view
1.) Choose the appropriate School Year from the school year tabs at the bottom
of the reports area:
2.) Select the appropriate class from the “Select a Class” dropdown list.
3.) Select the report option “Assessment Levels” from the “Select a Report”
dropdown list.
4.) Confirm that you are viewing the expected Level (Instructional or Independent)
in the “Show data for” area.
5.) Confirm that you are viewing data within your expected date range in the
“Show data between” area. The dates default to the school year.
6.) Click on the Log icon, the Table icon, or the Graph icon to view the report type
of your choice:
Teacher User’s Manual: Fountas & Pinnell Benchmark Assessment Online Data Management System ©
79
The graph report comes with a key to easily interpret the information displayed on
the graph:
The bars on the graph also have dynamic rollover states, so if you roll the cursor
over a bar, the following data will appear:
Date Administered
Student Name
Book Title
Genre
If more than one data point appears in approximately the same area, the rollover
text will start with the header:
“[#] of [#] Press mouse for next.”
The data for one user will appear under that header.
Click the mouse on the data point to cycle to the next student’s rollover data. The
data will continue to cycle as you click, allowing you to see the text for the
remaining students that are covered by that data point.
See an example below:
Teacher User’s Manual: Fountas & Pinnell Benchmark Assessment Online Data Management System ©
80
Class Report –
Comprehension
Below is an example of the same Class Comprehension report in a table format
and in a graph format:
Table
Graph
To view a Class Comprehension report, confirm that the Classes tab is forward.
Teacher User’s Manual: Fountas & Pinnell Benchmark Assessment Online Data Management System ©
81
Steps to view
1.) Choose the appropriate School Year from the school year tabs at the bottom
of the reports area:
2.) Select the appropriate class from the “Select a Class” dropdown list.
3.) Select the report option “Comprehension” from the “Select a Report”
dropdown list.
4.) Confirm that you are viewing the expected Level (Instructional or Independent)
in the “Show data for” area.
5.) Click on either the Table icon or the Graph icon to view the report type of your
choice:
6.) Choose the assessments that you would like to view in the graph by clicking
on the check boxes next to each assessment. You can also click on the check box
again to remove the checkmark; this will also remove that data from the graph you
are viewing.
Note: “1st Assessment” refers to the first assessment given to the student at which
they had the level of Independent or Instructional. The graph will show either
Independent Level or Instructional Level data, depending on which Level radio
button you chose in step 4 above.
The graph report comes with a key to easily interpret the information displayed on
the graph:
7.) Choose the type of Comprehension score you would like to view by choosing
one of the radio button options below the “F&P Benchmark” header. The type
defaults to Comprehension Total. The options include:
Within the Text
Beyond the Text
About the Text
Comprehension Total
Teacher User’s Manual: Fountas & Pinnell Benchmark Assessment Online Data Management System ©
82
The bars on the graph also have dynamic rollover states, so if you roll the cursor
over a bar, the following data will appear:
Number of students
Number Assessment
Comprehension Total
See an example below:
Teacher User’s Manual: Fountas & Pinnell Benchmark Assessment Online Data Management System ©
83
Class Report – Class Below is an example of the same Class Profile report in a table format and in a
graph format:
Profile
Table
Graph
To view a Class Profile report, confirm that the Classes tab is forward.
Teacher User’s Manual: Fountas & Pinnell Benchmark Assessment Online Data Management System ©
84
Steps to view
1.) Choose the appropriate School Year from the school year tabs at the bottom
of the reports area:
2.) Select the appropriate class from the “Select a Class” dropdown list.
3.) Select the report option “Class Profile” from the “Select a Report” dropdown
list.
4.) Confirm that you are viewing the expected Level (Instructional or Independent)
in the “Show data for” area.
5.) Click on either the Table icon or the Graph icon to view the report type of your
choice:
For the Graph report:
6.) Choose the assessments that you would like to view in the graph by clicking
on the check boxes next to each assessment. You can also click on the check box
again to remove the checkmark; this will also remove that data from the graph you
are viewing.
Note: “1st Assessment” refers to the first assessment given to the student at which
they had the level of Independent or Instructional. The graph will show either
Independent Level or Instructional Level data, depending on which Level radio
button you chose in step 4 above.
The graph report comes with a key to easily interpret the information displayed on
the graph:
The bars on the graph also have dynamic rollover states, so if you roll the cursor
over a bar, the following data will appear:
Number of students
Number Assessment
Teacher User’s Manual: Fountas & Pinnell Benchmark Assessment Online Data Management System ©
85
For the Table report:
Check boxes appear next to the assessment numbers to the left of the table report.
You can uncheck a check box to remove that assessment’s data from the table
report you are viewing, or check it off again to add that assessment’s data back
into the table report:
Teacher User’s Manual: Fountas & Pinnell Benchmark Assessment Online Data Management System ©
86
Print Reports
All reports can be printed in full color. While you are viewing the report you would
like to print, click on the Print button, located in the lower right corner of the report
view:
1.) Click the Print button.
2.) Select your printer from the “Print” window that pops up, and click the Print
button.
An example of a printed report is below:
Teacher User’s Manual: Fountas & Pinnell Benchmark Assessment Online Data Management System ©
87
The Reports printout will include all of the information that is shown in the report
view online.
This printout will include the relevant combination of the headers:
Fountas & Pinnell Benchmark Assessment
Report Name
Student Name
Class Name
Instructional or Independent Level
Dates
School Year
Report Key/Legend
The Reports printout will be in the same format (log, table, or graph) that you are
viewing when you click the Print button.
Built by:
Teacher User’s Manual: Fountas & Pinnell Benchmark Assessment Online Data Management System ©
88

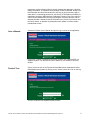
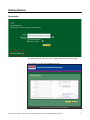

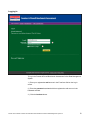
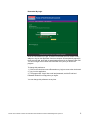
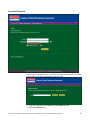
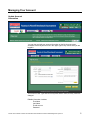
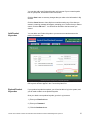
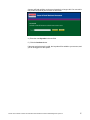
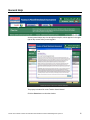
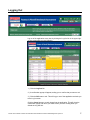
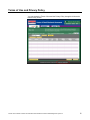
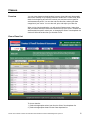
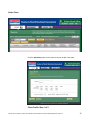
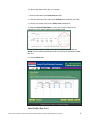
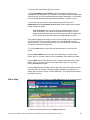
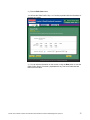
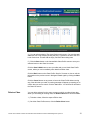

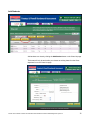


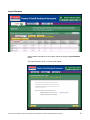
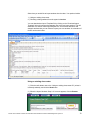
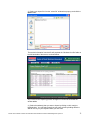
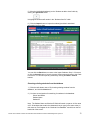
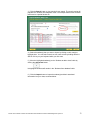
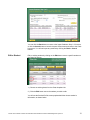
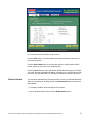
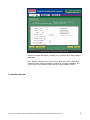
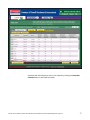
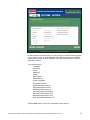
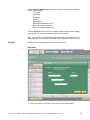
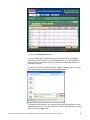
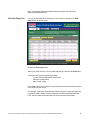
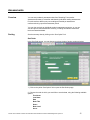

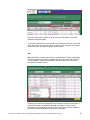
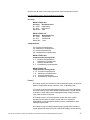
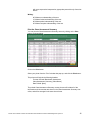
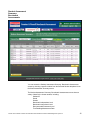

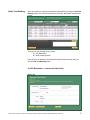
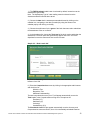
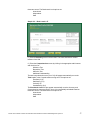
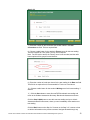
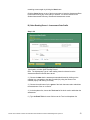
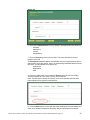

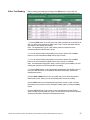
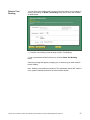
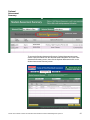
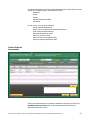
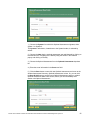
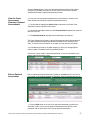
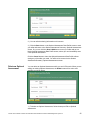
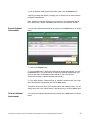

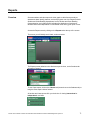
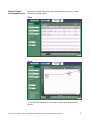
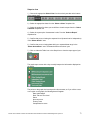
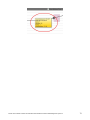
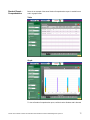
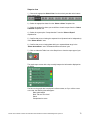
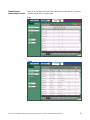
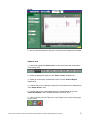
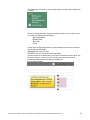
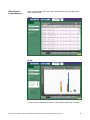

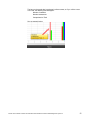
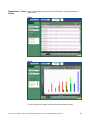
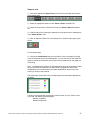
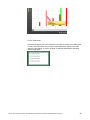
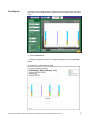


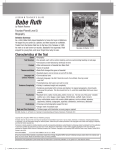


![ShowMan User Manual [PDF Format]](http://vs1.manualzilla.com/store/data/005637930_1-31cd6ced5af6c2a7a337ddd38fc92d65-150x150.png)