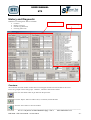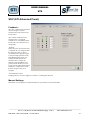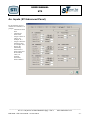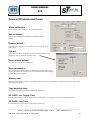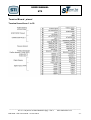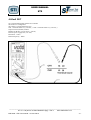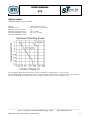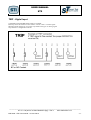
1
USER MANUAL ST2 User manual Referred to : Fw revision starting from 2.00 RC software revision starting from 2.00 _____________________________________________________________________________________ STI s.r.l. via pascoli 10 A/B 24020Gorle (Bg) – ITALY www.stiactuation.com IOM 4029 - ST2 User manual - rev.3 01/2012 -1- USER MANUAL ST2 Description ............................................................................................................................................................................5 CONTROLLER MOUNTING .....................................................................................................................................5 Manufacturer’s identification : .....................................................................................................................................6 GENERAL SAFETY INSTRUCTIONS ..............................................................................................................................8 Installation .....................................................................................................................................................................8 Maintenance ..................................................................................................................................................................8 Controller sw upgrade ...........................................................................................................................................................9 RemoteControl sw installation ...........................................................................................................................................11 RemoteControl sw connection ...........................................................................................................................................11 USB connection : ........................................................................................................................................................11 Starting the sw .....................................................................................................................................................................12 The Main page ....................................................................................................................................................................13 Quick Buttons .....................................................................................................................................................................14 Download button .............................................................................................................................................................14 Graph button ...................................................................................................................................................................14 Password button ..............................................................................................................................................................14 ‘Tuning window’.................................................................................................................................................................15 ‘Travel Control’ area.......................................................................................................................................................15 Definitions :.....................................................................................................................................................................15 0 Ctrl Signal : ..............................................................................................................................................................15 0 Position : ..................................................................................................................................................................15 Low [0..50 %]: ............................................................................................................................................................15 High [50..100 %]: .......................................................................................................................................................15 Tuning : ...........................................................................................................................................................................15 Kp IN/OUT [0 .. 100]: ................................................................................................................................................16 Stroke Time IN/OUT [0,0 ..3000,0 sec]: ....................................................................................................................16 Approach IN/OUT [0..100]: .......................................................................................................................................16 Dead Band [0..10] : .....................................................................................................................................................16 ‘IN/OUT window’...............................................................................................................................................................17 Fail/Trip settings .............................................................................................................................................................17 Mode C1/C2 : ..............................................................................................................................................................17 Ack END MODE .......................................................................................................................................................17 On St. ..........................................................................................................................................................................17 SOV .................................................................................................................................................................................18 SOV ASSIGNEMENT ...............................................................................................................................................19 SOV BOOSTER FUNCTION ....................................................................................................................................20 Analog Outputs ...................................................................................................................................................................24 Temperature ....................................................................................................................................................................25 Date & Time....................................................................................................................................................................25 History and Diagnostic .......................................................................................................................................................26 Counters : ....................................................................................................................................................................26 Example of Diagnostic Report :..................................................................................................................................27 Historic event log ........................................................................................................................................................29 Periodic log (SD Card)................................................................................................................................................30 SDCard : ......................................................................................................................................................................30 Main vars and status............................................................................................................................................................32 ActPos [%] : ................................................................................................................................................................32 ReqPos [%]: ................................................................................................................................................................32 Input [mA]: .................................................................................................................................................................32 Status : .........................................................................................................................................................................32 Errors:..........................................................................................................................................................................32 Service State / Mode : .................................................................................................................................................33 Channel 1 CFG window (Channel 2 CFG window) .......................................................................................................34 CALIBRATION .........................................................................................................................................................34 _____________________________________________________________________________________ STI s.r.l. via pascoli 10 A/B 24020Gorle (Bg) – ITALY www.stiactuation.com IOM 4029 - ST2 User manual - rev.3 01/2012 -2- USER MANUAL ST2 INPUT SIGNAL : Split range.....................................................................................................................................34 INPUT SIGNAL : Calibrate 4mA ..............................................................................................................................35 INPUT SIGNAL : Calibrate 20mA ............................................................................................................................35 Change Description .....................................................................................................................................................35 Position excess Fail .........................................................................................................................................................37 Signal Fail ...................................................................................................................................................................37 Probe Fail ....................................................................................................................................................................38 HART panel ........................................................................................................................................................................39 HART PARAMETERS ..................................................................................................................................................39 Tag : ............................................................................................................................................................................39 Date : ...........................................................................................................................................................................39 Descriptor :..................................................................................................................................................................39 Message :.....................................................................................................................................................................39 Polling address: ...........................................................................................................................................................39 Dev. ID : ......................................................................................................................................................................39 HART Protocol ...............................................................................................................................................................39 HART Communication ...................................................................................................................................................39 Hart Mode : .................................................................................................................................................................39 The Graph window..............................................................................................................................................................40 The Graph Menu .................................................................................................................................................................41 File : Save Image ........................................................................................................................................................41 File : Save Snapshot ....................................................................................................................................................41 File : Load Snapshot ...................................................................................................................................................41 File : Load History File ...............................................................................................................................................41 File : Convert History File ..........................................................................................................................................41 STI Advanced Panel ...........................................................................................................................................................42 Probe (STI Advanced Panel) ..............................................................................................................................................43 Proportional valve (STI Advanced Panel) ..........................................................................................................................44 FB Current Value : ......................................................................................................................................................44 Manual control : ..........................................................................................................................................................44 Calibration type :.........................................................................................................................................................44 SOV (STI Advanced Panel) ................................................................................................................................................45 Feedback : ...................................................................................................................................................................45 Manual Settings ..........................................................................................................................................................45 4-20mA (STI Advanced Panel) ..........................................................................................................................................46 An. Inputs (STI Advanced Panel) .......................................................................................................................................47 General (STI Advanced Panel) ...........................................................................................................................................48 ‘Erase calibration’ : .....................................................................................................................................................48 ‘Set as default’ : ..........................................................................................................................................................48 Reset to default’: .........................................................................................................................................................48 ‘Upload’ : ....................................................................................................................................................................48 ‘Reset factory default’ : ..............................................................................................................................................48 ‘Save parameters’ : .....................................................................................................................................................48 ‘Memory test’ : ...........................................................................................................................................................48 Trips detection time: ...................................................................................................................................................48 SD CARD : Pre Trigger Time ....................................................................................................................................48 SD CARD : Log Time ................................................................................................................................................48 The Menu ............................................................................................................................................................................49 Menu : File ......................................................................................................................................................................49 Load: ...........................................................................................................................................................................49 Save : ...........................................................................................................................................................................49 Report : ........................................................................................................................................................................49 Exit : ............................................................................................................................................................................49 Menu : Device .................................................................................................................................................................49 Download ....................................................................................................................................................................49 _____________________________________________________________________________________ STI s.r.l. via pascoli 10 A/B 24020Gorle (Bg) – ITALY www.stiactuation.com IOM 4029 - ST2 User manual - rev.3 01/2012 -3- USER MANUAL ST2 Example of Configuration Report...............................................................................................................................50 SYSTEM INFORMATION ..............................................................................................................................................50 TRAVEL CONTROL .........................................................................................................................................................50 TUNING .............................................................................................................................................................................50 Parameter ........................................................................................................................................................................50 Channel 1 ........................................................................................................................................................................50 Channel 2 ........................................................................................................................................................................50 FAIL TRIP SETTINGS ......................................................................................................................................................52 SOV STATUS....................................................................................................................................................................52 Channel 1 ........................................................................................................................................................................56 Channel 2 ........................................................................................................................................................................56 Menu : Password .............................................................................................................................................................60 Login ...........................................................................................................................................................................60 Change ........................................................................................................................................................................60 Menu : ? Info ...................................................................................................................................................................60 Electrical connections: ........................................................................................................................................................61 Application example : .....................................................................................................................................................61 Terminal Board : wiring specification and electrical rating ...........................................................................................62 Terminal board from 1 to 50 and from 100 to 113 : ...................................................................................................63 Terminal board from 51 to 70 .....................................................................................................................................63 Terminal board from 80 to 81 .....................................................................................................................................63 Terminal Board : pinout ..................................................................................................................................................64 Terminal board from 1 to 50 .......................................................................................................................................64 Terminal board from 51 to 70 .....................................................................................................................................65 Terminal board from 80 to 82 .....................................................................................................................................65 Terminal board from 100 to 113 .................................................................................................................................66 Position Feedback Probe .................................................................................................................................................67 Analog Input ( pressure sensors).....................................................................................................................................68 4-20mA IN : Request position ........................................................................................................................................69 4-20mA OUT ..................................................................................................................................................................70 Digital output ..................................................................................................................................................................71 TRIP : Digital Input ........................................................................................................................................................72 ON/OFF SOV .................................................................................................................................................................73 Proportional Valve ..........................................................................................................................................................74 Power supply ...................................................................................................................................................................75 AC universal input (standard solution) : .....................................................................................................................75 DC 24V= input :..........................................................................................................................................................75 DC 24V= input without isolation : .............................................................................................................................75 Options ........................................................................................................................................................................75 How To (advanced user configuration guide) ....................................................................................................................76 Configure SOV and TRIP ...............................................................................................................................................76 Setting the the Trip signal Type :................................................................................................................................77 Setting the Activation Status : ....................................................................................................................................77 Setting the SOV : ........................................................................................................................................................78 Configure Power reduction and test the SOV .............................................................................................................79 Configure the Proportional Valve ...................................................................................................................................80 Select the type of proportional valve ..........................................................................................................................80 TROUBLE SHOOTING .....................................................................................................................................................81 ST2Mono : single channel version .....................................................................................................................................83 Differences : ....................................................................................................................................................................83 ST2Mono Power supply : ...............................................................................................................................................83 ST2Mono : terminal board ..............................................................................................................................................84 _____________________________________________________________________________________ STI s.r.l. via pascoli 10 A/B 24020Gorle (Bg) – ITALY www.stiactuation.com IOM 4029 - ST2 User manual - rev.3 01/2012 -4- USER MANUAL ST2 Description The “Smart Trak” controller is used as a positioning system for proportionally-driven hydraulic actuators. Fast stroke and superior resolution allow the unit to be applied on severe service hydraulic actuators demanding fast stroking and precise positioning. Smart Trak system covers a wide range of actuator size and stroke length requirements. Smart Trak 2 is able to drive two fully independent actuators. The Smart trak controller must be connected to the following devices: 1. feedback probe (for each actuator) which detects the hydraulic actuator's actual position 2. One modulating valve ( for each actuator) 3. Up to 3 on-off solenoid ( for each channel) 4. Optional pressure/temperature (4-20mA signal) sensors On the customer's side power supply, 4-20mA signal (request position) and if required trip signal and output signal must be connected. CONTROLLER MOUNTING The controller enclosure is rated for NEMA4 (NEMA4X when the Stainless Steel) / IP66 environment, which is watertight to “wash down”, such as a water hose. Outdoor mounting is acceptable, however, the controller should be protected from direct sunlight by a suitable sun shield (see temperature ratings). _____________________________________________________________________________________ STI s.r.l. via pascoli 10 A/B 24020Gorle (Bg) – ITALY www.stiactuation.com IOM 4029 - ST2 User manual - rev.3 01/2012 -5- USER MANUAL ST2 Manufacturer’s identification : Every controller Smart Trak is provided with a name plate with its serial number. The year of manufacturing is indicated by the first two numbers of the serial number. Do not remove it and/or replace with other name plates The decoder of the manufacturer’s model can be made by means of the following table : _____________________________________________________________________________________ STI s.r.l. via pascoli 10 A/B 24020Gorle (Bg) – ITALY www.stiactuation.com IOM 4029 - ST2 User manual - rev.3 01/2012 -6- USER MANUAL ST2 ST2 Housing O – Standard I – Stainless steel H – Hazardous S – Special Output port 1 – Blank 2 – Standard dwg. …… 3 – Standard dwg. …… 4 – Special 5 – Hazardous dwg. …… Supply 1 – Universal AC / 110 Vdc 2 – 24 Vdc DC/DC 3 – None 4 – Special Communication D – Nr. 2 digital C – Nr. 2 digital + CANBUS + 485/422 N – None S – Special Display 0 – Blind cover 1 – With display Certification A – American (UL) E – European CE _____________________________________________________________________________________ STI s.r.l. via pascoli 10 A/B 24020Gorle (Bg) – ITALY www.stiactuation.com IOM 4029 - ST2 User manual - rev.3 01/2012 -7- USER MANUAL ST2 GENERAL SAFETY INSTRUCTIONS The non-observation of the following safety instructions and of the instruction manuals can result in serious injury. Installation - Must be done by qualified person trained to operate A ground tap is necessary The electrical and hydraulic connections must be done according to the diagram and label The supply circuit must be protected in case of current exceeding the limit fixed The equipment must be provided with cable entries and filler plugs certified according to the required certification The actuator must be installed and used according to the project design specification. The fluid must be chemically compatible with the used gaskets and lubricant Maintenance - Must be done by qualified person Cleaning must be done with a humid cloth Greases and oils must be used according to the manufacturer’s instructions, however their flammability point must be > 140°C _____________________________________________________________________________________ STI s.r.l. via pascoli 10 A/B 24020Gorle (Bg) – ITALY www.stiactuation.com IOM 4029 - ST2 User manual - rev.3 01/2012 -8- USER MANUAL ST2 Controller sw upgrade The software is factory installed in the controller. For a new installation, a "Loader" program is necessary. It can be installed selecting the file SETUP.exe from the supplied LOADER software cd. A shortcut should appear in the program selection of start menu. Select the “Loader” access program: Program » Loader » Loader Or select it directly: C:\Program Files\STI s.r.l\Loader\Loader.exe The following window will appear: _____________________________________________________________________________________ STI s.r.l. via pascoli 10 A/B 24020Gorle (Bg) – ITALY www.stiactuation.com IOM 4029 - ST2 User manual - rev.3 01/2012 -9- USER MANUAL ST2 Configure the PC COM port selecting: “Configuration” from EDIT menu for “Texas 2812 DSP”. Copy the DSP software to be installed to a folder on the laptop. File extension should be “.hex”. Perform the following steps on the Smart Trak controller to prepare it for software loading. - Turn off the controller by the main power switch - Change the switches SW1 as showed in SW Upgrade mode NORMAL SW UPGRADE mode Attach the USB cable to the CN1 connection block Launch the loader program Select the down arrow next to the “OPEN” quick select button Select “Texas 2812 DSP File” - Locate the .HEX file, and select OPEN Turn on the controller Select the “Program” quick select button The program should run to completion Upon completion select File » Exit Turn off the controller Change the switches SW1 as showed in Normal mode. _____________________________________________________________________________________ STI s.r.l. via pascoli 10 A/B 24020Gorle (Bg) – ITALY www.stiactuation.com IOM 4029 - ST2 User manual - rev.3 01/2012 - 10 - USER MANUAL ST2 RemoteControl sw installation Insert the CD ( or download the installation file) Run setup.exe Follow the instruction on the desktop RemoteControl sw connection USB connection : Connect a standard USB ‘A’ to ‘B’ cable from your computer to the ST2 USB port CN1 When the USB connection is used a specific USB driver is required. The USB driver is usually provided with the RemoteControl installation file or can be download from http://www.ftdichip.com/Drivers/VCP.htm with reference to FT232R device. If communication problems are recognized check the ‘latency timer’ in the advanced properties of the COM port assigned and set it to 1ms. _____________________________________________________________________________________ STI s.r.l. via pascoli 10 A/B 24020Gorle (Bg) – ITALY www.stiactuation.com IOM 4029 - ST2 User manual - rev.3 01/2012 - 11 - USER MANUAL ST2 Starting the sw Run the sw starting from the desktop icon or from the Windows Start menu. The ‘Select Communication’ page is displayed. Select the right communication port Only the available communication ports are displayed in the combo box. Select the Communication mode (RS232or HART) Press the ‘OK’ button _____________________________________________________________________________________ STI s.r.l. via pascoli 10 A/B 24020Gorle (Bg) – ITALY www.stiactuation.com IOM 4029 - ST2 User manual - rev.3 01/2012 - 12 - USER MANUAL ST2 The Main page MAIN VARS QUICK BUTTONS _____________________________________________________________________________________ STI s.r.l. via pascoli 10 A/B 24020Gorle (Bg) – ITALY www.stiactuation.com IOM 4029 - ST2 User manual - rev.3 01/2012 - 13 - USER MANUAL ST2 Quick Buttons Download button Download all the parameters from ST2. At the end of the download the values displayed on the RC sw are the same of the ST2 positioner Graph button Open the Graph window Password button Open the Login window In order to change the parameters value or to access the various configuration windows a login is request. The default standard password is : 12345 _____________________________________________________________________________________ STI s.r.l. via pascoli 10 A/B 24020Gorle (Bg) – ITALY www.stiactuation.com IOM 4029 - ST2 User manual - rev.3 01/2012 - 14 - USER MANUAL ST2 ‘Tuning window’ ‘Travel Control’ area Definitions : Limit : when a limit is configure the Request position is limited at this value Example : Set the Limit at 95%. Even if the signal input is 20ma and the theoretical Request position is 100%, the applied Request position is 95% CutOff : When a cutoff is configured if the Actual position falls inside the Cutoff area the Request position is fixed at the min ( or max) value. Example : Set the cutoff at 5%. When the Request position is less of 5% and the Actual position is less of 5% a fixed pressure is applied in order to put the actual position at 0%. WARNING_ On some type of valves it is mandatory to enable a cutoff to ensure that the valve works properly ( to ensure full trust on sit) 0 Ctrl Signal : Specify the relationship between 4-20mA signal input and stem position. ‘Stem in’ means that you want that the Stem is in ‘in position’ when you apply 4mA ‘Stem out’ means that you want that the Stem is in ‘out position’ when you apply 4mA 0 Position : Specify the relationship between 0-100% indication ( a 4-20mA Out) and stem position. ‘Stem in’ means that 0% position is when the Stem is in ‘in position’ ‘Stem out’ means that 0% position is when the Stem is in ‘out position’ Low [0..50 %]: Specify if a Limit or a CutOff is configurated in the close direction. High [50..100 %]: Specify if a Limit or a CutOff is configurated in the open direction. Tuning : A lot of parameter are configurable with a different value in the Open direction and in the close one. This is to maximize the performance of the system. If the Mono flag is checked the first value of each parameter is automatically copied in the second one. _____________________________________________________________________________________ STI s.r.l. via pascoli 10 A/B 24020Gorle (Bg) – ITALY www.stiactuation.com IOM 4029 - ST2 User manual - rev.3 01/2012 - 15 - USER MANUAL ST2 Kp IN/OUT [0 .. 100]: Proportional gain is the multiplier of the error (difference between input signal and actuator actual position) and it is expressed in percent. It is active only for an error which is bigger than dead band value. A different gain for each stem direction can be imposed. Stroke Time IN/OUT [0,0 ..3000,0 sec]: The value expressed in seconds of the stroking time for each direction Approach IN/OUT [0..100]: Special parameter, similar to a derivative factor, used to control overshoot. Dead Band [0..10] : Dead band prevents (at expense of the accuracy) that the valve, in the controlled condition, keeps continuously hunting for the target position _____________________________________________________________________________________ STI s.r.l. via pascoli 10 A/B 24020Gorle (Bg) – ITALY www.stiactuation.com IOM 4029 - ST2 User manual - rev.3 01/2012 - 16 - USER MANUAL ST2 ‘IN/OUT window’ Fail/Trip settings Configure the digital input for TRIP function. Up to 6 digital input are available. For each digital input you can configure : Mode C1/C2 : Error mode for channel 1 and channel 2. It is possible to define the action to do when the TRIP input is ON. Normally a TRIP is related only to one channel, but it is possible to set an error mode for both the channels. Off/DirectDriveMode/Booster Enabled Mode : The TRIP is not used or it is assigned for Direct Drive function ( See SOV configuration) SafetyShutdown : Up to 3 different Safety mode for each channel. The SOV activation in each SafetyShutdown mode is define in the SOV configuration panel Modulation valve : The actuator is driven to a specific position specified in the ‘Pos’ field that is showed when ‘Modulation Valve’ is selected Freeze : Actuator freezes in the last position Ack : Trip is used for the error acknowledgment in remote mode. External SOV : External safety shut down valve has been activated. Ack END MODE The end mode option allows to configure the action to be executed at the end of the error conditions. On St. This option allows to configure the ON status for the selected trip. ‘E’ means : when the input is energized ( contact is closed or voltage is applied) ‘nE’ means : when the input is de-energized ( contact is open or voltage is not applied) For safety reason the best choice is ‘nE’ : if a wire is cut off you are able to recognize this potential problem Err : Led used to show if a trip is activated (trip status , energized or not, is equal to ‘On St’ and a function , Mode C1/C2) is defined. Hw : Led used to show if a trip is energized or not _____________________________________________________________________________________ STI s.r.l. via pascoli 10 A/B 24020Gorle (Bg) – ITALY www.stiactuation.com IOM 4029 - ST2 User manual - rev.3 01/2012 - 17 - USER MANUAL ST2 SOV SOV1 SOV2 SOV3 SOV4 SOV5 SOV6 Yellow Led : SOV On Red led : SOV disconnected or short circuit Black led : SOV off Configuration _____________________________________________________________________________________ STI s.r.l. via pascoli 10 A/B 24020Gorle (Bg) – ITALY www.stiactuation.com IOM 4029 - ST2 User manual - rev.3 01/2012 - 18 - USER MANUAL ST2 SOV ASSIGNEMENT Select if a SOV is assigned to Channel 1 or Channel 2 or if it is reserved for DirectDrive. Selecting DirectDrive a SOV is not assigned to a specific channel and can be activated from a trip. This mode is used typically to drive ON/OFF Valve without feedback. When a specific trip is assigned to a SOV for direct drive, a warning is showed if the trip is already assigned for other functions. Channel 1 : Only the SOV assigned to channel 1 are active and configurable in this panel. The matrix specify if a SOV is activated or not in a specific Running/SafetyShutdown status. Refer to “Configure SOV and TRIP” at the end of this instruction manual to understand how to set the SOV. Channel 2 : Only the SOV assigned to channel 2 are active and configurable in this panel. The matrix specify if a SOV is activated or not in a specific Running/SafetyShutdown status. Refer to “Configure SOV and TRIP” at the end of this instruction manual to understand how to set the SOV. _____________________________________________________________________________________ STI s.r.l. via pascoli 10 A/B 24020Gorle (Bg) – ITALY www.stiactuation.com IOM 4029 - ST2 User manual - rev.3 01/2012 - 19 - USER MANUAL ST2 SOV BOOSTER FUNCTION This feature come with sw release 2.0 . The ON/OFF valves can be used in order to speedup the movement of big actuators. Two operative modes are available : - With enable - Normal When Booster ‘with enable’ is selected a specific TRIP signal is used like ENABLE of the booster : it means that you can have a big error and that the movement can happens only with the proportional valve ( if the TRIP is not activated ) or also with the ON/OFF valve. When Booster ‘normal’ is selected every time the error is greater than the activation threshold the ON/OFF valve is used. The Booster function is related to a SafetyShutdown mode and not to a specific SOV because in order to move in one specific direction the status of more than one SOV must be changed. Configuration parameters : Mode : No : booster function is disabled Normal : booster function is enabled all the time based on the other configuration parameters With Enable : booster function is enabled based on the status of the TRIP channel specified on the same row Target : We need to specify if this ‘safety shutdown’ mode move the actuator in the ‘Stem IN’ or ‘Stem OUT’ direction. Make attention : a wrong settings can cause an hydraulic short circuit ( if the proportional valve is used with the booster) Activation Threshold : Is the minimum error that can start the booster activation Disactivation Threshold : Is the residual error ( when we are approaching the target) that stop the booster activation Use PV : If this caption is selected the proportional valve works helping the movement during the booster action Trip Nr : This parameter is used only when the mode is ‘With enable’ and specify the TRIP channel used to enable the booster function. _____________________________________________________________________________________ STI s.r.l. via pascoli 10 A/B 24020Gorle (Bg) – ITALY www.stiactuation.com IOM 4029 - ST2 User manual - rev.3 01/2012 - 20 - USER MANUAL ST2 The TRIP signal is evaluated ‘on the edge’ and not ‘on the level’ , it means that in order to enable the booster the TRIP status must change from ‘not active’ to ‘active’. It cannot be ‘active’ all the time, if you need the booster all the time you need to select mode=’Normal’ When the Mode is ‘With Enable’ the SafetyShutdown mode related to a booster cannot be used like in the previous sw versions for a Quickopen or QuickClose function because it is automatically disactivated when the error is less than the ‘disactivation threshold’. Examples of movement : Booster ‘with enable’, PV not used. The setpoint is changed The slope changes because the BOOSTER is activated TRIP is activated and the BOOSTER are fired PV is used at the beginning ( before the enable that come from the TRIP) PV is used at the end when the booster is disactivated _____________________________________________________________________________________ STI s.r.l. via pascoli 10 A/B 24020Gorle (Bg) – ITALY www.stiactuation.com IOM 4029 - ST2 User manual - rev.3 01/2012 - 21 - USER MANUAL ST2 Booster ‘with enable’, PV used. The setpoint is changed TRIP is activated and the BOOSTER are fired PV is used all the time The slope changes because the BOOSTER is activated The slope changes again because the BOOSTER is disactivated _____________________________________________________________________________________ STI s.r.l. via pascoli 10 A/B 24020Gorle (Bg) – ITALY www.stiactuation.com IOM 4029 - ST2 User manual - rev.3 01/2012 - 22 - USER MANUAL ST2 Digital Output Digital Output 1 Digital Output 2 Configuration Digital Output 3 Yellow led : Digital Output ON Three Digital Output are available, for each one it is possible to select different activation options. When a Digital Output is configured it is Turned ON ( the normally open contact of the relay is closed) if the error condition is not present and it is turned off when the error condition is true. Selecting more than one error condition in one column the output is turned off when at least one condition is verified. _____________________________________________________________________________________ STI s.r.l. via pascoli 10 A/B 24020Gorle (Bg) – ITALY www.stiactuation.com IOM 4029 - ST2 User manual - rev.3 01/2012 - 23 - USER MANUAL ST2 Analog Outputs Two analog outputs are available. It’s possible to choose the required parameter, in order to associate it to the selected output channel for the reproduction of the indicated signal in a range from 4mA to 20 mA. ReqPosCh1 : required position of CH1 , between 4÷20 mA ReqPosCh2 : required position of CH2 , between 4÷20 mA ActPosCh1 : actuator position of CH1 , between 4÷20 mA ActPosCh2 : actuator position of CH2 , between 4÷20 mA InputCh1 : input signal of CH1 , between 4÷20 mA InputCh1 : input signal of CH2 , between 4÷20 mA Temperature :temperature in the controller box , between 0÷100°C AI1 : Analog input 1 , between 4÷20 mA AI2 : Analog input 2 , between 4÷20 mA AI3 : Analog input 3 , between 4÷20 mA AI4 : Analog input 4 , between 4÷20 mA AI5 : Analog input 5 , between 4÷20 mA AI6 : Analog input 6 , between 4÷20 mA _____________________________________________________________________________________ STI s.r.l. via pascoli 10 A/B 24020Gorle (Bg) – ITALY www.stiactuation.com IOM 4029 - ST2 User manual - rev.3 01/2012 - 24 - USER MANUAL ST2 Temperature Show the temperature inside the enclosure. Date & Time Show Date & Time of the controller. This information is used for diagnostic purposes. With a double-click it is possible to change the date&time ( when you double-click a panel with actual date&time –taken from the laptop - is opened, pressing ‘OK’ this information is sent to the controller). _____________________________________________________________________________________ STI s.r.l. via pascoli 10 A/B 24020Gorle (Bg) – ITALY www.stiactuation.com IOM 4029 - ST2 User manual - rev.3 01/2012 - 25 - USER MANUAL ST2 History and Diagnostic Different level of diagnostic data are available. Counters Historic event log Periodic log (SD Card) Event log (SD Card) COUNTERS Historic Event Log Counters : The controller record the number of time that an event happens and the last time and date of this event. Events are grouped in three main groups : Channel 1, Channel 2 and Alarm Counters Press the ‘download’ button to get data from the positioner Press the ‘Report’ button to make a file (in .rtf format) with all the data Press the ‘Exit’ button to close the window _____________________________________________________________________________________ STI s.r.l. via pascoli 10 A/B 24020Gorle (Bg) – ITALY www.stiactuation.com IOM 4029 - ST2 User manual - rev.3 01/2012 - 26 - USER MANUAL ST2 Example of Diagnostic Report : Report Date : 13/10/2008 15.20 CHANNEL 1 Error Signal <min Pos.Exc.Error Pos.Exc.Warn. Probe Hard Limits Calib. Erased Calibr. Aborted Counter : : : : : : : System Calibration In Service Out Of Service 0 0 0 2 0 0 0 Date 10/10/2008 18:31:11 Counter : : : Date 0 0 0 Position History Total Stroke (Stroke nr.) Time in [0,1) Time in [1,25) Time in [25,50) Time in [50,75) Time in [75,99) Time in [99,100) In Service Time : : : : : : : : 0h 6h 0h 0h 0h 0h 0h 0h 00m 07m 04m 00m 00m 00m 00m 00m 12s 30s 25s 00s 00s 00s 05s 00s CHANNEL 2 Error Signal <min Pos.Exc.Error Pos.Exc.Warn. Probe Hard Limits Calib. Erased Calibr. Aborted Counter : : : : : : : System Calibration In Service Out Of Service 0 0 0 2 0 0 0 Date 10/10/2008 18:31:11 Counter : : : Date 0 0 0 Position History Total Stroke (Stroke nr.) Time in [0,1) Time in [1,25) Time in [25,50) Time in [50,75) Time in [75,99) Time in [99,100) In Service Time Alarm Trip 1 Trip 2 : : : : : : : : Counter : : 0h 6h 0h 0h 0h 0h 0h 0h 00m 12m 00m 00m 00m 00m 00m 00m 06s 00s 00s 00s 00s 00s 00s 00s Date 0 0 _____________________________________________________________________________________ STI s.r.l. via pascoli 10 A/B 24020Gorle (Bg) – ITALY www.stiactuation.com IOM 4029 - ST2 User manual - rev.3 01/2012 - 27 - USER MANUAL ST2 Trip 3 Trip 4 Trip 5 Trip 6 Error on Error on Error on Error on Error on Error on EEPROM 0 EEPROM 1 SOV SOV SOV SOV SOV SOV 1 2 3 4 5 6 : : : : : : : : : : : : 0 0 0 0 0 0 0 0 0 0 0 0 Temperature [°C] Min Max Average : : : 23.2 36.0 33.7 Events Log 10/13/2008 10/13/2008 10/13/2008 10/10/2008 10/10/2008 10/10/2008 10/10/2008 10/10/2008 10/10/2008 10/10/2008 10/10/2008 10/10/2008 10/10/2008 10/10/2008 15:18:20 15:16:11 12:27:41 18:31:11 18:31:11 18:26:46 18:26:00 17:19:11 17:18:42 17:01:41 16:53:47 16:53:41 16:46:38 16:46:33 Log Time: 10 --> 2 Log Time: 0 --> 10 System Turned ON Ch1 Probe Error Ch2 Probe Error System Turned ON Ch2 Probe Error SOV3: Channel 1 --> Channel 2 SOV2: Channel 1 --> Channel 2 Trip 2 Err Mode: Off --> SSD1 Ch1 Operation Mode: Stem Out --> Stem In Ch1 Operation Mode: Stem In --> Stem Out Ch1 HighLimit: 95,0 --> 96,0 Ch1 LowLimit: 5,3 --> 5,0 _____________________________________________________________________________________ STI s.r.l. via pascoli 10 A/B 24020Gorle (Bg) – ITALY www.stiactuation.com IOM 4029 - ST2 User manual - rev.3 01/2012 - 28 - USER MANUAL ST2 Historic event log Up to 500 events can be stored in the internal eeprom of the positioner. The events are stored in a circular queue , so when the limit is reached the older elements are deleted to free space for the new elements. Each element is recorded with : date, time , event specification. Press the ‘Start Read’ button to download the events from the positioned. Events are downloaded starting from the most recent one. Press the ‘Stop Read’ button to stop the download. Filter options are available to show only : - Errors - Warning - Info It is also possible to select a filter related to the channel : only Ch1, only Ch2, Ch1 & Ch2 Types of event : - Ch x Signal < min Ch x Signal > max Ch x Position Error Ch x Position warning Ch x Probe Error Ch x Hard Limit Ch x Calibration Erased Ch x Calibration Aborted Ch x Calibration Completed In Service Out Of Service Trip x Error On SOV x Eeprom x System Startup _____________________________________________________________________________________ STI s.r.l. via pascoli 10 A/B 24020Gorle (Bg) – ITALY www.stiactuation.com IOM 4029 - ST2 User manual - rev.3 01/2012 - 29 - USER MANUAL ST2 Periodic log (SD Card) Inserting an SD Card in the slot an automatic process of data collection is activated. The time between two consecutive recording is defined in the SDCARD LogTime parameter in the advanced STI menu. Typically the LogTime is equal to 10 minutes. A file is created for each month of the year, the name of the file is DIAGyymm (where ‘yy’ is the year and ‘mm’ is the month). The Graph Tool allow : - To open the History file and show the most important data - To convert the History file in a .csv file ( compatible with Excell and other spreadsheet) Converting the History file you have access up to 30 different data to monitor the status of a positioner. SD Card slot SDCard : ST is able to manage standard SDCard formatted in FAT16 (storage capacity up to 2Gbyte). In the STI advanced panel it is possible to check if the SD is recognized or not. _____________________________________________________________________________________ STI s.r.l. via pascoli 10 A/B 24020Gorle (Bg) – ITALY www.stiactuation.com IOM 4029 - ST2 User manual - rev.3 01/2012 - 30 - USER MANUAL ST2 Event log (SD Card) - Every time an event happens a SnapShot is saved on the SD card - SnapShot is 20 seconds lenght with a sample rate of 100Hz - SnapShot is centered around the event (pretrigger is configurable in the advanced STI menu) - The RemoteControl Graph tool is able to open and show a SnapShot file - SnapShot are saved with a name related to date/time/event_type in order to find the data in an easy way Events that start a snapshot are : - Ch x Signal < min - Ch x Signal > max - Ch x Position Error - Ch x Position warning - Ch x Probe Error - Ch x Hard Limit - TRIP x _____________________________________________________________________________________ STI s.r.l. via pascoli 10 A/B 24020Gorle (Bg) – ITALY www.stiactuation.com IOM 4029 - ST2 User manual - rev.3 01/2012 - 31 - USER MANUAL ST2 Main vars and status This window report a collection of information about the status of the positioner. You can select 3 different views : - Channel 1 : only the information of the channel 1 - Channel 2 : only the information of the channel 2 - Channel 1 and 2 : the information of both the channels ActPos [%] : Actual position measured by the positioner. ReqPos [%]: Request position evaluated ( the request position take in account the ‘Service State’, the 4-20ma input signal or manual setup, the transfer function and the split range) Input [mA]: Current read at the 4-20ma Loop current Input channel. The user can align the value showed using the commands available in the ‘CFG’ area Status : The calibration status is showed Errors: Show , for each channel, the actual and the last error. More detailed information are available in the ‘history and diagnostic’ window. _____________________________________________________________________________________ STI s.r.l. via pascoli 10 A/B 24020Gorle (Bg) – ITALY www.stiactuation.com IOM 4029 - ST2 User manual - rev.3 01/2012 - 32 - USER MANUAL ST2 Service State / Mode : Allow the selection of the Service State. - In Service : the Request Position is evaluated continually by the positioner starting from the 4-20ma signal value - Out Of Service (Manual) : the Request Position come from the manual set in the window. When the Service Mode become ‘Out Of Service (Manual)’ the first manual setpoint is equal to the last ‘Actual position’ in order to minimize the movement of the system - Out of Service : special mode selected automatically when the system is not calibrated. In this mode port B is fully pressurized and port A is depressurized WARNING_ Changing from ‘Out of Service’ to ‘In Service’ the system can move The ‘Main vars’ window can show information in two ways : Channel 1 & 2 : reduced set of information concerning the two channels in one page Only one channel : detailed information for one channel at a time _____________________________________________________________________________________ STI s.r.l. via pascoli 10 A/B 24020Gorle (Bg) – ITALY www.stiactuation.com IOM 4029 - ST2 User manual - rev.3 01/2012 - 33 - USER MANUAL ST2 Channel 1 CFG window (Channel 2 CFG window) CALIBRATION Start the calibration procedure. WARNING_ When the ‘Start Calibration’ button is pressed the system can move. INPUT SIGNAL : Split range Enable the split range function. The values in Lower range value and Upper range value are referred to the 4-20mA input. A minimum distance of 20% is required between Lower and Upper value, so up to 5 split range area can be configured in different concatenated positioners. The result of the split range is then evaluated by the ‘Transfer Function Curve’. If the Low range value is equal to 0% and Upper range value is equal to 100% the positioner interpret 4ma like the 0% Request position and the 20ma like 100%. If the Low range value is equal to 0% and Upper range value is equal to 50% the positioner interpret 4ma like the 0% Request position and the 12ma like 100%. _____________________________________________________________________________________ STI s.r.l. via pascoli 10 A/B 24020Gorle (Bg) – ITALY www.stiactuation.com IOM 4029 - ST2 User manual - rev.3 01/2012 - 34 - USER MANUAL ST2 INPUT SIGNAL : Calibrate 4mA Read the actual value of the input current and assume it like 4ma value. CAUTION_ Be sure that you are supplying the positioner with a stable, real 4ma INPUT SIGNAL : Calibrate 20mA Read the actual value of the input current and assume it like 20ma value. Change Description Each channel can have a description used to identify it in an easy way. _____________________________________________________________________________________ STI s.r.l. via pascoli 10 A/B 24020Gorle (Bg) – ITALY www.stiactuation.com IOM 4029 - ST2 User manual - rev.3 01/2012 - 35 - USER MANUAL ST2 INPUT CHAR. The Characterization specify the relationship between the Input signal and the Request Position. Selecting ‘Customer’ you have the chance to draw a specific characterization curve. Table button : Open the Transfer Function Curve window - The ‘Stem In’ and ‘Stem Out ’ label in the ‘Requested position’ axis show the effect of the ‘0 Ctrl Signal’ and ‘0 Ctrl Position’ selection - The ‘4.0ma’ and ’20.0ma’ in the ‘Signal Position’ show the effect of the ‘Split Range’ setup - The effect of ‘Limit’ and ‘CutOff’ are showed on the graph - To ‘Send’ a ‘Customer Curve’ to the Positioner press the ‘OK’ button. - You can change a value in the table or click_&_move the dot in the graph - Keeping hold the shift key and clicking on two dots, automatically the system make a linear interpolation between these two points. _____________________________________________________________________________________ STI s.r.l. via pascoli 10 A/B 24020Gorle (Bg) – ITALY www.stiactuation.com IOM 4029 - ST2 User manual - rev.3 01/2012 - 36 - USER MANUAL ST2 Position excess Fail Selecting this command, it’s possible to configure the max admissible position error and warning (difference between the required and the actual position) and the actions to be executed, if these limits are exceeded. Mode : configure the action that will be taken when the error happens. Warning Tolerance : it's possible to set the max error position value (tolerance) that cause a warning Warning Time : In case of warning condition, this parameter defines the waiting time before the alarm is activated Error Tolerance : it's possible to set the max error position value (tolerance) that cause an error Error Time : In case of error condition, this parameter defines the waiting time before the alarm is activated To set the value, double click on the corresponding cell, click the option and press “OK” to confirm it or “CANCEL” to exit. Signal Fail This command allows to configure the minimum and maximum admissible inlet signal (mA), the actions to be executed if these limits are reached and the error clearing condition. Mode : The first line allows to configure the action to be executed in case of an out of range or fail signal. To set the value, double click on the corresponding cell, click the option and press “OK” to confirm it or “CANCEL” to exit. Ack : The end mode option configures the action to be executed at the end of the error conditions. The available options are: OPTION EXECUTED ACTION AUTO Automatic return to normal working condition without waiting for confirmation. WAIT ACK A confirmation is required before returning to normal working condition. WAIT NOERR Automatic return to normal working condition only if all Position : This function is active only if the “Spool” selection has been made for the “Error mode” option; by this function it’s possible to define the actuator position in case of signal fail. The value of the position (expressed in percentage of the stroke) can be adjusted between -10 and 110% of the stroke, _____________________________________________________________________________________ STI s.r.l. via pascoli 10 A/B 24020Gorle (Bg) – ITALY www.stiactuation.com IOM 4029 - ST2 User manual - rev.3 01/2012 - 37 - USER MANUAL ST2 Probe Fail Mode : The first line allows to configure the action to be executed in case of an out of range or fail of the probe. To set the value, double click on the corresponding cell, click the option and press “OK” to confirm it or “CANCEL” to exit. Ack : The end mode option configures the action to be executed at the end of the error conditions. The available options are: OPTION EXECUTED ACTION AUTO Automatic return to normal working condition without waiting for confirmation. WAIT ACK A confirmation is required before returning to normal working condition. WAIT NOERR Automatic return to normal working condition only if all _____________________________________________________________________________________ STI s.r.l. via pascoli 10 A/B 24020Gorle (Bg) – ITALY www.stiactuation.com IOM 4029 - ST2 User manual - rev.3 01/2012 - 38 - USER MANUAL ST2 HART panel HART PARAMETERS Tag : The Tag is a 8 character label assigned by the end user based on the location and use of the field device. It’s a 8 character (6 byte) Packed ASCII string used to identify the field device. The term originated when physical tags were attached to instruments for this purpose. Date : The date is represented by three 8-bit binary unsigned integers representing, respectively, the day, month and year (minus 1900). It’s a date code, used by the Master for record keeping (e.g. last or next calibration date). Descriptor : The Descriptor is a 16 character (12 byte) Packed ASCII string used by the Master for record keeping. The default value is a blanked string, 16 bytes long. Message : The Message is a 32 character (24 byte) Packed ASCII string used by the Master for record keeping. The default value is a blanked string, 32 bytes long. Polling address: In the HART Protocol, the polling address is an integer used to identify the field device. It is used to construct the Short Frame Address. The Polling Address is set to 0 in point to point installations. Dev. ID : This number is different for every device manufactured with a given Manufacturer ID and Device Type. HART Protocol Show some communication parameters used for debug HART Communication Hart Mode : ‘Time management’ and ‘Time management (performance)’ are two different way to manage the Hart modem. If you have experience of communication problems try to change this option. _____________________________________________________________________________________ STI s.r.l. via pascoli 10 A/B 24020Gorle (Bg) – ITALY www.stiactuation.com IOM 4029 - ST2 User manual - rev.3 01/2012 - 39 - USER MANUAL ST2 The Graph window Event Line : moving with the mouse on the line, specification about the event are showed ( i.e. Ch1 TRIP1) Begin a movement (if in manual mode) Start & Stop the recorder Channel 2 information selector. Specify the CH1 Required position for a manual movement Channel 1 information selector. Specify the CH2 Required position for a manual movement Double Click on the painted area to change the color. _____________________________________________________________________________________ STI s.r.l. via pascoli 10 A/B 24020Gorle (Bg) – ITALY www.stiactuation.com IOM 4029 - ST2 User manual - rev.3 01/2012 - 40 - USER MANUAL ST2 The Graph Menu File : Save Image Save the actual showed picture like a .bmp file File : Save Snapshot Save the actual picture in binary file File : Load Snapshot Load the graph stored in a binary file File : Load History File Load an History file previously stored in a SD card Opening the file you can select the portion of the graph that you want to see. In the right-bottom side of the graph appear a selection box with a list of the records available. Select the desidered one and click Load to open. File : Convert History File Open an History file previously stored in a SD card in a .csv file. It is possible open the file with a spreadsheet like Excel and analyze the data. _____________________________________________________________________________________ STI s.r.l. via pascoli 10 A/B 24020Gorle (Bg) – ITALY www.stiactuation.com IOM 4029 - ST2 User manual - rev.3 01/2012 - 41 - USER MANUAL ST2 STI Advanced Panel This panel is for expert user only. Inserting the password ‘23456’ the ‘STI’ button appear in the top left part of the main window. Pressing the ‘STI’ button different windows are available _____________________________________________________________________________________ STI s.r.l. via pascoli 10 A/B 24020Gorle (Bg) – ITALY www.stiactuation.com IOM 4029 - ST2 User manual - rev.3 01/2012 - 42 - USER MANUAL ST2 Probe (STI Advanced Panel) For each channel is possible : - Select the type of the probe o Micropulse o 4-20mA - Check the actual values - Verify calibration limits It is possible to change the type of the probe only if the channel is NOT calibrated. _____________________________________________________________________________________ STI s.r.l. via pascoli 10 A/B 24020Gorle (Bg) – ITALY www.stiactuation.com IOM 4029 - ST2 User manual - rev.3 01/2012 - 43 - USER MANUAL ST2 Proportional valve (STI Advanced Panel) The P.V.Type allow the selection of different types of proportional solenoid valve. Choosing a value the PWM min and max limits are loaded. If it is needed to use a proportional valve not listed , it is possible to evaluate the min and max value with manual control and then put the value in the min and max field ( select calibration type equal to ‘Manual’ to disable the self evaluation of the current limits). FB Current Value : Show the current ( in ampere) that flow in the solenoid valve. Manual control : (only if the channel is not calibrated) Drive manually one proportional valve. Write a value in the field (between the PWMmin and max values) and press the ‘+’ or ‘-‘ button to energize the proportional valve in one direction or in the other). Check the current that energize the solenoid in the ‘FB Current Value’ field. Calibration type : Manual : during calibration only the minimum current needed to move the valve is evaluated Autosearch : during calibration not only the minimum current is evaluated but also the PWM needed to reach the nominal current value ( if you select an ATOS 12V 2,2A the ST2 search for the PWM that is necessary to drive 2,2A in the coil). _____________________________________________________________________________________ STI s.r.l. via pascoli 10 A/B 24020Gorle (Bg) – ITALY www.stiactuation.com IOM 4029 - ST2 User manual - rev.3 01/2012 - 44 - USER MANUAL ST2 SOV (STI Advanced Panel) Feedback : The ‘SET’ column show if the ST2 want to energize a specific solenoid valve( The yellow led is turned ‘ON’). The ‘F.back’ column show if a solenoid valve is connected without errors ( the GREEN led is turned ‘ON’ if a solenoid valve is recognized). ‘Pw Red.’ Select the power level for the SOV. A solenoid valve is energized with the full power (24V=). After 1 second the power applied is equal to the percentage specified in the field. Reducing the power ( for example at 80%) the life of a solenoid valve is longer, the heating is reduced and the total power used for the device is less. In case of long cables between ST2 and SOV it is important to check that the voltage on the coil is enought) ‘Use Feedback Control’ Checking the box if an error happens on a SOV it is managed by the ST2 Manual Settings If the SOV is not assigned to a calibrated channel it is possible to turn ON and OFF it. _____________________________________________________________________________________ STI s.r.l. via pascoli 10 A/B 24020Gorle (Bg) – ITALY www.stiactuation.com IOM 4029 - ST2 User manual - rev.3 01/2012 - 45 - USER MANUAL ST2 4-20mA (STI Advanced Panel) 4-20mA INPUT : It is possible to check the calibration limits and the current value It is possible to calibrate the 420mA input in the standard channel CFG panel. 4-20mA OUTPUT : It is possible to calibrate the 4mA and the 20mA signal level of each output. _____________________________________________________________________________________ STI s.r.l. via pascoli 10 A/B 24020Gorle (Bg) – ITALY www.stiactuation.com IOM 4029 - ST2 User manual - rev.3 01/2012 - 46 - USER MANUAL ST2 An. Inputs (STI Advanced Panel) For each analog input ( 6 channels are available) it is possible : - Calibrate the 4mA limit - Calibrate the 20mA limit - Assign a Name of 4 digit ( for example ‘Pi’) - Assign a label like measuring unit ( for example ‘bar’) - Specify the relationship between the 420mA signal and the measured value ( for example : 4mA=0bar, 20mA=400bar) _____________________________________________________________________________________ STI s.r.l. via pascoli 10 A/B 24020Gorle (Bg) – ITALY www.stiactuation.com IOM 4029 - ST2 User manual - rev.3 01/2012 - 47 - USER MANUAL ST2 General (STI Advanced Panel) ‘Erase calibration’ : For each channel it is possible to remove the calibration ‘Set as default’ : Save the actual configuration data like a default in the ST2 memory. Reset to default’: Load a stored configuration. It is possible to select a partial set of data to load. ‘Upload’ : Send the actual data in the Remote Control to the ST controller. It is possible to select a partial set of data to load. ‘Reset factory default’ : Reset the ST2 to the factory default data. ‘Save parameters’ : Start to save the parameters that are in RAM in the eeprom (this action is only for diagnostic, the parameters are saved automatically when changed in the RemoteControl interface. ‘Memory test’ : With the ‘check memory’ button it is possible to check if the stored configuration is equal to the one used. This option is for diagnostic purpose Trips detection time: Specify the delay (filter) in milliseconds for TRIP detection. SD CARD : Pre Trigger Time Position of the event in the 20 seconds snapshot. Selecting 8 sec the snapshot starts 8 second before the event. SD CARD : Log Time Period between two consecutive record in the Periodic Log _____________________________________________________________________________________ STI s.r.l. via pascoli 10 A/B 24020Gorle (Bg) – ITALY www.stiactuation.com IOM 4029 - ST2 User manual - rev.3 01/2012 - 48 - USER MANUAL ST2 The Menu Menu : File Load: Load a saved set of parameters in the RC interface Save : Save the current set of parameters in a .qtp file Report : Make a document in .rtf format with the actual parameters ( It is similar to the Save command but the file format is compatible with editor software) Exit : Close the application Menu : Device Download It is the same of the quick button _____________________________________________________________________________________ STI s.r.l. via pascoli 10 A/B 24020Gorle (Bg) – ITALY www.stiactuation.com IOM 4029 - ST2 User manual - rev.3 01/2012 - 49 - USER MANUAL ST2 Example of Configuration Report SYSTEM REPORT SYSTEM INFORMATION Date (PC) Date (Smart Trak) Channel 1 Description Channel 2 Description Device Unique ID DSP SW Version Temperature Calibration Status Service State 08/20/2010 09.02.00 08/20/2010 08:03:33 Channel 1 Channel 2 01D1FCC41100009F 9,09 26,0 Channel 1 Not Calibrated Out Of Service Channel 2 Calibrated Manual TRAVEL CONTROL Parameter 0 Ctrl Signal 0 Position Low Limit Low Limit Mode High Limit High Limit Mode Channel 1 Channel 2 Stem In Stem In 5,0 % Off 95,0 % Off Stem In Stem In 5,0 % Off 95,0 % Off TUNING Parameter Channel 1 Kp IN Kp Out Stroke Time IN Stroke Time OUT Approach IN 10,0 10,0 0,0 sec 0,0 sec 0 Channel 2 0,2 0,2 0,0 sec 0,0 sec 0 _____________________________________________________________________________________ STI s.r.l. via pascoli 10 A/B 24020Gorle (Bg) – ITALY www.stiactuation.com IOM 4029 - ST2 User manual - rev.3 01/2012 - 50 - USER MANUAL ST2 Approach OUT Dead Band (%) 0 0,50 % 0 0,50 % _____________________________________________________________________________________ STI s.r.l. via pascoli 10 A/B 24020Gorle (Bg) – ITALY www.stiactuation.com IOM 4029 - ST2 User manual - rev.3 01/2012 - 51 - USER MANUAL ST2 FAIL TRIP SETTINGS Trip Number 1 2 3 4 5 6 Mode Ch1 Mode CH2 Ack “On” Status Off Off Off Off Off Off Safety Shut Down 4 Off Off Off Off Off Auto Auto Auto Auto Auto Auto Energized Energized Energized Energized Energized Energized SOV ASSIGNEMENT SOV Number 1 2 3 4 5 6 Assigned to: Channel 2 Channel 2 Channel 2 Disconnected Disconnected Disconnected SOV STATUS Channel 1 Running Safety Shut Down 1 Safety Shut Down 2 Safety Shut Down 3 SOV 1 ----- SOV 2 ----- SOV 3 ----- SOV 4 ----- SOV 5 ----- SOV 6 ----- SOV 3 Off Off Off Off SOV 4 ----- SOV 5 ----- SOV 6 ----- Channel 2 Running Safety Shut Down 4 Safety Shut Down 5 Safety Shut Down 6 SOV 1 On Off On Off SOV 2 Off Off On Off _____________________________________________________________________________________ STI s.r.l. via pascoli 10 A/B 24020Gorle (Bg) – ITALY www.stiactuation.com IOM 4029 - ST2 User manual - rev.3 01/2012 - 52 - USER MANUAL ST2 BOOSTER CONFIGURATION Channel 1 Safety Shut Down 1 Safety Shut Down 2 Safety Shut Down 3 Mode No No No Target Act. Tresh Dis. Tresh. Stem In Stem In Stem In 50,00 50,00 50,00 20,00 20,00 20,00 Use PV Trip Yes Yes Yes Trip 1 Trip 1 Trip 1 Use PV Trip Yes No Yes Trip 1 Trip 1 Trip 1 Channel 2 Safety Shut Down 4 Safety Shut Down 5 Safety Shut Down 6 Mode With Enable With Enable No Target Stem Out Stem In Stem In Act. Tresh Dis. Tresh. 50,00 50,00 50,00 5,00 5,00 20,00 _____________________________________________________________________________________ STI s.r.l. via pascoli 10 A/B 24020Gorle (Bg) – ITALY www.stiactuation.com IOM 4029 - ST2 User manual - rev.3 01/2012 - 53 - USER MANUAL ST2 DIGITAL OUTPUT CONFIGURATION OUT 1 Off Off Off Off Off Off Off Off Off Off Off Off Off Off Off Off Off Off Off Off Waiting Ack CH 1 Waiting Ack CH 2 Out Of Service CH1 Out Of Service CH1 Trip 1 Trip 2 Trip 3 Trip 4 Trip 5 Trip 6 General Error CH 1 General Error CH 2 Signal Fail CH 1 Signal Fail CH 2 Position Excess Error CH 1 Position Excess Error CH 2 Position Excess Warning CH 1 Position Exce ss Warning CH 2 Probe Error CH 1 Probe Error CH 2 OUT 2 Off Off Off Off Off Off Off Off Off Off Off Off Off Off Off Off Off Off Off Off OUT 3 Off Off Off Off Off Off Off Off Off Off Off Off Off Off Off Off Off Off Off Off ANALOG OUTPUTS CONFIGURATION OUT A OUT B Off Off CHANNELS CONFIGURATION Parameter Split Range Low Split Range High Position Excess Error Fail Mode Position Excess Error Tolerance Position Excess Error Time Position Excess Warning Tolerance Position Excess Warning Time Signal Fail Mode Signal Fail Ack Signal Fail Min Value Signal Fail Position Probe Fail Mode Probe Fail Ack Input Char Channel 1 Channel 2 4,0 mA 20,0 mA Off 10,0 % 10 sec 10,0 % 10 sec Off Auto 3,0 mA 0,0 % Safety Shut Down 1 Wait Ack Linear 4,0 mA 20,0 mA Off 10,0 % 10 sec 10,0 % 10 sec Off Auto 3,0 mA 0,0 % Safety Shut Down 4 Wait Ack Linear _____________________________________________________________________________________ STI s.r.l. via pascoli 10 A/B 24020Gorle (Bg) – ITALY www.stiactuation.com IOM 4029 - ST2 User manual - rev.3 01/2012 - 54 - USER MANUAL ST2 CUSTOMER CURVE DATA Channel 1 Signal % 0,00 10,00 20,00 30,00 40,00 50,00 60,00 70,00 80,00 90,00 100,00 Channel 2 Req. Pos % 0,00 10,00 20,00 30,00 40,00 50,00 60,00 70,00 80,00 90,00 100,00 Signal % 0,00 10,00 20,00 30,00 40,00 50,00 60,00 70,00 80,00 90,00 100,00 Req. Pos % 0,00 10,00 20,00 30,00 40,00 50,00 60,00 70,00 80,00 90,00 100,00 _____________________________________________________________________________________ STI s.r.l. via pascoli 10 A/B 24020Gorle (Bg) – ITALY www.stiactuation.com IOM 4029 - ST2 User manual - rev.3 01/2012 - 55 - USER MANUAL ST2 ADVANCED PARAMETERS PROBE PARAMETERS Channel 1 Probe Type Probe Limit Inf. Probe Limit Sup. Channel 2 MicroPulse 4160 11988 4-20mA 735 3473 PROPORTIONAL VALVE Channel 1 Valve Type Channel 2 Atos 12V 2.2/2.6A Atos 12V 2.2/2.6A 1000 3500 0 1100 3500 0 1000 3500 0 1100 3500 0 Side 1 PWM_min PWM_Max PWM_1A Side 2 PWM_min PWM_Max PWM_1A SOLENOID VALVE PWM Reduction Use Feedback Control SOV 1 SOV 2 SOV 3 SOV 4 SOV 5 SOV 6 100% 100% 100% 100% 100% 100% Off INPUT 4-20 mA Channel 1 AD Converter at 4 mA AD Converter at 20 mA Channel 2 12177 60877 12177 60877 OUTPUT 4-20 mA OUT 1 AD Converter at 4 mA AD Converter at 20 mA OUT 2 792 4011 792 4011 _____________________________________________________________________________________ STI s.r.l. via pascoli 10 A/B 24020Gorle (Bg) – ITALY www.stiactuation.com IOM 4029 - ST2 User manual - rev.3 01/2012 - 56 - USER MANUAL ST2 _____________________________________________________________________________________ STI s.r.l. via pascoli 10 A/B 24020Gorle (Bg) – ITALY www.stiactuation.com IOM 4029 - ST2 User manual - rev.3 01/2012 - 57 - USER MANUAL ST2 USER ANALOG INPUTS Analog Input 1 Name Measure Unit AD Converter at 4 mA AD Converter at 20 mA Value at 4 mA Value at 20 mA AI1 761 3823 0,0 400,0 Analog Input 2 Name Measure Unit AD Converter at 4 mA AD Converter at 20 mA Value at 4 mA Value at 20 mA AI2 761 3823 0,0 400,0 Analog Input 3 Name Measure Unit AD Converter at 4 mA AD Converter at 20 mA Value at 4 mA Value at 20 mA AI3 761 3823 0,0 400,0 Analog Input 4 Name Measure Unit AD Converter at 4 mA AD Converter at 20 mA Value at 4 mA Value at 20 mA AI4 761 3823 0,0 400,0 Analog Input 5 Name Measure Unit AD Converter at 4 mA AD Converter at 20 mA Value at 4 mA Value at 20 mA AI5 761 3823 0,0 400,0 Analog Input 6 Name Measure Unit AD Converter at 4 mA AD Converter at 20 mA Value at 4 mA Value at 20 mA AI6 761 3823 0,0 400,0 _____________________________________________________________________________________ STI s.r.l. via pascoli 10 A/B 24020Gorle (Bg) – ITALY www.stiactuation.com IOM 4029 - ST2 User manual - rev.3 01/2012 - 58 - USER MANUAL ST2 GENERAL PARAMETERS Channel 1 Normal Camera Mode Channel 2 Inverted SD CARD Pre Trigger Time Log Time 8,0 sec 60 min TRIPS Trips Detection Time 40 mSec _____________________________________________________________________________________ STI s.r.l. via pascoli 10 A/B 24020Gorle (Bg) – ITALY www.stiactuation.com IOM 4029 - ST2 User manual - rev.3 01/2012 - 59 - USER MANUAL ST2 Menu : Password Login It is the same of the quick button Change To change the password Menu : ? Info Information panel with different sw version data. “Device Unique ID” is an hardware identifier used to identify a specific electronic hw. _____________________________________________________________________________________ STI s.r.l. via pascoli 10 A/B 24020Gorle (Bg) – ITALY www.stiactuation.com IOM 4029 - ST2 User manual - rev.3 01/2012 - 60 - USER MANUAL ST2 Electrical connections: Application example : _____________________________________________________________________________________ STI s.r.l. via pascoli 10 A/B 24020Gorle (Bg) – ITALY www.stiactuation.com IOM 4029 - ST2 User manual - rev.3 01/2012 - 61 - USER MANUAL ST2 Terminal Board : wiring specification and electrical rating _____________________________________________________________________________________ STI s.r.l. via pascoli 10 A/B 24020Gorle (Bg) – ITALY www.stiactuation.com IOM 4029 - ST2 User manual - rev.3 01/2012 - 62 - USER MANUAL ST2 Terminal board from 1 to 50 and from 100 to 113 : Phoenix Contact UKK3 (2770011) Double-level terminal block with a screw connection, cross section: 0.2 mm2 - 2.5 mm2, AWG: 28 – 12 Rated surge voltage 6 kV Nominal current IN 32 A Nominal voltage UN 500 V Type of connection Screw connection Tightening torque, min 0.5 Nm Tightening torque max 0.6 Nm Terminal board from 51 to 70 Phoenix Contact UK 2,5 N (3003347) Universal terminal block with screw connection, cross section: 0,2- 2.5 mm², AWG: 24- 12 Rated surge voltage 8 kV Nominal current IN 24 A Nominal voltage UN 800 V Type of connection Screw connection Tightening torque, min 0.6 Nm Tightening torque max 0.8 Nm Terminal board from 80 to 81 Phoenix contact UK 6,3-HESI (3004171) Fuse terminal block for cartridge fuse insert, cross section: 0.5 - 16 mm², AWG: 26 - 8, Rated surge voltage 6 kV Fuse G / 6,3 x 32 Nominal current IN 10 A Nominal voltage UN 500 V (As a fuse terminal block) Type of connection Screw connection Tightening torque, min 1.2 Nm Tightening torque max 1.5 Nm _____________________________________________________________________________________ STI s.r.l. via pascoli 10 A/B 24020Gorle (Bg) – ITALY www.stiactuation.com IOM 4029 - ST2 User manual - rev.3 01/2012 - 63 - USER MANUAL ST2 Terminal Board : pinout Terminal board from 1 to 50 _____________________________________________________________________________________ STI s.r.l. via pascoli 10 A/B 24020Gorle (Bg) – ITALY www.stiactuation.com IOM 4029 - ST2 User manual - rev.3 01/2012 - 64 - USER MANUAL ST2 Terminal board from 51 to 70 Terminal board from 80 to 82 AC Power supply : 80 = Line 81 = Neutral DC Power supply : 80 = Positive input 81 = Negative input _____________________________________________________________________________________ STI s.r.l. via pascoli 10 A/B 24020Gorle (Bg) – ITALY www.stiactuation.com IOM 4029 - ST2 User manual - rev.3 01/2012 - 65 - USER MANUAL ST2 Terminal board from 100 to 113 _____________________________________________________________________________________ STI s.r.l. via pascoli 10 A/B 24020Gorle (Bg) – ITALY www.stiactuation.com IOM 4029 - ST2 User manual - rev.3 01/2012 - 66 - USER MANUAL ST2 Position Feedback Probe You can use two different type of position feedback probe : Micropulse transducers or 4-20mA. - BTL5-P1 Balluff Micropulse transducer ( or equivalent) o The probe is powered at 24V=. o Shield of the cable can be connected in the ST2 earth connection bar. Depending on the quality of the earth connection in the field could be necessary remove the earth connection of the probe or connect it at the gnd terminal board. - 4-20mA signal transmitter (for example STI2030) - The position transmitter is energized with a 24V= power supply. - The measurement resistor inside ST2 is equal to 120 ohms. _____________________________________________________________________________________ STI s.r.l. via pascoli 10 A/B 24020Gorle (Bg) – ITALY www.stiactuation.com IOM 4029 - ST2 User manual - rev.3 01/2012 - 67 - USER MANUAL ST2 Analog Input ( pressure sensors) 6 input for 4-20mA ( or 0-5V) are available. SW3 dip switch select if the input is for 0-5V ( dip in OFF position) or 4-20mA ( dip in ON position). SW3_1 is for Analog IN1, SW3_2 is for Analog IN2 and so on. 4-20mA input (preferred solution) : Terminal board 9 : +24V= for sensor excitation Terminal pin 12, 36, 11, 35, 10, 34 : input signal from the sensor Burden resistor : 227 ohms Analog Input 0-5V : Terminal board 33 : 5V to energize the sensors ( max 100mA) Terminal board 8 : GND Terminal pin 12, 36, 11, 35, 10, 34 : input signal from the sensor Resolution : 12 bits Sampling rate : 1KHz with moving average filter. Isolation : Analog input are not isolated and designed for local use. Take care of electrical noise effect. _____________________________________________________________________________________ STI s.r.l. via pascoli 10 A/B 24020Gorle (Bg) – ITALY www.stiactuation.com IOM 4029 - ST2 User manual - rev.3 01/2012 - 68 - USER MANUAL ST2 4-20mA IN : Request position CH1 : Terminal board 14 (+) and 38 (-) . With HART communication channel CH2 : Terminal board 13 (+) and 37 (-) Burden resistor : 474 ohms Resolution : 16 bits Sampling Rate : 1KHz with filter Hardware LowPass filter present. Isolation : the two channels are isolated respect other electronic (microprocessor) and themselves _____________________________________________________________________________________ STI s.r.l. via pascoli 10 A/B 24020Gorle (Bg) – ITALY www.stiactuation.com IOM 4029 - ST2 User manual - rev.3 01/2012 - 69 - USER MANUAL ST2 4-20mA OUT Two isolated independent channels are available. The function is configurable. The output is energized from the loop. CH1 : Terminal board 16 (+) and 40 (-) . CH2 : Terminal board 15 (+) and 39 (-) Output current (nominal) 4-20ma Burden 750 Ω max ( power supply = 24Vdc) External power supply 24V ( 12..30V) Resolution : 12 bits Refresh frequency : 1KHz _____________________________________________________________________________________ STI s.r.l. via pascoli 10 A/B 24020Gorle (Bg) – ITALY www.stiactuation.com IOM 4029 - ST2 User manual - rev.3 01/2012 - 70 - USER MANUAL ST2 Digital output 3 indipendent digital output is available. Material Rating (resistive) Maximum Carrying Current Maximum Switching Power Maximum Switching Voltage Maximum Switching Current Gold overlay silver alloy 3 A 250 VAC or 3 A 30 VDC 5A 750 VA, 90 W 270 VAC, 150 VDC 5A For each digital output the Normally Open contact is available (i.e. DigitalOutput 1 : pin 19 and 43) When a DigitalOutput is configured the relè is energized ( and the contact become closed) when the error condition is false, and is deenergized ( and the contact return to open condition) when the error condition is true. _____________________________________________________________________________________ STI s.r.l. via pascoli 10 A/B 24020Gorle (Bg) – ITALY www.stiactuation.com IOM 4029 - ST2 User manual - rev.3 01/2012 - 71 - USER MANUAL ST2 TRIP : Digital Input 6 indipendent isolated TRIP digital input are available. Each trip can be drived from a ‘free contact’ or from a 24V= or 24Vac signal. SW2 dip switch must be set in a proper way based on the type of driving signal. Trip function is configurable in the sw. _____________________________________________________________________________________ STI s.r.l. via pascoli 10 A/B 24020Gorle (Bg) – ITALY www.stiactuation.com IOM 4029 - ST2 User manual - rev.3 01/2012 - 72 - USER MANUAL ST2 ON/OFF SOV Up to 6 ON/OFF SOV are available. Nominal voltage : 24V= Nominal current : up to 2A ( continuos mode, ambient = 70°C) Power reduction : It is possible to specify for each solenoid valve a different power reduction value. Solenoids are energized at full power, after 1 second the pwm circuit reduce the power at the specified value Solid state driver with : - Over temperature shutdown (with auto-restart) - Short circuit protection (current limit) - Full diagnostic capability - Active clamp - Open load detection in On and Off state Number and power of the SOV depends on the supply unit and the number of SOV that must be energized at the same time. Connect earth of SOV at the earth connection bar inside the ST2. _____________________________________________________________________________________ STI s.r.l. via pascoli 10 A/B 24020Gorle (Bg) – ITALY www.stiactuation.com IOM 4029 - ST2 User manual - rev.3 01/2012 - 73 - USER MANUAL ST2 Proportional Valve ST2_Channel 1 : Proportional Valve A1 and A2 ST2_Channel 2 : Proportional Valve A3 and A4 Voltage output : 24V (pwm circuit allow the use of 12V solenoid) Current output : hardware limit at 2,7A Tested with ATOS 12V , ATOS 18V, Wandfluh 24V, Bosch Selection of the type of proportional valve, minimum and maximum current is made by sw. _____________________________________________________________________________________ STI s.r.l. via pascoli 10 A/B 24020Gorle (Bg) – ITALY www.stiactuation.com IOM 4029 - ST2 User manual - rev.3 01/2012 - 74 - USER MANUAL ST2 Power supply Different solutions are available. AC universal input (standard solution) : The power supply module is fitted inside the controller enclosure. Power supply module is a PhoenixContact QUINT-PS/1AC/24DC/20 able to supply 24V= with a current up to 20A. Input range : Nominal AC range DC range 100 V AC ... 240 V AC 85 V AC ... 264 V AC 90 V DC ... 350 V DC DC 24V= input : The power supply module is fitted inside the controller enclosure. Power supply module is a PhoenixContact QUINT-PS-24DC/24DC/10 Check that the total power required ( depending from the number of solenoid and from the schematic) is less than 240W DC 24V= input without isolation : No power supply module is fitted inside the enclosure. The power supply is provided from the customer. Care must be taken in the selection of cable size and length (possible problems : voltage drop, heating, noise). We suggest to use a dedicated 24V= for each SmartTrak. Options (must be fitted in an external enclosure) : Phoenix contact 2938963 Redundancy Module QUINT-DIODE/40 Phoenix contact 2866239 Uninterruptible Power Supply Unitfor Universal Use QUINT-DC-UPS/24DC/20 Phoenix contact 2866213 QUINT-BUFFER/24DC/20 _____________________________________________________________________________________ STI s.r.l. via pascoli 10 A/B 24020Gorle (Bg) – ITALY www.stiactuation.com IOM 4029 - ST2 User manual - rev.3 01/2012 - 75 - USER MANUAL ST2 How To (advanced user configuration guide) Configure SOV and TRIP You must have a clear picture of what you want the SOV do. Referring to the standard schematic showed you have : SOV1 SOV2 SOV3 SOV4 SOV5 SOV6 Related to channel 1 , function Quick Close Related to channel 1 , function Quick Open Not used Related to channel 2 , function Quick Close Related to channel 2 , function Quick Open Direct drived from TRIP for ON/OFF water valve TRIP1 TRIP2 TRIP4 TRIP5 TRIP6 Quick Close command input for channel 1 Quick Open command input for channel 1 Quick Close command input for channel 2 Quick open command input for channel 2 ON/OFF water valve command _____________________________________________________________________________________ STI s.r.l. via pascoli 10 A/B 24020Gorle (Bg) – ITALY www.stiactuation.com IOM 4029 - ST2 User manual - rev.3 01/2012 - 76 - USER MANUAL ST2 For each TRIP signal you must know : - The type of the TRIP signal ( 24Vac, 24Vdc, Free contact) - The activation status of the TRIP (Energized, NotEnergized) In our example we can consider the most standard configuration : Trip Signal type = Free Contact Activation Status = Not Energized Setting the the Trip signal Type : Set the SW2 and SW6 DIP-SWITCH all in the ON position like described in the ‘TRIP : Digital Input’ paragraph ( If you have some Trip signal powered at 24Vdc or 24Vac you must turn the specific dip-switch in the off position). Setting the Activation Status : For TRIP1,2,4,5 select ‘NotEnergized’ in the RemoteControl panel. Select the proper SafetyShutdown mode for each trip : TRIP1=SSD1/OFF , ‘NotEnergized’ =SafetyShutdown1CH1when NOTEnergized TRIP2=SSD2/OFF , ‘NotEnergized’ = SafetyShutdown2CH1 when NOTEnergized TRIP3=OFF/OFF It is not used TRIP4=OFF/SSD4 , ‘NotEnergized’ = SafetyShutdown4CH2 when NOTEnergized TRIP5=OFF/SSD5 , ‘NotEnergized’ = SafetyShutdown5CH2 when NOTEnergized TRIP6=OFF/OFF , Energized Must Be configured for DirectDrive in the SOV configuration panel _____________________________________________________________________________________ STI s.r.l. via pascoli 10 A/B 24020Gorle (Bg) – ITALY www.stiactuation.com IOM 4029 - ST2 User manual - rev.3 01/2012 - 77 - USER MANUAL ST2 Setting the SOV : Set the SOV like showed in the picture. Explanation : Channel 1 When the SmartTrak channel 1 is in running ( normal operation mode when the system is calibrated), SOV1 is energized and SOV2 is deenergized. The two ON/OFF valves are in the ‘close’ position, so the only valve that can control the actuator is the proportional one. If TRIP1 is activated SOV1 is deenergized (and also SOV2) : the quick close on/off SOV drive the actuator in the CLOSE position. If TRIP2 is activated SOV1 is energized (‘close’) and SOV2 is energized (‘open’) : the quick open on/off SOV drive the actuator in the OPEN position. Channel 2 Same of channel 1 but with SOV4, SOV5, TRIP1, TRIP2 SOV6 : This SOV is directly drived from TRIP6. When TRIP6 is activated (‘Energized’) it turns on the SOV6 that open the ON/OFF valve _____________________________________________________________________________________ STI s.r.l. via pascoli 10 A/B 24020Gorle (Bg) – ITALY www.stiactuation.com IOM 4029 - ST2 User manual - rev.3 01/2012 - 78 - USER MANUAL ST2 Configure Power reduction and test the SOV To reduce the power consumption of the solenoids, power reduction can be configured. With that on the one hand the power dissipation of the power supply and the solenoids can be reduced, on the other hand the life time is going to be increased. The power reduction is by means of pulse-width-modulation. With longer lines between the SmartTrak and the solenoids, pay attention that the control voltage on the solenoid through the voltage drop on the lines must not under 17 V. When the solenoid is turned on , full power is applied for 1 second, after this time the power is reduced to the value specified ( in %) in the specific configuration field. Default value is 100% that means that power reduction is not applied. If you specify a value of 75% it means that after 1 second the pwm circuit works at 75% with an equivalent voltage of 24V*75%=18V Test the SOV : Manual Setting allow to Turn ON and OFF the SOV for diagnostic purpose ( this feature is available only when the related channel is not calibrated) The Feedback led indicates if the SOV is connected and works properly ( the electronic circuit is able to recognize if the SOV is not connected or if it is in short circuit) The Set led indicates if the required SOV status made by the sw. ‘Use feedback control’ enable error management of the SOV. _____________________________________________________________________________________ STI s.r.l. via pascoli 10 A/B 24020Gorle (Bg) – ITALY www.stiactuation.com IOM 4029 - ST2 User manual - rev.3 01/2012 - 79 - USER MANUAL ST2 Configure the Proportional Valve Select the type of proportional valve You can select from different types of proportional valves. Each proportional valve has a specific minimum and maximum current. When you select a specific proportional valve, default values for this valve are loaded. During the calibration the positioner use these values for reference and find proper configuration for : - PwmMin : minimum driver power able to move slowly the actuator - PwmMax : default value if ‘Calibration Type = manual’ or pwm value able to drive the theoretical max current FB CURRENT VALUE : Show the current applied at the proportional valve MANUAL CONTROL : Allow to drive manually a proportional valve for diagnostic purpose ( only when the channel is not calibrated) Tips & Tricks: If you have a very little actuator but you have a big size proportional valve you can modify manually the PWMmax parameter in order to increase the performance of the system. Reducing the PWMmax value you can use big Kp : - Kp is bigger : the system is quick and able to reduce the residual error ( reduce the deadband) - PWMmax is lower : the proportional valve can’t be open at full flow rate ( even if you have a big kp you can reduce overshoot and instability) _____________________________________________________________________________________ STI s.r.l. via pascoli 10 A/B 24020Gorle (Bg) – ITALY www.stiactuation.com IOM 4029 - ST2 User manual - rev.3 01/2012 - 80 - USER MANUAL ST2 TROUBLE SHOOTING Problem description 1. The controller doesn’t switch on Cause 1.1 The power is not connected 1.2 the power supply voltage is out of the admissible range (+/-10%) 1.3 the fuses are blown 1.4 some wiring is not properly done either inside the controller 1.5 there is a short circuit on some of the devices connected to the controller Solution 1.1 Connect the power 1.2 check the power supply voltage value with a multimeter 1.3 replace the fuses 1.4 check the wiring using the electrical diagram 1.5 disconnect all the terminal boards connected to these device and check whether the controller switches on. 2. Probe error 2.1 some wiring is not properly done 2.2 the software selection in STI menu of the used probe is not correct 2.3 the probe has been calibrated with a shorter stroke process valve 2.4 the probe is damaged 2.1 check the wiring 2.2 check that the software setting corresponds to the used probe 2.3 erase the previous calibration and perform a new calibration 2.4 replace the probe 3. Proportional valve is not working properly 3.1 the proportional valves connectors are not properly plugged 3.2 the wiring is not properly done 3.1 check the connector plug 3.2 check the wiring 4. A change in the valve position set point doesn’t affect the actuator’s position 4.1 the oil pressure value is too low 4.2 the proportional valve is sticking 4.3 the parameters configuration is not correct 4.4 actuator and/or jammed valve 4.5 signal wires are not properly connected 4.6 circuit boards are defective 4.7 calibration and tuning have not been carried out 4.8 device is in “manual” or “out of service” mode 4.9 device is in fail safe status 4.1 check the oil pressure value 4.2 check that the proportional valve can slide smoothly 4.3 check gain and dead band values 4.3 check that the actuator can move in a continuous way and not in steps 4.5 check signal wires 4.6 replace circuit boards 4.7 perform a calibration and make the proper tuning 4.8 set the system in “in service” mode 4.9 check whether the solenoid valve making the fail safe mode is energized 5. Overshooting or positioning too slow 5.1 incorrect tuning in terms of dead band and gain 5.2 the proportional valve is sticking 5.3 too small oil tubing or dirty oil filter 5.4 leakages in oil tubing and manifold connections 5.5 process valve is sticking 5.1 change the dead band and gain values 5.2 check that the proportional valve can slide smoothly 5.3 check oil tubing size with the factory and inspect oil filter 5.4 check leakages in oil tubing and manifold connections 5.5 check process valve 6. Low signal fail limit 6. Low signal fail limit 7. Position excess error 7. Position excess error 6.1 check that the signal wires are properly connected to the terminal board 6.2 check with a multimeter the value of the signal 7. see point 4. of this table _____________________________________________________________________________________ STI s.r.l. via pascoli 10 A/B 24020Gorle (Bg) – ITALY www.stiactuation.com IOM 4029 - ST2 User manual - rev.3 01/2012 - 81 - USER MANUAL ST2 8. Position excess warning 8. Position excess warning 8. see point 4. of this table 9. Hard limits error 9. Hard limits error 9.1 check the probe is working properly 9.2 check that the oil supply value is not too low 10. Error on solenoid valve SOVx 10. Error on solenoid valve SOVx 11. Calibration erased 11. Calibration erased 10.1 check that the solenoid valve’s coil is not burnt 10.2 check the wiring between the solenoid valve and the controller 11. This is a warning message used to inform that a calibration parameters reset has been performed by the operator 12. Waiting ACK 13. External SOV warning 12. in order to go back to normal operation an “ack” command must be provided 13. this is a warning message showing that a solenoid valve not energized by the controller has taken the system into the fail safe position _____________________________________________________________________________________ STI s.r.l. via pascoli 10 A/B 24020Gorle (Bg) – ITALY www.stiactuation.com IOM 4029 - ST2 User manual - rev.3 01/2012 - 82 - USER MANUAL ST2 ST2Mono : single channel version Based on the same electronic, a single channel version is available. The electronic is partially mounted , the terminal board is different, the sw is the same and is able to recognize if the electronic is suitable for a double channel or for a single one. Differences : TRIP digital Inputs SOV Proportional valve driver 4-20mA Analog Output Digital Output Start/Stop Feedback Probe 4-20mA Feedback Probe Analog inputs 4-20mA inputs ( setpoint) Hart RemoteControl SD Card ST2 6 6 2 2 3 2 2 6 2 ST2Mono 4 3 1 2 3 1 1 3 1 ST2Mono Power supply : When the power supply selected is the 24Vdc the power supply adapter is the same for the ST2 and the ST2Mono ( see chapter ‘Power Supply’ of this IOM). When the power supply selected is ‘AC Universal Input’ a specific unit is used for the single channel version (Phoenix QUINT-PS/1AC/24DC/10 ) able to delivery up to 10A. _____________________________________________________________________________________ STI s.r.l. via pascoli 10 A/B 24020Gorle (Bg) – ITALY www.stiactuation.com IOM 4029 - ST2 User manual - rev.3 01/2012 - 83 - USER MANUAL ST2 ST2Mono : terminal board _____________________________________________________________________________________ STI s.r.l. via pascoli 10 A/B 24020Gorle (Bg) – ITALY www.stiactuation.com IOM 4029 - ST2 User manual - rev.3 01/2012 - 84 - USER MANUAL ST2 _____________________________________________________________________________________ STI s.r.l. via pascoli 10 A/B 24020Gorle (Bg) – ITALY www.stiactuation.com IOM 4029 - ST2 User manual - rev.3 01/2012 - 85 -