1
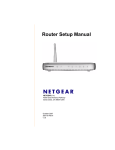
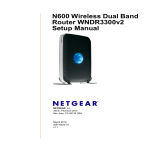
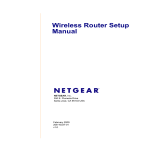
Your Optus Premium Speed
WiFi Cable modem
User Guide
Full of
handy hints.
P/N 202-10818-02
1382777E 0411 166321.indd 1
7/04/11 10:41 AM
Introduction
Welcome to the exciting world of Optus Broadband and high quality
Optus Local Access Telephony. Your new WiFi Cable Modem acts as
a cable modem for providing premium speed internet with the ability
to also provide your home phone service.
This guide provides procedures for operating and troubleshooting
your WiFi Cable Modem.
Please note: This equipment requires power to operate. If you have
a telephony service, this is also provided via this equipment, please
ensure that the equipment remains powered at all times to ensure
uninterrupted service.
Carefully read all safety and operating instructions before operating
this product. Retain this guide for future use.
Customer
@optusnet.com.au
Username .........................................................................
1382777E 0411 166321.indd 2
7/04/11 10:41 AM
Contents
Before you begin 2
Front panel and normal operations description
3
Back panel description
4
Macintosh installation
5
Using WPS to configure your wireless
5
Using a Wireless adapter (or Wireless Enabled Computer)
9
Changing your WiFi cable modem password
10
Security
11
Managing your Optus cable account 11
Technical support contact details 11
Frequently asked questions
12
It’s easy.
1382777E 0411 166321.indd 1
7/04/11 10:41 AM
Before you begin
Your WiFi Cable Modem package will contain the following items:
Keep me handy
your user information
SSID:
PASSPHRASE:
For wireless support please contact Netgear on 1300 361 254
1277910 04/07
CG 3000 WiFi Cable Modem
Wireless Information Card
Install Guide
Ethernet Cable
Power Supply
Telephone Cable
Optus CD Rom
2
BEFORE YOU BEGIN
1382777E 0411 166321.indd 2
7/04/11 10:41 AM
Front Panel Description
The front panel of your WiFi Cable Modem provides status LED’s that indicate how well and what state
your WiFi Cable Modem is operating. See below table for more information on front panel LED status
indicator functions.
1
2
3 4
5
6
7
8 9
1. POWER
On, power is applied to the WiFi Cable modem
2.DS
On, the WiFi Cable modem is receiving data from the cable network
3. US
On, the WiFi Cable modem is sending data to the cable network
4.INTERNET
On, the WiFi Cable modem is registered on the network and fully operational
On, a device is connected to one of the Ethernet ports
5. LAN 1-4
BLINKING indicates that data is being transferred over the Ethernet connection
6. TEL2
ON indicates telephony service is enabled. Blinks when line 2 is in use
OFF indicates that phone service for TEL 2 is not enabled
7. TEL1
ON indicates telephony service is enabled. Blinks when line 1 is in use
OFF indicates that phone service for TEL 1 is not enabled
8. WIRELESS LINK
By default, the wireless modem router is set up to work as a wireless access point.
Pressing this button turns the wireless access point feature on and off. You can also do
this through the Wireless Settings screen.
9. WPS
You can use the Wi-Fi Protected Setup (WPS) feature with clients on the network that are
Wi-Fi certified and WPA capable.
1382777E 0411 166321.indd 3
FRONT PANEL DESCRIPTION
3
7/04/11 10:42 AM
Back Panel Description
The following picture shows the description and function of the back panel components on your modem.
1
1. Telephone
1 and 2
2
3
4
5
6
RJ-11 telephone ports connect to home telephone wiring to conventional
telephones or fax machines
2. LAN
Four RJ-45 Ethernet ports connect to the Ethernet port on your PC or your home network
3. USB
Connects to a printer or mass storage device. This feature is currently disabled. This can
only be made active by a remote software upgrade
4. CABLE
5. POWER
6. ON/OFF SWITCH
4
Note: Your service does not support data connections via USB, please connect your computer via the Ethernet
port to ensure optimal connection speed.
F-connector connects to an active cable signal from Optus
Connects your residential gateway to the AC power adapter that is provided
with your WiFi Cable modem
Caution: Avoid damage to your equipment. Only use the power supply that
is provided with your modem
Turns the device on or off. It is recommended that the device remains on at all times.
BACK PANEL DESCRIPTION
1382777E 0411 166321.indd 4
7/04/11 10:42 AM
Macintosh Installation
To use your WiFi Cable Modem with a Macintosh computer please ensure your computer is set up to use
DHCP (consult your Macintosh user guide for more information) and then connect the Ethernet cable to your
Macintosh and the Modem.
When power is applied to the WiFi Cable Modem, the test light turns on for about 15 seconds and then goes
off. The Power, Internet and Wireless lights should all be lit.
Wait for the Internet light to turn amber.
Using Push ‘N’ Connect (WPS) to
Configure Your Wireless
Network
If your wireless clients support Wi-Fi Protected Setup (WPS), you can use this feature to configure the
router’s SSID and security settings and, at the same time, connect the wireless client securely and easily to
the router. 1 WPS automatically configures the SSID and wireless security settings for the router (if the router
is in its default state) and broadcasts these settings to the wireless client.
1382777E 0411 166321.indd 5
MACINTOSH INSTALLATION
5
7/04/11 10:42 AM
i
NETGEAR’s Push ‘N’ Connect feature is based on the Wi-Fi Protected Setup (WPS) standard.
All other Wi-Fi-certified and WPS-capable products should be compatible with NETGEAR products
that implement Push ‘N’ Connect.
If the router has already been configured manually, and either WPS-PSK or WPA2-PSK security has
been enabled, a wireless client can be connected quickly and simply by using the WPS method of
connecting to the wireless network. In this case, the existing wireless settings are broadcast to the
WPS-capable client.
i
If you choose to use WPS, the only security methods supported are WPA-PSK and WPA2-PSK.
WEP security is not supported by WPS.
These instructions assume that you are configuring WPS on the router for the first time and
connecting a WPS-capable device.
For a list of other Wi-Fi-certified products available from NETGEAR, go to http://www.wi-fi.org.
To set up basic wireless connectivity:
1. Log in to the wireless modem router
at its default address of http://192.168.0.1.
On the router main menu.
i
You can also enter either of these addresses
to connect to your wireless router:
http://www.routerlogin.net or
http://www.routerlogin.com.
2. On the router main menu, select
Add a WPS Client (computers that
will connect wirelessly to the router
are clients). The Add WPS Client wizard screen displays. Click Next.
6
Using Push ‘N’ Connect (WPS) to Configure Your Wireless
1382777E 0411 166321.indd 6
7/04/11 10:42 AM
3. Select the method for adding the
WPS client. A WPS client can be added using the Push Button method or the PIN method.
Using the Push Button.
This is the preferred method.
•Select the Push Button radio box and
either press the WPS Push Button on the side of the router or click the soft WPS Push Button on the screen (as shown
on right).
•
The router will attempt to communicate with the client; you have 2 minutes to enable WPS from the client device using the client’s WPS networking utility.
Entering a PIN. If you want to use the
PIN method, select the PIN radio box.
A screen similar to the one shown on the
right displays.
•Go to your wireless client and, from obtain the wireless client’s security PIN,
or follow the client’s WPS utility
instructions to generate a security PIN.
•
the client’s WPS utility,
Then, enter this PIN in the Enter
Client’s PIN field provided on the
router and click Next. You have
4 minutes to enable WPS on the
router using this method.
1382777E 0411 166321.indd 7
Using Push ‘N’ Connect (WPS) to Configure Your Wireless
7
7/04/11 10:42 AM
Using either method, the client wireless device will attempt to detect the WPS signal from the
router and establish a wireless connection in the time allotted.
• If no connection is detected, then no SSID or security settings are configured on the router.
•If a connection is established, the router WPS screen displays a message confirming that the
wireless client was successfully added to the wireless network. (The router has generated an
SSID, implemented WPA/WPA2 wireless security (including a PSK security password) on the
router and has sent this configuration to the wireless client.)
4. Note the new SSID and WPA/WPA2 password for the wireless network.
To access the Internet from any computer connected to your wireless modem router, launch
a browser such as Microsoft Internet Explorer or Mozilla Firefox. You should see the wireless
modem router’s Internet LED blink, indicating communication to the ISP.
i
If you are planning a mixed network of WPS capable devices and non-WPS capable devices,
NETGEAR suggests that you set up your wireless network and security settings manually first,
and use WPS only for adding additional WPS capable devices.
For more information on setting up your wireless network and configuring your wireless security
settings, see the User Manual located online at help.optuszoo.com.au/help/cable
i
8
If you require Wi-Fi support for your Optus-supplied NETGEAR Wi-Fi ADSL Modem Router and
Wi-Fi Adapter, please contact NETGEAR on 1300 361 254.
Using Push ‘N’ Connect (WPS) to Configure Your Wireless
1382777E 0411 166321.indd 8
7/04/11 10:42 AM
Using a Non-Netgear wireless
adapter or wireless enabled
computer
You may already have a computer with wireless capability. You will need to enter your Wireless security
information, such as your SSID and WPA passphrase into the Wireless Network Setup utility:
1. 2. 3. 4. Power on your laptop and when Windows has started, go to the Start menu.
Click on the Control Panel and Switch to Classic View.
Double-click on the Wireless Network Setup Wizard and follow the prompts.
Enter the wireless information for your network.
This information can be found on the wireless information card that came with your Optus WiFi Cable Modem,
or on the label printed on the base of your WiFi Cable Modem.
Keep me handy
your user information
SSID:
PASSPHRASE:
For wireless support please contact Netgear on 1300 361 254
1277910 04/07
•
•
•
Both the SSID and WPA passphrase are all in uppercase characters.
The SSID consists of the characters “OPTUSV” followed by the last 6 characters of the CM MAC Address.
These characters are the letters A-F and the digits 0-9.
The WPA passphrase consists of three or four 5-character “words” followed by
a 5 digit random number consisting of the digits 1-9 only.
There is no particular significance to the words used – words have been used rather than random letters
to make the passphrase easier to remember and type.
If you would prefer to use a different passphrase, this can be changed on the Wireless Settings page.
For Optus Cable Broadband support in setting up a wired Internet connection from your modem to your
computer, please contact Optus on 133 937
1382777E 0411 166321.indd 9
USING A NON-NETGEAR WIRELESS ADAPTER OR WIRELESS ENABLED COMPUTER
9
Selective call features
9
7/04/11 10:42 AM
Changing your WiFi Cable
Modem password
If you wish to change your WiFi Cable Modem password, please follow the steps below:
1. Open your web browser and change the address to http://192.168.0.1
2. Enter the default username and password as follows:
Default Username: admin
Default Password: password
3.From the menu on the top click Administration
and then select the management tab.
4. To change the password, type a new password and retype
it in the Re-Enter New Password box to confirm it. Then
click Save settings to have the password changed.
5.Write down your new password and keep it safe. You may
want to write it down with the Settings Summary page if
you printed it earlier.
Note: You will need to use this new password to access
any of your WiFi Cable Modem’s advanced features or to
reconfigure your service. If you forget this password you
can reset your WiFi Cable Modem by pressing and holding
the reset button in for five seconds, this will also delete
any other customised settings you have set.
10
changing your wifi cable modem password
1382777E 0411 166321.indd 10
7/04/11 10:43 AM
Security
The Internet is your gateway to the world and while security issues shouldn’t stop you enjoying your Internet
experience, you need to ensure that you take precautions to protect your computer.
optuszoo.com.au/help/cable/safety for more information.
Managing your Optus Cable account
For information on managing your Optus Cable account see optuszoo.com.au/help/cable/myaccount
Technical Support Contact Details
For Optus Cable Broadband support in setting up a wired Internet connection from your modem to your
computer, please contact Optus on 133 937.
SECURITY, MANAGING YOUR OPTUS CABLE ACCOUNT, TECHNICAL SUPPORT CONTACT DETAILS
1382777E 0411 166321.indd 11
11
7/04/11 10:43 AM
Frequently Asked Questions
This section provides answers to frequently asked questions regarding your Optus Telephony and
Broadband Service.
Q. What if I don’t subscribe to a telephony service from Optus, can I still use this WiFi cable modem
to make and receive phone calls?
A. No. A Telephone service is enabled for each telephone port on the WiFi cable modem. Please contact
Optus on 133 937 or visit your nearest Optus Outlet to arrange installation of your telephone service.
Q. Can I use my existing phone number with the WiFi cable modem?
A. In most cases you should be able to keep your existing phone number. Please contact Optus on 133 937
or visit your nearest Optus Outlet for more information about using an existing telephone number.
Q. Do I automatically receive broadband with the WiFi cable modem?
A. Your device acts as a cable modem and may be used to provide a telephone service, broadband service,
or both services. Please contact Optus on 133 937 or visit your nearest Optus Outlet for more information
if you are not currently subscribing to Optus Broadband.
Q. How many telephones can I connect?
A. You can connect up to two phone lines with a maximum of two extensions on each phone line.
If you have existing phone sockets in the house, we may use these extensions where applicable.
Q. Can I use my Optus Broadband and make telephone calls at the same time?
A. Absolutely! The Telephone service is provided separately from your broadband service. Your broadband
service does not affect the quality of your telephone calls. If these services are enabled by Optus, you can
make telephone calls and use your Optus broadband at the same time.
12
FREQUENTLY ASKED QUESTIONS
1382777E 0411 166321.indd 12
7/04/11 10:43 AM
1382777E 0411 166321.indd 13
13
7/04/11 10:43 AM
1382777E 04/11
1382777E 0411 166321.indd 14
7/04/11 10:43 AM