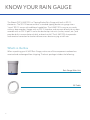
1
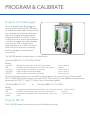
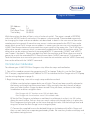
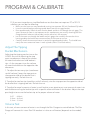
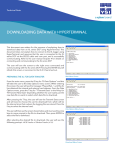
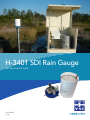
H-3401 SDI Rain Gauge
GETTING STARTED GUIDE
D31-03 0615
V.1.0
This guide is a brief overview of the H-3401 Tipping Bucket Rain Gauge and its basic
features. Please refer to waterlog.com/rain-gauge or contact your sales representative
for more information. Updated manuals, brochures, and technical notes are available
online.
For additional assistance, please contact us at +1.435.753.2212 or [email protected]
CONTENTS
Know Your Rain Gauge...................................................1
What’s in the Box...............................................2
Connect & Install.............................................................3
Wire The Terminal Block...................................4
Install Your Rain Gauge.....................................4
Program & Calibrate........................................................5
Program Your Data Logger.............................6
On-site User Calibration..................................7
Adjust the Tipping Bucket Mechanism.........8
Volume Test......................................................8
01 /
KNOW YOUR
RAIN GAUGE
What’s in the Box
1
KNOW YOUR RAIN GAUGE
The WaterLOG® H-3401 SDI is a Tipping Bucket Rain Gauge with built-in SDI-12
electronics. The SDI-12 feature converts a standard tipping bucket rain gauge into a
“smart” SDI-12 sensor with additional capabilities. The H-3401 SDI is easy to use, works
with any data recorder / logger with an SDI-12 Interface, and connects directly to any data
recorder with an SDI-12 port. It scales the bucket tips into units (inches, meters, etc.) and
provides built-in accumulation of daily and total rainfall. The H-3401 SDI also provides
mathematical correction for bucket volume errors due to varying rainfall rate.
What’s in the Box
When unpacking your H-3401 Rain Gauge, make sure all the components ordered are
received and undamaged from shipping. The basic package includes the following:
Rain Gauge Main Unit
20’ Cable
2
02 /
CONNECT
& INSTALL
Wire The Terminal Block
Install Your Rain Gauge
3
CONNECT & INSTALL
Wire The Terminal Block
The H-3401 SDI Rain Gauge has a 6-pin
“WAGO” wiring terminal block for
connecting the data logger and power.
The terminal block has spring clamp
terminals which work with both large and
small wires and provide reliable longterm connections. To open the spring
clamp to insert or remove a wire, insert a
small flat screwdriver blade in the square
opening adjacent to the wire and twist
or pry carefully to one side. The image to
the right shows a wiring diagram.
Words of Caution: Keep the lead wires as
short as possible. Use shielded cables in
noisy environments.
Install Your Rain Gauge
Install the H-3401 SDI Rain Gauge in
an open location where it will not be in
the rain shadow of trees or buildings. A
rooftop location helps prevent vandalism
and the accumulation of leaves and
debris. Bolt or screw the 3-mounting
feet to the structure to prevent upset
in high winds. Adjust the three selfleveling screws until the “bulls eye” level
is centered.
4
03 /
PROGRAM &
CALIBRATE
Program Your Data Logger
Program The H-3401 SDI
Factory Calibration
User Calibration
Adjusting Tipping Mechanism
5
PROGRAM & CALIBRATE
Program Your Data Logger
You must prepare your data logger to
receive and record the H-3401 SDI data.
Since data recorders differ widely, refer to
your recorder manufacturer’s directions.
In general, program the data recorder
to input five values via the SDI-12 port.
Usually only one or two of the parameters
is actually recorded. Your data recorder
must issue an “aM!” command then
collect the data with a “aD0” command
(refer to the user manual on waterlog.
com/rain-gauge for more detailed
instructions).
The 3401SDI places five data values in its data buffer:
+AA.AAA+BBB+CC.CCC+DD.DDD+EE.EEE
Where:
+AA.AAA
+BB
+CC.CCC
+DD.DDD
+EE.EEE
= Rainfall accumulation since last measurement
= Number of raw bucket tips since last measurement
= Total rainfall accumulation since reset.
= Total rainfall accumulation today
= Total rainfall accumulation yesterday
(mm/in of rain)
(counts)
(mm/in of rain)
(mm/in of rain)
(mm/in of rain)
All five of these parameters are automatically reset at power-up, or manually with the extended
SDI-12 “aXRA” Reset Accumulators command. NOTE: There are also some additional measurement
commands, M1, MC1, C1 and CC1 that will return the following data.
+AA.AAA+BBB+CC.CCC
Where:
+AA.AAA
+BB
+CC.CCC
+KKKK or
+AA.AAA+BBB+CC.CCC+KKKK
= Uncompensated rainfall accumulation since last measurement (mm/in of rain)
= Number of raw bucket tips since last measurement
(counts)
= Uncompensated total rainfall accumulation since reset.
(mm/in of rain)
= CRC
Program SDI-12
The H-3401SDI comes from the factory with the following settings:
6
Program & Calibrate
SDI Address: 0
Slope:1.0
Daily Reset Time: 00:00:00
Time of day:
00:00:00
With these values the data will be in units of inches of rainfall. The setup is stored in EEPROM
within the 3401SDI and will not be lost if the power is disconnected. The extended commands
for changing the slope and sensor address are described in detail in the user manual (found on
waterlog.com/rain-gauge). If more than one sensor is to be connected to the SDI-12 bus, make
certain each sensor has a unique sensor address. In some cases the user may wish to preset the
H-340’s Total Accumulation value to match the current rainfall of the water year. The H-340 has an
offset value stored in memory which is automatically added to the Total Accumulation value. The
offset value can be written or read with two extended SDI-12 commands (“aXWO” and “aXRO”),
see Chapter 2 for details. Please note both the Total Accumulation and Offset values are reset at
power-up, or with the extended SDI-12 Reset Accumulators (“aXRA”) command. To change the
Total Accumulation to a new value you must first reset the accumulators with the “aXRA” command,
then set the offset with the “aXWO” command.
On-Site User Calibration
To calibrate your H-3401 SDI Rain Gauge on-site, follow the steps outlined below.
1. You will first need to connect the gauge to your PC or Laptop. To do this, use the Rain Gauge
SDI-12 output, supplied cable and a Sidekick H-4191 to interface the Rain Gauge with a PC/Laptop
(see the wiring diagram on page 4).
2. Begin the wet testing - start with a rough setup and balance check.
A) Make sure the bucket stopper bolts are still tight. These have been carefully adjusted at the factory and should not have come loose. If they are tight, then don’t loosen or adjust
them until after the Rain Gauge has been tested. If they are loose, set them to the height
listed below and then re-tighten them.
Rain Gauges with .01” buckets set to 1.00 inch both sides.
Rain Gauges with .2mm buckets set to 1.08 inch both sides.
B) Set the Rain Gauge on a platform or workbench and elevate it so that it sits 3-4 inches
above the work surface. You can also use a work surface with through holes in it—place the
Rain Gauge over the holes and run the hoses through the holes. Use the bullseye level and
wing nuts to level the Rain Gauge’s main triangular plate.
C) Connect the supplied hose to the barbed fittings on the bottom of the Rain Gage, and then run each hose into a separate graduated cylinder. Be sure the cylinders are empty and
dry before starting the test.
7
PROGRAM & CALIBRATE
D) If you want to perform a simplified balance test that does not require a PC or SDI-12
software, you can do the following:
• Make sure the hoses are connected and running into separate 200 mL Graduated Cylinders
• Insert the special bottle and fitting upside down into the rain gage bucket
• Pour approximately 200ml of water into the bottle and let it run through the rain gage. The
exact amount of water is not important at this step because we are only checking the Rain
Gauge bucket’s balance (side-to-side), not the actual rain fall accuracy.
• Let all the water run through the bottle and rain gage, then carefully remove the white
housing and tip the bucket once more to allow all the water to run out.
• Carefully check the amount of water in each of the graduated cylinders. The should have
nearly the same amount of water in each cylinder (within 5% of each other).
Adjust The Tipping
Bucket Mechanism
Adjusting the tipping mechanism on the
H-3401 consists of adjusting the stop
posts to reduce or increase the volume
of water the bucket can hold before it
tips. As the stop post rises the volume
of water the bucket on the opposite side
decreases.
1. To adjust for too many tips (need more
rainfall volume), lower the stop post on
the opposite side of the bucket that is
tipping too early. Re-lock the nut.
2. To adjust for too few tips (need less rainfall volume), raise the stop post on the opposite side of
the bucket that is tipping too late. Re-lock the nut.
3. To adjust for equal amounts of water in each bucket, use a pipet to put a set amount of water into
each bucket ensuring the bucket tips with a specific volume of water in the bucket. Adjust the stop
post heights to ensure the buckets tip at the proper volume of water
0.01” - 8.24 mL
0.2mm - 6.49 mL
0.1mm - 3.24 mL
Volume Test
In this test, a known amount of water is run through the Rain Gauge at a controlled rate. The Rain
Gauge will convert this into a Rain Fall readout in inches or millimeters (depends on the model).
8
Program & Calibrate
The user will then perform their own calulation based on the formulas below. Compare calculations
to the Rain Gauge readings to see if they match.
1. Reset the accumulator, type ‘0XRA’ in the command line of the Windows SDI Terminal
2. Hit the ‘SDI DoItAll’ command and make sure it returns all ‘Zeros’. This confirms the gauge reset.
3. Run approximately 800mL to 1000mL of water through the Rain Gauge by pouring it into the
special bucket. You will have to fill the bucket several times because it won’t hold 800mL at once.
4. When you are done running the water through the Gauge, remove the white cover and tip the
bucket one more time to make sure it is empty. Carefully measure the volume in the graduated
cylinders and record it below under ‘Volume (ml)’.
5. Calculate the amount of rain fall (in. or mm.) that the ‘Volume (ml)’ equals based on the formulas
at the bottom of the page. Use the formula (in. or mm.) that corresponds to your Rain Gauge
model and record it.
VolMeas in Inches = Volume (ml) x .001214
VolMeas in Millimeter = Volume (ml) x .030836
6. Hit the ‘SDI DoItAll’ command in the Windows SDI Terminal and record the results below. The
readout should look similar to the diagram below:
Received> 0 +.950 + 4 + 2.354 + .950 + 1.404
Received> 0+(todays reading)+(number of tips)+(total reading)+(today’s reading)+(yesterday’s reading)
1st Test Attempt (test as many times as needed)
Record Rain gauge
Time
_____________ #Counts(Tips)_____________
Volume (ml) _____________ VolBucket
_____________ Hit “SDI DoItAll”
VolMeas(mm) ____________% Error_____________
7. Compare the measurements. Check to see that the amount of rain fall the Rain Gauge reported
is the same as the amount that you measured and calculated. They should be within 3% of each
other using the formula below.
VolMeas − VolBucket
% Error =
× 100%
VolMeas
8. Make adjustments if needed. Verify percent error is less than 3%.
• If Gauge reads high, decrease the tip speed ( 1/4 to 1/2 a turn clockwise at a time is recommended).
• If Gauge reads low, raise the post to increase tip speed. ( 1/4 to 1/2 a turn counterclockwise at a time is
recommended).
If you are not comfortable making these adjustments, return to the factory for calibration.
9
What Can Xylem Do For You?
Xylem
1) The tissue in plants that brings water upward from the roots;
2) a leading global water technology company.
We’re 12,900 people unified in a common purpose: creating innovative solutions
to meet our world’s water needs. Developing new technologies that will improve
the way water is used, conserved, and re-used in the future is central to our work.
We move, treat, analyze, and return water to the environment, and we help people
use water efficiently, in their homes, buildings, factories and farms. In more than 150
countries, we have strong, long-standing relationships with customers who know us
for our powerful combination of leading product brands and applications expertise,
backed by a legacy of innovation.
For more information on how Xylem can help you, go to www.xyleminc.com
YSI Incorporated
1700/1725 Brannum Lane
Yellow Springs, Ohio, 45387, USA
Request a Quote
Tel:
Email:
Internet:
+1.435.753.2212
[email protected]
www.waterlog.com
Place an Order
Tel:
Email:
+1.937.767.7241
[email protected]
Customer Support
Tel:
+1.937.767.2772
©2014 Xylem Inc.
Item#360427 dwg#360427
February 2014 Rev C