1
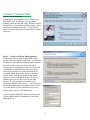
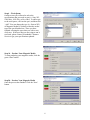
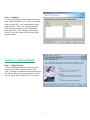
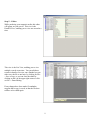
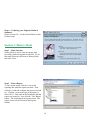
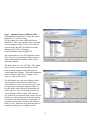
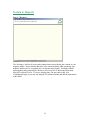
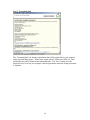
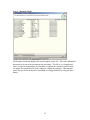
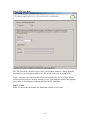
Greenshades Mag.NET
User Manual
Using the Mag.NET Wizard
Mag.NET User Manual
Greenshades Software
7800 Belfort Parkway
Suite 220
Jacksonville, FL 32256
(904) 807-0160
www.greenshades.com
If you have any questions about steps in this documentation, please contact technical
support by email at [email protected] or by phone at 904-807-0160.
Table of Contents
Table of Contents .......................................................................................................... 2
Common Steps Within Mag.NET Magnetic Media Wizard........................................... 3
Section 1: Normal Mode ............................................................................................. 4
Section 2: Advanced Mode ......................................................................................... 7
Section 3: History Mode ........................................................................................... 10
Section 4: Reports ..................................................................................................... 12
Section 5: Mag.NET Options.................................................................................... 17
Section 6: License Agreement .................................................................................. 19
2
Common Steps Within Mag.NET Magnetic Media Wizard
Regardless of which accounting package you use, Mag.NET should have been launched
and will allow you to produce your magnetic media. Each screen of Mag.NET contains a
short explanation of the information it requires from the user. The following is an
overview of using Mag.NET. Note that the colors and other aspects of the appearance of
Mag.NET in the following pages may not be exactly the same as it will appear on your
machine. Mag.NET changes its appearance to mimic the accounting package installed on
your system.
3
Section 1: Normal Mode
Step 1. – Mode Selection
Normal Mode is the quickest way to generate your
Mag Media files. It will allow you to generate
multiple reports quickly and easily. Because Normal
Mode allows you to generate multiple reports, it does
not allow any editing of the files. To use Normal
Mode, click the circle next to Normal Mode, and then
click next.
Step 2. – On-line or Off-line Mode (optional)
If this screen appears, then the Mag.NET wizard
cannot detect your internet connection. You may not
be online or you could be running through a proxy or
firewall. On this screen you will need to select
whether you are running on on- line or off- line mode.
Greenshades recommends that you run in on- line
mode to get the most up to date specifications for
your Mag Media filing needs. To run in on- line or
off- line mode, click the circle next to the desired
option you wish to run and click ne xt. If you are
behind a proxy server, please click on the link
labeled, “If your computer is on- line but your
computer is behind a proxy server.” You will need to
fill out this information to run behind a proxy server.
If you are unsure if you are behind a proxy server,
please consult your IT or IS departments.
*Note: Using the Mag.NET Wizard in on- line mode,
will not transfer data to Greenshades or any of the
filing agencies.
4
Step 3a – Online Mode
Online Mode
The Mag.NET Wizard May try to automaticaclly
authorize for you. This only happens if you have
previously used Mag.NET. If the automatic
authorization fails Mag.NET will bring you to the
authorization screen.
You will need to enter your registration name and
key that has been provided to yo u from
Greenshades Software. If you do not have a
registration code, please contact Greenshades
Customer Service Department. After you enter in
your company name and registration code, press the
‘Authorize’ button. The picture to the right will
change, and display your number of specifications,
accounting package and the date you must renew.
Once this info is displayed, click next.
Step 3b – Offline Mode
To run Mag.NET in off- line mode, you will need to
get an archive file from Greenshades Software. If
you do not have an archive file, please contact
Greenshades Technical Support.
Offline Mode
Enter in the path to the Archive file, either by
typing in the path, or browsing to the file. Then,
enter in your company name and registration key.
If you do not have these, please contact
Greenshades Customer Service for them. Once you
have entered in this information, press the
‘Authorize’ button. The picture to the right will
change, and display your number of specifications,
accounting package and the date you must renew.
Once this info is displayed, click next.
5
Step 4 – Work Queue
On this screen you will need to select the
specifications that you need to run (i.e. Suta, W2,
1099 Misc, 1099 Div, or New Hire). To add a spec
to the work queue, click on the spec, and then click
“Add”. You can change the type (i.e. Suta or W2)
of Magnetic Media by clicking on the tabs on the
top of the specifications box. Once you have
finished selecting the specs that you wish to run,
click next. If the spec that you are trying to run is
not listed, please contact Greenshades Customer
Service to get your specifications updated.
Step 5a – Produce Your Magnetic Media
To start producing your magnetic media, click the
green ‘Start’ button.
Step 5b - Produce Your Magnetic Media
Once the process has finished. Click the ‘Next’
button.
6
Step 6. – Summary
To view your Magnetic Media double click on the
name of the specification. (i.e. If you were running
South Carolina W2’s. you would double click on
South Carolina – W2). You will need to double
click on the specification even if the Magnetic
Media has failed. This will bring up the reports
screen. The reports screen will be covered in the
Reports Section.
Section 2: Advanced Mode
Step 1. – Mode Selection
To run your Magnetic Media in advanced mode,
click the circle next to advanced mode, click
‘Next.’ Running in advanced mode means that you
will only be able to run one specification at a time,
and you will be able to edit this file if you desire.
7
Step 2. - Online or Offline & Authorization
See steps 2 – 3 from the Normal Mode Section.
Step 3. - Work Queue
Select the specification that you need to run then
click ‘Next.’ In advanced mode you can only run
one specification at a time.
Step 4. - Produce You Magnetic Media
Click the ‘Start’ button to start producing your
magnetic media.
8
Step 5. – Editor
While producing your magnetic media, this editor
will appear on your screen. This view is the
Detailed View, enabling you to view one record at a
time.
This view is the List View, enabling you to view
multiple records at one time. You can edit these
records in detail or list view, once finished you can
either save the file to use later, by clicking on File > Save a Copy, or you can close the editor by
clicking on the x in the upper right corner or click
on File -> Done Editing.
If any changes have been made, Greenshades
suggests that a copy is saved, so that the file does
not have to be edited again.
9
Step 6. - Producing your Magnetic Media &
Summary.
Please see steps 5b – 6 in the Normal Mode section
for these steps.
Section 3: History Mode
Step 1 – Mode Selection
History Mode is used to view the reports from
previously produced magnetic media files. To use
this mode select the circle next to History Mode,
then click ‘Next.’
Step 2 – Select a Report
To view an old report, click the + next to the
reporting date when the report was made. Next,
click the + beside the company the report was made
for. Click the + next to the type of the report (i.e.
Suta or W2). Then click on the Jurisdiction that the
report was created in. Last, click the ‘View Report’
button. This will bring up the reports screen. The
reports screen will be covered in the Reports
Section.
10
Step 3 – Optional Features of History Mode
Producing Bulk Information- To open this option,
right click on a company listing.
The first option is to create Label Mail Merge
DataSource. This can be used to create new labels
for your magnetic media, The file is saved in the
same directory Mag.NET is installed to and the
default path for this is C:\Program
Files\Greenshades Software\Mag.NET.
The second option is view All Transmittal Letters.
This will create a report listing all information on
all the transmittal letters that have been sent out
under that company.
The third option is to view All Totals. This option
allows you to create a report that shows you all
totals for all the magnetic media that has been
created under that company. The Bulk Information
reports will work at the Date, Company, or Tax
Type (i.e. Suta or 1099) levels.
The final option is to rerun your magnetic media.
You will only be able to use this option if you
checked the box to save your data to history, when
you previously created your magnetic media. To
use this option, right click on the jurisdiction you
wish to rerun (i.e. New York Suta), then click on
‘Rerun Magnetic Media’ button. This will ask if
you wish to run in Advanced Mode, click yes or no.
Clicking yes will rerun the data in advanced mode.
Clicking no will rerun the data in normal mode. It
will take you back to the ‘Produce your Magnetic
Media’ screen. Follow the steps from that point to
complete reproducing your magnetic media.
11
Section 4: Reports
Step 1 – Messages
The ‘Messages’ tab lists all errors and warnings that occurred during the creation of your
magnetic media. Errors indicate that there were critical problems while producing your
magnetic media (such as a required piece of data not being found). Warnings indicate
that something may potentially be incorrect, such as a piece of data being longer than
Mag.NET expected it to be. If you are missing data, you may enter it into your
accounting package or you may run Mag.NET in advanced mode and add the information
in the editor.
12
Step 2 – Totals
The ‘Totals’ screen displays a list of totals generated by your financial information. You
may check these to ensure that the proper information was gathered and saved in your
magnetic media file.
13
Step 3. Transmittal Info
The ‘Transmittal Info’ tab displays information that will be applicable to your magnetic
media type and filing agency. Some states require specific forms to be filled out. That
information may all be found on this transmittal letter. The ‘Save’ button saves the
displayed text to a file on your computer, and the print button sends the displayed content
to a printer.
14
Step 4 – Magnetic Media
The Magnetic Media tab displays the actual magnetic media file. This is the information
that needs to be sent to the government for processing. This file is very complicated.
There are specific requirements for what data is required on each line at each location.
No matter how simple this file looks, editing it is highly discouraged. This magnetic
media file may be saved anywhe re (including on a floppy diskette) by using the Save
button.
15
Step 5 - File Your Data
The ‘File Your Data’ tab allows you to save your magnetic media to a floppy disk and
will also give you information on how to e- file for the report you are trying to file.
*Note: On some Citrix and Terminal server environments, the ‘Save To Disk’ button
will not work or will give an error message, to save your magnetic media if this happens,
please click on the magnetic media tab and save the file from there.
Step 6 – Forms
Please see the FormsLite Manual for instructions on how to use Forms.
16
Section 5: Mag.NET Options
Option 1. – Normal Mode XML Data File
If you load Greenshades Mag.NET from the Start Menu and select ‘Normal Mode’,
Mag.NET will ask you for an xml data file to load. This file is in the directory your
accounting package is installed to. (You will have to browse to this directory.) There,
you should find a directory named after your company (i.e. If your company name is The
World Online, the directory will be named TWO). In this directory you will find a
MMDATA directory, go into this folder. From there go into the quarter you were trying
to run for (i.e. if you were running for 4th Quarter for 2002, you would go into the folder
named QTD1202). There will be a file named “out.xml” double click on this file to put
the path in the bar. The path in the bar will look something like this;
c:\dynamics\two\mmdata\QTD1202\out.xml. Then click ‘Next,’ and follow the directions
for normal mode.
*Note: If you made any changes in your accounting package to your data, these changes
will NOT be reflected in this file until you press the ‘Mag Media’ button in your
accounting package.
17
Option 2. – Advanced Mode
If you are running Mag.NET from the start menu, and select advanced mode, Mag.NET
will ask you for a source data file or a saved merged file. If you are loading a source data
file, please follow the directions from Option 1 to load an xml file, these files are the
same. If you loaded a previously created saved merged file, you will need to browse to
where you saved the file to and select the file. You will also need to select saved merged
file from the drop down list. Then click ‘Next.’ Please follow the directions for
advanced mode to complete processing your magnetic media.
18
Section 6: License Agreement
Green Shades Software, Inc. licenses this software to the user for use for one year
from the date of purchase and subsequent maintenance plan renewals. We warrant that
we have put forth our best efforts to ensure that this software will properly generate the
magnetic media files required by the various governmental agencies. We warrant we will
respond promptly to resolve any rejections of the magnetic media by these governmental
agencies. It is the client’s responsibility to forward us all communications from these
agencies within 48 hours of their receipt by fax or email. It is the client's responsibility to
contest all proposed penalties. The extent of Greenshades Software's liability shall be
limited to the replacement of the diskettes or the full refund of the purchase price of the
software.
Except for this limited warranty described above, there are no warranties, expressed or
implied, including but not limited to the implied warranties of merchantability and fitness
for a particular purpose, and all such warranties are expressly and specifically disclaimed.
In no event shall Greenshades Software, Inc. be responsible for any indirect, special,
incidental or consequential damages or lost profits to you or any other person or entity
regardless of the legal theory, even if Greenshades Software has been advised of the
possibility of such damage.
Information in this document is subject to change without notice and does not
represent a commitment by Greenshades Software. Each registered user may make one
copy of the software for backup purposes. This software may be used or copied only
according to the terms of this license agreement. No part of this manual may be
reproduced or trans mitted in any form or by any means, electronic or mechanical,
including photocopying and recording, for any purpose without the written permission of
Greenshades Software.
19