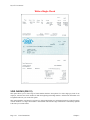
1
Payroll
with Employee Management, check Writing and Direct Deposit
Part #108
User Manual
Version 7.3
Information in this document is subject to change without notice and does not represent a commitment on
the part of Data Pro Accounting Software, Inc. The software described in this document is furnished under
a license agreement or nondisclosure agreement. The software may be used or copied only in accordance
with the terms of those agreements. The purchaser may make one copy of this software for backup
purposes. No part of this manual or other materials included with the package, may be reproduced or
transmitted in any form or by any means electronic or mechanical, including photocopying and recording
for any purpose, other than the purchaser’s personal use, without the written permission of Data Pro
Accounting Software, Inc.
© 1985-2008 Data Pro Accounting Software, Inc.
Data Pro Accounting Software is a trademark of Data Pro Accounting Software, Inc.
No investigation was made into the common-law trademark rights of any word. Every effort was made to
capitalize or highlight, in some manner, any word with current registrations.
All companies, products, addresses, and persons contained herein are intended to be completely fictitious
and are designed solely to document and exemplify the use of Data Pro Accounting Software, Inc.’s
products.
Page i
This page intentionally left blank.
Page ii
TABLE OF CONTENTS
Description
Page
CHAPTER 1 INTRODUCTION ............................................................................................... 1-1
DEPARTMENTAL OPTION .............................................................................................................1-2
JOB COST OPTION ...........................................................................................................................1-2
WORKERS' COMPENSATION OPTION .......................................................................................1-3
DIRECT DEPOSIT OPTION .............................................................................................................1-3
TAX TABLES.......................................................................................................................................1-3
TIME CATEGORIES..........................................................................................................................1-4
SYSTEM INTEGRATION..................................................................................................................1-5
Integration w/General Ledger............................................................................................................................ 1-5
Integration w/Job Cost Main Module ................................................................................................................ 1-6
DATA FILE DESCRIPTIONS ...........................................................................................................1-7
PREPRINTED FORMS.......................................................................................................................1-9
EMPLOYEE MAILING LABELS .....................................................................................................1-9
MASKED FIELDS ...............................................................................................................................1-9
TRANSACTION PROCESSING FLOWCHARTS........................................................................1-10
CHAPTER 2 SET UP AND MAINTENANCE ........................................................................ 2-1
GENERAL OVERVIEW.....................................................................................................................2-1
NAVIGATION TOOLS.......................................................................................................................2-4
SET UP EMPLOYEES ........................................................................................................................2-5
Inquiry Mode (PR0400)..................................................................................................................................... 2-6
Add Mode (PR0401) ......................................................................................................................................... 2-6
Change Mode (PR0402) .................................................................................................................................. 2-19
Delete Mode (PR0403) .................................................................................................................................... 2-20
Copy Mode (PR0404)...................................................................................................................................... 2-20
IMPORT EMPLOYEES (PR0601) ..................................................................................................2-20
Fixed Length ASCII Files................................................................................................................................ 2-22
Variable Length ASCII Files ........................................................................................................................... 2-23
Comma Delimited *.PRN Files ....................................................................................................................... 2-23
File Import Modules Overview........................................................................................................................ 2-24
Sample Import Employees File........................................................................................................................ 2-26
RENAME PR EMPLOYEE NUMBER (PR0450) ..........................................................................2-32
SET UP DEPARTMENTS ................................................................................................................2-34
Inquiry Mode (PR0404)................................................................................................................................... 2-34
Add Mode (PR0405) ....................................................................................................................................... 2-34
Change Mode (PR0406) .................................................................................................................................. 2-36
Delete Mode (PR0407) .................................................................................................................................... 2-36
Copy Mode (PR0408)...................................................................................................................................... 2-36
SET UP SPECIAL PAY TYPES.......................................................................................................2-37
Inquiry Mode (PR0408)................................................................................................................................... 2-37
Inquiry Mode (PR0409)................................................................................................................................... 2-37
Change Mode (PR0410) .................................................................................................................................. 2-41
Delete Mode (PR0411) .................................................................................................................................... 2-42
Copy Mode (PR0412)...................................................................................................................................... 2-42
SET UP TAX TABLES......................................................................................................................2-42
Inquiry Mode (PR0412)................................................................................................................................... 2-43
Add Mode (PR0413) ....................................................................................................................................... 2-43
Change Mode (PR0414) .................................................................................................................................. 2-52
Delete Mode (PR0415) .................................................................................................................................... 2-52
Copy Mode (PR0416)...................................................................................................................................... 2-52
Page iii
TABLE OF CONTENTS (continued)
Description
Page
UPDATE TAX TABLES FROM MASTER FILE (PR0417).........................................................2-53
SET UP WORKERS' COMP. CLASSES ........................................................................................2-53
Inquiry Mode (PR0425)................................................................................................................................... 2-53
Add Mode (PR0426) ....................................................................................................................................... 2-54
Change Mode (PR0426) .................................................................................................................................. 2-55
Delete Mode (PR0427) .................................................................................................................................... 2-55
Copy Mode (PR0428)...................................................................................................................................... 2-55
PAYROLL CONFIGURATION (PR0223)......................................................................................2-56
MASTER CONFIGURATION (PR0420) ........................................................................................2-56
GENERAL LEDGER ACCOUNTS .................................................................................................2-60
TIME CATEGORIES........................................................................................................................2-61
SYSTEM INTEGRATION................................................................................................................2-62
MAINTAIN DATA FILES (PR0422) ...............................................................................................2-62
START NEW YEAR'S DATA FILE (PR0423)...............................................................................2-63
MAKE COMPLETE DATA BACKUPS .........................................................................................2-66
CHAPTER 3 ENTER TRANSACTIONS ................................................................................. 3-1
SINGLE EMPLOYEE ENTRY (PR0101) .........................................................................................3-1
RAPID EMPLOYEE ENTRY (PR0102) ...........................................................................................3-5
PRINT CHECK SUMMARY (PR0104).............................................................................................3-9
PRINT CERTIFIED PAYROLL (PR0110).....................................................................................3-15
PRINT CHECKS (PR0105)...............................................................................................................3-18
WRITE A SINGLE CHECK (PR0107)............................................................................................3-21
RECORD ACCRUED PERSONAL TIME (PR0108) ....................................................................3-24
RECORD EMPLOYEE COMMENTS (PR0109)...........................................................................3-24
CHAPTER 4 PRINT REPORTS............................................................................................... 4-1
STANDARD FEATURES FOR REPORTS ......................................................................................4-1
CTRL+O (Output Options)................................................................................................................................ 4-1
Font Attributes................................................................................................................................................... 4-2
Report Print Options .......................................................................................................................................... 4-2
Displayed Report Options.................................................................................................................................. 4-3
Range of Accounts............................................................................................................................................. 4-3
Report Sorting Preference.................................................................................................................................. 4-3
Masking (Wildcards) ......................................................................................................................................... 4-3
Period to Report On ........................................................................................................................................... 4-4
Cancel the Print Job ........................................................................................................................................... 4-4
TRANSACTION REPORTS...............................................................................................................4-4
Check Register (PR0201) .................................................................................................................................. 4-4
Check Register by Employee (PR0202) .......................................................................................................... 4-10
EMPLOYEE/DEPARTMENTAL SUMMARIES ..........................................................................4-16
Monthly Pay Summary (PR0203).................................................................................................................... 4-16
Quarterly Pay Summary (PR0204) .................................................................................................................. 4-18
Annual Pay Summary (PR0205)...................................................................................................................... 4-20
Departmental Expense Summary (PR0206) .................................................................................................... 4-22
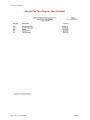
Special Pay Type Register (PR0211)............................................................................................................... 4-24
Employee Hours Report (PR0220) .................................................................................................................. 4-28
PERSONNEL REPORTS..................................................................................................................4-31
Employee Pay Review Reminder (PR0207).................................................................................................... 4-31
Employee Pay Review (PR0208) .................................................................................................................... 4-33
Page iv
TABLE OF CONTENTS (continued)
Description
Page
Employee Personal Time Balance (PR0209)................................................................................................... 4-35
Employee Comments Report (PR0219)........................................................................................................... 4-37
TAX REPORTS..................................................................................................................................4-39
Unemployment Tax Reports (PR0210) ........................................................................................................... 4-39
MONTHLY WORKER’S COMPENSATION REPORT (PR0224) .............................................4-43
Quarterly Pay Summary (for 941) (PR0226)................................................................................................... 4-45
PRINT W-2 FORMS (PR0212).........................................................................................................4-48
W-2 REPORTING ON DISKETTE Magnetic media - MMREF-1 FORMAT (PR0225)...........4-50
Windows GUI and Character-based Systems .................................................................................................. 4-50
LINUX............................................................................................................................................................. 4-50
PRINT W-2 TOTALS (PR0230) .......................................................................................................4-53
MAINTENANCE REPORTS (PR0110) ..........................................................................................4-55
Employee Listing (PR0213) ............................................................................................................................ 4-55
Department Listing (PR0214).......................................................................................................................... 4-59
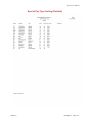
Time Category Listing (PR0215) .................................................................................................................... 4-62
SPECIAL PAY TYPE LISTING (PR0216) .....................................................................................4-64
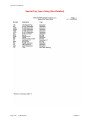
TAX TABLE LISTING (PR0217) ....................................................................................................4-67
Workers’ Compensation Classes Listing (PR0223)......................................................................................... 4-74
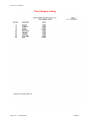
Employee Mailing Labels (PR0218) .................................................................................................4-77
CHAPTER 5 PERFORM ANALYTICAL GRAPHS ............................................................... 5-1
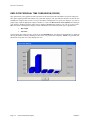
PAYROLL EXPENSE BY DEPARTMENT (PR0301) ....................................................................5-1
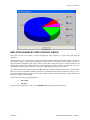
EMPLOYEE PERSONAL TIME COMPARISON (PR0302) .........................................................5-2
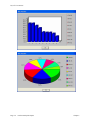
EMPLOYEE RANKING BY TIME CATEGORY (PR0303)..........................................................5-3
INDEX......................................................................................................................................... I-1
Page v
This page intentionally left blank.
Page vi
Payroll User Manual
CHAPTER 1
INTRODUCTION
Simply stated, the purpose of a payroll system is to calculate employee pay, generate paychecks, and track employee
tax information. The Payroll system expands on this simplified description to bring you a very sophisticated
integration of a complete pay calculation and check writing module, providing detailed personnel reporting and
analysis, as well as multi-departmental and multi-state breakdowns.
The pay calculation and check writing module provides rapid or single pay data entry, allowing salaried and hourly
employees. Hourly employees may have up to twenty (20) different hourly rates on the same pay period. The
following pay cycles may be handled individually or in combined paycheck runs:
•
Daily
•
Weekly
•
Bi-Weekly
•
Semi-Monthly
•
Monthly
•
Quarterly
•
Semi-Annually
•
Annually
Complete check runs or individual checks may be generated at any time. On-line employee inquiries provide current
month, quarter and Year-to-Date pay and tax information. The Job Cost feature optionally allows the allocation of
employee's salaries and wages to multiple Projects. The allocation of the payroll to Projects may also be used in
combination with the departmentalization feature.
The departmental features optionally allow all processing and reporting by department. In addition, multidepartment allocations are permitted by employee. The workers' compensation features optionally allow the tracking
and reporting of wages and salaries by multiple workers' compensation class codes.
State specific income (SIT) and unemployment tax (SUTA) features optionally allow the simultaneous processing
of all 50 states. The system automatically keeps track of each state's information and allows tax reporting by state.
Local income tax (LIT) may also be calculated and reported.
Optional special non-cash earnings and 401K type deductions may also be utilized. Tips are fully supported by the
system; including a “tip boost” warning if below minimum wage. Personnel reporting and analysis is provided
through tracking of personal time balances and employee personnel comments. In addition, the Payroll system
provides pay review reporting and scheduling, as well as graphs which indicate abuses to personal time allowances.
As you can see, the Payroll module not only provides you with the tools necessary to efficiently process your
company's payroll requirements, but also provides you with the management information necessary to direct the
performance of your staff.
Chapter 1
Introduction
Page 1-1
Payroll User Manual
DEPARTMENTAL OPTION
The Payroll system optionally allows you to process payroll information on a departmental basis. When you initially
start up on this system, you may specify if you want to use the departmental option. If you do not turn on the
Department feature, the system will never ask you for a department number. If you turn on the departmental feature
will be activated. You may switch from departmental to non-departmental without any additional re-keying or resorting of data. Before changing from non-departmental to departmental, you must first pack your data files and then
proceed with setting set up all of the departmental information.
The following features summarize the effects of using the departmental feature:
1) You must perform the initial set up of your departments. This includes department number,
description, GL account numbers for wages and expenses, and the expense allocation factor.
2) Each employee should be tied to a “Home” department.
3) All reports, data entry and employee selection may be specified by department.
4) Pay data entry can allocate employee time to individual departments; up to twenty (20)
departments per employee per pay check.
5) Payroll expenses will be allocated to various departments based on the allocation of employee
time between departments.
JOB COST OPTION
The Payroll module optionally allows you to allocate employee's salary and wages to projects or jobs. This feature
should only be turned on if you have purchased the Job Cost Main Module. When you initially start up on the
system, you may specify whether you want to use the Job Cost feature. If you do not use this feature, the system will
not allow the input of costing information. If you turn on this feature, the system will allow you to allocate some or
all of an employee's time to specific projects or jobs. This does not restrict the allocations to departments by using
this option. You may combine both departmental and project allocations at the same time of entry by the same
employee.
The following features summarize the effects of using the Job Cost feature:
1) You must specify in the Master Configuration what level of detail the Job Cost Main Module has
been configured for. You may specify the employee name, employee number, or none.
2) You must specify the default-billing rate for each employee. The system will then always default
to this rate unless you decide to override it.
3) Pay data entry may allocate employee time to specific projects. This may include up to twenty
(20) jobs per employee, per pay period.
4) Payroll expenses will be allocated to various projects based on the Payroll Overhead expense
factor set up in each project and the employee time and wages allocated to the project.
Page 1-2
Introduction
Chapter 1
Payroll User Manual
WORKERS' COMPENSATION OPTION
The Payroll system optionally allows you to process payroll information by workers' compensation class codes.
When you initially start up on this system, you may specify if you want to use the workers' compensation option. If
you do not specify this option, the system will never ask you for a workers' compensation class code. If you turn this
on, this feature will be activated.
The following features summarize the effects of using the workers' compensation feature:
1) You must perform the initial set up of your workers' compensation class codes. This includes the
four character code, description, state, predefined hourly pay rate, insurance rate, and insurance
maximum and the calculation type as it relates to the inclusion of overtime hours and whether it
should accumulate monthly totals so reports may be run for prior months.
2) Each employee should be tied to a “default” workers' compensation class.
3) Pay data entry can allocate employee wages and salary for up to twenty (20) workers'
compensation classes per employee, per pay check.
Workers' Compensation Classes will keep track of the various types of work an employee may perform on the job,
as well as different pay and insurance rates based on the type of work being performed. This optional feature is most
common in union and construction payroll environments. Reporting is summarized by state and job classification.
DIRECT DEPOSIT OPTION
The Payroll system optionally allows you to process Direct Deposit payroll information electronically from your
Bank Account to your employee's bank account(s). When you initially start up on this system and you wish to utilize
this option, you will need to follow the steps outlined in the Check Reconciliation module for setting up an EFT
Processor and transmitting EFT Batches. Also, the Employee setup for Direct Deposit under the option
“Add/Change an Employee” will need to be followed.
TAX TABLES
The Payroll system allows the simultaneous processing of multiple state and local taxes. The system accomplishes
this by allowing each employee to have five (5) different tax tables.
Each employee's tax tables are required to be in the following format:
•
Federal Tax Table
•
State Tax Table
•
Additional State Tax (optional)
•
Local Tax Table
•
Additional Local Tax (optional)
Although there are five (5) tables, only three (3) different taxes are supported; Federal (FIT), State (SIT), and Local
(LIT). Table numbers 2 and 3 combine to calculate SIT. Tables 4 and 5 combine to calculate LIT. (The use of LIT
is completely optional.) The need for two tax tables for SIT and LIT calculations is to provide you with enough
flexibility to handle the tax calculations for states and municipalities that utilize very complex formulas.
Every employee working in the U.S. should have at least two tax tables (Federal & State) set up in order to
calculate FUTA and SUTA (even if the state does not have any income tax). Unemployment tax calculations are
also established in the tax table file. Federal unemployment tax (FUTA) is defined in the federal tax tables, and state
unemployment tax (SUTA) in the state tax tables.
If you have multiple tax tables for the same state, make certain that all tables have the same SUTA information. This
also applies to the federal tax tables, since separate tables are required for married (Table: FED-M) and single
(Table: FED-S).
Chapter 1
Introduction
Page 1-3
Payroll User Manual
NOTE
The system provides the standard tax table information for both Federal and
State Income Tax calculations. Normally, these tables are already set up in
your system. Customers who are current on their Annual License Fees will be
issued updates to the Tax Tables as they occur.
Please note that the General Ledger accounts and the Unemployment Tax
Percent may need to be changed to meet your specific requirements. In
addition, after you receive the tax update, it is your responsibility to verify
that the tax calculation meets your legal requirements.
TIME CATEGORIES
The Payroll system allows you to predefine “time categories.” These time categories are used to display the type of
hours that are being entered (e.g., Regular, Overtime, etc.) through the “Enter Pay Data” options. These time
categories are also used to automatically calculate the hourly rate for hourly employees and track personal time
balances (e.g., Vacation, Sick, Holiday, etc.).
There are fifteen (15) time categories that may be defined, however, categories eleven through fifteen are handled by
the system in a special way. These are referred to as personal time and will “count down” the personal time
balances for the employee each time they are used. These personal time categories allow you to allocate hours to
each employee for such things as vacation time, personal time, etc. and then the system will “use up” this time as
the pay data is entered with hours assigned to these types.
Time category ten is used by the system to indicate piecework type pay. The number of “pieces” should be entered
instead of hours and the system will not consider this as hours during the calculations and updates.
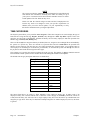
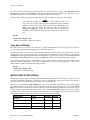
The default time category description and factors are listed below.
Description
Factor
1) Regular
1.0000
2) Overtime
1.5000
3) Double
2.0000
4) Holiday
2.5000
5-9)
Blank
10) Piecework
1.0000
11) Vacation
1.0000
12) Sick Time
1.0000
13) Personal
1.0000
14) Unexcused
0.0000
15) Misc.
0.0000
The factors listed above, are used as a direct multiplier to the employee's hourly rate. In other words, if an
employee's hourly rate is $10.00 and his time is entered as a time category #2 (Overtime), which has a factor of
1.5000, then his hourly rate will be $15.00. A single employee may have time entered for up to 15 different time
categories per pay check. Time may be classified to multiple categories for salaried employees; however, the factor
is ignored.
Page 1-4
Introduction
Chapter 1
Payroll User Manual
SYSTEM INTEGRATION
This section includes a brief overview of how the Payroll system integrates with General Ledger.
Integration w/General Ledger
If your Payroll system is interactive with the General Ledger module, the General Ledger Integration File will be
updated after printing your pay checks. Every department, tax table, and special pay type has a General Ledger
account associated with it that will be used in the General Ledger journal entry. This journal entry is normally
posted after each pay check cycle.
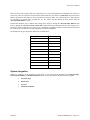
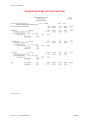
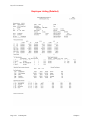
The following displays the typical non-departmental journal entry:
Account Description
Debit
Credit
PAYROLL JOURNAL ENTRY
Wages & Salaries
X
Additional Earnings
X
FIT Withheld
X
SIT Withheld
X
LIT Withheld
X
FICA Expense Employer’s
X
FICA Payable Employer’s
X
FICA Payable Employee’s
X
FUTA Expense
X
FUTA Payable
SUTA Expense
X
X
SUTA Payable
X
Deductions
X
Cash
X
The following displays the typical departmental journal entry.
Account Description
Debit
Credit
MAIN COMPANY JOURNAL ENTRY
Inter-Dept Account
X
Dept. OH Expense Credit
Additional Earnings
X
FIT Withheld
X
SIT Withheld
X
LIT Withheld
X
FICA Expense Employer’s
FICA Payable Employer’s
Chapter 1
X
X
X
Introduction
Page 1-5
Payroll User Manual
Account Description
Debit
FICA Payable Employee’s
FUTA Expense
X
X
FUTA Payable
SUTA Expense
Credit
X
X
SUTA Payable
X
Deductions
X
Cash
X
DEPT. JOURNAL ENTRY
Dept. Wages & Salaries
X
Allocated Expenses
X
Inter-Department Account
X
and/or
PROJECT ALLOCATION JOURNAL ENTRY
Work-In-Progress
X
Allocated Expenses
X
Inter-Department Account
X
You may update your general ledger at any time by entering General Ledger and executing the “Post Integration
Files” option. (See your General Ledger manual for details.) Or, if you choose the option “Automatically Post
Integration Modules” in the General Ledger Master Configuration, these same transactions will be posted in real
time to the General Ledger each time a transaction is entered into the Payroll system.
Integration w/Job Cost Main Module
If your Payroll system is interactive with the Job Cost Main Module, this module will be updated at the time that
you print pay checks. Costs may be allocated to various projects in either of these two modules. After allocating the
time to various projects, you may simply proceed to run the payroll cycle as normal. Once the checks are printed, the
system will simultaneously update both the projects as well as the employee's master file. Please note that the Job
Cost versions of Accounts Payable, Accounts Receivable, Manufacturing Inventory Management, Payroll, and
Purchase Order Entry are designed to work with the Job Cost Main Module.
Page 1-6
Introduction
Chapter 1
Payroll User Manual
DATA FILE DESCRIPTIONS
The Payroll module utilizes the following data files:
•
Master Configuration
•
Employee File
•
Current Pay Data File
•
Transaction File
•
Transaction Detail File
•
Department File
•
Special Pay Types File
•
Tax Table File
•
Employee Comments File
•
Workers' Compensation Class File
•
Payroll Historical File
•
General Ledger Integration File
These files are defined here.
File Name
Description
Master Configuration File
(filetype: PR00)
(filename: coPR0.dbf, where
“co” represents the company
number)
This file contains your Master Configuration, General Ledger
Accounts, Time Categories, and Integration with other modules.
Employee File
(filetype: PR01)
(filenames: coPR1cy.dbf and
coPR1cy.mdx, where “cy”
represents the last 2 digits of the
calendar year)
This file contains the master payroll information for each of your
employees, including name, address, historical information, tax
status, etc.
Current Pay Data File
(filetype: PR11)
(filenames: coPRB.dbf and
coPRB.mdx)
This file contains current pay data information for the current pay
cycle.
Transaction File
(filetype: PR02)
(filenames: coPR2cy.dbf and
coPR2cy.mdx, where “cy”
represents the last 2 digits of the
calendar year)
This file contains each transaction, or check, entered into the
Payroll system for the fiscal year. This file is used when printing
the Check Register and the Check Register by Employee.
Chapter 1
Introduction
Page 1-7
Payroll User Manual
Transaction Detail File
(filetype: PR12)
(filenames: coPRCcy.dbf and
coPRCcy.mdx where “cy”
represents the last 2 digits of the
calendar year)
Department File
(filetype: PR03)
(filenames: coPR3cy.dbf and
coPR3cy.mdx , where “cy”
represents the last 2 digits of the
calendar year)
Special Pay Types File
(filetype: PR04)
(filenames: coPR4.dbf and
coPR4.mdx)
Tax Table File
(filetype: PR05)
(filenames: coPR5.dbf and
coPR5.mdx)
Employee Comments File
(filetype: PR06)
(filenames: coPR6.dbf and
coPR6.mdx)
This file contains all of the pay data detail for each transaction
posted to payroll.
This file contains the Department information for your company,
such as the department description, overhead factor for allocation
of expenses, and total hours and wages for each period of the
current fiscal year.
This file contains the Special Pay Types that you may wish to use
when entering the payroll data for additional earnings, non-cash
earnings, deductions, or additional Federal Income Tax
withholding.
This file contains the Tax Table information to allow the system to
calculate Federal Income Tax, State Income Tax, Local Income
Tax, and the Unemployment Taxes.
This file contains the employee comments that may be entered to
record special comments or reminders for each employee for
employee review purposes.
Workers' Compensation Class
File
(filetype: PR07)
(filenames: coPR7.dbf and
coPR7.mdx)
This file contains the workers' compensation class codes that you
wish to use to classify each employee's wages for insurance
reporting purposes.
Payroll Historical File
(filetype: PR22)
(filenames: coPRMcy.dbf and
coPRMcy.mdx, where “cy”
represents the last 2 digits of the
calendar year)
General Ledger Integration File
(filename: PR2GL.co)
This file contains the historical information on all employee’s
wages and taxes in monthly totals for the calendar year.
Page 1-8
Introduction
If you are processing interactive with General Ledger, all
transactions which require General Ledger updates will post to this
file. Once the update is performed in General Ledger, this file will
be cleared and made ready for new transactions.
Chapter 1
Payroll User Manual
PREPRINTED FORMS
This section outlines the various forms available for the Payroll module. As in other systems, several types of forms
may be used with this program. For convenience, custom forms modifications may be made to accommodate any
specific needs of a particular business. The forms that are shipped standard with this module and the preprinted
forms that are supported by the accounting system are described in the Payroll sections of the Infinity POWER
Supported Forms Reference Manual. This can be found in the User Manuals section of the Data Pro web site and
on the CD-ROM.
Preprinted forms will be illustrated in the DPAForms section located in this manual. If you find that customization
of your forms is necessary, DPAForms can adjust any preprinted form to meet your specific form printing need.
Most of the forms illustrated in the DPAForms catalogue are also available in “Laser Form” format. This means
these versions of the forms are pre-cut to specifically meet the needs of the various HP LaserJet and compatible
printers. Infinity POWER programs have already included the necessary forms files with your software for you to
utilize this advanced feature. All forms that have an “L” in their form name have been modified to accommodate
form printing on LaserJet printers.
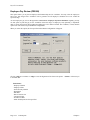
To utilize any of the forms listed here, simply go to the Payroll>Set Up and Maintenance>Payroll Configuration
option. In Change mode, select the “Master Configuration” tab and input the name of the form you want to use in
the “W-2 Form” field. This tells the system which forms you would like to use.
You may change forms styles as often as you would like and at any time.
EMPLOYEE MAILING LABELS
The size label used for the printing of employee mailing labels is:
15/16” X 3 1/2”
MASKED FIELDS
The following field can be “Masked” when generating certain reports from the system:
Department Number
Chapter 1
Introduction
Page 1-9
Payroll User Manual
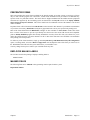
TRANSACTION PROCESSING FLOWCHARTS
This section covers the processing flow for the different types of transaction processing in the Payroll system.
Single Employee Entry Flowchart
Page 1-10
Introduction
Chapter 1
Payroll User Manual
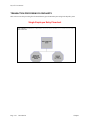
Rapid Employee Entry Flowchart
Chapter 1
Introduction
Page 1-11
Payroll User Manual
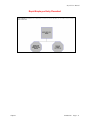
Write a Single Check Flowchart
Page 1-12
Introduction
Chapter 1
Payroll User Manual
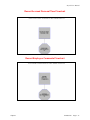
Record Accrued Personal Time Flowchart
Record Employee Comments Flowchart
Chapter 1
Introduction
Page 1-13
Payroll User Manual
This page intentionally left blank.
Page 1-14
Introduction
Chapter 1
Payroll User Manual
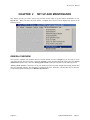
CHAPTER 2
SET UP AND MAINTENANCE
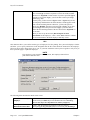
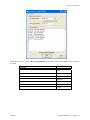
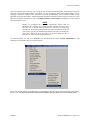
This chapter provides you with a step-by-step procedure for the initial set up and routine maintenance of your
Payroll files. When you select this menu option, a complete list of choices will be displayed as shown on the
following screen:
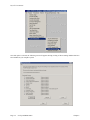
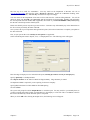
GENERAL OVERVIEW
Once you have installed your module(s) and reviewed the System Overview, (Chapter 1), you are ready to set up
your master Payroll files from scratch. Select the “Systems” option from the Menu Bar. Then, select the “System
Administrator” option. Then, select the “Start up from Scratch” menu option as shown on the following screen.
“Start Up From Scratch” is utilized to set up your initial Payroll and any other integrated accounting module data
files for a particular company. This procedure is performed only once. Thereafter, your data files may be packed or
re-indexed through the Payroll option “Maintain Payroll Files.”
Chapter 2
Setup and Maintenance
Page 2-1
Payroll User Manual
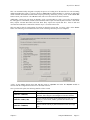
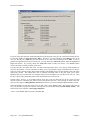
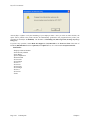
Once this option is selected, the following screen will appear showing a listing of all accounting modules that have
been installed on your computer system.
Page 2-2
Set Up and Maintenance
Chapter 2
Payroll User Manual
This is an automated utility designed to simplify the process of creating all of the data files for each accounting
module throughout the system. Users may choose to “Select All” accounting modules by <clicking> on this button
which will check all modules and make them ready for processing. Otherwise, you may <click> on the “Clear All”
button to undo your selections. The “Invert” button will reserve the order of all current selections.
Additionally, you may use your mouse to manually <click> on each module to <click> it on or off to be included in
the startup process. Remember, modules such as Purchase Order require Accounts Payable to function. Sales Order
Entry requires Accounts Receivable and Time Sheet Entry requires the Payroll data files. Point of Sale and
Accounts Receivable share common files which is why it is so noted on the screen.
This step must be done for each company for which you intend to process data. To begin, <click> on the “Start”
button. The following screen illustrates how the screen will change when the process is completed.
<Click> on the “Close” button when done and then return to “Systems” and select the “Payroll” module to
continue with the configuration functions to be described from here.
Once you select this option, the following data files will be created:
File Name
Description
Master Configuration File
(filename: coPR0.dbf)
This file contains your Master Configuration, General Ledger
Accounts, Time Categories, and Integration with other modules.
Employee File
(filename: coPR1cy.dbf)
This file contains the master payroll information for each of your
employees, such as name, address, personal time balances, tax
status, etc.
Current Pay Data File
(filename: coPRB.dbf)
This file contains current pay data information for the current pay
cycle.
Chapter 2
Setup and Maintenance
Page 2-3
Payroll User Manual
Transaction File
(filename: coPR2cy.dbf)
This file contains each transaction, or check, entered into the
Payroll system for the fiscal year. This file is used when printing
the Check Register and the Check Register by Employee.
Transaction Detail File
(filename: coPRCcy.dbf where
“cy” represents the last 2 digits
of the current year)
Department File
(filename: coPR3cy.dbf)
This file contains all of the pay data detail for each transaction
posted to payroll.
Special Pay Types File
(filename: coPR4.dbf)
This file contains the Special Pay Types that you may wish to use
when entering the payroll data for additional earnings, non-cash
earnings, deductions, or additional income tax withholding.
Tax Table File
(filename: coPR5.dbf)
This file contains the Tax Table information to allow the system to
calculate Federal Income Tax, State Income Tax, Local Income
Tax, and the Unemployment Taxes.
Employee Comments File
(filename: coPR6.dbf)
This file contains the employee comments that may be entered to
record special comments or reminders for each employee for
employee review purposes.
Workers' Comp. Class File
(filename: coPR7.dbf)
This file contains the workers' compensation class codes that will
be used to classify each employee's wages and salary for insurance
reporting.
This file contains the Department information for your company,
such as the department description, overhead factor for allocation
of expenses, and total hours and wages for each period of the
current fiscal year.
NOTE
Attempting to execute this option after these files have already been set up
will result in a warning message that will not permit you to execute this
option. Once the files are created, press ENTER to return to the menu.
NAVIGATION TOOLS
Within this module there are numerous references to navigation. The following navigation buttons are defined for
reference when used through this chapter.
Navigation Button
Function
Selects the first record.
Selects the previous record.
Selects the next record.
Selects the last record.
Page 2-4
Set Up and Maintenance
Chapter 2
Payroll User Manual
Navigation Button
Function
Scroll view. Selects a specific record from a list.
Creates a record.
Modifies the current record.
Deletes the current record.
Creates a record based on the current record.
Maintains notes for this record.
Displays record timestamp information.
SET UP EMPLOYEES
This section discusses the ways to set up, change, delete and copy and import employee information. It also
discusses how to print the Employee Listing which is used to verify all information input into the Employee file.
Each employee must be assigned an employee number. This number may be up to twelve (12) characters
(alpha/numeric). This will enable you to set up your employee's social security number as their employee number, if
you wish.
You may add “notes” to any Employee that may be viewed on the screen for additional information or planning.
This may be done when viewing an inquiry, adding a new employee, changing an existing employee or copying an
employee.
By <clicking> on the Note Pad Button, a screen will appear that will allow you to add or review free-form notes. If
you are adding a new record, navigation is not required. <Click> on the “Create a New Record” button or choose
the “Operation” option from the Menu Bar and then “Add.” A screen will appear with the current data and time.
You will be prompted for a description of fifty (50) characters, which is used as part of the display when selecting to
review existing notes. Each note recorded has up to ten (10) lines of fifty characters each which may be used for
your free-form notes.
Once notes are added to the file, they can be reviewed at any time by accessing the account through an inquiry mode
or a change mode and then <clicking> on the Note Pad Button.
Once this screen is displayed you will have the tool bar navigation options to select the first detail record, select the
next record detail, select the previous record detail, select the last record in the detail list or search through the detail
records. You may then view the notes for this record.
If you have set up User-Definable Fields in either the Windows Character-based or UNIX products, you will be
able to view and change data information in these fields. By <clicking> on the “User Fields” button, you will
access an additional screen of data fields. If you are in an Inquiry Mode, then you will be able to view these fields.
If you are in a Change or Copy Mode, you will be able to modify the information in these fields. You must make
sure that your General Configuration options are set up to allow access to User-Definable Fields.
Chapter 2
Setup and Maintenance
Page 2-5
Payroll User Manual
Inquiry Mode (PR0400)
This option allows you to review all employee master information such as employee name, mailing address, phone
number, social security number, status, home department, race, gender and default pay information. You may press
the additional information buttons to see the following information:
•
Personnel
•
Historical
•
Tax Table
•
Accumulators
•
Pay Types
•
Direct Deposit
•
W2
Navigate to the record you wish to view. You may find a record using the navigation tool bar or <click> on the
“Navigation” option on the Menu Bar and then the appropriate navigation option. Once the employee has appeared
on the screen, you may review the employee information. This information includes the employee name, mailing
address, phone number, social security number, status, home department, and default pay information.
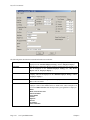
Add Mode (PR0401)
This option allows you to add new employees to your Employee file. The main data entry screen allows you to enter
the employee's name, address, phone, status, base pay information, and department. There are seven (7) buttons on
this screen which allow you to access other data entry screens to input personnel, historical, tax table, accumulating,
special pay type, direct deposit and W2 data.
If you choose to utilize the Direct Deposit Payroll feature, an additional data item will appear on the screen to
define direct deposit information for that employee. For Direct Deposit Payroll features to appear, you must have
an "EFT" type bank account selected in the Payroll Master Configuration and your integration to the Check
Reconciliation module must be turned on.
NOTE
There are four key pieces of data that must be set up for each employee. If
any of these five items are not entered during the addition or editing of an
employee record, the system will warn the user. The first two fields that must
be defined for each employee are the First and Last Name separately entered
under the “W-2” button for use when printing an employees’ W-2 form at the
end of each year. Additionally, you must define both a “Federal” and “State
Tax Table” record for each employee under the “Tax Table” button. Even if
the state that the employee resides in currently has no State Income tax (i.e.
Florida), there are other items, such as the State Unemployment Tax Rate and
the maximum amount, that can be taxed (Unemployment Maximum) and are
also defined by state in these state tax tables. Only one “Federal Table”
(Single or Married) is assigned by employee. Also, the employee’s “normal
hours” must be greater than zero.
When adding a new record, navigation is not required. <Click> on the “Create a New Record” button or choose the
“Operation” option from the Menu Bar and then “Add.” The following is an explanation of each of the data items
set up on an employee.
Page 2-6
Set Up and Maintenance
Chapter 2
Payroll User Manual
The following table describes the Maintain Employees screen details:
Employee Number
This is a twelve (12) character (alpha-numeric) field used for the
employee number for this employee. This field is the main sort key on
reporting and search routines.
Employee Name
This is a thirty (30) character field for the name of the employee which
will be displayed on all reports, checks and screens. For instance, if you
had two employees named John Smith Jr. and Mary Jones, the correct
way to enter these names would be:
Smith Jr., John
Jones, Mary
For purposes of printing names on W-2s, <click> on the “W-2” button
detailed later in this section and you will be prompted to enter the “first
name/middle name” and the “last name” separately. This is the actual
name that will print on your W-2. These W-2 First Name and Last Name
fields in the W-2 section of the employee setup must be entered exactly
as shown on your original Social Security card.
Mailing Address
This data item contains two lines of twenty-five (25) characters each for
the employee's address, fifteen (15) characters for the city, two (2)
characters for the state abbreviation, and ten (10) characters for the zip
code. This address will be printed on the payroll checks and W-2s.
Phone
This data item contains the employee's phone number. There are fourteen
(14) characters available, which is enough for the area code and all
parenthesis, spaces, and dashes.
S.S. #
This data item contains the employee's social security number. This
number will be printed on the W-2s and most reports and screens.
Chapter 2
Setup and Maintenance
Page 2-7
Payroll User Manual
Marital Status
This data item is a one (1) character field for the marital status of the
employee. This field will not be used for anything but as a display. You
may enter any character, but the letters S or M are recommended. The
system will not stop you from entering any other letter.
There is no validity checking for S or M because the field is not used
internally.
WC Class
This data item contains default workers' compensation class for this
employee. This WC Class will automatically be placed in the pay data
entry screen for this employee. You may enter the WC Class or <click>
the Down Arrow (F2 by default) to scroll through the WC Class file to
make your selection.
Default JC Billing Rate
Default: 0
This data item contains the default Job Cost Billing Rate for this
employee. If the Job Cost integration is turned off in the Master
Configuration, you will not be allowed to access the item. You may
select one of the available billing rates from the “Pull down” menu. This
billing rate will be the rate set up in the Project Detail File if the budget
and default information has not already been entered through the Job
Cost Main Module.
Status
This data item contains the employee's status with the company. The
default value for a new employee is choice 1) - Active. You may select
one of the available status types from the “Pull down” menu.
The valid choices are listed below:
1) Active
2) Leave of Absence
3) Resigned (Good)
4) Resigned (Fair)
5) Resigned (Bad)
6) Terminated (Good)
7) Terminated (Fair)
8) Terminated (Bad)
9) Laid Off
Options #3 and greater are implemented in the system for historical
review of the status of the leaving of the employee. You may find this
helpful when making comments on personnel references. All employees
with a status of 3 or greater will be automatically removed from the
employee file when you perform the “Start New Year's File” option.
The status of an employee must be “active” to be processed in any of the
“Enter Transactions” options.
Home Department
This data item contains the home department of the employee. If the
department breakdown in the Master Configuration has been turned off,
you will not be allowed access to this item. You may enter the
department number or <click> the Down Arrow (F2 by default) to scroll
through the department file to make your selection. This department will
be the default department that the employee's wages or salary is allocated
to. However, you may change this allocation at the time of entering pay
data.
Page 2-8
Set Up and Maintenance
Chapter 2
Payroll User Manual
Compensation Type
This data item contains either Hourly or Salary to indicate to the system
if the employee's pay will be hourly or salary. There are no other values
accepted for this item. <Click> on the appropriate compensation type for
this employee.
Pay Cycle
This is the pay cycle that will be used when processing the pay data for
this employee. The default will be the value set up in the Master
Configuration. The pay cycle will be used to group similar payrolls and
to correctly calculate the payroll taxes.
The valid pay cycles are:
1) Daily
2) Weekly
3) Bi-Weekly
4) Semi-Monthly
5) Monthly
6) Quarterly
7) Semi-Annually
8) Annually
You may select one of the available pay cycles from the “Pull down”
menu.
Base Rate
This data item contains the base hourly or salary pay rate for this
employee. For salary employees, this is the salary for the pay cycle that
this employee is paid. For hourly employees, this is the base hourly rate
for the employee. This hourly rate will be multiplied by the pay factors
set up for the time categories. If you have turned on the feature to “Allow
Override of Pay Rates” in the Master Configuration, you will be
allowed to change this rate when entering pay data for hourly employees.
Normal Hours
This data item contains the normal hours worked in one pay cycle. This
will be the default number of hours when entering pay data, however you
will be allowed to change the hours at that time. Salaried employees
cannot have zero (0) hours in this data item. It is important that this field
be defined for hourly as well as salaried employees. It is used for
reporting and posting procedures.
Personnel
<Click> on this button and the system allows you to enter the personnel data on another data entry screen. This
includes birth date, start date, review information, date of last check, comments, and personal time balances. It even
allows you to define whether the Employee is “exempt” from Social Security and/or Medicare taxes. This is
significant for those individuals who may be part of specific unions who are not subject to either taxation or for
those entities that need to utilize the Payroll module outside the United States where Social Security and Medicare
do not apply.
Chapter 2
Setup and Maintenance
Page 2-9
Payroll User Manual
The following table describes the Personnel Information screen details:
Birth Date
This data item contains the date of birth of the employee. This will only be
displayed on the “Detailed Employee Listing” and the “Employee Inquiry.”
Start Date
This data item contains the date the employee started with your company. This
will be displayed on the “Detailed Employee Listing,” the “Pay Review
Report” and the “Employee Inquiry.”
End Date
This data item contains the date the employee ended employment with your
company. This will be displayed on the “Detailed Employee Listing,” and the
“Employee Inquiry.”
Gemder
This data item contains the gender of the employee. This should be “M” for
Male or “F” for female.
Race
This data item is a twenty (20) character field to describe the race of the
employee. Some of the standard races are listed below. These examples were
used in the 2000 US Census and should provide a good guideline to employers.
White
Black, African American
American Indian
Asian Indian
Chinese
Japanese
Korean
Vietnamese
Native Hawaiian
Page 2-10
Set Up and Maintenance
Chapter 2
Payroll User Manual
Date of Last Review
This data item contains the date the last time the employee had a pay review.
This will be displayed on the “Detailed Employee Listing,” the “Employee Pay
Review Reminder” report, and the “Employee Inquiry.”
Rate Prior to Review
This data item contains the employee's base rate prior to the last time the
employee had a pay rate change. This will be displayed on the “Detailed
Employee Listing,” the “Employee Pay Review Reminder” report, and the
“Employee Inquiry.”
Date of Next Review
This data item contains the scheduled date of the employee's next pay review.
This will be displayed on the “Detailed Employee Listing,” the “Employee Pay
Review Reminder” report, the “Employee Pay Review” form, and the
“Employee Inquiry.” The “Employee Pay Review Reminder” and “Employee
Pay Review” will use this date to select those employees to print and as a sort
key.
Date of Last Check
This data item contains the date of the last pay check the employee received.
The system will automatically update this item as the pay checks are written.
Comments
This data item contains one line of fifty (50) characters for any comments you
would like to enter for this employee. This will be displayed on the “Employee
Inquiry,” the “Detailed Employee Listing,” and the “Employee Pay Review
Reminder.”
Personal Time Balances
This allows you to define the number of hours the employee has accrued for
personal time. These five personal times are the last five categories set up in the
Time Categories in the Master Configuration. Once these balances have been
initially defined, the “Record Accrued Personal Time” option in the Enter
Transactions menu can be used to modify these balances whenever necessary.
The balances in these fields will be reduced by the hours entered in the
paycheck entry options in Enter Transactions. For example, if an employee has
40 accrued hours of sick time specified and a paycheck is entered for 72 hours
of regular and 8 hours of sick time, the Personal Time Balance for Sick Time
will be reduced to 32 hours. If there are zero hours of accrued Personal Time
Balances, the system will negatively increment the total number of hours
specified for that personal time. <Click> the “Save” button to validate this
screen and return to the main employee data entry screen.
Minimum Wage
Override
This field allows the override of the master configuration’s minimum wage
value. This provides the ability to specify on an employee by employee basis
what their minimum wage should be. If the employee’s minimum wage is set to
zero, then the system will use the master configuration value.
Exempt Social Security
This data item allows you to specify whether this employee is subject to U.S.
Federal Social Security taxes or not. If they are exempt due to the fact that they
are a member of a specific union or are a foreign company utilizing the Payroll
module outside of the United States, then <click> this option on and no Social
Security taxes (FICA) will be calculated for this employee and/or employer.
Exempt Medicare
This data item allows you to specify whether this employee is subject to U.S.
Federal Medicare taxes or not. If they are exempt due to the fact that they are a
member of a specific union or are a foreign company utilizing the Payroll
module outside of the United States, then <click> this option on and no
Medicare taxes (Mediwages) will be calculated for this employee and/or
employer.
Chapter 2
Setup and Maintenance
Page 2-11
Payroll User Manual
Historical
<Click> on this button, and the system allows you to enter the historical data on another data entry screen. For each
data item, you may enter the Taxable Amount and the Tax Amount on a month by month basis for the calendar year.
The twelve categories are defined below.
The following is an explanation of each of the data items on this screen:
NOTE
Only those categories that are set up on an employee’s Tax Table Data
Information will be show on the historical data screen.
The following is an explanation of each of the data items on this screen:
Federal Income
This data item contains the monthly period figures for gross taxable
wages and the FIT tax amount. This is the amount of the employee's
wages subject to federal income tax (also referred to as FIT wages). The
total of all twelve periods will be reported on the employee's W-2 as
Gross Wages.
FICA
This data item contains the monthly period figures for Social Security
wages and the Social Security tax amount. This is the amount of the
employee's wages subject to Social Security tax. The total of all twelve
periods will be reported on the employee's W-2 as Social Security
Wages. The total Social Security tax amount will be reported on the
employee's W-2 as the Social Security tax amount.
Medicare
This data item contains the monthly period figures for Medicare wages
and the Medicare tax amount. This is the amount of the employee's
wages subject to Medicare tax. The total of all twelve periods will be
reported on the employee's W-2 as Medicare Wages. The total Medicare
tax amount will be reported on the employee's W-2 as the Medicare tax
amount.
State 1 Income
This data item contains the monthly period figures for State 1 Wages
and the State 1 Income Tax Withheld. The total of all twelve periods
totaled will be on the employee’s W-2 as State 1 Wages and the State 1
Income Tax Withheld.
State 2 Income
This data item contains the monthly period figures for State 2 Wages
and the State 2 Income Tax Withheld. The total of all twelve periods
totaled will be on the employee’s W-2 as State 2 Wages and the State 2
Income Tax Withheld.
Local 1 Income
This data item contains the monthly period figures for local wages and
local income tax. This is the amount of local income tax that was
withheld from the employee's pay checks. The monthly periods will be
combined with the Local 2 Income Tax Amount and reported on the
employee's W-2 as Local Income Tax Withheld.
Local 2 Income
This data item contains the monthly period figures for additional local
wages and local income tax. This is the amount of local income tax that
was withheld from the employee's pay checks. The monthly periods will
be combined with the Local 1 Income Tax Amount and reported on the
employee's W-2 as Local Income Tax Withheld.
FUTA (Federal
Unemployment Tax)
This data item contains the monthly period figures for taxable amount of
wages for Federal Unemployment Tax calculations.
Page 2-12
Set Up and Maintenance
Chapter 2
Payroll User Manual
SUTA 1 (State
Unemployment Tax for
State 1)
SUTA 2 (State
Unemployment Tax for
State 2)
This data item contains the monthly period figures for taxable amount of
wages for State Unemployment Tax calculations.
This data item contains the monthly period figures for taxable amount of
wages for State Unemployment Tax calculations.
Direct Deposit
This data item contains the monthly period figures for future use.
Weeks Worked
This data item contains the monthly period figures for number of weeks
worked. This is the actual number of weeks for each pay cycle in which
the employee was paid. The figures will be reported on the pay
summaries and unemployment reports. Press ENTER to validate this
screen and return to the main employee data entry screen.
<Click> on the "Save" button to validate this screen and return to the
main employee data entry screen.
Tax Table
<Click> on this button, and the system allows you to enter the tax table data on another data entry screen. This
includes the tax table number, primary and secondary exemptions, and additional annual exemption amounts for five
tax tables. The following is an explanation of each of the data items on this screen:
FIT Table
This data item contains the tax table that you want the system to use to
calculate the federal income tax for this employee.
SIT Table
This data item contains the primary tax table that you want the system to
use to calculate the state income tax for this employee. Some states
require a two step process to complete the calculation of the state income
tax. If this is the case, you may use the Add. SIT table for the secondary
calculation. You must set up at least one state tax table for each
employee for the system to be able to calculate the State Unemployment
taxes (even though there may not actually be any state tax).
Add. SIT
This data item contains the Additional SIT or secondary tax table that
you want the system to use to calculate the state income tax for this
employee.
LIT Table
This data item contains the primary tax table that you want the system to
use to calculate the local income tax for this employee. Some local areas
require a two step process to complete the calculation of the local income
tax. If this is the case, you may use the Add. LIT table for the secondary
calculation.
Add LIT
This data item contains the Additional LIT or secondary tax table that
you want the system to use to calculate the local income tax for this
employee. Each data item includes the tax table number, primary and
secondary exemptions, and additional annual exemption amounts for five
tax tables.
Tax Table Number
This is the number of the tax table specified for this data item.
Primary Exemption
This field contains the number of primary exemption claimed by the
employee for the specified tax table. When tax calculations are
performed, the system will reduce the employee's taxable wage base by
the result of the Primary Exemption Amount in the tax table times this
number. If the primary exemption is set to 99, the system will skip the
tax calculation for this table.
Chapter 2
Setup and Maintenance
Page 2-13
Payroll User Manual
Secondary Exemption
This field contains the number of secondary exemption claimed by the
employee for the specified tax table. When tax calculations are
performed, the system will reduce the employee's taxable wage base by
the result of the Secondary Exemption Amount in the tax table times
this number.
Additional Exemption
Amount
This field contains any additional exemption dollar amount that will
reduce the employee's taxable wages base. This dollar amount must be
expressed as an annualized figure.
NOTE: This is not the data item that is used for Additional FIT. In order
for the system to calculate Additional FIT, you must use a special pay
type. Refer to the “Set Up Special Pay Type” section in this chapter for
more information. To handle additional state and local tax, a separate tax
table must be used.
<Click> the “Save” button to validate this screen and return to the main
employee data entry screen.
Accumulator
<Click> on this button, and the system allows you to enter the
accumulating data on another data entry screen. Accumulators are those
“Special Pay Types” for which you would like the system to track the on
a period by period basis. You can allocate up to two hundred (200)
accumulators foe each employee. The Special Pay Types that you define
on a pay check will automatically create these accumulators in the
employees file on the fly when the checks are printed. Reports can be run
monthly, quarter-to-date or year-to-date.
For each accumulator to be defined, enter the special pay type number or
<click> the Down Arrow (F2 by default) to scroll through the Special
Pay Type file to make your selection. Once the special pay type is
selected, the system will display the pay type description and then allow
you to enter monthly figures.
The accumulating data for these Special Pay Types can be printed
through several reports. These accumulators are excellent tools for
tracking deductions such as insurance, pension benefits, etc. When you
have set up the necessary accumulators for this employee, <click> on the
"Save" button to validate this screen and return to the main employee
data entry screen.
Pay Types
<Click> on this button, and the system allows you to enter the special pay type data on another data entry screen.
You may set up twenty (20) special pay types per employee. These must be set up in the Special Pay Type file.
These special pay types may also be changed while entering the employee's pay data. All Special Pay Type
information that is defined on a pay check will automatically create accumulators that store the period-by-period
information for that employee.
For each special pay type that you want to set up, you may enter the special pay type number or <click> the Down
Arrow (F2 by default) to scroll through the Special Pay Type file to make your selection. Once the special pay type
is selected, the system will display the pay type description and then allow you to enter the following information:
Once the special pay type is selected, the system will display the pay type description and then allow you to enter
the following information:
Page 2-14
Set Up and Maintenance
Chapter 2
Payroll User Manual
WC
This field allows you to classify whether certain earnings (such as
bonuses, commissions, etc.) should be used in calculating the Workers'
Compensation (WC) liabilities. <Clicking> "on" the checkbox for this
field will update the default WC class for the employee. To use this
option, there must be a WC class set up in the employee's master record.
Perm
This field indicates to the system whether or not the special pay type is
permanent. If the special pay type is permanent, <click> on this
checkbox and this pay type will remain in the employee's pay data until
manually removed. If the special pay type is temporary, leave this
checkbox blank and the system will remove this pay type when the
option to “Print Checks” is executed. If you will be utilizing the “Max
Per Check” or the “Max Per Year” fields, this option must be set to
(Y)es.
Recursions
This field contains a number (0 - 999) which indicates to the system how
many recurrences this special pay type will have. This will only be used
if the pay type is NOT permanent. When the option to “Print Checks” is
selected, the system will reduce this number by one until it reaches 0, at
which time it will be removed. This is a special feature which gives you
the ability to, for example, deduct an amount from an employee's check
for a specified number of pay cycles to repay a loan or advance. This is
very significant for those companies dealing in deferred compensation
plans such as 401K plans where there may be a cap on the amount of
money that can be contributed to the plan. Keep in mind that this feature
stays with the employee across fiscal years so loans and other deductions
can be tracked until they reach a zero balance. Further, if the last
remaining balance for the last period is less than the amount set up in this
option, only the remaining balance will be deducted to complete the
cycle to zero.
NOTE: This is the number of times this special pay type is to occur in
addition to this pay cycle. So if this pay type is only for this pay cycle
(one time only), you would indicate a 0 in the number of recurrences. If
you would like this special pay type to occur two times, you would
indicate a one in the number of recurrences field.
Type
This field allows you to select from three options which allow you to specify calculations for each special pay type
added on this screen. If you <click> on the “Pull Down” the following choices appear:
1) Fixed
This calculation method is the most basic. Choose “fixed” so that you
may directly specify the amount to be “added” or “deducted” for this
special pay type. You will enter the amount in the following field
“Amount.”
2) Pct.
This method allows you to enter a percentage number in the following
field “Amount” and specifies to the system to calculate the percentage
entered against the total Gross Earnings for the pay cycle. This
calculated amount will then automatically either be “added” or
“deducted” for this special pay type.
Chapter 2
Setup and Maintenance
Page 2-15
Payroll User Manual
3) $/Hr.
This method allows you to enter a dollar amount in the following field
“Amount” and specifies to the system to calculate the total number of
hours allocated during each pay cycle times the dollar amount entered.
This calculated amount will then automatically either be “added” or
“deducted” for this special pay type. This method is very useful in the
calculation of dues for various types of organizations such as unions.
Amount
This field contains the actual amount of the special pay type. This will be
the amount of the deduction, extra earning, additional FIT, etc. If you
have specified either Type 2 or 3 from the previous field “Type,” you
will be able to enter either a percentage number (e.g., 2%) or an amount
to be used in a calculation based on total number of hours worked per
pay cycle respectively.
If you entered Type 1, all that is required is to enter the actual net dollar
amount for each special pay type. You will be allowed to change, or
remove, the amounts at the time the pay data is entered for the employee.
Max Per Check
This field contains the maximum amount to be automatically calculated
for any one check for this employee. When the Special Pay Type amount
is calculated for a check, it is checked against this amount and will only
calculate an amount up to this amount. Although this is an automatic
calculation, it may be overridden at the time the pay data information is
entered.
Max Per Year
This field contains the maximum amount for the year. This field will take
the year-to-date accumulated and checks to make sure that the amount
calculated for any given check plus this accumulated amount is over this
maximum per year amount. Although this is an automatic calculation, it
may be overridden at the time the pay data information is entered.
Remaining Balance
This field keeps a running total that is decremented with each check
written and will not allow any automatic calculation to be more than the
remaining balance. Although this is an automatic calculation, it may be
overridden at the time the pay data information is entered.
When you have set up the necessary special pay types for this employee,
<click> on the “Save” button to validate this screen and return to the
main employee data entry screen.
Direct Deposit
If you have integration with the Infinity POWER Check Reconciliation
module turned on, you will have access to this option. Otherwise, the
system will skip this option. <Click> on this button, and the system
allows you to define Payroll Direct Deposit information regarding the
Bank Account Numbers, Routing Numbers and dollar amounts to
deposit.
You may set up to four (4) Direct Deposit accounts per employee. The
system will display the input screen and then allow you to enter the
following information.
Account #
This field contains the employee's bank account number to which a
portion or total amount of his paycheck will be deposited to. It is very
important that the entry of the account number is exact. When you
<click> on the checkbox to “Generate Prenote” it will create a batch
record in the EFT Batch File in the Check Reconciliation module. This
prenote information will be sent when the next batch is processed and
transmitted electronically (via modem). The EFT Company will be
verifying that this account number is correct.
Page 2-16
Set Up and Maintenance
Chapter 2
Payroll User Manual
Route#
This field contains the employee's bank account routing number which
corresponds to the “Account #” field. It is very important that the entry
of the routing number is exact. When you <click> on the checkbox to
“Generate Prenote” it will create a batch record in the EFT Batch File
in the Check Reconciliation module. This prenote information will be
sent when the next batch is processed and transmitted electronically (via
modem). The EFT Company will be verifying that this account number is
correct.
This is a nine (9) character field in which to enter the routing number for
your bank account. The nine character format will verify that it meets
with the United States requirements and performs a validation check
when a nine digit number is entered into this field. You may also enter a
six (6) digit number into this field for use in the United Kingdom and
other countries. However, when a six digit number is entered into this
field, no validation of what is being entered is being done by the system.
Account Type
This field is a Checking or Saving question to define whether the account
number that will be used to deposit the money is a checking account or a
savings account.
Active
This field allows you to indicate whether this employee's account is
“active” in the Direct Deposit Payroll. <Clicking> “on” the checkbox
for this field will allow the Direct Deposit information for this employee
to take effect upon the next payroll cycle.
Amount Type
This field allows you to select from three options which allow you to
specify calculations for each deposit amount added on this screen. If you
<click> on this field, a small “Pull Down” window will appear with the
following choices:
1) Fixed
2) Pct.
3) Remain
Fixed
This calculation method is the most basic. Choose “fixed” so that you
may directly specify the amount to be “deposited” in this account. You
will enter the amount in the following field “Amount.” This method
allows you to enter a percentage number in the following field
“Amount” and specifies to the system to calculate the percentage
entered against the total Gross Earnings for the pay cycle. This
calculated amount will be automatically “deposited” in this account. The
amount that is calculated will be shown on either the “Preliminary
Check Summary” or the “Final Check Summary.”
Remain - This method allows you to define that the remaining amount
that is left from the employee's pay check (due to other distributions)
will be automatically “deposited” in this account.
You cannot enter any amount in the “Amount” field, for the system
automatically calculates the amount remaining. The amount that is
calculated will be shown on either the “Preliminary Check Summary”
or the “Final Check Summary.” If the “Remain” type is utilized, there
should not be any other accounts defined after that line item as there will
be no funds available.
Chapter 2
Setup and Maintenance
Page 2-17
Payroll User Manual
Amount
This field contains the actual amount of the deposit to this account. If you
have entered Type 1, all that is required is to enter the actual net dollar
amount to be “deposited” in that account. If you have specified Type 2
from the previous field “Type,” you will be able to enter a percentage
number (e.g., 2%).
If at this point, you have entered a Type 1 and/or a Type 2 and you have
not completely distributed the net check amount, a normal paycheck will
print with the remaining amount. Otherwise, you have the option to
deposit the “Remain” amount to an account with a Type 3. If you have
specified Type 3 from the previous field “Type,” you will be able to
define that the remaining amount of the net check will be “deposited” to
this account.
When you have set up the necessary Direct Deposit Account
Information for this employee, <click> on the "Save" button to validate
this screen and return to the main employee data entry screen.
W-2
This data item allows you to define certain types of employees for W-2 printing. The system will display a window
and allow you to specify which items in the designated box the W-2 form should be checked for this employee.
These tax rules tend to change from year to year, so you must consult the current year's tax guide to verify if any of
these questions apply to a particular employee.
NOTE
If an employee is not entered in the W-2 screen, their employee data will not
print on the actual W-2 form.
The following table describes the details of this screen:
Considered a Statutory
Employee
<Click> "on" the checkbox for employees whose earnings are subject to
Social Security but NOT subject to Federal Income Tax withholding.
(See Circular E for more information on statutory employees).
Participant in a
Retirement Pension Plan
<Click> “on” the checkbox for employees who were actively
participating (for any part of the year) in a retirement plan (including a
Page 2-18
Set Up and Maintenance
Chapter 2
Payroll User Manual
simplified employee pension (SEP) plan) maintained by you. See IRS
Notice 87-16 published in Internal Revenue Bulletin 1987-5, dated
February 2, 1987, for definition of an active participant.
Contributed to Deferred
Comp. Plan
<Click> "on" the checkbox if you made contributions on behalf of the
employee to a section 401(k), 403(b), 408(k)(6), 457, or 501(c)(18)(D)
retirement plan. When you have defined the necessary W-2 Status for
this employee, press END to jump to the validation line and the ENTER
to validate this screen.
Third Party Sick Pay
<Click> "on" the checkbox if you have an employee who has received
third party sick pay compensation during the year.
First Name
This is the first name that will print on your W-2 or used in the Magnetic
Media Reporting options. The combination of the First Name and the
Last Name fields in this section must be entered exactly as shown on
your original Social Security Card. You may enter your First Name
and/or Middle Name/Initial into this field.
Last Name
This is the last name that will print on your W-2 or used in the Magnetic
Media Reporting options. The combination of the First Name and the
Last Name fields in this section must be entered exactly as shown on
your original Social Security Card. DO NOT ENTER ANYTHING
OTHER THAN YOUR LAST NAME INTO THIS FIELD! Do not
include any Jr., Sr., III, or other trailing titles as part of your last name.
<Click> the "Save" button to validate the employee information that is being added.
To save all information entered for this employee, <click> on the “Save” button on the main employee entry screen.
Results:
coPR1cy.dbf - Employee File
- All Employee Information set up
Change Mode (PR0402)
This option allows you to change information on an existing employee. If you have made any mistakes during this
set up process, you may change any information you have already entered.
First, you must navigate to the record you wish to change. You may find a record using the navigation tool bar or
<click> on the “Navigation” option on the Menu Bar and then the appropriate navigation option. If you are
changing a record, <click> on the “Modify the Current Record” button or choose the “Operation” option from the
Menu Bar and then “Change.” Make the changes required and <click> on the “Save” button to save your changes
or <click> on the “Cancel” button to cancel the changes made.
Results:
coPR1cy.dbf - Employee File
- All Employee Information updated
Delete Mode (PR0403)
This option allows you to delete an existing employee. Do NOT delete an employee which has had pay information
in the current year. This will cause governmental reporting, such as W-2 and quarterly reports to be incorrect.
This option allows you to delete employees that you may have entered by mistake, or you no longer want. First, you
must navigate to the record you wish to delete. You may find a record using the navigation tool bar or <click> on
the “Navigation” option on the Menu Bar and then the appropriate navigation option. This option allows you to
Chapter 2
Setup and Maintenance
Page 2-19
Payroll User Manual
delete sales codes that you may have entered by mistake, or you no longer want. <Click> on the “Delete the Current
Record” button or choose the “Operation” option from the Menu Bar and then “Delete.” This will place you into
the “Delete” mode, then <click> on “Save” to validate your deletion of this record.
Make sure this is what you want to do, because once an employee is deleted, it can not be retrieved again.
NOTE
You should not normally use this option to delete employees that are no
longer with your company. The system will automatically remove terminated
employees, based on their status, when you perform the “Start New Year's
Files” option. You may change an employee's status by executing the
“Change an Employee” option. This will insure that all information is
available to print the W-2 forms for employees having worked in the current
year.
Results:
coPR1cy.dbf - Employee File
- Employee Information is marked for deletion
Copy Mode (PR0404)
This option allows you to create a new employee by copying the information from an existing one. This option is
very useful when setting up similar employees or renumbering employees.
Using this option, the system provides a quick method of setting up employees that are very similar. First, you must
navigate to the record you wish to copy from. You may find a record using the navigation tool bar or <click> on the
“Navigation” option on the Menu Bar and then the appropriate navigation option. <Click> on the “Create a Record
Based on the Current Record” button or choose the “Operation” option from the Menu Bar and then “Copy.”
You will notice all the information, except for the employee number, will be copied to a new record. Enter the new
employee number for this record. At this point you may choose to edit any of the information or <click> on the
“Save” button to validate, which will then add it to the file.
Results:
coPR1cy.dbf - Employee File
- All Employee Information set up
IMPORT EMPLOYEES (PR0601)
The File Import options allow you to bring information into the appropriate modules from text, or ASCII files. Word
processors, spreadsheets, databases, or many other types of programs may create these text files. This option is
designed to allow you to import Employees directly into the Payroll module.
When you select the option to “Import Employees,” a new screen will appear. At this point, you may choose to print
the standard map file or create a map file on the hard drive to modify. To print the map file, <click> on the “Print
Map” button. This will print out the format in which this option is looking for information to be organized in. To
create a map file in the program directory, <click> on the “Create Map” button. If the import file is a comma
delimited file, the data can be variable length. If the import file is a fixed length ASCII file, it must have a logical
record length of 389 bytes. Both types of files must have the following field lengths.
Description
Type
Position Length
Action #
CHAR
1
1
Employee #
STRING
2
12
Name
STRING
14
30
Addr. 1
STRING
44
25
Page 2-20
Set Up and Maintenance
Chapter 2
Payroll User Manual
Description
Type
Position Length
Addr. 2
STRING
69
25
City
STRING
94
15
State
STRING
109
2
Zip
STRING
111
10
Phone
STRING
121
14
SS#
STRING
135
12
Marital Status
STRING
147
1
Active Status
CHAR
148
1
Comments
STRING
149
50
Home Dept.
STRING
199
10
Default WC Code
STRING
199
10
Type (H=72, S=83)
CHAR
213
3
Cycle (1-8)
CHAR
216
1
Normal Hours
FLOAT
217
10
Pay Rate
FLOAT
227
10
Previous Pay Rate
FLOAT
237
10
FIT Table
STRING
247
5
SIT Table #1
STRING
252
5
SIT Table #2
STRING
257
5
LIT Table #1
STRING
262
5
LIT Table #2
STRING
267
5
FIT Prim. Ex.
CHAR
272
2
SIT #1 Prim. Ex.
CHAR
274
2
SIT #2 Prim. Ex.
CHAR
276
2
LIT #1 Prim. Ex.
CHAR
278
2
LIT #2 Prim. Ex.
CHAR
280
2
FIT Sec. Ex
CHAR
282
2
SIT #1 Sec. Ex.
CHAR
284
2
SIT #2 Sec. Ex.
CHAR
286
2
LIT #2 Sec. Ex.
CHAR
288
2
LIT #2 Sec. Ex.
CHAR
290
2
FIT #1 Add. Ex.
FLOAT
292
10
SIT #1 Add. Ex.
FLOAT
302
10
SIT #2 Add. Ex.
FLOAT
312
10
LIT #1 Add. Ex.
FLOAT
322
10
Chapter 2
Setup and Maintenance
Page 2-21
Payroll User Manual
Description
Type
Position Length
LIT #2 Add. Ex.
FLOAT
332
10
Birth Date
STRING
342
6
Start Date
STRING
348
6
Last Review Date
STRING
354
6
Next Review Date
STRING
360
6
If it is not in this format, you will encounter errors during the import process or not be allowed to continue at all.
The File Import features allow for the importing of “text” file information into the Infinity POWER program. This
includes the ability to import Master File information, such as Charts of Accounts, Customer Names and Addresses,
Employees, Vendors, etc. as well as “transaction” information for those master files, such as invoices and credit
memos, journal entry updates, etc.
These “text” files may be created by a wide range of sources, which may include word processors, spreadsheets,
databases, or other types of accounting programs. These sources may also include other computer systems that
utilize different operating systems and functions, such as mainframes, minicomputers, or various types of PCs.
After printing or creating the map file, you will then be prompted for three (3) data items.
•
Import File Format
•
Import File Name
•
Process Import File
The “Import File Format” is prompting you to select the type of file you will be using during the import process.
There are three choices:
•
Fixed Length (ASCII)
•
Variable Length (ASCII)
•
Comma Delimited (.PRN)
These three choices are described below.
Fixed Length ASCII Files
Fixed Length ASCII “text” Files are those files in which each data field starts on a specific number of characters
from the start of each record. There should be no separators between data fields and each record should be the exact
same length. The program recognizes each record by the number of characters that is expected per record. There is
no Carriage Return/Line Feed sequence necessary to separate records.
For example:
1
11125 Cash In Bank - Can 1 0
1
68500 Lodging Expense
0
0
0
0
0
0
0
0
0
0
0
0
12 0 100 200 300 400 500 600 700 800 900 1000 1100 1200
Variable Length ASCII Files
Variable Length ASCII “text” Files are those files in which each data field starts on a specific number of characters
from the start of each record and each record is separated by a Carriage Return/Line Feed sequence {CR}{LF}.
There should be no separators between data fields. The program recognizes each record by the Carriage Return/Line
Feed sequence, which allows for other data to be in the file.
For example:
Page 2-22
Set Up and Maintenance
Chapter 2
Payroll User Manual
1
11125 Cash In Bank - Can 1 0
1
68500 Lodging Expense
0
0
0
0
0
0
0
0
0
0
0
0 {CR}{LF}
12 0 100 200 300 400 500 600 700 800 900 1000 1100 1200 {CR}{LF}
Comma Delimited *.PRN Files
Comma Delimited *.PRN “text” files are those files in which text type data fields are enclosed in double quotes (“),
and all data fields are separated by commas (,). The text files must contain the information for one record on a single
line of the file. Each line, or record, must be terminated by a Carriage Return/Line Feed sequence {CR}{LF}.
For example, a transaction import should look like this:
1,"11125","Cash In Bank - Can",1,0,0,0,0,0,0,0,0,0,0,0,0,0,0{CR}{LF}
1,"68500","Lodging
Expense",12,0,100,200,300,400,500,600,700,800,900,1000,1100,1200{CR}{LF}
<Click> on one of the three choices to define the type of file you will be using. You will be prompted to enter the
name of the file to be imported. You may use any name consistent with Windows naming structures. You will have
the option to browse for your import file, which may be located anywhere on your hard drive or any network you
may be attached to.
Next, you will be prompted as to whether the system should print an audit trail first before starting the import
process. It is highly recommended that you <click> on this option. It is selected by default. This will allow you to
see if there are any discrepancies within your “import” file.
The system will first print an audit trail of what will be imported into the Infinity POWER accounting module.
Upon completion of this report, you will be prompted whether or not to go ahead and process the import of data.
If there are any discrepancies that make your import file incompatible, the Infinity POWER import options will not
allow the information to update the system. This audit trail would then serve to assist you in correcting any
problems.
Once you have answered these three questions, <click> on the “Start” button to begin the process and the system
will begin to either print the audit trail first or go ahead and perform the “import” process based upon your answer.
If you have chosen to print the audit trail, the system will display the printer option screen for you to choose your
method of output.
The screen will then reflect the number of transactions that have been posted to the system as it goes through the
import process. Once it completes the “import” process, the system will return you to the screen and if there are
additional files to import, you may <click> on the “Next” button, otherwise, <click> on the “Close” button to return
you to the Menu Bar.
Below is a more comprehensive description of how Import Modules work within the Infinity POWER.
Chapter 2
Setup and Maintenance
Page 2-23
Payroll User Manual
File Import Modules Overview
Because the concept of transferring information from one system or program to another via “text” interface files is
more technical than the normal operation of most word processors or the Infinity POWER modules, this
documentation must assume that the reader has some understanding of the terms and concepts explained here.
Otherwise, you may want to work with your reseller or consultant regarding the actual implementation and use of
these modules with your Infinity POWER programs. The ability of importing information into the Infinity
POWER modules provides the user with several benefits.
•
They allow the rapid conversion and setup from other computer based accounting systems,
without the manual re-keying of information that is normally required.
•
They allow the batch entry of transactions processed in other specialized or custom software
programs. This may even include updates from Infinity modules running at different locations or
on different network or Linux fileservers.
•
They allow the update of the accounting system files from remote transaction processing sites.
Please note that the Infinity POWER programs do allow for the exportation of all accounting reports to text files.
The formats of these standard Infinity POWER reports, however, are not compatible with the use of any of the
Infinity POWER File Import options. The order in which information is sent to “text” files and their format do not
correspond to the formats that the File Import Modules require.
The Infinity POWER Report Writer program, however, does provide the user with this ability to organize
information from the various Infinity POWER programs into the formats required by the File Import options. The
text files that contain the information to be imported must be in one of three forms:
Fixed Length ASCII Records
Variable length ASCII Records
Comma Delimited Text
These three types of files are discussed earlier in this section. For all three types of text files, the format of the data
must be accurate for the import options to read the correct information. Each field, or data item, must be in the
correct order across the line, or record, and in the correct format depending on the type of text file.
Each of the import options allow you to print a transaction journal as the import is being performed. This provides
an audit trail of the information being updated into your data files. This report will also indicate if the import of a
record was not performed due to errors encountered in the importation process.
Some of the import file structures allow you to specify “action numbers.” These “action numbers” tell the system
whether you want the information being imported to be added, changed, or deleted. The action numbers are listed
below.
1 = Add Record to file
2 = Change record in file
3 = Delete record in file
4 = Add record if it doesn't exist, otherwise change it
Some of the transaction import file structures require a field called “Cont? (0=NO, 1=YES).” This field indicates to
the import programs whether or not the transaction is continued in the next record. For example, in the Accounts
Receivable Transaction import, there may be several lines of detail on an invoice that is being imported. Each line
should be placed in a separate record of the text file with a “1” for YES to indicate that the transaction is continued.
The last line should contain a “0” for NO indicating the end of the transaction.
For each transaction-related import, there are certain fields that are required and used by the system to verify the
validity of the information being imported. These fields are marked in the field definition section with an asterisk
(*).
Page 2-24
Set Up and Maintenance
Chapter 2
Payroll User Manual
For each type of import that you wish to perform, the import text file must contain all of the fields specified for that
particular import option. Any text fields that are blank will overwrite existing fields in the data files. Also, numeric
fields that are blank will be considered as zero.
To allow the import of only a subset of the import structure, you must have a custom “MAP” file created. This will
allow you, for example, to only update the retail price in Inventory without affecting, or requiring, any other fields.
You may obtain or create custom import “MAP” files one of two ways. You may first <click> on the “Create
Map” button at the point in the program when you have selected the “import” option. The result is to produce a
“XXXXXX.map” file in the program directory. The “Xs” in this file name represent the actual name of the Infinity
POWER option within the program (e.g., AP0604.MAP).
The “XXXXXX.map” file is used by the import option to override the default layout of the import transaction file.
By using file editing tools such as EDIT under the DOS shell, Notepad under Windows or “vi” under Linux, you
may create a customized import record layout. Whenever a “XXXXXX.map” file is created, it overrides the default
predefined import record layout.
Items can be deleted entirely from the record layout file or moved from one position to another. If a field is not
specified in an import file, that field may be deleted from the record layout file.
NOTE
“Key Value” fields must be present in the import file and cannot be deleted
from the record layout file. “Key Value” fields are those fields that are
designated with an asterisk (*) in the documented import record layouts. You
may also have customized “MAP” files created for you by calling the Data
Pro Support Services group at 727-803-1550.
Chapter 2
Setup and Maintenance
Page 2-25
Payroll User Manual
Sample Import Employees File
Page 2-26
Set Up and Maintenance
Chapter 2
Payroll User Manual
Chapter 2
Setup and Maintenance
Page 2-27
Payroll User Manual
Page 2-28
Set Up and Maintenance
Chapter 2
Payroll User Manual
Chapter 2
Setup and Maintenance
Page 2-29
Payroll User Manual
Page 2-30
Set Up and Maintenance
Chapter 2
Payroll User Manual
Chapter 2
Setup and Maintenance
Page 2-31
Payroll User Manual
RENAME PR EMPLOYEE NUMBER (PR0450)
This option was designed to allow a user to modify existing Payroll Employee Numbers in all applicable fields. The
following pages will describe the changes that will take place during normal processing when this menu option is
executed.
NOTE
Although this option will perform a series of “record locks” as necessary as
it goes through all of the integrated files as it “renames” all of the appropriate
transactions, records, and notes attached to the master records, this function is
not designed to be run by multiple users at one time. More importantly,
before you proceed to use this option, make sure that all other accounting
users are logged out of the entire accounting system before you proceed.
Otherwise, users may receive “record locked” error messages during the
processing of this function or during their normal transaction processing. If
they do not read the screen and follow proper instructions, incomplete updates
may occur and invalidate your intended efforts and jeopardize new accounting
transactions.
ALWAYS MAKE SURE TO HAVE A COMPLETE DATA BACKUP
PRIOR TO RUNNING THIS OPTION!
For instance, many users may desire to rename a single employee number which has a great deal of history or
transactions posted to it over time. This would only be possible with a special function like this with a unique
capability to update all of the files where the Payroll Employee Number has been updated. The following section
provides a listing of the files that will be updated once this menu option has been selected and the employee
numbers defined.
NOTE
You MUST perform the Rename function for each fiscal year you want the
rename to be applied.
When you choose this menu option and enter the Old Employee # and New Employee #, the following screen will
appear: Notice that the Old Employee # field allows users to <click> on the Down Arrow (F2 by default) to select
from the existing Employee File. Once selected, you may then enter the new Employee Number in which you want
to convert. The section of the screen below will display a “Processing Log” of the various files in all of the related
accounting modules and the number of records in each file that have been affected by the change.
Page 2-32
Set Up and Maintenance
Chapter 2
Payroll User Manual
When done, the screen will state “Processing Completed” and you may <click> on the “Close” button to return to
the menu.
Chapter 2
File Name
Fields Modified
PAYROLL
PR01 (xxxPR1cy.dbf) Payroll Employee File
NUM
PR02 (xxxPR2cy.dbf) Payroll Transaction File
ENUM
PR06 (xxxPR6.dbf) Payroll Employee Comments File
ENUM
PR11 (xxxPRB.dbf) Current Pay Data Work File
EMPNUM
PR12 (xxxPRCcy.dbf) PR Detailed Transaction File
ENUM
PR22 (xxxPRMcy.dbf) PR History Accumulator File
ENUM
TE01 (xxxTE1.dbf) Timesheet Entry File
ENUM
Setup and Maintenance
Page 2-33
Payroll User Manual
SET UP DEPARTMENTS
This section discusses the ways to set up, change, delete and copy departments. It also discusses how to print the
Department Listing that is used to verify all information input into the department file. You may only access these
options if you have turned the Department Breakdown data item in the Master Configuration on. If this is turned
on, the system will allow you to distribute each employee's wages between departments and also allocate overhead
expenses to departments. If you are not using departments, skip over this section and proceed to Set Up Special Pay
Types.
You may add “notes” to any Department that may be viewed on the screen for additional information or planning.
This may be done when viewing an inquiry, adding a new department, changing an existing department or copying a
department.
By <clicking> on the Note Pad Button, a screen will appear that will allow you to add or review free-form notes. If
you are adding a new record, navigation is not required. <Click> on the “Create a New Record” button or choose
the “Operation” option from the Menu Bar and then “Add.” A screen will appear with the current data and time.
You will be prompted for a description of fifty (50) characters, which is used as part of the display when selecting to
review existing notes. Each note recorded has up to ten (10) lines of fifty characters each which may be used for
your free-form notes.
Once notes are added to the file, they can be reviewed at any time by accessing the account through an inquiry mode
or a change mode and then <clicking> on the Note Pad Button. Once this screen is displayed you will have the tool
bar navigation options to select the first detail record, select the next record detail, select the previous record detail,
select the last record in the detail list or search through the detail records. You may then view the notes for this
record.
If you have set up User-Definable Fields in either the Windows Character-based or UNIX products, you will be
able to view and change data information in these fields. By <clicking> on the “User Fields” button, you will
access an additional screen of data fields. If you are in an Inquiry Mode, then you will be able to view these fields.
If you are in a Change or Copy Mode, you will be able to modify the information in these fields. You must make
sure that your General Configuration options are set up to allow access to User-Definable Fields.
Inquiry Mode (PR0404)
This option allows you to review all department information. You may press the “Details” button to view the
monthly departmental information.
Navigate to the record you wish to view. You may find a record using the navigation tool bar or <click> on the
“Navigation” option on the Menu Bar and then the appropriate navigation option. Once the department has
appeared on the screen, you may review the department information. This information includes the description,
overhead factor and general ledger chart of account numbers for the wages and expense accounts.
Add Mode (PR0405)
This option allows you to set up new departments. The use of departments is optional, and may be utilized only if
you wish to have departmental payroll analysis and reporting.
The top portion of the screen will be used to define the department description, overhead factor, and account
numbers. The "Details" button will display a scrolling screen which maintains the wages and expense amounts and
hours worked for each month of the year.
When adding a new record, navigation is not required. <Click> on the “Create a New Record” button or choose the
“Operation” option from the Menu Bar and then “Add.” The following is an explanation of each of the data items
set up on a department.
Page 2-34
Set Up and Maintenance
Chapter 2
Payroll User Manual
Department
This is a ten (10) character designator for the department you are adding.
Description
This is a twenty (20) character description of the department which will
be displayed on all reports and screens.
Overhead Factor
This data item contains the factor that you wish the system to use to
allocate overhead expenses to this department. For each payroll
processed, the system will multiply this factor by the total wages that are
expensed to this department. This overhead expense will then be
allocated to this department using the “GL Expense Account” and
credited to the “Dept. OH Expense Credit” account in the main
company. By using this overhead factor, you may allocate to each
department its portion of the overhead expenses normally expensed to the
main company.
GL Wages Account
This data item contains the General Ledger account that will be used to
post the normal wages to this department. You may <click> Down
Arrow (F2 by default) and choose the desired General Ledger account.
The system allows the entry of General Ledger Account Numbers even
when the integration to GL is turned “OFF” in the System Integration
section of the Payroll Configuration option. HINT: If you are not
running General Ledger, you can run Payroll and print an account
summary to obtain the GL entries that are needed to be posted to your
accounting system.
GL Expense Account
This data item contains the General Ledger account that will be used to
post the overhead expenses that will be calculated if you have set up an
Overhead Factor for this department. The system allows the entry of
General Ledger Account Numbers even when the integration to GL is
turned “OFF” in the System Integration section of the Payroll
Configuration option. HINT: If you are not running General Ledger,
you can run Payroll and print an account summary to obtain the GL
entries that are needed to be posted to your accounting system.
<Click> on the "Details" button to display a scrolling window which contains the wages and expenses amounts and
the hours worked for each month of the year.
The Wages and Expenses amount will be the total of all wages for employees that have been allocated to this
department and any overhead expenses that have been calculated for this department. The Hours Worked will be the
number of hours for all employees that have been allocated to this department. These figures will be automatically
updated when using “Enter Transactions” menu options to process your payroll.
Results:
coPR3cy.dbf - Department File
- All Department Information set up
- Period Wages, Expenses and Hours Worked updated
Chapter 2
Setup and Maintenance
Page 2-35
Payroll User Manual
Change Mode (PR0406)
This option allows you to change information on an existing department. After initial set up, any changes to the
Wages and Expenses or Hours Worked should be made through the “Enter Transactions” option in order to
maintain an audit trail.
If you have made any mistakes during this set up process, you may return to change any information you have
already entered.
First, you must navigate to the record you wish to change. You may find a record using the navigation tool bar or
<click> on the “Navigation” option on the Menu Bar and then the appropriate navigation option. If you are
changing a record, <click> on the “Modify the Current Record” button or choose the “Operation” option from the
Menu Bar and then “Change.” Make the changes required and <click> on the “Save” button to save your changes
or <click> on the “Cancel” button to cancel the changes made.
Results:
coPR3cy.dbf - Department File
- All Department Information is set up
- Period Wages, Expenses and Hours Worked updated
Delete Mode (PR0407)
This option allows you to delete an existing department. You cannot delete a department which has had activity in
the current period. This would distort your Year-to-Date pay summary figures.
This option allows you to delete departments that you may have entered by mistake, or you no longer want.
First, you must navigate to the record you wish to delete. You may find a record using the navigation tool bar or
<click> on the “Navigation” option on the Menu Bar and then the appropriate navigation option. This option allows
you to delete sales codes that you may have entered by mistake, or you no longer want. <Click> on the “Delete the
Current Record” button or choose the “Operation” option from the Menu Bar and then “Delete.” This will place
you into the “Delete” mode, then <click> on “Save” to validate your deletion of this record.
Make sure this is what you want to do, because once a department is deleted, it cannot be retrieved again.
Results:
coPR3cy.dbf - Department File
- Department information is marked for deletion
Copy Mode (PR0408)
This option allows you to create a new department by copying the information from an existing one. This option is
very useful when setting up similar departments or renumbering departments.
Using this option, the system provides a quick method of setting up departments that are very similar. First, you
must navigate to the record you wish to copy from. You may find a record using the navigation tool bar or <click>
on the “Navigation” option on the Menu Bar and then the appropriate navigation option. <Click> on the “Create a
Record Based on the Current Record” button or choose the “Operation” option from the Menu Bar and then
“Copy.”
You will notice all the information, except for the department number, will be copied to a new record. Enter the new
department number for this record. At this point, you may choose to edit any of the information or <click> on the
“Save” button to validate, which will then add it to the file.
Page 2-36
Set Up and Maintenance
Chapter 2
Payroll User Manual
Results:
coPR3cy.dbf - Department File
- All Department Information set up
- Period Wages, Expenses, and Hours Worked updated
SET UP SPECIAL PAY TYPES
This section discusses the ways to set up, change, delete and copy Special Pay Types. It also discusses how to print
the Special Pay Type Listing that is used to verify all information input into the Special Pay Type file. Special Pay
Type are the codes that you will be using to enter some of your pay data, such as commissions, bonuses, insurance
deductions, deferred compensation plans (401K), non-payroll payments etc. You should use these options to set up
the codes that you think will be necessary to enter all of your payroll information.
You may add “notes” to any Special Pay Type that may be viewed on the screen for additional information or
planning. This may be done when viewing an inquiry, adding a new special pay type, changing an existing special
pay type or copying a special pay type.
By <clicking> on the Note Pad Button, a screen will appear that will allow you to add or review free-form notes. If
you are adding a new record, navigation is not required. <Click> on the “Create a New Record” button or choose
the “Operation” option from the Menu Bar and then “Add.” A screen will appear with the current data and time.
You will be prompted for a description of fifty (50) characters, which is used as part of the display when selecting to
review existing notes. Each note recorded has up to ten (10) lines of fifty characters each which may be used for
your free-form notes.
Once notes are added to the file, they can be reviewed at any time by accessing the account through an inquiry mode
or a change mode and then <clicking> on the Note Pad Button. Once this screen is displayed you will have the tool
bar navigation options to select the first detail record, select the next record detail, select the previous record detail,
select the last record in the detail list or search through the detail records. You may then view the notes for this
record.
If you have set up User-Definable Fields in either the Windows Character-based or UNIX products, you will be
able to view and change data information in these fields. By <clicking> on the “User Fields” button, you will
access an additional screen of data fields. If you are in an Inquiry Mode, then you will be able to view these fields.
If you are in a Change or Copy Mode, you will be able to modify the information in these fields. You must make
sure that your General Configuration options are set up to allow access to User-Definable Fields.
Inquiry Mode (PR0408)
This option allows you to review all special pay type information. Navigate to the record you wish to view. You
may find a record using the navigation tool bar or <click> on the “Navigation” option on the Menu Bar and then the
appropriate navigation option. Once the special pay type has appeared on the screen, you may review the
information. This information includes the description, type, earning adjustments, department, general ledger
accounts and W2 status.
Inquiry Mode (PR0409)
This option allows you to set up new special pay types. These special pay types can include earning, deduction,
additional withholding, non-payroll payments, tip and/or 401K type pay information. It is a five (5) character
(alpha/numeric) field designed to help in describing deductions and additional earnings for W-2 purposes.
This option allows you to add new special pay types to your Special Pay Type file. For each special pay type, you
may enter the description, type, how it will affect the payroll taxes, account number, and department.
There are several special pay types that are automatically set up for you which may help you during the set up
process. You may want to print the “Special Pay Type Listing” before continuing. A special pay type (FIT), is
included which will handle additional Federal withholding from an employee's pay. To handle additional state or
local taxes (withholding), a tax table must be used. Please refer to the “Add A Tax Table” section.
Chapter 2
Setup and Maintenance
Page 2-37
Payroll User Manual
When adding a new record, navigation is not required. <Click> on the “Create a New Record” button or choose the
“Operation” option from the Menu Bar and then “Add.” The following is an explanation of each of the data items
set up on a special pay type.
Description
This is a twenty (20) character (alpha/numeric) description of the special pay type which will be displayed on all
reports and screens. On any special pay types that are set up for deferred compensation type plans, the first character
of the description has to be the letter for that particular plan. For example:
D 401K Deferred Compensation Plan
E 403(b)
F 408(k)(6)
G 457
H 501(c)(18)(D)
S Simple Retirement Plan
Type
This data item defines how this special pay type will be used in the calculation of the pay data for each employee.
You may <click> on the drop down box and select the type from the menu. The valid types are listed below.
1) Earning
2) Non-Cash Earning
3) Deduction
4) Additional FIT
5) Non PR Payments
A description of each type and examples of each are described below.
Earning (Type 1
This type is used for additional earnings and will be grouped with
the hourly wages or salary. This type could be for Bonus,
Commission, etc.
Non-Cash Earning (Type 2)
This type is for additional earnings that will not actually be paid to
the employee on the payroll check. The amount will be included in
the wages for tax and historical purposes but not paid. This type
could be for Tip, Company Car Benefit, etc. Non-cash earnings will
not be included in the payroll journal entry. Because of this, the
General Ledger account and Department data items (Data Items #5
and #6) will be turned off.
Deduction (Type 3)
This type is for any deductions that may be withheld from the
employee's pay. The amount will be withheld from the pay after
payroll taxes have been calculated. This type could be for Insurance,
Repayment of Advance, etc.
Additional FIT (Type 4)
This type is for withholding an additional amount on each payroll
check for Federal Income Tax. The amount will be in addition to the
taxes calculated from the tax table set up for the employee. Because
this amount will be included with the federal withholding tax, Data
Items #3 through #8 will be turned off.
Non-Payroll Payments (Type
5)
This type is for any additional amounts or deductions to be included
in the employee’s paycheck, but not effect and wages or tax
calculations.
Page 2-38
Set Up and Maintenance
Chapter 2
Payroll User Manual
Adjust FIT Wages
This data item indicates whether or not the amount will affect the
wages subject to federal income tax. “FIT wages” are the total
employee wages subject to Federal Income Tax and FUTA and
SUTA taxes.
If you <click> "on" the checkbox for this data item, the system will
adjust the FIT wages. Earnings Special Pay Types (types #1 and #2)
will increase FIT wages, deductions (type #3) will decrease FIT
wages. If you leave the checkbox blank, the earning or deduction
will have no effect on FIT wages. The normal response should be
"on" for earnings and "blank" for deductions.
An example of when to turn this item on for a deduction would be
for a 401K deduction. The 401K plan is similar to an IRA in which
the amount invested in the plan is not subject to FIT. The system will
deduct this amount from the FIT wages before calculating the
payroll taxes.
Adjust Soc. Sec. Wages
This data item indicates whether or not the amount will affect the
wages subject to Federal Social Security tax. “Social Security
Wages” are the total employee wages subject to Social Security Tax.
If you enter (Y)es for this data item, the system will adjust the Social
Security wages. “Earnings” Special Pay Types (types #1 & #2) will
increase Social Security wages while “Deductions” Special Pay
Types (type #3) will decrease Social Security wages.
Adjust Medicare Wages
This data item indicates whether or not the amount will affect the
wages subject to Federal Medicare tax. “Medicare Wages” are the
total employee wages subject to Medicare Tax. If you enter (Y)es for
this data item, the system will adjust the Medicare wages.
“Earnings” Special Pay Types (types #1 & #2) will increase
Medicare wages while “Deductions” Special Pay Types (type #3)
will decrease Medicare wages.
Adjust SIT Wages
This data item indicates whether or not the amount will affect the
wages subject to state income tax. “SIT wages” are the total
employee wages subject to State taxes. If you <click> on the
checkbox for this data item, the system will adjust the SIT wages.
Earnings Special Pay Types (types #1 and #2) will increase SIT
wages, deductions (type #3) will decrease SIT wages. If you leave
the checkbox blank, the earning or deduction will have no effect on
SIT wages. The normal response should be “on” for earnings and
“blank” for deductions.
Adjust Add. SIT
This data item indicates whether or not the amount will affect the
wages subject to additional state income tax. “SIT wages” are the
total employee wages subject to additional State taxes. If you
<click> on the checkbox for this data item, the system will adjust the
additional SIT wages.
Earnings Special Pay Types (types #1 and #2) will increase
additional SIT wages, deductions (type #3) will decrease additional
SIT wages. If you leave the checkbox blank, the earning or
deduction will have no effect on additional SIT wages. The normal
response should be "on" for earnings and "blank" for deductions.
Chapter 2
Setup and Maintenance
Page 2-39
Payroll User Manual
Adjust LIT Wages
This data item indicates whether or not the amount will affect the
wages subject to local income tax. “SIT wages” are the total
employee wages subject to local income taxes. If you <click> on the
checkbox for this data item, the system will adjust the LIT wages.
Earnings Special Pay Types (types #1 and #2) will increase LIT
wages, deductions (type #3) will decrease LIT wages.
If you leave the checkbox blank, the earning or deduction will have
no effect on LIT wages. The normal response should be “on” for
earnings and “blank” for deductions.
Adjust Add. LIT
This data item indicates whether or not the amount will affect the
wages subject to additional local income taxes. “Add. SIT wages”
are the total employee wages subject to additional local taxes. If you
<click> on the checkbox for this data item, the system will adjust the
additional LIT wages.
Earnings Special Pay Types (types #1 and #2) will increase
additional LIT wages, deductions (type #3) will decrease additional
LIT wages. If you leave the checkbox blank, the earning or
deduction will have no effect on additional LIT wages. The normal
response should be "on" for earnings and "blank" for deductions.
Adjust FUTA Wages?
This data item indicates whether or not the amount will affect the
wages subject the Federal Unemployment Taxes. Earnings Special
Pay Types (types #1 and #2) will increase FUTA wages; deductions
(type #3) will decrease FUTA wages.
If you leave this checkbox blank, the earning or deduction will have
no effect on FUTA wages. The normal response should be "on" for
earnings and "blank" for deductions.
Adjust SUTA Wages?
This data item indicates whether or not the amount will affect the
wages subject to State Unemployment Taxes. Earnings Special Pay
Types (types #1 and #2) will increase the SUTA wages; deductions
(type #3) will decrease SUTA wages. If you leave this checkbox
blank, the earning or deduction will have no effect on SUTA wages.
The normal response should be "on" for earnings and "blank" for
deductions.
W-2 Reporting Category
This data item enables Year-to-Date amounts of the Special Pay Type Accumulators to print in the correct boxes on
the W-2 forms.
The categories are as follows:
1) Normal Earnings and Deductions should be used for all special pay types except for those that
qualify in categories 2-5 below.
2) Normal EIC Payments should be used when the special pay type is an Employee's advanced
earned income credit payment.
3) Tip Earnings should be used when the special pay type is used for Tip earnings.
4) Deferred Compensation (401K) should be used when the special pay type is used for contributions
to deferred compensation plans such as: 401(k), 403(b), 408(k)(6), 457, or 501(c)(18)(D).
5) Fringe Benefits should be used when the special pay type is for taxable non-cash fringe benefits.
Page 2-40
Set Up and Maintenance
Chapter 2
Payroll User Manual
6) Dep. Care Benefits represent amounts paid or incurred by an employer for dependent care
assistance for an employee. Assigning this type to a special pay type will make the accumulated
amount print in the Dep. Care box on the W-2.
7) Allocated Tips - Large food or beverage employers with employees who receive tips and report
less than 8% of adjusted gross receipts as tips must show allocated tips on the W-2 form.
Assigning this type to a special pay type will make the accumulated amount print in the Allocated
Tips box on the W-2.
8) Non-qualified Plans are contributions to a profit-sharing or stock bonus plan that are not
considered Qualified Plans by the IRS. Assigning this type to a special pay type will make the
accumulated amount print in the Non-qualified Plans box on the W-2.
9) Section 125 Cafeteria Plans represent Qualified Plans under section 125 of the IRS Guidelines.
Items classified as this type would be printed in the “Other” box on the W-2.
GL Account Number
Expense to Department
This data item contains the General Ledger account that will be used to
post the amount entered for this special pay type. The default will be the
Main Earnings account set up in the Master Configuration, if the type is
an earning (type 1 or 2), or the Main Deduction account if the type is a
deduction (type 3 or 4).
This data item contains the department number of the department that
you would like to allocate the earnings or deductions to. Normally, all
earnings and deductions are allocated to the main company.
Interdepartmental expenses are allocated through the department expense
allocation factor.
However, if you have an earnings code such as “commissions” which
would only apply to one department, this option may be used to directly
allocate the “commission expense” to that one department. If you leave
this data item blank, this will indicate that no direct department allocation
is needed. Or you may enter the department number that you would like
the expense allocated to.
NOTE: If the “Allow Department Breakdown” feature is turned off in
the Master Configuration, this option will be turned off and not
accessible.
<Click> on the “Save” button to validate the special pay type information that is being added.
Results:
coPR4.dbf - Special Pay Type File
- All Special Pay Type Information set up
Change Mode (PR0410)
This option allows you to change information on an existing special pay type. If you have made any mistakes during
this set up process, you may return and change any information you have already entered.
First, you must navigate to the record you wish to change. You may find a record using the navigation tool bar or
<click> on the “Navigation” option on the Menu Bar and then the appropriate navigation option. If you are
changing a record, <click> on the “Modify the Current Record” button or choose the “Operation” option from the
Menu Bar and then “Change.” Make the changes required and <click> on the “Save” button to save your changes
or <click> on the “Cancel” button to cancel the changes made.
Chapter 2
Setup and Maintenance
Page 2-41
Payroll User Manual
Results:
coPR4.dbf - Special Pay Type File
- All Special Pay Type Information updated
Delete Mode (PR0411)
This option allows you to delete special pay types that you may have entered by mistake, or you no longer want.
First, you must navigate to the record you wish to delete. You may find a record using the navigation tool bar or
<click> on the “Navigation” option on the Menu Bar and then the appropriate navigation option. This option allows
you to delete sales codes that you may have entered by mistake, or you no longer want. <Click> on the “Delete the
Current Record” button or choose the “Operation” option from the Menu Bar and then “Delete.” This will place
you into the “Delete” mode, then <click> on “Save” to validate your deletion of this record.
Make sure this is what you want to do, because once a special pay type is deleted, it can not be retrieved again.
Results:
coPR4.dbf - Special Pay Type File
- Special Pay Type Information is marked for deletion
Copy Mode (PR0412)
This option allows you to create a new special pay type by copying the information from an existing one. This
option is very useful when setting up similar special pay types or renumbering special pay types. Using this option,
the system provides a quick method of setting up special pay types that are very similar.
First, you must navigate to the record you wish to copy from. You may find a record using the navigation tool bar or
<click> on the “Navigation” option on the Menu Bar and then the appropriate navigation option. <Click> on the
“Create a Record Based on the Current Record” button or choose the “Operation” option from the Menu Bar and
then “Copy.”
You will notice all the information, except for the special pay type number, will be copied to a new record. Enter the
new special pay type number for this record. At this point, you may choose to edit any of the information or <click>
on the “Save” button to validate, which will then add it to the file.
Results:
coPR4.dbf - Special Pay Type File
- All Special Pay Type Information set up
SET UP TAX TABLES
This section discusses the ways to set up, change, delete, copy and update Tax Tables from master file. It also
discusses how to print the Tax Table Listing that is used to verify all information input into the Tax Table file. These
tax tables will be used by the system to calculate Federal, State, and Local income taxes and unemployment taxes.
For each employee you may assign one Federal tax table, two State tax tables, and two Local tax tables.
Allowing two state and local tables per employee is done to allow you to calculate those taxes in a two step process,
if necessary. All tax tables should be entered based on an annual payroll. The system will automatically perform the
correct conversions for your actual payroll cycle.
You may add “notes” to any Tax Table that may be viewed on the screen for additional information or planning.
This may be done when viewing an inquiry, adding a new tax table, changing an existing tax table or copying a tax
table.
Page 2-42
Set Up and Maintenance
Chapter 2
Payroll User Manual
By <clicking> on the Note Pad Button, a screen will appear that will allow you to add or review free-form notes. If
you are adding a new record, navigation is not required. <Click> on the “Create a New Record” button or choose
the “Operation” option from the Menu Bar and then “Add.” A screen will appear with the current data and time.
You will be prompted for a description of fifty (50) characters, which is used as part of the display when selecting to
review existing notes. Each note recorded has up to ten (10) lines of fifty characters each which may be used for
your free-form notes.
Once notes are added to the file, they can be reviewed at any time by accessing the account through an inquiry mode
or a change mode and then <clicking> on the Note Pad Button. Once this screen is displayed you will have the tool
bar navigation options to select the first detail record, select the next record detail, select the previous record detail,
select the last record in the detail list or search through the detail records. You may then view the notes for this
record.
If you have set up User-Definable Fields in either the Windows Character-based or UNIX products, you will be
able to view and change data information in these fields. By <clicking> on the “User Fields” button, you will
access an additional screen of data fields. If you are in an Inquiry Mode, then you will be able to view these fields.
If you are in a Change or Copy Mode, you will be able to modify the information in these fields. You must make
sure that your General Configuration options are set up to allow access to User-Definable Fields.
Inquiry Mode (PR0412)
This option allows you to review all tax table information. Navigate to the record you wish to view. You may find a
record using the navigation tool bar or <click> on the “Navigation” option on the Menu Bar and then the
appropriate navigation option. Once the tax table has appeared on the screen, you may review the information. This
information includes the description, unemployment tax rate and minimums, general ledger account numbers, and
other information regarding the set up of this specific tax table. You may <click> on the “Details” button to view
the details of the tax calculations.
Add Mode (PR0413)
This option allows you to add new tax tables to your Tax Table file. These tax tables are used to calculate federal,
state, and local withholding amounts for each employee. The top portion of the screen will be used to define the tax
table description, unemployment tax, account numbers, exemption values, and adjustments. The bottom portion of
the screen is a scrolling screen, which contains the tax calculation table.
There are several tax tables that are automatically set up for you, including the Federal Married and Single tables,
which may help you during the set up process. You may want to print the “Tax Table Listing” before continuing.
An example of state withholding is given at the end of this section.
There is one special consideration in the numbering of your tax tables. If you have a secondary state tax that needs
to be printed on the W-2 form separately from the normal state tax amount, you must enter “@” as the first
character of the tax table number. This will indicate to the system that the tax amounts accumulated for this tax table
will be printed in the designated box on the W-2 form. An example of this would be the California SDI Tax.
When adding a new record, navigation is not required. <Click> on the “Create a New Record” button or choose the
“Operation” option from the Menu Bar and then “Add.”
Chapter 2
Setup and Maintenance
Page 2-43
Payroll User Manual
The following is an explanation of each of the data items set up on a tax table.
Description
This is a twenty (20) character description of the tax table which will be
displayed on all reports and screens.
Unemployment Maximum
This data item contains the maximum amount of wages that are subject to
unemployment tax. When the Year-to-Date gross wages of an employee
reaches this amount, the system will no longer calculate unemployment
tax.
Unemployment Tax Rate
This data item contains the unemployment tax rate that will be used when
calculating the unemployment tax. This percentage will be multiplied by
the gross taxable wages of an employee until they reach the maximum.
GL Unemployment Exp.
This data item contains the General Ledger expense account for the
unemployment taxes calculated from this tax table. This account will be
debited at the time the payroll journal entry is calculated.
GL Unemployment Liab.
This data item contains the General Ledger liability, or accrual, account
for the unemployment taxes calculated from this tax table. This account
will be credited at the time the payroll journal entry is calculated.
GL Accrual Account
This data item contains the General Ledger liability, or accrual, account
for the federal, state, or local taxes calculated from this table. This
account will be credited at the time the payroll journal entry is calculated.
Primary Exemption
This data item contains annual dollar amount of the value of one
exemption. This amount will be multiplied by the number of primary
exemptions set up for each employee and then subtracted from the
annualized taxable wages before the tax is calculated.
Secondary Exemption
This data item contains annual dollar amount of the value of any
secondary exemptions. This amount will be multiplied by the number of
secondary exemptions set up for each employee and then subtracted from
the annualized taxable wages before the tax is calculated.
Adjust Base By FIT
This data item indicates to the system whether or not the taxable wages
should be adjusted by the federal income tax amount. An example of this
would be if your state or local income tax table allows you to reduce the
taxable base wages by the amount of federal income tax paid. <Click> on
the checkbox to activate this adjustment.
Adjust Base By FICA
This data item indicates to the system whether or not the taxable wages
should be adjusted by the FICA tax amount. An example of this would be
if your state or local income tax table allows you to reduce the taxable
base wages by the amount of FICA tax paid. <Click> on the checkbox to
activate this adjustment.
Adjust Base By SIT
This data item indicates to the system whether or not the taxable wages
should be adjusted by the state income tax amount. An example of this
would be if your local income tax table allows you to reduce the taxable
base wages by the amount of state income tax paid. <Click> on the
checkbox to activate this adjustment.
Tax Calculation Method
There are nine (9) different methods that can be used to calculate the
amount of tax. These types are used to accommodate the variations in
state income tax calculations. As state governments change the way state
and local income taxes are calculated, new calculation types will be
added to handle methods that are not currently supported.
Page 2-44
Set Up and Maintenance
Chapter 2
Payroll User Manual
1) Normal Table
Calculation
This method allows for normal calculation of taxes using the percentage
table method. This should be used for the federal tax calculations and
also those states that calculate taxes similar to the federal method. The
following outlines exactly how the tax tables calculate the taxes for each
paycheck using the Normal Table Calculation Method.
1) Start with taxable wages.
2) If “Adjust Base by FIT” is “Y,” then subtract current FIT amount.
3) If “Adjust Base by FICA” is “Y,” then subtract current FICA
amount.
4) If “Adjust Base by SIT” is “Y,” then subtract both current SIT
amounts.
5) Annualize adjusted base by multiplying by the number of pay cycles
in one year.
6) Subtract the “Additional Annual Exemption” amount set up for this
employee for this tax table.
7) Subtract both the primary and secondary exemption amounts.
(Multiply the number of exemptions set up for the employee by the
exemption amounts set up for this tax table.)
8) Find tax table line for which this adjusted taxable income is greater
than or equal to the lower limit and less than the next line's lower limit.
9) Multiply the amount of adjusted taxable income over the lower limit
by the tax percentage and then add the base tax amount.
10) Divide the annualized tax amount by the number of pay cycles per
year to calculate the current pay period's tax.
2) Percentage Up to YTD
Gross
Chapter 2
This method allows a certain percentage of tax to be deducted until a
certain dollar amount of tax has been collected. The “Lower Limit” on
line one is .01 and the “% Over Limit” is the percentage of gross wages
that will be withheld. The “Lower Limit” on line two is the maximum
tax to be collected.
An example would be CA State Disability. This requires employees to
pay .9% on the first 21,900.00 of gross wages for SDI, (21,900.00 X .009
= 197.10 of SDI tax that will be collected). Therefore, “% Over Limit”
on line one is .9% and the “Lower Limit” on line two is $197.10.
The following outlines exactly how the tax tables calculate the taxes for
each paycheck using the Percentage up to YTD Gross Method.
1) Start with taxable wages.
2) If “Adjust Base by FIT” is “Y,” then subtract current FIT amount.
3) If “Adjust Base by FICA” is “Y,” then subtract current FICA
amount.
4) If “Adjust Base by SIT” is “Y,” then subtract both current SIT
amounts.
5) Multiply the adjusted base by the percentage rate on line 1 of the table.
6) Divide the employee's “Additional Exemption Amount” by the
number of pay cycles per year and subtract from the calculated tax
amount.
7) Multiply the number of primary and secondary exemptions set up for
the employee by the exemption amounts set up on the tax table, then
divide by the number of pay cycles per year, then subtract from the
calculated tax amount.
Setup and Maintenance
Page 2-45
Payroll User Manual
8) Compare the previous YTD tax amount for this table to the lower
limit. Apply only the portion of the currently calculated tax that will not
exceed the lower limit on line 1.
3) Normal with % Wage
Exemption
This method calculates a tax exemption that is a certain percentage of
gross wages or a certain dollar amount, whichever is less. Line 1 of the
tax table is used to calculate the percentage of wage exemption. The
“Lower Limit” on line 1 is the maximum dollar amount that is allowed
for the exemption while the “% Over Limit” is the percent of gross
wages that is allowed as an exemption.
An example would be if a state allows an employee to deduct 15% of his
gross wages or $3000.00, whichever is less, the lower limit on line 1
would be $3000.00 and the % Over Limit would be 15%.
Lines 2 down perform the normal table calculation on the figure
calculated on line 1.
The following outlines exactly how the tax tables calculate the taxes for
each paycheck using the Normal with % Wage Exemption method.
1) Start with taxable wages.
2) If “Adjust Base by FIT” is “Y,” then subtract current FIT amount.
3) If “Adjust Base by FICA” is “Y,” then subtract current FICA
amount.
4) If “Adjust Base by SIT” is “Y,” then subtract both current SIT
amounts.
5) Multiply current gross taxable wages by the number of pay cycles per
year, then multiply by the percentage in line 1 of the tax table, Compare
this with the lower limit in line 1, and don't allow it to exceed the lower
limit, then, subtract this from the adjusted tax income as an additional
exemption value.
6) Follow Steps 8 - 10 of Normal Calculation method except the tax table
starts on line 2.
4) Normal with Annual
Credit
This table performs a normal tax calculation but also deducts a “Tax
Credit” amount off of the net tax amount. Tax credits differ from
exemptions in that they are deducted from the check AFTER tax has
been calculated. Exemptions are deducted BEFORE the taxes are
calculated. The table itself is set up as a normal table. The ANNUAL
amount of the tax credit is then placed in the “Add. Exemption Amount”
field of the employee's tax table information.
An example of this would be if a state allowed an employee to take
$180.00 in tax credits for the year, the employee's tax table data would
read:
OR-M Oregon - Married 1991 0 180.00
The following outlines exactly how the tax tables calculate the taxes for
each paycheck using the Normal with Annual Credit method.
1) Start with taxable wages.
2) If “Adjust Base by FIT” is “Y,” then subtract current FIT amount.
3) If “Adjust Base by FICA” is “Y,” then subtract current FICA
amount.
4) If “Adjust Base by SIT” is “Y,” then subtract both current SIT
amounts.
5) Annualize adjusted base by multiplying by the number of pay cycles
in one year.
Page 2-46
Set Up and Maintenance
Chapter 2
Payroll User Manual
6) Subtract both the primary and secondary exemption amounts set up for
this tax table.
7) Find the tax table line for which this adjusted taxable income is greater
than or equal to the lower limit and less than the next line's lower limit.
8) Multiply the amount of adjusted taxable income over the lower limit
by the tax percentage and then add the base tax amount.
9) Divide the annualized tax amount by the number of pay cycles per
year, to calculate the current pay periods tax.
10) Divide the “Additional Annual Exemption” (which is the tax
credit) amount set up for this employee by the number of pay cycles per
year and then subtract this from the tax amount.
5) Normal with % FIT &
SIT Exempt
Chapter 2
The switches to adjust the gross by FIT and SIT (items 9 and 11 on the
tax table) are EFFECTIVE when an unlimited amount of tax is allowed
to be deducted as an exemption. However, some states put limits on how
much can be deducted. Method five handles this situation.
Line one of the tax table is for the FIT deduction calculation, while line 2
is for SIT. The “Lower Limit” is the maximum amount of tax that can
be deducted while the “% Over Limit” is the percent of tax that can be
deducted (when all tax up to a certain dollar amount is allowed, this
percentage must be set to 100%).
An example would be if FIT is allowed to be deducted for tax
calculations from gross wages up to a maximum of $3000.00. The
“Lower Limit” on line 1 would be $3000.00 and the “% Over Limit”
would be 100%. Line 2 would contain 0 as there is not state tax deducted.
The remaining lines of the tax table, starting at line 3, perform a normal
tax calculation.
The following outlines exactly how the tax tables calculate the taxes for
each paycheck using the Normal with % FIT & SIT Exemption method.
1) Start with taxable wages.
2) If “Adjust Base by FIT” is “Y,” then subtract current FIT amount.
3) If “Adjust Base by FICA” is “Y,” then subtract current FICA
amount.
4) If “Adjust Base by SIT” is “Y,” then subtract both current SIT
amounts.
5) Annualize adjusted base by multiplying by the number of pay cycles
in one year.
6) Subtract the “Additional Annual Exemption” amount set up for this
employee for this tax table.
7) Subtract both the primary and secondary exemption amounts set up for
this tax table.
8) Multiply the current FIT amount by the number of pay cycles per year,
then multiply by the percentage on line 1 of the table but don't allow it to
exceed the lower limit on line 1. Now subtract from the adjusted taxable
wages.
9) Perform Step 8 above for both SIT amounts.
10) Follow Steps 8 - 10 of Normal Calculation method except the tax
table starts on line 3.
Setup and Maintenance
Page 2-47
Payroll User Manual
6) Normal with Credit &
FIT & SIT
This method combines the features of 4 and 5 into one table. The table
set up will be the same as in option number 5 and the annual tax credit
will go into the “Add. Exemption Amount” field of the employee for
the tax credit.
The following outlines exactly how the tax tables calculate the taxes for
each paycheck using the Normal with Credit & FIT & SIT Exempt
method.
1) Start with taxable wages.
2) If “Adjust Base by FIT” is “Y,” then subtract current FIT amount.
3) If “Adjust Base by FICA” is “Y,” then subtract current FICA
amount.
4) If “Adjust Base by SIT” is “Y,” then subtract both current SIT
amounts.
5) Multiply the current FIT amount by the number of pay cycles per year,
then multiply by the percentage on line 1 of the table but don't allows it
to exceed the lower limit on line 1, then subtract from the adjusted
taxable wage.
6) Perform Step 5 above for both SIT amounts.
7) Follow Steps 8 - 10 of Normal Calculation method except the tax table
starts on line 3.
8) Divide the “Additional Annual Exemption” (which is the tax credit)
amount set up for this employee by the number of pay cycles per year
and then subtract this from the tax amount.
7) Special Tax Calculation
for OK
This method performs the special tax calculations that are necessary for
the state of Oklahoma. Line one of the tax table is for the gross wage
limit and the percent of tax above the limit. The “Lower Limit” is the
maximum amount of gross wage that is used in the table calculations.
The “% Over Limit” is the tax rate that is used to calculate the
additional tax amount on gross wages over the limit. Line two of the tax
table is for calculating the percent of the base wages to be used in the
table calculations. Enter the percent in the “% Over Limit” field.
Line three of the tax table is for additional exemption calculations.
Oklahoma allows the larger of $1,000.00 or 15% of the withholding base,
not to exceed $2,000.00. Enter the lower limit in the “Lower Limit”
field, the percent in the “% Over Limit” field, and the maximum in the
“Base Tax Amount” field.
The following outlines exactly how the tax tables calculate the taxes for
each paycheck using the Special Tax Calculation for OK.
1) Start with taxable wages.
2) If “Adjust Base by FIT” is “Y,” then subtract current FIT amount.
3) If “Adjust Base by FICA” is “Y,” then subtract current FICA
amount.
4) If “Adjust Base by SIT” is “Y,” then subtract both current SIT
amounts.
5) Annualize adjusted base by multiplying by the number of pay cycles
in one year.
6) If this amount is over the limit in line 1 of the tax table, use the limit to
continue the tax calculations. The amount over the limit will be used in
Step #10.
Page 2-48
Set Up and Maintenance
Chapter 2
Payroll User Manual
7) Calculate the additional exemption amount by multiplying the
withholding base calculated above by the percentage in line 3 of the
table. If the amount is less than the amount in the “Lower Limit,” then
use the lower limit as the exemption amount. If the amount is more than
the amount in the “Base Tax Amount” field, use the “Base Tax
Amount” as the exemption amount.
8) Calculate the taxable income by multiplying the withholding base by
the percentage in line 2 of the table. Subtract the exemption amount
calculated in Step #7. Subtract any “Additional Exemption Amount”
set up for the employee for this tax table. Subtract both the primary and
secondary exemption amounts. (Multiply the number of exemptions set
up for the employee by the exemption amounts set up for this tax table).
9) Follow Steps 8 - 10 of the Normal Calculation method except the tax
table starts on line 4.
10) If the gross wages are over the limit calculated in Step #6, multiply
the amount over the limit by the “% Over Limit” and then divide by the
number of pay cycles per year to calculate the additional amount of tax.
8) Tax Based on FIT
Amount
This method will calculate State or Local tax based on a percentage of
Federal Income Tax. The lower limit represents the amount of Federal
Tax and the Percentage over Limit column represents the percentage of
Federal Tax.
The following outlines exactly how the tax tables calculate the taxes for
each paycheck using the “Tax Based on FIT Amount” method.
1) Start with Federal Income Tax.
2) Annualize Federal Income tax by multiplying the number of pay
cycles in one year.
3) Find the tax table line for which Federal Tax is greater than or equal to
the lower limit and is less than the next line's lower limit.
4) Multiply Federal Income Tax above the lower limit by the tax
percentage and then add the base tax amount.
5) Divide the annualized tax amount by the number of pay cycles per
year to calculate the current pay period's tax.
6) Divide the “Additional Annual Exemption” (which is the tax credit)
amount set up for this employee by the number of pay cycles per year
and then subtract this from the tax amount.
9) Special Tax Calculation
for CT (Connecticut)
This method performs the special tax calculations that are necessary for
the state of Connecticut. This method requires you to put the
“Annualized Exemption Amount” (found in “Table A - Exemptions”
of the CT Tax Guide) in the “Add. Exemption Amount” field of the
employee's state tax table.
Line one of the tax table contains the base tax rate (as of July 2003, this
was 3%). The “% Over Limit” is the actual base tax rate.
Line two contains the Withholding Code’s Break Point amount (i.e.
$10,000, $16,000 or $20,000) as the lower limit, the base tax amount
($300.00, $480.00, or $600.00) and the tax rate of 5% of the amount
over the limit. Lines 3 and higher 15 will now represent the Personal
Tax Credit Table.
The following outlines exactly how the tax tables calculate the taxes for
each paycheck using the Special Tax Calculation for CT.
1) Start with taxable wages.
Chapter 2
Setup and Maintenance
Page 2-49
Payroll User Manual
2) If “Adjust Base by FIT” is “Y,” then subtract current FIT amount.
3) If “Adjust Base by FICA” is “Y,” then subtract current FICA
amount.
4) If “Adjust Base by SIT” is “Y,” then subtract both current SIT
amounts.
5) Annualize adjusted base by multiplying by the number of pay cycles
in one year.
6) Subtract the “Additional Annual Exemption” amount set up for this
employee for this tax table.
Determine initial withholding amount from table below:
WITHHOLDING
WITHHOLDING CODE: B
WITHHOLDING
CODE: A,D,or F
CODE: C
If the Annualized Taxable
If the Annualized Taxable Income is If the Annualized Taxable
Income is less than or
less than or equal to $16,000,
Income is less than or equal to
equal to $10,000, multiply
multiply the amount by .03
$20,000, multiply the amount
the amount by .03
If the Annualized Taxable Income is
by .03
If the Annualized Taxable
Over $16,000, multiply the excess
If the Annualized Taxable
Income is
over
Income is
Over $10,000, multiply
$16,000 by .05 and add $480.00
Over $20,000, multiply the
the excess over
excess over
$20,000 by .05 and add $600.00
$10,000 by .05 and add
$300.00
For example: If the Annualized Taxable Income is $10,000 and the withholding code is “F”, the initial
withholding amount equals $300.00 ($10,000 x .03 = $300.00).
If the Annualized Taxable Income is $15,710 and the withholding code is “F”, the initial withholding
amount equals $585.50 ($15,710 - $10,000 = $5710. $5,710 x .05 = $285.50 + $300.00 = $585.50).
Initial Withholding Amount
($12,000 -$10,000 = $2,000. $2,000 x .05 = $100.00. $100.00 + 300.00 = $400.)
Multiply by 1.00 minus the decimal amount in Table B (.85)
$ 400.00
Tax for this period ($340.00 / 24)
$ 14.17
$ 340.00
W-2 State
This is the two (2) character state abbreviation that determines the state wages and state taxes that will be
accumulated and printed on the W-2. For instance, if you have both SIT1 and SIT2 defined on an employee and the
tax tables assigned both have the same W-2 state, these wages and taxes will be combined on the W-2.
Each Tax Table that you are using for your employees should be modified to include a two (2) character
abbreviation in this field for State Wage Reporting on the W2 Totals Report or for State Wage Magnetic Media
Reporting.
Page 2-50
Set Up and Maintenance
Chapter 2
Payroll User Manual
Exclude from W-2 Wages?
This option determines whether or not state wages are combined if you are using SIT1 and SIT2 on an employee and
both tax tables have the same W-2 State. If you <click> on the checkbox, the system will NOT combine the state
wages on the W-2. If you leave the checkbox blank the system will combine the state wages. In the case of using a
tax table that is preceded with the “@,” you must NOT define a W-2 state.
Once you have entered the necessary information and pressed ENTER to validate, you may set up the actual table
information. This information includes the lower limit, base tax amount, and percentage over limit for each of the
annual tax brackets.
This table is organized to be very similar to the format of the Employer's Federal Tax Guide (Circular E),
Percentage Method Annual Table. For each tax bracket, you must enter the lower limit of wages. The upper limit
will be the lower limit of the next bracket.
Then enter the base tax amount for the bracket. Finally, enter the tax percentage to use on the amount of wages over
the lower limit. When calculating the tax, the system will determine which two lower limits an employee's taxable
wages are between and then perform the necessary calculations.
If the wages are below the first lower limit, no tax will be calculated. If the wages are above the last lower limit, the
system will use the last bracket information to perform the calculations. Enter the necessary table information and
<click> on the “Save” button to validate this entry.
NOTE
While additional Federal Income Tax can be withheld from the employee
using a special pay type (e.g., FIT), State Income Tax cannot be. To withhold
additional SIT from an employee a tax table must be set up. The tax table
must follow these guidelines:
1.
Unemployment Maximum and Rate should be 0.
2.
All Adjust questions should be set to (N)o.
3.
Table Calculation Method is #1 (Normal).
4.
Lower Limit on Line 1 should be $0.01.
5.
Base Tax Amount on Line 1 should be annualized amount of additional SIT (e.g., if $10 per
week, Base Tax is $520).
6.
% Over Limit should be 0.000.
7.
Lower Limit for Line 2 is $999,999.99.
8.
Everything else in table is 0.
In the example below the employee is requesting an additional $10 per week to be withheld for SIT.
Lower Limit
Base Tax
% Over Limit
==============================
1)
$0.01
$520.00
0.0000%
2) $999,999.99
$0.00
0.0000%
3)
$0.00
$0.00
0.0000%
———————————————————————
To withhold a different amount simply setup a tax table with the appropriate Base Tax Amount. <Click> OK to
validate the tax table information that is being added.
Chapter 2
Setup and Maintenance
Page 2-51
Payroll User Manual
NOTE
The system provides the standard tax table information for both Federal and
State Income Tax calculations. Normally, these tables are already set up in
your system. Customers current on their Annual License Fees will be notified
of updates as they become available.
Please note that the General Ledger accounts and the Unemployment Tax
Percent may need to be changed to meet your specific requirements. In
addition, after you receive the tax update, it is your responsibility to verify
that the tax calculation meets your legal requirements.
Results:
coPR5.dbf - Tax Table File
- All Tax Table Information set up
Change Mode (PR0414)
This option allows you to change information on an existing tax table. If you have made any mistakes during this set
up process, you may return to change any information you have already entered.
First, you must navigate to the record you wish to change. You may find a record using the navigation tool bar or
<click> on the “Navigation” option on the Menu Bar and then the appropriate navigation option. If you are
changing a record, <click> on the “Modify the Current Record” button or choose the “Operation” option from the
Menu Bar and then “Change.” Make the changes required and <click> on the “Save” button to save your changes
or <click> on the “Cancel” button to cancel the changes made.
Results:
coPR5.dbf - Tax Table File
- All Tax Table Information updated
Delete Mode (PR0415)
This option allows you to delete existing tax tables that you may have entered by mistake, or you no longer want.
First, you must navigate to the record you wish to delete. You may find a record using the navigation tool bar or
<click> on the “Navigation” option on the Menu Bar and then the appropriate navigation option. This option allows
you to delete sales codes that you may have entered by mistake, or you no longer want. <Click> on the “Delete the
Current Record” button or choose the “Operation” option from the Menu Bar and then “Delete.” This will place
you into the “Delete” mode, then <click> on “Save” to validate your deletion of this record.
Make sure this is what you want to do, because once a tax table is deleted, it cannot be retrieved.
Results:
coPR5.dbf - Tax Table File
- Tax Table Information is marked for deletion
Copy Mode (PR0416)
This option allows you to create a new tax table by copying the information from an existing one. This option is
very useful when setting up similar tax tables or renumbering tax tables.
First, you must navigate to the record you wish to copy from. You may find a record using the navigation tool bar or
<click> on the “Navigation” option on the Menu Bar and then the appropriate navigation option. <Click> on the
“Create a Record Based on the Current Record” button or choose the “Operation” option from the Menu Bar and
then “Copy.”
Page 2-52
Set Up and Maintenance
Chapter 2
Payroll User Manual
You will notice all the information, except for the tax table number, will be copied to a new record. Enter the new
tax table number for this record. At this point, you may choose to edit any of the information or <click> on the
“Save” button to validate, which will then add it to the file.
Results:
coPR5.dbf - Tax Table File
- All Tax Table Information set up
UPDATE TAX TABLES FROM MASTER FILE (PR0417)
This option will update your tax table file from the master default tax table file, which is included on the program
disks. Make sure to transfer the updated diskettes onto your system before executing this option.
Whenever you receive Payroll updates from Data Pro Accounting Software to bring your tax tables current, the first
step is update your Payroll program. Please refer to the “transfer” procedures in your Installation Guide for
complete instructions on this process. Once the transfer is complete, this option must be executed individually for
“each” company you have in your payroll system. <Click> on the "Start" button to begin this procedure.
SET UP WORKERS' COMP. CLASSES
This section discusses the ways to set up, change, delete and copy Workers' Compensation Class Codes. It also
discusses how to print the Workers' Compensation Class Listing, which is used to verify all information input into
the Workers' Compensation Class file.
You may add “notes” to any workers' comp class that may be viewed on the screen for additional information or
planning. This may be done when viewing an inquiry, adding a new workers' comp class, changing an existing
workers comp class or copying a workers' comp class.
By <clicking> on the Note Pad Button, a screen will appear that will allow you to add or review free-form notes. If
you are adding a new record, navigation is not required. <Click> on the “Create a New Record” button or choose
the “Operation” option from the Menu Bar and then “Add.” A screen will appear with the current data and time.
You will be prompted for a description of fifty (50) characters, which is used as part of the display when selecting to
review existing notes. Each note recorded has up to ten (10) lines of fifty characters each which may be used for
your free-form notes.
Once notes are added to the file, they can be reviewed at any time by accessing the account through an inquiry mode
or a change mode and then <clicking> on the Note Pad Button. Once this screen is displayed you will have the tool
bar navigation options to select the first detail record, select the next record detail, select the previous record detail,
select the last record in the detail list or search through the detail records. You may then view the notes for this
record.
If you have set up User-Definable Fields in either the Windows Character-based or UNIX products, you will be
able to view and change data information in these fields. By <clicking> on the “User Fields” button, you will
access an additional screen of data fields. If you are in an Inquiry Mode, then you will be able to view these fields.
If you are in a Change or Copy Mode, you will be able to modify the information in these fields. You must make
sure that your General Configuration options are set up to allow access to User-Definable Fields.
Inquiry Mode (PR0425)
This option allows you to review all workers' compensation class information. Navigate to the record you wish to
view. You may find a record using the navigation tool bar or <click> on the “Navigation” option on the Menu Bar
and then the appropriate navigation option. Once the tax table has appeared on the screen, you may review the
information. This information includes the description, state abbreviation, hourly pay rate, insurance rate and
maximums, as well as monthly totals.
Chapter 2
Setup and Maintenance
Page 2-53
Payroll User Manual
Add Mode (PR0426)
This option allows you to set up new Workers' Compensation Classes. These WC Classes are used for calculating
monthly Workers' Comp. Insurance and for predefining employee pay rates. These workers' compensation classes
will assist you in classifying your monthly payroll information by work category and calculating the necessary
workers' compensation insurance premiums. You may also use these classes to predefine employee pay rates by
work classification.
When adding a new record, navigation is not required. <Click> on the “Create a New Record” button or choose the
“Operation” option from the Menu Bar and then “Add.” The following is an explanation of each of the data items
set up on a worker's comp class.
If you use a period (.) as the first character of the WC Class number, the system will not perform any calculations
for this WC Class. It will be considered as “not applicable.”
The following table describes the details of this screen:
Description
This is a fifteen (15) character description of the WC Class which will be
displayed on all reports and screens.
State Abbreviation
This is a two (2) character abbreviation of the state that this WC Class
will be reported in. The Monthly Workers' Compensation Report will
sort and subtotal all WC Class by this state abbreviation.
Hourly Pay Rate
This data item contains the predefined hourly pay rate that will be used
when paying an hourly employee classified in this WC Class. This rate
will not be used on salaried employees. If you enter $0.00, the pay rate
set up in the employee's master record will be used. If this rate is greater
than zero (0), the system will use this rate, multiplied by the pay factor
(type), then multiplied by the number of hours, to determine the amount
of wages.
Calc. Type
This data item defines how the Monthly Worker’s Compensation liability
will be calculated. There are three (3) choices.
Regular Earnings &
Regular part of Over Time
This is the monthly total of regular pay and the regular portion of all
overtime pay that was classified in this WC Class. The regular portion of
overtime pay is calculated by dividing the overtime pay by the pay factor.
Regular Earnings & All
Over Time
This is the monthly total of regular pay and all overtime pay that was
classified in this WC Class. Overtime pay is defined as any pay type that
has a factor greater than 1.000.
Regular Earnings Only
This is the monthly total of all regular pay that was classified in this WC
Class. Regular pay is defined as any pay type that has a factor of 1.000.
All salaried employees' pay will be considered as regular pay.
Insurance Rate
This is the percentage rate that will be used in calculating the insurance
premium on the “Monthly Workers' Compensation Report.” The rate will
be divided by 100 and then multiplied by the monthly applicable pay for
this WC Class. The monthly applicable pay is the sum of regular pay and
the regular portion of the overtime pay.
Insurance Maximum
This is the maximum premium that will be shown on the “Monthly
Workers' Compensation Report.” If this value is zero (0), no
maximum will be used.
Monthly Amts.
By <clicking> on this button, another screen will appear and allow you to
enter or edit monthly earning totals for Regular Earnings, Overtime
Earnings and the Regular Portion of Overtime Earnings.
Page 2-54
Set Up and Maintenance
Chapter 2
Payroll User Manual
<Click> the “Save” button to validate the workers' compensation class information that is being added.
Results:
coPR7.dbf - Workers' Comp. Class File
- All WC Class Information set up
Change Mode (PR0426)
This option allows you to change information on an existing WC Class. If you have made any mistakes during this
set up process, you may return to change any information you have already entered.
First, you must navigate to the record you wish to change. You may find a record using the navigation tool bar or
<click> on the “Navigation” option on the Menu Bar and then the appropriate navigation option. If you are
changing a record, <click> on the “Modify the Current Record” button or choose the “Operation” option from the
Menu Bar and then “Change.” Make the changes required and <click> on the “Save” button to save your changes
or <click> on the “Cancel” button to cancel the changes made.
Results:
coPR7.dbf - Workers' Comp. Class File
- All WC Class Information updated
Delete Mode (PR0427)
This option allows you to delete an existing WC Class. Do NOT delete WC Classes which have been used for
current pay data entry.
First, you must navigate to the record you wish to delete. You may find a record using the navigation tool bar or
<click> on the “Navigation” option on the Menu Bar and then the appropriate navigation option. This option allows
you to delete sales codes that you may have entered by mistake, or you no longer want. <Click> on the “Delete the
Current Record” button or choose the “Operation” option from the Menu Bar and then “Delete.” This will place
you into the “Delete” mode, then <click> on “Save” to validate your deletion of this record.
Make sure this is what you want to do, because once a WC Class is deleted, it cannot be retrieved.
Results:
coPR7.dbf - Workers' Comp. Class File
- WC Class Information is marked for deletion
Copy Mode (PR0428)
This option allows you to create a new WC Class by copying the information from an existing one. Using this
option, the system provides a quick method of setting up WC Classes that are very similar.
First, you must navigate to the record you wish to copy from. You may find a record using the navigation tool bar or
<click> on the “Navigation” option on the Menu Bar and then the appropriate navigation option. <Click> on the
“Create a Record Based on the Current Record” button or choose the “Operation” option from the Menu Bar and
then “Copy.”
You will notice all the information, except for the workers' comp class number, will be copied to a new record.
Enter the new workers' comp class number for this record. At this point, you may choose to edit any of the
information or <click> on the “Save” button to validate, which will then add it to the file.
Results:
coPR7.dbf - Workers' Comp. Class File
- All WC Class Information set up
Chapter 2
Setup and Maintenance
Page 2-55
Payroll User Manual
PAYROLL CONFIGURATION (PR0223)
This section discusses in detail the options necessary to input your master file information. The options utilized in
this menu allow you to custom configure your Payroll Master Information, maintain your data files, and configuring
your Direct Deposit functions. This option allows you to set up the master configuration, time category information,
and the integration with other systems.
A default configuration is already built into your Payroll module. However, you may prefer to change this
configuration to meet your company's specific requirements. If you decide to assume the default values, please
review them carefully before you begin processing. After selecting this option, a screen will appear displaying the
following four tabs:
1) Master Configuration
2) G/L Accounts
3) Time Categories
4) System Integration
As you proceed to select each tab, enter all required changes <click> on the “OK” button to validate and assume the
default values. The default values include account numbers which are coordinated to the default company in the
General Ledger module. If you wish to use your own internal account numbers, these default account numbers must
be changed to match the account numbers you will be using.
Master Configuration (PR0420)
The Master Configuration screen will display the data items necessary for configuring your Payroll defaults.
Page 2-56
Set Up and Maintenance
Chapter 2
Payroll User Manual
Departments
Default: OFF
This data item indicates to the system whether or not you will be using
departmental breakdown of your payroll data. If you leave this checkbox
blank, all options and data items which refer to departments will be turned
off.
Rate Override
Default: OFF
This data item indicates to the system if you want to have the option of
changing the pay rates at the time the pay data is being entered. When you
are entering the pay data for an hourly employee, the system will calculate
the pay rate based on normal rate for the employee and the factor associated
with the time category entered (e.g., 1.00 for Regular, 1.50 for Overtime,
2.00 for Double time, etc.).
<Clicking> on this checkbox will give you the option of accepting this
calculated rate or changing the rate, if you desire. This data item will not be
used if the employee is defined as a salaried employee.
Workers’ Comp.Class
Default: OFF
This data item indicates to the system whether or not you will be
classifying your pay data by workers' compensation class codes. If you
leave this checkbox blank, all options and data items which refer to
workers' compensation classes will be turned off.
This option is ideal if you would like the ability to pay employees different
rates of pay based on the nature of the work that they are performing. There
is no requirement that you use this feature for anything other than
automatic pay calculations.
Variable OT Calculation
Default: OFF
This data item indicates whether or not you want the system to
automatically calculate variable overtime. The formula that is used is based
on the U.S. Department of Labor (Form: WH-134) for computing Extra
Half-Time for Overtime.
If you <click> on this checkbox, and the first special pay type in the
employee's record is an earnings code which begins with “V,” the system
will calculate the overtime pay for the pay cycle. The overtime pay will
automatically be placed in the special pay type amount column. This
feature is typically used by those companies either performing government
or union type work, where multiple pay rates are used for different types of
work, or for piecework applications.
FICA Override
Default: OFF
This data item indicates to the system whether or not you want to be able to
override the calculated FICA amount at the time the pay data is being
entered.
Allocate Dept Overhead
Default: OFF
This data item indicates to the system whether or not you want to be able to
allocate department overhead based on factors entered in the departments.
Allow Check Reprint
Default: OFF
This option will determine whether or not you will allow checks to be reprinted at the time of check printing. If you leave the checkbox blank, you
will be required to Void the check and re-write it.
Chapter 2
Setup and Maintenance
Page 2-57
Payroll User Manual
Default Pay Cycle
Default: Bi-Weekly
This is the default pay cycle that will be assumed when setting up
employees, entering pay data, printing the preliminary and final check
summaries, printing the checks, and updating the employee history. The
pay cycle will be used to group similar payrolls and to correctly calculate
the payroll taxes. The valid pay cycles are:
Daily
Weekly
Bi-Weekly
Semi-Monthly
Monthly
Quarterly
Semi-Annually
Annually
You may enter the pay cycle number or <click> on the drop down box to
select the pay cycle. After you have entered the pay cycle, the system will
display the pay cycle description below this data item.
Minimum Wage/Hour
The minimum wage per hour will be used by the system to warn you if you
are entering pay data for an employee which calculates to an hourly rate
less than the minimum wage and to calculate the wages subject to the
employer's portion of Social Security. While you are entering the pay data
for an employee, the system will calculate the minimum wage amount by
using the number of hours entered times the minimum wage per hour.
If the total wages entered for the employee (including hourly wages or
salary, bonuses, tips, etc.) is less than the minimum wage amount, the
system will display a warning message and indicate the “Boost Amount.”
Social Security Tax %
This figure represents the percentage rate that will be used when calculating
the employer's and employee's portion of Social Security tax. The system
will multiply this percentage by the employee's wages subject to Social
Security (including tips) up to the “Social Security Limit.”
Social Security Limit
This figure is the maximum amount of employee wages that are subject to
the employer's and employee's portion of Social Security. Once the yearly
wages for an employee has reached this limit, the system will no longer
calculate the employer's/employee's Social Security tax.
Medicare Tax %
This figure represents the percentage rate that will be used when calculating
the employer's and employee's portion of Medicare tax. The system will
multiply this percentage by the employee's wages subject to Social Security
(including tips) up to the “Medicare Tax Limit.”
Medicare Tax Limit
This is the maximum amount of employee wages that are subject to the
employer's and employee's portion of Medicare tax. At present, there is no
cap on the Medicare tax limit.
Employer's Federal I.D. #
Default: None
This is a twenty (20) character field for your federal tax identification
number. This will be printed on the employee's W-2 forms and included in
all appropriate magnetic media (if selected.)
Employer's State I.D. #
Default: None
This is a twenty (20) character field for your state tax identification
number. This will be printed on the employee's W-2 forms and included in
all appropriate magnetic media (if selected.)
Page 2-58
Set Up and Maintenance
Chapter 2
Payroll User Manual
W-2 Form
Default: W2
This is the name of the W-2 form that will be used when printing W-2s. See
the Payroll sections of the Infinity POWER Supported Forms Reference
Manual for a listing of the standard forms available with these modules and
the preprinted forms that are supported by the accounting system. A
selection of preprinted forms are available through DPAForms and may
also be found in the DPAForms Catalog included in the Product Kit.
They may also be found on the CD-ROM presentation. Once you have
reviewed the available forms, simply enter the form name into this field to
activate it as the current form being used. This option may be changed as
often as desired. If none of the standard forms fit your particular company's
needs, custom modifications are available to configure to your needs.
Emp. Review Form
Default: REV
This is the name of the form that will be used when printing the
employee reviews. This may be the name of the form supplied with the
Payroll system, or the name of a custom form that you may have had
designed. Below is the name of the standard white paper form that comes
as the default for the system.
REV - Plain 8 1/2” by 11” paper form.
GL Journal #
Default: 4 – Checking Payroll
This number corresponds with the General Ledger default journal
number in the General Ledger module. All Payroll transactions will be
posted to this journal. You may <click> on the drop down box to select
from a menu (if you are interactive with General Ledger).
Hours Dec. (0-5)
Default: 2
This figure will represent the number of decimal places you wish the
system to use during the data entry, display, and calculation of the hours
worked for each employee. The default is set to two (2) decimal places,
with a maximum of five (5). The number of decimal places specified will
be used throughout the Payroll System for all references to Hours
Worked.
Rate Dec. (0-5)
Default: 2
This figure will represent the number of decimal places you wish the
system to use during the data entry, display, and calculation of the hourly
rate of pay for each employee. The default is set to two (2) decimal
places, with a maximum of five (5). The number of decimal places
specified will be used throughout the Payroll System for all references to
Hourly Pay Rate.
Next Check Number
This is the next check number that will be used when printing payroll
checks. If Payroll is integrated with the Check Reconciliation module,
the next check number will be found in Accounts Payable under Setup
Bank Accounts.
Check Form
This is the name of the check form that will be used when printing
checks. See the Payroll sections of the Infinity POWER Supported
Forms Reference Manual for a listing of the standard forms available
with these modules and the preprinted forms that are supported by the
accounting system. A selection of preprinted forms are available through
DPAForms and may also be found in the DPAForms Catalog included
in the Product Kit. They may also be found on the CD-ROM
presentation. Once you have reviewed the available forms, simply enter
the form name into this field to activate it as the current form being used.
Chapter 2
Setup and Maintenance
Page 2-59
Payroll User Manual
This option may be changed as often as desired. If none of the standard
forms fit your particular company's needs, custom modifications are
available to configure to your needs.
If Payroll in integrated with the Check Reconciliation module, the check
form will be found in Accounts Payable under Setup Bank Accounts.
JC Detail Type
Default: Employee Name
This number defines the type of detail in which the Job Cost module is
configured. When setting up either the Job Cost or Time Billing Main
Module, you may specify the use of an additional twenty (20) character
description field to be used in setting up the project detail information.
This is referred to as the “Detailed Description” in the Job Cost module.
Only if the integration to Job Cost is turned on in the Master
Configuration of this module, will this option display the following
choices. <Click> on the drop down box and a list of choices will appear.
The valid choices are:
None, Employee Number, Employee Name
If you select “None,” the system will not use the description to update
the Project Detail File. If you select “Employee Number,” the system
will use the employee number in the form “EMP:XXX,” where the Xs
will be the employee number to update the Project Detail File. If you
select “Employee Name,” the system will use the first twenty (20)
characters of the employee name as the description to update the Project
Detail File.
Direct Deposit Form
This is the name of the Direct Deposit form that will be used when
printing checks/stubs.
Checking Account
If you are integrated with the Check Reconciliation module, you will be
able to enter a Checking Account number to use for Payroll. This
Checking Account will use the form name defined on the Bank Account
associated with this Checking Account.
G/L Accounts
The General Ledger Accounts screen will display the data items necessary for configuring your default General
Ledger accounts. There are two columns of accounts. The first column is for the expense account and the second
column is for the payable, or accrual account. Some of the data items will use one or the other and some will use
both columns. If you are interactive with General Ledger, you may use the space bar to blank the existing account
from the data item and then <click> the Down Arrow (F2 by default) to scroll through the General Ledger account
file to make your selection.
Page 2-60
Set Up and Maintenance
Chapter 2
Payroll User Manual
S.S. Account - Employer
Default: 95100 & 33100
There are two fields for this data item. The first field is for the expense
account for the employer's portion of Social Security Taxes, excluding
the Medicare portion. The second field is for the Accounts Payable, or
accrual, account for the employer's portion of Social Security Taxes,
excluding the Medicare portion.
S.S. Account - Employee
Default: 33100
This field is for the accrued payable account used for the employee's
portion of Social Security Taxes, excluding the Medicare portion.
Medi Account Employer
Default: 95100 & 33100
There are two fields for this data item. The first field is for the expense
account for the employer's portion of the Medicare Taxes. The second
field is for the Accounts Payable, or accrual, account for the employer's
portion of the Medicare Taxes.
Medi Account Employee
Default: 33100
This field is for the accrued payable account used for the employee's
portion the Medicare Taxes.
Wages & Salaries Account
Default: 60100
This field is for the default expense account used for normal wages and
salaries.
Payroll Cash Account
Default: 03100
This field is for the payroll cash account that will be used. This account
is an asset but it will still be located under the “Expense” column.
Chapter 2
Setup and Maintenance
Page 2-61
Payroll User Manual
FUTA Account
Default: 95200 & 37100
There are two fields for this data item. The first field, under the expense
column, is for the default FUTA expense account. The second field,
under the accrued payable column, is for the FUTA Payable account.
SUTA Account
Default: 95200 & 37200
There are two fields for this data item. The first field, under the expense
column, is for the default SUTA expense account. The second field,
under the accrued payable column, is for the SUTA Payable account.
Main Earnings Account
Default: 60100
This field is for the default earnings expense account. This account will
be the default for earnings other than salaries and wages (e.g., Bonuses,
Tips, Commissions, etc.).
Main Deduction Account
Default: 37400
This field is for the default deductions expense account. This account
will be the default for payroll deductions.
Dept. OH Expense Credit
Default: 95000
There is one field for this data item under the “Expense” column. This
field is for the credit account of overhead expenses that have been
allocated to departments.
Interdepartment Account
Default: 60000
There is one field for this data item under the “Expense” column. This
field is for the inter-department account that will be used as the debit of
expenses to departments and the offsetting credit to the main company.
Time Categories
The Time Category screen allows you to define the time category descriptions and factors that you may need. These
time categories will be used to display the type of hours that are being entered (Regular, Overtime, etc.) and to
calculate the hourly rate for hourly employees.
Page 2-62
Set Up and Maintenance
Chapter 2
Payroll User Manual
There are fifteen time categories that may be defined, however, eleven through fifteen are handled by the system in a
special way. These are referred to as personal time and each time they are used will “count down” the personal time
balances specified for the employee. These personal time categories allow you to allocate hours to each employee
for such things as vacation time, personal time, etc. The system will then deduct the hours entered from the
“Personal Time Balance” fields.
Personal time balances may be defined when setting up the employee through the “Personal Time Balance” data
item, or through the “Record Accrued Personal Time” option in the Enter Transactions menu. Time category ten is
used by the system to indicate piece work type pay. The number of “pieces” should be entered instead of hours and
the system will not consider this as hours during the calculations and updates.
The default time category description and factors are listed below.
Description
Factor
1) Regular
1.0000
2) Overtime
1.5000
3) Double
2.0000
4) Holiday
2.5000
5-9)
Blank
10) Piece Work
1.0000
11) Vacation
1.0000
12) Sick Time
1.0000
13) Personal
1.0000
14) Unexcused
0.0000
15) Misc.
0.0000
System Integration
Indicate by <clicking> on the checkbox for each system, if your system will be integrating with General Ledger,
Job Cost Main Module or Check Reconciliation. These are the only modules that Payroll actively updates.
Chapter 2
•
General Ledger
•
Detail (Y/N)
•
Job Cost
•
Check Reconciliation
Setup and Maintenance
Page 2-63
Payroll User Manual
If the “Detail (Y/N)” option is left blank, the Payroll information posted to General Ledger will be in a summary
format showing the total amounts allocated to the various payroll account numbers set up in the Master
Configuration.
The option to “Detail (Y/N)” allows you to post all Payroll transactions into the General Ledger in detail rather than
in a summary format. If this is checkbox is <clicked> on, each transaction will be posted into General Ledger with
all associated information including Employee Name, Check Number, Transaction Date, Check Amount, and much
more.
The advantage of posting in detail to General Ledger is the enhanced audit information that will be stored. However,
posting in detail will require the file sizes for the General Ledger transactions to be increased, as the posting
information could be quite large.
If you want to be able to use the Direct Deposit feature, you must be integrated with the Check Reconciliation
module and have an EFT Processor set up and associated with the Bank Account you are using for Payroll which
processes ACH transactions.
NOTE
The Payroll module is automatically integrated with the Time Sheet Entry
module (if both modules are loaded on the computer).
<Click> on the "OK" button to validate or assume the default settings for the Payroll Configuration.
MAINTAIN DATA FILES (PR0422)
This option includes both “Pack” and “Re-Index” utilities to manage your Payroll files after a hardware or media
failure or to remove any items marked for deletion from your data files. You should NOT rely on the “Pack” option
to replace backups. Your backup procedures should include daily backups and weekly off-site backups.
There are several situations in which the Pack option need be accessed.
Power (hardware) failure.
Media Error (bad disk)
Remove records marked for deletion
You are then given the options to “Pack” or “Re-Index” that data file. Pack is a utility that physically removes any
deleted records from that data file. These procedures display a “Percentage of Completion” graph on the screen
Page 2-64
Set Up and Maintenance
Chapter 2
Payroll User Manual
while the files are being processed. Re-Index is a utility to rebuild the index file. It is also run automatically at the
end of a Pack procedure. Before you execute the Pack option, check the file size of your Payroll files at the
operating system level. The system will sort the current “out of index” file into a new “indexed” file before
deleting the old file.
If you do not have enough disk space available to perform this function, an error will be generated at the time the
system runs out of disk space. This, however, could be some time later, depending on the size of your data files. If
your data files are 2MB in combined size, you will need at least 2.2MB in additional free space before proceeding
with this option.
NOTE
This option will only re-organize undamaged data within your files.
Therefore, you should carefully audit all information after executing this
option and make any necessary adjustments to your data.
The following files are available for maintenance:
•
Employee File
•
Current Pay Data File
•
Transaction File
•
Transaction Detail File
•
Historical File
•
Department File
•
Special Pay Type File
•
Tax Table File
•
Employee Comments File
•
Workers Comp. File
You may select individual files or all files for either of these procedures. There are buttons on the right hand side of
the screen that allow you to “Select All” files, “Unselect All” files, and “Invert Selection,” which selects those
files that were not selected in a previous pack or re-index condition. There is also a button, “Details,” that provides
pertinent information about that particular data file. This information includes the directory path and file name, the
type of file, the pattern of the filename structure and the total records including those records marked for deletion in
that data file.
To begin the procedure of a pack or re-index, simply <click> on the “Start” button, after selecting the files you
wish to manage.
Results:
All records in all or specified Payroll files will be packed or re-indexed.
START NEW YEAR'S DATA FILE (PR0423)
This option starts up your Payroll files for the new calendar year. Before executing this option, you should make
multiple copies of the old year's files for archival purposes. When you start the files for a new fiscal year, the
following files are copied into or created for the new year:
Chapter 2
•
Employee File (coPR1cy.dbf)
•
Transaction File (coPR2cy.dbf)
•
Transaction Detail File (coPRCcy.dbf)
•
Department File (coPR3cy.dbf)
Setup and Maintenance
Page 2-65
Payroll User Manual
Page 2-66
•
Historical File (coPRMcy.dbf)
•
Workers Compensation File (coPR7cy.dbf)
Set Up and Maintenance
Chapter 2
Payroll User Manual
After you create the files for the new year, you may process in both years simultaneously. All transaction activity for
each year will be tracked independently. In addition, you must be careful to make any overhead changes, such as
changing a employee's address, to the most current year (or to both years). This overhead restriction is only
applicable on the files listed above. All historical dollar and hours information will be cleared out of the new year's
data files. In addition, all employees with a “Terminated Status” (status number 3 or above), will not be copied
forward into the new year.
NOTE
Because of government W-2 reporting requirements, Payroll must be
maintained on a calendar year, regardless of the company's fiscal year end.
The new year in Payroll must be started after the close of business on
December 31. Because this procedure does not clear out information in the old
year, the new year may be started and payroll processed prior to printing last
year's W-2s. When your W-2s are ready to be printed, change the date to
December 31 of the old year and print the W-2s.
To select this option, you will go to “Systems” from the Menu Bar and select “System Administrator.” The
following screen illustrates where to locate this option.
Before selecting this option you should make several backups of the old year for archival purposes before starting
the new year. You must also be in the last fiscal period (month) of the year before you can execute this option.
Chapter 2
Setup and Maintenance
Page 2-67
Payroll User Manual
If you are in any other period or month other than the last fiscal period of the year, the system will not allow the user
to select any modules to “Start New Year’s Files.” Therefore, if you are looking to create 2007 data files as the
new year, the old year is 2006 and your date should be set to a day in the last fiscal period of 2006. If you are
prepared to begin data files for the new fiscal year, you may choose the “Select All” button which will highlight all
Registered Systems. Or, you may choose the “Clear All” button to undo your choices. The “Invert” button
reverses the choices currently selected on the screen.
You may also take your mouse and <click> on each accounting module one by one to specify which module(s) to
select for this function. It is not uncommon for many users to be prepared to begin certain data files for the new
fiscal year such as General Ledger and Accounts Payable while holding back on certain modules such as the Sales
Order Entry module. This would allow users to continue processing orders in the prior fiscal year to allow
additional sales to get on the books or to complete orders prior to starting the new order file for the new year. Once
this file is started, only outstanding orders will be transferred to the new fiscal year.
General Ledger, however, is one module whereby users may create new data files for the new fiscal year and
continue to process in both the prior and new fiscal years and the same time. Once postings are made to the prior
fiscal year, the option to “Bring Balances Forward” into the new year is run to bring all adjusted balances current.
Select the module(s) to Start New Year’s Files for and <click> on the “Start” button. The program will create the
new year's data files. The system will show a message next to each module stating “System already started.” The
bottom of the screen will show “Processing Completed.”
<Click> on the “Close” button to return to the Menu Bar.
Page 2-68
Set Up and Maintenance
Chapter 2
Payroll User Manual
Results:
Files Copied to or Created for the New Year.
•
Employee File (coPR1cy.dbf)
•
Transaction File (coPR2cy.dbf)
•
Transaction Detail File (coPRCcy.dbf)
•
Department File (coPR3cy.dbf)
•
Historical File (coPRMcy.dbf)
•
Workers Compensation File (coPR7cy.dbf)
MAKE COMPLETE DATA BACKUPS
Make sure that as you are adding more and more information to your system that you are making complete data
backups as you go. The file naming structure is designed to allow you to copy data files only, very quickly and
easily. We strongly recommend that the following backup procedures be followed to adequately protect your data
files against any possible problems. Experience has shown that “careless disregard” for making adequate backups
can literally cost you months of hard work and expense.
Any of the following problems could destroy all or part of your accounting information.
1) Hardware Failure of any kind (such as a hard disk failure)
2) Power Failure or Fluctuations) Improper Execution of certain operating system
commands
3) Careless Handling of Data Disks (such as copying files the wrong direction)
It is recommended that you make a backup of your data files on a daily basis. This does not mean for you to
continue copying over the same backup that you may have made the previous day. Instead you should consider the
following structure. Create five to seven daily backup sets of disks or tape cartridges, depending on your system.
The number will vary based on the number of days you “normally” work on your files.
Mark each set with the name of the day of the week that it is to be used for backup purposes. For instance, disk set
#1 may read Monday, disk set #2 may read Tuesday, etc. Only use these specific sets of disks or tapes on the days
that are designated. This would mean that they would not be used more than once a week.
Therefore, if a problem were to occur and you did not realize it immediately, you could at least go back as far as a
week to find your last set of valid data files. Of course the entries made during the last week may be lost, but that is
better than many months or years worth of input.
To go a step further, we recommend that you next make four additional sets of disks or tapes. These would be your
weekly master backups. Mark them accordingly with the week number (Week #1) and at the end of every week,
make a full backup of your data files.
Though you may have a complete daily backup for each day of the week, sometimes problems are not found within
the week's time frame and all of those backups could be invalid. This way, you could go back several weeks at a
time to find your last set of valid files.
Next, you will want to go further and create a monthly master set of disks or tapes. You would mark them
accordingly with the name of the month of the year. At the end of every month, you would then make a complete
backup of your data files again. This allows you to then go back several months at a time, if necessary, to review
information or to print historically dated information.
Of course, the last set of files created should be the yearly set of files done at the end of each fiscal year for
archiving purposes. It is also highly recommended that all key master file reports, journals, agings, etc. be run at this
time for hard copy backup.
Chapter 2
Setup and Maintenance
Page 2-69
Payroll User Manual
As an additional protection for those DOS users with tape backup systems, it is still highly recommended that floppy
disk backups be made occasionally (at least monthly) in case a problem were to develop on the tape drive that you
are using. Normally, you would not find out there is a problem until you needed to restore information, and that may
be too late.
This all may sound like a considerable amount of work and inconvenience, but consider the investment involved.
Depending on your business, you may have anywhere from one to several hundred people working on your
accounting processing.
The largest true cost of a hardware failure or loss of information is not the loss of programs, disks, or even
computers. The largest cost is that of labor and management's time inputting your accounting information. This can
literally represent thousands of man hours over time. This is a large investment that should be safeguarded at all
times.
These programs are designed for creating and generating accounting information. Unfortunately, they have limited
ability to protect the information created. That is entirely up to you, the user and manager, to protect your
investment. For further information on Backup Procedures and commands, refer to either the System Administrator,
(under Combination Keys) or the documentation for your operating system.
Page 2-70
Set Up and Maintenance
Chapter 2
Payroll User Manual
This page intentionally left blank.
Chapter 2
Setup and Maintenance
Page 2-71
Payroll User Manual
CHAPTER 3
ENTER TRANSACTIONS
This section discusses the different ways transactions may be entered into the Payroll module. These procedures
include single and rapid employee pay data entry, printing the check summary, printing the checks, writing a single
check, voiding checks, recording accrued personal time, and entering employee comments. These options should not
be performed until the initial set up has been completed.
SINGLE EMPLOYEE ENTRY (PR0101)
This option allows you to enter all pay information for individual employees. This option should be used to enter or
change the current pay data for a single employee. Normally, the option “Rapid Employee Entry” will be used to
enter the majority of your pay data. For single employee checks or changes, this option is provided. When you select
this option, the system will prompt you for the employee number. Enter the employee number or <click> the Down
Arrow (F2 by default) to scroll through the employee file to make your selection.
Once you have selected the employee, a screen will be displayed showing the employee name and number, the
normal pay rate and hours, the home department, and the pay cycle. There is also three Pay Information items,
which will allow you to change the default pay information. The data items are described on the following pages.
Pay
Hours
This data item indicates to the system whether or not the employee is to
be paid on this payroll cycle. The default value is with the checkbox
<clicked> on. If you have the checkbox <clicked> on, this employee will
be paid on this pay cycle. If you leave the checkbox blank, the employee
will not be paid until the pay data for this employee is re-entered. By
leaving the checkbox blank, the employee will not be included in this pay
cycle.
The "Hours" button allows you to change the default hours, pay rates,
WC Class, and department allocation. The system will display another
screen, which will allow you to change all of the default values. The
default pay information will be the Home Department, Normal Hours,
WC Class, and Normal Base Rate set up in the employee's master file.
If you have already entered the pay data for this cycle, those values will
be retained as the defaults. This screen is a scrolling window, which
allows you to enter up to twenty (20) different pay rates, hour types,
hours, WC Classes, project and cost code allocations, and/or
departments. If the employee is hourly, each pay rate will be multiplied
by the number of hours to calculate the total pay.
If the employee is salaried, the salary amount will always remain the
same but will be distributed between the departments or hour types by
the percentage of hours on each line. For salaried employees, you may
enter a bonus check by entering zero hours (which calculates a zero
salary distribution), and then enter a special pay type for the bonus
amount.
<Clicking> on the "Hours" button will allow you to enter the necessary
data items for each detail line of input. They are discussed in the
following items in this table.
Chapter 3
Enter Transactions
Page 3-1
Payroll User Manual
Hours Type
This data item contains the hour type (time category) for this line of input. The time
categories are those you have set up in the Master Configuration. You may <click>
on the pull down menu to choose from the fifteen available time categories. After
you make your selection, the time category description will be displayed below this
data
item.
If the employee is hourly, the time category factor for this type will be used to
calculate the hourly rate from the employee's base rate. The adjusted hourly rate will
equal the normal hourly rate multiplied by the factor. So an hourly rate of $10.00
with a factor of 1.500 will provide an adjusted hourly rate of $15.00. If the category
is 11-15, the hours entered will be subtracted from the employee's personal time
balances that have been defined.
Job?
This data item indicates whether or not you wish to allocate the employees hours
and pay to project or job. If the Job Cost interaction has been turned off in the
Master Configuration, you will not be allowed to access this data item.
If you leave the checkbox blank, the system will assume that the pay will be
allocated to a department or to the main company, if the departmental feature is not
turned on. If you <click> on the checkbox, the system will assume the pay will be
allocated to a project and you must enter a project number and a cost code.
Dept./Job
This data item will be turned off if the department breakdown and Job Cost
integration in the Master Configuration is turned off. This data item either contains
the department number of the department that you would like to allocate the wages
to or the project number in which you want to allocate expenses to.
If you have left the checkbox blank on the “Job?” you may enter the department
number or <click> the Down Arrow (F2 by default) to scroll through the
department file to make your selection. The department description will be displayed
below this data item. If you have <clicked> on the “Job?” checkbox, you must enter
an existing project number that has been set up in the Job Cost module. You may
<click> the Down Arrow (F2 by default) to scroll through the project file to make
your selection. The project description will be displayed below this data item.
Cost Code
This data item will be turned on only when the wages are being allocated to a
project. This data item contains the project code number that the wages will be
allocated to within the selected project. You must enter a valid project code, or
<click> the Down Arrow (F2 by default) to scroll through the file to make your
selection. Once the project code is selected, the system will set the detail level from
the “JC Detail Type” in the Master Configuration and search for the project detail.
In the Job Cost configuration, you may configure the system to require the detail to
be set up before any costs may be allocated to the Project (Require Cost Budget?).
If so, the system will give you a warning “Invalid Project Code,” if you do not
select a valid project code.
If you do not require the detail to be set up with a budget, the system will display a
window that indicates the detail was not set up and asks you if you wish to add the
new entry to the project. If you answer (Y)es, the system will allow you to continue
and will add the detail to the project when the check is printed. The Project Code
description will be displayed below the data item over the project description.
Page 3-2
Enter Transactions
Chapter 3
Payroll User Manual
W.C.
This data item contains the workers' compensation class for the type of work that
was performed. This item will not be displayed if the feature “Allow Workers'
Comp. Class” in the Master Configuration is turned off.
The default value will be the default WC Class set up in the employee's master file.
You may accept this WC Class or press the space bar to blank the field and then
press ENTER to scroll through the WC Class file to make your selection. For
hourly employees, if you choose a WC Class that has a predefined pay rate set up,
the system will use this rate instead of the employee's hourly rate.
Hours
This data item contains the number of hours for this hour’s type or
project/department. For hourly employees, the number of hours entered will be
multiplied by the pay rate to calculate the amount of wages. For salaried employees,
the system will perform the percentage breakdown calculations as described in the
pay rate discussion of this section.
The “Total Hours” field will keep track of the hours that have been distributed.
This makes it easier for you to determine when an employee has reached the point
where you need to allocate overtime rates instead of regular pay rates.
Rate
This data item will be turned off if the feature Override Pay Rates in the Master
Configuration is turned off or if the employee is salaried. For hourly employees, this
value will be the base hourly rate (or WC Class rate) multiplied by the pay factor of
the type of time category for this line of input. For salaried employees, the system
will perform a special calculation. The hours for all lines of input will be added to
calculate the total number of hours worked. The hours for each line of input will
then be used to calculate the percentage of hours for each line.
This percentage will then be multiplied by the salary to determine the amount of the
salary for each line. This allows you to immediately visualize the salary breakdown
by department or hour’s type. You may enter zero hours to force the calculation of
zero salary to enter a “bonus only” type check.
Amount
This data item contains the amount of wages for this hour’s type or department. You
will not be allowed to change this value. It is used for calculation and display
purposes only. For hourly employees, this value will be the pay rate multiplied by
the number of hours. For salaried employees, this value will be the salary
distribution calculated and displayed in the Rate data item.
When you have completed the entry of detail hours for this employee, <click> on the Save button to return to the
main screen. If there has been any Special Pay Types assigned to this employee and you are using the special
calculation methods (Hour Ext & Gr Wage %), the system will automatically recalculate these Special Pay Type
amounts when you save this information.
<Clicking> on the Pay Types button will allow you to enter Special Pay Type information for this employee for this
paycheck.
You may use this option to change any existing earnings or deductions or add a new earning or deduction. For
example, you may need to add a temporary (one time only) bonus amount.
The system will display another screen which will allow you to change all of the current values. These special pay
types may also be changed while setting up the employee. If you have turned on the feature “Allow VOT
Calculations” in the Master Configuration and the first character of the first special pay type is the letter “V,” the
system will automatically calculate the overtime pay for this employee.
This is based on the U.S. Department of Labor formula for computing Extra Half-Time for Overtime. The formula
calculating the overtime pay is (Form: WH-134):
Gross Earnings X Overtime Hours
Total Hours
2
Chapter 3
Enter Transactions
Page 3-3
Payroll User Manual
For each special pay type that you want to set up, you may enter the special pay type number or <click> the Down
Arrow (F2 by default) to scroll through the Special Pay Type file to make your selection. Select the special pay
type, and <click> “OK.”
WC
If you have turned on the feature to “Allow Workers' Comp. Class?” in
the Master Configuration, your cursor will be positioned in this field;
otherwise this field will not appear. This “checkbox” field allows you to
classify whether certain earnings, (such as bonuses, commissions, etc.)
should be used in calculating the Workers' Compensation liabilities. The
WC class will be updated if you <click> "on" this checkbox as the
default WC class for the employee. Press TAB to move to the “amount”
field.
Amount
This field contains the actual amount of the special pay type. This will be
the amount of the deduction, extra earning, additional FIT, etc. You may
change, or remove this amount. When you have entered the necessary
special pay types for this employee, <click> on the "Save" button to
validate this screen.
Additional Pay Calculations
There are also two calculation methods (Hour Ext & Gr Wage %) that may be used while you are changing these
special pay types. These buttons allow the quick calculation of amounts based on either a rate per hour worked or
percentage of gross wages. These keys are discussed in the following section: This feature may be extremely useful
in performing payroll calculations for companies required doing “union” calculations and reporting.
Hourly Extension
This function allows you to calculate an earning or deduction amount
based on the number of hours worked times a dollar amount per hour.
You should enter the dollar amount per hour in the “Amount” data field
and then, <click> on the "Hour Ext" button.
The system will calculate the total number of hours, multiply this by the
amount per hour entered, and place the result in the “Amount” data field
for this special pay type. Keep in mind, this may be established
automatically by setting the “Type” for each Special Pay Type in the
Employee's Master File. If so, this procedure is not required to have the
calculation automatically performed.
Gross Wage %
This function allows you to calculate an earning based on a percentage of
the gross wages. You should enter the percentage in the “Amount” data
field and then, <click> on the "Gr. Wage %" button. The system will
calculate the total gross wages, multiply this by the percentage entered,
and place the result in the “Amount” data field for this special pay type.
Keep in mind, this may be established automatically by setting the
“Type” for each Special Pay Type in the Employee's Master File. If so,
this procedure is not required to have the calculation automatically
performed.
After you have entered all of the necessary pay information for the employee, <click> on the Save button to
validate. At this point you may edit any of the information, <click> on the Cancel button to exit from this employee
without validating, or <click> on the Save button to validate. After you have validated, the system will perform all
pay and tax calculations and display another window, which shows you the summarized pay information.
This summary information includes the amounts for Normal Earnings, Additional Earnings, Non-Cash Earnings,
Deductions, Total Tax Amount, Total FICA Amount, Net Check Amount, weeks worked, and the breakdown of tax
amounts by tax table. You may <click> on the Save button to validate and save the pay information, or you may
change the tax amounts that have been calculated for each of the tax tables set up for this employee, the weeks
worked, and the FICA amount.
Page 3-4
Enter Transactions
Chapter 3
Payroll User Manual
This allows you to override the calculated tax amounts for FIT, SIT, LIT, FICA, and/or weeks worked, if necessary.
You will be allowed to change the FICA amount only if you turned on the feature “Allow Override of FICA” in the
Master Configuration. <Click> on the Save button to validate and the pay information will be updated for the
employee and then you will be asked for the next employee.
NOTE
No historical information will be updated until after you have printed pay
checks.
Results:
coPR1cy.dbf - Employee File
- Current Pay Data updated
coPRB.dbf – Current Pay Cycle File
- Current Pay Data updated
RAPID EMPLOYEE ENTRY (PR0102)
This option allows you to rapidly input all pay information for employees within a specified pay cycle. Employees
will be automatically retrieved by department, in alphabetic or numeric order.
This option will normally be used to enter most of the current pay data. Select the range of the employees to include
and then select the pay cycle to run or choose “all” for all pay cycles. The default pay cycle will be the default set
up in the Master Configuration. The system will then prompt you to answer two questions. Assume the default pay
for Salaried Employees and Assume the default pay for Hourly Employees.
The first question allows you to specify whether you want to use the default pay information for all “Salaried”
employees. By <clicking> on the checkbox, the system by-passes the procedure that would require you to verify
each employees pay data for each check run. If you know there are no changes to be made to any of the employees
selected in this range, turning on this option will save you time. If there are changes to be made, then leave this
checkbox blank.
The second question allows you to specify whether you want to use the default pay information for all “Hourly”
employees. By <clicking> on the checkbox, the system by-passes the procedure that would require you to verify
each employees pay data for each check run. If you know there are no changes to be made to any of the employees
selected in this range, turning on this option will save you time. If there are changes to be made, then leave this
checkbox blank.
If you <click> on both questions, the system will calculate the current pay data for all employees in the file
automatically and you can then proceed to print the “Check Summary Report” to verify the pay data information. If
you leave either question blank, then the following procedures will apply.
Based on the employee range, department mask, and pay cycle selected, the system will display each employee,
allow pay data changes, and then after validation, display the next employee. This procedure allows you to very
quickly enter the pay data for a large number of employees.
As each employee is displayed, you may press ENTER to accept the default pay data or edit the pay information. If
you choose to edit the default pay information, there are three data items that you may use.
Chapter 3
Enter Transactions
Page 3-5
Payroll User Manual
These data items are described on the following pages.
Pay
This data item indicates to the system whether or not the employee is to be paid on this
payroll cycle. The default value is with the checkbox <clicked> on. If you have the
checkbox <clicked> on, this employee will be paid on this pay cycle. If you leave the
checkbox blank, the employee will not be paid until the pay data for this employee is reentered. By leaving the checkbox blank, the employee will not be included in this pay
cycle.
The "Hours" button allows you to change the default hours, pay rates, WC Class, and
department allocation. The system will display another screen, which will allow you to
change all of the default values. The default pay information will be the Home
Department, Normal Hours, WC Class, and Normal Base Rate set up in the employee's
master file.
Hours
If you have already entered the pay data for this cycle, those values will be retained as the
defaults. This screen is a scrolling window, which allows you to enter up to twenty (20)
different pay rates, hour types, hours, WC Classes, project and cost code allocations,
and/or departments. If the employee is hourly, each pay rate will be multiplied by the
number of hours to calculate the total pay. If the employee is salaried, the salary amount
will always remain the same but will be distributed between the departments or hour
types by the percentage of hours on each line. For salaried employees, you may enter a
bonus check by entering zero hours (which calculates a zero salary distribution), and
then enter a special pay type for the bonus amount.
Hours Type
<Clicking> on the "Hours" button will allow you to enter the necessary data items for
each detail line of input. They are discussed as follows:
This data item contains the hour type (time category) for this line of input. The time
categories are those you have set up in the Master Configuration. You may <click> on the
pull down menu to choose from the fifteen available time categories. After you make your
selection, the time category description will be displayed below this data item.
If the employee is hourly, the time category factor for this type will be used to calculate
the hourly rate from the employee's base rate. The adjusted hourly rate will equal the
normal hourly rate multiplied by the factor. So an hourly rate of $10.00 with a factor of
1.500 will provide an adjusted hourly rate of $15.00. If the category is 11-15, the hours
entered will be subtracted from the employee's personal time balances that have been
defined.
Job?
This data item indicates whether or not you wish to allocate the employees hours and pay
to project or job. If the Job Cost interaction has been turned off in the Master
Configuration, you will not be allowed to access this data item.
If you leave the
checkbox blank, the system will assume that the pay will be allocated to a department or
to the main company, if the departmental feature is not turned on. If you <click> on the
checkbox, the system will assume the pay will be allocated to a project and you must enter
a project number and a cost code.
Dept./Job
This data item will be turned off if the department breakdown and Job Cost integration in
the Master Configuration is turned off. This data item either contains the department
number of the department that you would like to allocate the wages to or the project
number in which you want to allocate expenses to. If you have left the checkbox blank
on the “Job?” you may enter the department number or <click> the Down Arrow (F2 by
default) to scroll through the department file to make your selection. The department
description will be displayed below this data item. If you have <clicked> on the “Job?”
checkbox, you must enter an existing project number that has been set up in the Job Cost
module. You may <click> the Down Arrow (F2 by default) to scroll through the project
file to make your selection. The project description will be displayed below this data item.
Page 3-6
Enter Transactions
Chapter 3
Payroll User Manual
Cost Code
This data item will be turned on only when the wages are being allocated to a project. This
data item contains the project code number that the wages will be allocated to within the
selected project. You must enter a valid project code, or <click> the Down Arrow (F2 by
default) to scroll through the file to make your selection. Once the project code is
selected, the system will set the detail level from the “JC Detail Type” in the Master
Configuration and search for the project detail.
In the Job Cost configuration, you may configure the system to require the detail to be set
up before any costs may be allocated to the Project (Require Cost Budget?). If so, the
system will give you a warning “Invalid Project Code,” if you do not select a valid
project code.
If you do not require the detail to be set up with a budget, the system will display a
window that indicates the detail was not set up and asks you if you wish to add the new
entry to the project. If you answer (Y)es, the system will allow you to continue and will
add the detail to the project when the check is printed. The Project Code description will
be displayed below the data item over the project description.
W.C.
This data item contains the workers' compensation class for the type of work that was
performed. This item will not be displayed if the feature “Allow Workers' Comp. Class”
in the Master Configuration is turned off.
The default value will be the default WC Class set up in the employee's master file. You
may accept this WC Class or press the space bar to blank the field and then press ENTER
to scroll through the WC Class file to make your selection. For hourly employees, if you
choose a WC Class that has a predefined pay rate set up, the system will use this rate
instead of the employee's hourly rate.
Hours
This data item contains the number of hours for this hour’s type or project/department. For
hourly employees, the number of hours entered will be multiplied by the pay rate to
calculate the amount of wages. For salaried employees, the system will perform the
percentage breakdown calculations as described in the pay rate discussion of this section.
The “Total Hours” field will keep track of the hours that have been distributed. This
makes it easier for you to determine when an employee has reached the point where you
need to allocate overtime rates instead of regular pay rates.
Rate
This data item will be turned off if the feature Override Pay Rates in the Master
Configuration is turned off or if the employee is salaried. For hourly employees, this value
will be the base hourly rate (or WC Class rate) multiplied by the pay factor of the type of
time category for this line of input. For salaried employees, the system will perform a
special calculation. The hours for all lines of input will be added to calculate the total
number of hours worked. The hours for each line of input will then be used to calculate
the percentage of hours for each line.
This percentage will then be multiplied by the salary to determine the amount of the salary
for each line. This allows you to immediately visualize the salary breakdown by
department or hour’s type. You may enter zero hours to force the calculation of zero
salary to enter a “bonus only” type check.
Amount
Chapter 3
This data item contains the amount of wages for this hour’s type or department. You will
not be allowed to change this value. It is used for calculation and display purposes only.
For hourly employees, this value will be the pay rate multiplied by the number of hours.
For salaried employees, this value will be the salary distribution calculated and displayed
in the Rate data item.
Enter Transactions
Page 3-7
Payroll User Manual
When you have completed the entry of detail hours for this employee, <click> on the Save button to return to the
main screen. If there has been any Special Pay Types assigned to this employee and you are using the special
calculation methods (Hour Ext & Gr Wage %), the system will automatically recalculate these Special Pay Type
amounts when you save this information.
<Clicking> on the Pay Types button will allow you to enter Special Pay Type information for this employee for this
paycheck.
You may use this option to change any existing earnings or deductions or add a new earning or deduction. For
example, you may need to add a temporary (one time only) bonus amount.
The system will display another screen which will allow you to change all of the current values. These special pay
types may also be changed while setting up the employee. If you have turned on the feature “Allow VOT
Calculations” in the Master Configuration and the first character of the first special pay type is the letter “V,” the
system will automatically calculate the overtime pay for this employee.
This is based on the U.S. Department of Labor formula for computing Extra Half-Time for Overtime. The formula
calculating the overtime pay is (Form: WH-134):
Gross Earnings X Overtime Hours
Total Hours
2
For each special pay type that you want to set up, you may enter the special pay type number or <click> the Down
Arrow (F2 by default) to scroll through the Special Pay Type file to make your selection. Select the special pay
type, and <click> “OK.”
WC
If you have turned on the feature to “Allow Workers' Comp. Class?” in
the Master Configuration, your cursor will be positioned in this field;
otherwise this field will not appear. This “checkbox” field allows you to
classify whether certain earnings, (such as bonuses, commissions, etc.)
should be used in calculating the Workers' Compensation liabilities. The
WC class will be updated if you <click> "on" this checkbox as the
default WC class for the employee. Press TAB to move to the “amount”
field.
Amount
This field contains the actual amount of the special pay type. This will be
the amount of the deduction, extra earning, additional FIT, etc. You may
change, or remove this amount. When you have entered the necessary
special pay types for this employee, <click> on the "Save" button to
validate this screen.
Additional Pay Calculations
There are also two buttons (Hour Ext. and Gt. Wage %) that may be used while you are changing these special pay
types. These buttons allow the quick calculation of amounts based on either a rate per hour worked or percentage of
gross wages. These buttons are discussed in the following section: This feature may be extremely useful in
performing payroll calculations for companies required to do “union” calculations and reporting.
Hourly Extension
This function allows you to calculate an earning or deduction amount
based on the number of hours worked times a dollar amount per hour.
You should enter the dollar amount per hour in the “Amount” data field
and then, instead of pressing TAB, <click> the Hour Ext. button.
The system will calculate the total number of hours, multiply this by the
amount per hour entered, and place the result in the “Amount” data field
for this special pay type. Keep in mind, this may be established
automatically by setting the “Type” for each Special Pay Type in the
Employee's Master File. If so, this procedure is not required to have the
calculation automatically performed.
Page 3-8
Enter Transactions
Chapter 3
Payroll User Manual
Gross Wage %
This function allows you to calculate an earning based on a percentage of
the gross wages. You should enter the percentage in the “Amount” data
field and then, instead of pressing TAB, <click> the Gr. Wage %
button. The system will calculate the total gross wages, multiply this by
the percentage entered, and place the result in the “Amount” data field
for this special pay type.
Keep in mind, this may be established automatically by setting the
“Type” for each Special Pay Type in the Employee's Master File. If so,
this procedure is not required to have the calculation automatically
performed.
After you have entered all of the necessary pay information for the employee, the system will ask you to <click> on
the “Save” button to validate. At this point you may edit any of the information, <click> “Cancel” to exit from this
employee without validating, or <click> on “Save” to validate. After you have validated, the system will perform all
pay and tax calculations and display another window which shows you the summarized pay information.
This summary information includes the amounts for Normal Earnings, Additional Earnings, Non-Cash Earnings,
Deductions, Total Tax Amount, FICA Amount, Net Check Amount, weeks worked, and the breakdown of tax
amounts by tax table. You may <click> “Save” to validate and save the pay information, or you may change the tax
amounts that have been calculated for each of the tax tables set up for this employee, the weeks worked, and the
FICA amount.
This allows you to override the calculated tax amounts for FIT, SIT, LIT, FICA, and/or weeks worked, if necessary.
You will be allowed to change the FICA amount only if you have specified (Y)es to the feature “Allow Override of
FICA” in the Master Configuration. <Click> “Save” to validate and the pay information will be updated for the
employee and then you will be asked for the next employee.
NOTE
No historical information will be updated until after you have printed pay
checks.
Results:
coPR1cy.dbf - Employee File
- Current Pay Data Updated
coPRB.dbf – Current Pay Cycle File
- Current Pay Data updated
PRINT CHECK SUMMARY (PR0104)
This option allows you to print a complete audit trail of all pay data and tax calculations for each employee with
current pay data set up. This option will print a report showing the detail of all of the current pay data that was
entered for this pay cycle. This is the report that should be used to verify the current pay data and/or Direct Deposit
pay data that was entered. When you select this option, the system will ask you for the range of employees to
include. The system will then prompt you for the beginning and ending date of the pay cycle and, the pay cycle to
run or all pay cycles. You may optionally, enter a department mask. You will then be asked to select the type of
checks to print. There are three (3) choices you may choose from:
Employees Receiving Checks
Employees Receiving Direct Deposit Stubs
All Employees Selected
<Click> on the “Start” button and the system will then ask you for the starting check number (which will default to
the next check number set up in the master configuration or if integrated to Check Reconciliation in the Set Up
Bank Accounts option in Accounts Payable), leave the default check number or enter a new beginning check
number.
Chapter 3
Enter Transactions
Page 3-9
Payroll User Manual
Finally, choose whether to include an “Account Summary” at the end of the report which breaks down all of the
General Ledger postings that will occur once this Payroll cycle is completed. This is optional each time the report is
run. Therefore, you may not want to include this level of detail while you are analyzing pay data entry. However,
once completed, you may want a final draft that includes everything, including the Account Summary. Then,
<click> on the “Start” button to begin printing the report.
The system will then print a report showing the current pay data summary and detail information for each employee
selected. The employees printed will be those in the employee range selected, those whose home department
matches the department mask, those whose pay cycle matches the selected pay cycle, those whose have current pay
data, and those who match the criteria selected for the type of checks to print.
The exception to this is if you may have used the automatic calculation for employee pay data and are now just
being able to review the employee pay data for this payroll cycle. Any employee whose pay information results in a
“negative check amount” will not appear on this report or will be included in the pay run.
NOTE
No historical information will be updated until after you have printed
paychecks.
Field Names:
Summary Information
Direct Deposit Brea
- Employee Name and Number
- Home Department
- Normal Earnings
- Additional Earnings
- Non-Cash Earnings
- Deductions
- Total Taxes
- Social Security
- Medicare
- Net Check
- Check Number
Employee's Bank Account Number
- Employee's Routing Number
- Amount being deposited into the account
Account Summary
- Department
- General Ledger Accounts
Detail Information
Hours Breakdown:
- Department/Project
- Hours Type
- Hours
- WC Class
- Rate
- Amount
Special Pay Type Breakdown
- Code
- Amount
Tax Table Breakdown
- Tax Table Number
- Tax Amount
- Totals
- Total Hours by Type
Page 3-10
Enter Transactions
Chapter 3
Payroll User Manual
Check Summary
Chapter 3
Enter Transactions
Page 3-11
Payroll User Manual
Page 3-12
Enter Transactions
Chapter 3
Payroll User Manual
Chapter 3
Enter Transactions
Page 3-13
Payroll User Manual
Page 3-14
Enter Transactions
Chapter 3
Payroll User Manual
PRINT CERTIFIED PAYROLL (PR0110)
This report provides the specified employee reporting requirements for the U.S. Department of Labor (Wage and
Hour Division) Form #WH-347. This reporting is necessary on most government contracts. Make certain to print
this report before executing the “Print Checks” option.
The Certified Payroll report is designed to show the allocation of an employee's time to all projects during the
current pay period as well as the total number of hours and their breakdown by hour type. This “Hour Type”
includes all hours such as Regular Time, Overtime, Double-time, Vacation, etc. This is required by many
governmental agencies when performing government contracts. You may also use this report internally to show you
all project allocations during the current pay period.
It is very important to remember that this report must be printed prior to running the option “Print Checks.”
Once this option is executed, all current payroll and project allocation information is posted to the appropriate files
and the current amounts are cleared. The new payroll cycle is then ready to begin.
It may be worth pointing out at this point, that if you would like to maintain this information, you may use
CTRL+O to “Change Report Output Device” and redirect this report to a “Text” file which may be printed as
often as you desire. Once you have selected this option, the system will prompt you to choose a job to report on.
You may <click> the Down Arrow (F2 by default) to scroll through the job file. The system will also prompt you
for the type of classification you want the report generated from.
Job Cost Cost Code
Worker's Comp. Class
You may print the report based on either method, depending on your specific needs. Once you have <clicked> on
your choice, <click> on the "Start" button. The report will then be printed and the system will next prompt you for
the next project that you want to print.
Field Names:
- Project Number and Name
- Project Address
- Employee Name and Number
- Total Project Wages by Employee
- Other Earnings
- Gross Earnings
- FICA Amount
- Withholding Tax
- Other Deductions
- Total Deductions
- Net Check Amount
Detail Information:
Hours Breakdown:
- Type
- Work Classification
- Hours
- Rate
- Amount
- Total Hours by Employee
- Totals for Project
Chapter 3
Enter Transactions
Page 3-15
Payroll User Manual
Certified Payroll (By Job Cost Cost Code)
Page 3-16
Enter Transactions
Chapter 3
Payroll User Manual
Certified Payroll (By Worker’s Comp. Code)
Chapter 3
Enter Transactions
Page 3-17
Payroll User Manual
PRINT CHECKS (PR0105)
This option prints actual paychecks and/or Direct Deposit stubs (if you are utilizing Direct Deposit) for all
employees with current pay data set up. This option will automatically update all historical information for all
employees that checks are printed for.
This option should be used to print the normal paychecks and/or Direct Deposit stubs (if you are utilizing Direct
Deposit). The pay check form that will be used is the form set up in the Master Configuration, unless you are
integrated with Check Reconciliation. If so, then the pay check form will be defined within the bank account
information. The Direct Deposit stub that will be used is the form set up in the “Master Configuration” option. If
there is no form defined for the Direct Deposit stub, the system will automatically use the normal pay check form.
When paychecks and/or Direct Deposit stubs are printed the historical information is updated immediately.
When you select this option, the system will ask you for the range of employees to include. The system will then
prompt you for the beginning and ending date of the pay cycle and the pay cycle to run or all pay cycles. You may
optionally, enter a department mask. You will then be asked to select the type of checks to print. There are three (3)
choices you may choose from:
•
Employees Receiving Checks
•
Employees Receiving Direct Deposit Stubs
•
All Employees Selected
<Click> on the “Start” button and the system will then ask you for the starting check number (which will default to
the next check number set up in the master configuration), leave the default check number or enter a new
beginning check number and <click> on the “Save” button. If you enter a check number that already exists in the
Payroll Transaction Detail file (PR02), the system will generate a warning message at the bottom of the screen
stating that the Check Number already exists and will not allow you to proceed until a different check number is
entered.
A screen will appear with the “Check Form” that is currently selected.
Page 3-18
Enter Transactions
Chapter 3
Payroll User Manual
You may <click> on the “Browse” button, which will allow you to select another valid check form for the next
series of checks you will enter. <Click> on the “Select” button to continue with the printing process.
The system will then print the type of checks selected for each employee using the correct form based on the
selection chosen. The employees printed will be those in the employee range selected, those whose home
department matches the department mask, those whose pay cycle matches the selected pay cycle, those whose have
current pay data, and those who match the criteria selected for the type of checks to print.
The exception to this is if you may have used the automatic calculation and an employee whose pay information
results in a “negative check amount.” They will not be included in the pay run. If your printer jams or your checks
are not in complete alignment, you will need to use the option “Void Checks” to void the check run or a specific
check and then re-enter the information and print the check again.
Chapter 3
Enter Transactions
Page 3-19
Payroll User Manual
Print Checks
Page 3-20
Enter Transactions
Chapter 3
Payroll User Manual
WRITE A SINGLE CHECK (PR0107)
This option allows you to generate a single paycheck for an employee. All historical information will be updated at
the time you execute this option. This option should be used when it is necessary to pay an employee outside of their
normal pay cycle. This could be used, for example, to pay terminated employees or employees leaving for vacation,
etc.
The pay data information that you can enter is the same as the option “Single Employee Entry.” After you have
entered all pay data, <click> on the “Write” button to validate. The system will show the paycheck distribution
screen for any last changes to the taxing information. <Click> on the “Save” button and the system will then ask
you for the starting check number (which will default to the next check number set up in the master configuration
or if integrated to Check Reconciliation under Set Up Bank Accounts in Accounts Payable). Leave the default
check number or enter a new beginning check number and <click> on the “Save” button and the paycheck will be
printed and then the historical, project/department, and General Ledger information will be updated. If you enter a
check number that already exists in the Payroll Transaction Detail file (PR02), the system will generate a warning
message at the bottom of the screen stating that the Check Number already exists and will not allow you to proceed
until a different check number is entered.
Another exception to this is if you have an employee whose pay information results in a “negative check amount.”
No check will print and you will be given a warning message that you cannot proceed. The General Ledger
integration file for the payroll journal entry will only be updated if the General Ledger is set to be interactive in the
Master Configuration.
Results:
coPR1cy.dbf - Employee File
- Current Pay Data Cleared
- Accumulators Updated
- Personal Time Balances Reduced (if applicable)
- Date of Last Check Updated
coPR2cy.dbf - Transaction File (optional)
- Transaction Record Added
coPRCcy.dbf - Transaction Detail File (optional)
- Transaction Detail File Updated
coPR3cy.dbf - Department File (optional)
- Period Wages and Expenses Updated
coPR7.dbf - Workers' Comp. Class File (optional)
- Monthly Pay Totals by Class Updated
coPRMcy.dbf – Historical File
- Historical information updated
PR2GL.co - General Ledger Integration File
(optional)
- Payroll Journal Entry Transaction Recorded
coJC1dy.dbf - Project File
- Current, Month-To-Date, and Project-To-Date Hours
and Costs Updated
coJC2dy.dbf – Project Detail File (optional)
- Transaction Record Added to File
coJC3dy.dbf - Transaction File (optional)
- Transaction Record Added to File
coCR2.dbf - Check Reconciliation Detail File
- Updates check record if integration is turned on
Chapter 3
Enter Transactions
Page 3-21
Payroll User Manual
Write a Single Check
VOID CHECKS (PR0111)
This option allows you to void a range of check numbers that have been printed. To void a single pay check for an
employee, enter the same check number for both the beginning and ending numbers. All historical information will
be updated at the time you execute this option.
This option should be used when it is necessary to void paychecks that were written and need to be voided in a range
of check numbers or a single check number. All historical and General Ledger information is immediately updated
at the time you void the checks.
Page 3-22
Enter Transactions
Chapter 3
Payroll User Manual
This option will print a “Void Check Report” that will contain all information about each check that has been
voided. This information includes employee, department, normal earnings, additional earnings, non-cash earnings,
deductions, total taxes, FICA amount, net check and check number.
The information being voided is generated from the original check as it was calculated at its time of inception and
not based on any settings currently configured in the Payroll Module.
There is an option to Restore Previous Pay Data for the employees whose checks are being voided. This allows the
whole Payroll cycle to be “voided” and ALL of the current pay cycle date (including all Department allocation
and Job cost allocations by employee) to be restored. No need to re-key the entire Pay Data cycle. You will still
need to go into each employee through Single or Rapid Employee Entry to validate in order to recalculate Payroll
taxes and some deductions.
NOTE
All FUTA and SUTA calculations and General Ledger entries for a voided
check are automatically taken into consideration and posted to the integration
file.
Results:
coPR1cy.dbf - Employee File
- Historical Information updated
- Current Pay Data cleared
- Accumulators updated
- Personal Time Balances increased (if applicable)
- Date of Last Check updated
coPR2cy.dbf - Transaction File (optional)
- Transaction Record added
coPRCcy.dbf - Transaction Detail File (optional)
- Transaction Detail File updated
coPR3cy.dbf - Department File (optional)
- Period Wages and Expenses updated
coPR7.dbf - Workers' Comp. Class File (optional)
- Monthly Pay Totals by Class updated
coPRMcy.dbf – Historical File
- Historical Information Updated
PR2GL.co - General Ledger Integration File
(optional)
- Payroll Journal Entry Transaction recorded
coJC1dy.dbf - Project File
- Current, Month-To-Date, and Project-To-Date Hours
and Costs Updated
coJC2dy.dbf – Project Detail File (optional)
- Transaction Record Added to File
coJC3dy.dbf - Transaction File (optional)
- Transaction Record Added to File
coCR2.dbf - Check Reconciliation Detail File
- Updates check record if integration is turned on
Chapter 3
Enter Transactions
Page 3-23
Payroll User Manual
RECORD ACCRUED PERSONAL TIME (PR0108)
This option allows you to enter new accruals of personal time (such as vacation, sick, etc.). This option allows you
to select an employee and then enter additional personal time hours that the employee has accrued. The personal
time categories are the time categories 11 through 15 that you have set up in the Master Configuration. When you
select this option, the system will prompt you to enter the employee number. You may <click> the Down Arrow
(F2 by default) to scroll through the employee file to make your selection.
After you have selected the employee, a screen will be displayed showing the employee's name and number, their
social security number, and current status. The system will then display the five personal time category descriptions,
their current balances, and then allow you to enter the accrued time (in hours) for each. As you enter the accrued
hours, you will notice that the current balances will be adjusted accordingly.
After the accrued time has been entered for each category, you may <click> on the “Save” button to validate and the
system will update the employee's file and then prompt you for the next employee. These balances will be decreased
by the hours entered for the time categories 11 - 15 during pay data entry. The “Employee Personal Time Balance”
report can be printed at any time to review the status of the time balances for each employee.
Results:
coPR1cy.dbf - Employee File
- Personal Time Balances updated
RECORD EMPLOYEE COMMENTS (PR0109)
This option allows you to input, review and change personnel comments concerning individual employees. This
option provides you with a sub-menu through which you may either enter new employee comments, review, and/or
change existing employee comments. These comments are personnel or activity related comments that you would
like to keep on file for each employee. You may enter up to 1000 comments for each employee or a maximum of
30,000 comments for all employees.
These comments could be printed using the “Employee Comments Report” at review time to assist in evaluating the
employee's performance. Comments could reflect a daily log of tardiness to work, doctor's appointments, sick days,
good behavior, or superior job performance. The key is that you have a tool that you may use on a daily basis to
keep a diary of information while it is still fresh and relevant in your mind.
When you select this option, the system will prompt you to select the employee. You may enter the employee
number or <click> the Down Arrow (F2 by default) to scroll through the employee file. After you have selected the
employee, the employee number and name will be displayed as well as a scrolling window with up to 1000
comments for this employee. The system will then display two data items, which are used to enter the comments.
These data items are described below.
Date
This data item is the date of the comment. This date will be used by the
system as the key to sort the comments in chronological order.
<Clicking> the Down Arrow (F2 by default) will display a calendar for
you to choose a date.
Comment
This data item contains the actual comment. This is a fifty (50) character
field (alpha/numeric) for any descriptive comment that you would like to
enter. When the comments have been entered, <click> on the “Save”
button to validate and update the employee's files. The system will then
prompt you for the next employee.
Page 3-24
Enter Transactions
Chapter 3
Payroll User Manual
NOTE
If you have an office environment that would allow several members of your
staff to have access to the computer, you may want to create security rights on
this menu option. Advanced Security can restrict access to all Payroll
functions. Information contained here may be deemed highly sensitive
material and therefore should be protected.
Results:
coPR6.dbf - Employee Comments File
- Employee Comment Records updated
Chapter 3
Enter Transactions
Page 3-25
Payroll User Manual
This page intentionally left blank.
Page 3-26
Enter Transactions
Chapter 3
Payroll User Manual
CHAPTER 4
PRINT REPORTS
This section includes a description and sample of each report generated by the Payroll program. A listing of all of
the fields is included on each report, and some examples of how to utilize each report. Reports are a combination of
information from several different fields; therefore, no updating of files is performed.
All modules are designed to be extremely flexible in the way you may organize data and print the corresponding
reports accordingly. Do not assume that these sample reports reflect the only way in which these reports may be
structured and/or printed. These reports may be used as a cross-reference to determine which reports you should be
using in your daily activities or when trying to locate specific types of information.
The equations used to calculate the amounts on the reports and how these reports are generated (through the use of
various questions asked by the system) are discussed here. Reports illustrate the results of transactions from the
options within this module or from another integrated module. Reports do not update the actual files.
STANDARD FEATURES FOR REPORTS
Here is a listing of some standard features, which can be utilized with all reports:
CTRL+O (Output Options)
Destination - Printer Choice, E-Mail or Display
Report Titles
E-mail Settings - Recipient and Subject
Font Attributes
Report Print Options
Displayed Report Options
Range of Accounts
Report Sorting Preference
Masking (Wildcards)
Period to Report On
Cancel the Print Job
CTRL+O (Output Options)
You are able to change your Output Options (printing preference) at any time when you are within the Infinity
POWER programs. By Pressing CTRL O, an overlay screen will appear with your available output options. You
may choose to print to a Printer, send the report as an e-mail, or display the report on the screen.
If you select “Printer,” this will cause the output to be generated to whichever printer device you currently have as
“active” in the Windows operating system. You may choose to change printers by clicking on the “Print Options”
button and select another printer that you have set up in your Windows program. Also, by choosing “Printer,” you
have the capability of changing the title of the report you will be printing. The standard report name will be shown,
however, if you wish to overwrite it with another title, you may do so.
If you select “E-Mail,” this will cause the output to generate an e-mail to a specific recipient. On the Output
Options screen, you will need to define the recipient of the e-mail in the “To” field. Make sure to enter their e-mail
address and not just their name. The “Subject” field is automatically assigned the name of the report you will be
generating, however, if you wish to overwrite it with another subject, you may do so.
Chapter 4
Print Reports
Page 4-1
Payroll User Manual
NOTE
Be sure you have defined your “E-Mail Host” in the Output section of the
Configuration Settings, otherwise, this feature will not be operational. Your
name should be your e-mail address, not your actual name.
If you select “Display,” this will cause the output to generate the report to the screen. All reports are generally
created in an 80 or 132 column format. You may size your output window both larger and smaller to allow you to
view as much of the report on the screen at once as possible.
If you are used to using the Windows Character-based or UNIX version of Infinity POWER, you realize that you
may also send reports to a “text” file for a myriad of uses. You may do the same in Windows, however, you must
set up a “printer” type in Windows that will direct the output to the file. Once this is done, any time you want to
direct reports to a file, you simply select the new printer definition under Windows.
The principal applies if you want to print any report or form as a FAX document. Define the FAX software as a
printer in Windows and simply redirect your output to that specific printer.
Font Attributes
Within the Output Options window, you can modify font attributes such as color, size, and styles for each report.
This allows you to be creative in your report styles whether formal, informal, or classic professional, depending on
the purpose of the report. You may choose a more informal style for internal reports, but select a more elegant style
for a customer. Selecting a font in the Printer Settings section affects printed reports only. If you select Print as the
output destination, this is the font that will be applied to the printed report.
You can also select a font style for the display destination, independent of the Print Settings font selection. In the
Display Settings section of the screen, click on the Fonts… button to open the Font window. From this window
select different fonts, add special effects such as underlining, change the color, font style (bold, italics, bold italic,
etc), and the font size. When a report is selected in display output, this is the font that will be applied when the
report is displayed on the screen.
NOTE
If you send a report to print directly from the displayed output screen, (Send
menu option or the Send to another output destination toolbar options) the
font selected in the Printer Settings will be the font that is applied to the
printed report, regardless of what font settings are selected for the Display
Settings. Font attributes are unique for Printer Settings and Display settings
due to the fact that your printer and the Infinity POWER system may not
support all of the same fonts.
After selecting font attributes for either the Printer Settings or Display
Settings, clicking the corresponding Save button will make those current
selections the default settings. If you select different attributes between
displaying/printing reports, you must click the Apply button for the new font
attributes to be applied. Otherwise, the selections made for the previous report
(within the same session), will be applied to the current report. Once you log
out of the system, the last saved printer and display settings will be applied to
the reports when you log back into the system.
If E-Mail is selected as the report output destination, the actual report will be embedded within the e-mail message
as an HTML display in a fixed Courier font so that columns will automatically adjust to align properly.
Page 4-2
Print Reports
Chapter 4
Payroll User Manual
Report Print Options
In the Printer Settings section, click on the Options… button to open the Print window. You can select the entire
report, the current page, or a range of pages, or a specific page to be printed. You can also custom adjust form sizes
by increasing or decreasing the horizontal and vertical offsets. The horizontal offset adjusts the alignment in
fractions of an inch. The default offset value is set to 0.00. A positive increase will adjust alignment to the right, a
negative value will adjust alignment to the left. The vertical offset adjusts the alignment in fractions of an inch.
The default offset value is set to 0.00. A positive increase will adjust alignment down, a negative value will adjust
alignment up.
Displayed Report Options
If the report output is Display, you can also use the navigation toolbar buttons to jump to another page within the
displayed report, or click the # toolbar button to specify a particular page. This comes in handy to view specific
information in a long report, without having to navigate page by page.
From within a displayed report, you can also send the report (current page or all pages) to print or change the output
destination for the current page or the entire report without leaving the screen.
By clicking the search toolbar button, you can also search for specified text within the displayed report. This allows
you to search for any text, amounts, dates, etc, contained within the report.
Range of Accounts
When asked to define the range of account numbers to report on, place your cursor on the “Beginning Account #”
field and click the Down Arrow (F2 by default) to gain access to the account listing. You may choose to search for
accounts by account number or description. Once you have selected the Beginning Account Number, click on the
Ending Account Number field and then click the Down Arrow (F2 by default) to gain access to the account listing
to choose your ending number.
Report Sorting Preference
This is the order in which items will print on reports. This is handled through the method in which you choose the
beginning and ending account range. For example, you will be given two choices when you select your beginning
and ending account number when clicking the Down Arrow (F2 by default):
Employee Number
Name
Instead of printing all reports in order of the account number, you may elect to print them in alphabetical order by
the employee's name by selecting your account range by “Name.”
Masking (Wildcards)
The account number mask is a field which gives you the ability to set up a specific search and have the system only
retrieves those items defined within the parameters of that search. This is very beneficial if you want to print all
reports for a particular department or location.
Your account number is the key to how specific information may be searched on. The account number length will be
reflected in the mask field on your screen.
The account number mask field would appear on your screen as:
[
]
*123567890*
Chapter 4
Print Reports
Page 4-3
Payroll User Manual
Assuming that you were utilizing a five digit account number with the last two digits representing the department or
location number (e.g., “03”), to print a report that would mask for a department or location you would enter the
following:
[
03
]
*1234567890*
The areas not being masked can either be spaces or question marks. Question marks are the standard wildcard
format.
Period to Report On
If a report is a summary type report, the information contained in the report will be inclusive of all data input during
the date range specified at the time of selection of the report. This provides you the ability to do historical period
reporting as well as current period reporting.
Cancel the Print Job
Clicking on the “Cancel” button during the printing of a report will cancel the print job. However, keep in mind,
some of the report may still be in the printer buffer at the time of cancellation.
TRANSACTION REPORTS
Two reports are available by selecting the Transaction Reports menu option:
Check Register
Check Register by Employee
Each report is discussed on the following pages.
Check Register (PR0201)
This report is an optional feature which lists all checks for a specific date range in check number order. This report
provides you with an audit trail of all payroll checks written through the “Enter Transactions” menu option. You
may select the beginning and ending date range to include in this report, which could include the entire year.
After entering the desired date range, the system will prompt you to select a “non-detailed” or “detailed listing.” If
you select the “Detailed Listing,” the system will print all of the detail for each check for the date range specified
and then include a summary report at the end which will reflect all of the General Ledger accounting entries that
apply to these checks. This serves as an excellent auditing tool to cross check against the General Ledger.
Field Names:
- Employee Number & Name
- Department
- Normal Earnings
- Additional Earnings
- Non-Cash Earnings
- Deductions
- Total (Federal Withholding) Taxes
- FICA (Taxes) Amount
- Net Check
- Check Number
- Check Date
- Grand Totals
- Hours by Pay Category
- Total Hours
Page 4-4
Print Reports
Chapter 4
Payroll User Manual
- Total Weeks Worked
- Special Pay Types Allocations
Chapter 4
Print Reports
Page 4-5
Payroll User Manual
Check Register (Non-Detailed)
Page 4-6
Print Reports
Chapter 4
Payroll User Manual
Check Register (Detailed)
Chapter 4
Print Reports
Page 4-7
Payroll User Manual
Page 4-8
Print Reports
Chapter 4
Payroll User Manual
Chapter 4
Print Reports
Page 4-9
Payroll User Manual
Page 4-10
Print Reports
Chapter 4
Payroll User Manual
Check Register by Employee (PR0202)
This report is an optional feature which lists all checks by employee, for a specific date range in check number
order. This report provides you with an audit trail of all payroll checks by employee written through the “Enter
Transactions” menu option. You may select a range of employees, departmental “mask,” and the beginning and
ending date range to include in this report, which could include the entire year.
After entering the desired date range, the system will prompt you to select a “non-detailed” or “detailed listing.” If
you select the “Detailed Listing,” the system will print all of the detail for each check for the date range specified
and then include a summary report at the end which will reflect all of the General Ledger accounting entries that
apply to these checks. This serves as an excellent auditing tool to cross check against the General Ledger.
Field Names:
- Employee Number & Name
- Department
- Normal Earnings
- Additional Earnings
- Non-Cash Earnings
- Deductions
- Total (Federal Withholding) Taxes
- FICA (Taxes) Amount
- Net Check
- Check Number
- Check Date
- Grand Totals
- Hours by Pay Category
- Total Hours
- Total Weeks Worked
- Special Pay Types Allocations
Chapter 4
Print Reports
Page 4-11
Payroll User Manual
Check Register by Employee (Non-Detailed)
Page 4-12
Print Reports
Chapter 4
Payroll User Manual
Check Register by Employee (Detailed)
Chapter 4
Print Reports
Page 4-13
Payroll User Manual
Page 4-14
Print Reports
Chapter 4
Payroll User Manual
Chapter 4
Print Reports
Page 4-15
Payroll User Manual
Page 4-16
Print Reports
Chapter 4
Payroll User Manual
EMPLOYEE/DEPARTMENTAL SUMMARIES
The following reports are available by selecting the Employee and Departmental Summaries menu option:
•
Monthly Pay Summary
•
Quarterly Pay Summary
•
Annual Pay Summary
•
Departmental Expense Summary
•
Special Pay Type Register
•
Employee Hours Report
Each report is discussed on the following pages.
Monthly Pay Summary (PR0203)
This report provides a monthly summary by employee of all Taxable Wages, FICA Wages, Social Security,
Medicare, FIT, SIT, and LIT. This report may be selected by department and/or state.
This report provides you with the information necessary to file your payroll tax reports monthly. When you select
this option, you will be asked for the range of employees, and, optionally, a department mask. After you have
selected the employees to include on the report, you may specify the state and/or local tax table to report. You may
also specify the Special Pay Type Accumulator.
If you do not enter a state or local tax table number mask, the system will print the report for all employees that have
been paid during the current month. If you enter a state tax table number mask, the system will only include those
employees that have a tax table set up in either the SIT Table or Additional SIT Table which matches the mask. If
you enter a local tax table number mask, the system will only include those employees that have a tax table set up in
either the LIT Table or Additional LIT Table which matches the mask. If you enter both masks, the employees
included must match both masks. The Employee Accumulator provides you with information on accumulating data
for Special Pay Types. These pay types must have been defined in the “Change Accumulating Data” option in the
Set up Employee screen.
When you specify a Special Pay Type number in the Employee Accumulator field, the system will report the M-TD information for each employee that has this special pay type number defined in the “Change Accumulating
Data” screen. If you do not specify an Employee Accumulator mask, the system will exclude any special pay type
information from printing on the report.
Using the masks, you may print the report for all employees, or only those employees taxed in a specific state or
local area. The masks entered will also be included in the title of the report. You may also choose to print a detailed
or non-detailed report. The detailed report will print both SIT and LIT Table amounts and the totals. If the tax table
does not match the mask entered, the amount will be printed as N/A. The non-detailed report will only print the total
of the SIT and LIT amounts.
Field Names:
- Employee Number & Name
- Social Security Number
- Gross Wages
- Social Security Wages
- Medicare Wages
- Weeks Worked
Chapter 4
- Medi. Amount
- FIT Amount
- SIT Table Number
- SIT Amount
- LIT Table Number
- LIT Amount
- Accumulator Amount
- Totals
- S.S. Amount
- Accumulator Number
Print Reports
Page 4-17
Payroll User Manual
Monthly Pay Summary
Page 4-18
Print Reports
Chapter 4
Payroll User Manual
Quarterly Pay Summary (PR0204)
This report provides a quarterly summary by employee of all Taxable Wages, FICA Wages, Social Security,
Medicare, FIT, SIT, and LIT. This report may be selected by department and/or state.
This report provides you with the information necessary to file your payroll tax reports quarterly. When you select
this option, you will be asked for the range of employees, and, optionally, a department mask. After you have
selected the employees to include on the report, you may specify the state and/or local tax table to report. If you do
not enter a state or local tax table number mask, the system will print the report for all employees that have been
paid during the current quarter.
If you enter a state tax table number mask, the system will only include those employees that have a tax table set up
in either the SIT Table or Additional SIT Table which matches the mask. If you enter a local tax table number
mask, the system will only include those employees that have a tax table set up in either the LIT Table or
Additional LIT Table which matches the mask. If you enter both masks, the employees included must match both
masks.
The Employee Accumulator provides you with information on accumulating data for Special Pay Types. These pay
types must have been defined in the “Change Accumulating Data” option in the Set up Employee screen. When
you specify a Special Pay Type number in the Employee Accumulator field, the system will report the Q-T-D
information for each employee that has this special pay type number defined in the “Change Accumulating Data”
screen.
If you do not specify an Employee Accumulator mask, the system will exclude any special pay type information
from printing on the report. Using the masks, you may print the report for all employees, or only those employees
taxed in a specific state or local area. The masks entered will also be included in the title of the report.
You may also choose to print a detailed or non-detailed report. The detailed report will print both SIT and LIT Table
amounts and the totals. If the tax table does not match the mask entered, the amount will be printed as N/A. The
non-detailed report will only print the total of the SIT and LIT amounts.
Field Names:
- Employee Number & Name
- Social Security Number
- Gross Wages
- Social Security Wages
- Medicare Wages
- Weeks Worked
- S. S. Amount
- Medi. Amount
- FIT Amount
- SIT Table Number
- SIT Amount
- LIT Table Number
- LIT Amount
- Accumulator Number
- Accumulator Amount
- Totals
Chapter 4
Print Reports
Page 4-19
Payroll User Manual
Quarterly Pay Summary
Page 4-20
Print Reports
Chapter 4
Payroll User Manual
Annual Pay Summary (PR0205)
This report provides an annual summary by employee of all Taxable Wages, FICA Wages, Social Security,
Medicare, FIT, SIT, and LIT. This report may be selected by department and/or state.
This report provides you with the information necessary to file your payroll tax reports annually. When you select
this option, you will be asked for the range of employees and, optionally, a department mask. After you have
selected the employees to include on the report, you may specify the state and/or local tax table to report. If you do
not enter a state or local tax table number mask, the system will print the report for all employees that have been
paid during the current year.
If you enter a state tax table number mask, the system will only include those employees that have a tax table set up
in either the SIT Table or Additional SIT Table which matches the mask. If you enter a local tax table number
mask, the system will only include those employees that have a tax table set up in either the LIT Table or
Additional LIT Table which matches the mask. If you enter both masks, the employees included must match both
masks.
The Employee Accumulator provides you with information on accumulating data for Special Pay Types. These pay
types must have been defined in the “Change Accumulating Data” option in the Set up Employee screen. When
you specify a Special Pay Type number in the Employee Accumulator field, the system will report the Y-T-D
information for each employee that has this special pay type number defined in the “Change Accumulating Data”
screen.
If you do not specify an Employee Accumulator mask, the system will exclude any special pay type information
from printing on the report. Using the masks, you may print the report for all employees, or only those employees
taxed in a specific state or local area. The masks entered will also be included in the title of the report. You may also
choose to print a detailed or non-detailed report. The detailed report will print both SIT and LIT Table amounts and
the totals. If the tax table does not match the mask entered, the amount will be printed as N/A. The non-detailed
report will only print the total of the SIT and LIT amounts.
Field Names:
- Employee Number & Name
- Social Security Number
- Gross Wages
- Social Security Wages
- Medicare Wages
- Weeks Worked
- S.S. Amount
- Medi. Amount
- FIT Amount
- SIT Table Number
- SIT Amount
- LIT Table Number
- LIT Amount
- Accumulator Number
- Accumulator Amount
- Totals
Chapter 4
Print Reports
Page 4-21
Payroll User Manual
Annual Pay Summary
Page 4-22
Print Reports
Chapter 4
Payroll User Manual
Departmental Expense Summary (PR0206)
This report provides a 12 month or 13 period summary of all wages and expenses charged to each department,
depending on your company's fiscal period configuration.
This report provides a monthly trend analysis of the wages and expenses allocated to your departments. You may
select a range of departments to include.
Field Names:
- Department Number & Description
- Wages & Expenses for each period of the year
- Totals
- Grand Totals
Chapter 4
Print Reports
Page 4-23
Payroll User Manual
Departmental Expense Summary
Page 4-24
Print Reports
Chapter 4
Payroll User Manual
Special Pay Type Register (PR0211)
This report provides special pay accumulator information for all employees in one of the following formats: Current,
MTD, QTD or YTD. This report can be printed in either detailed or non-detailed format.
This report can be very beneficial to employers who provide health care and retirement benefits to their employees
and need a summary of the deductions for management purposes. Upon selecting this option, you will be prompted
to enter the beginning and ending pay types. If desired, select a sort by field, then, click on the "Start" button to
validate. A new screen will be displayed where you may select the desired reporting period. Your choices are:
•
Current Pay Period
•
Month-to-Date
•
Quarter-to-Date
•
Year-to-Date
Next, select the type of report you would like to run, either:
Detailed or Non-detailed
After your report has printed, you will be returned to the previous screen, where you may select another reporting
period or type of report to print.
Field Names:
Detailed
- Special Pay Type Number
- Description
- Employee #
- Social Security Number
- Name
- Amount (Current, MTD, QTD or YTD)
Non-Detailed
- Special Pay Type Number
- Description
- Amount (Current, MTD, QTD or YTD)
Chapter 4
Print Reports
Page 4-25
Payroll User Manual
Special Pay Type Register (Non-Detailed)
Page 4-26
Print Reports
Chapter 4
Payroll User Manual
Special Pay Type Register (Detailed)
Chapter 4
Print Reports
Page 4-27
Payroll User Manual
Page 4-28
Print Reports
Chapter 4
Payroll User Manual
Employee Hours Report (PR0220)
This report provides total hours paid for either a range of employees or a single employee. You may select
beginning and end dates to narrow the scope of your report. The report can be printed in either detailed or nondetailed format.
This report can be very beneficial to employers in reporting hours worked to local tax authorities, union stewards, or
other regulatory agencies. Upon selecting this option, you will be prompted to enter the beginning and ending
employees to be considered in the tabulation of total hours on this report. To select sort sequence criteria, you must
either right mouse click the selection scroll view, or click the Down Arrow (F2 by default) when filling in the
appropriate entry in the beginning employee and ending employee fields and then select one of the following three
options using a left mouse click:
•
Employee Number
•
Name
•
Department
You then may select the report type; non-detailed, detailed or total hours. You will then be given the opportunity to
mask by department number.
Field Names:
Detailed
Total Hours
-Employee Number
- Employee Name
- Check Dates
- Regular Hours
- Overtime Hours
- Double Time Hours
- Holiday/Personal Hours
- Vacation
- Sick Time
- Unexcused
- Misc.
- Employee Number
- Employee Name
- Check Dates
- Regular Hours
- Overtime Hours
- Double Time Hours
- Holiday/Personal Hours
- Vacation
- Sick Time
- Unexcused
- Misc.
Non-Detailed
- Employee Number
- Employee Name
- Check Dates
- Regular Hours
- Overtime Hours
- Double Time Hours
- Holiday/Personal Hours
- Vacation
- Sick Time
- Unexcused
- Misc.
Chapter 4
Print Reports
Page 4-29
Payroll User Manual
Employee Hours Report
Page 4-30
Print Reports
Chapter 4
Payroll User Manual
Chapter 4
Print Reports
Page 4-31
Payroll User Manual
PERSONNEL REPORTS
Four reports are available by selecting the Personnel Reports menu option:
•
Employee Pay Review Reminder
•
Employee Pay Review
•
Employee Personal Time Balance
•
Employee Comments Report
Each report is discussed on the following pages.
Employee Pay Review Reminder (PR0207)
This option allows you to print a listing of all employees who are approaching the scheduled time for their next
review. Simply provide the review date range and the system will prioritize the report in review date order.
This report may be used by management to prepare for the employee pay reviews. Enter the range of employees and,
optionally, a department mask. Specify the number of employees to include, then, select a beginning and ending date
range. The system will only include employees that have a review date scheduled and within the specified date
range.
The system will then sort the employees within the date range in review date order and then print the report for the
maximum number of employees specified. This report may then be used as a scheduling tool to print the “Employee
Pay Review” forms as the review date approaches.
Field Names:
- Employee Number
- Employee Name
- Social Security Number
- Department
- Hourly/Salary
- Start Date
- Date of Last Review
- Next Review Date
- Comments
Page 4-32
Print Reports
Chapter 4
Payroll User Manual
Employee Pay Review Reminder
Chapter 4
Print Reports
Page 4-33
Payroll User Manual
Employee Pay Review (PR0208)
This option allows you to print an Employee Performance/Pay Review worksheet. You may select the employees
and review date ranges and a worksheet will be generated for all employees scheduled for review within the
specified range.
As each employee's pay review date approaches (based on the “Employee Pay Review Reminder” report), you may
use this option to print the pay review worksheets. Select the range of employees, and, optionally, a department
mask. You may then specify the beginning and ending pay review dates to include. The worksheet, or form, that this
option uses is the form set up in the Master Configuration.
When you select this option, the form specified in the Master Configuration will appear.
Click on “Select” to continue or “Align” to test the alignment of the form to the printer. “Cancel” will return you
to the Menu Bar.
Field Names:
- Employee Number
- Employee Name
- Social Security Number
- Department
- Start Date
- Date of Last Review
- Current Pay Rate
- Next Review Date
- Other fields depend on form specified
Page 4-34
Print Reports
Chapter 4
Payroll User Manual
Employee Pay Review
Chapter 4
Print Reports
Page 4-35
Payroll User Manual
Employee Personal Time Balance (PR0209)
This report provides a quick listing by employee of their current personal time balances (e.g., Vacation, Sick, etc.).
This option allows you to select a range of employees and, optionally, a department mask and that will print a report
displaying the personal time balances for each employee. The personal time categories are the last five (11-15) time
categories set up in the Master Configuration.
Field Names:
- Employee Number
- Employee Name
- Personal Time Balances (For the five categories
specified as personal time in the Master Configuration)
Page 4-36
Print Reports
Chapter 4
Payroll User Manual
Employee Personal Time Balance
Chapter 4
Print Reports
Page 4-37
Payroll User Manual
Employee Comments Report (PR0219)
This option allows you to print all employee personnel comments by employee for a specific date range. When you
select this option, you will be asked for the range of employees, and, optionally, a department mask. You may then
enter the date range of personnel comments to include. The system will then print each employee that has comments
in the specified range and the list of comments.
Field Names:
- Employee Name & Number
- Comment Date
- Comments
Page 4-38
Print Reports
Chapter 4
Payroll User Manual
Employee Comments Report
Chapter 4
Print Reports
Page 4-39
Payroll User Manual
TAX REPORTS
Three tax reports, the printing of W-2s, and the printing of Certified Payroll reports are available by selecting the
Tax Reports menu option:
•
Unemployment Tax Reports
•
Monthly Workers' Comp. Report
•
Quarterly Pay Summary (for 941)
•
Government W-2 Reporting
•
Print Certified Payroll
Each report/form is discussed on the following pages.
Unemployment Tax Reports (PR0210)
This option allows you to generate Monthly, Quarterly, and/or Annual Federal (FUTA) and State (SUTA)
Unemployment Tax Liability Reports. These reports provide totals by employee and may be selected for individual
states for wages subject to FUTA and SUTA. A summarized version known as a Wage Summary is also available.
This variation provides wage information on each employee. This particular version of the report is in a format,
which corresponds to the filing requirements of several states.
These reports provide you with the information necessary to file your Federal and State Unemployment Tax
Liability reports. When you select this option, the system will ask you for the range of employees to include and
optionally, a department mask. The system will then display a screen and prompt you for the reporting basis, state
mask and report format. The first item you must enter is the reporting basis. Select Monthly, Quarterly, or
Annually, respectively.
The second item is the state mask. If you do not enter the state mask, the system will include all selected employees
that have been paid during the reporting period. If you enter a state mask, the system will include only those select
employees whose SIT or Additional SIT tax tables match the mask.
NOTE
If you have employees working in a state which requires you to use the SIT
and Add. SIT tax tables to calculate the state tax, the system will use the
unemployment tax information set up in the first (SIT) tax table to perform
the necessary calculations. The “Special Adjustment” field on this report is
the special deduction (401K) which is exempt from federal tax, however, is
subject to FUTA and SUTA.
This amount will be retrieved from the employee's accumulator which has been set to “Adjust FUTA Wages”
and/or “Adjust SUTA Wages” within the special pay type number. This accumulator amount will be added to the
gross taxable wages amount to calculate the wages subject to FUTA and SUTA.
A key item to select is the report format type. If you choose “Tax Detail,” the system will print the Unemployment
information in detail. If you choose “Wage Summary,” the system will print the Unemployment information
necessary to complete most quarterly unemployment Wage Summary reports.
Florida users can use this option to create the necessary file for use with the Florida EasyLink electronic mailbox
provided by the State of Florida. This option is compatible with the Florida Electronic Filing Unemployment Tax
Reporting (UTC-6). This will eliminate manually keying in employee information to the state’s system each
quarter.
The Florida Department of Revenue (DOR) requires any employer with a Payroll of ten (10) employees or more
or any “person” who prepared and reported on behalf of five or more employers to convert to either the Florida
MMREF-1 electronic filing or the State of Florida’s free Internet site.
Page 4-40
Print Reports
Chapter 4
Payroll User Manual
The first step is to enroll for “e-services.” You may enroll on the Department of Revenue web site at
www.myflorida.com/dor and select the option “Enroll for e-Services.” Below the “e-Services” heading, select
“Enrollment/Authorization,” “File and Pay” and follow the steps accordingly.
You must enroll on the Department of Revenue web site and select the “Software Filing Method.” You will be
mailed or faxed your “user-ID” and “password” and the instructions for downloading, installing and configuring
the free EasyLink electronic mailbox and if applicable, the transfer of your Florida MMREF-1 file (UTC-6) using
the Internet or the dial-up modem with EasyLink.
Please note that this process may take up to three weeks!!! Customers may still manually key in the information on
the free web site provided by the State of Florida.
Once you have all of your components and registration in place, follow these instructions to complete your update to
the State of Florida.
First, set your system date to the “last day of each quarter” as applicable.
Select from the Reports menu in Payroll, “Tax,” “Unemployment Tax.” The following screen will appear:
Enter the range of Employees to be included in the report (normally first and last records for all employees).
Specify “Quarterly” as the Report Basis.
The “Report Format” can be either Tax Detail or Wage Summary. Wage Summary is normal.
No Department Mask is required if you are reporting for the entire company.
Specify (FL) in the State Tax Table Mask for Florida Reporting.
Click on “Start.”
The system will prompt for which “Output Device” to send the report. You may send it to your normal printer so
you have an audit trail which is highly recommended or to the Display or a Text File. This is in addition to the file
that will be automatically created when this option is completed.
When you click “OK” after selecting the Output device, the following screen will appear:
Chapter 4
Print Reports
Page 4-41
Payroll User Manual
Answer (Y)es or (N)o to verify the formatting of your employee names. Once you click on either selection, the
report will be printed to the printer and the file automatically generated to the program directory where your
programs are located (i.e. C:\POWER). The filename is: UTmmddyy.txt (mm being month, dd being day and yy
being year).
If you have any questions, contact Data Pro Support at (727) 803-1550 or the E-Services Unit of the State of
Florida at (800) 482-8293 and select Option #6, then Option #3. Or, via e-mail at [email protected].
Field Names:
- Employee Name & Number
- Social Security Number
- Gross Wages
- Special Adjustment
- Weeks Worked
- FUTA Limit
- FUTA Wages
- FUTA %
- FUTA Tax
- SUTA Limit
- SUTA Wages
- SUTA %
- SUTA Tax
- Totals
Page 4-42
Print Reports
Chapter 4
Payroll User Manual
Unemployment Tax Reports
Chapter 4
Print Reports
Page 4-43
Payroll User Manual
MONTHLY WORKER’S COMPENSATION REPORT (PR0224)
This option allows you to print a report showing the information necessary to report your monthly Workers'
Compensation information. This report will subtotal, by state, and provide breakouts by WC Class.
This report provides you with the information necessary to calculate and pay your monthly workers' compensation
insurance premiums. When you select this option, the system will immediately begin printing a report of all WC
Classes, subtotaling by state, and the insurance premiums for each.
Field Names:
- State
- Class
- Description
- Regular Pay
- Overtime Pay
- Regular Portion of Overtime Pay
- Applicable Pay
- Rate
- Amount
- Totals
Page 4-44
Print Reports
Chapter 4
Payroll User Manual
Monthly Workers' Compensation Report
Chapter 4
Print Reports
Page 4-45
Payroll User Manual
Quarterly Pay Summary (for 941) (PR0226)
This report is a one page Pay Summary of the Quarterly 941 taxable wages, taxes withheld and advanced EIC
payments made to employees. The information is listed in the same format as the 941 Tax Form.
This report provides you with the information necessary to file your payroll tax reports quarterly (Tax Form 941).
When you select this option, you will be prompted for the range of employees and optionally, a department mask.
The summary information will be accumulated from each employee's historical wages. The bottom detailed portion
will be accumulated from the transaction detail file.
NOTE
Special Pay Types set up with a W-2 Reporting Category 4 “Deferred Comp.
(401K)” and with Category 9 “Section 125 Plan” are NOT included as
wages on this report.
Field Names:
- Gross Taxable Wages
- FIT Tax Amount
- Taxable Social Security Wages
- Taxable Social Security Tip Wages
- Taxable Medi. and Tips Wages
- Total Social Security Tip Tax Amount
- Total Taxes Withheld
- Advanced EIC Payments
- Net Taxes
- Employer ID Number
- Date Quarter Ended
- Description (for each report category)
- Daily Tax Liability
- First Month of Quarter
- Second Month of Quarter
- Third Month of Quarter
- Total for months
- Total for quarter
Page 4-46
Print Reports
Chapter 4
Payroll User Manual
Quarterly Pay Summary (for 941)
Chapter 4
Print Reports
Page 4-47
Payroll User Manual
Page 4-48
Print Reports
Chapter 4
Payroll User Manual
PRINT W-2 FORMS (PR0212)
This option allows you to print your year-end government W-2 Forms on preprinted W-2 Forms.
Select the employee range to include and a department mask (if desired). The system will then print the W-2 form
for each employee that has had any wages during the current year. The form that will be used is the form set up in
the Master Configuration (W2).
Make sure that you print the W-2s for all employees with the correct system date, if you have selected the option
“Start New Year's Files.” When you start the new year's files, the system will remove all employee information for
employees that have been terminated in the new year. However, all employee information will remain in the
previous year's file, so you may simply change the system date to December 31 of the previous year before printing
the old W-2s.
Field Names:
- Employer's Federal ID Number
- Company Name
- Employee Name
- Employee Address
- Social Security Number
- Gross Taxable Wages
- Social Security Wages
- Medicare Wages
- Amount of FIT Withholding
- Amount of FICA
- Amount of SIT Withholding
- Amount of LIT Withholding
Chapter 4
Print Reports
Page 4-49
Payroll User Manual
W-2 Forms
W-2 REPORTING ON DISKETTE
MAGNETIC MEDIA - MMREF-1 FORMAT (PR0225)
This option allows you to print your year-end government W-2 information onto a floppy disk (diskette). This
option allows you to create a file on a diskette which can then be sent to the Social Security Administration (SSA)
for W-2 reporting. The data file format conforms to the specifications described in the SSA publication number
MMREF-1-TY01, “Specifications for Magnetic Media Reporting and Electronic Filing of W-2 Information.”
For information regarding the testing and validation process of your MMREF-1 file using the AccuWage and
AccuW2C software, please visit the SSA website at: http://www.ssa.gov/employer/accuwage/index.html
NOTE
The SSA publication MMREF-1-TY01 specifies that an employer who is
required, or volunteers, to submit their W-2 information on magnetic media
Page 4-50
Print Reports
Chapter 4
Payroll User Manual
must obtain a Personal Identification Number (PIN) from the SSA prior to
submitting the report.
Windows GUI and Character-based Systems
This option will create one file, named “W2REPORT” in the program directory, which contains all information
necessary for the employer who is reporting, each employee to be reported, and all the totals and subtotals. You may
also combine several of your Payroll data files into one file reported as one employer. The file, W2REPORT must
be transferred to a diskette in order to send it to the SSA.
LINUX
A file called “a:w2report” will be created in the program directory (e.g., /usr/datapro). This file will need to be
renamed and then transferred to a diskette in order to send it to the SSA.
Once this option is selected, a screen will be displayed showing the data items necessary for creating this file. These
data items are described below:
Multi-Company?
This instructs the system whether or not to combine several Payroll files
into the report for one employer If you leave the checkbox blank, the
system will use only the current company's payroll file for this report. If
you click on the checkbox, the system will use your current company's
overhead information for the employer's information and then prompt
you for each company to include employee information from. If you
want to include the employees from the current company make sure to
specify this company number as the first company.
Resubmission?
This data item allows you to “mark” this submission of records as a
Resubmission. If you are resubmitting a MMREF-1 file, then you must
enter a TLCN number supplied from the SSA.
TLCN
This data item is used when a “Resubmission” of the MMREF-1 file is
necessary. This TLCN number is issued for control purposes from the
SSA.
Submitter EIN
This data item is a nine (9) character field which contains a “69” number
for Section 218 state/local entities only. If applicable, this should be a
numeric code which begins with “69,” otherwise it should be left blank.
Submitter PIN
This data item contains the Personal Identification Number (PIN) which
you received from the SSA to file magnetic media.
Chapter 4
Print Reports
Page 4-51
Payroll User Manual
Contact Name
This data item contains the contact name of the person attesting to the
accuracy of this file.
Contact Phone
This data item contains the contact phone number of the person attesting
to the accuracy of this file.
Contact Phone Ext
This data item contains the contact phone number extension of the person
attesting to the accuracy of this file.
Contact Fax
This data item contains the contact fax number of the person attesting to
the accuracy of this file.
Contact Email
This data item contains the contact email of the person attesting to the
accuracy of this file.
This data item defines the method of contact that you wish to use with
the SSA. There are three (3) choices that are listed below:
Method of Contact
Email/Internet
Fax
Postal Service
Prepared By
Click on the contact method of your choice.
This data item defines who prepared this report. There are five (5)
choices that are listed below:
Accounting Firm
Self-Prepared
Service Bureau
Parent Company
Other
Click on the correct choice to define the person who has prepared this
report.
Submitter Information
Company to receive MMREF-1 filing instructions:
Company Name
This data item contains the Company Name who will be responsible for
receiving any filing instructions from the SSA.
Location Address
This data item contains the Location Address of the Company
responsible for receiving any filing instructions from the SSA.
Delivery Address
This data item contains the Delivery Address of the Company
responsible for receiving any filing instructions from the SSA.
City
This data item contains the city of the Company responsible for receiving
any filing instructions from the SSA.
State
This data item contains the state of the Company responsible for
receiving any filing instructions from the SSA.
Zip
This data item contains the zip code of the Company responsible for
receiving any filing instructions from the SSA.
Company Name
This data item contains the Company Name who will be responsible for
receiving notices of unprocessed information from the SSA.
Location Address
This data item contains the Location Address of the Company
responsible for receiving notices of unprocessed information from the
SSA.
Page 4-52
Print Reports
Chapter 4
Payroll User Manual
Delivery Address
This data item contains the Delivery Address of the Company
responsible for receiving notices of unprocessed information from the
SSA.
City
This data item contains the city of the Company responsible for receiving
notices of unprocessed information from the SSA.
State
This data item contains the state of the Company responsible for
receiving notices of unprocessed information from the SSA.
Zip
This data item contains the sip code of the Company responsible for
receiving notices of unprocessed information from the SSA.
When all the above data items have been entered, click on the “Start”
button to continue.
Company #
This data item is the three (3) character identifier for you company’s data
files.
Name Code
This data item defines the format of the employee names within the W-2
data file. Click on the appropriate button to specify either the employee's
first name will be listed first or the employee's last name (Surname) to
be listed first.
Type of Employment
This data item indicates the type of employment. The valid choices are:
Agriculture
Household
Military
M.Q.G.E. (Medicare Qualified Gov. Emp.)
Railroad
Regular (All Others)
Establishment Number
This data item contains a four (4) digit number which identifies each
location as defined under the “Establishment Reporting Plan.” See
SSA publication 42-033 for details. This code is only used for 69 code
employers.
Other EIN used this tax
year
This data item contains a previously used EIN for this company for this
tax year.
Business terminated this
tax year
This data item determines if this company (business) has terminated this
tax year.
When completed with the data items listed above, click on the “Process” button to create the W2REPORT file.
Windows (GUI) and Windows Character-based
At this point insert a floppy disk into the specified disk drive. Copy the W2REPORT file, which is located in the
default program directory (C:\POWER) to the diskette.
Chapter 4
Print Reports
Page 4-53
Payroll User Manual
PRINT W-2 TOTALS (PR0230)
This option allows you to print a report showing total information for all W-2s printed or filed via magnetic media.
This information will be useful in filing the W-3 Transmittal Form. The State Wage Information on this report is
calculated based on the W-2 State field on each Tax Table set up on each employee record.
NOTE
If you have more than one State Tax Table, it is important to check the Exclude from W-2 Wages box on
the Maintain Tax Tables screen for the 2nd and subsequent State Tax Tables. Failure to check this box will
cause your W-2 Totals report to be incorrect.
The following data fields are prompted before running this report.
Company Number
Enter the three (3) character company identifier you wish to include on
this report.
Type of Employment
This data item contains a number which indicates the type of
employment. The valid choices are:
1 = Agriculture
2 = Household
3 = Military
4 = M.Q.G.E. (Medicare Qualified Gov. Emp.)
5 = Railroad
6 = Regular (All Others)
Establishment Number
This data item contains a four (4) digit number which identifies each
location as defined under the “Establishment Reporting Plan.” See
SSA publication 42-033 for details. This code is only used for 69 code
employers.
Click on the “Start” button to begin this report. Choose an output method and click on the “Continue” button.
Click on the “Process” button , then the “Close” button to print this report.
Field Names:
Type of Employment
- Total Number of W2s
- Employer Federal ID Number
- Employer State ID Number
- Establishment Number
- Company Name, Address, City, State & Zip
- Total Wages, tips, other compensation
- Total Federal income tax withheld
- Total Social Security Wages
- Total Social Security tax withheld
- Total Medicare wages and tips
- Total Medicare tax withheld
- Total Social Security Tips
- Total Allocated Tips
- Total Advanced EIC Payments
- Total Dependant Care Benefits
Page 4-54
Print Reports
- Total Nonqualified Plans
- Total Deferred Compensation
- State
- State Wages
- State Tax Withheld
Chapter 4
Payroll User Manual
Print W-2 Totals
Chapter 4
Print Reports
Page 4-55
Payroll User Manual
MAINTENANCE REPORTS (PR0110)
Seven reports are available by selecting the Maintenance Reports menu option:
Employee Listing
Department Listing
Time Category Listing
Special Pay Types Listing
Tax Table Listing
Workers' Comp. Classes Listing
Employee Mailing Labels
Each report is discussed on the following pages.
Employee Listing (PR0213)
This option allows you to print a summarized or detailed employee listing in alpha/numeric, Employee #, Name,
and/or departmental order. It also gives you the option of specifying a specific “Status Type” to include on the
report.
The non-detailed version of this report contains a brief list of employees with just their employee numbers, names,
Social Security Numbers, Phone Numbers, and home departments. The detailed version of this report contains all of
the information specific to each employee's record, including historical, special pay type and accumulator data,
Direct Deposit and tax information.
The detailed report prints one employee per page. You may specify a range of employees to print and, optionally, a
department mask. The detail report is especially beneficial for verifying input after initial set up and for archival
purposes.
The fields included in this report are as follows:
Field Names:
- Employee Name & Number
- Tax Table Information for FIT, SIT, & LIT
- Address
- MTD, QTD, YTD for Accumulator Information
- Phone
- Special Pay Type Information
- Social Security Number
- Direct Deposit Information
- WC Class
- Gender
- Status
- Race
- Marital Status
- Date of Last Check
- Home Department
- Default Billing Rate
- Hourly/Salary
- Pay Cycle
- Current Base Rate
- Normal Hours
- Comments
- Date of Birth
- Start Date
- Date of Last Review
- Rate Prior to Last Review
- Date of Next Review
- MTD, QTD, & YTD for wages, taxes, & weeks
- Personal Time Balances
Page 4-56
Print Reports
Chapter 4
Payroll User Manual
Employee Listing (Non-Detailed)
Chapter 4
Print Reports
Page 4-57
Payroll User Manual
Employee Listing (Detailed)
Page 4-58
Print Reports
Chapter 4
Payroll User Manual
Employee Listing (Employee Information)
Chapter 4
Print Reports
Page 4-59
Payroll User Manual
Department Listing (PR0214)
This option provides a summarized or detailed listing of all of your department information. The non-detailed
version of this report contains a brief list of departments with just the department numbers, descriptions, and account
numbers. The detailed version of this report contains all of the information specific to each department record,
including historical information. You may specify a range of departments to print on the report. The detail report is
especially beneficial for verifying input after initial set up and for archival purposes.
Field Names:
- Department Number
- Description
- GL Wages Account
- GL Expense Account
- Overhead Factor
- Period
- Total Hours for each period of the year
- Total Wages & Expenses for each period of the year
- Total
Page 4-60
Print Reports
Chapter 4
Payroll User Manual
Department Listing (Non-Detailed)
Chapter 4
Print Reports
Page 4-61
Payroll User Manual
Department Listing (Detailed)
Page 4-62
Print Reports
Chapter 4
Payroll User Manual
Time Category Listing (PR0215)
This option provides a listing of all of your Time Categories (e.g., Regular Time, Overtime, Vacation, etc.). This
report may be used for a simple reference list of the time categories and their factors that you have set up.
Field Names:
- Category Number
- Description
- Factor
Chapter 4
Print Reports
Page 4-63
Payroll User Manual
Time Category Listing
Page 4-64
Print Reports
Chapter 4
Payroll User Manual
SPECIAL PAY TYPE LISTING (PR0216)
This option provides a summarized or detailed listing of all of your Special Pay Types information. The non-detailed
version of this report contains a brief list of special pay types with just the pay type numbers, descriptions, and type
(Earning, Deduction, etc.). The detailed version of this report contains the information specific to each special pay
type. You may specify a range of special pay types to print on the report. The detail report is especially beneficial
for verifying input after initial set up and for archival purposes.
Field Names:
- Special Pay Type Number
- Description
- Type
- Adjust FIT
- Adjust FICA
- GL Account
- Expense to Department
Chapter 4
Print Reports
Page 4-65
Payroll User Manual
Special Pay Type Listing (Non-Detailed)
Page 4-66
Print Reports
Chapter 4
Payroll User Manual
Special Pay Type Listing (Detailed)
Chapter 4
Print Reports
Page 4-67
Payroll User Manual
TAX TABLE LISTING (PR0217)
This option provides a summarized or detailed listing of all of your Tax Table information. The detailed report will
print your tax tables in the same format as the Employer's Federal Tax Guide (Circular E), Percentage Method
Annual Table.
The non-detailed version of this report contains a brief list of tax tables with just the tax table numbers and
descriptions. The detailed version of this report contains all of the information specific to each tax table. You may
specify a range of tax tables to print on the report. The detail report is especially beneficial for verifying input after
initial set up and for archival purposes.
Field Names:
- Tax Table Number
- Description
- GL Accrual Account
- Primary Exemption Value
- Secondary Exemption Value
- Adjust Base by FIT
- Adjust Base by FICA
- Adjust Base by SIT
- Type
- Unemployment Maximum
- Unemployment Tax Rate
- Unemployment GL Expense
- Unemployment GL Accrual
- Tax Calculation Table
Page 4-68
Print Reports
Chapter 4
Payroll User Manual
Tax Table Listing (Non-Detailed)
Chapter 4
Print Reports
Page 4-69
Payroll User Manual
Page 4-70
Print Reports
Chapter 4
Payroll User Manual
Chapter 4
Print Reports
Page 4-71
Payroll User Manual
Page 4-72
Print Reports
Chapter 4
Payroll User Manual
Chapter 4
Print Reports
Page 4-73
Payroll User Manual
Tax Table Listing (Detailed)
Page 4-74
Print Reports
Chapter 4
Payroll User Manual
Workers’ Compensation Classes Listing (PR0223)
This option provides a summarized or detailed listing of all of your Workers' Compensation Class information. The
non-detailed version of this report contains a brief list of WC Classes with the WC Class number, description,
predefined pay rate, insurance rate, and insurance maximum. The detailed version of this report contains the
information specific to each WC Class. You may specify a range of WC Classes to print on the report. The detail
report is especially beneficial for verifying input after initial set up and for archival purposes.
Field Names:
- WC Class Number
- Description
- Pay Rate
- Insurance Rate
- Insurance Maximum
- Regular Pay
- Overtime Pay
- Regular Portion of Overtime Pay
Chapter 4
Print Reports
Page 4-75
Payroll User Manual
Workers' Compensation Classes Listing (Non-Detailed)
Page 4-76
Print Reports
Chapter 4
Payroll User Manual
Workers' Compensation Classes Listing (Detailed)
Chapter 4
Print Reports
Page 4-77
Payroll User Manual
EMPLOYEE MAILING LABELS (PR0218)
This option prints mailing labels for all employees, or for a subset of the employees based on selected criteria of
“Employee Status.” These labels may also be used for affixing to time cards.
This option may be used for printing standard size mailing labels, or you may adjust the size of the labels being
printed for such things as rotary file cards. You may specify a range of employees to print and, optionally, a
department mask. Selecting the desired Employee Status can further narrow the selection criteria. You may also
choose to include the employee's social security number and/or phone number.
Field Names:
- Employee Name
- Mailing Address
- Social Security Number (optional)
- Phone Number (optional)
Page 4-78
Print Reports
Chapter 4
Payroll User Manual
Employee Mailing Labels
Chapter 4
Print Reports
Page 4-79
Payroll User Manual
CHAPTER 5
PERFORM ANALYTICAL GRAPHS
This section discusses both types of Analytical Graphs utilized by the Payroll module. These graphs are designed to
give you an instant visualization of your employee information. Graphing capabilities are not currently available
with the Linux versions. No other programs are required to execute this option. The system performs all graphics
functions from within its own programs.
After the graph has been displayed to your screen, printing is one simple step:
For Windows Compatibles: Press ALT Print Screen and paste into a WORD document.
You may also paste this image into a document or an Excel spreadsheet for presentation purposes.
PAYROLL EXPENSE BY DEPARTMENT (PR0301)
This option provides a line graph comparing the Year-to-Date wages and expenses on up to four (4) different
departments.
Once you have selected this option, you will be asked to specify the departments you wish to graph. Simply input
the appropriate department numbers; or <click> the Down Arrow (F2 by default) and a listing of your department
numbers and their descriptions will be displayed. Highlight the department you wish to use and <click> OK. Press
TAB to select another Department in the same manner. Once you have input all of the department numbers to be
graphed, <click> on the GRAPH button and the line graph will be plotted.
Chapter 5
Perform Analytical Graphs
Page 5-1
Payroll User Manual
EMPLOYEE PERSONAL TIME COMPARISON (PR0302)
This option allows you to graph a bar and/or pie chart for the current personal time balances for specific employees.
This option graphs personal time balances for a particular employee. The personal time categories are the last five
(11-15) time categories that you have set up in the Master Configuration. To specify the employee you wish to
graph, simply input the appropriate employee number, or <click> the Down Arrow (F2 by default) and a listing of
your employee numbers and their names will be displayed. Highlight the employee you wish to use and <click>
OK. The system will display this employee's name and number. You will then select the type of graph desired:
•
Bar Graph
•
Pie Chart
Upon selecting the graph type and <click>ing on the GRAPH button, the graph will automatically be displayed
showing the number of hours remaining for each of the five personal time categories. NOTE: Any personal time
balance that is less than zero will be displayed as zero.
Page 5-2
Perform Analytical Graphs
Chapter 5
Payroll User Manual
EMPLOYEE RANKING BY TIME CATEGORY (PR0303)
This option provides a bar and/or pie graph comparing the Time Categories on up to twelve (12) different
employees.
This option allows you to select a range of employees and then rank them based on the negative balance of a specific
personal time category. The personal time categories will be the last five (11-15) time categories that you have set
up in the Master Configuration. The system will only choose those employees that have a negative balance in the
personal time specified. The balances, however, will be displayed as positive numbers. This provides you with a
quick analysis of those employees that have used up more personal time than they have accrued.
You must first specify the employee range, “Sort By” field and, optionally a department mask. The system will then
allow you to enter the maximum number of employees to include (up to 12) and the personal time category to use.
The system will then rank the employees base on their negative balances in the personal time category selected and
display the employees to be graphed.
You will then select the type of graph desired:
•
Bar Graph
•
Pie Chart
Upon selecting the graph type, <click> on the GRAPH button and the graph will be displayed.
Chapter 5
Perform Analytical Graphs
Page 5-3
Payroll User Manual
Page 5-4
Perform Analytical Graphs
Chapter 5
Payroll User Manual
INDEX
A
Accumulator ................................................................................................................................................................................ 2-14
Add LIT ....................................................................................................................................................................................... 2-13
Add. SIT ...................................................................................................................................................................................... 2-13
Additional Exemption Amount.................................................................................................................................................... 2-14
Additional FIT (Type 4) .............................................................................................................................................................. 2-38
Additional Pay Calculations ..........................................................................................................................................................3-4
Adjust Add. LIT........................................................................................................................................................................... 2-40
Adjust Add. SIT........................................................................................................................................................................... 2-39
Adjust Base By FICA .................................................................................................................................................................. 2-44
Adjust Base By FIT ..................................................................................................................................................................... 2-44
Adjust Base By SIT ..................................................................................................................................................................... 2-44
Adjust FIT Wages........................................................................................................................................................................ 2-39
Adjust FUTA Wages?.................................................................................................................................................................. 2-40
Adjust Medicare Wages............................................................................................................................................................... 2-39
Adjust SIT Wages........................................................................................................................................................................ 2-39
Adjust Soc. Sec. Wages ............................................................................................................................................................... 2-39
Adjust SUTA Wages?.................................................................................................................................................................. 2-40
Allocate Dept Overhead............................................................................................................................................................... 2-57
Allow Check Reprint ................................................................................................................................................................... 2-57
ANALYTICAL GRAPHS .............................................................................................................................................................5-1
Annual Pay Summary .........................................................................................................................................................4-20, 4-21
B
Base Rate .......................................................................................................................................................................................2-9
Business terminated this tax year................................................................................................................................................. 4-52
C
Cancel the Print Job .......................................................................................................................................................................4-4
Certified Payroll..................................................................................................................................................................3-16, 3-17
Check Register (Detailed)..............................................................................................................................................................4-6
Check Register (Non-Detailed)......................................................................................................................................................4-5
Check Register (PR0201) ..............................................................................................................................................................4-4
Check Register by Employee....................................................................................................................................................... 4-10
Check Register by Employee (Detailed)...................................................................................................................................... 4-12
Check Register by Employee (Non-Detailed).............................................................................................................................. 4-11
Check Summary........................................................................................................................................................................... 3-11
Compensation Type .......................................................................................................................................................................2-9
Considered a Statutory Employee................................................................................................................................................ 2-19
Contact Email .............................................................................................................................................................................. 4-51
Contact Fax.................................................................................................................................................................................. 4-51
Contact Name .............................................................................................................................................................................. 4-51
Contact Phone.............................................................................................................................................................................. 4-51
Contact Phone Ext ....................................................................................................................................................................... 4-51
Contributed to Deferred Comp. Plan ........................................................................................................................................... 2-19
CTRL+O (Output Options)............................................................................................................................................................4-1
D
DATA FILE DESCRIPTIONS......................................................................................................................................................1-7
Deduction (Type 3)...................................................................................................................................................................... 2-38
Default JC Billing Rate..................................................................................................................................................................2-8
Default Pay Cycle ........................................................................................................................................................................ 2-57
Index
Page I-1
Payroll User Manual
Delivery Address ......................................................................................................................................................................... 4-51
Department Listing ...................................................................................................................................................................... 4-59
Department Listing (Detailed) ..................................................................................................................................................... 4-61
Department Listing (Non-Detailed) ............................................................................................................................................. 4-60
Departmental Expense Summary........................................................................................................................................4-22, 4-23
DEPARTMENTAL OPTION........................................................................................................................................................1-2
Dept. OH Expense Credit ............................................................................................................................................................ 2-61
Description................................................................................................................................................................................... 2-35
Direct Deposit Form .................................................................................................................................................................... 2-59
DIRECT DEPOSIT OPTION ........................................................................................................................................................1-3
Displayed Report Options..............................................................................................................................................................4-3
E
Earning (Type 1 ........................................................................................................................................................................... 2-38
Emp. Review Form ...................................................................................................................................................................... 2-58
Employee Comments Report ..............................................................................................................................................4-37, 4-38
Employee Hours Report......................................................................................................................................................4-28, 4-29
Employee Listing......................................................................................................................................................................... 4-55
Employee Listing (Detailed)...............................................................................................................................................4-57, 4-58
Employee Listing (Non-Detailed)................................................................................................................................................ 4-56
Employee Mailing Labels........................................................................................................................................... 1-9, 4-77, 4-78
Employee Name.............................................................................................................................................................................2-7
Employee Number .........................................................................................................................................................................2-7
Employee Pay Review ................................................................................................................................................................. 4-34
Employee Pay Review (PR0208)................................................................................................................................................. 4-33
Employee Pay Review Reminder .......................................................................................................................................4-31, 4-32
Employee Personal Time Balance ......................................................................................................................................4-35, 4-36
EMPLOYEE PERSONAL TIME COMPARISON .......................................................................................................................5-2
Employee Ranking by Time Category...........................................................................................................................................5-3
EMPLOYEE/DEPARTMENTAL SUMMARIES....................................................................................................................... 4-16
Employer's Federal I.D. # ............................................................................................................................................................ 2-58
Employer's State I.D. # ................................................................................................................................................................ 2-58
ENTER EMPLOYEE COMMENTS........................................................................................................................................... 3-24
Exclude from W-2 Wages?.......................................................................................................................................................... 2-51
Exempt Medicare......................................................................................................................................................................... 2-11
Exempt Social Security................................................................................................................................................................ 2-11
F
Federal Income ............................................................................................................................................................................ 2-12
FICA ............................................................................................................................................................................................ 2-12
FICA Override ............................................................................................................................................................................. 2-57
FIT Table ..................................................................................................................................................................................... 2-13
Font Attributes...............................................................................................................................................................................4-2
FUTA (Federal Unemployment Tax)........................................................................................................................................... 2-12
FUTA Account ............................................................................................................................................................................ 2-60
G
GENERAL LEDGER ACCOUNTS............................................................................................................................................ 2-60
GENERAL OVERVIEW ..............................................................................................................................................................2-1
GL Accrual Account.................................................................................................................................................................... 2-44
GL Expense Account ................................................................................................................................................................... 2-35
GL Unemployment Exp............................................................................................................................................................... 2-44
GL Unemployment Liab. ............................................................................................................................................................. 2-44
GL Wages Account...................................................................................................................................................................... 2-35
Gross Wage % ........................................................................................................................................................................3-4, 3-9
Page I-2
Index
Payroll User Manual
H
Home Department..........................................................................................................................................................................2-8
Hourly Extension ....................................................................................................................................................................3-4, 3-8
I
IMPORT EMPLOYEES.............................................................................................................................................................. 2-20
Insurance Maximum .................................................................................................................................................................... 2-54
Insurance Rate ............................................................................................................................................................................. 2-54
Integration w/General Ledger ........................................................................................................................................................1-5
Integration w/Job Cost Main Module ............................................................................................................................................1-6
Interdepartment Account ............................................................................................................................................................. 2-61
INTRODUCTION .........................................................................................................................................................................1-1
J
JC Detail Type ............................................................................................................................................................................. 2-59
JOB COST OPTION .....................................................................................................................................................................1-2
L
LINUX......................................................................................................................................................................................... 4-50
LIT Table..................................................................................................................................................................................... 2-13
Location Address ......................................................................................................................................................................... 4-51
M
Mailing Address.............................................................................................................................................................................2-7
Main Deduction Account............................................................................................................................................................. 2-61
Main Earnings Account ............................................................................................................................................................... 2-61
MAINTAIN DATA FILES.......................................................................................................................................................... 2-62
MAINTENANCE REPORTS...................................................................................................................................................... 4-55
MAKE COMPLETE DATA BACKUPS .................................................................................................................................... 2-66
Marital Status.................................................................................................................................................................................2-8
MASKED FIELDS ........................................................................................................................................................................1-9
Masking (Wildcards) .....................................................................................................................................................................4-3
MASTER CONFIGURATION ................................................................................................................................................... 2-56
Medi Account Employee ............................................................................................................................................................. 2-60
Medi Account Employer.............................................................................................................................................................. 2-60
Medicare ...................................................................................................................................................................................... 2-12
Medicare Tax %........................................................................................................................................................................... 2-58
Medicare Tax Limit ..................................................................................................................................................................... 2-58
Method of Contact ....................................................................................................................................................................... 4-51
Minimum Wage Override ............................................................................................................................................................ 2-11
Minimum Wage/Hour.................................................................................................................................................................. 2-57
Monthly Amts.............................................................................................................................................................................. 2-54
Monthly Pay Summary ................................................................................................................................................................ 4-17
Monthly Pay Summary (PR0203)................................................................................................................................................ 4-16
Monthly Worker’s Compensation Report .................................................................................................................................... 4-43
Monthly Workers' Compensation Report..................................................................................................................................... 4-44
Multi-Company?.......................................................................................................................................................................... 4-50
N
Navigation Tools ...........................................................................................................................................................................2-4
Non-Cash Earning (Type 2)......................................................................................................................................................... 2-38
Non-Payroll Payments (Type 5) .................................................................................................................................................. 2-38
Normal Hours ................................................................................................................................................................................2-9
Normal Table Calculation............................................................................................................................................................ 2-45
Normal with % FIT & SIT Exempt ............................................................................................................................................. 2-47
Index
Page I-3
Payroll User Manual
Normal with % Wage Exemption ................................................................................................................................................ 2-46
Normal with Annual Credit ......................................................................................................................................................... 2-46
Normal with Credit & FIT & SIT ................................................................................................................................................ 2-48
O
Other EIN used this tax year........................................................................................................................................................ 4-52
Overhead Factor........................................................................................................................................................................... 2-35
P
Participant in a Retirement Pension Plan ..................................................................................................................................... 2-19
Pay Cycle.......................................................................................................................................................................................2-9
Payroll Cash Account .................................................................................................................................................................. 2-60
PAYROLL CONFIGURATION ................................................................................................................................................. 2-56
PAYROLL EXPENSE BY DEPARTMENT ................................................................................................................................5-1
Percentage Up to YTD Gross ...................................................................................................................................................... 2-45
Period to Report On .......................................................................................................................................................................4-4
Perm............................................................................................................................................................................................. 2-15
Personnel .......................................................................................................................................................................................2-9
PERSONNEL REPORTS............................................................................................................................................................ 4-31
Prepared By ................................................................................................................................................................................. 4-51
Primary Exemption .............................................................................................................................................................2-13, 2-44
PRINT CERTIFIED PAYROLL ................................................................................................................................................. 3-15
PRINT CHECK SUMMARY........................................................................................................................................................3-9
Print Checks................................................................................................................................................................................. 3-20
PRINT CHECKS ......................................................................................................................................................................... 3-18
PRINT REPORTS .........................................................................................................................................................................4-1
PRINT W-2 FORMS (PR0212)................................................................................................................................................... 4-48
Print W-2 Totals .......................................................................................................................................................................... 4-54
PRINT W-2 TOTALS ................................................................................................................................................................. 4-53
Q
Quarterly Pay Summary............................................................................................................................................................... 4-18
Quarterly Pay Summary (for 941) ............................................................................................................................................... 4-45
R
Range of Accounts.........................................................................................................................................................................4-3
RAPID EMPLOYEE ENTRY.......................................................................................................................................................3-5
Rapid Employee Entry Flowchart................................................................................................................................................ 1-11
Rate Dec. (0-5) ............................................................................................................................................................................ 2-59
Rate Override............................................................................................................................................................................... 2-56
RECORD ACCRUED PERSONAL TIME ................................................................................................................................. 3-24
Record Accrued Personal Time Flowchart .................................................................................................................................. 1-13
Record Employee Comments Flowchart ..................................................................................................................................... 1-13
Recursions ................................................................................................................................................................................... 2-15
Regular Earnings & All Over Time ............................................................................................................................................. 2-54
Regular Earnings & Regular part of Over Time .......................................................................................................................... 2-54
Regular Earnings Only................................................................................................................................................................. 2-54
RENAME PR EMPLOYEE NUMBER....................................................................................................................................... 2-32
Report Print Options ......................................................................................................................................................................4-2
Report Sorting Preference..............................................................................................................................................................4-3
Resubmission? ............................................................................................................................................................................. 4-50
S
Secondary Exemption .........................................................................................................................................................2-14, 2-44
SET UP AND MAINTENANCE ..................................................................................................................................................2-1
SET UP DEPARTMENTS .......................................................................................................................................................... 2-34
Page I-4
Index
Payroll User Manual
SET UP EMPLOYEES..................................................................................................................................................................2-5
SET UP SPECIAL PAY TYPES ................................................................................................................................................. 2-37
SET UP WORKERS' COMP. CLASSES.................................................................................................................................... 2-53
Single Employee Entry Flowchart ............................................................................................................................................... 1-10
SIT Table ..................................................................................................................................................................................... 2-13
Social Security Limit ................................................................................................................................................................... 2-58
Social Security Tax %.................................................................................................................................................................. 2-58
Special Pay Type Listing ............................................................................................................................................................. 4-64
Special Pay Type Listing (Detailed) ............................................................................................................................................ 4-66
Special Pay Type Listing (Non-Detailed) .................................................................................................................................... 4-65
Special Pay Type Register ..................................................................................................................................................4-24, 4-25
Special Tax Calculation for CT (Connecticut)............................................................................................................................. 2-49
Special Tax Calculation for OK................................................................................................................................................... 2-48
STANDARD FEATURES FOR REPORTS..................................................................................................................................4-1
START NEW YEAR'S DATA FILE........................................................................................................................................... 2-63
State 1 Income ............................................................................................................................................................................. 2-12
State 2 Income ............................................................................................................................................................................. 2-12
Status .............................................................................................................................................................................................2-8
Submitter EIN.............................................................................................................................................................................. 4-50
Submitter Information.................................................................................................................................................................. 4-51
Submitter PIN .............................................................................................................................................................................. 4-50
SUTA 1 (State Unemployment Tax for State 1) .......................................................................................................................... 2-13
SUTA 2 (State Unemployment Tax for State 2) .......................................................................................................................... 2-13
SUTA Account ............................................................................................................................................................................ 2-60
SYSTEM INTEGRATION...................................................................................................................................................1-5, 2-62
T
Tax Based on FIT Amount .......................................................................................................................................................... 2-49
TAX REPORTS........................................................................................................................................................................... 4-39
Tax Table Listing......................................................................................................................................................................... 4-67
Tax Table Listing (Detailed)........................................................................................................................................................ 4-73
Tax Table Listing (Non-Detailed)................................................................................................................................................ 4-68
Tax Table Number....................................................................................................................................................................... 2-13
TAX TABLES...............................................................................................................................................................................1-3
TIME CATEGORIES...........................................................................................................................................................1-4, 2-61
Time Category Listing ........................................................................................................................................................4-62, 4-63
TLCN........................................................................................................................................................................................... 4-50
TRANSACTION PROCESSING FLOWCHARTS .................................................................................................................... 1-10
U
Unemployment Maximum ........................................................................................................................................................... 2-44
Unemployment Tax Rate ............................................................................................................................................................. 2-44
Unemployment Tax Reports ...............................................................................................................................................4-39, 4-42
UPDATE TAX TABLES FROM MASTER FILE...................................................................................................................... 2-53
V
Variable OT Calculation.............................................................................................................................................................. 2-57
VOID CHECKS........................................................................................................................................................................... 3-23
W
W-2 .............................................................................................................................................................................................. 2-18
W-2 Form .................................................................................................................................................................................... 2-58
W-2 Forms................................................................................................................................................................................... 4-49
W-2 Reporting Category.............................................................................................................................................................. 2-40
W-2 REPORTING ON DISKETTE ............................................................................................................................................ 4-50
Wages & Salaries Account .......................................................................................................................................................... 2-60
WC............................................................................................................................................................................................... 2-15
Index
Page I-5
Payroll User Manual
WC Class .......................................................................................................................................................................................2-8
Windows GUI and Characther-based Systems ............................................................................................................................ 4-50
WORKERS' COMPENSATION ...................................................................................................................................................1-3
Workers' Compensation Classes Listing (Detailed)..................................................................................................................... 4-76
Workers' Compensation Classes Listing (Non-Detailed)............................................................................................................. 4-75
Workers’ Comp.Class.................................................................................................................................................................. 2-56
Workers’ Compensation Classes Listing ..................................................................................................................................... 4-74
WRITE A SINGLE CHECK ....................................................................................................................................................... 3-21
Write a Single Check Flowchart .................................................................................................................................................. 1-12
Page I-6
Index