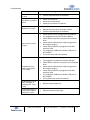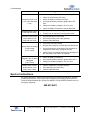
1
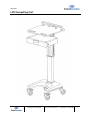
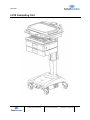
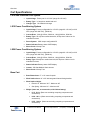
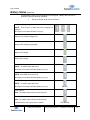
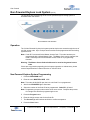
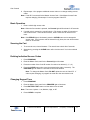
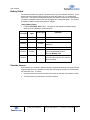
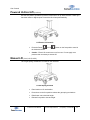
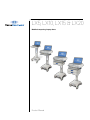
LX5, LX10, LX15 & LX20 Mobile Computing Laptop Carts Product Manual Copyright and Distribution Notice January 2015© Copyright 2015 Capsa Solutions ALL RIGHTS RESERVED. Published 2015 Printed in the United States of America WARNING: ANY UNAUTHORIZED DUPLICATION OF THIS DOCUMENTATION SHALL BE AN INFRINGEMENT OF COPYRIGHT. Trade Secret Notice This documentation, the software it describes, and the information and know-how they contain constitute the proprietary, confidential and valuable trade secret information of Capsa Solutions, its affiliated companies or its or their licensors, and may not be used for any unauthorized purpose, or disclosed to others without the prior written permission of the applicable Capsa Solutions entity. This documentation and the software which it describes are licensed either “AS IS” or with a limited warranty, as set forth in the applicable license agreement. Other than any limited warranties provided, NO OTHER WARRANTY IS EXPRESSED AND NONE SHALL BE IMPLIED, INCLUDING THE WARRANTIES OF MERCHANTABILITY AND FITNESS FOR USE OR FOR A PARTICULAR PURPOSE. The applicable Capsa Solutions entity reserves the right to revise this publication from time to time and to make changes in the content hereof without the obligation to notify any person or entity of such revisions or changes. Product names mentioned herein may be trademarks and/or registered trademarks of their respective companies. Capsa Solutions 4253 NE 189th Avenue 8170 Dove Parkway Portland, OR 97230 Canal Winchester, OH 43110 Phone: (503) 766-2324 Phone: (614) 864-9966 Customer Service: (800) 437-6633 Email: [email protected] Web site: www.capsasolutions.com LX Series Product Manual © 2015 Capsa Solutions | Proprietary + Confidential -i- Contents Overview ............................................................................................................................ 1 About LX Series Computing Carts ................................................................................ 1 Cart Specifications ........................................................................................................ 6 Warnings and Cautions ................................................................................................ 8 Customer and Technical Support ................................................................................. 9 Setting up the Cart ............................................................................................................ 11 Removing Your Cart from the Shipping Materials ........................................................ 11 Transport and Storage .................................................................................................. 12 Setting Up Your Cart..................................................................................................... 12 Using the Cart ................................................................................................................... 15 Locking the Drawer Module (LX15/LX20 with Auto Lock) ............................................ 17 Accessing Basic Service Information (LX15/LX20 with Auto Lock).............................. 17 Programming the Cart From the Keypad (LX15/LX20 with Auto Lock)........................ 17 Keyboard Adjustment (LX10/LX15/LX20)..................................................................... 17 Adjusting Cart Height .................................................................................................... 18 Adjusting Laptop Position (LX10/LX15/LX20) .............................................................. 18 LX Drawer Module ........................................................................................................ 19 LX Column Accessories................................................................................................ 19 Maintenance ................................................................................................................. 21 Cart Controls ..................................................................................................................... 23 Standard LX Powered Keypad (LX15/LX20) ................................................................ 23 Battery Status (Standard) ............................................................................................. 24 LX Auto Lock Keypad (LX15/LX20 with Auto Lock) ..................................................... 25 LX Interactive Display Screen (LX15/LX20 with Auto Lock)......................................... 26 Battery Status (LX15/LX20 with Auto Lock) ................................................................. 27 Auto Lock (LX15/LX20)................................................................................................. 29 Unlocking the Drawer Module (LX15/LX20 with Auto Lock)......................................... 30 Non-Powered Keyless Lock System (LX10)................................................................. 32 Powered Vertical Lift (LX15/20) .................................................................................... 35 Manual Lift (LX10, LX15, LX20) ................................................................................... 35 Troubleshooting ................................................................................................................ 37 General Tips for the LX Series Carts (LX15/LX20) ...................................................... 37 Troubleshooting Guide ................................................................................................. 37 Service Instructions ...................................................................................................... 39 Index ................................................................................................................................... 41 LX Series Product Manual © 2015 Capsa Solutions | Proprietary + Confidential -iii- 1 Overview About LX Series Computing Carts Introduction Designed specifically to accommodate your choice of computer, the LX line of mobile computing carts offers a lightweight, ergonomic design that lets you configure each cart to best meet your exact requirements. The LX line is built upon a foundation that promotes dependability, reliability, and most of all - - confidence that your choice in this platform will ensure your computer cart program’s success. The small but stable footprint permits simple navigation and point-of-care access for bedside patient monitoring and documentation, enabling more efficient nursing workflows. This chapter contains the following topics: • Product Benefits • Cart Features and Specifications • Warnings and Cautions • Customer and Technical Support • About This Manual Benefits The Capsa Solutions LX line of computing carts offers the following benefits: • Many hours of cord-free mobile computing • Powerful battery and power conditioning system (LX15/LX20) • Improved workflow and efficiency • Safe and ergonomic design • Small footprint for easy maneuverability • Customized configuration • Accessory accommodation LX Series Product Manual © 2015 Capsa Solutions | Proprietary + Confidential -1- Overview Cart Features The Capsa Solutions LX line of computing carts combines the latest cart design with proven mobile computing and point-of-care technology solutions. This section describes the major features and specifications of the cart. Cart Features/Components • Ergonomic adjustability with a host of design features including a tilting keyboard • All models feature antimicrobial surfaces to support infection control • Small footprint and slim profile ensure simple maneuvering throughout the facility • Single-wheel casters promote smooth travel with each model including (1) locking and (1) tracking caster standard • Optional CartWatch™ Remote Management software can support cart fleet security management from a single PC location • Capsa’s robust PowerWatch™ software provides a real-time view into the power system health of your mobile computer carts (LX15/LX20) • 24/ 7 Customer and Technical Service provide clinical and IT teams the support they deserve • The rechargeable, sealed lead acid or optional Lithium Ion battery provides the extended run time required in demanding work environments. The battery works with an intelligent charging system for maximum battery life. (LX15/LX20) • The organized workspace enhances workflow and efficiency. Optional Accessories • Non-Powered Keyless Locking System: Keyless locking system for carts without onboard power systems. • Baskets: Baskets can be mounted on back, sides, or front of column to provide convenient storage space. • Scanner Platform: Convenient holder for barcode scanner charging base to enhance workflow (LX10/ LX15 /LX20) • Scanner Bracket: Convenient holder for handheld barcode scanner to enhance workflow (LX10/ LX15 /LX20) • Storage Drawer: An optional locking storage drawer provides secure storage of medications and supplies. This option is available as a keyed drawer or as a keyless locking drawer. • IV Pole: Provides a means to hang patient IV bags (LX10/LX15/LX20) Computer Configurations The Capsa LX line of computing carts provides a cart platform to mobilize your chosen computing device, including popular models from Dell©, HP©, Panasonic©, Lenovo©, and many others. LX medical computing carts accommodate widescreen laptops featuring up to a 17” monitor, most thin client PCs, and small form factor PCs. The customer supplies the computing device to be integrated with the cart. The keyboard, mouse and monitor may also be provided as options. LX Series Product Manual © 2015 Capsa Solutions | Proprietary + Confidential -2- Overview LX5 Computing Cart LX Series Product Manual © 2015 Capsa Solutions | Proprietary + Confidential -3- Overview LX10 Computing Cart LX Series Product Manual © 2015 Capsa Solutions | Proprietary + Confidential -4- Overview LX15/LX20 Computing Cart LX Series Product Manual © 2015 Capsa Solutions | Proprietary + Confidential -5- Overview Cart Specifications LX10 Non-Powered Lock System • Input Voltage: Factory set for 115 VAC (range 90-130 VAC) • Battery Type: 3.0 amp-hour sealed lead acid • Charger Type: .5A float/trickle charger LX15 Power Conditioning System • Input Voltage: Factory configurable for 115 VAC (range 90–130 VAC) or 230 VAC (range 180–260 VAC), (50/60 Hz). • Current Draw: 3.6A @ 125Vac, 50/60 Hz, 1.8A @ 230Vac, 50/60 Hz • Battery Type: 50 amp-hour sealed lead acid, 40 amp-hour Lithium Ion for extended run times • Power System: 150W output configurable DC • Status Indicator: Battery status OLED display • Short-Circuit: 30 amp Fuse LX20 Power Conditioning System • Input Voltage: Factory configurable for 115 VAC (range 90–130 VAC) or 230 VAC (range 180–260 VAC), (50/60 Hz). • Current Draw: 3.6A @ 125Vac, 50/60 Hz, 1.8A @ 230Vac, 50/60 Hz • Battery Type: 50 amp-hour sealed lead acid, 40 amp-hour Lithium Ion for extended run times • Status Indicator: Battery status OLED display • Inverter: 150 Watt Medical Grade Inverter • Short-Circuit: 30 amp Fuse • Base Dimensions: 17" x 16" caster footprint • Work Surface Area: 19" x 22" with integrated forward-facing handles • Work Surface Height: Base Cart • • Electric Lift: Minimum 33.5” - Maximum 48” • Gas Spring: Minimum 32” – Maximum 49” Weight: (base cart, no accessories, with Lithium battery) • LX 5: 50 lbs. (Base cart excluding computing components and accessories) • LX10: 60 lbs. (Base cart excluding computing components and accessories) • LX15: 100 lbs. (Base cart excluding computing components and accessories) LX Series Product Manual © 2015 Capsa Solutions | Proprietary + Confidential -6- Overview • LX20: 100 Lbs. (Base cart excluding computing components and accessories) • Construction: Formed steel, aluminum, and high-density polymer • Finish: Powder coat, anodize, and antimicrobial touch points • Wheels: 1 locking, 1 tracking , 2 standard Environmental Conditions • Operating Temperature: 15–35°C (60–95°F) • Operating Humidity: 30–90% non-condensing • Shipping and Storage Temperature: -29–60°C (-20–140°F) • Shipping and Storage Humidity: 10–95% RH non-condensing Electrical Safety • Class I Equipment and Internally Powered • Equipment not suitable for use in the presence of flammable mixtures • Continuous operation Computer Support • Mounting: The cart is factory-equipped for mounting the selected computing technology solution. • Power: The cart is factory-equipped with the appropriate voltage and DC power cable to operate the selected computing technology solution. (LX15 Models Only) Warning: Do not attempt to substitute a different computer, since power requirements vary. Substituting a different computer can cause damage to the computer and the cart. Please consult Capsa Solutions Technical Support when replacing the computer with a different model. (LX15 Models Only) • Computing Specifications: For specifications, refer to the computer manufacturer’s manual with your IT department. Note: The computing device being attached to the cart should be certified by Capsa Solutions. The power recommendations should be followed. Additional Weight Limits The following is a list of recommended weights not to exceed when adding components or accessories to certain safety critical structures. • Top Work Surface: 15 lbs. • Drawers: 15 lbs. • Baskets: 15 lbs. LX Series Product Manual © 2015 Capsa Solutions | Proprietary + Confidential -7- Overview Warnings and Cautions Read and follow these warnings and cautions when using or maintaining your cart to reduce risk of damage or injury. Note: Only trained and authorized personnel should service the cart. If your cart is not working properly, contact Capsa Solutions Technical Support for assistance. • Only trained and authorized personnel who are aware of the risks of servicing electrical equipment should open the base to service the battery power system. Others risk injury or death. • Do not use your cart near water. If your cart becomes excessively wet, unplug and turn off immediately, wipe off any excess liquid, and allow it to dry before using again. • Do not immerse your cart in water. This is an electrical hazard and can cause damage to your cart, as well as cause injury to you. • Keep the cart in a well-ventilated area. • Avoid using an electrical extension cord with your cart. If you must use an extension cord, make sure that it is rated for your cart power capacity. • Do not leave children unattended around the cart to prevent injury or death. • Do not lean on the keyboard tray or use it as a support. Applying excessive weight to the tray could result in damage to the cart or personal injury. • Close all drawers and drawers before moving cart. • This device has the potential for emitting electromagnetic interference. • If the integrity of the AC power cord is in doubt, the cart should only be operated from its internal battery supply. The AC power cord should be replaced. • For proper cart performance, it is necessary to routinely check the battery to make sure it is holding a charge properly. If the battery is not performing as expected, it may need to be replaced. • Caution, LX20 models: Cart contains live AC power. Contact with AC power may cause electrical shock, injury or death. LX Series Product Manual © 2015 Capsa Solutions | Proprietary + Confidential -8- Overview Customer and Technical Support This manual can be obtained by contacting Capsa Solutions Technical Support Monday thru Friday 8:00 AM EST to 8:00 PM EST and after hours for emergency support at: 800-437-6633 When you call for technical support, please have the following information available: • Model: LX5, LX10, LX15, LX20 • Serial Number: Located in two places: Interior of clamshell and on rear of base. • Computer Type: Customer supplied About This Manual Introduction This manual is arranged in the following chapters and appendix: • Overview: This chapter applies to all users. It contains overview information about the cart, its features, warnings, cautions, and technical support. It also describes type conventions used throughout the document and terms you must understand to interact with the cart. • Setting up the Cart: This chapter applies to deployment personnel. It describes removing your cart from the shipping materials, transport and storage, and setting up your cart. • Using the Cart: This chapter applies to all users. It describes the different parts of the cart and the tasks associated with your everyday use of the cart. • Cart Controls: This chapter describes the LX user interface. • Troubleshooting: This chapter applies to users who perform troubleshooting and maintenance functions. • Repair: This chapter applies to users who perform troubleshooting and maintenance functions. It describes how to replace parts that are field replaceable. Documentation Conventions The different type styles used in this document to indicate elements of the cart are described below. • Bold Type - Indicates a selection that you are instructed to make or clear by pressing the appropriate button on the cart’s keypad. • Italics - Used for emphasis or to cross reference topics containing additional information. LX Series Product Manual © 2015 Capsa Solutions | Proprietary + Confidential -9- 2 Setting up the Cart Overview Introduction The procedures in this chapter explain the tasks associated with unpacking and setting up your cart: • Removing Your Cart From the Shipping Materials • Transport and Storage • Setting Up Your Cart Removing Your Cart from the Shipping Materials When your cart arrives, complete the following procedure to inspect the cart and remove the cart from the packaging. Procedure Remove Cart from Shipping Materials Read this chapter before unpacking the cart. Check the shipping container for damage (holes or crushed top). Remove the straps from around the container. Open the top of the container to inspect the product. Lift the container from the shipping pallet and over the product. Remove the plastic protective cover from the product. With assistance, lift the cart from the packaging riser. Hold the cart by the base and support the sides as you lift it. Warning: The product is heavy. Do not lift the product from the packaging riser without assistance. Use proper lifting techniques when lifting heavy objects. Inspect the cart again for shipping damage. Note: Some models may be shipped in more than one container. If so, follow the applicable steps for each container. If you identify any damage, contact Capsa Solutions Customer Support. LX Series Product Manual © 2015 Capsa Solutions | Proprietary + Confidential -11- Setting up the Cart Transport and Storage General The following precautions must be taken to ensure proper operation of your cart: • You must charge the batteries within 30 days of the shipping date. • Do not expose the cart to liquid or temperatures outside of -29–60°C (-20–140°F) or humidity outside of 10–95% RH non-condensing. • Do not transport, set, or store the cart outdoors where it can be exposed to weather. LX Long-Term Unit Storage (LX15/LX20) You must fully charge the battery at least once every 30 days or as needed. Improper care may cause damage to the power system. For more information, contact Capsa Solutions Technical Support. Cart Maintenance For best performance of the gas spring vertical lift mechanism (if configured), it is recommended to occasionally cycle the work surface from the highest position to the lowest position. This will ensure proper operation. Setting Up Your Cart To set up your cart, complete the following procedure: Initial Setup 1. Install the computer on the cart, connecting power and USB cables as required. 2. Install the 30 amp fuse in the positive battery terminal cable. Note: LX20 models only. The fuse holder is located near the battery on the red positive battery cable. Simply push the supplied fuse into the holder. 3. Plug the AC cord into a wall outlet to charge the battery properly before deploying the cart to the facility floor. Laptop Installation This section describes the installation of the laptop computer into the LX series carts. LX5: This section describes the installation of a Laptop PC on the LX5 cart. 1. Prior to installation of the laptop, the security bar must be removed from the security frame by using a T25 pin and Torx driver (included with cart) to remove the (2) #10-32 x ½” screws located on the outside of the security frame. While removing screws, grip security bar with crescent wrench to prevent rotation. 2. Place Laptop PC on the LX5 work surface, tucking the rear of the laptop against the security frame. 3. Secure laptop to security frame by re-installing the security bar in one of the three provided positions which best secures the laptop to the security frame. The Laptop should not be removable with the bar installed. 4. Tighten the two screws using the Torx driver and Crescent wrench. LX Series Product Manual © 2015 Capsa Solutions | Proprietary + Confidential -12- Setting up the Cart 5. If cart was supplied with power brick holder, secure the power brick to the bracket using the supplied Velcro straps. 6. Route the power cable to the laptop power input port and plug in using the openings in the rear of the security bar for access. LX10, LX15, LX20: 1. Using the provided key, unlock the clamshell lid by pulling the lock tab away from the cart. Press release tabs and slide clamshell lid towards the handle until the lid hits its stops. Tilt front of lid up and remove. 2. Separate the two Velcro straps on the laptop tray and place laptop on the tray, sliding it rearward up to the ledge on the tray. 3. Secure laptop to the tray with the Velcro straps. 4. Adjust laptop platform height to place laptop at desired position relative to clamshell lid. To adjust platform, loosen the thumb screws on each side of the platform and pivot platform to desired height. Tighten thumb screws to secure position. 5. If you have a LX20 model cart, place the power brick supplied with the computer behind the CPU tray in the rear of the clamshell. 6. Connect laptop to power. • DC Power: Route power cable through slots in right rear of clamshell and attach to laptop power input port. • AC Power: Connect power brick to supplied triple tap outlet 7. Connect USB cable from USB hub to an open port on the laptop. 8. Using Allen wrench, remove right lock pin from clamshell. Insert security bar into left clamshell lock pin. Secure lock bar with right lock pin. 9. Line up guides on clamshell lid with pins on clamshell. 10. Secure clamshell lid by sliding rearward until it fully engages the clamshell. Slide lock in, toward clamshell, and lock lid with supplied key. 11. Tilt laptop screen into the desired position. LX Series Product Manual © 2015 Capsa Solutions | Proprietary + Confidential -13- 3 Using the Cart Overview This chapter explains different parts of the cart and the tasks associated with your everyday use of the cart. This chapter contains the following topics: • Cart Exterior features • Cart Controls • Powering up the cart • The LX keypad • Multi-function display • Battery Display • Unlocking the Cart • Locking the Cart • Drawer Module • Column Accessories • Maintenance This manual does not include instructions for cart programming at the display screen or remotely using CartWatch or Standard Host. For instructions on advanced cart functions please refer to the LX User Interface Manual. Power Plug (LX10/LX15/LX20) This cart is supplied with a hospital-grade power plug and is to be plugged into a hospital-grade receptacle. Grounding reliability can only be achieved when the equipment is plugged into such a receptacle. To charge battery, plug the cart into an appropriate AC outlet. The outlet should be visible to the operator and no more than 2 meters (6 feet) from the cart. If the cart is moved while plugged in the interactive screen will display a warning: BATTERY CHARGING! UNPLUG BEFORE MOVING! Warning: If the grounding of the AC receptacle is compromised, do not insert the power plug into the receptacle. Warning: If the hospital-grade cord is damaged, do not use the cord. Call Capsa Solutions Customer Support to order a replacement cord. LX Series Product Manual © 2015 Capsa Solutions | Proprietary + Confidential -15- Using the Cart Cart Controls (LX15/LX20) This section describes the cart controls, which are located under the work surface in the front of the cart. • ON/OFF Switch - The switch turns the power on and off to the cart. o The ON/OFF switch is located under the clamshell handles on the right front of the cart. The following symbols on the ON/OFF switch identify the two power states: - DC power is turned on - DC power is turned off Note: If the cart AC power cord is plugged into an operable wall receptacle, the cart battery will charge regardless of whether the ON/OFF switch is set to ON. • Communication Port- The communication port is normally used by service technicians and Capsa Solutions personnel to set up and service the cart. • Serial # - Located in two places: Interior of clamshell and on rear of base. Powering Up the Cart (LX15/LX20) To use the cart, set the cart’s ON/OFF switch to the ON position. Note: The ON/OFF switch is located on the front of the cart below the cart’s work surface. When the cart is turned on the screen will run through a startup sequence. The screen will display cart information including: Cart Name, Cart Number, Hardware Version, Firmware Version, Cart Serial Number, and access control software setting (Standard or Remote). Note: This service information can also be retrieved through the Cart Info menu. You must first unlock the cart to access this menu. When the cart is powered up using the ON/OFF switch, the reset circuitry detects the event. The cart power system is initially set to the stored power settings. Note: If the cart has never been programmed or if the stored power settings are invalid, the three DC power channels will default to the off state, and no power will be provided to the computer system (LX15 Models Only). LX Series Product Manual © 2015 Capsa Solutions | Proprietary + Confidential -16- Using the Cart Locking the Drawer Module (LX15/LX20 with Auto Lock) There are three ways to lock the drawer module: • Use key to manually lock cart • Allow the Auto Lock timer to expire by not pressing any buttons or moving the cart. (Auto Lock Only) • Press the button on the keypad (Auto Lock Only) Note: The drawer module can still lock with a drawer not fully pushed in from the drawer module. Drawers can be closed even if the drawer module is locked. Accessing Basic Service Information (LX15/LX20 with Auto Lock) It is helpful to have cart service information available when reporting a cart issue. To access the cart service information: • First unlock the cart • Select INFO from the home screen • ↓ > 1. CART DIAGNOSTICS ( to return to the home screen). • ↓ Scroll down the list • When finished Select other info. to return to the Home Screen or ↓ to review Programming the Cart From the Keypad (LX15/LX20 with Auto Lock) For instructions how to access and program Cart and User settings refer to the Cart Interface Manual, part number 6874. Keyboard Adjustment (LX10/LX15/LX20) This section describes how to adjust the keyboard. • Keyboard Tray Adjustment - The friction of the tilt adjustment is factory set. Slide the keyboard tray out and tilt it upward or downward to the correct position. LX Series Product Manual © 2015 Capsa Solutions | Proprietary + Confidential -17- Using the Cart Adjusting Cart Height The LX series cart comes standard with a gas spring assisted lift mechanism. The LX15 and LX20 carts are available with powered lift. Powered Lift Operation (LX15, LX20) Instructions for operation with the powered vertical lift are detailed in the Powered Vertical Lift section of the Cart Controls on Page 35. Manual Lift Operation (LX5) To adjust the cart height of a LX5 cart: Lift Handle LX5 Gas Lift Actuation Handle • Lifting up on the actuation handle will release the gas spring. • With the handle actuated, lift up on the work surface to raise the cart • With the handle actuated, push down on the work surface to lower the cart • Once the cart is in the desired position, release the actuation handle to set the height of the cart Manual Lift Operation (LX10, LX15, LX20) Instructions for operation with the gas spring lift are detailed in the Manual Lift section of the Cart Controls section on Page 35. Adjusting Laptop Position (LX10/LX15/LX20) The LX10/LX15/LX20 cart allows for positional adjustment of the laptop platform. The platform is able to tilt up or down to accommodate laptops of different dimensions and configurations. • Loosen the thumb screws located on each side of the laptop platform. • Position laptop tray where it is most accommodating for the mounted laptop • Tighten the thumb screws to lock the platform position. LX Series Product Manual © 2015 Capsa Solutions | Proprietary + Confidential -18- Using the Cart LX Drawer Module The drawer module for the LX series carts can accommodate a maximum of 6” of drawers. The drawer module is configured with a keyless Auto Lock mechanism; a manual override is included in case of power loss. Overview All drawer modules are mounted on the LX column with a nut plate. A drawer module assembly may come assembled with the cart or it may be purchased as an optional accessory. Drawers come in 3 sizes, 3”, 6” and 9”. Drawers and are mounted on the front column below the keyboard tray. LX Column Accessories A number of accessories are available that mount to the LX column. There are two types of mounting arrangements and procedures: • Front mounting • Side and rear mounting Front Mounting When mounting an accessory to the front of the LX column, the accessory is attached through the front channel with nut plates. Examples of accessories that mount on the front of the LX column are shelves, drawer modules, and baskets. Front of LX Column LX Series Product Manual © 2015 Capsa Solutions | Proprietary + Confidential -19- Using the Cart Side and Rear Mounting When mounting an accessory to the side or rear of the LX column, an accessory bracket assembly must be used. Side channel Screws Side of LX Column LX Accessory Bracket The LX column consists of channels, or grooves, that run the full length of the column on both sides and on the rear (back). The LX Accessory Bracket Assembly fits in a column groove and slides up or down depending on the desired location for its accessory. Accessories that mount to the LX Accessory Bracket Assembly do so with 2-4 screws. Examples of accessories that mount on the sides and rear of the LX column are a Scanner Holder, Sharps Container, and a Rear Handle. Example: LX Rear Handle Accessory LX Series Product Manual © 2015 Capsa Solutions | Proprietary + Confidential -20- Using the Cart Maintenance Cleaning Guidelines Routinely maintain your cart to ensure proper function and performance. Follow these guidelines when cleaning your cart: • Verify that your cart is unplugged from the wall outlet and turned OFF before cleaning. • Use a soft, clean cloth to clean the cart. • Use a cleaner of 70% denatured alcohol and 30% water. Caution: Do NOT use the following chemicals to clean your cart: acetone, mineral spirits, abrasive cleansers, paint thinner, or any other harsh or toxic chemicals. • Allow your cart to dry completely before plugging the power plug into a wall outlet or turning the cart ON. LX Series Product Manual © 2015 Capsa Solutions | Proprietary + Confidential -21- 4 Cart Controls Overview This section provides instructions for basic cart controls, monitoring battery status, access permissions and cart management modes. Refer to the LX User Interface Manual for detailed instructions; how to program cart settings, users and review Event Logs. Standard LX Powered Keypad (LX15/LX20) The cart is controlled from a simple-to-use membrane keypad. The dedicated buttons on the keypad control only basic cart functions: • • Turn lighting on/ off Alarm silence button Lighting Battery Status Alarm Silence Keyboard (and Base) Light To turn on the keyboard light, and the base light (if equipped): • Press the LX Series Product Manual button on the keypad © 2015 Capsa Solutions | Proprietary + Confidential -23- Cart Controls Battery Status (Standard) Current battery status is usually displayed on the Keypad. Battery status will not be displayed under the following conditions: • The cart is turned off (at the on/ off switch) Battery Charging (Plugged In) NOTE: There may be a delay before the charging icon appears. » Blue light on foot switch will blink (if equipped) » Battery Fully Charged (Plugged In) Battery 100% Charge (Unplugged) Battery 75% Charge Battery 50% Charge Battery 25% Charge NOTE : An audible alarm will sound. Blue light on foot switch will blink rapidly (if equipped) Battery 10% charge NOTE: An audible alarm will sound. Blue light on foot switch will blink rapidly (if equipped) Battery 0% charge NOTE : An audible alarm will sound. Blue light on foot switch will blink rapidly (if equipped) Blinking Over Current: Note: An audible alarm will sound until resolved Exceeded Current: Note: An audible alarm will sound until resolved Cart shut down, must cycle power to resolve LX Series Product Manual Slow Blinking © 2015 Capsa Solutions | Proprietary + Confidential -24- Cart Controls LX Auto Lock Keypad (LX15/LX20 with Auto Lock) The cart is controlled from a simple-to-use membrane keypad. The dedicated buttons on the keypad control only basic cart functions: • • • • Numeric keypad for entering access codes to unlock the Drawer Module Lock button to lock the Drawer Module Turn lighting on/ off Multi-function keys are used to navigate through on-screen menus to simplify more complex programming and logging tasks. Numeric Keypad Multi-function Keys Lighting Lock Cart Keyboard (and Base) Light To turn on the keyboard light and the base light (if equipped): • Press the LX Series Product Manual button on the keypad © 2015 Capsa Solutions | Proprietary + Confidential -25- Cart Controls LX Interactive Display Screen (LX15/LX20 with Auto Lock) Cart status, instructions and feedback are displayed on an interactive display screen. Three multifunction keys are provided to navigate through cart functions, programming menus and to make selections: Note: The cart display colors are black background with blue/black text Date/ Time Lock Battery Status Status Status Bar Message Bar Selection Bar Multi-Function Keys Status Bar • • • • Date (MM.DD.YR, DD.MM.YR) Time (12, 24h) Drawer Module Lock Status Battery Status • • • • • • Auto Lock timer screen – Time remaining before auto relock occurs Menu or Prompts Display Error Messages Undo or delete last input Cart Service Information – Basic cart information can be retrieved Cart Diagnostics • Navigation commands Message Bar Selection Bar LX Series Product Manual © 2015 Capsa Solutions | Proprietary + Confidential -26- Cart Controls Battery Status (LX15/LX20 with Auto Lock) Current battery status is normally present on the Display Screen. Battery status will not be displayed under the following conditions: • • • The cart is turned off (at the on/ off switch) In sleep mode When navigating in the cart or user settings menu For carts equipped with electronic lift, the battery status will display on the footswitch. The following images illustrate how the battery status icon indicates battery state: Battery Charging (Plugged In) • Charging icon • NOTE: There may be a delay before the charging icon appears • The blue light on the foot switch will blink while charging Battery Fully Charged (Plugged In) • Press CHARGE COMPLETE! to begin using the cart Battery Status Refresh - Cart preparing battery status Battery 100% Charge Battery 75% Charge Battery 50% Charge Battery 25% Charge • NOTE : An audible alarm will sound • Message Bar will Display: PLEASE CHARGE • Blue light on foot switch will blink rapidly Battery 10% charge • NOTE: An audible alarm will sound • Message Bar will Display: Accessories Turned Off • Blue light on foot switch will blink rapidly LX Series Product Manual © 2015 Capsa Solutions | Proprietary + Confidential -27- Cart Controls Sleep Mode (LX15/LX20 with Auto Lock) The cart automatically enters a power conservation state known as sleep mode after one minute of inactivity or motion. The cart can also be forced to enter sleep mode by selecting the SLEEP option from the screen, if available. Sleep mode is disabled while the cart is unlocked. When entering sleep mode the interactive screen and any cart lighting will turn off automatically. Upon entering sleep mode, the following will occur: • A text screen saver will blink across the screen. • The Default text is “Sleep”, but will change to “Charging” if the cart is charging or “Full Charge” if the cart is plugged in and has completed charging. The cart will be woken from sleep mode by any of the following methods: • • • Pressing the first key of your access code on the keypad. Press any key on the keypad or footswitch (if configured). Moving the cart while plugged in (if configured). Upon waking: • • The screen will come on, displaying the Locked Home Screen. • The display remains on as long as buttons are pressed, or the cart is in motion. After 1 minute of inactivity the cart returns to sleep mode. Remote & Standard Mode (LX15/LX20 with Auto Lock) In STANDARD mode, the cart settings and user management tasks are performed on the cart using the keypad and multi-function display screen. Cart management may also be conducted with Standard Host software. The cart is preset to STANDARD on delivery. In REMOTE mode, most programming is completed using CartWatch™ or Standard Host software. In REMOTE, only basic cart unlocking and Info functions are available on the cart. CartWatch™, with the carts set to REMOTE enables a larger group to be managed from a single, remote location. The cart is preset to STANDARD on delivery. The cart can be placed in REMOTE mode in the Cart Settings Menu. Note that the cart locks when set to remote. Refer to the Programming the Cart Section in this manual for instructions how to modify this setting. Access Privileges (LX15/LX20 with Auto Lock) The cart is operated in either GENERAL or SPECIFIC modes. In GENERAL, all users use a single 4 digit code to unlock the cart. A second MASTER code is needed to access to cart programming functions. In SPECIFIC, each user is assigned a unique 4 digit code. The privileges assigned to a particular user grant access to programming menus. There are three (3) levels of user privileges: Normal, Administrator and Override. Regardless of mode or user privilege a separate Master Code is required to enter the Cart and User Programming menus and Event Logs. The Master Code number cannot be the same as any other Access Code number. There is only one Master Code number per cart. LX Series Product Manual © 2015 Capsa Solutions | Proprietary + Confidential -28- Cart Controls The cart is preset to GENERAL mode on delivery. For the cart to be operated in SPECIFIC mode, it must first be programmed to SPECIFIC in the Cart Settings Menu. Please refer to the Programming the Cart Section in this manual for instructions how to modify this cart setting. SPECIFIC NORM GENERAL NORMAL LOCK CART CHANGE ACCESS CODE Master Code Required OVERRIDE UNLOCK CART CART DIAGNOSTICS PROGRAM CART SETTINGS PROGRAM USER EVENT LOGS OVERRIDE MODE * OVERRIDE Admin ADMIN Normal users can only change their access codes if PERSONAL EDIT is set to YES. Programming the Cart Programming the cart in Standard Mode and advanced administrator programming are described in detail in the MX User Interface Manual (Part number: 810026). Auto Lock (LX15/LX20) The cart is equipped with an Auto Lock feature that prompts it to re-lock automatically after a set time. The Auto Lock timer is preset to five (5) minutes at the factory but can be adjusted from 0-99 minutes. To prevent the cart re-locking while being used, the timer can be reset by pressing any button, or cart movement. LX Series Product Manual © 2015 Capsa Solutions | Proprietary + Confidential -29- Cart Controls Unlocking the Drawer Module (LX15/LX20 with Auto Lock) Home Screen – Drawer Module Locked When the drawer module is locked, and awaiting input the screen will display an instruction for unlocking the cart (depending on the authentication method being used): Unlock the Drawer Module (LX15/LX20 with Auto Lock Only) Depending on the procedures and authentication systems used at your facility, you will unlock the drawer module in one of the following ways: • Access Code • Authentication Device – Bar Code, Magnetic Stripe or Proximity readers • Access Code and Secondary Authentication Device • Manual Override – Bypasses keypad, requires Using an Access Code (LX15/LX20 with Auto Lock) Enter your personal Access Code from the numeric keypad. If the cart is in sleep mode press the first key of your access code to wake it up. Press and re-enter if you make a mistake. An audible beep will sound after each key press (unless Key Beep is set to OFF). The Drawer module will unlock as soon as the last digit of a valid code is entered. If an invalid code is entered an error screen will display and an alarm will sound for a few seconds. Re-enter your code or Cancel to return to the Home Screen. CAUTION: A continuous alarm will sound on the third unsuccessful attempt. LX Series Product Manual © 2015 Capsa Solutions | Proprietary + Confidential -30- Cart Controls Using an Access Card (LX15/LX20 with Auto Lock) To save power, the cart must be woken first before the authentication device is used. Press a button, or move the cart and wait for the screen to come on. Then use the normal procedure to present your card to the reader. If the access card is invalid an error message will be displayed and you should retry the card. CAUTION: A continuous alarm will sound on the third unsuccessful attempt. Using an Access Code and Card (LX15/LX20 with Auto Lock) First enter your personal access Code as described previously. The screen will then prompt you to use your secondary authentication. If secondary authentication is successful the cart will unlock. If the access code or secondary authentication is invalid, an error message will be displayed prompting you to re-enter. CAUTION: A continuous alarm will sound on the third unsuccessful attempt. Home Screen - Drawer Module Unlocked (LX15/LX20 with Auto Lock) When the Drawer module unlocks there will be an audible beep and a sound from the lock mechanism. Depending on configuration and access privileges this screen also may provide access to cart Info and Programming functions. The greeting screen will appear for 4 seconds: • The security icon now displays “unlocked” • The options shown in the selection bar will vary depending on the cart configuration and your access privileges. Then the Auto Lock timer will start: • The timer will reset when any button is pressed or the cart is moved. LX Series Product Manual © 2015 Capsa Solutions | Proprietary + Confidential -31- Cart Controls Non-Powered Keyless Lock System (LX10) The operation and programming for the LX non-powered keyless locking system is described within this section. Non-Powered Cart Interface Operation The LX Non-Powered Keyless lock system permits simple user access through the use of a 4-digit access code. Up to 5 unique access codes can be programmed into the locking system at once. Note: Code ID 5 is reserved for the Master Access Code. This code has been preprogrammed with a default Master Code. The Master Code can be changed, but Code 5 will always serve as the Master Access Code for re-programming functions. Warning: The Master Access Code should never be used as the general access code. If there are any questions regarding the lock system operation or maintenance, please contact Capsa Solutions Customer Service at: 800-437-6633 Non-Powered Keyless System Programming 1. Press the PROGRAM button. 2. Enter the cart’s MASTER CODE: 4545 Note: This code will ALWAYS open the lock until Code 5 is re-programmed. 3. Wait for the PROCEED light to illuminate. 4. Select the number of the Code ID to be programmed: Code ID 1, 2, 3 or 4 Note: Programming access codes must be done one at a time. Complete the process for a single code ID before programming the next. 5. Press the Program button 6. Enter the 4-digit access code for that Code ID. 7. The Proceed light will illuminate and blink to confirm acceptance. 8. Press the Clear button. LX Series Product Manual © 2015 Capsa Solutions | Proprietary + Confidential -32- Cart Controls 9. Repeat steps 1-9 to program additional access codes or to change existing access codes. Note: Code ID 5 is reserved for the Master Access Code. If the Master Access Code requires changing, follow steps 1-9 and re-program Code ID 5. Basic Operation 1. Enter a valid 4-digit access code. Note: When the first number is pressed, the Proceed light will illuminate for 25 seconds. 2. If a valid code is entered, the cart will unlock. Pull drawer out within (5) seconds or cart will auto-relock. If the cart auto-relocks, enter a valid code to unlock it once more. Note: If the ERROR light is illuminated, press the CLEAR button and re-attempt the access code. If an incorrect code is entered four (4) times, the cart will be locked down for 30 seconds. Securing the Cart 1. To secure the cart, close all drawers. The cart will auto-relock after 5 seconds. 2. Alternatively, pressing the CLEAR button will re-lock the cart if it is in the unlocked states Deleting Individual Access Codes 1. Press PROGRAM 2. Enter the Master Code, wait for the Proceed light to illuminate 3. Press the number of the Code ID location for code to be deleted (1, 2, 3, 4) 4. Press the CLEAR button twice (must be pressed twice within 2 seconds). The PROCEED light will flash for 4 seconds to confirm the deletion Note: To change the Master Code, DO NOT delete the code in Code ID 5. If code requires changing, re-program the code ID to the new desired code. Changing Keypad Tone 1. Press PROGRAM 2. Enter the Master Code, wait for the PROCEED light to illuminate 3. Press BATTERY TEST button until the desired tone is heard Note: There are 4 options: Low, Medium, High, or Off 4. Press CLEAR to complete LX Series Product Manual © 2015 Capsa Solutions | Proprietary + Confidential -33- Cart Controls Battery Status The standard keyless lock system is powered by four (4) D-Cell alkaline batteries. These batteries should maintain sufficient charge to power the system for 6-12 months with normal use. The optional rechargeable keyless lock system is powered by a SLA battery. The battery recharges each time the cart is plugged in to charge the laptop. This system is capable of 3000+ locking cycles between charges. Testing Battery Power 1. Press the BATTERY TEST button. The lights on the keypad will indicate battery status (6 second flashing or solid indication) Battery Test Light Proceed Light SOLID SOLID Error Light Indication Good Batteries *FLASH* SOLID *FLASH* *FLASH* Low Batteries Very Low Batteries (or inferior batteries) No Power *FLASH* *FLASH* New Batteries have been installed (occurs automatically without pressing Battery Test) Power Available (will display accurate battery power once cart has been unlocked) *FLASH* Override Access If the batteries do not contain sufficient charge to operate the keyless lock system OR the keypad malfunctions, it is possible to unlock the cart using the override key included with the medication cart. To do this: 1. Insert the tubular key into the override lock located on the side of the drawer module. 2. Turn the tubular key clockwise to unlock the drawers. LX Series Product Manual © 2015 Capsa Solutions | Proprietary + Confidential -34- Cart Controls Powered Vertical Lift (LX15/20) Use the foot pedal to operate the powered vertical lift in an up/ down direction. When you reach the lowest or highest point of travel the lift will stop automatically. LX Electric Lift Controls • Press the Down the desired direction. • Caution: Electric lift controls are not a foot rest. Do not apply more pressure than necessary to actuate lift. or Up button on the foot pedal to travel in Manual Lift (LX10, LX15, LX20) The LX gas spring mechanism is located on the cart base. LX Gas Spring Controls • Place hands on LX cart handles • Press down on the foot pedal to release the gas spring mechanism • Raise/lower cart to desired height • Release foot pedal to set cart height LX Series Product Manual © 2015 Capsa Solutions | Proprietary + Confidential -35- 5 Troubleshooting Overview This section provides • General Tips • Troubleshooting Guide For additional information contact your supervisor or Capsa Solutions Technical Support. Technical support is available Monday thru Friday 8:00 AM EST to 8:00 PM EST and after hours for emergency support at: 800-437-6633 When you call for technical support, please have the following information available: • Model: LX5, LX10, LX15, LX20 • Serial Number: Located in two places: Interior of clamshell and on rear of base. • Computer Type: Customer supplied General Tips for the LX Series Carts (LX15/LX20) If the cart does not function properly, try the following: • Make sure the power switch is in the ON position. • DC Carts: Make sure the Circuit Breaker on bottom rear of cart did not trip. Press in to reset the Circuit Breaker. • AC Carts: Make sure the fuse located above the inverter is not damaged. Replace with new fuse if found to be damaged. • Make sure the battery is charged and the cart is connected to 110 or 220VAC. A completely discharged battery may require a few minutes to recharge enough to operate the cart. Troubleshooting Guide This guide provides some basic troubleshooting steps to address problems that you may encounter over the lifetime of the cart. See the next chapter for how to replace damaged or inoperable parts that can be replaced in the field. Should you have any problems not covered or have questions on achieving the solution indicated, please call Capsa Solutions Technical Support. Note: The first step in most troubleshooting is to ensure that you can get a response from the cart and the battery is sufficiently charged. Caution: Before working on any internal component, make sure that the computer is shut down, the power plug is unplugged from the wall socket, and the cart power switch is turned off. LX Series Product Manual © 2015 Capsa Solutions | Proprietary + Confidential -37- Troubleshooting Symptom Cart does not move up or down Suggested Action • Contact Capsa Solutions for assistance • Check for obstructions • Unlock the locking casters • Caster(s) may need to be replaced • Check for obstructions • Manually lock and unlock the drawer module • Contact Capsa Solutions for assistance • Check that the mouse is plugged into the USB hub • Try plugging the mouse into another USB port • Check that the computer is using the correct mouse driver • Check that the USB extension cable is plugged into the computer properly • Check that the USB hub is plugged into the USB extension cable • Try plugging the USB hub into another USB port on the computer • The mouse may need to be replaced • Check that the keyboard is plugged into the USB hub • Try plugging the keyboard into another USB port • Check that the computer is using the correct keyboard driver • Check that the USB extension cable is plugged into the computer properly • Check that the USB hub is plugged into the USB extension cable • Try plugging the USB hub into another USB port on the computer • The keyboard may need to be replaced Keyboard palm rest is worn, damaged, or missing (LX10, LX15, LX20) • Replace keyboard palm rest Power plug hanger no longer will hold power plug (LX15, LX20) • Replace the power plug hanger Cart difficult to push or swivel Drawers do not open Mouse does not work properly Keyboard does not work properly (LX10, LX15, LX20) LX Series Product Manual © 2015 Capsa Solutions | Proprietary + Confidential -38- Troubleshooting Symptom Interactive screen is off (LX15, LX20 with Auto Lock) Screen freezes (LX15, LX20 with Auto Lock) Electronic Lock will not unlock drawer (LX15, LX20 with Auto Lock) Battery does not charge or hold charge (LX15, LX20) Cart works when plugged in but not when unplugged (LX15, LX20) Audible alarm sounds, display shows “Lock Fault” (LX15, LX20) Suggested Action • Check that the cart power switch is in “ON” position • Check the 30 amp fuse (AC Carts) • Check the battery connections in base • Verify that the battery voltage is greater than 10.5 volts • Charge cart if battery voltage is 10.5 V or less • Check the battery connection to the LX Main PCB • Press the lock button on the keypad • Turn the cart off and back on at the power switch • Incorrect primary key code used • Incorrect secondary code used (optional) • Contact Capsa Solutions • Turn on the cart power switch • Plug the power plug into a known good AC wall outlet • If all connections are good and the cart indicates it is charging, allow the cart to charge for 8 hours • If after 8 hours, the battery still seems to discharge too fast, the battery may need to be replaced • Check the battery connections • Verify that the battery voltage is greater than 10.5 V • Charge cart if battery voltage is 10.5 V or less • Check if drawers are inserted improperly • Verify drawer(s) are closed fully • Contact Capsa Solutions Service Instructions For service instructions, please refer to the MX service manual (Part Number: 810025) for detailed instructions. This manual can be obtained by contacting Capsa Solutions Technical Support Monday thru Friday 8:00 AM EST to 8:00 PM EST and after hours for emergency support at: 800-437-6633 LX Series Product Manual © 2015 Capsa Solutions | Proprietary + Confidential -39- 6 Index A E About This Manual .............................................................. 9 Adjusting Cart Height ........................................................ 18 Adjusting Laptop Platform ................................................ 18 Electrical Safety .................................................................. 7 Environmental .................................................................... 7 H C Cabinet .............................................................................. 19 Capsa Solutions LX Workstation ............................. See Cart Cart Benefits .......................................................................... 1 Features .......................................................................... 2 LX10 ................................................................................ 4 LX15/LX20....................................................................... 5 LX5 .................................................................................. 3 Maintenence ................................................................ 12 Setting Up ..................................................................... 12 Unpacking the .............................................................. 11 Cart Controls ..................................................................... 23 Cautions .............................................................................. 8 Cleaning Guidelines .......................................................... 21 Column Accessories .......................................................... 19 Configuration ...................................................................... 2 Controls Autolock Keypad Layout ............................................... 25 Display Screen .............................................................. 26 Manual Lift, LX15/LX20................................................. 35 Non-Powered Keyless ................................................... 32 Power Switch ................................................................ 16 Standard Keypad Layout............................................... 23 Vertical Lift ................................................................... 35 Copyright ............................................................................. i Customer Support ............................................................... 9 Help .................................................................................... 9 K Keyboard Adjusting the ................................................................ 17 L Laptop Installation LX10/LX15/LX20 ........................................................... 13 LX5 ............................................................................... 12 Locking Non-Powered Keyless .................................................. 32 Locking the Cart................................................................ 17 Locking, Auto .................................................................... 29 LX Column ........................................................................ 19 M Maintenance .................................................................... 21 P D Damage, Shipping ............................................................. 11 Display, Battery Status ...................................................... 27 Distribution Notice............................................................... i Drawer Cabinet ................................................................. 19 Drawer Module Unlocking ...................................................................... 30 LX Series Product Manual Power Cord ............................................................................. 15 S Service, Instructions ......................................................... 39 Setting Up the Cart ........................................................... 11 Specifications AC Power System ........................................................... 6 Cart ................................................................................ 6 © 2015 Capsa Solutions | Proprietary + Confidential -41- Index DC PowerSystem ............................................................ 6 Electrical Safety .............................................................. 7 Environmental ................................................................ 7 Non-Powered Keyless Lock............................................. 6 Weight Limits.................................................................. 7 Standard Keypad Battery Status ............................................................... 24 Storage .............................................................................. 12 Support, Technical ........................................................ 9, 37 U Unpacking the Cart ........................................................... 11 User Manual ....................................................................... 9 Using the Cart ................................................................... 15 V Voltage ............................................................................... 6 T Technical Support ......................................................... 9, 37 Transport and Storage ...................................................... 12 Troubleshooting................................................................ 37 Guide ............................................................................ 37 Tips ............................................................................... 37 LX Series Product Manual W Warnings ............................................................................ 8 Weight Limits ..................................................................... 7 © 2015 Capsa Solutions | Proprietary + Confidential -42- 4253 NE 189th Avenue 8170 Dove Parkway Portland, OR 97230 Canal Winchester, Ohio 43110 Phone: (503) 766-2324 Phone: (614) 864-9966 Customer Service: (800) 437-6633 Email: [email protected] Web site: www.capsasolutions.com ©Capsa Solutions, 2015 Part #810028 Rev. A