1
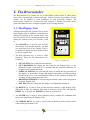
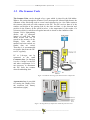
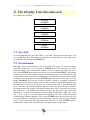
VAKI
User manual for
the Riverwatcher fishcounter
_________________________ Vaki Aquaculture Systems Ltd. _________________________
Table of contents
TABLE OF CONTENTS ............................................................. 1
WARRANTY .................................................................................. 2
1. THE RIVERWATCHER ......................................................... 3
1.1. THE DISPLAY UNIT ..............................................................................................3
1.2. THE SCANNER UNITS ...........................................................................................4
1.3. THE SOLAR-PANEL AND BATTERY.......................................................................5
1.4. TELEPHONE CONNECTION ....................................................................................5
1.5. THE WINARI PC SOFTWARE ................................................................................5
2. THE DISPLAY UNIT DISCONNECTED ........................... 6
2.1. SET CLOCK ...........................................................................................................6
2.2. SET MINIMUM.......................................................................................................6
2.3. DISPLAY OPTION ..................................................................................................7
2.4. PROGRAM VERSION ..............................................................................................7
2.5. PIN NO..................................................................................................................8
3. THE DISPLAY UNIT CONNECTED .................................. 9
3.1. “VISION ” TESTS ...................................................................................................9
3.2. CALIBRATION OF THE THERMOMETER ................................................................10
3.3. SETTINGS CONTROL ...........................................................................................10
3.4. RESET ................................................................................................................10
4. INSTALLATION ....................................................................11
4.1. EXAMPLE OF INSTALLATION SITES AND THE “INSCALE”.....................................11
4.2. WATER FLOW .....................................................................................................12
4.3. CONNECTIONS AND POWER SOURCES .................................................................12
4.4. TELEPHONE CONNECTIONS .................................................................................13
5. CAMERA SYSTEM ...............................................................14
6. MAINTENANCE ....................................................................17
Vaki Aquaculture Systems Ltd.
Akralind 4, 201 Kópavogur, Iceland
Tel. 354 – 595 3000
e-mail: [email protected]
Fax. 354 – 595 3001
Internet: www.vaki.is
DU version: A:3.09 B:2.3 – Camera version: 1.0.0.
May 2003
____________________________
_________________________
-1-
_________________________ Vaki Aquaculture Systems Ltd. _________________________
Warranty
Vaki Aquaculture Systems Ltd. offers warranty for defects that appear within two (2)
years from the date of delivery from Vaki Iceland, on condition that the equipment
has been assembled, used, and maintained in accordance with the instructions for
assembly and use. Changes to the start date of this warranty, such as delayed delivery
to the user, must be reported to Vaki upon receipt of the equipment and agreed in
writing.
Vaki undertakes to repair all defects that are due to faults in the design, materials
used, or manufacture of the equipment. These defects will be rectified by repairing the
equipment, or replacing components. The complete unit or parts thereof may be
required to return to the factory in Iceland for repair.
Vaki accepts corresponding warranty for original parts fitted by Vaki as replacements,
for a period of one (1) year from the date supplied.
Vaki will not be liable for:
∗ Incorrect assembly and use, or inadequate maintenance.
∗ Defects which result from the fitting of materials, components, or
devices not supplied by Vaki, and which are purchased and fitted by
the user.
∗ Defects due to changes made to the equipment by the user, without
the written consent of Vaki.
∗ Faulty or inadequate repairs carried out by the user.
∗ Normal wear and tear of the equipment.
∗ Faulty connection of electrical equipment.
∗ Faults caused by excessive voltage.
∗ Damage or stoppage due to immersion of the computer in water.
∗ Damage to electrical supply cables.
∗ Any economic loss that may arise from production stoppage.
If faults or defects appear in the equipment, the user must report this in writing to
Vaki or its appointed representative as soon as possible, and without unjustifiable
delay. The report must be sent within two (2) weeks from the expiry of the deadline,
which is two (2) years from the date of supply by Vaki Iceland.
If the purchaser does not inform Vaki or its representative within the time limits stated
above, the purchaser shall forfeit the rights of the warranty.
____________________________
_________________________
-2-
_________________________ Vaki Aquaculture Systems Ltd. _________________________
1. The Riverwatcher
The Riverwatcher is a counter for use in fish ladders, barrier dams or other places
where fish swim through a restricted passage. Various versions are available, and the
counter can be adapted to local conditions in each individual instance. The
Riverwatcher consists of a Control Unit with software, a Scanner Unit with cables,
solar-panel batteries and a computer program for processing the data.
1.1. The Display Unit
VAKI
All data collected by the Scanner Unit is stored
in the Display Unit, in addition to which data is
displayed according to the current status. The
keys on the DU are for selecting functions and
setting the Scanner Units (see Sections 2 and
3).
∗ The ON/OFF key is used to turn on both
the Display Unit and the Scanner. All data
are preserved even if the Display Unit is
switched off. But it has to be turned ON to
be able to register fish.
BIO M A SS C O UN TER
11:45
! 8.2
ON/OFF
S:
T:
FN
365
47
RESET
ENTER
ON /O FF
Data stored inmemory during pow er dow n
Tochange betw een YES and NO
Toscroll FUN CTIO N menu
ENTER
FN
R ESET
Toaccept the values onthe display, press
ENTE
R
FUNCTION menu:
Toselect Biomass mode
Counting mode
and options
ToERA SEdata from memory To RESET count to zero
LOW BA T Rechargebattery or runof an exter nal power source
∗ The FN (Function) key is used to select
functions. There are five alternatives (see
Section 3):
Figure 1: Display Unit
1. (SET CLOCK) For setting the date and time.
2. (SET MINIMUM) For setting the size limits for the Scanner Unit, i.e. the
minimum height of the fish to be recorded and the estimated difference in
height between salmon and trout.
3. (DISPLAY OPTION) For selecting the form in which data are presented on
the display: a) the number of large and small; b) the number of fish passing up
and down the river; c) the total number of fish. It is also possible to disable the
counting of fish passing down the river.
4. (PROGRAM VERSION) For displaying the edition of the control program in
use in the Display Unit.
5. (SET PIN NO.) For setting the pin number of GSM mobile telephone.
∗ The RESET key is used to clear all data from the memory of the Display Unit.
When this is done, the Scanner Unit must be connected to the DU, and after the
RESET key is pressed, the ENTER key must be pressed twice.
∗ The ENTER key is used to select functions and to confirm the commands that
have been entered into the Display Unit.
∗ The ARROW KEYS are used to move between functions and to select values
when setting the Scanner Unit.
____________________________
_________________________
-3-
_________________________ Vaki Aquaculture Systems Ltd. _________________________
1.2. The Scanner Units
The Scanner Units can be thought of as a gate which is placed in the fish ladder.
When a fish swims through the Scanner Unit it interrupts the infrared light beams, the
silhouette of the fish being used to count it and calculate its size. One cable connects
the scanners sides and one cable connects to the DU. The DU receives data of a) the
number and height of the passing fish; b) the time and date; c) the direction and
position in the scanner, d) the speed in m/sec, e) the temperature, f) the results of a
vision test which is carried out at regular intervals to check on the condition of the
Scanner Unit’s lightemitting
diodes, and g) silhouette
images of each fish. Data
about 20,000 fish can be
stored in the memory of the
Display Unit; after this
number has been reached, no
further data are stored.
Therefore it is recommended
to transfer data from the DU
to a PC regularly.
PC or Lab-tops, can be
connected to the small
Connector box. Its function
is to be a “bridge” to the DU
and other components. It is
not necessary to disconnect
the DU from the scanner
when downloading data.
Figur 2. Schematic drawing of the Riverwatcher components
A protective box is provided
for storing the Display Unit,
the connector box, battery
and modems (right).
Figur 3. Arrangement of components inside the protective box
____________________________
_________________________
-4-
_________________________ Vaki Aquaculture Systems Ltd. _________________________
1.3. The Solar-Panel and Battery
A solar-panel and a battery is used when other sources of
electrical power (110/220 V) are not available (optional).
The charge is stored in a battery, the recommended size
being c. 110 Ampere- hours. A diode is situated between
the battery and the solar-panel unit to prevent discharge
from the battery. It is vital that the sensory side of the
solar-panel unit face south in the northern hemisphere
and north in the southern hemisphere.
Figure 4 (right): Solar-Panel and a protective box fitted on to a pole.
1.4. Telephone connection
The Riverwatcher can be connected to a telephone, either
via landline or a GSM mobile phone. This option makes
it possible for the user to download data from the
Riwerwatcher directly to its own PC in the office without
visiting the site. Landline connection: the telephone
line is connected to modem on the site which again is
plugged to the Connector box (see above). The same
setting is used when remote GSM-telephone is used
except with a different kind of modem (Falcon) with an
antenna.
PC
Telephone
Connector box
Modem
Figure 5 (right): Telephone connection (landline) to the Connector
box via modem
1.5. The Winari PC Software
Data collected by the Display Unit are loaded into a
computer program for processing. It has three main
functions: transferring the data from the Display Unit in
machine-readable form, storing and managing the
documents retrieved from the Display Unit and
presenting the data in an accessib le form for the user. The
Winari program is easy to use, and gives information
about the numbers of migrating fish, the date and time of
passing and their size distribution. The temperature of the
river can also be presented graphically. In addition it has
a powerful database which stores images of the passing
fish. The images can then be viewed and each fish
identified manually and categorised. (See special manual
for the software).
____________________________
_________________________
-5-
_________________________ Vaki Aquaculture Systems Ltd. _________________________
2. The Display Unit disconnected
Five options are available:
Set clock
<ENTER>
ñò
Set minimum
<ENTER>
ñò
Display opt.
<ENTER>
ñò
Program vers.
<ENTER>
ñò
Pin no.
<ENTER>
2.1. Set clock
To set the date and time, press the FN key. “Set clock” will appear on the display. The
year, month, day, hour and minutes can then be set using the arrow keys, and values
are confirmed by pressing the ENTER key.
2.2. Set minimum
Minimum values for the Scanner Unit are set under this option. To open the option,
press FN and then the ò key. Then press ENTER and use the arrow keys to set the
minimum height of the fish that the Scanner Unit is to register; generally, 40 mm is
used. Press ENTER again and use the arrow keys to set the POSITION, this number
enables you to turn off scanning from top (0) of scanning area to the bottom (96), this
is useful if the water level does not submerse the scanner unit and a part of the scanner
is always above the waterlevel. Press ENTER again and use the arrow keys to set the
Garb. Threshold: the unit has a built- in monitor which is constantly watching if
anything gets stuck in the scanner, if the monitor records more then 25 disturbances at
the same area in one hour it will give the counter instructions to start ignoring this
area, a fish that will swim through the scanner at this exact area will not be counted.
In situation when the counter is not totally submersed it may be necessary to increase
this number or even disable this function because the waterlevel may cause this
disturbance. To disable this function set this number to 220. Press Enter and “F ilter
ON” can be used to avoid counting water turbulence as fish. Under all normal
conditions this function should be active. Press ENTER again and use the arrow keys
to set the difference in height between salmon and trout to be shown in the Display
Unit; 77 mm is generally used, but other values may be set. Press ENTER again to
confirm these values, and “Set minimum” will appear again on the display.
____________________________
_________________________
-6-
_________________________ Vaki Aquaculture Systems Ltd. _________________________
2.3. Display option
One of three display options may be
selected to be valid when the
Riverwatcher
is
counting:
Salmon/trout, Up/down and Total
number. To make the selection, press
the FN key and the ò key twice.
“Display opt.” will appear on the
display. The following diagram shows
how selections are made by using the
ENTER and arrow keys.
Here you can choose between small or
large digits on the display (only when
showing Total).
Press ENTER when you have made
your selection.
Here you can choose between seeing
on the DU the number of fish going up
or the number of fish going up minus
fish going down.
Press ENTER when you have made
your selection
Here you can set the DU to show
temperature as Fahrenheit or Celsius.
Press ENTER when you have made
your selection
Display opt.
<ENTER>
↓ <ENTER> ↓
Salmon / trout
òñ
Up / down
òñ
Total
↓ <ENTER> ↓
Small digits
òñ
Large digits
↓ <ENTER> ↓
+ Up
òñ
+Up – Down
↓ <ENTER> ↓
Fahrenheit
òñ
Celsius
<ENTER>
2.4. Program version
This option is to see what version of the program is installed in the Display Unit. Press FN
and ñ twice. “Program vers.” will appear on the display. Press ENTER again to see what
version of the program is in use. To exit this option, the Display Unit must be switched off. If
keys other than ON/OFF are pressed, the P in “Program” will change according to the key
pressed. This is for testing whether all the keys are active.
____________________________
_________________________
-7-
_________________________ Vaki Aquaculture Systems Ltd. _________________________
2.5. Pin no.
When using GSM mobile telephone connection, it is necessary to set the pin number of the
telephone card. Press FN and then ñ once and the display shows “Pin no.”
Pin no.
<ENTER>
Press ENTER and the first digit in the four digit number can be set by using the arrows.
Enter PIN no:
0***
Press ENTER when the first digit is set and then you can set the next one. It is important to
set the PIN number before the telephone is connected to the Display Unit, since the telecard
can be closed if the Display Unit sends wrong pin number more than three times. If that
happens, place the card in a regular GSM telephone and unlock it by using the PUK code
supplied with the telephone card.
When applied for a telephone card it is necessary to get a service that enables transferring of
data. Regular cards are not able to transfer data, so the subscription must be for data transfer
to and from the telephone. There is also another number for the data service than the regular
service so two numbers are required. The data number must be dialled from the Winari
software.
____________________________
_________________________
-8-
_________________________ Vaki Aquaculture Systems Ltd. _________________________
3. The Display Unit connected
When the Scanner Unit is connected to the Display Unit, a battery signal flashes in the lefthand corner of the Display Unit’s display panel. This indicates that the Scanner Unit and
Display Unit are connected, it also indicates the voltages that the power source is giving. Full
black box means more than 12.6 V and empty means less than 12.0 V. When the two units are
connected, one of the following three display options will be presented (to select an option
using the Display option function, see Section 2.3.).
13:09
8 ºC
S: 256
T: 79
a) In addition to the time and the temperature of the river, this display shows the total
numbers of salmon (S) and trout (T) that have passed through the Scanner Unit. The
difference between salmon and trout is the height in mm set in “Set minimum”.
13:09
8 ºC
U: 343
D: 8
b) This display shows the total number of fish that have passed up (U) and down (D) the river
through the Scanner Unit.
13:09
8 ºC
335
c) The third alternative is to display the total number of fish that have passed through the
Scanner Unit.
3.1. “Vision” Tests
With any one of the above displays, pressing the ñ key will activate a “vision” test in order to
find out whether any of the diodes of the Scanner Unit are obstructed. If all the diodes are
active, two lines, each of 16 ¨ -symbols, will be displayed. Each box represents 6 diodes (the
first representing diodes 1-6, the second diodes 7-12, and so on). If any diode is obstructed, a
filled box (n) will be displayed instead of a clear one (¨ ), indicating that one or more of the
relevant six diodes are obstructed.
¨ ¨ ¨ ¨ ¨¨ ¨ ¨¨ ¨ ¨ ¨¨ ¨ ¨¨
¨ ¨ ¨ ¨ n ¨¨ ¨ ¨ ¨¨ ¨ ¨¨ ¨ ¨
In the above diagram, the upper row of boxes represents the row of diodes in the Scanner Unit
which is situated higher up the river, and all are operative. The filled box in the lower row
indicates that one or more of the diodes 25-30 may be obstructed; it may also be that the
surface of the water is casting a shadow if the Scanner Unit is partly projecting above the
surface, or that the diode panels need to be cleaned. Press ENTER to get back to counting
mode (shut of vision test). NB that the counter must be switched off before cleaning, and that
it is best to use a soft brush to clean it. The counter may be turned on again after cleaning.
____________________________
_________________________
-9-
_________________________ Vaki Aquaculture Systems Ltd. _________________________
3.2. Calibration of the thermometer
The temperature is measured electronically. If the electronic thermometer has to be calibrated
that is done the following way: Press FN twice and the following window is displayed.
Calibrate temp.
now 12.4 12.4
Use the arrows to calibrate the temperature and press ENTER when the temperature is set
right. It is only possible to change the temperature for 2 degrees at the time. Make sure that
the settings are on right value (Celsius/Fahrenheit) and the scanner is submerged in the water.
3.3. Settings control
To check the settings of the display unit, the date and memory, press FN and the following
will be displayed:
Pos 0 Min40
Gt 25 Vrec 0 +uThis means the position is set on 0 (no diodes closed manually), minimum height of scanned
fish is 40 mm, Garbage threshold is 25, Video triggering is set off and fish swimming both up
and down are displayed on the DU.
Then the following window is displayed showing the date.
YY
01
MM
9
DD
14
And at last the memory status is shown. The percentage shows how much memory is
available and it is full when 20,000 fish have been registered.
13:09
MEMORY x% FULL
3.4. Reset
To clear data from the Control Unit, press RESET and ENTER once. The following will be
shown on the display:
13:09
RESET ?
To erase all data, press ENTER once. The following will appear on the display:
The progress bar will empty to the right and the counter will be set to 0.
Erasing
¨ ¨ ¨ ¨ nnnnnnnnnnn
____________________________
_________________________
- 10 -
_________________________ Vaki Aquaculture Systems Ltd. _________________________
4. Installation
The installation site must be carefully selected in order to get all the migrating fish counted.
The most common sites are fishladders, fish-passways or places where fish access is
restricted. The circumstances are usually quite different from one installation site to another.
4.1. Example of installation sites and the “Inscale”
In most cases a special grid (inscale) must be made around the scanner unit and the steel
housing to guide the fish through the scanner but without blocking the water flow. The bars
on the grid must be tight enough to prevent fish to passing through. Below is an example of
few installation sites with a stainless steel “inscale”.
Figure 6.
River Kalix (Sweden)
- Installation in 1998
- Fishway type: Pool and Weir
(with orifice)
- Counted fish per season:
ca. 2500 –5000
- Species: Salmon (trout)
Figure 7.
River Pite (Sweden)
- Installation in 1998
- Fishway type: Pool and Weir
- Counted fish per season:
ca. 400 –600
- Species: Salmon and trout
Figure 8.
River Alma (Sweden)
- Installation in 1998
- Fishway type: Natural bypass
- Counted fish per season:
ca. 100 –150
- Species: Trout (salmon)
____________________________
_________________________
- 11 -
_________________________ Vaki Aquaculture Systems Ltd. _________________________
It is important that both the scanner units and the “inscale” can be taken out and cleaned. It is
recommended that the Riverwatcher is stored in dry place during off- season (winter time).
4.2. Water flow
The direction of the scanners in the steel housing must be checked before installed. An arrow
on the side of the scanner indicates the water direction, put the scanner in according to the
arrow. It is recommended to test the scanner before use by putting a fish-like object through
the scanner.
It is recommended to have the scanners totally submersed in the water, if possible. This is to
avoid water-surface disturbances caused by water-bubbles or fluctuation in water levels. It is
important that there should be the steadiest possible flow of water through the Scanner Unit
and that there should not be much lateral turbulence between the plates on the two sides of the
unit. It is also vital to check to see whether debris, algae or other impurities are building up on
the Scanner Unit or the surrounding frame, as this could obstruct the Scanner Unit’s “vision”.
4.3. Connections and power sources
Connect the scanner plates with the short cable
provided. Then connect the Display Unit to the
Scanner with the long cable. It is important that
the cable is securely fastened to the grid so that
tree branches or debris wont get stuck to it or
damage the cables or the connectors.
The Riverwatcher can be connected to a 12 Volt
battery as shown on fig. 3 and 9. Note that the
power consumption of the Riverwatcher is ca.
180 mA and if it is connected to a 105 Amp car
battery then the maximum operational time is ca
20 days. It is recommended to check and
recharge the battery regularly or use an
additional source of power f.i. a solar panel or
connect it directly to the 110 / 220 Volt powersystem (use 12 V adapter). The Solar panel can
be easily attached to the Riverwatcher to charge
up the battery.
Figure 9 . Connecting the solar-panel
to the Riverwatcher.
____________________________
_________________________
- 12 -
_________________________ Vaki Aquaculture Systems Ltd. _________________________
4.4. Telephone connections
GSM-mobile: The GSM modem (Falcon 2AD) is
connected as shown on fig. 3. This option requires a
good GSM signal at the installation site. Before you can
use the GSM phone you need to have a GSM card that
allows data transport in both directions, and install it
in the modem. Please call your local telephone company
for information about available GSM card options.
When the small GSM card is in place you need to install
your PIN number on the Display Unit: Before you go
further disconnect the Scanner cable from the DU
and the GSM modem, then press the following buttons
on the DU and enter your Pin no.
Settings:
FN
Change the Pin number
by pressing the arrows
until the first digit
appears
then
press
ENTER and change the
next digit the same way.
When all the digits are
right press ENTER to
confirm the Pin number.
Set clock
ñ
Pin no
Enter
Connect the scanner and the GSM modem when the Pin no has been set. It is important that
the DU is not connected until after the Pin no has been set. If not the GSM card might close
down. If that happens put the GSM card in a GSM telephone and open it with the PUK code,
try then again with the Riverwatcher modem as described above.
Landline connection: Connect the modem to a telephone line. The connection is established
as soon as the modem is connected. For modem installation instructions please read the
modem manual.
____________________________
_________________________
- 13 -
_________________________ Vaki Aquaculture Systems Ltd. _________________________
5. Camera system
By using the Riverwatcher camera system it is possible to distinguish between different
species of fish, sex and even if the fish are farmed or wild. A computer with special software
and an underwater camera are added to the Riverwatcher system (the yellow control unit is
not needed any more). The camera is triggered by the scanner when a fish (or any other
object) swims through it. A digital image of the fish is stored on the hard disk along with the
data on number, size, time, temperature etc. The data are stored even though the computer is
shut down, but for analysing the data the right files have to be created by pressing the Save
button.
In the Control Panel there are six buttons and five boxes.
On/Off
This button starts the connection between the scanner and the camera. When the camera is
started press the On button and “Connected” then fla shes at the bottom left corner. If the
connection is lost then “Not connected” is flashing.
____________________________
_________________________
- 14 -
_________________________ Vaki Aquaculture Systems Ltd. _________________________
Settings
Here you can change both camera
settings and scanner settings.
The camera settings are the
resolution for the images and
the size of the picture. It is
also possible to choose
between still images or video
sequence for each fish. When
set on still images it is possible
to choose between one to five
images of each fish and also
set the time interval between
the images taken. This can
vary between installations with
water current and the speed of
the fish swimming through.
When set to video recording it
is possible to set the recording
time as well as the number of
frames per second. Under
Scanner Settings it is possible
to set the Garbage Threshold,
Minimum Depth and which
comport to use (see chapter
2.2. for further details).
Save
The save button saves the data to the four file types readable to Winari analysing software.
These are arv (textfile with data on number, time, size etc), img (with images of each
scanned fish), tdt (textfile with temperature readings every three hours) and vsb (a
visibility check to see if the diodes are functioning correctly). At the same time all the
photos taken by the camera are stored in a subfolder in the same folder as the four files.
To reset the data, press the Total Reset button.
Scanner visibility
This function is to check the status of the infra red diodes. There are 32 dots
each representing 3 diodes. If one of these three diodes is blocked then
the respective yellow dot turns black. If e.g. the first 5 yellow dots turn
black for both lines it means that the top 15 diodes are blocked, appr.
7,5 cm of the scanner plate (see chapter 3.1. for further details). The
adjustable bar on the left side is to manually turn of some of the diodes
(see Position in chapter 2.2. for further details).
Close
This turns off the counter and closes the program.
Reset
Press this button to reset the numbers in the windows.
____________________________
_________________________
- 15 -
_________________________ Vaki Aquaculture Systems Ltd. _________________________
The windows show how many fish are registered up and down, and also how many images
are rejected. The rejections can be because a fish swims into the
scanning area and then turns back before it is all the way through. It
may also be because of water turbulence or surface reflections if the
scanner is not fully submerged. If the number of rejections is greater
than is set up in Garbage Threshold then that area of the scanner is
closed down for one hour. A closed area is shown with a red box.
Total Reset
Press this button to reset all data and images. Make sure that
the four files (arv, img, tdt, vsb) have been saved into a
special folder and all the photos in a subfolder before
reset.
The bottom bar shows the total number of fish up and down, as well as the water temperature.
The numbers are reset with Total Reset.
____________________________
_________________________
- 16 -
_________________________ Vaki Aquaculture Systems Ltd. _________________________
6. Maintenance
As the Riverwatcher must be dismantled and stored every autumn, it is best to be absolutely
sure how to set it up again. We suggest you take photos of the equipment when it is set up so
as to be able to set it up in the same way aga in later on.
Regular maintenance should be carried out as follows:
1. Clean the Scanner Unit plates with a brush and clear away all rubbish, algae and other
plant growth that has accumulated on the frame and near the Scanner Unit, including any
that is above the Scanner Unit. NB: The Scanner Unit must be switched off while this is
done.
2. Measure the battery charge. The minimum charge must be 11.2 V (flat), the maximum
12.6 V (fully charged). If the charge falls below 12 V, it is recommended that you either
replace the battery or charge it.
3. Check whether the clock in the Control Unit is correct, and set it if it is not (see Section
2.1. Set clock).
4. Check whether the memory is filling up. If it is, transfer data to a computer using the
Winari program and clear the memory. NB: Make absolutely sure that the data have
been transferred successfully before deleting data from the Control Unit.
5. Test the Scanner Unit’s “vision” (see Section 3.1. “Vision” test.)
____________________________
_________________________
- 17 -