Download Inventory User`s Manual OPEN SYSTEMS
Transcript
OPEN SYSTEMS® Accounting Software Inventory User’s Manual © 1998 Open Systems Holdings Corp. All rights reserved. Document Number 2210.IN60 No part of this manual may be reproduced by any means without the written permission of Open Systems Holdings Corp. OPEN SYSTEMS is a registered trademark and OSAS, Resource Manager, Resource Manager for Windows, and Report Writer are trademarks of Open Systems Holdings Corp. BBx is a trademark and PRO/5 and Visual PRO/5 are registered trademarks of BASIS International Ltd. Novell and NetWare are registered trademarks of Novell, Inc. Microsoft, Windows, Windows 95, Windows NT, and MS-DOS are either trademarks or registered trademarks of Microsoft Corporation. Adobe and Acrobat are registered trademarks of Adobe Systems, Inc. TrueType is a registered trademark of Apple Computer, Inc. Open Systems Accounting Software for UNIX uses PKUNZIP utilities from Ascent Solutions, Inc., 9009 Springboro Pike, Miamisburg, OH 45342. Phone: (937) 847-2374 Internet: www.asizip.com Printed in U.S.A. This manual is recyclable. August 1998, Release 6.00 This document has been prepared to conform to the current release version of OPEN SYSTEMS Accounting Software. Because of our extensive development efforts and our desire to further improve and enhance the software, inconsistencies may exist between the software and the documentation in some instances. Call your customer support representative if you encounter an inconsistency. Open Systems Holding Corp. 1157 Valley Park Drive Suite 105 Shakopee, Minnesota 55379 General Telephone (612) 403-5700 General Fax (612) 496-2495 Support Telephone (800) 582-5000 Support Fax (612) 403-5870 Internet Address www.osas.com Inventory User’s Manual Contents Introduction General Information Inventory System Conventions Text Menu Graphical-Style Menus Favorites Menu Function Commands Reports 1-3 1-5 1-7 1-11 1-15 1-25 1-29 1-37 Setup Installing the Application Setup Considerations Entering Your Data Creating a Backup Schedule 2-3 2-5 2-13 2-33 Work Flow Daily Tasks Periodic Tasks 3-3 3-15 Information Inquiry Price and Availability Summary History Detail History Movement History Sales Trending Items Item Locations Costs and Vendors Lot Numbers iii 4-3 4-13 4-17 4-21 4-25 4-29 4-39 4-49 4-55 Inventory User’s Manual Serial Numbers 4-59 Daily Work Inventory Transactions Location Transfers Transactions Journal Transfers Journal Post Transactions GL Adjustments Journal Post GL Adjustments 5-3 5-37 5-55 5-59 5-63 5-67 5-71 Reorder Processing Calculate Reorders Reorder Report Generate Purchase Requisitions 6-3 6-7 6-11 Reports Inventory Movement Report Item Status Report Price Report Valuation Report Cost Variance Report Serialized History Report Lot History Report Transaction History Report 7-3 7-7 7-11 7-15 7-19 7-23 7-27 7-31 Analysis Reports Safety Stock Alert Report Overstock Report Slow/Fast Movement Report Sales Analysis Report Gross Profit Analysis Report Trend Analysis Report Movement Trending Report Inventory User’s Manual 8-3 8-7 8-11 8-15 8-19 8-23 8-27 iv Periodic Process Item Price Change Cost Changes Quantity Cross Verification Year-End Maintenance Purge Selected Files Rebuild Item Quantities 9-3 9-7 9-11 9-15 9-19 9-23 Physical Inventory Physical Inventory Selection Freeze Quantities Print Physical Inventory Tags Print Physical Inventory Worksheets Physical Counts Tag Entry Physical Counts Worksheet Entry Batch List Physical Count List Variance Report Physical Count Valuation Report Update Perpetual Inventory 10-3 10-7 10-11 10-15 10-19 10-27 10-33 10-37 10-41 10-45 10-49 File Maintenance Items Item Locations Locations Price Structures Promotional Pricing Tables 11-3 11-17 11-51 11-55 11-59 11-63 Code Maintenance Sales Categories Customer Levels Product Lines Account Codes Forecast Types v 12-3 12-5 12-7 12-9 12-13 Inventory User’s Manual Standard Cost Makeup Codes User-Defined Fields User-Defined Field Sorts 12-17 12-19 12-23 Master File Item Detail List Item Summary List Item Locations List Location Detail List Price Structure List Promotional Pricing List Tables List 13-3 13-7 13-11 13-15 13-19 13-23 13-27 Master Codes List Sales Categories List Customer Levels List Product Lines List Account Codes List Forecast Types List Cost Makeup Codes List User-Defined Fields List User-Defined Field Sorts List 14-3 14-7 14-11 14-15 14-19 14-23 14-27 14-31 References Conversion System Messages File Descriptions Other Commands Price Calculator A-1 B-1 C-1 D-1 E-1 Index Inventory User’s Manual vi Inventory User’s Manual Introduction Introduction General Information Inventory System Conventions Text Menu Graphical-Style Menus Favorites Menu Function Commands Reports Inventory User’s Manual 1 1-3 1-5 1-7 1-11 1-15 1-25 1-29 1-37 1-1 General Information The OPEN SYSTEMS Accounting Software (OSAS™) product line consists of several accounting applications. Each application addresses a different phase of your financial operations; together, they form a powerful accounting solution to your daily and periodic accounting needs. Customer Support Open Systems has a strong commitment to customer service and product quality. If you have difficulty in using Open Systems products, consult the user’s manual and other OSAS reference materials. If you need more information, consult a customer support representative. The Structure of OSAS Resource Manager The Resource Manager application is the foundation or shell of OSAS; it provides the operating environment that holds the other applications. To use OSAS, you must run Resource Manager through an operating system based on Microsoft® Windows™, Windows 95®, Windows NT®, UNIX®, or Novell® NetWare®. OSAS operates on LAN systems, across a web server using the OSAS Web program, and within a single computer. After you install Resource Manager, you can use it to install other applications, modify how each application works, and specify how the overall system operates. Base applications Base applications are designed and produced with the largest possible number of industries in mind. They are most effective when you interface them with each other. Base applications are usually named after common accounting operations. Examples are Payroll, Inventory, Accounts Payable, Purchase Order, Accounts Receivable, Sales Order, and General Ledger. Inventory User’s Manual 1-3 Inventory System The Inventory application helps you control and keep track of the items you stock. For each item (including lots and serialized items), Inventory tracks the quantities sold, purchased, and adjusted; location transfers; and costs. Each item is identified by location, product line, user-defined fields, bin number, status, vendor ID, serial and lot number, and unit of measure. Use the Items function to enter information specific to the item, and use the Item Locations function to enter detailed information about the locations of the items. You can then track transfers between locations, sell items from an alternate location, and track differences in price activity. Information Inquiry Use the Information Inquiry functions to view (not change) information about items: prices, transaction and historical records, general information, alternate items, units of measure, location and bin information, costs, vendors, lot numbers, and serial numbers. Daily Work Once you establish the codes and IDs through the File Maintenance and Code Maintenance functions, you can use the Daily Work functions to enter adjustments, sales, purchases, and location transfers; to produce journals; and to post transactions. Reorder Processing Use the Reorder Processing functions to calculate the reorder quantity for items, to print the Reorder Report, and to generate purchase requisitions. Reports Use the Reports functions to produce information about inventory movement; item statuses; prices; valuation; cost variance; and serialized, lot and transaction history. Inventory User’s Manual 1-5 Inventory System Introduction Analysis Reports Use the Analysis Reports functions to analyze items that have fallen below safety stock level, items that are overstocked, sales, gross profit, and trends. Periodic Processing After posting over a period of time, the files might get so large that they slow down your system. Use the Periodic Processing functions to remove outdated information from the files. Physical Inventory Use the Physical Inventory functions to process your physical inventory cycle. File Maintenance Use the File Maintenance functions to set up and maintain information about your items. Code Maintenance Use the Code Maintenance functions to set up codes assigned to an item. Master File Lists Use the Master File Lists functions to print lists of information about item detail, item location, price structure, and tables. These lists are useful if you are planning to make changes, want to add information, or keep a record of information that is on your system. Master Code Lists Use the Master Code Lists functions to print lists of information about sales categories, accounts codes, and user-defined fields. 1-6 Inventory User’s Manual Conventions Your manual will help you to install OSAS on any standard machine within many popular operating systems and help you with your accounting software questions. In the manual, we use the term “Conventions”, or standards, to help describe complicated processes, new terms, and to help you use your OSAS applications. Manual Conventions This User’s Manual is divided into these sections, made up of several chapters: • The “Introduction” provides an overview of this application and the OSAS system, including installation procedures, graphical and text-based application features, and function key references. • “Installation” explains the steps necessary to begin using this application in your company, including how to install the application on your system. • The last part of your manual is made of several chapters, each chapter describing a function group within this application. Mouse Conventions The standard mouse has two buttons, left and right, each performing certain functions. In this manual, we use these terms for using the mouse: click, right-click, double click, and deselect. The click is a single press on the left mouse button. Place the cursor over the desired function, and press the left button to enable, or “select”, that function. A right-click is a single press of the right mouse button. To double-click, move the cursor over the desired function, and quickly press the left mouse button twice. If there is too long a pause between clicks, the computer may interpret your action as two separate clicks and may not perform the desired function. Inventory User’s Manual 1-7 Conventions Introduction To deselect an object, move the cursor off the icon or folder onto a blank space within the window and press the left mouse button. Note Some mouse manufacturers allow you to change the function of the mouse buttons for those who prefer (for example) to use the mouse with their left hand. In this case, reverse the commands when you use them. For example, a click refers to a single press of the right mouse button, while the term right-click refers to a single press of the left button, and so on. OSAS Conventions Operations in OSAS follow conventions, or patterns. The conventions used in OSAS applications are presented below. Running OSAS OSAS memory and disk space requirements vary according to the operating system you use and the size of your data file. Consult the Resource Manager User’s Manual for more information. Starting OSAS To start OSAS on a Windows machine, double-click the OSAS icon on the desktop or in the appropriate folder. To start OPEN SYSTEMS Accounting Software on a non-Windows machine, enter osas at the operating system prompt. The command can recognize three parameters: -t, -c, and -a. 1-8 Inventory User’s Manual Introduction Conventions The terminal ID (-t) is the identification code assigned to the terminal you are using to work with OSAS. On multiuser systems each terminal usually has a default ID that was assigned when the terminals were added to the system. Use the -t parameter only when you want to log on with an ID other than the default ID. The terminal parameter is valid only if you are using Resource Manager for LANs. The company ID (-c) is the identification code assigned to a company. If your system carries two or more companies and you do not enter a company ID, the menu of the company entered by the last person who used the terminal appears. The access code (-a) is your personal password. Refer to the Resource Manager User’s Manual for information about assigning passwords. The most general expression for getting into OSAS takes all the parameters into account. For example, if you are on terminal 2, you want to work with company B, and the password is lerxst, specify that information to enter the system: osas -t T2 -c B -a lerxst You can enter the parameters in any order, and you can use any combination. You must leave a space between the parameter mark (-t, -c, or -a) and the parameter itself. Menu Conventions When you start OSAS, the Main menu, which presents the applications you can use, appears. If you are using the Resource Manager for UNIX, the Text menu appears. If you are using the Resource Manager for Windows, you can choose between the Text Menu, Graphical Menu, or Start Menu. In Windows, use the Workstation Configuration Defaults function in Resource Manager to select the style of menu you want displayed. The following pages describe how you use each of these types of menus. Inventory User’s Manual 1-9 Conventions Introduction Favorites Menu The Favorites menu operates in the text-based format as well as in the graphical formats. The Favorites menu allows quick and easy access to the OSAS functions you use most, allowing you to add selections for entire menus or particular functions. With the Favorites menu, you save time in no longer switching to and from commonly accessed applications. For example, if you have application entries in Transactions (Accounts Payable), Transfer Journals (Inventory), and Edit Transactions (General Ledger), rather than moving through each application menu by menu, you could set up a Favorites Menu where, with one press of the enter key or a click of a button, your function would be open for work. Favorites Menu: Graphical Style For Favorites Menu set up information, see page 1-25. 1-10 Inventory User’s Manual Text Menu The Text menu can be used on all OSAS compatible systems. Using text-based menus, the Text menu (shown below) offers easy access to your applications. Text Main Menu When you select an application, the application’s menu, which presents several related functions, is superimposed over the Main menu. Selecting a function leads you to a function screen or to another menu. You can select applications from the Main menu in these ways: • Use the arrow keys to move the cursor up or down, highlighting the application you want to use. Then press PgDn or Enter to select it. Inventory User’s Manual 1-11 Text Menu Introduction • Press the first letter of the application you want to use. The cursor jumps to the first application beginning with the letter, press the letter key or the down arrow until the application you want is highlighted. When your choice is highlighted, press PgDn or Enter to select it. • Position the mouse cursor over the application and click. The application will briefly highlight and switch to the application screen. • To jump to the first application on the menu, press Home. To jump to the last application on the menu, press End. To select a function from an application menu, highlight and select your choices the same way you do on the Main menu—with one exception: you can press PgDn only when an option leads to another menu, and you must press Enter to select a function. On an application menu you can press PgUp to move to the menu immediately above it. If you are several menu levels away from the Main menu, you can return to the Main menu by pressing PgUp repeatedly or by pressing the Tab key. You can exit from a menu in these ways: • • • Press the PgUp key to go to the previous menu (one menu up) Press the Tab key to go to the Main menu Use the Exit (F7) command to go to the operating system Function Keys Used in the Text menu Most keyboards have a set of function keys (usually labeled with the letter F and a number). Within the menu, commands are assigned to these function keys. You can use the commands to work with data entry screens. 1-12 Inventory User’s Manual Introduction Text Menu Except for the Command Help (Esc), the Jump (Tab) commands, and the Enter key, you can use the Keyboard function in Resource Manager to reassign any function key to any command. Key Operation Esc (Command help) Views the list of commands for the menu. (To close the commands window, press any key.) F1 (Function Help) Displays help information for this function. F2 (Favorites Menu) Displays the Favorites menu or changes to the regular menu from the Favorites menu. F3 (Change Company) Allows you to switch between companies. F4 (Access Code) Displays the Access Code prompt. F4 (twice) (Other Menu) Opens a menu of utilities. A calculator and Global Inquiry (which consolidates and presents information from other applications) are some of the utilities on the Other Commands menu. See the Resource Manager User’s Manual for information about the utilities on the Other Commands menu. F5 (Live/Sample swap) Switches between live and sample data. F6 (Workstation Date) Displays the current workstation date and allows you to change it. F7 (Exit) Exits from OSAS. F9 (Application Setup) Allows certain functions to be set up. Works only in certain applications. The application’s user’s manual will describe the function if necessary. F10 (Add to Favorites) Allows you to add to and delete from your Favorites menu. Inventory User’s Manual 1-13 Text Menu 1-14 Introduction Key Operation Shift + F5 (Change menu style) Switch between text and graphical menu styles without going into Defaults. Shift + F2 (Application Info) Displays information about the applications you have installed. PgUp (Start over) Move back one menu level. Tab (Jump) Move back to the Main menu. Enter Select a menu or function from a menu. Up Arrow Down Arrow Move the cursor up or down through the menu selections. Ctrl + G (Bell on/off) If the bell is turned on, it sounds at an error or when you must verify a command. To turn off the bell, use this command or the Defaults function in chapter 3. To turn the bell back on, use this command again. Inventory User’s Manual Graphical-Style Menus There are two types of graphical-style menus to choose from. The standard Graphical menu features application buttons that resemble many Windows functions. The Start Main menu is named because of its functional resemblance to the Start menu in Windows 95 and Windows NT. Featuring graphical displays, access buttons for your installed applications, and allowing access to OSAS functions via both the mouse and function keys, both graphical-style menus allow you a greater selection of interaction with OSAS and your data. Both graphical-style menus are available in a Windows environment only. Much like the Text menu, when you select an application in either graphical menu, the application’s menu, presenting several related functions, is displayed beside the Main menu. Selecting a function leads you to a function screen or to another menu. If you are using the Graphical menu, click the appropriate button with the mouse to select an application from the Graphical menu. To select a function from an application menu, click the function’s button with the mouse the same way as you do for an application. If you choose the Start menu you can select applications from the Main menu in these ways: • • • Use the arrow keys and press Enter Click the selection Hold the mouse over the selection From any application menu, you can select a button from the previous menu to move directly to that menu. If you are several menu levels away from the Main menu, you can return to the Main menu by clicking items on previous menus. Inventory User’s Manual 1-15 Graphical-Style Menus Introduction Graphical Main Menu You can exit from a Graphical menu in these ways: • • • • • 1-16 select a button from a previous menu press the Tab key to go to the Main menu click the Close box in the upper right hand corner of the window to close OSAS use the Exit (F7) command to close OSAS select Exit from the File Menu to close OSAS Inventory User’s Manual Introduction Graphical-Style Menus Start Main Menu You can exit from a menu in these ways: • • • • • • press the left arrow key to go to the previous menu (one menu up) hold the mouse over a different menu item press the Tab key to go to the Main menu click the Close box in the upper right hand corner to close OSAS use the Exit (F7) command to close OSAS select Exit from the File Menu to close OSAS Inventory User’s Manual 1-17 Graphical-Style Menus Introduction Special Commands in Graphical menus Right-click to display the Special Commands menu, which allows you to perform these special tasks: From the standard menus: • • • • • add a function or menu to the Favorites menu change to the Favorites menu change from live to sample data and vice versa display information about a function perform special application setup From the Favorites menu: • • • • • remove a function or menu change to the Main menu change from live to sample data and vice versa display information about a function perform special application setup Menu Keys Most keyboards have a set of function keys (usually labeled with the letter F and a number). In OSAS, commands are assigned to these function keys. 1-18 Key Operation F1 (Key Help) Displays the list of Icons and Functions keys available to you. F2 (Favorites Menu) Displays the Favorites menu. F4 (Access Code) Displays the Access Code dialog box. F5 (Live/Sample swap) Switches between live and sample data. Inventory User’s Manual Introduction Graphical-Style Menus Key Operation F6 (Workstation Date) Displays the current workstation date and allows you to change it. F7 (Exit) Exits from OSAS. F9 (Application Setup) Allows certain functions to be set up. Works only in certain applications. This application does not use an application setup function. F10 (Change to Favorites) Allows you to add to and delete from your Favorites menu. (works only with Start-style menu). Right-click Displays the a functions display box. Shift + F5 (Change menu style) Switch between text and graphical menu styles without going into Defaults. Shift + F2 (Application Info) Displays information about the applications you have installed. Window Title Bar Menus When working using the graphical menus, you can use the pull-down menus and tool buttons (graphical icons) to access functions without using the function keys. While the function keys still work in the graphical menus, the menu bar and icons offers you a choice in how you access certain functions. Using the mouse, move the cursor to the menu and click once, or, click on an icon for the function desired. Pictured below is the OSAS pull-down menu/icon selection. Inventory User’s Manual 1-19 Graphical-Style Menus Introduction File Menu Command Icon Key Result Access code F4 Displays the Access Code dialog box. See Access Code dialog box below. Sample data set or Live Data set F5 Toggles between the Sample Data and the Live Data. Workstation date F6 Displays the Workstation date dialog box. See Workstation Date dialog box below. Exit F7 Exits from OSAS Access Code dialog box 1. Enter the access code. 2. Click OK to save your entry and return to the Main Menu or Exit to abandon the dialog box and return to the Main menu. 1-20 Inventory User’s Manual Introduction Graphical-Style Menus Workstation Date dialog box 1. Enter the date, or use the up/down buttons to increase or decrease the date. 2. Select OK to change the workstation date, System Date to change the workstation date to match the operating system date, Abandon to exit without changing the date, or Exit to return to the Main menu. Tools Menu Command Icon Key Calculator Result Displays the Windows calculator. Favorites Menu Command Change to Favorites Inventory User’s Manual Icon Key F2 Result Displays the Favorites menu/Main menu. See Favorites Menu on page 1-25. 1-21 Graphical-Style Menus Introduction Other Menu The Other menu contains a set of utilities. A calculator and Global Inquiry (which consolidates and presents data from other applications) are some of the utilities on the Other menu. See the Resource Manager User’s Manual for information about the utilities on the Other menu. Help Menu Command Help About OSAS 1-22 Icon Key F1 Result Displays the online help. Displays the About OSAS dialog box. Inventory User’s Manual Introduction Graphical-Style Menus Toolbar Icons There are three icons on the toolbar that were not described above. Icon Key Result Displays the Application Information dialog box. Opens an MS-DOS prompt. Displays a screen for calling any BBx program that does not require variables to be passed to it. See the Resource Manager User’s Manual. Other Graphical Screen Features The graphical screens offer more than shortcuts to application functions. In version 6.0, you can, at a glance or with a mouse click, determine the date and time, switch between live and sample data, and switch between companies and their data sets. Date and Time The workstation date and time are displayed. Inventory User’s Manual 1-23 Graphical-Style Menus Introduction Data Set Check the Live Data radio button to work with live data. Check the Sample Data radio button to work with sample data. Change Company Field Select the company to change to. 1-24 Inventory User’s Manual Favorites Menu Your Favorites menu saves time in moving between applications, opening and closing submenus and application menus, and allows easy access to your common applications. By setting up your Favorites menu, you can access your most-used functions or submenus by pressing the F2 button (or selecting the mouse pull-down menu). Favorites Menu: Text Style There are two ways you can set up your Favorites menu, depending on if you use the text-style menu or the graphical-style menus. To set up the text-style Favorites menu, follow these steps: 1. Move your cursor to the submenu or application that you want placed in the Favorites menu. 2. Press F10. You can press F2 to verify your selection was added to your Favorites menu. To remove an application: 1. Press F2 to display the Favorites menu. 2. Move your cursor to the submenu or application you want removed. 3. Press F10. Inventory User’s Manual 1-25 Favorites Menu Introduction Favorites Menu: Start-Style To set up the graphical-style display (you can find an example of the graphicalstyle Favorites menu on page 1-10), follow these steps: 1. Position the cursor over the submenu or function you want placed into your Favorites menu. 2. Right-click on the function or submenu. The Favorites menu set up box (shown below) appears. 3. Click on Add to Favorites. 1-26 Inventory User’s Manual Introduction Favorites Menu Screen Use Screen Description Add to/Remove Favorites Use the Add to/Remove Favorites menu button to add the desired submenu or function to or from your Favorites menu. Change to Favorites/Main Toggles your display menu between your Favorites menu and your Main menu. Sample data/Live data Switches between your sample data and your live data. Setup Clicking on this button or pressing F9 sets up the selected application. Setup works only in certain applications. If an application requires a setup function, you will find instructions in that application’s user’s manual. Function Information Displays information about the selected function. Inventory User’s Manual 1-27 Function Commands Once you select an OSAS application function from the menu, the function screen appears. The way that you enter data on OSAS screens is consistent from function to function. To move around the OSAS screens you use the function commands described below. Most keyboards have a set of function keys (usually labeled with the letter F and a number). In OSAS, commands are assigned to these function keys. You can use the commands to work with data entry screens. Except for the Command Help (Esc) and Jump (Tab) commands and the Enter key, you can use the Keyboard function in Resource Manager to reassign any function key to any command. Key Operation Esc (Command help) View the list of commands for the screen you are on and the field you are in. (To close the commands window, press any key.) F1 (Help) Get information about the field you are working on. F2 (Inquiry) Make a selection from a range of entries for a field if the Inquiry flag appears at the bottom of the screen. F3 (Delete) Delete the information on the screen. Since this command can delete an entire record, use it with caution. F4 (Other) Open a menu of utilities. A calculator and Global Inquiry (which consolidates and presents information from other applications) are some of the utilities on the Other Commands menu. See the Resource Manager User’s Manual for information about the utilities on the Other Commands menu. F5 (Abandon) Move the cursor back to the first field on the screen or to the first field after the key field. The entries and changes you made are erased. Inventory User’s Manual 1-29 Function Commands 1-30 Introduction Key Operation F6 (Maintenance) Go directly to the appropriate File Maintenance function to update information about the field you are in if the Maint flag appears at the bottom of the screen. F7 (Exit) Exit from a screen or a window and disregard everything you entered. F8 (List) Send the contents of the screen to a printer or a text file. Shift + F2 (Information) Open an Information menu. Each selection on the menu is an information window that you can access if the Info flag appears at the bottom of the screen. Each window contains a category of information about the field you are in. PgUp (Start over) Move the cursor back to the first field on the screen or to the first field after the key field without erasing the entries or changes you made. PgDn (Proceed) Approve the data on the screen, change the file accordingly, and proceed to the next spot (field or screen). Tab (Jump) Move the cursor to the next block of data on the screen or to the next field that requires an entry. Enter or Down Arrow (Enter) Move the cursor to the next field and accept the data entered. Up Arrow Move the cursor up (or back) one field. If you changed the information in the field you were in before you used this command, the change is lost when you move the cursor up. Ctrl + V (Verification on/off) If verification is turned on, you must press a key twice to verify that you want to perform that operation. Ctrl + G (Bell on/off) If the bell is turned on, it sounds at an error or when you must verify a command. To turn off the bell, use this command or the Defaults function in chapter 3. To turn the bell back on, use this command again. Ctrl + F (Quick on/off) If this option is turned off, the cursor stops at every field possible. To make the cursor skip the fields that do not require an entry, use this command to turn the option on. Inventory User’s Manual Introduction Function Commands Key Operation Ctrl + O (Show/hide function keys) If this option is turned on, the applicable function keys are displayed on the screen. If this option is turned off, no keys are displayed. Help Commands When you use the Help (F1) command, three commands become available for you to use on help screens. Key Operation F3 (Delete) Delete the help screen contents. F6 (Maintenance) Edit a help screen. F7 (Exit) Exit from the help screen and close the window. To recover a deleted help screen, copy the xxHELP file from the distribution media to the /PROGxx subdirectory (xx is the application ID). The copying process overwrites changes you made to other help screens. In-Field Editing Commands When the cursor is in a field that contains information, you can use the following keys and commands: Key Operation Right Arrow Move the cursor to the right. Left Arrow Move the cursor to the left. Del (Delete) Delete the character the cursor is on. Inventory User’s Manual 1-31 Function Commands Introduction Key Operation Ins (Insert on/off) Switch insert mode on and off. When the Insert flag appears at the bottom of the screen, characters you type push characters after the cursor off to the side. When insert mode is turned off, characters you type write over existing ones. Home Move the cursor directly to the beginning of the field. End Move the cursor directly to the end of the field. F9 (Undo) Restore a field to the way it was before you changed it. You can use this command only while you are in the field; once you move past it, you must use the Abandon (F5) command to clear the field. F10 (Delete to end of line) Delete the characters in the field to the right of the cursor. If insert mode is turned off and you enter a character in the field’s first position, everything in the field is deleted. Inquiry Commands When you use the Inquiry (F2) command, several other commands become available for you to use in the inquiry window. Note To shorten your data search, use a partial-key inquiry to cut down the size of the inquiry list. For example, if you know that the ID starts with J, enter J in the ID field before you use the Inquiry command. The inquiry list will start with J and run through the end of the list. 1-32 Key Operation PgUp Display the previous page of the window. PgDn Display the next page of the window. End Move directly to the last item on file. Inventory User’s Manual Introduction Function Commands Key Operation Home Move directly to the first item on file. Down Arrow Move down one item. Up Arrow Move up one item. Ins (Look up) Enter a string of information. F7 (Exit) Leave the Inquiry window without selecting anything. Enter Select the item the cursor is pointing to. Esc (View commands) Open a window that shows Inquiry window commands and the window ID. If you have an idea of what you are looking for and the ID is longer than one character, you can make a partial-key inquiry to cut down the size of the inquiry list. For example, if you know that the ID starts with J, enter J in the ID field. Inventory Search Commands If you use the Inventory application and the cursor is in an Item ID field, you can use any of the Inventory Search commands to search for information about items and select an item for entry in the field you are in. Key Operation Shift + F3 (Alias Lookup) Search for items with a specified alias listed as an alternate item. When you enter the alias, you can use the “*” and “?” wildcard characters to restrict or widen the search. Shift + F4 (Customer/Vendor Lookup) Search for an item based on customer ID or vendor ID. When you enter the customer or vendor ID, you can use the “*” and “?” wildcard characters to restrict or widen the search. Inventory User’s Manual 1-33 Function Commands Introduction Key Operation Shift + F5 (Detail Lookup) Search for detailed information about an item. You can enter search information in any of the fields that appear, using any of the following wildcard characters to restrict or widen the search: * ? < > =. Shift + F6 (Lot–Item Lookup) Search for an item based on lot number. When you enter the lot number, you can use the “*” and “?” wildcard characters to restrict or widen the search. Shift + F7 (Serial Number–Item Lookup) Search for an item based on serial number. When you enter the serial number, you can use the “*” and “?” wildcard characters to restrict or widen the search. Shift + F8 (Item Description Lookup) Search for an item based on item description. When you enter the description, you can use the “*” and “?” wildcard characters to restrict or widen the search. Report Commands You can use the following commands when a report is displayed on the screen: 1-34 Key Operation PgUp Move to the previous page of the report. PgDn Move to the next page of the report. Home Move directly to the top of a group of pages. End Move directly to the bottom of a group of pages. F7 (Exit) Exit to the menu from any point in the report. Left Arrow Move left one character. Right Arrow Move right one character. Tab (Toggle) Toggle between the left and right halves of a report. Inventory User’s Manual Introduction Function Commands Key Operation Up Arrow/Down Arrow Move a line up and down the screen to line up information when you toggle between halves of a report. Scroll Region Commands When the prompt (>) is in a line-item scroll region, you can use the following commands: Key Operation Down Arrow Move down one line item. Up Arrow Move up one line item. PgUp Move to the previous screen or to the first line if you are on the first screen. PgDn Move to the next screen or to the last line if you are on the last screen. Home Move to the first line item in the entire list. End Move to the last line item in the entire list. F3 (Delete) Delete the line item at the prompt (>). Ins (Insert) Insert a line item at the prompt (>). Enter (Edit) Edit the line item at the prompt (>). Inventory User’s Manual 1-35 Reports Selecting a Range of Information To produce a report, you must specify the amount of information you want in the report. • To produce a report that includes all the available information, leave the From-Thru fields on the report function screen blank. For example, if you want information about all the vendors to be in a report, leave the Vendor ID From and Thru fields blank. • To limit the amount of information in the report, enter the range of information in the From-Thru fields. For example, if you want a report to include information only about vendor ACE001, enter ACE001 at both From and Thru. If you want the report to include information only about vendors that start with CO, enter CO at From and COZZZZ at Thru. Each field where you enter information on a report function screen usually restricts the overall output of the report. For example, if you leave the Vendor ID From and Thru fields blank, the report will contain information about all the vendors. But if you enter invoice 100 in the Invoice Number From and Thru fields, and invoice 100 is assigned only to vendor ACE001, the report includes information only about vendor ACE001. Sorting Information for reports is sorted first by a space (_), then by characters, then by digits, then by uppercase letters, and finally by lowercase letters. No matter what you enter in the From and Thru fields, however, your entries are sorted in alphabetical order (unless the function provides an option to sort the information differently). Sorting by alphabetical codes or IDs is easy. For example, the ID ACL comes before the ID BB because A comes before B. Inventory User’s Manual 1-37 Reports Introduction But take notice when you enter codes or IDs that consist of something other than letters; the order might not be what you expect. For example, if 20 items are labeled 1 through 20 and you want all of them to be in a report, you might enter 1 at From and 20 at Thru, expecting them to be listed 1, 2, 3 . . . 19, 20. However, since OSAS sorts in alphabetical order, they are listed in a different order: 1, 10–19, 2, 20, 3–9. To prevent that situation, pad extra spaces in codes and IDs with zeros so that numbers in alphabetical order are also in numerical order. In the example above the items would be labeled 00000000000000000001 through 00000000000000000020. Output Device Report functions screens offer four output options: printer, file, screen, and end. • When you need a hard copy of a report, select P, and either accept the printer that appears or enter the code for the printer you want to use. If applicable, select S if you want the report to be in standard-size print or C if you want it to be in compressed print. If you want to stop printing after it has begun, press Ctrl + Break. • If you want to save the report as a data file—for example, to include it in a word-processed report (in CR-LF format)—select F. The data path for the workstation, including the default drive, appears if it is specified in the Defaults function. Enter the filename and file extension, using no more than 35 characters overall. • To preview the report—you must be using the Visual PRO/5 Interpreter and have a sysprint printer in your CONFIG.BBX file—select R. If applicable, select S if you want the report to be in standard-size print or C if you want it to be in compressed print. In the Printer dialog box that appears, select a sysprint printer and press Enter. The report is displayed on the screen. 1-38 Inventory User’s Manual Introduction Reports • To view the report on the screen, select S. If the workstation default for compressed characters is inactive, the report is displayed in standard character mode. If the default is active, you can select standard mode or compressed mode. See your terminal documentation and the section on the termcap file in the User’s Reference Guide (PRO/5). If the message End of Page appears at the bottom of the report screen, you can press Enter to generate the next page of the report. If the message End of Report appears at the bottom of the report screen, you can press Enter to exit to the menu you selected the report from. • If you need to change some selections before you produce the report, select E and then press Enter. To end the function and return to the menu without producing the report, select E and then use the Exit (F7) command. Inventory User’s Manual 1-39 Inventory User’s Manual Setting Up Setup Installing the Application Setup Considerations Entering Your Data Creating a Backup Schedule Inventory User’s Manual 2 2-3 2-5 2-13 2-33 2-1 Installing the Application The best time to install Inventory is at the beginning of your fiscal year so that you will not have to enter information for an entire year. If you cannot install Inventory at the beginning of your fiscal year, install it at the beginning of a month (or an other accounting period). If you plan to use General Ledger and Accounts Payable/Purchase Order, install and set up the current version of those applications in that order before you install Inventory. You can put this version of Inventory on the system in one of two ways: you can install a new system, or you can convert the old files and upgrade the system. To install Inventory, use the Install Applications function in Resource Manager (see the Resource Manager User’s Manual). To convert files and upgrade the system, see appendix A. Inventory User’s Manual 2-3 Setup Considerations Follow these steps to prepare for entering your data: 1. 2. 3. 4. 5. 6. Define types of inventory items. Organize your inventory items. Set up codes and IDs. Choose costing methods. Determine options and interfaces. Set up access codes. Defining Types of Inventory Items Many businesses have a variety of serial, nonserial, and service items. Serial numbers are used to track large-ticket items such as appliances, computers, and stereo equipment. Nonserialized items are regular inventory items identified by the item ID and description. Service items are work you perform for your customers— for example, service warranties and repair services. Organizing Inventory Items Items in Inventory are identified by an item number and a description. You can also assign additional identification to an item: product line, location, user-defined fields, bin number, status, vendor ID, unit of measure, serial number, and lot number. In some of the Inventory reports functions, you can select the order the information is presented. In the Price Report you can sort the information by item ID or by location ID; in the Valuation Report you can sort the information by product line or user-defined fields. Organize your inventory items with this information in mind. Setting Up Codes and IDs When you set up the system, you assign codes and IDs to tell the system how to identify each item on file. The system uses these identifiers to organize the information in reports and inquiry windows. Inventory User’s Manual 2-5 Setup Considerations Setup The system arranges code characters in a particular order. In the following list codes and IDs are sorted from lowest to highest and dashes represent blank spaces: —————0 —————1 —————Z ————— a — — — — — 01 —— a——— 000000 000001 1 The organization of these codes illustrates the following principles: • The system reads codes from left to right until it finds something other than a blank space. • Items that make up a code are always listed alphabetically. The items are listed in this order for each position: blank spaces characters (-, *, /) numbers (0–9) uppercase letters (A–Z) lowercase letters (a–z) Numbers are sorted as if they were letters. When the first characters of several IDs are compared, the ID with the smallest first character is placed first in the list. If the first character of the IDs is the same, the second characters are compared and the ID with the smallest second character is placed first in the list. This comparison is made for each character in the range of IDs until they are in alphabetical order. For example, in the alphabetical sorting ID 112 comes before ID 60, since anything that starts with 1 comes before anything that starts with 6 alphabetically. 2-6 Inventory User’s Manual Setup Setup Considerations Listed below are some suggestions for setting up codes and IDs: • To prevent organization problems, use zeros to make all IDs the same length. If IDs are divided into more than one part, the part should be the same length in every ID. Do not use spaces to divide IDs into more than one part. For example, use ACE-01 instead of ACE-1. • If you use numbers for IDs, pad them with zeros so that they are all the same length and numeric rules can hold true. If ID 60 were ID 000060 and ID 112 were ID 000112, ID 000060 would be listed first, since 060 is less than 112 alphabetically and numerically. • If you use letters in IDs, use either all uppercase or all lowercase letters so that the IDs can be sorted correctly. • Use descriptive IDs. For example, WIN001 and WIN002 are more descriptive IDs than 001 and 002. (However, if you already use a numbered system, you may want to continue using it.) • If you want to sort items by a particular attribute—name or group—put the attribute in the ID. • To ensure that you can insert new items into a sequence, use a combination of letters and numbers that leaves room in the sequence for later additions. Item IDs Item IDs, which can be 20 characters long, identify items throughout Inventory and other OSAS applications. Items can have the same product line, location, and price ID; but no two items can have the same product line, location, price ID, and item ID. Inventory User’s Manual 2-7 Setup Considerations Setup Establish an item numbering system that organizes your inventory for your business. If you currently identify your items by a number, use that number as the ID. If you do not already have a numbering system, use the following suggestions to create one: • Use as many of the 20 characters as you need to establish a logical system, but use as few characters as possible to identify your items. • Leave room between IDs so that you can add items. • Use IDs that make selecting ranges of items easy. For example, if all your inventory numbers for raw materials begin with RM (and no other items begin with RM), you can specify a range of inventory items such as RM0001 through RM0100 to print a report that lists only raw materials. Location IDs Location IDs, which can be 6 characters long, identify where you store your inventory items. If you currently identify your locations by a number, use that number as the ID. If you do not already have a numbering system, create an alphabetic or an alphanumeric system. Product Lines Product lines, which can be 12 characters long, categorize or identify groups of similar items. Product lines are used throughout Inventory in reports (as sort options) and physical counts. When you set up product lines, set up a character sequence that identifies both a broad category and specific categories of items. For example, the first three characters could identify broad categories, and the remaining characters could identify a specific category. Price IDs Price IDs, which can be 6 letters long, identify customer-level pricing. You may want to set up price IDs for categories of items or items in particular locations. 2-8 Inventory User’s Manual Setup Setup Considerations Choosing Costing Methods You must select a costing method for your items in the Options and Interfaces function in Resource Manager. The FIFO (first-in, first-out) method uses the oldest items in your inventory as the basis for costing your sales and inventory. FIFO allocates the oldest unit costs to the cost of goods sold and the most recent unit costs to the ending inventory. When costs rise, the FIFO method yields the highest net income; when costs fall, the FIFO method yields the lowest net income. The LIFO (last-in, first-out) method uses the last items brought into inventory as the basis for costing sales and inventory. When costs of your inventory items rise, the LIFO method yields the lowest net income of all the costing types; when inventory item costs fall, the LIFO method yields the highest net income. The average cost method calculates a weighted average cost by dividing the total cost of all units of an inventory item by the number of units on hand. The standard cost method is an estimate of costs you set yourself. For example, in a manufacturing operation the standard cost is the cost of the item plus costs of raw materials, labor, and overhead. Set up standard cost codes in the Standard Cost Makeup Codes function and assign them to item locations on the Item Locations Cost Information screen. Determining Options and Interfaces Interfaces Inventory can be interfaced with General Ledger and Purchase Order. If you want to interface Accounts Receivable, Sales Order, Accounts Payable, or Bill of Materials/Kitting with Inventory, see the user’s guides for those applications. When Inventory is interfaced with General Ledger, the inventory accounts assigned to the items in locations and in the specified transfer account are updated. Inventory User’s Manual 2-9 Setup Considerations Setup When Accounts Payable is interfaced with Inventory, you can view information from Inventory about a purchased or a returned item: description, serialized item information, and unit of measure. The quantities, costs, and purchase history are updated in Inventory when you post transactions in Accounts Payable. When Inventory is interfaced with Purchase Order, the same information is exchanged as with Accounts Payable. In addition, the INLDxxx (Location Detail) file keeps track of quantities on order when you place orders through Purchase Order. When Accounts Receivable is interfaced with Inventory, you can view information from Inventory about a sold or returned item: price, cost, assigned general ledger account numbers, serialized item information, category code, and unit of measure. The sales quantities and amounts, costs, serialized item information, and sales history are updated in Inventory when you post transactions in Accounts Receivable. When Sales Order is interfaced with Inventory, the same information is exchanged as with Accounts Receivable. In addition, the INLDxxx file tracks the quantity committed when you place orders in Sales Order. When Bill of Materials/Kitting is interfaced with Inventory, you can track the assembly of raw materials in an assembly and group several items (otherwise sold separately) as one. When the assembly is completed, Bill of Materials/Kitting updates the INLDxxx file. Options To set up each company’s options and interfaces, us the Resource Manager Options and Interfaces function (see the Resource Manager User’s Manual). IN is the application ID. Your answers to the following questions determine how the system works and how information flows through it. 1. Toggle to YES or NO to indicate whether or not you want to interface General Ledger, Accounts Payable/Purchase Order, and Accounts Receivable/Sales Order. 2-10 Inventory User’s Manual Setup Setup Considerations The interface options work independently of each other. You can respond to them with any combination of Y’s and N’s. 2. Toggle to FIFO, LIFO, Average, or Standard to indicate the costing valuation method you want to use. 3. Toggle to YES or NO to indicate whether or not you want to allow quantities to be edited online. 4. Toggle to Average, Last, Base, or Standard to indicate the cost you want to use for zero-quantity items. 5. Toggle to YES or NO to indicate whether or not you want to enter 1 to 10 lines of additional text for items. 6. Toggle to YES or NO to indicate whether or not you want to be able to enter price information for sales transactions. 7. Toggle to YES or NO to indicate whether or not you want to keep detail history for inventory. If you elect not to keep detail history for inventory, you cannot access the Inventory Movement Report and Transaction History Report functions. 8. Toggle to YES or NO to indicate whether or not you want to keep lot history. If you select NO, you cannot use the Lot History Report function. 9. Toggle to YES or NO to indicate whether or not you want to keep serial history. If you select NO, you cannot use the Serialized History Report function. 10. Toggle to YES or NO to indicate whether or not you want to show costs of items in sales transactions. 11. Toggle to YES or NO to indicate whether or not you want to post line-item detail or only summary information to General Ledger. You cannot select YES if you elected not to keep detail history. Inventory User’s Manual 2-11 Setup Considerations Setup 12. Toggle to YES or NO to indicate whether or not you want the system to check for aliases in the Item ID field in reports. 13. Toggle to Serial/Lot or Lot/Serial to select the order you want to use for your transaction entry method. 14. Toggle to YES or NO to indicate whether or not you want to allow discounts on serialized items. 15. Toggle to YES or NO to indicate whether or not you want the system to display costs when you use the price and availability lookup. Setting Up Access Codes To restrict access to data files, menus, and functions that provide confidential information or are sensitive to change, use the Resource Manager Access Codes function to set up access codes on your system. Access codes are company-specific. When you set up an access code for a user, the code is assigned the company you are in. After you set up your access codes, print a list of the codes and store it in a safe place. 2-12 Inventory User’s Manual Entering Your Data When you set up your inventory items, gather and enter the information in the order below. As you complete the setup steps, use the Master File Lists and Master Code Lists functions to print the information you entered in each step; use the lists as references throughout the setup process. 1. 2. 3. 4. 5. 6. 7. 8. 9. 10. 11. 12. 13. 14. 15. 16. 17. 18. 19. 20. 21. 22. 23. 24. Set up the INPDxxx table. Enter sales categories. Enter customer levels. Enter product lines. Enter account codes. Define forecast types. Define standard cost makeup codes. Define user-defined fields. Define user-defined field sorts. Enter locations. Set up price structures. Enter item IDs and descriptions. Enter general information for items. Define units of measure. Set up alternate items. Enter item locations. Enter location information. Enter location price information. Enter location cost information. Enter vendor information. Enter bin information. Enter lot information. Enter serial information. Set up promotional pricing. Tables Tables store information relating to the system, data, options and other applications. Inventory User’s Manual 2-13 Entering Your Data Setup Note Use tables only to enter and store data. Do not delete or rearrange the account descriptions. The system looks for the information by the position of the account descriptions in the table. Set up the INPDxxx table before you set up anything else. For information about this table and other Inventory tables, see chapter 4. If you are setting up multiple companies, you must set up an INPDxxx table for each one. Sales Categories Sales categories identify the market you sell groups of items to and help you analyze sales. They are used in Accounts Receivable and Sales Order to sort detail sales history. Select Sales Categories from the Code Maintenance menu. Then enter each sales category and a description. Customer Levels Customer levels identify groups of customers you sell to and are used for pricing purposes, when you set up customers in Accounts Receivable and Sales Order, when you sell items, and in the Price Structures and Promotional Pricing functions. Select Customer Levels from the Code Maintenance menu. Then enter each of your customer levels and a description of each customer level. Examples of customer levels are senior citizens, frequent buyers, contractors, and builders. Product Lines Product lines categorize your inventory items into groups of similar items. You can sort by product line in many reports, and you can specify the product lines you want to use when setting up promotional pricing. 2-14 Inventory User’s Manual Setup Entering Your Data Select Product Lines from the Code Maintenance menu. Then enter each product line and a description of each product line. Account Codes Account codes contain default accounts for posting to General Ledger. The accounts are paired under one account code, which can be assigned to an item. You can enter an account number for the following general ledger accounts: • • • • • • • • • sales COGS inventory work in process inventory adjustment COGS adjustment purchase price variance physical count adjustment transfer cost The accounts you enter are used when the item is sold or returned through Accounts Receivable/Sales Order or purchased through Accounts Payable/ Purchase Order. For more information about setting up general ledger accounts, see the General Ledger User’s Manual. Select Account Codes from the Code Maintenance menu. Then enter each account code or copy an existing code. Enter a description of each code and an account number for the GL accounts. Forecast Types Forecast types help you predict current and seasonal trends for your inventory items. You can set up a forecast type for seasonal, regular, slow-moving, or fastgrowing items. Inventory User’s Manual 2-15 Entering Your Data Setup When you use forecast types, you must have sales history for the item. Sales history is used to accurately determine the reorder quantity and usage for your inventory items. When you assign a forecast type, you decide on the weight factor for the periods you want to base your forecast on. How you determine the weight factor depends on the item you are working with and your reorder process. You might base your forecast 100 percent on last month’s sales or on sales from one year ago. You can also split the weight factor; for example, you might base the forecast evenly on the last four months. You can assign an adjustment percentage to determine sales increases or decreases. For example, if you are expecting sales to grow for the items in the forecast type, you may want to increase the percentage accordingly. Once a forecast type is set up, it is assigned to an item in the Item Locations function. Then in the Reorder Report function, you can calculate reorder quantities, using the forecast type method. Select Forecast Types from the Code Maintenance menu. Then enter each forecast type code or copy an existing code. Enter a description of each code, a weight factor from 0 (or leave the field blank) to 100 percent, and an adjustment percent for expected increases or decreases in demand. Note The total weight factor for the periods must equal 100 percent. Standard Cost Makeup Codes An item’s standard cost is the amount an item should cost based on its standard costing model. The standard costing model varies from company to company and is usually used in a manufacturing environment. 2-16 Inventory User’s Manual Setup Entering Your Data If you use the standard costing valuation method, you must define cost codes that make up your standard cost. Cost codes are used on the Cost Information screen in the Item Locations function and define the composition of the standard cost for an item. Examples of standard costs for items are marketing, labor, and distribution costs. Select Standard Cost Makeup Codes from the Code Maintenance menu. Then enter each cost code and a description of each code. User-Defined Fields You can set up 16 user-defined fields, which can be used to describe an item. Userdefined fields 1 and 2 are sort options in report functions. User-defined fields 3 to 16 are unsorted fields. All user-defined fields can be assigned to an item on the General Information screen in the Items function. When setting up the sorted fields, use fields that you sort by most often. These fields are used as sort options in several reports and in the Calculate Reorders, Item Price Change, Cost Changes, Physical Inventory Selection, and Freeze Quantities functions. Select User-Defined Fields from the Code Maintenance menu. Then enter a userdefined field number and a description of the user-defined field. Enter an unlimited number of field values and a description of the field values. For example, if disk size is your first user-defined field, you could list the available sizes of diskettes (3.5-inch, 5.25-inch) in the field values and use the description 3.5-inch diskette. If you leave a field value and description blank for a user-defined field, the userdefined field is free-form when you assign the user-defined fields to an item in the Items function. User-Defined Field Sorts In addition to the two sorted fields (user-defined fields 1 and 2), you can add two other sorting options that can be used in several reports. Inventory User’s Manual 2-17 Entering Your Data Setup Select User-Defined Field Sorts from the Code Maintenance menu. The userdefined fields you set up in the User-Defined Fields function are displayed. You can also choose to sort by product line. Enter the description of the sort sequence that appears in the functions mentioned above. Then enter the number of the user-defined fields you want to appear first, second, and third in the sort sequence. You can choose between any of the 16 userdefined fields (or however many you set up) and the product line, but each userdefined field can be used only once in a sort sequence. After you save your sort sequences, they are written to the INVExxx (Items) and the INKYxxx (Alternate Keys) files. If you want to change the sort sequence, you must back up your data files first. Locations Locations are places your items are stored—warehouses, vendors, retail stores, receiving docks, repair locations, or cities. Location IDs should convey information about the location. For example, you might use VN0001 as the location ID for a vendor and WH0001 as the location ID for a warehouse. Before you add items, you must set up at least one inventory location. Select Locations from the File Maintenance menu. Then enter each location ID, the name of the location, the address, the city, the state, the zip code of the location, the contact person at the company, and the phone and fax numbers for the location. If you plan to calculate reorders based on the EOQ, enter a default carrying cost percentage and an ordering cost amount. The carrying cost is the percentage it costs you to store the item at the location. The ordering cost is the amount it costs to place an order from the location. 2-18 Inventory User’s Manual Setup Entering Your Data Price Structures You can define pricing in the Inventory system in several ways, and depending on the products your company sells, you might choose any of the following combinations of pricing: • Price Structures: Price calculations can take the form of a discount (based on a percentage or a dollar amount) from several pricing fields or a markup from several cost fields. By combining a customer level and the price ID, you can develop many unique pricing structures. • Item Locations (Price Information screen): Since you can sell an item in several units of measure, you must set prices for each unit, using the average, base, list, and minimum pricing fields. In addition, you can define quantity break pricing for each unit of measure. • Item Locations (Price Information screen): To price items for customer groups, use customer-level pricing in the Item Locations function. • Promotional Pricing: Use promotional pricing for short-term specials. You can specify beginning and ending dates for promotional prices. Set up price IDs to store customer-level pricing information, an adjustment base, and adjustment amounts. Price IDs can be assigned to an item in the Items function and to an item location in the Item Locations function. If a different price ID is set up at the location level from the price ID set up at the item level, the price ID set up at the item level is the default. You can also assign a price ID to a transaction in the Inventory Transactions function. Select Price Structures from the File Maintenance menu, and enter a price ID or copy an existing ID. Then enter a description of the price ID, a customer level, a description of the customer level, an adjustment base, an adjustment type ($ or %), and the amount of the price adjustment. Inventory User’s Manual 2-19 Entering Your Data Setup Note If a customer level is not found when the price is calculated, the default customer level NONE is used. Item IDs and Descriptions Item IDs and descriptions identify the inventory item and are used throughout Inventory. To save time, set up one item first, following all the steps through Serial Information later in this chapter. Then when you enter new items, use the Copy From window to copy any of the following information: • • • • • • • • alternate items user-defined fields location information price information customer-level pricing cost summary information vendor information bin information Select Items from the File Maintenance menu. Then enter each item or copy an existing item record, and enter a description of the item. If you elected to use additional descriptions in the Options and Interfaces function, you can add 1 to 10 lines of additional descriptions for the item. If you choose to add or edit information on the General Information, Units of Measure, Alternate Items, and Item Locations screens, see the explanation of those screens below. If you are entering a new item, you must enter general information. 2-20 Inventory User’s Manual Setup Entering Your Data General Information The information you set up on the General Information screen is used at the item level and is not associated with a location. 1. Enter the status of the item: active, discontinued, obsolete, or superseded. 2. Enter the type of item you are working with: serial, nonserial, or service. 3. If Bill of Materials/Kitting is interfaced with Inventory and the item will be described as a kit, set the flag to YES. 4. If you plan to set up lots for the item, you must set the flag to YES. 5. If you want the system to calculate the reorder point for the item, set the flag to YES. If you are planning to use the Generate Purchase Requisitions function, this flag must be set to YES. 6. Enter the smallest unit of measure for the item, which is your base unit of measure. Initially the base unit is also your default unit of measure, but you can change the default unit of measure on the Units of Measure screen. 7. If you want, assign a sales category to the item. 8. If you want, assign a product line to the item. 9. Enter the price ID you want to use for the item. 10. Enter the tax class for the item. 11. Enter the weight of the item. 12. The user-defined fields you set up in the User-Defined Fields function are displayed. Select and assign the user-defined fields for the item. Inventory User’s Manual 2-21 Entering Your Data Setup Units of Measure You can assign an item a default unit of measure, unlimited alternate units of measure, a conversion factor, and a penalty amount. The base unit of measure must be your smallest unit of measure. Note You cannot change your base unit of measure if quantities are on file. If the smallest unit of measure is EACH, you might use the following alternate units: a BOX of 10, a PKG (package) of 100, a CARTN (carton) of 500, and a CASE of 1000. The conversion factor tells the system what portion of the base unit the alternate unit is. In the example above you would enter the units with the following conversion factors: Unit Conversion Factor EACH 1.00 BOX 10.00 PKG 100.00 CARTN 500.00 CASE 1000.00 The base unit of measure is EACH, but you can set up BOX as the default unit of measure if you sell the item most often in boxes. The penalty amount determines the price when fractional parts of a unit are sold. For example, if a customer orders half a carton, you might add a penalty to the price because you have to sell part of a carton. 2-22 Inventory User’s Manual Setup Entering Your Data A penalty expressed as a percentage applies to the fractional part of the units sold, resulting in a unit penalty. A penalty expressed as a dollar amount applies to the inventory item, regardless of the quantity sold, resulting in a penalty per sale rather than per unit. Make sure that your base unit of measure is set up. Then enter each unit of measure and a conversion factor for each unit of measure. To charge a percentage that applies to the fraction of the units sold, enter %. To charge a dollar amount that applies to the entire sale, enter $. Then enter the percentage or the dollar amount of the penalty. Alternate Items Alternate items store additional identification about an item. You can choose to enter an alternate item ID, customer identification, alias identification, a superseded part number, a bar code, and vendor identification for an item. Alternate Item ID If you have items that are comparable or can be substituted for other items, you may want to set up alternate item IDs. The alternate item ID is used when you sell an item with insufficient quantities in inventory. Customer ID If Accounts Receivable/Sales Order are interfaced with Inventory, you can assign customer IDs to an item. For example, if a customer uses PS145 as the identification for plumbing supplies, but your item ID is 700, you set up PS145 as the customer ID on the Alternate Items screen. Then when the customer calls to order more PS145 and you enter item ID PS145, a message gives you the inventory item ID 700. Inventory User’s Manual 2-23 Entering Your Data Setup Note When you set up customer alternates, you must enter the customer ID in the source field. Alias An alias is another name for an item. You can define an alias as an alternate for any inventory item. For example, you might use an alias as an alternate if item 700 is also known as plumbing supplies. When you enter plumbing supplies as an item ID, a message lets you know that plumbing supplies is an alias for item 700. Superseded Superseded alternates are replacements for items that are no longer available for purchase or sale. For example, if you set up item 700 as the superseded alternate of item 100, each time you enter item 700 for a sale or a purchase, a message lets you know that item 700 has been replaced by item 100. Before you set up superseded alternates, change the status of the item to superseded in the Items function. The system will not find superseded alternates unless the status of the item is superseded. Bar Code If you use bar codes, set up the bar code alternate to record the identification number for an item. Then whenever a bar code is scanned or entered in an item ID field, the item ID appears. Vendor ID If Accounts Payable/Purchase Order are interfaced with Inventory, you can assign vendor IDs to an item. For example, if a vendor uses VC200 as the identification for vacuum cleaners, but your item ID is 300, you can set up VC200 as the vendor ID on the Alternate Items screen. Then when you call the vendor to order more VC200 and you enter item ID VC200, a message gives you the inventory item ID 300. 2-24 Inventory User’s Manual Setup Entering Your Data Note When you set up vendor alternates, you must enter the vendor ID in the source field. For each alternate you set up, you can define a start date and an end date. If you want to keep the alternate indefinitely, leave the fields blank. Item Locations You can get to the Item Locations screen from the Items menu or the File Maintenance menu. To save time when assigning locations to your inventory items, set up one location first, following all the steps through Serial Information later in this chapter. Then when you assign additional locations, use the Append Location window to copy any of the following information: • • • • • price information customer-level pricing cost summary information vendor information bin information To add locations to the item you are working with, press A; the Append Location window appears. Note You must assign one location for each item. If you choose to add or edit location information, price information, cost information, vendor information, bin information, lot numbers, and serial numbers, see the explanations below. Inventory User’s Manual 2-25 Entering Your Data Setup If you did not identify the item as a lotted or a serialized item in the Items function, you cannot maintain the Lot Information or Serial Numbers screens. If you are entering a new item, you must enter location information. Location Information Default Information The default information you set up on the Location Information screen is used at the item location level. 1. Enter the default vendor ID. 2. Enter the default bin number. It appears in Physical Inventory reports and on picking slips. 3. Enter the default price ID. 4. Enter the number of days it takes the default vendor to ship the item to you. The default lead time is used in the calculation of the order point for the item. 5. You can assign a status to both an item and an item location. When assigning statuses, remember that the item is the primary source (the item location status is dependent on the item status). For example, if you want to change the status of an item from active to discontinued, the only place you need to change the status is at the item level. When you change the status of the item to discontinued, all the statuses for the item at the location level will be converted to discontinued. The following list shows the relationship between the item status and the item location status. 2-26 Item Status Item Location Status Active Active, Discontinued, Obsolete, Superseded Discontinued Discontinued, Obsolete, Superseded Inventory User’s Manual Setup Entering Your Data Item Status Item Location Status Obsolete Obsolete, Superseded Superseded Superseded If the item is active, the item location status can be active, discontinued, obsolete, or superseded. If the item is discontinued, the item location status can be discontinued, obsolete, or superseded. If the item is obsolete, the item location status can be obsolete or superseded. If the item is superseded, the item location status can be only superseded. Note When you enter transactions, the system reads the status of the item location. You cannot purchase an item with obsolete, discontinued or superseded status, and you cannot sell an item with obsolete status. 6. Enter the default forecast type. The forecast type assigned to the item is used in the calculation of the reorder point if you are using the forecast type method. Inventory Value The item value, COGS adjustment, and adjusted value fields are displayed. Order Quantities Set up the following order quantities for the item: • The maximum order quantity is the maximum number of units you want to have on hand at one time. It is used in the Reorder Report when you use the Min/Max calculation method. Inventory User’s Manual 2-27 Entering Your Data Setup • The order point is an estimate of the quantity you will use during the order process plus safety stock you want to maintain. If you want the system to calculate reorders, fill in an order point for the item. • Safety stock is the minimum number of units you want to keep on hand at all times because of uncertainty in the order process. • The EOQ is the quantity you want to order weighted against the cost to place an order versus the cost to carry additional stock to inventory. EOQ is used in the Reorder Report when you use the EOQ calculation method. • The minimum order quantity is the minimum quantity you want on hand. The minimum order quantity is used in the Reorder Report when you use the Min/ Max calculation method. GL Accounts You assign GL accounts to an item location. Enter a GL account code for the item location. Item Quantities Enter the in-use, committed, and on-order quantities for the item location. The available quantity (on hand minus committed minus in use) is displayed. The onhand quantity is entered on the Cost Information screen or the Serial Numbers screen. Location Price Information Set up unit-of-measure pricing, quantity breaks, and customer-level pricing on the Item Locations Price Information screen. Unit of Measure Pricing In unit-of-measure pricing you can enter prices and quantity breaks for the item. Unit-of-measure pricing is specific to the unit of measure you are working with. 2-28 Inventory User’s Manual Setup Entering Your Data In the Edit Price Information window, you can enter the average, base, list, and minimum prices. If you entered a price ID for the item, the price information you enter here will override any other price information previously specified. If you want to set up quantity breaks, enter the quantity, adjustment type ($ or %), and price adjustment. Customer-Level Pricing In customer-level pricing you can enter customer levels to use for the unit, the adjustment base, the adjustment type ($ or %), and the amount of the price adjustment. Indicate whether or not you want promotional prices to override the price adjustment amount for the customer level you set up. Location Cost Information Enter the average, last, and base costs. The average cost is a weighted average cost of on-hand quantities. The last cost is based on the value in the last Purchase Order transaction or purchases transaction in Accounts Payable. The base cost is used for calculating prices as a markup from cost. If you are using the EOQ method to calculate reorders and you want to override what you set up in the Locations function, enter the EOQ overrides. If you want to calculate standard cost, enter your standard cost codes that make up the standard cost of the item location. If quantities are already assigned to the item, you can enter cost detail information, but you will not have a record of your cost history. To keep records of your cost history, use the Inventory Transactions function on the Daily Work menu. Enter the current date, the on-hand quantity, and the unit cost of the item. The extended cost is calculated. Inventory User’s Manual 2-29 Entering Your Data Setup For lots, enter the lot number associated with the item. For serialized items, you must enter cost information on the Serial Numbers screen. For both lotted and serialized items, enter cost information on the Serial Numbers screen. Vendor Information Enter each vendor ID; the name of each vendor; the number of days it takes the vendor to ship the item to you; the order quantity, cost, and number; and the date of the last purchase of the item from the vendor. If the vendor gives quantity breaks, enter the quantity, cost, and units you must purchase before receiving the quantity break. Bin Information Bins identify where the item is located. They are assigned to an item location on the Location Information screen. Enter each bin ID. If you use bins during the physical count process, the other fields on this screen will contain historical information about the last physical count. Lot Information A lot can contain many items, but the same item cannot be in both lot A and lot B. A lot can also have many serial numbers, but the same serial number cannot be in both lot A and lot B. Use the Cost Information screen and the Lot Information screen in the Item Locations function to enter quantities for lots. (You can also enter quantities in the Inventory Transactions or Location Transfers functions.) Enter the lot numbers in the Edit Lot Information window of the Lot Information screen, the date the lot expires, and a comment about the lot. 2-30 Inventory User’s Manual Setup Entering Your Data When you add a lot, the status sold is displayed until you enter on-hand quantities for the lot. Then the status changes to available. If you add lots for your history records that are past the expiration date, the status expired is displayed. If you add lots for historical purposes and all the quantity buckets are at zero, the status sold is displayed. Enter the quantity of the lotted item. The available quantity (on hand minus committed minus in use) is displayed. The on-hand quantity is entered on the Cost Information screen. The purchase information of the lot is displayed unless you are entering lots for the first time. Serial Information Use the Serial Numbers screen in the Item Locations function to enter quantities for serial numbers. (You can also enter quantities in the Inventory Transactions or Location Transfers functions.) Enter the serial number in the Edit Serial Information window of the Serial Numbers screen. Then enter a status for the serial number, a comment about the serial number, the date the item was received into your inventory, the purchase cost of the serial number, and the price of the serial number. Note When you are setting up serial numbers, you can enter a lost status for your historical records without affecting the on-hand quantity. However, if you change the status of a serial item to lost after quantities have been entered, the on-hand quantity is reduced by 1. The vendor and customer information after a sale or a purchase is displayed. Inventory User’s Manual 2-31 Entering Your Data Setup Promotional Pricing Set up promotional pricing for a group of price IDs, customer levels, item IDs, location IDs, units, and user-defined fields in the Promotional Pricing function. Promotional pricing is the last price the system checks when assigning a price for an item. If more than one promotional price is set up, the one closest to the current date is the default. Enter a promotional price ID or copy an existing ID. Then enter a description of the promotional price ID and the start and end dates of the promotional price; select which price ID, customer levels, item IDs, location IDs, units, and user-defined fields you want the promotional pricing to affect; and enter an adjustment base, the adjustment type ($ or %), and the amount for the price adjustment. 2-32 Inventory User’s Manual Creating a Backup Schedule Back up your Inventory data files whenever they change and before you run these functions: • • • • • • • Inventory Transactions Location Transfers Post Transactions Post GL Adjustments Year-End Maintenance Purge Selected Files Update Perpetual Inventory Back up your programs once a month as insurance against diskette damage or deterioration. Use the Backup function on the Resource Manager Data File Maintenance menu to back up files. Note You must back up all the files in the data path for a particular list of companies at once to ensure that you have up-to-date copies of the system files. Do not try to use operating system commands to back up only a few files that have been changed; if you do, your system may not work after you restore them. The Backup function backs up all the data files for a specified company in a data path at one time. Inventory User’s Manual 2-33 Inventory User’s Manual Work Flow Work Flow Daily Tasks Periodic Tasks Inventory User’s Manual 3 3-3 3-15 3-1 Daily Tasks Doing the following daily tasks keeps your inventory up to date: 1. 2. 3. 4. 5. 6. 7. 8. 9. Add items. Enter transactions. Enter location transfers. Back up the Inventory data files (see chapter 2). Produce the Transactions Journal. Produce the Transfers Journal. Post transactions. Produce the GL Adjustments Journal. Post GL adjustments. Adding Items You usually use the Items function to add items, but you can also use the Maintenance (F6) command in the Inventory Transactions and Location Transfers functions. If you use the Maintenance (F6) command, you must know the numbering system your business uses. Note If you use the Maintenance (F6) command to add items in the Inventory Transactions and Location Transfers functions, only some of the information listed below appears. You must follow the steps to add information about the item. When you add items, follow these steps: 1. Enter the following information about the item in the Items function: general information, user-defined fields, units of measure, alternates, and location information. Inventory User’s Manual 3-3 Daily Tasks Work Flow 2. Enter the following location information in the Item Locations function or in the Items function: item location defaults, quantities, pricing, costs, and vendors. Entering Transactions You can enter three types of inventory transactions: adjustments, sales, and purchases. Adjustment and purchase transactions are updated online; sales transactions are updated when you post. When you enter transactions, the default value in the Cost field depends on the type of transaction you are working with. If you track serial or lot numbers, one of four screens appears when you enter an adjustment, a purchase, or a sale. (The item must have serial-tracking or lottracking status.) • If you are working with a lotted item, the Lot Entry window appears. • If you are working with a serialized item, the Serial Number Entry window appears. • If you are working with both a serialized and lotted item and you elected to sort by serial number then lot, the Serial/Lot Number Entry window appears. • If you are working with both a serialized and lotted item and you elected to sort by lot then serial number, the Lot/Serial Number Entry window appears. Adjustments Adjustment transactions correct differences in quantity, which might be found during a physical count. Adjustment transactions are also used to adjust quantities and costs of transactions posted from other applications. When you enter an adjustment to increase the quantity of an item, the on-hand and available quantities increase, and the last cost of the item appears in the Cost field but can be changed. 3-4 Inventory User’s Manual Work Flow Daily Tasks When an adjustment to increase the quantity is made to a serialized item, the serial number cannot exist in the INSNxxx (Serial Numbers) file; you must enter a new serial number and cost. When an adjustment to increase the quantity is made to a lotted item, you must enter the number, quantity, and unit cost of each lot. When you enter an adjustment to decrease the quantity of an item, the on-hand and available quantities decrease, and the costing method you are using (FIFO, LIFO, average, or standard) appears in the Cost field but can be changed. When an adjustment to decrease the quantity is made to a serialized item, the serial number must be in the INSNxxx file and must have available status; the cost comes from the INSNxxx file and cannot be changed. When an adjustment to decrease the quantity is made to a lotted item, you must enter a lot number that is in the file, the quantity of the lot, and the cost. Sales Sales transactions are used to process customer sales. If you do not have the Accounts Receivable/Sales Order applications, use the Sale option on the Inventory Transactions screen to enter new customer orders, verify orders, invoices, and miscellaneous credits. • New Order: Use the new order status to record sales orders that will be shipped at a later date. A new order increases the quantity committed and decreases the quantity available. When you enter a new order, the costing method you are using (FIFO, LIFO, average, or standard) appears in the Cost field and cannot be changed. • Verify Order: Use the verify order status to record the shipment of goods for sales orders. A verify order status decreases the quantity committed, increases the quantity in use, and does not affect the quantity available. When you enter a verify order, the costing method you are using (FIFO, LIFO, average, or standard) appears in the Cost field and cannot be changed. Inventory User’s Manual 3-5 Daily Tasks Work Flow When you enter a verify order for a serialized item, the serial number must be in the INSNxxx file and have available status. When you enter a verify order for a lotted item, you must enter a lot number that is on file and the quantity. • Invoice: Use the invoice status to record sales activity. Sales invoices are items that are sold and shipped at the same time. An invoice combines the new order and verify order statuses, increases the quantity in use, and decreases the quantity available. When you enter an invoice, the costing method you are using (FIFO, LIFO, average, or standard) appears in the Cost field and cannot be changed. When you enter an invoice for a serialized item, the serial number must be in the INSNxxx file and have available status. When you enter an invoice for a lotted item, you must enter a lot number that is on file and the quantity. • Miscellaneous Credit: Use the miscellaneous credit status when a customer returns goods to you. A miscellaneous credit decreases the quantity in use and increases the quantity available. When you enter a miscellaneous credit, the costing method you are using (FIFO, LIFO, average, or standard) appears in the Cost field, but you can change it. When you enter a miscellaneous credit for a serialized item, either the serial number cannot be in the INSNxxx file or if the serial number is in the INSNxxx file, it must have sold status. If the serial number is in the INSNxxx file, you cannot change the cost; if it is not, you must enter a cost. When you enter a miscellaneous credit for a lotted item, enter a lot number, the quantity, and the cost. Purchases Purchase transactions are used to process purchases you make from vendors. Purchasing activity is usually performed through the Accounts Payable/Purchase Order applications. If you do not have these applications, you can purchase items by entering a new order, goods received, invoices, and miscellaneous debits. 3-6 Inventory User’s Manual Work Flow Daily Tasks • New Order: Use the new order status to place orders that will be sent to you at a later date. A new order increases the quantity on order and does not affect the quantity available. When you enter a new order, the last cost of the item appears in the Cost field, but you can change it. • Goods Received: Use the goods received status to update the quantity and cost of the goods you received from the vendor. Goods received increase the quantity on hand, decrease the quantity on order, and increase the quantity available. When you enter goods received, the last cost of the item appears in the Cost field, but you can change it. When you enter goods received for serialized items, you must enter a new serial number, and you can choose whether or not to generate serial numbers. When you enter goods received for lotted items, enter a lot number, the quantity, and the cost. • Invoice: Use the invoice status to record purchases of inventory items that were not placed on order. An invoice increases the quantity on hand and the quantity available. When you enter an invoice, the last cost of the item appears in the Cost field, but you can change it. When you enter an invoice for serialized items, enter a new serial number, and choose whether or not to generate serial numbers. When you enter an invoice for lotted items, enter a lot number, the quantity, and the cost. • Miscellaneous Debit: Use the miscellaneous debit status when you return goods to a vendor. A miscellaneous debit decreases the quantity on hand and the quantity available. When you enter a miscellaneous debit, the average cost appears in the Cost field, but you can change it. Inventory User’s Manual 3-7 Daily Tasks Work Flow When you enter a miscellaneous debit for serialized items, the serial number must be in the INSNxxx file with sold status; you cannot enter a cost. When you enter a miscellaneous debit for lotted items, enter a lot number, the quantity, and the cost. The table below illustrates how adjustments, sales, and purchases affect quantities. Both adjustment and purchase quantities are updated immediately; sales quantities are not updated until you post transactions. Relationship Between Quantities and Transactions Transactions/ Status Quantity Committed Quantity In Use Quantity On Hand Quantity On Order Quantity Available Adjustment: Increase Increase Increase Decrease Decrease Decrease Sale: New Order Increase Verify Order Decrease Decrease Increase N/A Invoice Increase Decrease Transaction Post Decrease Misc. Credit Decrease Decrease Increase Purchase: New Order Increase N/A Decrease Increase Goods Received Increase Invoice Increase Increase Misc. Debit Decrease Decrease 3-8 Inventory User’s Manual Work Flow Daily Tasks The table below shows the transaction type, the default in the Cost field, and whether or not you can change the value in the Cost field. If the default in the Cost field is Costing Method, the value that appears in the Cost field is based on the costing valuation method you set up in the Options and Interfaces function in Resource Manager (FIFO, LIFO, average, or standard). Note The Cost field for sales transactions appears only if you elected to show the cost for sales transactions in the Options and Interfaces function in Resource Manager. Costs in Transactions Transactions/Status Default in Cost Field Allowed to Change Cost? Increase Last Cost Yes Decrease Costing Method Yes New Order Costing Method No Verify Order Costing Method No Invoice Costing Method No Misc. Credit Costing Method Yes New Order Last Cost Yes Goods Received Last Cost Yes Invoice Last Cost Yes Misc. Debit Average Cost Yes Adjustment: Sale: Purchase: Inventory User’s Manual 3-9 Daily Tasks Work Flow Entering Location Transfers Use the Location Transfers function to move inventory items from one location (source location) to another (destination location). When you enter a transfer, the system updates the quantities and files online. The quantity on hand and available for the source location is decreased by the number of items sent to the destination location. The quantity on hand and available for the destination location is increased by the number of items sent from the source location. The default value in the Unit Cost field is based on the type of costing method you are using and cannot be changed. The unit cost is the total cost divided by the total quantity transferred. If the transfer incurs expenses, you can allocate them. If you track serial or lot numbers, one of three screens appears. (The item must have serial-tracking or lot-tracking status.) • If you are working with a lotted item, the Lot Entry window appears. • If you are working with a serialized item, the Serial Number Entry window appears. • If you are working with both a serialized and lotted item and you elected to sort by serial number then lot, the Serial/Lot Number Entry window appears. If you are transferring serialized items, the serial number must be in the INSNxxx file; you can add the transfer cost, but the unit cost of the item cannot be changed. If you are transferring a lotted item, you can add destination lots and transfer costs, but you cannot change the cost of the unit item. 3-10 Inventory User’s Manual Work Flow Daily Tasks Producing the Transactions Journal After you have entered all your adjustments, sales, and purchases and before you post transactions, print the Transactions Journal. The journal is a record of transactions entered through the Inventory Transactions function. Use the journal to verify the quantity, costs, and prices for transactions and as an audit trail of inventory activity. Producing the Transfers Journal After you have entered all the location transfers and before you post transactions, print the Transfers Journal. The journal is a record of the transfers that were entered in the Location Transfers function. Use the journal to verify the quantity of each item transferred, number of units, transfer cost, and unit and extended cost and as an audit trail of inventory activity. Posting Transactions Adjustment, purchase, and location transfer transactions (including history) are updated online; sales transactions are updated during the post. Before you post, complete the following tasks: • If you have a multiuser system, make sure that no one else is using the Inventory system. • Print the Transactions Journal. • Back up all the data files. When you post transactions for adjustments, purchases, and location transfers, the general ledger accounts are updated. When you post sales, the in-use and available quantities, the general ledger accounts, and sales history are updated. If Inventory is interfaced with General Ledger, debit and credit entries are created in the GLJRxxx (Journal) file. If you post detail (line-item) information, entries are made for each line item. If you post summary (totals) information, one entry is made for each account. Inventory User’s Manual 3-11 Daily Tasks Work Flow If Inventory is not interfaced with General Ledger, use the Post Transactions Log to manually adjust the accounts affected by this function. When you post transactions, entries are made to the following accounts: Adjustment: increase in quantity and value; the reverse is true for a decrease. Inventory Adjustment CR DB Purchase: increase in quantity and value Inventory Adjustment CR DB Sale: decrease in quantity and value Inventory CR COGS DB Sales Adjustment CR DB Transfer: decrease from source, increase in destination, add transfer cost IN - Source CR IN - Destination DB Transfer Cost CR Destination Cost DB Producing the GL Adjustments Journal The GL Adjustments Journal is a record of the cost-of-goods-sold (COGS) adjustments and purchase price variances (PPV) in the INCJxxx (COGS Journal) file. Use it to verify that the adjustments are correct. 3-12 Inventory User’s Manual Work Flow Daily Tasks A COGS adjustment is made under the following circumstances: • The estimated cost is different from the actual cost. For example, suppose that you receive an item at an estimated cost of $20, but you do not receive the invoice. You then sell the item to a customer. When you receive the invoice, the cost of the item is $25. The variance of $5 is posted to the general ledger. • You enter a quantity adjustment for an item in the Inventory Adjustments window in the Inventory Transactions function. • You enter multiple receipts for an item in Purchase Order at different costs and then receive the invoice for the first receipt at a different cost than the last receipt cost. A purchase price variance is the difference between the standard cost and the actual price paid for the item in the standard costing valuation method. For example, if your standard cost for an item is $50 and you purchase the item at $60, the purchase price variance between the standard cost and what was paid for the item is $10. Before you post GL adjustments, print the GL Adjustments Journal to verify that the adjustments are correct. Posting GL Adjustments Use the Post GL Adjustments function to post COGS adjustments and purchase price variances to the general ledger. Before you post, print the GL Adjustments Journal and back up all the data files. Both COGS adjustments and purchase price variances in Inventory are updated online. COGS adjustments are stored in the INCJxxx file. A COGS adjustment in Accounts Payable/Purchase Order is updated when transactions are processed. A COGS adjustment in Accounts Receivable/Sales Order is updated when transactions are posted. Inventory User’s Manual 3-13 Daily Tasks Work Flow If Inventory is interfaced with General Ledger, debit and credit entries are created in the GLJRxxx file. If you post detail (line-item) information, entries are made for each line item. If you post summary (totals) information, one entry is made for each account. If Inventory is not interfaced with General Ledger, use the Post GL Adjustments Log to manually adjust the accounts affected by this function. When you post GL adjustments, entries are made to these accounts: COGS Post: increase value COGS CR Inventory DB Purchase Price Variance: standard cost higher than purchased cost PPV DB 3-14 Inventory CR Inventory User’s Manual Periodic Tasks You must do the following tasks periodically: 1. 2. 3. 4. 5. 6. 7. 8. 9. 10. 11. 12. 13. 14. 15. 16. 17. 18. 19. 20. Calculate reorders. Produce the Reorder Report. Generate purchase requisitions. Select physical inventory. Freeze quantities. Print physical inventory tags. Print physical inventory worksheets. Enter the physical count. Produce the Batch List. Produce the Physical Count List. Produce the Variance Report. Produce the Physical Count Valuation Report. Update perpetual inventory. Change the price of items. Change costs. Verify quantities. Do year-end maintenance. Purge selected files. Rebuild item quantities. Print selected reports. Calculating Reorders Depending on your type of business, you might calculate reorders daily or periodically. Use the Calculate Reorders function to determine the order point for items, based on the EOQ, Min/Max, and Forecast methods. Inventory User’s Manual 3-15 Periodic Tasks Work Flow Note The system calculates reorders only for items with active status. If the status of the item or the item location is discontinued, superseded, or obsolete, the items are not calculated. In the Calculate Reorders function you can choose the items you want to include in the Reorder Report. In the Reorder Report function you can choose one or all of the reordering methods listed below. The method you choose to reorder your quantities by depends on the item you are reordering and your type of business. EOQ Method The Economic Order Quantity (EOQ) method balances the cost to place an order with the cost to carry additional stock in inventory. Min/Max Method Distributors often use the Minimum/Maximum (Min/Max) method for reordering. When an item reaches its minimum on-hand quantity, an amount is ordered to bring the balance up to the maximum on-hand quantity. Forecast Method Companies that carry seasonal items often use the Forecast method for reordering items. The amount to reorder is based on the weighting factor for the current period, sales history, and an adjustment factor. Producing the Reorder Report After you select the items you want to include in the reorder process, you can produce the Reorder Report. Use the Reorder Report to analyze the reordering method(s) for the items, locations, product lines, and user-defined fields you selected. If you include items that are above the order point, the report lists all the items. If do not include items that are above the order point, the report lists only items that must be purchased at this time. 3-16 Inventory User’s Manual Work Flow Periodic Tasks Generating Purchase Requisitions If Purchase Order is interfaced with Inventory, you can use the Generate Purchase Requisitions function to create purchase requisitions. To generate purchase requisitions with the method that shows the least quantity you need to reorder (EOQ, Min/Max, and Forecast), select the Least Quantity calculation method. To generate purchase requisitions with the method that shows the greatest quantity you need to reorder, select the Greatest Quantity calculation method. Selecting Physical Inventory Periodically counting inventory items and changing the quantities in the system ensures accurate, up-to-date records. Use the Physical Inventory Selection function to enter batch IDs and to set up your physical count process. Batch ID You can assign a batch ID to items, locations, bins, product lines, and user-defined fields. The batch ID is used throughout the physical count process to group similar items together for counting purposes. Use Tag Numbers You can assign an inventory tag with a unique number to items. This number identifies the item number, location, bin, serial number (one tag per serial number), or lot within an item (one tag per lot). You can print preassigned tag numbers in the Print Physical Inventory Tags function. If you print tag numbers, use the Physical Counts Tag Entry function to enter your counts. Inventory User’s Manual 3-17 Periodic Tasks Work Flow You can also use tag numbers but choose not to print tag numbers. For example, you might use tag numbers as a tool to verify the number of bins you are counting, but use worksheets to record the actual count. The tag number for each bin is entered in the Physical Counts Worksheet Entry function and used to verify that all the bins were counted. In the Physical Count List an asterisk marks out-ofsequence or missing tag numbers. Display Frozen Quantities When you display frozen quantities, the system’s quantities in the INQTxxx (Quantity Totals) file appear on the screen. You can compare the system totals with your count totals. Note If you are entering exceptions only, frozen quantities are not displayed. Enter Exceptions Only With the Enter Exceptions Only toggle, counted and frozen quantities are equal and displayed on the screen, so you enter only physical discrepancies. Default Frozen Quantities If you choose to default counted quantities for each item, the counted quantity defaults to the system’s frozen quantity when you access each line on the entry screen. For example, if you count 5 of item 400 and then access the line on the screen that contains item 400, the frozen quantity (also 5) appears in the Counted Quantity field. Note If you chose to enter exceptions, the Default Frozen Quantities toggle is automatically set to NO. 3-18 Inventory User’s Manual Work Flow Periodic Tasks Print Items With Zero Quantities When you choose to print items with zero quantities, all items (including those with zero quantities) appear on the worksheet or tags list. Freezing Quantities Use the Freeze Quantities function to freeze the system quantities anytime before you begin the physical count process. Freeze the quantities in the system only if all the adjustments, purchases, and sales have been made and you are ready to do your physical count. After you freeze quantities, you can continue processing inventory transactions while verifying your physical count. Note If you change your selections in the Physical Inventory Selection function after your quantities are frozen, the tags and worksheets may be incorrect. In addition, you may need to print more tags and worksheets if items have been added to the batch. Printing Physical Inventory Tags If you use tag numbers, print the inventory tags for the items/locations, bins, and serial and lot numbers. (You can assign the starting tag number.) Attach each tag to the appropriate bin so that the person who counts the contents of the bin can record the count. If you did not select the option to print tag numbers but decide you need to, you can change your selection on the Print Physical Inventory Tags screen. (The selection toggle to print tags on the Physical Inventory Selection screen is changed to YES.) Inventory User’s Manual 3-19 Periodic Tasks Work Flow Printing Physical Inventory Worksheets If you use worksheets to record the physical count of your inventory, use the Print Physical Inventory Worksheets function to print them. They provide lines for each item/location, bin, serial number, and lot number. Entering Physical Counts If you use tags for physical counts, enter the physical count quantities in the Physical Counts Tags Entry function. If you use worksheets for physical counts, enter the physical count quantities in the Physical Counts Worksheet Entry function. Producing the Batch List Use the Batch List to verify the batches that are used and their statuses. The list shows what has or has not been completed in the physical count process. For example, it might show that the tags and worksheets have been printed but that the counts have not been entered. It can also show the items, locations, bin numbers, product lines, user-defined fields in the batch, and the selection toggles. Producing the Physical Count List Produce the Physical Count List after you have entered physical counts to verify that the correct quantities were entered for the batches. Producing the Variance Report Produce the Variance Report after you have entered and verified the physical count of your inventory. The report shows the difference between the counts you entered and the on-hand (frozen) quantities in the system. Variances are expressed as a quantity and a dollar amount, and they are based on your inventory valuation method. 3-20 Inventory User’s Manual Work Flow Periodic Tasks Producing the Physical Count Valuation Report Produce the Physical Count Valuation Report before you update your inventory accounts. The report shows frozen and updated quantities and their values. Updating Perpetual Inventory Before you update your perpetual inventory, complete the following tasks: • • • Enter the physical counts for each batch. Print the Variance Report. Back up all the data files. The on-hand quantities in the item records are updated by the difference between the frozen quantity and the physical counts you entered, and the Month- and Yearto-Date COGS Adjustments fields are updated by the variance amounts. The variance amounts are based on the inventory valuation method you use. If you use the LIFO or the FIFO method and no cost is available (for example, because the item has no on-hand quantity), the system updates quantities using the zero quantity method selected in the Options and Interfaces function in Resource Manager. If Inventory is interfaced with General Ledger, debit and credit entries are created in the GLJRxxx file. If you post detail (line-item) information, entries are made for each line item. If you post summary (totals) information, one entry is made for each account. If Inventory is not interfaced with General Ledger, use the Update Perpetual Inventory Log to manually adjust the accounts affect by this function. Inventory User’s Manual 3-21 Periodic Tasks Work Flow When you update perpetual inventory, entries are made to the inventory and physical count adjustment accounts: Variance: increase in inventory IN Adj Phys Ct Adj CR DB Variance: decrease in inventory IN Adj CR Phys Ct Adj DB Changing Prices To change the prices for large groups of items, product lines, locations, or price IDs, use the Item Price Change function. Before you can use this function, units-ofmeasure pricing must be set up for the items. When you change the prices of items, each item’s unit price is adjusted by the percentage or dollar amount you specify. When you change the prices of a price ID, the price breaks in the price record are adjusted by the percentage or dollar amount you specify. Changing Costs To change the base or standard cost for large groups of items, product lines, and user-defined fields, use the Cost Changes function. If you use the standard costing valuation method, you can change standard cost codes. If you change the base cost for items, the base cost on the Cost Information screen in the Item Locations function is updated. 3-22 Inventory User’s Manual Work Flow Periodic Tasks When you change the cost of an item, the item’s cost is adjusted by the percentage or dollar amount you specify. Verifying Quantities The Quantity Cross Verification function compares the INQTxxx (Quantity Totals) file and the INQLxxx (Quantity Locations) file to make sure that the quantities match. Although these files are updated in the same functions, produce the log periodically to check their accuracy. If the quantity files do not match, totals in reports will be incorrect. The Quantity Cross Verification function checks the on-hand total in the INQTxxx file and verifies that the total records for each location in the INQLxxx file are the same. If lots are used, the quantity for lots in the INQLxxx file is compared. If serial numbers are used, the quantity of serial numbers is compared. The system changes inconsistencies between the two files and updates them. The Quantity Cross Verification Log shows the inconsistencies and the adjustments the system made to the files. If quantity discrepancies are not found when you produce the log, it is blank. Year-End Maintenance Year-end maintenance prepares for the upcoming year. It increments the current fiscal year by 1 in the INPDxxx table, and it creates new records for the INHSxxx (Summary History) file if you keep summary history. Before using the Year-End Maintenance function, complete these tasks: • Set the INPDxxx table to the company you are doing the year-end maintenance for. • Post the Inventory transactions for the year in which you are performing the maintenance. You do not need to post Inventory transactions that are for the next year. • If you have a multiuser system, make sure that no one else is using the INHSxxx, INQLxxx, INQTxxx, INTB, and INVExxx files. Inventory User’s Manual 3-23 Periodic Tasks Work Flow Purging Selected Files To delete records that contain information you no longer need, use the Purge Selected Files function. This periodic procedure prevents files from growing so large that they slow down the processing speed of your system. Before you delete files, complete the following tasks: • • • Print the relevant reports for each file listed below. Back up your data files. Make sure that no one else is using the Inventory files listed below. If you elected not to keep serial, lot, detail, and summary history, you cannot delete information from the INSHxxx, INLHxxx, INHIxxx, and INHSxxx files. INSNxxx Delete the serial numbers you no longer need from the INSNxxx (Serial Numbers) file. If you keep serial history, print the Serialized History Report before purging this file. INLTxxx Delete the lot numbers you no longer use from the INLTxxx (Lot Detail) file. If you do not keep lot history, lots with a quantity of zero are deleted, regardless of the date they were sold. If you keep lot history, print the Lot History Report before purging this file. INAIxxx Delete the alternate items you no longer need from the INAIxxx (Alternate Items) file. INPPxxx Delete the promotional pricing IDs you no longer use from the INPPxxx (Promotional Pricing) file. Print the Price Report before deleting promotional price IDs. 3-24 Inventory User’s Manual Work Flow Periodic Tasks INSHxxx Delete serial history from the INSHxxx (Serial History) file. Print the Serialized History Report before you delete information from this file. INLHxxx Delete lot history from the INLHxxx (Lot History) file. Print the Lot History Report before you delete information from this file. INHIxxx Delete detail history for transactions from the INHIxxx (Detail History) file. Print the Transaction History Report before you delete information from this file. INHSxxx Delete summary history from the INHSxxx (Summary History) file. Print the following reports before you delete information from this file: • • • • • • • Inventory Movement Report Valuation Report Cost Variance Report Slow/Fast Movement Report Sales Analysis Report Gross Profit Analysis Report Trend Analysis Report Rebuilding Item Quantities Whether you use Inventory as a standalone application or other applications are interfaced with Inventory, use the Rebuild Item Quantities function to update item quantities. Back up your data files and make sure that nobody is using the system before you use this function. Inventory User’s Manual 3-25 Periodic Tasks Work Flow Printing Selected Reports Periodically you will print selected reports to analyze your items and review information needed to make decisions about inventory and your company. Use the functions on the Reports menu and the Slow/Fast Movement Report function. 3-26 Inventory User’s Manual Information Inquiry Price and Availability Summary History Detail History Movement History Sales Trending Items Item Locations Costs and Vendors Lot Numbers Serial Numbers 4 4-3 4-13 4-17 4-21 4-25 4-29 4-39 4-49 4-55 4-59 Inventory User’s Manual Inventory User’s Manual Inventory User’s Manual 4-1 Information Inquiry Introduction This chapter explains the features and uses of all the screens, windows, and processes in the Inventory application. Screens are presented first; windows associated with the screens in a function are presented after a description of all the screens. 4-2 Inventory User’s Manual Price and Availability Features Use the Price and Availability function on the Information Inquiry menu to look at the number of items available for sale and the price of the items. You can use the price calculator to calculate a price for an item. Reports No report is associated with this function. Screen Use Screen Description Price and Availability Use the Price and Availability screen to view an item’s available and on-order quantities at each location and to view base and list prices for an item. To add or change information on this screen, use the File Maintenance Item Locations function. Lot Price and Availability Inquiry Use the Lot Price and Availability Inquiry screen to view a lot’s availability and on-order quantities at each location. Serial Number Price and Availability Inquiry Use the Serial Number Price and Availability Inquiry screen to view a serial item’s availability and unit price at each location. Item Price and Availability Detail window Use the Item Price and Availability Detail window to view the on-hand, committed, in-use, available, and on-order quantities for an item. You can also view the average, base, list, and minimum prices for an item. Price Calculator window Use the Price Calculator window to calculate the price of any quantity of items for a customer. Inventory User’s Manual 4-3 Price and Availability Information Inquiry Price and Availability Screen Field Definitions Field Name Description Item ID Enter the ID of the item whose quantities and price information you want to view. Units Enter the unit of measure for the item. Command Bar Definitions 4-4 Command Description Next Press N to view the next item record on file. Prev Press P to view the previous item record on file. Inventory User’s Manual Information Inquiry Price and Availability Command Description First Press F to view the first item record on file. Last Press L to view the last item record on file. Item Press I to go to the Item ID field and enter a different item ID. View Press V to view detailed information about an item. The Item Price and Availability Detail window appears. Calc price Press C to calculate an item’s price. The Price Calculator window appears. Lots Press O to view detailed information about lots. The Lot Price and Availability Inquiry screen appears. Serials Press S to view detailed information about an item. The Serial Number Price and Availability Inquiry screen appears. Units Press U to go to the Units field and enter a different unit of measure for the item. Saving and Exiting To exit to the Information Inquiry menu, use the Exit (F7) command. Inventory User’s Manual 4-5 Price and Availability Information Inquiry Lot Price and Availability Inquiry Screen Field Definitions Field Name Description Item ID Enter the ID of the item whose quantities and price information you want to view. Units Enter the unit of measure for the item. Command Bar Definitions This screen has no command bar. Saving and Exiting To exit to the Price and Availability screen, press Enter. 4-6 Inventory User’s Manual Information Inquiry Price and Availability Serial Number Price and Availability Inquiry Screen Field Definitions Field Name Description Item ID Enter the ID of the item whose quantities and price information you want to view. Units Enter the unit of measure for the item. Command Bar Definitions This screen has no command bar. Saving and Exiting To exit to the Price and Availability screen, press Enter. Inventory User’s Manual 4-7 Price and Availability Information Inquiry Item Price and Availability Detail Window Field Definitions The information in the Item Price and Availability Detail window comes from the Location Information and Price Information screens in the File Maintenance Item Locations function. Command Bar Definitions This window has no command bar. Saving and Exiting To exit to the Price and Availability screen, press any key. 4-8 Inventory User’s Manual Information Inquiry Price and Availability Price Calculator Window Field Definitions Field Name Description Location ID Enter a location ID. Item ID Enter an item ID. Sale Units Accept the displayed unit of measure, or enter a different unit of measure. Price ID Enter a price ID (optional). Customer ID Enter a customer ID (optional). Cust Level Enter a customer level (optional). Sale Date Accept the displayed sale date, or enter a different date. Inventory User’s Manual 4-9 Price and Availability Information Inquiry Field Name Description Sale Quantity Accept the displayed sale quantity, or enter a different quantity. On Hand Qty The quantity on hand is displayed. Committed Qty The committed quantity is displayed. In Use Qty The in-use quantity is displayed. Available Qty The available quantity is displayed. On Order Qty The on-order quantity is displayed. LIFO/FIFO Cost This field appears if you elected in the Resource Manager Options and Interfaces function to show costs in the price and availability lookup. The LIFO/FIFO unit cost is displayed. Average Cost This field appears if you elected in the Resource Manager Options and Interfaces function to show costs in the price and availability lookup. The average unit cost is displayed. Standard Cost This field appears if you elected in the Resource Manager Options and Interfaces function to show costs in the price and availability lookup. The standard unit cost is displayed. Base Cost This field appears if you elected in the Resource Manager Options and Interfaces function to show costs in the price and availability lookup. The base unit cost is displayed. 4-10 Calc Unit Price The calculated unit price is displayed. Calc Ext Price The calculated extended unit price is displayed. Base The base level is displayed. Quantity The sale quantity levels are displayed. Inventory User’s Manual Information Inquiry Price and Availability Field Name Description Unit Price The calculated unit price for each quantity break is displayed. Command Bar This window has no command bar. Saving and Exiting To return to the Price and Availability screen, use the Exit (F7) command. Inventory User’s Manual 4-11 Summary History Features Use the Summary History function on the Information Inquiry menu to view information from the transaction history records for an item: number of items sold, purchased, transferred, adjusted, requisitioned, built, and issued for a period and year. Reports No report is associated with this function. Screen Use Screen Description Summary History The Summary History screen has two sections. Use the default Summary History screen to view the totals of the items purchased or returned, COGS, COGS returned, and requisitions. When you press M, the second section of the screen appears, and you can view the totals of transfers, adjustments, builds, and issues. To add or change information on this screen, use the Inventory Transactions function or the Location Transfers function. Inventory User’s Manual 4-13 Summary History Information Inquiry Summary History Screen Field Definitions 4-14 Field Name Description Item ID Enter the ID of the item whose summary history you want to view. Location Enter the ID of the location for the item. Period Enter the period whose summary history you want to view. Year Enter the year whose summary history you want to view. View Enter Q to view the total amounts in quantities. Enter D to view the total amounts in dollars. Units Enter the unit of measure for the item. Inventory User’s Manual Information Inquiry Summary History Command Bar Definitions Command Description More Press M to view totals of transfers, adjustments, builds, and issues. Next item Press N to view the next item record on file. Prev item Press P to view the previous item record on file. First item Press F to view the first item record on file. Last item Press L to view the last item record on file. Header Press H to go to the Item ID field and change any of the header information. Change view Press C to switch between viewing totals in quantities or dollars. Units Press U to go to the Units field and enter a different unit of measure for the item. Saving and Exiting To exit to the Information Inquiry menu, use the Exit (F7) command. Inventory User’s Manual 4-15 Detail History Features Use the Detail History function on the Information Inquiry menu to view transaction records for an item, including historical information about selected transactions. If you do not keep detail history, you cannot use this function. Reports No report is associated with this function. Screen Use Screen Description Detail History Use the Detail History screen to view selected information about transactions: period and year the transaction took place, transaction date, type of transaction, source ID, application, units, quantity, and total amount. To add or change information on this screen, use the Inventory Transactions function or the Location Transfers function. View Transaction Detail window Inventory User’s Manual Use the View Transaction Detail window to view such detailed information about the transaction as the unit price and cost. 4-17 Detail History Information Inquiry Detail History Screen Field Definitions 4-18 Field Name Description Item ID Enter the ID of the item whose detail history you want to view. Location Enter the location ID for the item. Include Enter P to include purchase transactions, S to include sales transactions, M to include material requisitions, T to include transfers, A to include adjustments, B to include builds, and L to include all transactions for the item. Period/Yr Enter the range of periods and years you want to view. Inventory User’s Manual Information Inquiry Detail History Command Bar Definitions Command Description Next Press N to view the next item record on file. Prev Press P to view the previous item record on file. First Press F to view the first item record on file. Last Press L to view the last item record on file. Header Press H to go to the Item ID field and change any of the header information. View Press V to view detailed information about a transaction. The View Transaction Detail window appears. Saving and Exiting To exit to the Information Inquiry menu, use the Exit (F7) command. Inventory User’s Manual 4-19 Detail History Information Inquiry View Transaction Detail Window Field Definitions The information in the View Transaction Detail window comes from the Inventory Transactions function and the Location Transfers function. Command Bar Definitions This window has no command bar. Saving and Exiting To exit to the Detail History screen, press any key. 4-20 Inventory User’s Manual Movement History Features Use the Movement History function on the Information Inquiry menu to view transaction records for an item, including information about selected transactions. If you do not keep detail history, you cannot use this function. Reports No report is associated with this function. Screen Use Screen Description Movement History Use the Movement History screen to view selected information about movement of materials and goods.. Inventory User’s Manual 4-21 Movement History Information Inquiry Movement History Screen Field Definitions 4-22 Field Name Description Item ID Enter the ID of the item whose movement history you want to view. Location Enter the location ID for the item. Period Enter the range of periods and years you want to view. Year Enter the range of years you want to view. Units Enter a unit of measure for the item you want to view. Inventory User’s Manual Information Inquiry Movement History Command Bar Definitions Command Description Next item Press N to view the next item record on file. Prev item Press P to view the previous item record on file. First item Press F to view the first item record on file. Last item Press L to view the last item record on file. Header Press H to go to the Item ID field and change any of the header information. Units Press U to go to the Units field and enter a different unit of measure for the item. Saving and Exiting To exit to the Information Inquiry menu, use the Exit (F7) command. Inventory User’s Manual 4-23 Sales Trending Features Use the Sales Trending function on the Information Inquiry menu to view the quantity sold and returned for an item and its value. Reports No report is associated with this function. Screen Use Screen Description Sales Trending Use the Sales Trending screen to enter the ID of the item whose sales trend information you want to view. Inventory User’s Manual 4-25 Sales Trending Information Inquiry Sales Trending Screen Field Definitions 4-26 Field Name Description Item ID Enter the ID of the item whose information you want to view. The item description appears. Location Enter the location ID of the item whose information you want to view. Period Enter the number of the period you want to view. Year The default year is displayed. Units Accept the default unit of measure for the item, or enter a different unit of measure. Last Sale The most recent date that the item was sold is displayed. Inventory User’s Manual Information Inquiry Sales Trending Field Name Description Per/Yr The period and year you specified above are displayed. Thirteen consecutive periods back from the period you enter (based on the periods you set up in the Resource Manager Period Setup function) appear. Sale Quantity The quantity sold of the item is displayed. Sale Dollars The dollar amount sold for the item is displayed. Return Quantity The quantity returned of the item is displayed. Return Dollars The dollar amount returned for the item is displayed. Command Bar Definitions Command Description Next item Press N to view the next item record on file. Prev item Press P to view the previous item record on file. First item Press F to view the first item record on file. Last item Press L to view the last item record on file. Header Press H to go to the header portion of the screen. Units Press U to change the displayed unit of measure. Saving and Exiting To exit to the Information Inquiry menu, use the Exit (F7) command. Inventory User’s Manual 4-27 Items Features Use the Items function on the Information Inquiry menu to look at the following item information: general information, alternate items, units of measure, and location information. To add or change information, use the File Maintenance Items function. Reports No report is associated with this function. Screen Use Screen Description Items - General Information Use the General Information screen to view general information about an item: default values and user-defined fields. Items - Alternate Items Use the Alternate Items screen to view alternate, customer, superseded, bar codes, and vendor part numbers for an item. Items - Units of Measure Use the Units of Measure screen to view alternate and default units of measure for an item. Item Locations - Locations Use the Item Locations screen to view the locations set up for the item and quantities for the locations for that item. Inventory User’s Manual 4-29 Items Information Inquiry Items - General Information Screen Field Definitions Field Name Description Item ID Enter the ID of the item whose information you want to view. Command Bar Definitions 4-30 Command Description Next Press N to view the next item record on file. Prev Press P to view the previous item record on file. Last Press L to view the last item record on file. First Press F to view the first item record on file. Inventory User’s Manual Information Inquiry Items Command Description Item Press I to go to the Item ID field and enter a different item ID. Alternates Press A to view alternate items for the item you are working with. The Alternate Items screen appears. Units Press U to view additional units of measure for the item. The Units of Measure screen appears. Locations Press O to view the locations assigned to the item. The Item Locations screen appears. Saving and Exiting To exit to the Information Inquiry menu, use the Exit (F7) command. Inventory User’s Manual 4-31 Items Information Inquiry Items - Alternate Items Screen Field Definitions The information on this screen comes from the Alternate Items screen in the File Maintenance Items function. 4-32 Inventory User’s Manual Information Inquiry Items Command Bar Definitions Command Description Next Press N to view the next item record on file. Prev Press P to view the previous item record on file. Last Press L to view the last item record on file. First Press F to view the first item record on file. Item Press I to go to the Item ID field and enter a different item ID. Units Press U to view additional units of measure for the item. The Units of Measure screen appears. General info Press G to view general information about the item. The General Information screen appears. Locations Press O to view the locations assigned to the item. The Item Locations screen appears. Saving and Exiting To exit to the Information Inquiry menu, use the Exit (F7) command. Inventory User’s Manual 4-33 Items Information Inquiry Items - Units of Measure Screen Field Definitions The information on this screen comes from the Units of Measure screen in the File Maintenance Items function. 4-34 Inventory User’s Manual Information Inquiry Items Command Bar Definitions Command Description Next Press N to view the next item record on file. Prev Press P to view the previous item record on file. Last Press L to view the last item record on file. First Press F to view the first item record on file. Item Press I to go to the Item ID field and enter a different item ID. Alternates Press A to view alternate items for the item you are working with. The Alternate Items screen appears. General info Press G to view general information about the item. The General Information screen appears. Locations Press O to view the locations assigned to the item. The Item Locations screen appears. Saving and Exiting To exit to the Information Inquiry menu, use the Exit (F7) command. Inventory User’s Manual 4-35 Items Information Inquiry Item Locations - Locations Screen Field Definitions The information on this screen comes from the Item Locations screen in the File Maintenance Items function. 4-36 Inventory User’s Manual Information Inquiry Items Command Bar Definitions Command Description Next Press N to view the next item record on file. Prev Press P to view the previous item record on file. Last Press L to view the last item record on file. First Press F to view the first item record on file. Item Press I to go to the Item ID field and enter a different item ID. Units Press U to view additional units of measure for the item. The Units of Measure screen appears. General Press G to view general information about the item. The General Information screen appears. Alternates Press A to view alternate items for the item you are working with. The Alternate Items screen appears. Saving and Exiting To exit to the Information Inquiry menu, use the Exit (F7) command. Inventory User’s Manual 4-37 Item Locations Features Use the Item Locations function on the Information Inquiry menu to view location detail for items: location defaults, GL accounts, order quantities, item quantities, pricing, customer levels, quantity price breaks, and bin information. To add or change information, use the Item Locations function on the File Maintenance menu. Reports No report is associated with this function. Screen Use Screen Description Item Locations - Locations Use the Item Locations screen to view the locations set up for an item. Item Locations - General Use the General screen to view location defaults, GL accounts, order quantities, and item quantities. Item Locations - Unit Price Information Use the Unit Price Information screen to view unit price information and customer levels. Item Locations - Bin Information Use the Bin Information screen to view the bin numbers assigned to the item. View Price Information window Use the View Price Information window to view quantity price breaks for an item. Inventory User’s Manual 4-39 Item Locations Information Inquiry Item Locations - Locations Screen Field Definitions 4-40 Field Name Description Item ID Enter the ID of the item whose location information you want to view. Units Enter a unit of measure for the item you want to view. Inventory User’s Manual Information Inquiry Item Locations Command Bar Definitions Command Description Next Press N to view the next item location record on file. Prev Press P to view the previous item location record on file. Last Press L to view the last item location record on file. First Press F to view the first item location record on file. Item Press I to go to the Item ID field and enter a different item ID. Units Press U to go the Units field and enter a different unit of measure. General Press G to view general information about the item location. The General screen appears. Pricing Press R to view pricing information about the item location. The Unit Price Information screen appears. Bins Press B to view bin information about the item location. The Bin Information screen appears. Saving and Exiting To exit to the Information Inquiry menu, use the Exit (F7) command. Inventory User’s Manual 4-41 Item Locations Information Inquiry Item Locations - General Screen Field Definitions The information on the General screen comes from the Location Information screen in the File Maintenance Item Locations function. 4-42 Inventory User’s Manual Information Inquiry Item Locations Command Bar Definitions Command Description Next Press N to view the next item location record on file. Prev Press P to view the previous item location record on file. Last Press L to view the last item location record on file. First Press F to view the first item location record on file. Item Press I to go to the Item ID field and enter a different item ID. Locations Press O to view the other locations for the item. The Locations screen appears. Pricing Press R to view pricing information about the item location. The Unit Price Information screen appears. Bins Press B to view bin information about the item location. The Bin Information screen appears. Saving and Exiting To exit to the Information Inquiry menu, use the Exit (F7) command. Inventory User’s Manual 4-43 Item Locations Information Inquiry Item Locations - Unit Price Information Screen Field Definitions The information on this screen comes from the Price Information screen in the File Maintenance Item Locations function. 4-44 Inventory User’s Manual Information Inquiry Item Locations Command Bar Definitions Command Description Tab = Cust Lvl Press Tab to go to the Customer Levels or the Unit Price Information section of the screen. Next Press N to view the next item location record on file. Prev Press P to view the previous item location record on file. Last Press L to view the last item location record on file. First Press F to view the first item location record on file. Item Press I to go to the Item ID field and enter a different item ID. Locations Press O to view the other locations for the item. The Locations screen appears. General Press G to view general information about the item location. The General screen appears. Bins Press B to view bin information about the item location. The Bin Information screen appears. View Press V to view quantity price breaks for the item. The View Price Information window appears. Saving and Exiting To exit to the Information Inquiry menu, use the Exit (F7) command. Inventory User’s Manual 4-45 Item Locations Information Inquiry Item Locations - Bin Information Screen Field Definitions The information on this screen comes from the Bin Information screen in the File Maintenance Item Locations function. 4-46 Inventory User’s Manual Information Inquiry Item Locations Command Bar Definitions Command Description Next Press N to view the next item location record on file. Prev Press P to view the previous item location record on file. Last Press L to view the last item location record on file. First Press F to view the first item location record on file. Item Press I to go to the Item ID field and enter a different item ID. General Press G to view general information about the item location. The General screen appears. Pricing Press R to view pricing information about the item location. The Unit Price Information screen appears. Locations Press O to view the other locations for the item. The Item Locations screen appears. Saving and Exiting To exit to the Information Inquiry menu, use the Exit (F7) command. Inventory User’s Manual 4-47 Item Locations Information Inquiry View Price Information Window Field Definitions The information in the View Price Information window comes from the Edit Price Information window in the File Maintenance Item Locations function. Command Bar Definitions This window has no command bar. Saving and Exiting To exit to the Unit Price Information screen, press any key. 4-48 Inventory User’s Manual Costs and Vendors Features Use the Costs and Vendors function on the Information Inquiry menu to view an item’s costs and the vendors that are set up for each item location. Reports No report is associated with this function. Screen Use Screen Description Costs and Vendors - Cost Information Use the Costs Information screen to view an item’s costs, standard cost makeup, EOQ overrides, and cost detail. Costs and Vendors Vendor Information Use the Vendor Information screen to view vendors for the item location. View Price Information window Use the View Price Information window to view the last quantity purchased, cost, order number, and order date. You can also view quantity price breaks for vendors. Inventory User’s Manual 4-49 Costs and Vendors Information Inquiry Costs and Vendors - Cost Information Screen Field Definitions 4-50 Field Name Description Item ID Enter the ID of the item whose cost information you want to view. Location Enter the ID of the location for the item. Inventory User’s Manual Information Inquiry Costs and Vendors Command Bar Definitions Command Description Tab = Cost Detail Press Tab to view the Cost Detail or the Cost Information sections of the screen. Next Press N to view the next item location record on file. Prev Press P to view the previous item location record on file. Last Press L to view the last item location record on file. First Press F to view the first item location record on file. Item Press I to go to the Item ID field and enter a different item ID. Loca Press O to go to the Location field and enter a different location ID. Vendors Press V to view vendor information about the item location. The Vendor Information screen appears. Units Press U to go to the Units field and enter a different unit size. Saving and Exiting To exit to the Information Inquiry menu, use the Exit (F7) command. Inventory User’s Manual 4-51 Costs and Vendors Information Inquiry Costs and Vendors - Vendor Information Screen Field Definitions The information on this screen comes from the Vendor Information screen in the File Maintenance Item Locations function. 4-52 Inventory User’s Manual Information Inquiry Costs and Vendors Command Bar Definitions Command Description Next Press N to view the next item location record on file. Prev Press P to view the previous item location record on file. Last Press L to view the last item location record on file. First Press F to view the first item location record on file. Item Press I to go to the Item ID field and enter a different item ID. Location Press O to go to the Location field and enter a different location ID. Costs Press C to view cost information about the item. The Cost Information screen appears. View Press V to view vendor quantity breaks. The View Price Information window appears. Saving and Exiting To exit to the Information Inquiry menu, use the Exit (F7) command. Inventory User’s Manual 4-53 Costs and Vendors Information Inquiry View Price Information Window Field Definitions The information in the View Price Information window comes from the Edit Vendor Information window in the File Maintenance Item Locations function. Command Bar Definitions This window has no command bar. Saving and Exiting To exit to the Vendor Information screen, press any key. 4-54 Inventory User’s Manual 
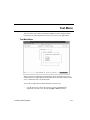
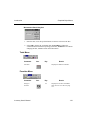
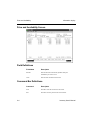
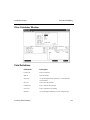
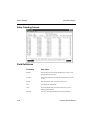
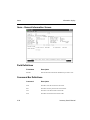
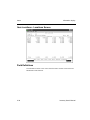
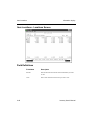
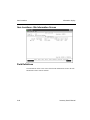
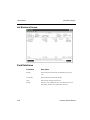
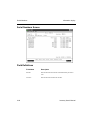
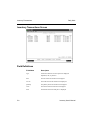
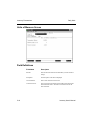
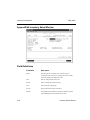
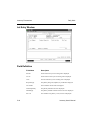
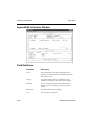
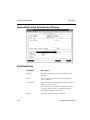
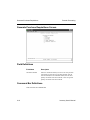
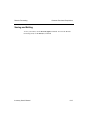
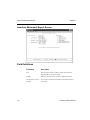
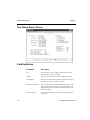
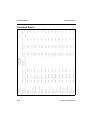
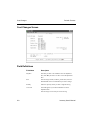
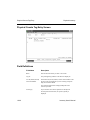
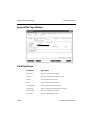
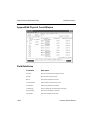
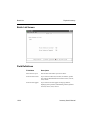
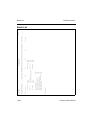
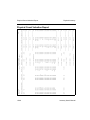
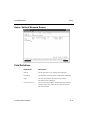
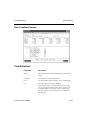
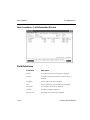
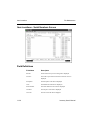
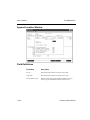
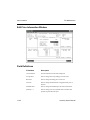
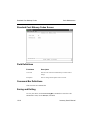
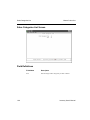
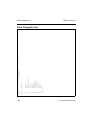
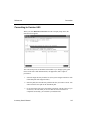
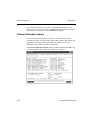
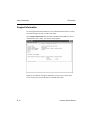
Lot Numbers Features Use the Lot Numbers function on the Information Inquiry menu to view the costs and quantities of lots and historical information if you keep lot history. Reports No report is associated with this function. Screen Use Screen Description Lot Numbers Use the Lot Numbers screen to view the lot numbers for the item, quantities available and on order, and the status of the lot. To add or change information on this screen, use the Item Locations function. Lot Inquiry Inventory User’s Manual Use the Lot Inquiry screen to view detailed information about historical lot transactions. 4-55 Lot Numbers Information Inquiry Lot Numbers Screen Field Definitions 4-56 Field Name Description Item ID Enter the ID of the item whose lot information you want to view. Location ID Enter the ID of the location for the item. Units Enter the unit of measure for the item. Include Enter A to view available lots, S to view sold lots, E to view expired lots, and L to view all the lots for the item. Inventory User’s Manual Information Inquiry Lot Numbers Command Bar Definitions Command Description Next Press N to view the next item location record on file. Prev Press P to view the previous item location record on file. Last Press L to view the last item location record on file. First Press F to view the first item location record on file. Item Press I to go to the Item ID field and enter a different item ID. Location Press O to go to the Location ID field and enter a different location ID. View Press V to view information about lot transactions. The Lot Inquiry screen appears. Saving and Exiting To exit to the Information Inquiry menu, use the Exit (F7) command. Inventory User’s Manual 4-57 Lot Numbers Information Inquiry Lot Inquiry Screen Field Definitions The information on the Lot Inquiry screen comes from the Lot Information screen in the File Maintenance Item Locations function. Command Bar This screen has no command bar. Saving and Exiting To exit to the Lot Numbers screen, press Enter. 4-58 Inventory User’s Manual Serial Numbers Features Use the Serial Numbers function on the Information Inquiry menu to look at costs, prices, and transaction information for serialized items. Reports No report is associated with this function. Screen Use Screen Description Serial Numbers Use the Serial Numbers screen to view the serial numbers for the item, costs and prices, and the status of the serial number. To add or change information on this screen, use the File Maintenance Item Locations function. View Serial Numbers window Inventory User’s Manual Use the View Serial Numbers window to view purchase and sales information about the serial numbers. 4-59 Serial Numbers Information Inquiry Serial Numbers Screen Field Definitions 4-60 Field Name Description Item ID Enter the ID of the item whose serial information you want to view. Location Enter the ID of the location for the item. Inventory User’s Manual Information Inquiry Serial Numbers Command Bar Definitions Command Description Next Press N to view the next item location record on file. Prev Press P to view the previous item location record on file. Last Press L to view the last item location record on file. First Press F to view the first item location record on file. Item Press I to go to the Item ID field and enter a different item ID. Location Press O to go to the Location field and enter a different location ID. View Press V to view information about sales and purchases of serialized items. The View Serial Numbers window appears. Saving and Exiting To exit to the Information Inquiry menu, use the Exit (F7) command. Inventory User’s Manual 4-61 Serial Numbers Information Inquiry View Serial Numbers Window Field Definitions The information in the View Serial Numbers window comes from the Serial Numbers screen in the File Maintenance Item Locations function. Command Bar This screen has no command bar. Saving and Exiting To exit to the Serial Numbers screen, press any key. 4-62 Inventory User’s Manual Inventory User’s Manual Daily Work Inventory Transactions Location Transfers Transactions Journal Transfers Journal Inventory User’s Manual 5 5-3 5-37 5-55 5-59 5-1 Inventory Transactions Features If Inventory is being used as a standalone system, use the Inventory Transactions function on the Daily Work menu for the following purposes: • • • • to adjust quantities to reflect sales after you sell an item to reflect transfers after you transfer an item to reflect purchases after you purchase an item, place an order, or receive an item If Accounts Payable/Purchase Order are interfaced with Inventory, Inventory transactions are updated automatically. If Accounts Receivable/Sales Order are interfaced with Inventory, Inventory transactions are updated when you post. If you have these applications, use the Inventory Transactions function only to make corrections. You cannot make adjustments for service items. Reports To produce a list of transactions for a period, use the Transaction History Report function on the Reports menu. Screen Use Screen Description Inventory Transactions Use the Inventory Transactions screen to choose a transaction type. All the transactions are listed on this screen before you post. If you want to delete a transaction that is associated with a lot or serial number, you must first delete the lot or serial numbers associated with that transaction. Inventory User’s Manual 5-3 Inventory Transactions 5-4 Daily Work Screen Description Inventory Items Use the Inventory Items screen to add an item ID and information about that item or to maintain information about an item. Units of Measure Use the Units of Measure screen to add or change units of measure for an item. Append/Edit Inventory Adjustments window Use the Append/Edit Inventory Adjustments window to add or edit an adjustment. You can increase or decrease the onhand quantity of an item. Append/Edit Inventory Sales window Use the Append/Edit Inventory Sales window to add or edit a sales transaction. You can enter a new order, an invoice, or a miscellaneous credit, and verify an order. Append/Edit Inventory Purchases window Use the Append/Edit Inventory Purchases window to add or edit a purchase transaction. You can enter a new order, goods received, an invoice, and a miscellaneous debit. Lot Entry window The Lot Entry window appears if you are tracking lots for an item. Use it to enter adjustments, sales, or purchases. Append/Edit Lot Number window Use the Append/Edit Lot Number window to add lot numbers to a transaction or to edit lot numbers associated with a transaction. Serial Number Entry window The Serial Number Entry window appears if you are working with a serialized item. Use it to enter adjustments, sales, or purchases. Append/Edit Serial Number window Use the Append/Edit Serial Number window to add serial numbers to a transaction or to edit serial numbers associated with a transaction. Serial/Lot Number Entry window The Serial/Lot Number Entry window appears if you are working with an item that is both lotted and serialized and you use the serial/lot entry method to enter transactions. Use it to enter adjustments, sales, or purchases for lotted and serialized items. Inventory User’s Manual Daily Work Inventory Transactions Screen Description Append/Edit Lotted Serial Number window Use the Append/Edit Lotted Serial Number window to add or edit serialized and lotted items, using the serial/lot entry method. Lot/Serial Number Entry window Use the Lot/Serial Number Entry window if you are working with an item that is both lotted and serialized and you use the lot/serial entry method to enter transactions. Use it to enter adjustments, sales, or purchases for lotted and serialized items. Append/Edit Lotted Serial Number window Use the Append/Edit Lotted Serial Number window to add lotted and serialized items, using the lot/serial entry method. Alternate Items and Locations window The Alternate Items and Locations window appears if you entered a quantity greater than the quantity at the location you are working with. This screen is display-only and shows the quantities available at other locations and alternate items for the item. (The alternate items must have been set up on the Alternate Items screen in the Items function.) This screen appears only for sales transactions. Inventory User’s Manual 5-5 Inventory Transactions Daily Work Inventory Transactions Screen Field Definitions 5-6 Field Name Description Type Transactions that have not been posted are displayed: adjustment, sale, or purchase. Item The item used in the transaction is displayed. Loc ID The location used in the transaction is displayed. Quantity The quantity used in the transaction is displayed. Units The units used in the transaction are displayed. Date The date the transaction took place is displayed. Inventory User’s Manual Daily Work Inventory Transactions Field Name Description Stat The status of the transaction is displayed: • • • • • • • • • • Adjustment 1 - Increase Adjustment 2 - Decrease Sale 1 - New Order Sale 3 - Verify Order Sale 4 - Invoice Sale 5 - Miscellaneous Credit Purchase 1 - New Order Purchase 2 - Goods Received Purchase 4 - Invoice Purchase 5 - Miscellaneous Debit Command Bar Definitions Command Description Enter = edit Move the prompt (>) to the line you want to edit and press Enter. Adjustment Press A to add or edit an adjustment. The Append/Edit Inventory Adjustments window appears. Sale Press S to add or edit a sale. The Append/Edit Inventory Sales window appears. Purchase Press P to add or edit a purchase. The Append/Edit Inventory Purchases window appears. Saving and Exiting This screen is display-only; information is saved through the windows. To exit to the Daily Work menu, use the Exit (F7) command. Inventory User’s Manual 5-7 Inventory Transactions Daily Work Inventory Items Screen Field Definitions 5-8 Field Name Description Item ID Enter the ID of the item whose information you want to add or change. Description Enter a description of the item. Status Enter or change the status of the item: Active Discontinued Superseded Obsolete Item Type Enter 1 if the item is nonserialized, 2 if the item is serialized, or 3 if the item is a service. Item Price ID Enter or change the price ID. Inventory User’s Manual Daily Work Inventory Transactions Field Name Description Track Lots? If you want to track lots for the item, enter Y; if not, enter N. Kitted Item? If the item is a kit, enter Y; if not, enter N. Sales Category Enter or change the sales category for the item. Product Line Enter or change the product line for the item. Base UOM Enter or change the base unit of measure at which the item is most often sold or picked from stock. Tax Class Enter or change the tax class the item belongs to. Location Enter or change the location of the item you want to work with. Bin No. Enter or change the number of the bin where the item is stored. Price ID Enter or change the price ID for the item at the location level. Status Enter or change the status of the item at the location: Active Discontinued Superseded Obsolete Base Cost Enter or change the base cost of the item. GL Code Enter or change the general ledger account code you want to use. Command Bar Definitions This screen has no command bar. Saving and Exiting To save your entries and exit to the transaction screen you were working with, use the Proceed (PgDn) command. To exit to the transaction screen you were working with without saving your entries, use the Exit (F7) command. Inventory User’s Manual 5-9 Inventory Transactions Daily Work Units of Measure Screen Field Definitions 5-10 Field Name Description Item ID Enter the ID of the item whose information you want to add or change. Description The description of the item is displayed. Unit of Measure Enter a unit of measure for the item. Conversion Factor The conversion factor tells the system what portion of the base unit the alternate unit is. Enter the conversion factor for the unit of measure. Inventory User’s Manual Daily Work Inventory Transactions Field Name Description Penalty Type The penalty type determines the price adjustment when fractional parts of a unit are sold. A penalty expressed as a percentage applies to the fractional part of the units sold, resulting in a unit penalty for fractional quantities sold. A penalty expressed as a dollar amount applies to the inventory item, regardless of the quantity sold, resulting in a penalty per sale rather than per unit. To charge a percentage that applies to the fraction of the units sold, enter %. To charge a dollar amount that applies to the entire sale, enter $. Penalty Amount Enter the percentage or dollar amount of the penalty. Command Bar Definitions This screen has no command bar. Saving and Exiting To save your entries and exit to the transaction screen you were working with, use the Proceed (PgDn) command. To exit to the transaction screen you were working with without saving your entries, use the Exit (F7) command. Inventory User’s Manual 5-11 Inventory Transactions Daily Work Append/Edit Inventory Adjustments Window Field Definitions 5-12 Field Name Description Status To make an adjustment that increases the quantity available, enter I. To decrease the quantity available, enter D. Date Enter or change the date of the adjustment. Period Enter or change the period of the adjustment. Year The current year is displayed. Loc ID Enter the ID of the location of the item. Item ID Enter the ID of the item whose quantity you want to adjust. The quantity on hand and available appear at the bottom of the screen. Inventory User’s Manual Daily Work Inventory Transactions Field Name Description Adjust Acct If the adjustment is an increase in inventory, enter a credit account. If the adjustment is a decrease in inventory, enter a debit account. Quantity Enter or change the quantity you want to adjust. Units Enter the unit of measure you want to work with. Cost Enter or change the cost of the item. Ext Cost The extended cost (quantity x cost) is displayed. Comment Enter additional information about the transaction. Command Bar Definitions This window has no command bar. Saving and Exiting To save your entries and exit to the Inventory Transactions screen, use the Proceed (PgDn) command. To exit to the Inventory Transactions screen without saving your entries, use the Exit (F7) command. Inventory User’s Manual 5-13 Inventory Transactions Daily Work Append/Edit Inventory Sales Window Field Definitions 5-14 Field Name Description Status Enter N if you are recording a new order, V if you are verifying an order, I if you are recording an invoice, or M if you are recording a miscellaneous credit. Date Enter or change the date of the sale. Period Enter or change the period of the sale. Year The current year is displayed. Loc ID Enter the ID of the location of the item. Item ID Enter the ID of the item that was sold. The quantity on hand and available appear at the bottom of the screen. Inventory User’s Manual Daily Work Inventory Transactions Field Name Description Price ID Enter the price ID for the item. Cust Level Enter the customer level for the item. Adjust Acct If the adjustment is an increase in inventory, enter a credit account. If the adjustment is a decrease in inventory, enter a debit account. If you are entering a new order, this field is skipped. Quantity Enter or change the quantity that was sold. Units Enter the unit of measure you want to work with. Cost The cost of the item is displayed. Price Enter or change the price of the item that was sold. Ext Cost The extended cost (quantity x cost) is displayed. Ext Price The extended price (quantity x price) is displayed. Comment Enter additional information about the transaction. Command Bar Definitions This window has no command bar. Saving and Exiting To save your entries and exit to the Inventory Transactions screen, use the Proceed (PgDn) command. To exit to the Inventory Transactions screen without saving your entries, use the Exit (F7) command. Inventory User’s Manual 5-15 Inventory Transactions Daily Work Append/Edit Inventory Purchases Window Field Definitions 5-16 Field Name Description Status Enter N if you are recording a new order, G if you are recording goods received, I if you are recording an invoice, or M if you are recording a miscellaneous debit. Date Enter or change the date of the purchase. Period Enter or change the period of the purchase. Year The current year is displayed. Loc ID Enter the ID of the location of the item. Item ID Enter the ID of the item that was purchased. The quantity on hand and available appear at the bottom of the screen. Inventory User’s Manual Daily Work Inventory Transactions Field Name Description Adjust Acct If the adjustment is an increase in inventory, enter a credit account. If the adjustment is a decrease in inventory, enter a debit account. If you are entering a new order, this field is skipped. Quantity Enter or change the quantity that was purchased. Units Enter or change the unit of measure. Cost The last cost of the item is displayed. Std Cost If you use the standard costing method, the standard cost is displayed. Ext Cost The extended cost (quantity x cost) is displayed. Ext Std The extended standard cost (quantity x standard cost) is displayed. Comment Enter additional information about the transaction. Command Bar Definitions This window has no command bar. Saving and Exiting To save your entries and exit to the Inventory Transactions screen, use the Proceed (PgDn) command. To exit to the Inventory Transactions screen without saving your entries, use the Exit (F7) command. Inventory User’s Manual 5-17 Inventory Transactions Daily Work Lot Entry Window Field Definition 5-18 Field Name Description Item ID The ID of the item you are working with is displayed. Loc ID The ID of the location you are working with is displayed. Units The unit of measure you are working with is displayed. Requested Qty The quantity being sold, adjusted, or purchased is displayed. Lot Number The lot numbers for the item are displayed. Ordered Quantity The quantity ordered for the lot is displayed. Fulfilled Qty The quantity available to fill the order for the lot is displayed. Ext Cost The extended cost (quantity x cost) of the lot is displayed. Inventory User’s Manual Daily Work Inventory Transactions Command Bar Definitions Command Definition Enter = edit Move the prompt (>) to the line you want to edit and press Enter. The Edit Lot Number window appears. Append Press A to add lot numbers to the item. The Append Lot Number window appears. Done Press D to save your entries when you are finished adding or editing information about lots. Saving and Exiting To save your entries and exit to the transaction window you were working with, press D. Inventory User’s Manual 5-19 Inventory Transactions Daily Work Append/Edit Lot Number Window Field Definitions 5-20 Field Name Description Lot No Enter the lot number of the item being adjusted, sold, or purchased. The quantity on hand and available appear at the bottom of the screen. Orig Qty The original quantity of the lot is displayed. If you are entering a new purchase or sales order, enter the quantity. Fulfill Qty Enter or change the quantity of the lot needed to fill the transaction. If you are entering a new order, this field is skipped. Backord Qty The quantity on backorder is displayed. Cost The cost of the lot is displayed. Inventory User’s Manual Daily Work Inventory Transactions Field Name Description Ext Cost The extended cost (quantity x cost) is displayed. Comment Enter additional information about the lot. Command Bar Definitions This window has no command bar. Saving and Exiting To save your entries and exit to the Lot Entry window, use the Proceed (PgDn) command. Inventory User’s Manual 5-21 Inventory Transactions Daily Work Serial Number Entry Window Field Definitions 5-22 Field Name Description Item ID The ID of the item you are working with is displayed. Loc ID The ID of the location you are working with is displayed. Units The unit of measure you are working with is displayed. Requested Qty The quantity being sold, adjusted, or purchased is displayed. Serial Number The serial numbers for the item are displayed. Unit Cost The unit cost of the serialized item is displayed. Unit Price The unit price of the serialized item is displayed. Inventory User’s Manual Daily Work Inventory Transactions Command Bar Definitions Command Definition Enter = edit Move the prompt (>) to the line you want to edit and press Enter. The Edit Serial Number window appears. Append Press A to add lot numbers to the item. The Append Serial Number window appears. Done Press D to save your entries when you are finished adding or editing information about serial numbers. Saving and Exiting To save your entries and exit to the transaction window you were working with, press D. To exit to the transaction window you were working with without saving your changes, use the Exit (F7) command. Inventory User’s Manual 5-23 Inventory Transactions Daily Work Append/Edit Serial Number Window Field Definitions Field Name Description Serial No Enter the serial number of the item being adjusted, sold, or purchased. Auto Generate? This field appears if you entered goods received or a purchase transaction with invoice status. If you want the system to generate serial numbers, enter Y; if not, enter N. When you enter Y, the maximum number of serial numbers available to order appears. 5-24 Orig Qty The original quantity of the serialized items is displayed. Fulfill Qty If you entered Y in the Auto Generate field, enter the quantity of serial numbers you are purchasing. Inventory User’s Manual Daily Work Inventory Transactions Field Name Description Backord Qty The quantities on backorder are displayed. Cost Enter or change the cost of the serialized item. Ext Cost The extended cost (quantity x cost) is displayed. Price This field appears for sales transactions. Enter the price of the serialized item. Ext Price This field appears for sales transactions. The extended price is displayed. Comment Enter additional information about the serialized item. Command Bar Definitions This window has no command bar. Saving and Exiting To save your entries and exit to the Serial Number Entry window, use the Proceed (PgDn) command. To exit to the Serial Number Entry window without saving your entries, use the Exit (F7) command. Inventory User’s Manual 5-25 Inventory Transactions Daily Work Serial/Lot Number Entry Window Field Definitions 5-26 Field Name Description Item ID The ID of the item you are working with is displayed. Loc ID The ID of the location you are working with is displayed. Units The unit of measure you are working with is displayed. Requested Qty The quantity being sold, adjusted, or purchased is displayed. Serial Number The serial numbers for the item are displayed. Unit Cost The unit cost of the serialized item is displayed. Unit Price The unit price of the serialized item is displayed. Inventory User’s Manual Daily Work Inventory Transactions Command Bar Definitions Command Definition Enter = edit Move the prompt (>) to the line you want to edit and press Enter. The Edit Lotted Serial Number window appears. Append Press A to add lot numbers to the item. The Append Lotted Serial Number window appears. Done Press D to save your entries when you are finished adding or editing information about serial numbers. Saving and Exiting To save your entries and exit to the transaction window you were working with, press D. Inventory User’s Manual 5-27 Inventory Transactions Daily Work Append/Edit Lotted Serial Number Window Field Definitions Field Name Description Serial No Enter the serial number of the item being adjusted, sold, or purchased. Lot No Enter or change the lot number of the item being adjusted, sold, or purchased. Auto Generate? This field appears if you entered goods received or a purchase transaction with invoice status. If you want the system to generate serial numbers, enter Y; if not, enter N. When you enter Y, the maximum number of serial numbers available to order appears. Orig Qty 5-28 The original quantity of the item is displayed. Inventory User’s Manual Daily Work Inventory Transactions Field Name Description Fulfill Qty The quantity needed to fill the transaction is displayed. Backord Qty The quantity on backorder is displayed. Cost Enter or change the cost of the item. Comment Enter additional information about the serialized/lotted item. Command Bar Definitions This window has no command bar. Saving and Exiting To save your entries and exit to the Lot/Serial Number Entry window, use the Proceed (PgDn) command. To exit to the Lot/Serial Number Entry window without saving your entries, use the Exit (F7) command. Inventory User’s Manual 5-29 Inventory Transactions Daily Work Lot/Serial Number Entry Window Field Definitions 5-30 Field Name Description Item ID The ID of the item you are working with is displayed. Loc ID The ID of the location you are working with is displayed. Units The unit of measure you are working with is displayed. Lot No Enter the lot number of the serialized item. Lot Qty The quantity in the lot for the transaction is displayed. Tot Qty The total quantity of the lot is displayed. Serial Number The serial numbers that are in the lot are displayed. Unit Cost The unit cost of the serialized item is displayed. Inventory User’s Manual Daily Work Inventory Transactions Field Name Description Unit Price The unit price of the serialized item is displayed. Command Bar Definitions Command Definition Enter = edit Move the prompt (>) to the line you want to edit and press Enter. The Edit Lotted Serial Number window appears. Append Press A to add lot numbers to the item. The Append Lotted Serial Number window appears. Lot number Press L to enter a different lot number. Done Press D to save your entries when you are finished adding or editing information about serial numbers. Saving and Exiting To save your entries and exit to the transaction screen you were working with, press D. Inventory User’s Manual 5-31 Inventory Transactions Daily Work Append/Edit Lotted Serial Number Window Field Definitions Field Name Description Serial No Enter the serial number of the item being adjusted, sold, or purchased. Auto Generate? This field appears if you entered goods received or a purchase transaction with invoice status. If you want the system to generate serial numbers, enter Y; if not, enter N. When you enter Y, the maximum number of serial numbers available to order appears. 5-32 Orig Qty The original quantity of the item is displayed. Fulfill Qty The quantity needed to fill the transaction is displayed. Backord Qty The quantity on backorder is displayed. Inventory User’s Manual Daily Work Inventory Transactions Field Name Description Cost Enter or change the cost of the item. Price This field appears for sales transactions. Enter the price of the serialized item. Comment Enter additional information about the lotted/serialized item. Command Bar Definitions This window has no command bar. Saving and Exiting To save your entries and exit to the Lot/Serial Number Entry window, use the Proceed (PgDn) command. To exit to the Lot/Serial Number Entry window without saving your entries, use the Exit (F7) command. Inventory User’s Manual 5-33 Inventory Transactions Daily Work Alternate Items and Locations Window Field Definitions 5-34 Field Name Description Original Item ID The ID of the item you are working with is displayed. Original Location ID The ID of the location you are working with is displayed. Item Number If you set up alternate items for the item you are working with, the item number is displayed. Item Description The description of the alternate item is displayed. Loc ID The ID of the location of the alternate item is displayed. Qty The available quantity of the alternate item is displayed. Units The unit of measure for the alternate item is displayed. Inventory User’s Manual Daily Work Inventory Transactions Field Name Description Loc ID The ID of the alternate location where the items can be found is displayed. Item Description The description of the item is displayed. Qty The quantity of the item at the alternate location is displayed. Units The unit of measure at the alternate location is displayed. Command Bar Definitions Command Definition Tab = Alternate Locations/Alternate Items Press Tab to toggle between the Alternate Locations and the Alternate Items sections of the screen. Done Press D when you are finished viewing the available quantities at alternate locations. Saving and Exiting To exit to the transaction screen you were working with, press D or use the Exit (F7) command. Inventory User’s Manual 5-35 Location Transfers Features Use the Location Transfers function on the Daily Work menu to move items from one location to another. Before you can transfer an item, you must set up the item in the destination location. Reports To produce a list of the information entered on the Location Transfers screen, use the Transfers Journal function on the Daily Work menu. Screen Use Screen Description Location Transfers Use the Location Transfers screen to add or edit a transfer. Append/Edit Transfer window Use the Append/Edit Transfer window to enter information about the location you are transferring items from and to enter transfer costs. Lot Entry window The Lot Entry window appears if you are tracking lots for the item you are transferring. Use it to indicate whether you want to add or edit a lot number. Append/Edit Lot Number window Use the Append/Edit Lot Number window to add or edit lot numbers. Serial Number Entry window The Serial Number Entry window appears if you are working with a serialized item. Use it to indicate whether you want to add or edit a serial number. Append/Edit Serial Number window Use the Append/Edit Serial Number window to add or edit serial numbers. Serial/Lot Number Entry window Use the Serial/Lot Number Entry window to enter location transfers for lotted and serialized items. Append/Edit Lotted Serial Number window Use the Append/Edit Lotted Serial Number window to add or edit serialized and lotted items. Inventory User’s Manual 5-37 Location Transfers Daily Work Location Transfers Screen Field Definitions 5-38 Field Name Description Type The location that the item was transferred from is displayed in the transfer Type From field. The location that the item was transferred to is displayed in the transfer Type To field. Item The ID of the item being transferred is displayed. Loc ID The IDs of the locations you are transferring the item from and to are displayed. Quantity The quantity that was transferred is displayed. Units The unit of measure for the item that was transferred is displayed. Inventory User’s Manual Daily Work Location Transfers Field Name Description Trans Date The date of the transfer is displayed. Command Bar Definitions Command Description Enter = edit Move the prompt (>) to the transfer you want to edit and press Enter. The Edit Transfer window appears. Append Press A to add a location transfer. The Append Transfer window appears. Saving and Exiting This screen is display-only; information is saved through the windows. To exit to the Daily Work menu, use the Exit (F7) command. Inventory User’s Manual 5-39 Location Transfers Daily Work Append/Edit Transfer Window Field Definitions 5-40 Field Name Description From Location Enter or change the ID of the location you are transferring the item from. Item ID Enter or change the number of the item you want to transfer. Quantity Enter or change the quantity you are transferring. Units Enter the unit of measure you want to work with. Unit Cost The unit cost (unit cost x quantity) of the item you are transferring is displayed. Extended Cost The total cost (item cost x quantity) of the item you are transferring is displayed. Inventory User’s Manual Daily Work Location Transfers Field Name Description To Location Enter or change the ID of the location you are transferring the item to. Item ID Enter or change the ID of the item you are transferring. Qty Before The on-hand quantity of the item in the destination location before the transfer is displayed. Qty After The on-hand quantity of the item in the destination location after the transfer is displayed. Transfer Cost Enter or change the cost of the transfer (shipping, handling, packaging). Transaction Date Enter or change the date of the transfer. Period Enter or change the period you want to post the transfer cost to. Year Enter or change the year of the transfer. Comment Enter additional information about the transfer. Command Bar Definitions This window has no command bar. Saving and Exiting To save your entries and exit to the Location Transfers screen, use the Proceed (PgDn) command. To exit to the Location Transfers screen without saving your entries, use the Exit (F7) command. Inventory User’s Manual 5-41 Location Transfers Daily Work Lot Entry Window Field Definitions 5-42 Field Name Description From Item ID The ID of the transferred item is displayed. From Loc ID The ID of the location the item is being transferred from is displayed. Units The unit of measure for the item is displayed. To Item ID The ID of the transferred item is displayed. To Loc ID The ID of the location the item is being transferred to is displayed. Requested Qty The quantity that is being transferred is displayed. Source Lot Number The lot that the item is being transferred from is displayed. Inventory User’s Manual Daily Work Location Transfers Field Name Description Dest. Lot Number The lot that the item is being transferred to is displayed. Ext Cost The total cost (item cost x quantity) is displayed. Command Bar Definitions Command Description Enter = edit Move the prompt (>) to the lot number you want to edit and press Enter. The Edit Lot Number window appears. Append Press A to add a lot number. The Append Lot Number window appears. Done Press D to go to the Location Transfers screen. Saving and Exiting To exit to the Location Transfers screen, press D or use the Exit (F7) command. Inventory User’s Manual 5-43 Location Transfers Daily Work Append/Edit Lot Number Window Field Definitions 5-44 Field Name Description Source Lot Enter or change the number of the lot you are transferring the item from. Destination Lot Enter or change the number of the lot you are transferring the item to. Quantity Enter or change the quantity of the item being transferred from the lot. Trans Cost Enter or change the cost of transferring the quantity of items from the lot. Comment Enter additional information about the quantity being transferred from the lot. Inventory User’s Manual Daily Work Location Transfers Field Name Description Cost The cost of the lotted item being transferred is displayed. Ext Cost The total cost (quantity x cost) of the lotted items being transferred is displayed. Command Bar Definitions This window has no command bar. Saving and Exiting To save your entries and exit to the Lot Entry window, use the Proceed (PgDn) command. To exit to the Lot Entry window without saving your entries, use the Exit (F7) command. Inventory User’s Manual 5-45 Location Transfers Daily Work Serial Number Entry Window Field Definitions 5-46 Field Name Description From Item ID The ID of the transferred item is displayed. From Loc ID The ID of the location the item is being transferred from is displayed. Units The unit of measure for the item is displayed. To Item ID The ID of the transferred item is displayed. To Loc ID The ID of the location the item is being transferred to is displayed. Requested Qty The quantity that is being transferred is displayed. Serial Number The serial number of the transferred item is displayed. Inventory User’s Manual Daily Work Location Transfers Field Name Description Unit Cost The unit cost of the serialized item is displayed. Command Bar Definitions Command Description Enter = edit Move the prompt (>) to the serial number you want to edit and press Enter. The Edit Serial Number window appears. Append Press A to add a serial number. The Append Serial Number window appears. Done Press D to go to the Location Transfers screen. Saving and Exiting To exit to the Location Transfers screen, press D or use the Exit (F7) command. Inventory User’s Manual 5-47 Location Transfers Daily Work Append/Edit Serial Number Window Field Definitions 5-48 Field Name Description Serial Number Enter or change the serial number you are transferring from. Cost The cost of the serialized item is displayed. Trans Cost Enter or change the cost of transferring the serialized item. Comment Enter additional information about the serialized item being transferred. Inventory User’s Manual Daily Work Location Transfers Command Bar Definitions This window has no command bar. Saving and Exiting To save your entries and exit to the Serial Number Entry window, use the Proceed (PgDn) command. To exit to the Serial Number Entry window without saving your entries, use the Exit (F7) command. Inventory User’s Manual 5-49 Location Transfers Daily Work Serial/Lot Number Entry Window Field Definitions 5-50 Field Name Description From Item ID The ID of the transferred item is displayed. From Loc ID The ID of the location the item is being transferred from is displayed. Units The unit of measure of the item is displayed. To Item ID The ID of the transferred item is displayed. To Loc ID The ID of the location the item is being transferred to is displayed. Requested Qty The quantity that is being transferred is displayed. Serial Number The serial number of the transferred item is displayed. Inventory User’s Manual Daily Work Location Transfers Field Name Description Unit Cost The unit cost of the serialized item is displayed. Command Bar Definitions Command Description Enter = edit Move the prompt (>) to the lot number you want to edit and press Enter. The Edit Lotted Serial Number window appears. Append Press A to add a lot number. The Append Lotted Serial Number window appears. Done Press D to go to the Location Transfers screen. Saving and Exiting To exit to the Location Transfers screen, press D or use the Exit (F7) command. Inventory User’s Manual 5-51 Location Transfers Daily Work Append/Edit Lotted Serial Number Window Field Definitions Field Name Description Serial Number Enter or change the serial number in the lot. Source Lot Enter the lot the serial number is being transferred from. Destination Lot Enter the lot the serial number is being transferred to. Cost The cost of the lotted/serialized item is displayed. Trans Cost Enter the cost of transferring the item to the destination lot. Comment Enter additional information about the serialized item being transferred. Command Bar Definitions 5-52 Inventory User’s Manual Daily Work Location Transfers This window has no command bar. Saving and Exiting To save your entries and exit to the Serial/Lot Number Entry window, use the Proceed (PgDn) command. To exit to the Serial/Lot Number Entry window without saving your entries, use the Exit (F7) command. Inventory User’s Manual 5-53 Transactions Journal Features Use the Transactions Journal function on the Daily Work menu to print transactions that were entered in the Inventory Transactions function. Reports A sample Transactions Journal is on page 5-58. Screen Use Screen Description Transactions Journal Use the Transactions Journal screen to select the locations, items, and types of transactions that you want in the journal. Inventory User’s Manual 5-55 Transactions Journal Daily Work Transactions Journal Screen Field Definitions 5-56 Field Name Description Pick Enter the range of locations and items whose information you want in the journal. Print By Select the option by which you want to organize the journal. Print adjustments? If you want the journal to include adjustment transactions, enter Y; if not, enter N. Print sales? If you want the journal to include sales transactions, enter Y; if not, enter N. Inventory User’s Manual Daily Work Transactions Journal Field Name Description Print purchases? If you want the journal to include purchase transactions, enter Y; if not, enter N. Command Bar Definitions Command Description Printer Select P to send the journal to a printer. File Select F to send the journal to a file. Screen Select S to send the journal to the screen. End Select E to change your selections or exit to the Daily Work menu. Saving and Exiting After the journal is produced, the Daily Work menu appears. Inventory User’s Manual 5-57 5-58 Builders Supply Transaction Journal Print By Item/Location Page 1 MN0001 SO Order MN0001 PO Order 100 Electrical Package 100 Electrical Package 1.0000 PKG 1.0000 PKG 1.0000 PKG Builders Supply Transaction Journal Print By Item/Location 000008 08/07/1995 08 1995 ACE001 BUILD 000010 08/07/1995 08 1995 000007 08/07/1995 08 1995 343.5500 343.55 343.5500 343.55 343.5500 343.55 .0000 .00 422.8320 422.83 .0000 .00 .0000 .00 .0000 .00 .0000 .00 Page 2 End of Report Increase Adjustment Totals Decrease Adjustment Totals New Order Totals (AR) Verify Order Totals AR Invoice Totals Miscellaneous Credit Totals New Order Totals (AP) Goods Received Totals AP Invoice Totals Miscellaneous Debit Totals 343.55 .00 343.55 .00 .00 .00 343.55 .00 .00 .00 422.83 .00 .00 .00 Transaction Type Extended Cost Extended Price ---------------------------------------------------------------------------------------------------------------------------------- 08/07/1995 3:45 PM MN0001 Adj Incr 100 Electrical Package Item ID Loc ID Type Seq. No. Trans. Date Quantity Unit Cost Unit Price Std. Cost Description Pd Year Units Ext Cost Ext. Price Ext Std. Comment Cust Level Price ID ---------------------------------------------------------------------------------------------------------------------------------- 08/07/1999 3:45 PM Transactions Journal Daily Work Transactions Journal Inventory User’s Manual Transfers Journal Features Use the Transfers Journal function on the Daily Work menu to print the transfers that were entered in the Location Transfers function. Reports A sample Transfers Journal is on page 5-62. Screen Use Screen Description Transfers Journal Use the Transfers Journal screen to select the locations and items that you want in the journal. Inventory User’s Manual 5-59 Transfers Journal Daily Work Transfers Journal Screen Field Definitions 5-60 Field Name Description Pick Enter the range of locations and items whose information you want in the journal. Print By Select the option by which you want to organize the journal. Inventory User’s Manual Daily Work Transfers Journal Command Bar Definitions Command Description Printer Select P to send the journal to a printer. File Select F to send the journal to a file. Screen Select S to send the journal to the screen. End Select E to change your selections or exit to the Daily Work menu. Saving and Exiting After the journal is produced, the Daily Work menu appears. Inventory User’s Manual 5-61 5-62 Builders Supply Transfers Journal Print By Item/Location Page 1 From Lot 120195 700500 Series Number To Lot 120195 MN0002 Serial Number 1/1000 700500 CA0001 06/15/1995 06 1995 000003 1.0000 1.0000 EA .0000 .0000 .0000 .00 .0000 .00 .0000 .00 .0000 .00 .0000 .00 From Item ID Loc ID To Item ID Loc ID Trans. Date Quantity Fr. Unit Cost Unit Trans. To Unit Cost Description Pd Year Units Fr. Ext Cost Ext. Trans. To Ext. Cost Comment Seq. No. ---------------------------------------------------------------------------------------------------------------------------------- 06/15/1999 12:13 PM Transfers Journal Daily Work Transfers Journal Inventory User’s Manual Post Transactions Features Use the Post Transactions function on the Daily Work menu to post adjustments, sales, purchases, and transfers. Before you post, complete the following tasks: • If you have a multiuser system, make sure that no one else is using the Inventory system. • Print the Transactions Journal. • Back up all the data files. Reports A sample posting log is on page 5-66. Screen Use Screen Description Post Transactions Use the Post Transactions screen to select what you want to post and the fiscal year you want to post to. Inventory User’s Manual 5-63 Post Transactions Daily Work Post Transactions Screen Field Definitions Field Name Description Have You Enter Y or N to indicate whether or not you have printed the Transactions Journal and backed up your data files. If you enter N, the Daily Work menu appears. Post transactions, transfers, or both? Enter T to post transactions, R to post transfers, or B to post both transactions and transfers. Post To If Inventory is not interfaced with General Ledger or if you have not created last-year data in General Ledger, 1 is displayed. If Inventory is interfaced with General Ledger and you have created last-year data in General Ledger, select 1 to post to the current-year GLJRxxx file or 2 to post to the last-year GLJRxxx file. 5-64 Inventory User’s Manual Daily Work Post Transactions Command Bar Definitions Command Description Printer Select P to send the log to a printer. File Select F to send the log to a file. End Select E to change your selections or exit to the Daily Work menu. Saving and Exiting After the log is produced, the Daily Work menu appears. Inventory User’s Manual 5-65 5-66 Builders Supply Post Transactions End of Report GL Balance 820001 820001 820002 820002 820003 820003 820004 820004 820005 820005 100 100 700 700 MN0001 MN0001 MN0001 MN0001 MN0001 MN0001 MN0001 MN0001 MN0001 MN0001 MN0001 MN0001 MN0001 MN0002 Purchase Purchase Purchase Purchase Purchase Purchase Purchase Purchase Purchase Purchase Adjustment Adjustment Transfer From Transfer To 104400 100500 104400 100500 104400 100500 104400 100500 104400 100500 104400 101000 104400 104400 343.55 201.58 74.50 189.00 357.50 221.00 275.00 201.58 ======================================= 1662.13 1662.13 343.55 74.50 189.00 357.50 221.00 275.00 Item ID Loc. ID Trans. Type GL Account Debit Credit ------------------------------------------------------------------------------------------------------ 08/07/1999 3:47 PM PAGE 1 Post Transactions Daily Work Post Transactions Log Inventory User’s Manual GL Adjustments Journal Features Use the GL Adjustments Journal function on the Daily Work menu to list COGS adjustments in the INCJxxx (COGS Journal) file. If Accounts Payable/Purchase Order are interfaced with Inventory, COGS adjustments from those applications are also posted through this function. Reports A sample GL Adjustments Journal is on page 5-70. Screen Use Screen Description GL Adjustments Journal Use the GL Adjustments Journal screen to select locations and items for the journal. Inventory User’s Manual 5-67 GL Adjustments Journal Daily Work GL Adjustments Journal Screen Field Definitions Field Name Description Pick Enter the range of locations and items whose information you want in the journal. Print By Select the option by which you want to organize the journal. Command Bar Definitions 5-68 Command Description Printer Select P to send the journal to a printer. File Select F to send the journal to a file. Inventory User’s Manual Daily Work GL Adjustments Journal Command Description Screen Select S to send the journal to the screen. End Select E to change your selections or exit to the Daily Work menu. Saving and Exiting After the journal is produced, the Daily Work menu appears. Inventory User’s Manual 5-69 5-70 Builders Supply GL Adjustments Journal Print by Item/Location Page 1 End of Report 100 Electrical Package 100 Electrical Package MN0001 06/14/1995 06 1995 000001 COGS Adjustment MN0001 06/14/1995 06 1995 000002 COGS Adjustment 01 01 00000007 IN 00000007 IN GRAND TOTAL 9.95 2.11 2.11 ============================== 12.06 12.06 9.95 Item ID Loc ID Date Pd Year Seq. No. Reference App. GL COGS/PPV Acct. Debit Credit Description Adjustment Type Code IN Adj. Acct. ---------------------------------------------------------------------------------------------------------------------------------- 06/15/1999 12:17 PM GL Adjustments Journal Daily Work GL Adjustments Journal Inventory User’s Manual Post GL Adjustments Features Use the Post GL Adjustments function on the Daily Work menu to post COGS adjustments and purchase price variances to General Ledger. Before you post, complete the following tasks: • If you have a multiuser system, make sure that no one else is using the Inventory system. • Print the GL Adjustments Journal. • Back up all the data files. Reports A sample posting log is on page 5-74. Screen Use Screen Description Post GL Adjustments Use the Post GL Adjustments screen to select the fiscal year you want to post the adjustments to. Inventory User’s Manual 5-71 Post GL Adjustments Daily Work Post GL Adjustments Screen Field Definitions Field Name Description Have You Enter Y or N to indicate whether or not you have printed the GL Adjustments Journal and backed up your data files. If you enter N, the Daily Work menu appears. Post To If Inventory is not interfaced with General Ledger or if you have not created last-year data in General Ledger, 1 is displayed. If Inventory is interfaced with General Ledger and you have created last-year data in General Ledger, select 1 to post the transactions to the current-year GLJRxxx file or 2 to post them to the last-year GLJRxxx file. 5-72 Inventory User’s Manual Daily Work Post GL Adjustments Command Bar Definitions Command Description Printer Select P to send the log to a printer. File Select F to send the log to a file. End Select E to change your selections or exit to the Daily Work menu. Saving and Exiting After the log is produced, the Daily Work menu appears. Inventory User’s Manual 5-73 5-74 Builders Supply Post GL Adjustments to General Ledger Page 1 End of Report 600 MN0001 12/21/1995 00 1995 000001 Standard Window 24” X 40” COGS Adjustment 00000038 PO =============================== 22.44 22.44 Period 0 Total GRAND TOTAL 504000 104400 22.44 22.44 ------------------------------22.44 22.44 01 Item ID Loc ID Date Pd Year Seq. No. Reference App. GL COGS/PPV Acct. Debit Credit Description Adjustment Type Code IN Adj. Acct. ---------------------------------------------------------------------------------------------------------------------------------- 08/07/1999 3:49 PM Post GL Adjustments Daily Work GL Adjustments Log Inventory User’s Manual Inventory User’s Manual Reorder Processing Calculate Reorders Reorder Report Generate Purchase Requisitions Inventory User’s Manual 6 6-3 6-7 6-11 6-1 Calculate Reorders Features Use the Calculate Reorders function on the Reorder Processing menu to calculate the quantity of an item to reorder. You can calculate reorders by one of the following methods: Economic Order Quantity (EOQ), Forecast, or Minimum/Maximum (Min/Max). Reports To retrieve the information entered in the Calculate Reorders function, use the Reorder Report function. Screen Use Screen Description Calculate Reorders Use the Calculate Reorders screen to select the item IDs, location IDs, product lines, and user-defined fields you want to calculate in the reorder process. Inventory User’s Manual 6-3 Calculate Reorders Reorder Processing Calculate Reorders Screen Field Definitions 6-4 Field Name Description Pick Enter the range of items, locations, product lines, and userdefined fields whose reorder quantity you want to calculate. Include issues in annual usage? If you want to include the annual usage quantities for issues (bill of materials with multiple items) in the reorder calculation, enter Y; if not, enter N. Include transfers out in annual usage? If you want to include the annual usage quantities for transfers in the reorder calculation, enter Y; if not, enter N. Inventory User’s Manual Reorder Processing Calculate Reorders Field Name Description Include material requisitions in annual usage This field appears if you entered information on the Calculate Reorders screen but did not use the Generate Purchase Requisitions function. If you want to include the material requisitions in the reorder calculation, enter Y; if not, enter N. Remove all calculations and start over? This field appears if you entered information on the Calculate Reorders screen but did not use the Generate Purchase Requisitions function. If you want the system to remove previous calculations and start over, enter Y; if not, enter N. If you enter Y, you cannot replace overlapping calculations. Replace overlapping calculations? This field appears if you entered information on the Calculate Reorders screen but did not use the Generate Purchase Requisitions function. If you want existing calculations to be replaced by current calculations that overlap, enter Y; if not, enter N. If you enter Y, previous calculations that overlap will be removed. Command Bar Definitions This screen has no command bar. Saving and Exiting To save your entries and exit to the Reorder Processing menu, use the Proceed (PgDn) command. Inventory User’s Manual 6-5 Reorder Report Features Use the Reorder Report function on the Reorder Processing menu to print a list of the items you need to reorder based on the calculations in the Calculate Reorders function. Reports A sample Reorder Report is on page 6-10. Screen Use Screen Description Reorder Report Use the Reorder Report screen to enter the calculation method you want in the report and to select the option by which to organize the report. Inventory User’s Manual 6-7 Reorder Report Reorder Processing Reorder Report Screen Field Definitions 6-8 Field Name Description Calculation Method Select the calculation method you want in the report: 1 for the EOQ method, 2 for the Forecast method, 3 for the Min/Max method, or 4 for all the calculation methods. Print By Select the option by which you want to organize the report. Do you want to print the report by location? If you want to separate the reorder quantity for each location, enter Y; if not, enter N. Include items that are above order point? If you want to include items whose quantity is above the order point, enter Y; if not, enter N. Inventory User’s Manual Reorder Processing Reorder Report Command Bar Definitions Command Description Printer Select P to send the report to a printer. File Select F to send the report to a file. Screen Select S to send the report to the screen. End Select E to change your selections or exit to the Reorder Processing menu. Saving and Exiting Note After the report is produced, the Reorder Processing menu appears. Inventory User’s Manual 6-9 6-10 CA0001 CA0001 MATERIAL MATERIAL MATERIAL 300 Interior Door 350 Entry Door 400 Interior Materials 450 MATERIAL Slide by Window 24” x 40” 460 MATERIAL Slide by Window 30” X 40” CA0001 CA0001 CA0001 600 MATERIAL Standard Window 24” X 40” 610 MATERIAL Standard Window 30” X 40” CA0001 CA0001 CA0001 MATERIAL 550 Millwork Package CA0001 MATERIAL 150 Plumbing Package CA0001 MATERIAL 100 Electrical Package 144.4600 121.0300 .0000 176.4700 161.1400 .0000 227.9800 22.2600 .0000 .0000 Last Cost Page 1 6.0000 .0000 .0000 6.0000 .0000 .0000 .0000 .0000 .0000 15.0000 .0000 .0000 10.0000 .0000 .0000 .0000 .0000 .0000 6.0000 .0000 .0000 16.0000 .0000 .0000 .0000 .0000 .0000 .0000 .0000 .0000 .0000 .0000 .0000 .0000 .0000 .0000 .0000 .0000 .0000 .0000 .0000 .0000 .0000 .0000 .0000 .0000 .0000 .0000 .0000 .0000 .0000 .0000 90.0000 .0000 .0000 72.0000 .0000 .0000 18.0000 .0000 .0000 90.0000 .0000 .0000 72.0000 .0000 .0000 18.0000 .0000 .0000 18.0000 .0000 .0000 108.0000 .0000 .0000 18.0000 .0000 .0000 3.0000 .0000 .0000 119.0000 .0000 .0000 94.0000 .0000 .0000 25.0000 .0000 .0000 110.0000 .0000 .0000 90.0000 .0000 .0000 25.0000 .0000 .0000 19.0000 .0000 .0000 134.0000 .0000 .0000 25.0000 .0000 .0000 10.0000 HM HM HM HM HM HM HM HM HM HM HM HM HM HM HM HM HM HM HM HM Available Annual Use Order Point EOQ Nt. On Order Forecast Use Forecast Safety Stock Min/Max --------------------------------------------------------------------------------------------------------------------------------- Product Line Loc. Id User Field 1 User Field 2 Builders Supply Reorder Report Location ID CA0001 By Item ID Item ID Description 06/15/1999 12:20 PM Reorder Report Reorder Processing Reorder Report Inventory User’s Manual Generate Purchase Requisitions Features Use the Generate Purchase Requisitions function on the Reorder Processing menu to create purchase requisitions for the items that need to be reordered. Before you can use the Generate Purchase Requisitions function, Purchase Order must be interfaced with Inventory and the Auto Reorder flag on the General Information screen in the Items function must be set to YES. Reports No report is associated with this function. Screen Use Screen Description Generate Purchase Requisitions Use the Generate Purchase Requisitions screen to select the calculation method you want to use when purchase requisitions are generated. Inventory User’s Manual 6-11 Generate Purchase Requisitions Reorder Processing Generate Purchase Requisitions Screen Field Definitions Field Name Description Calculation Method Select the calculation method you want to use when purchase requisitions are generated: 1 for the EOQ method, 2 for the Forecast method, 3 for the Min/Max method, 4 for the least quantity calculated of the three methods, or 5 for the greatest quantity calculated of the three methods. Command Bar Definitions This screen has no command bar. 6-12 Inventory User’s Manual Reorder Processing Generate Purchase Requisitions Saving and Exiting To save your entries, use the Proceed (PgDn) command. To exit to the Reorder Processing menu, use the Exit (F7) command. Inventory User’s Manual 6-13 Inventory User’s Manual Reports Inventory Movement Report Item Status Report Price Report Valuation Report Cost Variance Report Serialized History Report Lot History Report Transaction History Report Inventory User’s Manual 7 7-3 7-7 7-11 7-15 7-19 7-23 7-27 7-31 7-1 Inventory Movement Report Features Use the Inventory Movement Report function on the Reports menu to print summarized information about transactions and transfers and to show beginning and ending balances of selected items. Reports A sample Iventory Movement Report is on page 7-6. Screen Use Screen Description Inventory Movement Report Use the Inventory Movement Report screen to select the items, locations, product lines, and periods you want in the report. Inventory User’s Manual 7-3 Inventory Movement Report Reports Inventory Movement Report Screen Field Definitions 7-4 Field Name Description Pick Enter the range of items, locations, product lines, and userdefined fields you want in the report. Print By Select the option by which you want to organize the report. Do you want to print by location? If you want to separate the information by location, enter Y; if not, enter N. Inventory User’s Manual Reports Inventory Movement Report Command Bar Definitions Command Description Printer Select P to send the report to a printer. File Select F to send the report to a file. Screen Select S to send the report to a screen. End Select E to change your selections or exit to the Reports menu. Saving and Exiting After the report is produced, the Reports menu appears. Inventory User’s Manual 7-5 08/07/1999 3:14 PM Builders Supply Inventory Movement Report By Item ID Page 1 .0000 .0000 .0000 .0000 .0000 .0000 .0000 .0000 .0000 .0000 .0000 Item ID Prod. Line Beg. Quantity Sold Purchased Transfer In Built Adjustments End Quantity Description Loc. ID Returned Returned Transfer Out Issue Mat. Req. ----------------------------------------------------------------------------------------------------------------------------------.0000 MN0001 .0000 MATERIAL .0000 .0000 .0000 100 Electrical Package .0000 .0000 .0000 .0000 .0000 .0000 .0000 .0000 .0000 .0000 .0000 .0000 .0000 .0000 .0000 .0000 .0000 .0000 .0000 .0000 .0000 .0000 .0000 .0000 .0000 .0000 .0000 .0000 .0000 .0000 .0000 .0000 MN0001 .0000 .0000 .0000 .0000 .0000 .0000 .0000 .0000 MATERIAL .0000 TX0001 .0000 .0000 .0000 .0000 .0000 .0000 150 Plumbing Package MATERIAL .0000 .0000 .0000 .0000 .0000 TX0001 150 Plumbing Package .0000 MN0001 .0000 .0000 MATERIAL 200 HEAT/AIR Heating/Cooling Package .0000 TX0001 100 Electrical Package 200 HEAT/AIR Heating/Cooling Package End of Report Inventory User’s Manual 7-6 Reports Inventory Movement Report Inventory Movement Reportt Item Status Report Features The Item Status Report shows the status of items and the quantities in stock: on hand, on order, committed, in use, and available. Reports A sample Item Status Report is on page 7-10. Screen Use Screen Description Item Status Report Use the Item Status Report screen to select the items, locations, product lines, and user-defined fields you want in the report. Inventory User’s Manual 7-7 Item Status Report Reports Item Status Report Screen Field Definitions 7-8 Field Name Description Pick Enter the range of items, locations, product lines, and userdefined fields you want in the report. Print By Select the option by which you want to organize the report. Include Status Enter Y for each item status you want to include in the report. Enter N for each status you want to exclude. Print extra description? If you want the report to include additional descriptions, enter Y; if not, enter N. You can enter Y only if you elected to use additional descriptions in the Resource Manager Options and Interfaces function. Print by location? If you want to separate the information by location, enter Y; if not, enter N. Inventory User’s Manual Reports Item Status Report Field Name Description Print lot detail? If you want to print lot detail, enter Y; if not, enter N. Print serial detail? If you want to print serial detail, enter Y; if not, enter N. Print lost/sold serial numbers? If you want to print serial numbers for lost or sold items, enter Y; if not, enter N. Command Bar Definitions Command Description Printer Select P to send the report to a printer. File Select F to send the report to a file. Screen Select S to send the report to a screen. End Select E to change your selections or exit to the Reports menu. Saving and Exiting After the report is produced, the Reports menu appears. Inventory User’s Manual 7-9 7-10 Builders Supply Item Status Report Location ID MN0001 By Item ID MN0001 MN0001 MN0001 MN0001 200300 Air Conditioner 200400 Water Softener 200500 Sump Pump 200600 Humidifier End of Report MN0001 MN0001 200200 Water Heater 250 Exterior Panels HEAT/AIR Active MN0001 200100 Furnace MATERIAL Active HEAT/AIR Active HEAT/AIR Active HEAT/AIR Active HEAT/AIR Active HEAT/AIR Active HEAT/AIR Active 200 MN0001 Heating/Cooling Package CS EA EA EA EA EA EA PKG PKG MATERIAL Active 150 Plumbing Package MN0001 PKG 100 MN0001 MATERIAL Electrical Package Active Includes Electrical Outlets and Breaker Box MJR APPL BUILDING MJR APPL BUILDING MJR APPL BUILDING MJR APPL BUILDING MJR APPL BUILDING MJR APPL BUILDING BUILDING BUILDING BUILDING PLUMBING BUILDING ELECTRIC 242.0000 10.0000 8.0000 .0000 8.0000 .0000 8.0000 .0000 8.0000 .0000 8.0000 .0000 8.0000 .0000 .0000 .0000 15.0000 2.0000 23.0000 6.0000 .0000 20.0000 .0000 .0000 .0000 .0000 .0000 .0000 .0000 .0000 .0000 .0000 .0000 .0000 .0000 .0000 .0000 1.0000- .0000 1.0000 222.0000 8.0000 8.0000 8.0000 8.0000 8.0000 8.0000 .0000 16.0000 22.0000 Item ID Location Product Line UOM Application On Hand Committed Available Description Status Department On Order In Use Extra Description ------------------------------------------------------------------------------------------------------------------ 05/28/1999 7:23 AM Page 1 Item Status Report Reports Item Status Report Inventory User’s Manual Price Report Features The Price Report shows the quantity break prices for items, base or list prices, and the profit margin. You can use the information to analyze pricing structures. Reports A sample Price Report is on page 7-14. Screen Use Screen Description Price Report Use the Price Report screen to select the items, locations, and customer levels whose price information you want in the report. Inventory User’s Manual 7-11 Price Report Reports Price Report Screen Field Definitions 7-12 Field Name Description Pick Enter the range of items, locations, and customer levels you want in the report. Print By Select the option by which you want to organize the report. Print Prices As Of Enter the date from which you want to calculate prices. Print profit margin? If you want the report to include profit margins, enter Y; if not, enter N. Print quantity breaks? If you want the report to include quantity price breaks, enter Y; if not, enter N. Inventory User’s Manual Reports Price Report Command Bar Definitions Command Description Printer Select P to send the report to a printer. File Select F to send the report to a file. Screen Select S to send the report to the screen. End Select E to change your selections or exit to the Reports menu. Saving and Exiting After the report is produced, the Reports menu appears. Inventory User’s Manual 7-13 7-14 Price Report Prices as of 08/07/1999 Customer Level ACE001 PKG PKG TX0001 BUILD 150 Plumbing Package 200 MN0001 BUILD Heating/Cooling Package 200 TX0001 BUILD Heating/Cooling Package End of Report PKG MN0001 BUILD 150 Plumbing Package PKG PKG TX0001 BUILD 100 Electrical Package PKG MN0001 BUILD 100 Electrical Package Base Base Base Base Base Base 1.0000 1.0000 1.0000 1.0000 1.0000 1.0000 2739.2300 2739.2300 1463.7600 1463.7600 529.5400 529.5400 .0000 .0000 952.9065 952.9065 423.6320 423.6320 N/A N/A N/A N/A N/A N/A Item ID Loc Price ID UOM Break Quantity Orig. Price Adj. Price Promo ID Promo Price Description Used ------------------------------------------------------------------------------------------------------------------ 08/07/1999 3:17 PM Page 1 Price Report Reports Price Report Inventory User’s Manual Valuation Report Features Use the Valuation Report to evaluate the profitability of inventory items. It summarizes the value of the items on hand and the profit of the items sold during the year. It shows the average unit cost, extended cost depending on the valuation method selected, purchases, sales, COGS and PPV adjustments, other type of movement adjustments, and the beginning balance based on these figures. Reports A sample Valuation Report is on page 7-18. Screen Use Screen Description Valuation Report Use the Valuation Report screen to select items, locations, product lines, and user-defined fields that you want in the report. Inventory User’s Manual 7-15 Valuation Report Reports Valuation Report Screen Field Definitions 7-16 Field Name Description Pick Enter the range of items, locations, product lines, and userdefined fields you want in the report. Print By Select the option by which you want to organize the report. Print Valuation Method Select the option by which you want the valuation to be calculated for the report. Print by location? If you want the information to be separated by location, enter Y; if not, enter N. Inventory User’s Manual Reports Valuation Report Field Name Description Print extra description? If you want the report to include additional descriptions, enter Y; if not, enter N. You can enter Y only if you elected to use additional descriptions in the Resource Manager Options and Interfaces function. Print year-to-date? If you want the report to show year-to-date information, enter Y; if not, enter N. Print GL summary only? If you want the report summarized by GL account only, enter Y; if not, enter N. Print serial detail? If you want the report to show serial detail, enter Y; if not, enter N. Command Bar Definitions Command Description Printer Select P to send the report to a printer. File Select F to send the report to a file. Screen Select S to send the report to the screen. End Select E to change your selections or exit to the Reports menu. Saving and Exiting After the report is produced, the Reports menu appears. Inventory User’s Manual 7-17 7-18 Builders Supply Valuation Report By Item ID Valuation Method: LIFO/FIFO Page 1 MATERIAL PKG MN0001 EA MN0001 200 HEAT/AIR Heating/Cooling Package HEAT/AIR HEAT/AIR HEAT/AIR HEAT/AIR HEAT/AIR HEAT/AIR MATERIAL 200100 Furnace 200200 Water Heater 200300 Air Conditioner 200400 Water Softener 200500 Sump Pump 200600 Humidifier 250 CS EA MN0001 EA MN0001 EA MN0001 EA MN0001 EA MN0001 PKG MN0001 PKG MN0001 MATERIAL 150 Plumbing Package Includes Electrical Outlets and Breaker Box 100 Electrical Package 242.0000 8.0000 8.0000 8.0000 8.0000 8.0000 8.0000 .0000 15.0000 23.0000 1295.0323 75.1513 47.5000 127.4000 429.9500 227.5300 379.4400 .0000 907.5300 343.5500 576035.74 28098.94- 17825.69- 48964.93- 164185.20- 87204.73- 143743.33- .00 115441.92 320750.76- 422474.64- 33960.73 Extended Cost Variance 21468.38 Extended Cost Variance 58916.56 Extended Cost Variance 197445.77 Extended Cost Variance 104914.95 Extended Cost Variance 173478.14 Extended Cost Variance .00 193023.38Extended Cost Variance 279614.65 Extended Cost Variance 153561.10 5861.79 601.21 5260.58 3642.69 380.00 3262.69 9951.63 1019.20 8932.43 33260.57 3439.60 29820.97 17710.22 1820.24 15889.98 29734.81 3035.52 26699.29 .00 77581.4613612.95 91194.41- 41136.117901.65 49037.76- Item ID Product Line UOM On Hand Unit Cost Beg. Balance Net Change End Balance Description Location ID Extra Description ----------------------------------------------------------------------------------------------------------------------------------- 05/28/1999 7:25 AM Valuation Report Reports Valuation Report Inventory User’s Manual Cost Variance Report Features Use the Cost Variance Report to analyze the cost variance of items, using standard to average, actual to standard, and actual to average costs. Reports A sample Cost Variance Report is on page 7-22. Screen Use Screen Description Cost Variance Report Use the Cost Variance Report screen to select the items, locations, product lines, and user-defined fields that you want in the report. Inventory User’s Manual 7-19 Cost Variance Report Reports Cost Variance Report Screen Field Definitions 7-20 Field Name Description Pick Enter the range of items, locations, product lines, and userdefined fields you want in the report. Print By Select the option by which you want to organize the report. Print by location? If you want the information to be separated by location, enter Y; if not, enter N. Print lot detail? If you want the report to include lot detail information, enter Y; if not, enter N. Inventory User’s Manual Reports Cost Variance Report Field Name Description Print extra description? If you want the report to include additional descriptions, enter Y; if not, enter N. You can enter Y only if you elected to use additional descriptions in the Resource Manager Options and Interfaces function. Print year-to-date? If you want the report to show year-to-date information, enter Y; if not, enter N. Command Bar Definitions Command Description Printer Select P to send the report to a printer. File Select F to send the report to a file. Screen Select S to send the report to the screen. End Select E to change your selections or exit to the Reports menu. Saving and Exiting After the report is produced, the Reports menu appears. Inventory User’s Manual 7-21 7-22 Builders Supply Cost Variance Report By Item ID Page 1 TX0001 CA0001 MD0001 MN0001 TX0001 CA0001 MATERIAL MATERIAL MATERIAL MATERIAL MATERIAL MATERIAL 150 Plumbing Package 150 Plumbing Package 150 Plumbing Package 150 Plumbing Package 200 HEAT/AIR Heating/Cooling Package 200 HEAT/AIR Heating/Cooling Package 200 HEAT/AIR Heating/Cooling Package HEAT/AIR 100 Electrical Package 200 HEAT/AIR Heating/Cooling Package HEAT/AIR 100 Electrical Package 200100 Furnace 200100 MD0001 MN0001 MD0001 CA0001 TX0001 MN0001 MD0001 MATERIAL 100 Electrical Package CA0001 MATERIAL 100 Electrical Package .0000 .0000 .0000 .0000 .0000 .0000 7.0000 5.0000 .0000 .0000 6.0000 2.0000 .0000 .0000 .0000 .0000 .0000 .0000 .0000 .0000 6350.8000 4537.6500 .0000 .0000 2061.3000 687.4451 .0000 .0000 .0000 .0000 .0000 .0000 .0000 .0000 6350.8200- 4537.6500- .0000 .0000 2061.3000- 687.1000- .0000 .0000 .0000 .0000 .0000 .0000 .0000 .0000 6350.8000 4537.6500 .0000 .0000 2061.3000 687.4451 .0000 .0000 .0000 .0000 .0000 .0000 .0000 .0000 .0200- .0000 .0000 .0000 .0000 .3451 .0000 .0000 Item ID Product Line Loc. ID Application On Hand Actual --------------- Variance ------------------Description Department Std./Average Actual/Std. Actual/Avg. --------------------------------------------------------------------------------------------------------------------------------- 06/15/1999 12:33 PM Cost Variance Report Reports Cost Variance Report Inventory User’s Manual Serialized History Report Features Use the Serialized History Report function on the Reports menu to list historical transactions for serialized items. Reports A sample Serialized History Report is on page 7-26. Screen Use Screen Description Serialized History Report Use the Serialized History Report screen to select the items, locations, product lines, lot numbers, and serial numbers that you want in the report. Inventory User’s Manual 7-23 Serialized History Report Reports Serialized History Report Screen Field Definitions 7-24 Field Name Description Pick Enter the range of items, locations, product lines, lot numbers, serial numbers, and invoice dates you want in the report. Print By Select the option by which you want to organize the report. Print address and phone number detail? If you want the report to include address and phone number detail, enter Y; if not, enter N. You can enter Y only if Accounts Payable/Purchase Order or Accounts Receivable/ Sales Order are interfaced with Inventory. Print extra description? If you want the report to include additional descriptions, enter Y; if not, enter N. You can enter Y only if you elected to use additional descriptions in the Resource Manager Options and Interfaces function. Inventory User’s Manual Reports Serialized History Report Command Bar Definitions Command Description Printer Select P to send the report to a printer. File Select F to send the report to a file. Screen Select S to send the report to the screen. End Select E to change your selections or exit to the Reports menu. Saving and Exiting After the report is produced, the Reports menu appears. Inventory User’s Manual 7-25 7-26 Series Number Builders Supply Serialized History Report By Item, Location Build Build 21A218 21A220 Purchase TIM001 21A218 Purchase TIM001 Build 21A217 21A220 Purchase TIM001 21A217 Build Build 21A216 21A219 Purchase TIM001 21A216 Purchase TIM001 Purchase TIM001 2/1000 21A219 Purchase TIM001 1/1000 MN0002 MINNEAPOLIS MANUFACTURING 07/27/1994 05/28/1996 000015 05/28/1996 07/15/1994 05/28/1996 00000021 05/28/1996 25420 07/27/1994 05/28/1996 000015 05/28/1996 07/15/1994 05/28/1996 00000021 05/28/1996 25420 07/27/1994 05/28/1996 000015 05/28/1996 07/15/1994 05/28/1996 00000021 05/28/1996 25420 07/27/1994 05/28/1996 000015 05/28/1996 07/15/1994 05/28/1996 00000021 05/28/1996 25420 07/27/1994 05/28/1996 000015 05/28/1996 07/15/1994 05/28/1996 00000021 05/28/1996 25420 07/15/1994 05/28/1996 00000021 05/28/1996 25420 07/15/1994 05/28/1996 00000021 05/28/1996 25420 2.2500 2.2500 2.2500 2.2500 2.2500 2.2500 2.2500 2.2500 2.2500 2.2500 2.2500 2.2500 Loc. ID Description Serial Number Rep. Tran. Type Order Date Ship/Rec. Ord. No. Cost/Price Comment Vend./Cust. Inv. Date Inv. No. ----------------------------------------------------------------------------------------------------- Item 700500 05/28/1999 9:57 AM Page 1 Serialized History Report Reports Serialized History Report Inventory User’s Manual Lot History Report Features The Lot History Report shows historical purchase and sales information for lotted items. Reports A sample Lot History Report is on page 7-30. Screen Use Screen Description Lot History Report Use the Lot History Report screen to select the items, locations, product lines, and lot numbers that you want in the report. Inventory User’s Manual 7-27 Lot History Report Reports Lot History Report Screen Field Definitions 7-28 Field Name Description Pick Enter the range of items, locations, product lines, lot numbers, and invoice dates you want in the report. Include Enter Y for each selection you want to include in the report. Enter N for each selection you want to exclude. Inventory User’s Manual Reports Lot History Report Command Bar Definitions Command Description Printer Select P to send the report to a printer. File Select F to send the report to a file. Screen Select S to send the report to the screen. End Select E to change your selections or exit to the Reports menu. Saving and Exiting After the report is produced, the Reports menu appears. Inventory User’s Manual 7-29 7-30 Builders Supply Lot History Report Page 1 700500 120195 120195 120195 120195 120195 120195 120195 120195 120195 120195 120195 120195 120195 120195 120195 120195 120195 120195 120195 120195 120195 120195 120195 120195 120195 120195 120195 120195 120195 120195 120195 120195 120195 120195 120195 120195 120195 120195 120195 120195 Series Number 07/15/1994 Purch 07/15/1994 Purch 07/15/1994 Purch 07/15/1994 Purch 07/15/1994 Purch 07/15/1994 Purch 07/15/1994 Purch 07/15/1994 Purch 07/15/1994 Purch 07/15/1994 Purch 07/15/1994 Purch 07/15/1994 Purch 07/15/1994 Purch 07/15/1994 Purch 07/15/1994 Purch 07/15/1994 Purch 07/15/1994 Purch 07/15/1994 Purch 07/15/1994 Purch 07/15/1994 Purch 07/15/1994 Purch 07/15/1994 Purch 07/15/1994 Purch 07/15/1994 Purch 07/15/1994 Purch 07/15/1994 Purch 07/15/1994 Purch 07/15/1994 Purch 07/15/1994 Purch 07/15/1994 Purch 07/15/1994 Purch 07/15/1994 Purch 07/15/1994 Purch 07/15/1994 Purch 07/15/1994 Purch 07/15/1994 Purch 07/15/1994 Purch 07/15/1994 Purch 07/15/1994 Purch 07/15/1994 Purch MN0002 MN0002 MN0002 MN0002 MN0002 MN0002 MN0002 MN0002 MN0002 MN0002 MN0002 MN0002 MN0002 MN0002 MN0002 MN0002 MN0002 MN0002 MN0002 MN0002 MN0002 MN0002 MN0002 MN0002 MN0002 MN0002 MN0002 MN0002 MN0002 MN0002 MN0002 MN0002 MN0002 MN0002 MN0002 MN0002 MN0002 MN0002 MN0002 MN0002 TIM001 TIM001 TIM001 TIM001 TIM001 TIM001 TIM001 TIM001 TIM001 TIM001 TIM001 TIM001 TIM001 TIM001 TIM001 TIM001 TIM001 TIM001 TIM001 TIM001 TIM001 TIM001 TIM001 TIM001 TIM001 TIM001 TIM001 TIM001 TIM001 TIM001 TIM001 TIM001 TIM001 TIM001 TIM001 TIM001 TIM001 TIM001 TIM001 TIM001 00000021 00000021 00000021 00000021 00000021 00000021 00000021 00000021 00000021 00000021 00000021 00000021 00000021 00000021 00000021 00000021 00000021 00000021 00000021 00000021 00000021 00000021 00000021 00000021 00000021 00000021 00000021 00000021 00000021 00000021 00000021 00000021 00000021 00000021 00000021 00000021 00000021 00000021 00000021 00000021 EA EA EA EA EA EA EA EA EA EA EA EA EA EA EA EA EA EA EA EA EA EA EA EA EA EA EA EA EA EA EA EA EA EA EA EA EA EA EA EA 1.0000 1.0000 1.0000 1.0000 1.0000 1.0000 1.0000 1.0000 1.0000 1.0000 1.0000 1.0000 1.0000 1.0000 1.0000 1.0000 1.0000 1.0000 1.0000 1.0000 1.0000 1.0000 1.0000 1.0000 1.0000 1.0000 1.0000 1.0000 1.0000 1.0000 1.0000 1.0000 1.0000 1.0000 1.0000 1.0000 1.0000 1.0000 1.0000 1.0000 2.2500 2.2500 2.2500 2.2500 2.2500 2.2500 2.2500 2.2500 2.2500 2.2500 2.2500 2.2500 2.2500 2.2500 2.2500 2.2500 2.2500 2.2500 2.2500 2.2500 2.2500 2.2500 2.2500 2.2500 2.2500 2.2500 2.2500 2.2500 2.2500 2.2500 2.2500 2.2500 2.2500 2.2500 2.2500 2.2500 2.2500 2.2500 2.2500 2.2500 2.25 2.25 2.25 2.25 2.25 2.25 2.25 2.25 2.25 2.25 2.25 2.25 2.25 2.25 2.25 2.25 2.25 2.25 2.25 2.25 2.25 2.25 2.25 2.25 2.25 2.25 2.25 2.25 2.25 2.25 2.25 2.25 2.25 2.25 2.25 2.25 2.25 2.25 2.25 2.25 1.0000 1.0000 1.0000 1.0000 1.0000 1.0000 1.0000 1.0000 1.0000 1.0000 1.0000 1.0000 1.0000 1.0000 1.0000 1.0000 1.0000 1.0000 1.0000 1.0000 1.0000 1.0000 1.0000 1.0000 1.0000 1.0000 1.0000 1.0000 1.0000 1.0000 1.0000 1.0000 1.0000 1.0000 1.0000 1.0000 1.0000 1.0000 1.0000 1.0000 EA EA EA EA EA EA EA EA EA EA EA EA EA EA EA EA EA EA EA EA EA EA EA EA EA EA EA EA EA EA EA EA EA EA EA EA EA EA EA EA Item ID Description ------------------- Default ------------------- --- Transaction --Lot Number Tran. Date Type Loc. ID Source Ref. No. UOM Quantity Unit Cost Ext. Cost Quantity UOM ----------------------------------------------------------------------------------------------------------------------------------- 05/28/1999 9:58 AM Lot History Report Reports Lot History Report Inventory User’s Manual Transaction History Report Features The Transaction History Report shows the history of transactions within a specified time frame. Reports A sample Transaction History Report is on page 7-34. Screen Use Screen Description Transaction History Report Use the Transaction History Report screen to select the items, locations, sources, and periods and years that you want in the report. Inventory User’s Manual 7-31 Transaction History Report Reports Transaction History Report Screen Field Definitions 7-32 Field Name Description Pick Enter the range of items, locations, source applications, and periods and years you want in the report. Inventory User’s Manual Reports Transaction History Report Command Bar Definitions Command Description Printer Select P to send the report to a printer. File Select F to send the report to a file. Screen Select S to send the report to the screen. End Select E to change your selections or exit to the Reports menu. Saving and Exiting After the report is produced, the Reports menu appears. Inventory User’s Manual 7-33 7-34 Builders Supply Transaction History Report Page 1 PKG PKG PKG PKG PKG 200100 TrsfrIn Sale Furnace 07-1994 07/24/1994 IN 08-1994 08/15/1994 SO Plumbing Package 05-1999 05/03/1999 IN PKG 09-1999 09/21/1999 AR CASHCA 12670044 PKG 12-1999 12/14/1999 AR LOS001 12670073 PKG 12670044 12670072 12670073 57001 PHYSICAL Ending Balance On-Hand EA LOS001 24889008 EA Variance Ending Balance On-Hand Variance Ending Balance On-Hand Package AR CASHCA AR CASHCA AR LOS001 AP ELL001 IN 150 TrsfrIn Sale Sale Electrical 09/21/1999 12/06/1999 12/14/1999 12/21/1999 12/15/1999 09-1999 12-1999 12-1999 12-1999 12-1999 Variance Ending Balance On-Hand Electrical Package 07-1994 07/06/1994 IN PKG 08-1994 08/04/1994 IN PKG 08-1994 08/26/1994 AR LOS001 12670009 PKG 100 Sale Sale Sale Purch AdjIncr 100 TrsfrIn TrsfrIn Sale .0000 .0000 21.0000 367.6300 7720.23 15.0000367.6300 5514.45------------------------------------------6.0000 2205.7800 6.0000 2205.7800 ------------------------------------------- .0000 .0000 6.0000 902.1100 5412.66 5.0000902.1100 4510.551.0000902.1100 902.11------------------------------------------.0000 .00 .0000 .00 ------------------------------------------.0000 .00 26.0000 9002.2400 20.0000346.2400 6924.803.0000346.2400 1038.723.0000346.2400 1038.725.0000 348.0582 1740.29 2.0000 348.0582 696.12 ------------------------------------------7.0000 2436.41 7.0000 2436.41 ------------------------------------------.0000 .00 .0000 .0000 100.0000 346.2400 34624.00 126.0000 348.0582 43855.33 200.0000347.3855 69477.10------------------------------------------26.0000 9002.2300 26.0000 9002.2400 ------------------------------------------.0000 .0100 PKG PKG PKG PKG PKG 21.0000 EA 15.0000- EA 6.0000 PKG 5.0000- PKG 1.0000- PKG 20.00003.00003.00005.0000 2.0000 100.0000 PKG 126.0000 PKG 200.0000- PKG Item ID Description -------------------- Default --------------------- ---- Transaction --Trans. Type Per.-Yr. Date Src. Src. ID Ref. No. UOM Quantity Unit Cost Ext. Cost Quantity UOM ----------------------------------------------------------------------------------------------------------------------------------- Location CA0001 OAKLAND WAREHOUSE 05/28/1999 7:20 AM Transaction History Report Reports Transaction History Report Inventory User’s Manual Inventory User’s Manual Analysis Reports Safety Stock Alert Report Overstock Report Slow/Fast Movement Report Sales Analysis Report Gross Profit Analysis Report Trend Analysis Report Movement Trending Report Inventory User’s Manual 8 8-3 8-7 8-11 8-15 8-19 8-23 8-27 8-1 Safety Stock Alert Report Features Use the Safety Stock Alert Report function on the Analysis Reports menu to list items that you need to restock. These items have fallen below the safety stock level you specified (usually half the order point), including items that are on order or backordered. Reports A sample Safety Stock Alert Report is on page 8-6. Screen Use Screen Description Safety Stock Alert Report Use the Safety Stock Alert Report screen to select the items, locations, product lines, and user-defined fields that you want in the report. Inventory User’s Manual 8-3 Safety Stock Alert Report Analysis Reports Safety Stock Alert Report Screen Field Definitions 8-4 Field Name Description Pick Enter the range of items, locations, product lines, and userdefined fields you want in the report. Print By Select the option by which you want to organize the report. Include Status Enter Y for each item status you want to include in the report. Enter N for each status you want to exclude. Print extra description? If you want the report to include additional descriptions, enter Y; if not, enter N. You can enter Y only if you elected to use additional descriptions in the Resource Manager Options and Interfaces function. Inventory User’s Manual Analysis Reports Safety Stock Alert Report Field Name Description Print by location? If you want to separate the information by location, enter Y; if not, enter N. Print item with zero safety stock? If you want to include items with a quantity of zero in the Safety Stock field in the Item Locations function, enter Y; if not, enter N. Command Bar Definitions Command Description Printer Select P to send the report to a printer. File Select F to send the report to a file. Screen Select S to send the report to the screen. End Select E to change your selections or exit to the Analysis Reports menu. Saving and Exiting After the report is produced, the Analysis Reports menu appears. Inventory User’s Manual 8-5 8-6 Builders Supply Safety Stock Alert Report Location ID MN0001 By Item ID Page THO001 EA MIL001 PKG MIL001 PKG TIM001 EA TIM001 EA MN0001 MN0001 MN0001 200100 Furnace 200300 Air Conditioner 550 Millwork Package 555 MN0001 Millwork Package - Oak 600 MN0001 Standard Window 24” X 40” 610 MN0001 Standard Window 30” X 40” BUILDING INTERIOR BUILDING INTERIOR MJR APPL BUILDING MJR APPL BUILDING BUILDING BUILDING CABINET INTERIOR 3.0000 .0000 8.0000 .0000 2.0000 .0000 .0000 .0000 .0000 .0000 8.0000 .0000 8.0000 .0000 .0000 .0000 Builders Supply Safety Stock Alert Report Location ID MN0002 By Item ID Active MATERIAL Discontinued WINDOWS MATERIAL EXTERIOR Discontinued WINDOWS MATERIAL EXTERIOR Obsolete MATERIAL Active MATERIAL Active HEAT/AIR Active HEAT/AIR Active HEAT/AIR .0000 .0000 .0000 5.0000 .0000 1.0000- .0000 .0000 .0000 .0000 .0000 .0000 .0000 .0000 .0000 .0000 3.0000 3.0000 3.0000 .0000 .0000 8.0000 8.0000 .0000 Page 4.0000 12.5000 10.0000 2.5000 3.0000 10.0000 10.0000 1.5000 End of Report Item ID Location Vendor ID Status Application On Hand Committed Available Safety Stock Description UOM Product Line Department On Order In Use Extra Description --------------------------------------------------------------------------------------------------------------------------------- 05/28/1995 9:52 AM 700 MN0001 FINISH Cabinets SET Made up of parts 700100, 700300 and 700500 THO001 EA THO001 PKG 200 MN0001 Heating/Cooling Package Item ID Location Vendor ID Status Application On Hand Committed Available Safety Stock Description UOM Product Line Department On Order In Use Extra Description --------------------------------------------------------------------------------------------------------------------------------- 05/28/1999 9:52 AM 2 1 Safety Stock Alert Report Analysis Reports Safety Stock Alert Report Inventory User’s Manual Overstock Report Features Use the Overstock Report function on the Analysis Reports menu to list items whose in-stock quantities are above the order points you specified (on-hand value is greater than the maximum on-hand value). Reports A sample Overstock Report is on page 8-10. Screen Use Screen Description Overstock Report Use the Overstock Report screen to select the items, locations, product lines, and user-defined fields that you want in the report. Inventory User’s Manual 8-7 Overstock Report Analysis Reports Overstock Report Screen Field Definitions 8-8 Field Name Description Pick Enter the range of items, locations, product lines, and userdefined fields you want in the report. Print By Select the option by which you want to organize the report. Include Status Enter Y for each item status you want to include in the report. Enter N for each status you want to exclude. Print extra description? If you want the report to include additional descriptions, enter Y; if not, enter N. You can enter Y only if you elected to use additional descriptions in the Resource Manager Options and Interfaces function. Inventory User’s Manual Analysis Reports Overstock Report Field Name Description Print by location? If you want to separate the information by location, enter Y; if not, enter N. Print items with zero max. on hand? If you want to include items with a quantity of zero in the Maximum Quantity field in the Item Locations function, enter Y; if not, enter N. Command Bar Definitions Command Description Printer Select P to send the report to a printer. File Select F to send the report to a file. Screen Select S to send the report to the screen. End Select E to change your selections or exit to the Analysis Reports menu. Saving and Exiting After the report is produced, the Analysis Reports menu appears. Inventory User’s Manual 8-9 8-10 Builders Supply Overstock Report By Item ID Page MN0001 MN0001 MN0001 MN0001 MN0001 MN0001 MN0002 MN0002 MN0002 MN0002 MN0002 MN0002 CA0001 MN0002 200100 Furnace 200200 Water Heater 200300 Air Conditioner 200400 Water Softener 200500 Sump Pump 200600 Humidifier 700111 Cabinet Assembly 7001112 Cut Boards 700113 Cutting Board 700115 Drawer Assembly 700117 Cabinet Door 700119 Drawer Hardware 700500 Series Number 700500 COMPONENT COMPONENT EA COMPONENT SET COMPONENT EA COMPONENT EA COMPONENT EA COMPONENT SET COMPONENT EA HEAT/AIR EA HEAT/AIR EA HEAT/AIR EA HEAT/AIR EA HEAT/AIR EA HEAT/AIR EA Active Active Active Active Active Active Active Active Active Active Active Active Active Active 7.0000 1.0000 .0000 36.0000 .0000 4.0000 .0000 15.0000 .0000 3.0000 .0000 12.0000 .0000 15.0000 .0000 26.0000 .0000 11.0000 .0000 9.0000 .0000 12.0000 .0000 17.0000 .0000 3.0000 .0000 .0000 .0000 .0000 .0000 .0000 .0000 .0000 .0000 .0000 .0000 .0000 .0000 .0000 .0000 .0000 .0000 .0000 .0000 .0000 .0000 .0000 .0000 .0000 .0000 .0000 .0000 .0000 7.0000 1.0000 36.0000 4.0000 15.0000 3.0000 12.0000 15.0000 26.0000 11.0000 9.0000 12.0000 17.0000 3.0000 .0000 .0000 .0000 .0000 .0000 .0000 .0000 .0000 .0000 .0000 .0000 .0000 .0000 .0000 Item ID Location Product Line Status Application On Hand Committed Available Maximum Description UOM Department On Order In Use ---------------------------------------------------------------------------------------------------------------------------------- 06/15/1999 12:41 PM 1 Overstock Report Analysis Reports Overstock Report Inventory User’s Manual Slow/Fast Movement Report Features Use the Slow/Fast Movement Report to analyze fast-moving and slow-moving items. The report shows the profit, cost, volume, and sales of the inventory items. Reports A sample Slow/Fast Movement Report is on page 8-14. Screen Use Screen Description Slow/Fast Movement Report Use the Slow/Fast Movement Report screen to select the items, locations, product lines, and user-defined fields that you want in the report. Inventory User’s Manual 8-11 Slow/Fast Movement Report Analysis Reports Slow/Fast Movement Report Screen Field Definitions 8-12 Field Name Description Pick Enter the range of items, locations, product lines, and userdefined fields you want in the report. Print By Select the option by which you want to organize the report. Print Order Select the order that you want the information to be in: ascending or descending. Print For Period/Year Accept the displayed period and year, or enter a different period and year. Inventory User’s Manual Analysis Reports Slow/Fast Movement Report Field Name Description Print extra description? If you want the report to include additional descriptions, enter Y; if not, enter N. You can enter Y only if you elected to use additional descriptions in the Resource Manager Options and Interfaces function. Print detail? If you want to list the totals for the items and the grand total, enter Y. If you want to list only the grand total, enter N. Suppress zero qty. items? To exclude items with a quantity of zero in the PTD and YTD Quantity columns in the report, enter Y; to include them, enter N. Command Bar Definitions Command Description Printer Select P to send the report to a printer. File Select F to send the report to a file. Screen Select S to send the report to the screen. End Select E to change your selections or exit to the Analysis Reports menu. Saving and Exiting After the report is produced, the Analysis Reports menu appears. Inventory User’s Manual 8-13 8-14 Builders Supply Slow/Fast Movement Report By Sales, Ascending Detail Page HEAT/AIR HEAT/AIR 200 MN0001 Heating/Cooling Package 200 TX0001 Heating/Cooling Package MD0001 MN0001 TX0001 200100 Furnace 200100 Furnace 200100 Furnace CA0001 MD0001 200200 Water Heater 200200 Water Heater TOTAL FOR ITEM 200100 CA0001 200100 Furnace HEAT/AIR HEAT/AIR HEAT/AIR HEAT/AIR HEAT/AIR HEAT/AIR HEAT/AIR 200 MD0001 Heating/Cooling Package TOTAL FOR ITEM 200 HEAT/AIR 200 CA0001 Heating/Cooling Package 05/28/1996 MJR APPL 03/04/1995 BUILDING 05/28/1996 MJR APPL 11/12/1995 BUILDING 05/28/1996 MJR APPL 12/09/1995 BUILDING 12/09/1995 MJR APPL 12/09/1995 BUILDING 05/28/1996 MJR APPL 03/04/1995 BUILDING 05/28/1996 MJR APPL 11/12/1995 BUILDING BUILDING 12/09/1995 BUILDING 10/04/1995 BUILDING 12/09/1995 BUILDING BUILDING 03/04/1995 BUILDING BUILDING 11/12/1995 BUILDING .0000 311145.4400 .0000 495346.4100 .0000 110898.4500 .0000 16429.3800 .0000 .0000 .0000 .0000 .0000 .0000 .0000 .0000 .0000 151982.9300 .0000 238624.5900 .0000 54501.7500 .0000 8909.8200 .0000 .0000 .0000 .0000 .0000 .0000 .0000 .0000 367.6300 367.6300 379.4400 379.4400 367.6300 367.6300 367.6300 367.6300 .0000 46689.0100- .0000 75851.4400- .0000 16543.3500- .0000 2205.7800- .0000 45.0000 .0000 6.0000 .0000 .0000 .0000 .0000 223.0300 223.0300 223.0300 223.0300 .0000 10036.3500- .0000 1338.1800- ---------------------------------------------------------.0000 .0000 .0000 379.0000 .0000 141289.5800- .0000 127.0000 .0000 201.0000 .0000 45.0000 .0000 6.0000 ---------------------------------------------------------.0000 .0000 .0000 379.0000 933819.6800 454019.0900 .0000 127.0000 .0000 201.0000 .0000 45.0000 .0000 6.0000 Item ID Location Prod. Line Last Purch. Application PTD Quantity PTD Sales Last Cost PTD Profit Description Last Sale Department YTD Quantity YTD Sales Avg. Cost YTD Profit Extra Description --------------------------------------------------------------------------------------------------------------------------------- 05/28/1999 9:54 AM Period 05 1 Slow/Fast Movement Report Analysis Reports Slow/Fast Movement Report Inventory User’s Manual Sales Analysis Report Features The Sales Analysis Report summarizes the year-to-date and month-to-date history of stock items. You can use it to analyze the turnaround time for each stock item during the fiscal year. Reports A sample Sales Analysis Report is on page 8-19. Screen Use Screen Description Sales Analysis Report Use the Sales Analysis Report screen to select the items, locations, product lines, and user-defined fields that you want in the report. Inventory User’s Manual 8-15 Sales Analysis Report Analysis Reports Sales Analysis Report Screen Field Definitions 8-16 Field Name Description Pick Enter the range of items, locations, product lines, and userdefined fields you want in the report. Print For Period/Year Accept the displayed period and year, or enter a different period and year. Calculate Turns As Of The date that indicates where the calculation of turns starts is displayed. Print By Select the option by which you want to organize the report. Print Order Select the order you want the information to be in: slowest to fastest or fastest to slowest. Inventory User’s Manual Analysis Reports Sales Analysis Report Field Name Description Print Select the option that specifies the amount of history you want in the report. Suppress zero quantity items? To exclude items with a quantity of zero, enter Y; to include them, enter N. Command Bar Definitions Command Description Printer Select P to send the report to a printer. File Select F to send the report to a file. Screen Select S to send the report to the screen. End Select E to change your selections or exit to the Analysis Reports menu. Saving and Exiting After the report is produced, the Analysis Reports menu appears. Inventory User’s Manual 8-17 8-18 Builders Supply Sales Analysis Report By Sales , Slowest to Fastest Page 1 MD0001 HEAT/AIR EA 03/04/1995 MN0001 HEAT/AIR EA 12/09/1995 TX0001 HEAT/AIR EA 12/09/1995 CA0001 HEAT/AIR EA 11/12/1995 MD0001 HEAT/AIR EA 03/04/1995 MN0001 HEAT/AIR EA 12/09/1995 TX0001 HEAT/AIR EA 12/09/1995 CA0001 HEAT/AIR EA 11/12/1995 MD0001 HEAT/AIR EA 03/04/1995 MN0001 HEAT/AIR EA 12/09/1995 TX0001 HEAT/AIR EA 12/09/1995 CA0001 HEAT/AIR EA 11/12/1995 MD0001 HEAT/AIR 200100 Furnace 200100 Furnace 200100 Furnace 200200 Water Heater 200200 Water Heater 200200 Water Heater 200200 Water Heater 200300 Air Conditioner 200300 Air Conditioner 200300 Air Conditioner 200300 Air Conditioner 200400 Water Softener 200400 EA CA0001 HEAT/AIR EA 11/12/1995 200100 Furnace MJR APPL MJR APPL MJR APPL MJR APPL MJR APPL MJR APPL MJR APPL MJR APPL MJR APPL MJR APPL MJR APPL MJR APPL MJR APPL MJR APPL MTD MTD YTD MTD YTD MTD YTD MTD YTD MTD YTD MTD YTD MTD YTD MTD YTD MTD YTD MTD YTD MTD YTD MTD YTD MTD YTD .0000 .0000 6.0000 .0000 127.0000 .0000 201.0000 .0000 45.0000 .0000 6.0000 .0000 127.0000 .0000 201.0000 .0000 45.0000 .0000 6.0000 .0000 127.0000 .0000 201.0000 .0000 45.0000 .0000 6.0000 .0000 .0000 .0000 .0000 .0000 .0000 .0000 .0000 .0000 .0000 .0000 .0000 .0000 .0000 .0000 .0000 .0000 .0000 .0000 .0000 .0000 .0000 .0000 .0000 .0000 .0000 .0000 .0000 .0000 751.3800 .0000 53328.8900 .0000 85367.7900 .0000 18895.9500 .0000 2519.4600 .0000 28324.8100 .0000 45076.0300 .0000 10036.3500 .0000 1338.1800 .0000 46689.0100 .0000 72514.7300 .0000 16543.3500 .0000 2205.7800 .0000 .0000 751.3800- .0000 53328.8900- .0000 85367.7900- .0000 18895.9500- .0000 2519.4600- .0000 28324.8100- .0000 45076.0300- .0000 10036.3500- .0000 1338.1800- .0000 46689.0100- .0000 72514.7300- .0000 16543.3500- .0000 2205.7800- 58.9 0.0 0.0 61.1 0.0 0.0 61.2 0.0 0.0 0.0 0.0 0.0 0.0 0.0 0.0 104.4 0.0 0.0 0.0 0.0 0.0 0.0 0.0 0.0 104.4 0.0 0.0 0.0 0.0 0.0 0.0 0.0 0.0 104.4 0.0 0.0 0.0 0.0 0.0 0.0 Item ID Loc. Product Line UOM Application Quantity Sales COGS and -------Profit------- Annual Description Last Sale Department Adjustments Amount Pct. Turns ------------------------------------------------------------------------------------------------------------------------------------ 05/28/1999 9:57 AM Sales Analysis Report Analysis Reports Sales Analysis Report Inventory User’s Manual Gross Profit Analysis Report Features The Gross Profit Analysis Report shows the gross profit margin on items for a particular period. Reports A sample Gross Profit Analysis Report is on page 8-23. Screen Use Screen Description Gross Profit Analysis Report Use the Gross Profit Analysis Report screen to select the items, locations, product lines, user-defined fields, percent of profit, and periods and years that you want in the report. Inventory User’s Manual 8-19 Gross Profit Analysis Report Analysis Reports Gross Profit Analysis Report Screen Field Definitions 8-20 Field Name Description Pick Enter the range of items, locations, product lines, user-defined fields, percentages of profit, and periods and years you want in the report. Print By Select the option by which you want to organize the report. Print Order Select the order that you want the information to be in: GPM or reverse GPM. Print by location? If you want to separate the information by location, enter Y; if not, enter N. Inventory User’s Manual Analysis Reports Gross Profit Analysis Report Command Bar Definitions Command Description Printer Select P to send the report to a printer. File Select F to send the report to a file. Screen Select S to send the report to the screen. End Select E to change your selections or exit to the Analysis Reports menu. Saving and Exiting After the report is produced, the Analysis Reports menu appears. Inventory User’s Manual 8-21 8-22 Builders Supply Gross Profit Analysis Report Sort By Item ID, GPM 159162.5100 256721.8200 151982.9300 238624.5900 48.85 48.17 114118.1200 292227.6900 4200.5200 15291.9200 3.55 4.97 End of Report ========================================================= 1232330.1000 822230.1400 410099.9600 33.28 118318.6400 307519.6100 --------------------------------------------------------806491.8500 415884.3300 390607.5200 48.43 311145.4400 495346.4100 GRAND TOTAL MATERIAL TX0001 BUILDING ELECTRIC BUILDING ELECTRIC BUILDING BUILDING BUILDING BUILDING --------------------------------------------------------425838.2500 406345.8100 19492.4400 4.58 MATERIAL MN0001 HEAT/AIR HEAT/AIR TOTAL FOR 100 100 Electrical Package 100 Electrical Package TOTAL FOR 200 200 MN0001 Heating/Cooling Package 200 TX0001 Heating/Cooling Package Item ID Location Product Line Application Total Price Total Cost Profit Amount Profit Pct. Description Department ----------------------------------------------------------------------------------------------------------------- Period 01/1995 Thru 12/1995 08/07/1999 2:59 PM Page 1 Gross Profit Analysis Report Analysis Reports Gross Profit Analysis Report Inventory User’s Manual Trend Analysis Report Features The Trend Analysis Report shows the quantity of items sold during a particular period. Use it to analyze trends in your inventory items. Reports A sample Trend Analysis Report is on page 8-27. Screen Use Screen Description Trend Analysis Report Use the Trend Analysis Report screen to select the items, locations, product lines, and periods and years that you want in the report. Inventory User’s Manual 8-23 Trend Analysis Report Analysis Reports Trend Analysis Report Screen Field Definitions 8-24 Field Name Description Pick Enter the range of items, locations, product lines, and periods and years you want in the report. Print Select the types of transactions you want in the report: purchases or sales. Print detail? If you want to list the totals for the items and the grand total, enter Y. If you want to list only the grand total, enter N. Inventory User’s Manual Analysis Reports Trend Analysis Report Command Bar Definitions Command Description Printer Select P to send the report to a printer. File Select F to send the report to a file. Screen Select S to send the report to the screen. End Select E to change your selections or exit to the Analysis Reports menu. Saving and Exiting After the report is produced, the Analysis Reports menu appears. Inventory User’s Manual 8-25 8-26 Builders Supply Trend Analysis Report Purchases Summary Page 1 HEAT/AIR PKG 200 MN0001 Heating/Cooling Package End of Report GRAND TOTAL MATERIAL PKG MN0001 150 Plumbing Package MATERIAL PKG MN0001 100 Electrical Package .0000 631.0000 2088.0000 ============================= 1281455.3300 .0000 569282.9300 712172.4000 .0000 902.1916 341.0787 Item ID Location Product Line Yr./Per. Quantity Cost Avg. Unit Cost Description UOM ----------------------------------------------------------------------------------------------------------------------------------- 08/07/1999 3:00 PM Period 01/1995 Thru 12/1995 Trend Analysis Report Analysis Reports Trend Analysis Report Inventory User’s Manual Movement Trending Report Features Use the Movement Trending Report function on the Analysis Reports menu to produce a summary of inventory item movement. Reports A sample Movement Trending Report is on page 8-30. Screen Use Screen Description Movement Trending Report Use the Movement Trending Report screen to select the range of items and locations you want in the report; how you want the number of items rounded; and whether you want to include purchases, sales, or other inventory information. Inventory User’s Manual 8-27 Movement Trending Report Analysis Reports Movement Trending Report Screen Field Definitions 8-28 Field Name Description Pick Enter the range of item IDs, location IDs, product lines, and user-defined fields you want in the report. Print By Select the option by which you want to organize the report. Round to Nearest Select 1 to round quantities to the nearest ten thousand, 2 to round to the nearest thousand, 3 to round to the nearest hundred, 4 to round to the nearest ten, or 5 to round to the nearest whole number. Print Enter Y or N at each prompt to indicate whether or not you want to include it in the report. Inventory User’s Manual Analysis Reports Movement Trending Report Field Name Description Ending Period Enter the period number and year you want to use as the cutoff. Print by location? Enter Y or N to indicate whether or not you want the locations to appear in ascending order. Command Bar Definitions Command Description Printer Select P to send the report to a printer. File Select F to send the report to a file. Screen Select S to send the report to the screen. End Select E to change your selections or exit to the Analysis Reports menu. Saving and Exiting After the report is produced, the Analysis Reports menu appears. Inventory User’s Manual 8-29 8-30 Builders Supply Movement Trending Report Quantities shown in Hundreds Page 1 100 CA0001 PKG Electrical Package MATERIAL BUILDING ELECTRIC 150 CA0001 PKG Plumbing Package MATERIAL BUILDING PLUMBING 200 CA0001 PKG Heating/Cooling Package HEAT/AIR BUILDING BUILDING 200100 CA0001 EA Furnace HEAT/AIR MJR APPL BUILDING 200200 CA0001 EA Water Heater HEAT/AIR MJR APPL BUILDING 200300 CA0001 EA Air Conditioner HEAT/AIR MJR APPL BUILDING 200400 CA0001 EA Water Softener HEAT/AIR MJR APPL BUILDING 200500 CA0001 EA Sump Pump HEAT/AIR MJR APPL BUILDING 200600 CA0001 EA Humidifier HEAT/AIR MJR APPL BUILDING 300 CA0001 EA Interior Door MATERIAL BUILDING INTERIOR 100 MD0001 PKG Electrical Package MATERIAL BUILDING ELECTRIC 150 MD0001 PKG Plumbing Package MATERIAL BUILDING PLUMBING 200 MD0001 PKG Heating/Cooling Package HEAT/AIR BUILDING BUILDING 0 0 0 0 0 0 0 0 0 0 0 0 0 0 2- 0 0 1 0 0 0 0 0 0 0 1- 0 0 0 0 0 0 0 0 0 0 0 0 0 0 0 0 2- 0 0 0 0 0 0 0 0 0 0 0 0 1 0 0 0 0 0 0 0 0 0 0 0 0 0 0 0 0 0 0 0 0 0 0 0 0 0 0 0 0 0 0 0 0 0 0 0 0 0 0 1 0 0 0 0 0 0 0 0 0 0 0 0 0 0 0 0 0 0 0 0 0 0 0 0 0 0 0 0 0 0 0 0 0 0 0 0 0 0 1 0 0 0 0 0 0 0 0 0 0 0 0 0 0 0 0 0 0 0 0 0 0 0 0 1- 1 0 0 0 0 0 0 0 0 1- Item ID Location UOM 08/94 09/94 10/94 11/94 12/94 01/95 02/95 03/95 04/95 05/95 06/95 07/95 Total Description Product Line Application Department ----------------------------------------------------------------------------------------------------------------------------------- 07/16/1999 7:40 AM 07/1995 Movement Trending Report Analysis Reports Movement Trending Report Inventory User’s Manual Inventory User’s Manual Periodic Process Item Price Change Cost Changes Quantity Cross Verification Year-End Maintenance Purge Selected Files Rebuild Item Quantities Inventory User’s Manual 9 9-3 9-7 9-11 9-15 9-19 9-23 9-1 Item Price Change Features Use the Item Price Change function on the Periodic Processing menu to change the price of items. Reports A sample Item Price Change Log is on page 9-6. Screen Use Screen Description Item Price Change Use the Item Price Change screen to change prices for selected items, price IDs, locations, product lines, and userdefined fields. Inventory User’s Manual 9-3 Item Price Change Periodic Process Item Price Change Screen Field Definitions 9-4 Field Name Description Pick Enter the range of items, prices, locations, product lines, and user-defined fields whose price information you want to change. Print audit log? If you want to print an audit log that shows the old and new prices, enter Y; if not, enter N. Print By If you chose to print the audit log, select the option by which you want to organize the log. Adj Base Enter the adjustment base for the item price change: base, list, or minimum. Inventory User’s Manual Periodic Process Item Price Change Field Name Description Adj Type Enter % for a percentage adjustment; enter $ for a dollar adjustment. Adj Amount Enter the amount of the adjustment. For negative quantities, use the minus symbol; enter positive quantities without a plus sign. Command Bar Definitions. Command Description Printer Select P to send the log to a printer. File Select F to send the log to a file. End Select E to change your selections or exit to the Periodic Processing menu. Saving and Exiting After the log is produced, the Periodic Processing menu appears. Inventory User’s Manual 9-5 9-6 Builders Supply Item Price Change By Item ID Page 1 TX0001 MN0001 TX0001 100 Electrical Package 200 Heating/Cooling Package 200 Heating/Cooling Package End of Report MN0001 100 Electrical Package BUILD HEAT/AIR BUILD HEAT/AIR BUILD MATERIAL BUILD MATERIAL BUILDING BUILDING BUILDING BUILDING BUILDING ELECTRIC BUILDING ELECTRIC PKG PKG PKG PKG Old Price New Price Old Price New Price Old Price New Price Old Price New Price 2738.2300 2739.2300 2738.2300 2739.2300 528.5400 529.5400 528.5400 529.5400 Item ID Location Price ID Application Units Description Product Line Department ------------------------------------------------------------------------------------------------------------------------ 08/07/1999 2:46 PM Item Price Change Periodic Process Item Price Change Log Inventory User’s Manual Cost Changes Features Use the Cost Changes function on the Periodic Processing menu to change standard or base costs of items. Reports A sample Cost Changes Log is on page 9-10. Screen Use Screen Description Cost Changes Use the Cost Changes screen to select an adjustment base and to change the cost for selected items, locations, product lines, and user-defined fields. Inventory User’s Manual 9-7 Cost Changes Periodic Process Cost Changes Screen Field Definitions Field Name Description Adj Base Enter S if you want to use standard cost as the adjustment base; enter B if you want to use base cost as the adjustment base. Pick Enter the range of items, locations, product lines, and userdefined fields whose cost information you want to change. Print By Select the option by which you want to organize the log. Cost Code This field appears if you selected standard cost as the adjustment base. Enter the range of cost codes you want in the log. 9-8 Inventory User’s Manual Periodic Process Cost Changes Field Name Description Adj Type Enter % to use a percentage adjustment; enter $ to use a dollar adjustment. Adj Amount Enter the amount of the adjustment. For negative quantities, use the minus symbol; enter positive quantities without a plus sign. Command Bar Definitions Command Description Printer Select P to send the log to a printer. File Select F to send the log to a file. End Select E to change your selections or exit to the Periodic Processing menu. Saving and Exiting After the log is produced, the Periodic Processing menu appears. Inventory User’s Manual 9-9 9-10 Builders Supply Standard Cost Changes Log By Item ID Page 1 End of Report Item ID Location Product Line Application Description Department ------------------------------------------------------------------------------------------------------------------ 08/07/1999 2:47 PM Cost Changes Periodic Process Cost Changes Log Inventory User’s Manual Quantity Cross Verification Features Use the Quantity Cross Verification function on the Periodic Processing menu to verify that the quantity detail and the quantity totals for an item are the same. If you have a multiuser system, make sure that no one else is using the INQLxxx (Quantity Locations), INQTxxx (Quantity Totals), and INSNxxx (Serial Numbers) files. Other users cannot access these files while you use this function. Reports A sample Quantity Cross Verification Log is on page 9-14. Screen Use Screen Description Quantity Cross Verification Use the Quantity Cross Verification screen to produce a log of discrepancies between the INQLxxx, INQTxxx, and INSNxxx files. Inventory User’s Manual 9-11 Quantity Cross Verification Periodic Process Quantity Cross Verification Screen Field Definitions 9-12 Field Name Description Have You Enter Y or N to indicate whether or not you have backed up your data files and made sure that no one else is using the system. If you enter N, the Periodic Processing menu appears. Inventory User’s Manual Periodic Process Quantity Cross Verification Command Bar Definitions Command Description Printer Select P to send the log to a printer. File Select F to send the log to a file. End Select E to exit to the Periodic Processing menu without producing the log. Saving and Exiting After the log is produced, the Periodic Processing menu appears. Inventory User’s Manual 9-13 9-14 Builders Supply Quantity Cross Verification Page 1 TX0001 MN0001 TX0001 TX0001 MN0001 MN0001 TX0001 MD0001 200300 200600 200600 250 300 450 600 900 End of Report TX0001 100 .0000 6.0000 12.0000 35.0000 266.0000 3.0000 8.0000 3.0000 6.0000 .0000 6.0000 12.0000 35.0000 266.0000 3.0000 8.0000 3.0000 6.0000 .0000 712.6800 1933.6900 770.3700 338521.8900 215.5500 601.2100 1259.7300 2077.4200 .0000 712.6700 1933.6800 770.3500 338521.8700 215.5700 601.2000 1259.7400 2077.4400 Item ID Location Lot Number Old Quantity New Quantity Old Cost New Cost --------------------------------------------------------------------------------------------------------------------------------- 08/07/1999 2:48 PM Quantity Cross Verification Periodic Process Quantity Cross Verification Log Inventory User’s Manual Year-End Maintenance Features Use the Year-End Maintenance function on the Periodic Processing menu for maintenance tasks and to prepare for the next year. Reports A sample Year-End Maintenance Log is on page 9-18. Screen Use Screen Description Year-End Maintenance Use the Year-End Maintenance screen to increment the current fiscal year by 1 in the INPDxxx table. The year-todate totals in the INHSxxx (Summary History) file are reset to begin accumulating data for the next year. Inventory User’s Manual 9-15 Year-End Maintenance Periodic Process Year-End Maintenance Screen Field Definitions Field Name Description Have You Enter Y or N to indicate whether or not you have backed up your data files and made sure that no one else is using the system. If you enter N, the Periodic Processing menu appears. Note: You should also post the Inventory transactions and COGS adjustments for the year in which you are performing the maintenance before you use this function. You do not have to post Inventory transactions that are for the next year. Do you want to run Quantity Cross Verification? 9-16 Enter Y or N to indicate whether or not you want to produce the Quantity Cross Verification Log. If you enter N, the log is printed without verifying that the quantities are the same in the INQLxxx (Quantity Locations) and INQTxxx (Quantity Totals) files. Inventory User’s Manual Periodic Process Year-End Maintenance Command Bar Definitions Command Description Printer Select P to send the log to a printer. File Select F to send the log to a file. End Select E to exit to the Periodic Processing menu without producing the log. Saving and Exiting After the log is produced, the Periodic Processing menu appears. Inventory User’s Manual 9-17 9-18 Builders Supply Quantity Cross Verification Page 1 End of Report 900 MD0001 .0000 .0000 .0000 .0000 Item ID Location Lot Number Old Quantity New Quantity Old Cost New Cost --------------------------------------------------------------------------------------------------------------------------------- 08/07/1999 2:49 PM Year-End Maintenance Periodic Process Year-End Maintenance Log Inventory User’s Manual Purge Selected Files Features Use the Purge Selected Files function on the Periodic Processing menu to delete information you no longer need from selected files. Reports No report is associated with this function. Screen Use Screen Description Purge Selected Files Use the Purge Selected Files screen to delete the following out-of-date information: • • • • • • • • • • Inventory User’s Manual serial numbers lot numbers bin numbers alternate items physical count information promotional pricing serial history lot history detail history summary history 9-19 Purge Selected Files Periodic Process Purge Selected Files Screen Field Definitions 9-20 Field Name Description Have You Enter Y or N to indicate whether or not you have backed up your data files, printed all the reports, and made sure that no one else is using the system. If you enter N, the Periodic Processing menu appears. Delete zero quantity lots with sale dates before? Enter the sale date for zero-quantity lots where the deletion should stop. Zero-quantity lots before the date you enter will be deleted. Delete alternate items with end dates before? Enter the end date for alternate numbers where the deletion should stop. Alternate numbers with end dates before the date you enter will be deleted. Inventory User’s Manual Periodic Process Purge Selected Files Field Name Description Delete promotional pricing with end dates before? Enter the end date for the promotional pricing where the deletion should stop. Promotional price IDs with end dates before the date you enter will be deleted. Delete bins with last physical count date before? Enter the end date for the physical count date where the deletion should stop. Bins with physical count dates before the date you enter will be deleted. Delete serialized history and numbers with invoice dates before? This field appears if you keep serialized history. Delete lot history with invoice dates before? Enter the invoice date for lot history where the deletion should stop. Lot history before the date you enter will be deleted. Delete detail history with transaction dates before? This field appears if you keep detail history. Delete summary history dated before period/ year? Enter the period/year for summary history where the deletion should stop. Summary history before the date you enter will be deleted. Enter the invoice date for serialized history and serial numbers where the deletion should stop. Serialized history and serial numbers with invoice dates before the date you enter will be deleted. Enter the transaction date for detail history where the deletion should stop. Detail history before the date you enter will be deleted. Command Bar Definitions This screen has no command bar. Saving and Exiting After the files are purged, the Periodic Processing menu appears. Inventory User’s Manual 9-21 Rebuild Item Quantities Features Use the Rebuild Item Quantities function on the Periodic Processing menu to update the Inventory system with on-order, committed, and in-use information from Inventory or other applications that interface with Inventory. Reports A sample Rebuild Item Quantities Log is on page 9-26. Screen Use Screen Description Rebuild Item Quantities Use the Rebuild Item Quantities screen to verify that you have backed up your data files and that no one is using the system. Inventory User’s Manual 9-23 Rebuild Item Quantities Periodic Process Rebuild Item Quantities Screen Field Definitions 9-24 Field Name Description Have You Enter Y or N to indicate whether or not you have backed up your data files and made sure that no one else is using the system. If you enter N, the Periodic Processing menu appears. Print adjustment log only? If you want to print the adjustment log without updating quantities, enter Y; if not, enter N. Inventory User’s Manual Periodic Process Rebuild Item Quantities Command Bar Definitions Command Description Printer Select P to send the log to a printer. File Select F to send the log to a file. End Select E to change your selections or exit to the Periodic Processing menu. Saving and Exiting After the log is produced, the Periodic Processing menu appears. Inventory User’s Manual 9-25 9-26 Builders Supply Rebuild Item Quantities Page 1 Builders Supply Rebuild Item Quantities Page 2 End of Report Lot Record added to the Item Lot File Item= 812002 Lot Record added to the Item Lot File Item= 812002 Lot= 1302 Lot= 1303 Error Message ---------------------------------------------------------------------------------------------------------------------------------Lot Record added to the Item Lot File Item= 812002 Lot= 1301 07/01/1999 11:58 AM Item ID Location Old Committed New Committed Old In-Use New In-Use Old On-Order New On-Order ---------------------------------------------------------------------------------------------------------------------------------100 CA0001 .0000 .0000 3.0000.0000 .0000 .0000 100 MD0001 .0000 .0000 3.0000 .0000 5.0000 .0000 100 MN0001 .0000 .0000 1.0000 .0000 6.0000 .0000 100 TX0001 .0000 .0000 4.0000.0000 .0000 .0000 150 MD0001 .0000 .0000 2.0000 .0000 3.0000 .0000 150 MN0001 .0000 .0000 1.0000.0000 2.0000 .0000 250 MD0001 .0000 .0000 .0000 .0000 6.0000 .0000 250 MN0001 .0000 .0000 20.0000 .0000 10.0000 .0000 300 CA0001 .0000 .0000 4.0000 .0000 2.0000 .0000 300 MD0001 .0000 .0000 5.0000 .0000 .0000 .0000 300 MN0001 .0000 .0000 13.0000 .0000 4.0000 .0000 300 TX0001 .0000 .0000 2.0000 .0000 .0000 .0000 350 MN0001 .0000 .0000 7.0000 .0000 4.0000 .0000 400 CA0001 .0000 .0000 3.0000 .0000 2.0000 .0000 400 MN0001 .0000 .0000 1.0000.0000 .0000 .0000 400 TX0001 .0000 .0000 8.0000.0000 .0000 .0000 450 CA0001 .0000 .0000 3.0000 .0000 5.0000 .0000 450 TX0001 .0000 .0000 3.0000.0000 .0000 .0000 460 CA0001 .0000 .0000 4.0000 .0000 6.0000 .0000 460 MN0001 .0000 .0000 4.0000 .0000 .0000 .0000 460 TX0001 .0000 .0000 3.0000.0000 .0000 .0000 550 CA0001 .0000 .0000 .0000 .0000 5.0000 .0000 550 TX0001 .0000 .0000 4.0000 .0000 .0000 .0000 600 CA0001 .0000 .0000 .0000 .0000 3.0000 .0000 600 MN0001 .0000 .0000 1.0000.0000 .0000 .0000 610 MN0001 .0000 .0000 5.0000 .0000 .0000 .0000 650 MN0001 .0000 .0000 6.0000.0000 4.0000 .0000 07/01/1999 11:58 AM Rebuild Item Quantities Periodic Process Rebuild Item Quantities Log Inventory User’s Manual Inventory User’s Manual Physical Inventory Physical Inventory Selection Freeze Quantities Print Physical Inventory Tags Print Physical Inventory Worksheets Physical Counts Tag Entry Physical Counts Worksheet Entry Batch List Update Perpetual Inventory Physical Count List Variance Report Physical Count Valuation Report Inventory User’s Manual 10 10-3 10-7 10-11 10-15 10-19 10-27 10-33 10-49 10-37 10-41 10-45 10-1 Physical Inventory Selection Features Use the Physical Inventory Selection function on the Physical Inventory menu to identify a batch ID and select the data you want to include in the batch. Reports To produce a list of the data included in the batch ID, use the Batch List function on the Physical Inventory menu. Screen Use Screen Description Physical Inventory Selection Use the Physical Inventory Selection screen to enter a batch ID and then select the locations, items, bins, product lines, and user-defined fields you want to include in the batch ID. Inventory User’s Manual 10-3 Physical Inventory Selection Physical Inventory Physical Inventory Selection Screen Field Definitions 10-4 Field Name Description Batch ID Enter the ID of the batch you want to use to group items together for the physical count. Description Enter the description of the batch ID. Count Date Enter the date the physical count will be taken. GL Period Enter the period you want to post to. Location ID Enter the range of locations you want to include in the batch. Item ID Enter the range of items you want to include in the batch. Bin Number Enter the range of bins you want to include in the batch. Inventory User’s Manual Physical Inventory Physical Inventory Selection Field Name Description Product Line Enter the range of product lines you want to include in the batch. User-Defined Fields 1/2 Enter the range of user-defined fields you want to include in the batch. Use tag numbers? If you want to print tags and use tag numbers in the Physical Counts Tag Entry function, enter Y; if not, enter N. Display frozen quantities? If you want frozen quantities to be displayed when you enter counts, enter Y; if not, enter N. Enter exceptions only? If you want the counted quantity to be equal to the frozen quantity (so that only physical discrepancies must be entered), enter Y; if not, enter N. Default frozen quantities? If you want your frozen and counted quantities to be equal and you want your frozen quantities to be displayed, enter Y; if not, enter N. If you enter N, you must enter counted quantities for each item. Print items with zero quantities? If you want to print items with a quantity of zero on tags or worksheets, enter Y; if not, enter N. Freeze quantities? If you are ready for a physical count (all adjustments have been made) and want to freeze your on-hand quantities, enter Y; if not, enter N. Command Bar Definitions This screen has no command bar. Saving and Exiting To save your entries and exit to the Physical Inventory menu, use the Proceed (PgDn) command. To exit to the Physical Inventory menu without saving your entries, use the Exit (F7) command. Inventory User’s Manual 10-5 Freeze Quantities Features Use the Freeze Quantities function on the Physical Inventory menu to freeze the on-hand quantities of your items during the physical count. If you chose to freeze quantities in the Physical Inventory Selection function, you do not need to use this function. Reports No report is associated with this function. Screen Use Screen Description Freeze Quantities Use the Freeze Quantities screen to select the batch ID whose quantities you want to freeze. For a description of the display-only fields on this screen, see the Physical Inventory Selection function. Inventory User’s Manual 10-7 Freeze Quantities Physical Inventory Freeze Quantities Screen Field Definitions Field Name Description Batch ID Enter the ID of the batch you want to freeze quantities for. Note: You must enter a batch ID that is on file. (Batches are entered in the Physical Inventory Selection function.) Freeze quantities? 10-8 If you are ready for a physical count (all adjustments have been made) and want to freeze your on-hand quantities, enter Y; if not, enter N. Inventory User’s Manual Physical Inventory Freeze Quantities Command Bar Definitions This screen has no command bar. Saving and Exiting To save your entries and exit to the Physical Inventory menu, use the Proceed (PgDn) command. To exit to the Physical Inventory menu without saving your entries, use the Exit (F7) command. Inventory User’s Manual 10-9 Print Physical Inventory Tags Features Use the Print Physical Inventory Tags function on the Physical Inventory menu to print a tag for each item/location, bin number, lot, and serial number in the physical count. Reports A sample Physical Inventory Tag is on page 10-14. Screen Use Screen Description Print Physical Inventory Tags Use the Print Physical Inventory Tags screen to assign tag numbers and to select the order you want to organize the tags. Inventory User’s Manual 10-11 Print Physical Inventory Tags Physical Inventory Print Physical Inventory Tags Screen Field Definitions 10-12 Field Name Description Batch ID Enter the ID of the batch you want to work with. Print By Select the option by which you want to organize the list. Select Select the type of items you want in the list. Print frozen quantities? If you have frozen your inventory quantities and you want to print them on the tags, enter Y; if not, enter N. Use tag numbers? If you chose to use tag numbers in the Physical Inventory Selection function, YES is displayed. If you did not choose to use tag numbers in the Physical Inventory Selection screen, you can do so now. Inventory User’s Manual Physical Inventory Print Physical Inventory Tags Field Name Description Starting Tag Number Enter the number of the first tag for the physical count. If restart, last good tag number If you are reprinting tag numbers, enter the number of the last tag number assigned. Command Bar Definitions Command Description Printer Select P to send the list to a printer. File Select F to send the list to a file. End Select E to change your selections or exit to the Physical Inventory menu. Saving and Exiting Before the tags are produced, the message Mount Tags Now appears. Insert the tag forms into the printer and press Enter when you are ready to print. The message Is the form aligned? appears. If the form is aligned, enter Y; if not, enter N and realign the paper. After the list is produced, the Physical Inventory menu appears. Inventory User’s Manual 10-13 Print Physical Inventory Tags Physical Inventory Physical Inventory Tags 10-14 Inventory User’s Manual Print Physical Inventory Worksheets Features Use the Print Physical Inventory Worksheets function on the Physical Inventory menu to print worksheets, which can be used to record a physical count of your inventory. Reports A sample Physical Inventory Worksheet is on page 10-18. Screen Use Screen Description Print Physical Inventory Worksheets Use the Print Physical Inventory Worksheets screen to select the information you want on the worksheets. Inventory User’s Manual 10-15 Print Physical Inventory Worksheets Physical Inventory Print Physical Inventory Worksheets Screen Field Definitions 10-16 Field Name Description Batch ID Enter the ID of the batch you want to work with. Print By Select the option by which you want to organize the worksheets. Select Select the type of items you want on the worksheets. Print frozen quantities? If you have frozen your inventory quantities and you want to print them on the worksheets, enter Y; if not, enter N. Inventory User’s Manual Physical Inventory Print Physical Inventory Worksheets Field Name Description Page break on worksheets? If you chose to print the batch by location or product line and you want a page break between locations or product lines, enter Y; if not, enter N. If you chose to print by bin number, you cannot insert page breaks. Command Bar Definitions Command Description Printer Select P to send the worksheets to a printer. File Select F to send the worksheets to a file. End Select E to change your selections or exit to the Physical Inventory menu. Saving and Exiting After the worksheets are produced, the Physical Inventory menu appears. Inventory User’s Manual 10-17 10-18 Builders Supply Physical Inventory Worksheets Page 1 Item ID Location ID Application Department Bin ID Tag Number Units Frozen Qty Counted Qty Counted Description Product Line Units ----------------------------------------------------------------------------------------------------------------------------------350 CA0001 MATERIAL A-1 00062990 EA .0000 ______________ _____ Entry Door MATERIAL 300 CA0001 MATERIAL A-2 00062991 EA .0000 ______________ _____ Interior Door MATERIAL 150 CA0001 MATERIAL B-5 00062992 PKG .0000 ______________ _____ Plumbing Package MATERIAL 200600 CA0001 HEAT/AIR D-10 00062993 EA .0000 ______________ _____ Humidifier HEAT/AIR 450 CA0001 MATERIAL D-14 00062994 EA .0000 ______________ _____ Slide by Window 24” x 40” MATERIAL 460 CA0001 MATERIAL D-15 00062995 EA .0000 ______________ _____ Slide by Window 30” X 40” MATERIAL 200 CA0001 HEAT/AIR D-4 00062996 PKG .0000 ______________ _____ Heating/Cooling Package HEAT/AIR 200100 CA0001 HEAT/AIR D-5 00062997 EA .0000 ______________ _____ Furnace HEAT/AIR 200200 CA0001 HEAT/AIR D-6 00062998 EA .0000 ______________ _____ Water Heater HEAT/AIR 200300 CA0001 HEAT/AIR D-7 00062999 EA .0000 ______________ _____ Air Conditioner HEAT/AIR 200400 CA0001 HEAT/AIR D-8 00063000 EA .0000 ______________ _____ Water Softener HEAT/AIR 200500 CA0001 HEAT/AIR D-9 00063001 EA .0000 ______________ _____ Sump Pump HEAT/AIR 100 CA0001 MATERIAL E-10 00063002 PKG .0000 ______________ _____ Electrical Package MATERIAL 600 CA0001 MATERIAL E-14 00063003 EA .0000 ______________ _____ Standard Window 24” X 40” MATERIAL 610 CA0001 MATERIAL E-15 00063004 EA .0000 ______________ _____ Standard Window 30” X 40” MATERIAL 250 CA0001 MATERIAL G-10 00063005 CS .0000 ______________ _____ Exterior Panels MATERIAL 550 CA0001 MATERIAL G-12 00063006 PKG .0000 ______________ _____ Millwork Package MATERIAL 400 CA0001 MATERIAL H-12 00063007 PKG .0000 ______________ _____ Interior Materials MATERIAL 700 CA0001 MATERIAL I-16 00063008 SET .0000 ______________ _____ Cabinets MATERIAL 650 CA0001 MATERIAL J-17 00063009 PKG .0000 ______________ _____ Batch ID: 1 Print By: Location/Bin/Item 06/15/1999 1:10 PM Print Physical Inventory Worksheets Physical Inventory Physical Inventory Worksheets Inventory User’s Manual Physical Counts Tag Entry Features Use the Physical Counts Tag Entry function on the Physical Inventory menu to enter physical counts using tag numbers. Before you use this function, you must use the Print Physical Inventory Tags function. Reports To produce a list of the information entered in the Physical Counts Tag Entry function, use the Physical Count List function on the Physical Inventory menu. Screen Use Screen Description Physical Counts Tag Entry Use the Physical Counts Tag Entry screen to enter the physical count for each tag number. Append/Edit Tags window Use the Append/Edit Tags window to add or change information about the tag: item, location, bin number, unit of measure, counted quantity, and lot and serial numbers. Enter Exceptions window Use the Enter Exceptions window if you elected to enter exceptions only in the Physical Inventory Selection function. In this window you can enter only physical discrepancies that arise when the frozen and actual quantities are compared. Inventory User’s Manual 10-19 Physical Counts Tag Entry Physical Inventory Physical Counts Tag Entry Screen Field Definitions Field Name Description Batch Enter the ID of the batch you want to work with. Tag No The preassigned tag numbers in the batch are displayed. Loc ID, Bin ID, Item ID, Lot/Serial Number The location ID, bin ID, item ID, and lot /serial numbers in the physical count are displayed. If you are entering exceptions only, these fields are blank. The order that information is displayed depends on the selection you made. Frozen Qty 10-20 If you elected to show frozen quantities in the Physical Inventory Selection function, the system’s quantity is displayed. Inventory User’s Manual Physical Inventory Physical Counts Tag Entry Field Name Description Counted Qty The counted quantity for the item is displayed. Units The unit of measure for the item is displayed. Command Bar Definitions Command Description Enter = edit Move the prompt (>) to the line you want to edit and press Enter. The Edit Tags window appears. Exceptions Press C to go to the Enter Exceptions window and enter discrepancies in quantities. Append Press A to add tag numbers. The Append Tags window appears. Batch Press B to go to the Batch field and enter a different batch ID. Saving and Exiting To exit to the Physical Inventory menu, use the Exit (F7) command. Inventory User’s Manual 10-21 Physical Counts Tag Entry Physical Inventory Append/Edit Tags Window Field Definitions 10-22 Field Name Description Tag Number Enter the tag number for the batch. Location Enter the location ID for the physical count. Item ID Enter the item ID for the batch. Bin No Enter the bin number for the item. Unit of Measure Enter the unit of measure for the item. Counted Qty Enter or change the counted quantity of the item. Serial Number Enter the serial number of the item. Lot Number Enter the lot number for the item. Inventory User’s Manual Physical Inventory Physical Counts Tag Entry Command Bar Definitions This window has no command bar. Saving and Exiting To exit to the Physical Counts Tag Entry screen, use the Proceed (PgDn) command. Inventory User’s Manual 10-23 Physical Counts Tag Entry Physical Inventory Enter Exceptions Window Field Definitions 10-24 Field Name Description Tag Number Enter or change the tag number for the batch. Location The location ID for the physical count is displayed. Item ID The item ID for the batch is displayed. Bin No The bin number for the item is displayed. Counted Qty Enter or change the counted quantity of the item. Unit of Measure Enter or change the unit of measure for the item. Serial Number The serial number of the item is displayed. Lot Number The lot number for the item is displayed. Inventory User’s Manual Physical Inventory Physical Counts Tag Entry Command Bar Definitions This window has no command bar. Saving and Exiting To exit to the Physical Counts Tag Entry screen, use the Proceed (PgDn) command. Inventory User’s Manual 10-25 Physical Counts Worksheet Entry Features Use the Physical Counts Worksheet Entry function on the Physical Inventory menu to enter physical counts using worksheets. Before you use this function, you should use the Print Physical Inventory Worksheets function. Reports To produce a list of the information entered in the Physical Counts Worksheet Entry function, use the Physical Count List function on the Physical Inventory menu. Screen Use Screen Description Physical Counts Worksheet Entry Use the Physical Counts Worksheet Entry screen to enter the physical count for each worksheet. Append/Edit Physical Count window Use the Append/Edit Physical Count window to add or change information about the worksheet: item, location, bin number, unit of measure, counted quantity, and lot and serial numbers. Selected Sort window Use the Selected Sort window to select how you want the information to be displayed. Option 2 (Location/Product/Item/Bin) is used throughout this function . Inventory User’s Manual 10-27 Physical Counts Worksheet Entry Physical Inventory Physical Counts Worksheet Entry Screen Field Definitions Field Name Description Batch Enter the ID of the batch you want to work with. Location ID The ID of the location you are working with is displayed. Item ID, Bin ID, Product Line, Tag No., Lot Number, Serial Number The item ID, bin ID, product line, tag number (if you are using tags), and lot and serial numbers in the physical count are displayed. If you are entering exceptions only, these fields are blank. The order that information is displayed depends on the selection you made. 10-28 Inventory User’s Manual Physical Inventory Physical Counts Worksheet Entry Field Name Description Frozen Qty If you elected to show frozen quantities in the Physical Inventory Selection function, the system’s quantity is displayed. Counted Qty The counted quantity for the item is displayed. Units The unit of measure for the item is displayed. Command Bar Definitions Command Description Enter = edit Move the prompt (>) to the line you want to edit and press Enter. The Edit Physical Count window appears. Location Press O to go the Location ID field and change the location. Append Press A to add tag numbers. The Append Physical Count window appears. Saving and Exiting To exit to the Physical Inventory menu, use the Exit (F7) command. Inventory User’s Manual 10-29 Physical Counts Worksheet Entry Physical Inventory Append/Edit Physical Count Window Field Definitions 10-30 Field Name Description Location Enter the location ID for the physical count. Item ID Enter the item ID for the batch. Bin No Enter the bin number for the item. Unit of Measure Enter the unit of measure for the item. Tag Number Enter the tag number for the batch. Counted Qty Enter or change the counted quantity of the item. Serial Number Enter the serial number of the item. Lot Number Enter the lot number for the item. Inventory User’s Manual Physical Inventory Physical Counts Worksheet Entry Command Bar Definitions This window has no command bar. Saving and Exiting To exit to the Physical Counts Worksheet Entry screen, use the Proceed (PgDn) command. Inventory User’s Manual 10-31 Physical Counts Worksheet Entry Physical Inventory Selected Sort Window Field Definitions Field Name Description Selected Sort Select how you want the information to be displayed. Command Bar Definitions This window has no command bar. Saving and Exiting After you make your selection, the Physical Counts Worksheet Entry screen appears. 10-32 Inventory User’s Manual Batch List Features The Batch List shows the status of each batch in the physical inventory process and the selection criteria entered in the Physical Inventory Selection function. Reports A sample Batch List is on page 10-36. Screen Use Screen Description Batch List Use the Batch List screen to enter the batch IDs whose information you want to view. Inventory User’s Manual 10-33 Batch List Physical Inventory Batch List Screen Field Definitions 10-34 Field Name Description Enter batches to print Enter the IDs of the batches you want in the list. Print selection criteria? If you want the location IDs, item IDs, bin numbers, product lines, and user-defined fields for the batch in the list, enter Y; if not, enter N. Print selection toggles? If you want the selection toggles for using tag numbers, displaying frozen quantities, and defaulting counted quantities in the list, enter Y; if not, enter N. Inventory User’s Manual Physical Inventory Batch List Command Bar Definitions Command Description Printer Select P to send the list to a printer. File Select F to send the list to a file. Screen Select S to send the list to the screen. End Select E to change your selections or exit to the Physical Inventory menu. Saving and Exiting After the list is produced, the Physical Inventory menu appears. Inventory User’s Manual 10-35 10-36 Builders Supply Batch List Page 1 YES YES YES YES NO YES From Thru From 700 From 79999999999999999999 From Thru YES Use Tag Numbers? Display Frozen Quantities? Enter Exceptions Only? Default Counted Quantities? Print Tags for Zero Quantities? Freeze Quantities? Bin Number Item ID Location ID Batch 3 End of Report BAT3 YES Product Line From Thru Application From Thru Department From Thru NO NO 12/15/1995 Batch ID Description Tags Printed? Worksheets Printed? Counts Entered? Print Variance Reports? Count Date ---------------------------------------------------------------------------------------------------------------------------------- 2:32 PM 08/07/1999 Batch List Physical Inventory Batch List Inventory User’s Manual Physical Count List Features After you enter physical counts, produce a list of quantities from selected batches so that you can verify that the correct quantities were entered. Reports A sample Physical Count List is on page 10-40. An asterisk (*) indicates that there is a gap in the tag number sequence or that a tag number is missing. Screen Use Screen Description Physical Count List Use the Physical Count List screen to enter batches whose quantities you want to view. Inventory User’s Manual 10-37 Physical Count List Physical Inventory Physical Count List Screen Field Definitions 10-38 Field Name Description Batch ID Enter the IDs of the batches you want in the list. Print By Select the option by which you want to organize the list. Print exceptions only? If you want to list only exceptions for the batches, enter Y; otherwise, enter N. Print lot/serial numbers? If you want to list lot and serial numbers for each item, enter Y; if not, enter N. Print missing entries only? If you want to print a list of items that have not been entered through tags or worksheets, enter Y; if not, enter N. Inventory User’s Manual Physical Inventory Physical Count List Command Bar Definitions Command Description Printer Select P to send the list to a printer. File Select F to send the list to a file. Screen Select S to send the list to the screen. End Select E to change your selections or exit to the Physical Inventory menu. Saving and Exiting After the list is produced, the Physical Inventory menu appears. Inventory User’s Manual 10-39 10-40 Builders Supply Physical Count List Page 1 Dishwasher - Almond 910003 CA0001 Stove - Almond Dishwasher - White 910002 CA0001 920003 CA0001 Dishwasher - Black 910001 CA0001 Stove - White Refrigerator - Almond 902 CA0001 920002 CA0001 Refrigerator - White 901 CA0001 Stove - Black Refrigerator - White 901 CA0001 920001 CA0001 Refrigerator - Black 900 CA0001 L-21 L-21 L-21 L-20 L-20 L-20 L-19 L-20 L-19 L-19 APPLIANCE APPLIANCE APPLIANCE APPLIANCE APPLIANCE APPLIANCE APPLIANCE APPLIANCE APPLIANCE APPLIANCE .0000 EA .0000 EA .0000 EA .0000 EA .0000 EA .0000 EA .0000 EA .0000 EA .0000 EA .0000 EA Batch ID 1 Tag No. Item ID Bin Product Line Application Department Phys Count Units Location Description Lot Number Serial Number ----------------------------------------------------------------------------------------------------------------------------------- 06/15/1999 1:42 PM Physical Count List Physical Inventory Physical Count List Inventory User’s Manual Variance Report Features After you enter and verify the physical count of your inventory, produce the Variance Report. It shows the difference between the counts you entered and the frozen quantities in the system. You must print the Variance Report before you use the Update Perpetual Inventory function. Reports A sample Variance Report is on page 10-44. Screen Use Screen Description Variance Report Use the Variance Report screen to enter the batches that you want in the report. Inventory User’s Manual 10-41 Variance Report Physical Inventory Variance Report Screen Field Definitions 10-42 Field Name Description Enter batches to print Enter the IDs of the batches you want in the report. Inventory User’s Manual Physical Inventory Variance Report Command Bar Definitions Command Description Printer Select P to send the report to a printer. File Select F to send the report to a file. Screen Select S to send the report to the screen. End Select E to change your selections or exit to the Physical Inventory menu. Saving and Exiting After the report is produced, the Physical Inventory menu appears. Inventory User’s Manual 10-43 10-44 Product Line Application Department Builders Supply Variance Report Phys. Count Frozen Count Variance Units Unit Cost 1 Cost Variance Page End of Report ====================================== GRAND TOTALS 4.62 -------------------------------------Batch Total 4.62 ----------------------------------------------------------------------------------------------------------------------------------00002019 700400 I-13 COMPONENT CABINET 5003.0000 EA .1100 4.62 MN0002 Wood Screws 4961.0000 42.0000 Batch ID: BAT3 Tag No. Item ID Bin Location Description Serial/Lot Detail 08/07/1999 2:43 PM Variance Report Physical Inventory Variance Report Inventory User’s Manual Physical Count Valuation Report Features Use the Physical Count Valuation Report function on the Physical Inventory menu to produce a list of your inventory items and their quantities and values in dollars. Reports A sample Physical Count Valuation Report is on page 10-48. Screen Use Screen Description Physical Count Valuation Report Use the Physical Count Valuation Report screen to select the batches you want in the report. Inventory User’s Manual 10-45 Physical Count Valuation Report Physical Inventory Physical Count Valuation Report Screen Field Definitions 10-46 Field Name Description Enter Batches To Print Enter the batches you want in the report. Inventory User’s Manual Physical Inventory Physical Count Valuation Report Command Bar Definitions Command Description Printer Select P to send the report to a printer. File Select F to send the report to a file. Screen Select S to send the report to the screen. End Select E to change your selections or exit to the Physical Inventory menu. Saving and Exiting After the report is produced, the Physical Inventory menu appears. Inventory User’s Manual 10-47 10-48 Builders Supply Physical Count Valuation Report Page 1 BAT3 BAT3 BAT3 BAT3 BAT3 BAT3 BAT3 BAT3 BAT3 BAT3 BAT3 BAT3 BAT3 BAT3 BAT3 BAT3 BAT3 BAT3 BAT3 700500 700100 700110 700111 7001111 7001112 700113 700115 700117 700119 700120 700130 700199 700200 700300 700400 700998 700999 701 MN0002 MN0002 MN0002 MN0002 MN0002 MN0002 MN0002 MN0002 MN0002 MN0002 MN0002 MN0002 MN0002 MN0002 MN0002 MN0002 MN0002 MN0002 MN0002 EA EA EA EA OZ SET EA EA EA SET OZ OZ EA EA EA EA EA EA EA 8.0000 170.0000 85.0000 525.0000 1200.0000 12.0000 3.0000 15.0000 4.0000 15.0000 682.0000 632.0000 25.0000 91.0000 90.0000 4961.0000 36.0000 15694.0000 34.0000 Total Total .0000 Total .0000 .0000 .0000 .0000 .0000 .0000 .0000 .0000 .0000 .0000 .0000 .0000 .0000 .0000 .0000 .0000 .0000 .0000 Location ID MN0002 Total Account 104400 GL Code 01 Total 8.0000 Account 104000 GL Code 02 Total 170.0000 85.0000 525.0000 1200.0000 12.0000 3.0000 15.0000 4.0000 15.0000 682.0000 632.0000 25.0000 91.0000 90.0000 4961.0000 36.0000 15694.0000 34.0000 Location ID MN0001 Total Account 104400 ------------------------------------------68268.72 68268.72 .00 ------------------------------------------144.00 144.00 .00 144.00 144.00 .00 ------------------------------------------144.00 144.00 .00 ------------------------------------------68124.72 68124.72 .00 18684.70 18684.70 .00 4884.95 4884.95 .00 36781.50 36781.50 .00 72.00 72.00 .00 22.44 22.44 .00 7.50 7.50 .00 186.45 186.45 .00 21.64 21.64 .00 54.90 54.90 .00 354.64 354.64 .00 271.76 271.76 .00 1551.75 1551.75 .00 185.64 185.64 .00 187.20 187.20 .00 545.71 545.71 .00 94.68 94.68 .00 1255.52 1255.52 .00 2961.74 2961.74 .00 ------------------------------------------68124.72 68124.72 .00 ------------------------------------------604.74 604.74 .00 ------------------------------------------604.74 604.74 .00 Batch Inventory Number Location Unit Frozen Qty. Updated Qty. Variance Qty. Frozen Value Updated Value Variance Value ----------------------------------------------------------------------------------------------------------------------------------BAT3 700 MN0001 SET 3.0000 3.0000 .0000 604.74 604.74 .00 ------------------------------------------GL Code 01 Total 604.74 604.74 .00 06/10/1999 6:26 AM Physical Count Valuation Report Physical Inventory Physical Count Valuation Report Inventory User’s Manual Update Perpetual Inventory Features Use the Update Perpetual Inventory function after you complete and verify other Physical Inventory functions to update quantities for the items selected in each batch. Reports A sample Update Perpetual Inventory Log is on page 10-52. Screen Use Screen Description Update Perpetual Inventory Use the Update Perpetual Inventory screen to enter the batches you want to update to the general ledger. Inventory User’s Manual 10-49 Update Perpetual Inventory Physical Inventory Update Perpetual Inventory Screen Field Definitions 10-50 Field Name Description Have you backed up your data files? Enter Y or N to indicate whether or not you have backed up your data files. If you enter N, the Physical Inventory menu appears. Have you completed entering physical inventory for the batches? Enter Y or N to indicate whether or not you have completed entering physical counts for the batch. If you enter N, the Physical Inventory menu appears. Enter batches to update Enter the batches whose quantities you want to update. Note: You must also produce the Variance Report before you update your perpetual inventory. You cannot reconstruct this report after you post. Inventory User’s Manual Physical Inventory Update Perpetual Inventory Field Name Description Post variance amount to General Ledger? If Inventory is not interfaced with General Ledger N is displayed. If Inventory is interfaced with General Ledger and you want to post directly, enter Y; if not, enter N. Post to General Ledger Enter 1 to post the current year’s files to General Ledger or 2 to post last year’s files to General Ledger. Command Bar Definitions Command Description Printer Select P to send the log to a printer. File Select F to send the log to a file. End Select E to change your selections or exit to the Physical Inventory menu. Saving and Exiting After the log is produced, the Physical Inventory menu appears. Inventory User’s Manual 10-51 10-52 Builders Supply Update Perpetual Inventory PAGE 1 700400 700400 Posted to Period 12 BAT3 BAT3 MN0002 MN0002 104000 504000 4.62 -------------------------------------------4.62 4.62 4.62 Batch ID Inventory ID Loc ID Serial/Lot No.’s GL Account Debit Credit --------------------------------------------------------------------------------------------------------------------------------- 08/07/1999 2:44 PM Update Perpetual Inventory Physical Inventory Update Perpetual Inventory Log Inventory User’s Manual Inventory User’s Manual File Maintenance Items Item Locations Locations Price Structures Promotional Pricing Tables Inventory User’s Manual 11 11-3 11-17 11-51 11-55 11-59 11-63 11-1 Items Features Use the Items function on the File Maintenance menu to enter and maintain your inventory items at the item level. Reports To produce a list of the information entered on the Items screen, use the Item Detail List function on the Master File Lists menu. Screen Use Screen Description Items Use the Items screen to enter an item ID and a description and to select the information you want to enter or change: General Information, Units of Measure, Alternate Items, and Item Locations. Items - General Information Use the General Information screen to enter or change general information about the item, default values, and user-defined fields. Items - Units of Measure Use the Units of Measure screen to set up or maintain an unlimited number of alternate units of measure for an item. Items - Alternate Items Use the Alternate Items screen to set up and maintain alternate, customer, superseded, bar code, and vendor part numbers for an item. Items - Locations Use the Locations screen to enter the item whose location information you want to add or change. You can get to the Locations screen from the Items function or from the Item Locations function. The field descriptions are in the Item Locations function. Inventory User’s Manual 11-3 Items 11-4 File Maintenance Screen Description Append Location window Use the Append Location window to copy information from an existing item record. Additional Descriptions window The Additional Descriptions window appears if you elected to use additional descriptions in the Options and Interfaces function in Resource Manager. Use it to enter additional information about an item. Inventory User’s Manual File Maintenance Items Items Screen Field Definitions Field Name Description Item ID Enter the ID of the item whose information you want to add or change. Copy From This field appears if you entered a new item ID. Enter the ID of the item whose information you want to copy Description Enter a description of the item. If you elected to use additional descriptions in the Resource Manager Options and Interfaces function, the Additional Descriptions window appears. Do You Want to Maintain Enter Y for each screen you want to work on; enter N for each screen you do not want to work on. If you are adding new items, you must enter general information. Inventory User’s Manual 11-5 Items File Maintenance Command Bar Definitions This screen has no command bar. Saving and Exiting When you save your entries (PgDn), the first screen you selected from the Items menu appears. To exit to the File Maintenance menu, use the Exit (F7) command. 11-6 Inventory User’s Manual File Maintenance Items Items - General Information Screen Field Definitions Field Name Description Item ID The ID of the item you are working with is displayed. Description The description of the item you are working with is displayed. Status Enter or change the status of the item: Active Discontinued Superseded Obsolete Item Type Inventory User’s Manual Enter 1 if the item is nonserialized, 2 if the item is serialized, or 3 if the item is a service. 11-7 Items File Maintenance Field Name Description Kitted Item? If the item can be used as a kit, enter Y; if not, enter N. If you are working with a service item, this field is skipped. Track Lots? If you want to track lots for the item, enter Y; if not, enter N. If you are working with a service item or a kitted item, this field is skipped. Auto Reorder? If you want the item to be in the Reorder Report whenever the reorder level is reached, enter Y; if not, enter N. If you are working with a service item or a kitted item, this field is skipped. Base UOM Enter or change the base unit of measure at which the item is most often sold or picked from stock. Sales Category Enter or change the sales category for the item. Product Line Enter or change the product line for the item. Item Price ID Enter or change the item price ID for the item. Tax Class Enter or change the tax class the item belongs to. Item Weight Enter or change the weight of the item. User-Defined Fields Enter or change the user-defined fields for the item. Command Bar Definitions This screen has no command bar. Saving and Exiting When you save your entries and exit from the General Information screen (PgDn), the next screen you selected from the Items menu appears. If you did not select another screen, the File Maintenance menu appears. 11-8 Inventory User’s Manual File Maintenance Items Items - Units of Measure Screen Field Definitions Field Name Description Item ID The ID of the item you are working with is displayed. Description The description of the item you are working with is displayed. Units The base unit of measure you entered on the General Information screen is displayed. Conversion Factor The conversion factor tells the system what portion of the base unit the alternate unit is. Enter the conversion factor for the base unit of measure. Inventory User’s Manual 11-9 Items File Maintenance Field Name Description %/$ The penalty factor determines the price when fractional parts of a unit are sold. A penalty expressed as a percentage applies to the fractional part of the units sold, resulting in a unit penalty for fractional quantities sold. A penalty expressed as a dollar amount applies to the inventory item, regardless of the quantity sold, resulting in a penalty per sale rather than per unit. To charge a percentage that applies to the fraction of the units sold, enter %. To charge a dollar amount that applies to the entire sale, enter $. Penalty Enter the percentage or dollar amount of the penalty. Default The default unit of measure is displayed. Command Bar Definitions Command Description Enter = edit Move the prompt (>) to the line you want to edit and press Enter. Append Press A to add a unit of measure to the list. Base unit defaults Press D to go to the Default field and edit the default unit of measure set up on the General Information screen. Next screen Press N to go to the next screen you selected or to return to the Items screen if the Units of Measure screen is the last screen you selected. Previous screen Press P to go to the previous screen or to return to the Items screen if the Units of Measure screen is the first screen you selected. Saving and Exiting To save the information and go to the next or previous screen, press N or P, respectively. To exit to the File Maintenance menu, use the Exit (F7) command. 11-10 Inventory User’s Manual File Maintenance Items Items - Alternate Items Screen Field Definitions Field Name Description Item ID The ID of the item you are working with is displayed. Description The description of the item you are working with is displayed. Alternate Type Enter the type of alternate you want to use: aLias Alternate part number Customer part number Superseded part number Bar code Vendor part number Inventory User’s Manual 11-11 Items File Maintenance Field Name Description Src ID If you selected a customer alternate, enter a customer ID; if you selected a vendor alternate, enter a vendor ID. Alternate Item ID Enter or change the ID for the alternate item you selected. Start Date Enter the date you will begin using the alternate item. End Date Enter the date you will stop using the alternate item. To set the end date for an indefinite amount of time, leave this field blank. Command Bar Definitions Command Description Enter = edit Move the prompt (>) to the line you want to edit and press Enter. Append Press A to add an alternate item to the list. Next screen Press N to go to the next screen you selected or to return to the Items screen if the Alternate Items screen is the last screen you selected. Previous screen Press P to go to the previous screen or to return to the Items screen if the Alternate Items screen is the first screen you selected. Saving and Exiting To save the information and go to the next or previous screen, press N or P, respectively. To exit to the File Maintenance menu, use the Exit (F7) command. 11-12 Inventory User’s Manual File Maintenance Items Items - Locations Screen For information about this screen, see the Item Locations function. Inventory User’s Manual 11-13 Items File Maintenance Append Location Window Field Definitions 11-14 Field Name Description Loc ID Accept the displayed location ID, or enter a different location ID. Copy From The item ID you entered at the Copy From prompt is displayed. Description The description of the item whose information you want to copy is displayed. Do You Want to Copy Enter Y or N for each option to indicate whether or not you want to copy the information from the item record. Inventory User’s Manual File Maintenance Items Command Bar Definitions This window has no command bar. Saving and Exiting To save your entries and exit to the Items screen, use the Proceed (PgDn) command. Inventory User’s Manual 11-15 Items File Maintenance Additional Descriptions Window Field Definitions Field Name Description Additional Descriptions Enter information about the item. Command Bar Definitions This window has no command bar. Saving and Exiting To save your entry and exit to the Items screen, press Enter. 11-16 Inventory User’s Manual Item Locations Features Use the Item Locations function to add and maintain the following item-specific information at the location level: • • • • • • • general default information price information cost information vendor information bin information lot numbers serial numbers Reports To produce a list of the information entered on the Item Locations screen, use the Item Locations List function on the Master File Lists menu. Screen Use Screen Description Item Locations Use the Item Locations screen to enter the item whose location information you want to add or change and to select the information that you want to add or change. Item Locations - Location Information Use the Location Information screen to enter or change default information, inventory values, order quantities, GL accounts, and item quantity information. Item Locations - Price Information Use the Price Information screen to define item-specific pricing for selected customer levels. Inventory User’s Manual 11-17 Item Locations 11-18 File Maintenance Screen Description Item Locations - Cost Information Use the Cost Information screen to define item-specific costs, EOQ overrides, standard cost makeup, and cost detail. Item Locations - Vendor Information Use the Vendor Information screen to set up vendors for the item. Item Locations - Bin Information Use the Bin Information screen to enter bin locations for the item. Item Locations - Lot Information Use the Lot Information screen to define lots for the item. Item Locations - Serial Numbers Use the Serial Numbers screen to define serial numbers for the item. Append Location window Use the Append Location window to copy information from an existing location record. Edit Price Information window Use the Edit Price Information window to change pricing information for the unit specified and to view quantity breaks for the item. Edit Vendor Information window Use the Edit Vendor Information window to update quantity price break information and to change vendor purchase order information. Edit Lot Information window Use the Edit Lot Information window to change quantity and purchase information for the lot. Edit Serial Numbers window Use the Edit Serial Numbers window to update quantity and purchase information for the serial number. Inventory User’s Manual File Maintenance Item Locations Item Locations Screen Field Definitions Field Name Description Item ID Enter the ID of the item whose information you want to add or change. Description The description of the item is displayed. Units Accept the displayed unit of measure, or enter a different unit. Loc The location IDs for the item are displayed. If you delete a location record that contains inventory items, you can no longer access those item location records. If you accidentally delete a location that contains inventory items, reenter the location, using the same ID. You can then access the items again. Inventory User’s Manual 11-19 Item Locations File Maintenance Field Name Description On Hand The number of units on hand at the location is displayed. Committed The number of units of the item customers have on order or otherwise reserved is displayed. In Use The quantity being used is displayed. Available The quantity available for sale (the on-hand quantity minus the in-use and committed quantities) is displayed. On Order The quantity that is on order from vendors is displayed. Do You Want to Maintain Enter Y for each screen you want to work on; enter N for each screen you do not want to work on. Then see the appropriate screens below. Command Bar Definitions Command Description Enter = edit Move the prompt (>) to the location you want to edit and press Enter. The cursor goes to the Do You Want to Maintain fields, where you can select the screens you want to edit. Append Press A to add a location to the item. Item Press I to go to the Item ID field and enter a different item ID. Units Press U to go to the Units field and enter a different unit of measure. Saving and Exiting When you save your entries (PgDn), the first screen you selected from the Item Locations menu appears. To exit to the File Maintenance menu, use the Exit (F7) command. 11-20 Inventory User’s Manual File Maintenance Item Locations Item Locations - Location Information Screen Field Definitions Field Name Description Item ID The ID of the item you are working with is displayed. Location The location you selected on the Item Locations screen is displayed. Description The description of the item is displayed. Units The unit of measure you are working with is displayed. Vendor ID Enter or change the vendor you usually buy the item from. Bin Number Enter or change the bin number where the item is stored. Price ID Enter or change the price ID for the item. Inventory User’s Manual 11-21 Item Locations File Maintenance Field Name Description Lead Time Enter or change the number of days it usually takes the vendor to ship the item to you. Status Enter or change the status of the item at the location: Active Discontinued Superseded Obsolete Forecast Type Enter the forecast type for the item. Item Value The current value of the item (quantity x unit cost total) is displayed. COGS Adjustment The total amount of COGS adjustments that have been calculated for the item is displayed. Adjusted Value The value of the item after the COGS adjustments have been applied (current item value + COGS adjustment) is displayed. Maximum Qty Enter or change the maximum quantity you want to have on hand at one time. Order Point Quantity Enter or change the reorder point. When the number of units in stock reaches this point, the item is listed in the Safety Stock Alert Report. Order Point Status If you changed the order point quantity, enter M (manual). If the system calculates the order point, the order point status is calculated. If you want to freeze the current order point quantity, enter F. Safety Stock Quantity 11-22 Enter or change the quantity you want to have as a safeguard against the uncertainty of the order process. Inventory User’s Manual File Maintenance Item Locations Field Name Description Safety Stock Status If you changed the amount of the safety stock, enter M (manual). If the system calculates the safety stock, the safety stock status is calculated. If you want to freeze the current order point quantity, enter F. EOQ Quantity Enter or change the most economic order quantity you usually order from the vendor. EOQ Status If you changed the EOQ amount, enter M (manual). If the system calculates EOQ, the EOQ status is calculated. If you want to freeze the current EOQ quantity, enter F. Min Order Qty Enter or change the minimum quantity you want to order. GL Account Code Enter or change the GL account code you want to use. Sales The sales account code is displayed. COGS The COGS account code is displayed. Inventory The inventory account code is displayed. WIP The WIP account code is displayed. Inventory Adjustment The inventory adjustment account code is displayed. COGS Adjustment The COGS adjustment account code is displayed. Purch Price Variance The purchase price variance account code is displayed. Phys Count Variance The physical count variance account code is displayed. Transfer Cost The transfer cost account code is displayed. On Hand The quantity on hand at the location is displayed. Inventory User’s Manual 11-23 Item Locations File Maintenance Field Name Description Committed Enter or change the number of units of the item on order for customers or otherwise reserved. If Inventory is interfaced with Sales Order, this field is updated when you enter orders or a new sales order in the Inventory Transactions function. In Use Enter or change the quantity that has been invoiced but not posted. When you sell an item through Accounts Receivable or Sales Order, the quantity that is sold is stored in this field until it is posted. Available The quantity available for sale (the on-hand quantity minus the in-use and committed quantities) is displayed. On Order Enter or change the quantity that is on order from the vendors. Command Bar Definitions This screen has no command bar. Saving and Exiting When you save your entries (PgDn), the next screen you selected from the Item Locations menu appears. If you did not select another screen, the File Maintenance menu appears. 11-24 Inventory User’s Manual File Maintenance Item Locations Item Locations - Price Information Screen Field Definitions Field Name Description Item ID The ID of the item you are working with is displayed. Location The location you specified on the Item Locations screen is displayed. Description The description of the item is displayed. Units The default unit of measure is displayed. Average Price The average price for the item at the location is displayed. Base Price The base price of the item at the location is displayed. List Price The list price of the item at the location is displayed. Inventory User’s Manual 11-25 Item Locations File Maintenance Field Name Description Minimum Price The minimum price of the item at the location is displayed. Cust Lvl Enter the customer level you want to associate with the location. Description The description of the customer level is displayed. Adj Base Enter the adjustment base for the customer level: N no base: fixed dollar amount S standard cost: cost of the item determine by the component costs B base cost: fixed cost A average price: weighted average of selling prices P price: selling (base) price L list price: published price M minimum price: lowest selling price C calculated price: price at the time the price break is calculated 11-26 %/$ If you want to use a percentage adjustment, enter %; if you want to use a dollar adjustment, enter $. Adjustment Enter the amount of the adjustment. For negative amounts, use the minus symbol; enter positive quantities without a plus sign. Promo? If a promotional price is set up and should be applied to the customer level, enter Y; if not, enter N. Inventory User’s Manual File Maintenance Item Locations Command Bar Definitions Price Information Command Description Tab = Customer Levels Press Tab to go to the Customer Levels section of the screen. Enter = edit Move the prompt (>) to the line you want to edit and press Enter. The Edit Price Information window appears. Next screen Press N to go to the next screen you selected or to return to the Item Locations screen if the Price Information screen is the last screen you selected. Previous screen Press P to go to the previous screen or to return to the Item Locations screen if the Price Information screen is the first screen you selected. Customer Levels Command Description Tab = Price Info Press Tab to go to the Price Information section of the screen. Enter = edit Move the prompt (>) to the line you want to edit and press Enter. Append Press A to add a customer level to the list. Next screen Press N to go to the next screen you selected or to return to the Item Locations screen if the Price Information screen is the last screen you selected. Previous screen Press P to go to the previous screen or to return to the Item Locations screen if the Price Information screen is the first screen you selected. Saving and Exiting To save the information and go to the next or previous screen, press N or P, respectively. To exit to the File Maintenance menu, use the Exit (F7) command. Inventory User’s Manual 11-27 Item Locations File Maintenance Item Locations - Cost Information Screen Field Definitions 11-28 Field Name Description Item ID The ID of the item you are working with is displayed. Location The location you selected on the Item Locations screen is displayed. Description The description of the item is displayed. Units The unit of measure you are working with is displayed. Average Enter or change the weighted average cost of the item, regardless of the costing method you are using. Inventory User’s Manual File Maintenance Item Locations Field Name Description Last Enter or change the last price paid for each unit, regardless of the costing method you are using. If Accounts Payable/Purchase Order are interfaced with Inventory, this field is updated. Base Enter or change the cost of the unit. Carrying Cost Percent If you entered a carrying cost percent in the Locations function, it is displayed. Enter the amount you want to override the carrying cost by. When you override the carrying cost, you allow for an increase or a decrease to the item’s carrying cost as a result of abnormal conditions. Ordering Cost Amt If you entered an ordering cost in the Locations function, it is displayed. Enter the amount you want to override the ordering cost by. When you override the ordering cost, you allow for an increase or a decrease to the item’s ordering cost as a result of abnormal conditions. Code If you are using the standard costing valuation method, enter the standard cost codes. Description The description of the standard cost code is displayed. Cost Enter or change the amount of the cost bucket. Standard Cost The standard cost total (total of the costs entered) is displayed. Init Date The first time the order was purchased is displayed. The cost detail information is not available for serialized items. The quantities are updated on the Serial Numbers screen when items are purchased or sold. On Hand The quantity of items in stock at the location is displayed. If you elected to edit quantities in the Resource Manager Options and Interfaces function, you can edit the quantity on hand. Inventory User’s Manual 11-29 Item Locations File Maintenance Field Name Description Unit Cost Enter the unit cost of the item. Extended Cost The extended cost of the unit is displayed. Lot Number If lots are used, the lot number is displayed. Total On Hand The total on-hand quantity of the unit is displayed. Total Extended Cost The total of all the cost buckets is displayed. Command Bar Definitions Standard Cost Makeup 11-30 Command Description Tab = Cost Detail Press Tab to go to the Cost Detail section of the screen. Costs Press C to go to the Costs section of the screen. Enter = edit Move the prompt (>) to the standard cost bucket you want to edit and press Enter. Append Press A to add a standard cost makeup code. Next screen Press N to go to the next screen you selected or to return to the Item Locations screen if the Cost Information screen is the last screen you selected. Previous screen Press P to go to the previous screen or to return to the Item Locations screen if the Cost Information screen is the first screen you selected. Inventory User’s Manual File Maintenance Item Locations Cost Detail Command Description Tab = Cost Makeup Press Tab to go the Standard Cost Makeup section of the screen. Costs Press C to go to the Costs section of the screen. Enter = edit Move the prompt (>) to the cost detail you want to edit and press Enter. Append Press A to add a cost detail line. Next screen Press N to go to the next screen you selected or to return to the Item Locations screen if the Cost Information screen is the last screen you selected. Previous screen Press P to go to the previous screen or to return to the Item Locations screen if the Cost Information screen is the last screen you selected. Saving and Exiting To save the information and go to the next or previous screen, press N or P, respectively. To exit to the File Maintenance menu, use the Exit (F7) command. Inventory User’s Manual 11-31 Item Locations File Maintenance Item Locations - Vendor Information Screen Field Definitions 11-32 Field Name Description Item ID The ID of the item you are working with is displayed. Location The location you selected on the Item Locations screen is displayed. Description The description of the item is displayed. Units The default unit of measure is displayed. Vendor The vendors available for the item are displayed. Vendor’s Part Number The number the vendor uses to identify the item is displayed. This information is printed on the orders produced in Purchase Order if you use additional descriptions in Purchase Order. Inventory User’s Manual File Maintenance Item Locations Field Name Description Lead The number of days it usually takes the vendor to ship the item to you is displayed. Quantity The quantity last ordered from the vendor is displayed. Unit The unit last ordered from the vendor is displayed. Cost The last order cost from the vendor is displayed. Date The date the last purchase was made from the vendor is displayed. Command Bar Definitions Command Description Enter = edit Move the prompt (>) to the line you want to edit and press Enter. The Edit Vendor Information window appears. Append Press A to add a vendor to the item. Next screen Press N to go to the next screen you selected or to return to the Item Locations screen if the Vendor Information screen is the last screen you selected. Previous screen Press P to go to the previous screen or to return to the Item Locations screen if the Vendor Information screen is the first screen you selected. Saving and Exiting To save the information and go to the next or previous screen, press N or P, respectively. To exit to the File Maintenance menu, use the Exit (F7) command. Inventory User’s Manual 11-33 Item Locations File Maintenance Item Locations - Bin Information Screen Field Definitions 11-34 Field Name Description Item ID The ID of the item you are working with is displayed. Location The location you selected on the Item Locations screen is displayed. Description The description of the item is displayed. Units The unit of measure you are working with is displayed. Bin No If you entered a bin number on the Location Information screen, it is displayed. Tag Number If a tag number was assigned to the bin during the last physical count, it is displayed. Inventory User’s Manual File Maintenance Item Locations Field Name Description Date The last date a physical count was taken is displayed. Count Qty The quantity counted during the last physical count is displayed. Units The unit of measure the last physical count was based on is displayed. Batch The batch ID used in the last physical count is displayed. Command Bar Definitions Command Description Append Press A to add a bin number to the item. Next screen Press N to go to the next screen you selected or to return to the Item Locations screen if the Bin Information screen is the last screen you selected. Previous screen Press P to go to the previous screen or to return to the Item Locations screen if the Bin Information screen is the first screen you selected. Saving and Exiting To save the information and go to the next or previous screen, press N or P, respectively. To exit to the File Maintenance menu, use the Exit (F7) command. Inventory User’s Manual 11-35 Item Locations File Maintenance Item Locations - Lot Information Screen Field Definitions 11-36 Field Name Description Item ID The ID of the item you are working with is displayed. Location The location you selected on the Item Locations screen is displayed. Description The description of the item is displayed. Units The unit of measure you are working with is displayed. Lot Number The lot numbers of the item are displayed. Available The quantity available is displayed. Avg Unit Cost The average unit cost of the lot is displayed. Inventory User’s Manual File Maintenance Item Locations Field Name Description Expires The expiration date of the lot is displayed. Vendor The vendor of the lot is displayed. Status The status of the lot is displayed: available, sold, or expired. Command Bar Definitions Command Description Enter = edit Move the prompt (>) to the line you want edit and press Enter. Append Press A to add a lot to the item. Next screen Press N to go to the next screen you selected or to return to the Item Locations screen if the Lot Information screen is the last screen you selected. Previous screen Press P to go to the previous screen or to return to the Item Locations screen if the Lot Information screen is the first screen you selected. Saving and Exiting To save the information and go to the next or previous screen, press N or P, respectively. To exit to the File Maintenance menu, use the Exit (F7) command. Inventory User’s Manual 11-37 Item Locations File Maintenance Item Locations - Serial Numbers Screen Field Definitions 11-38 Field Name Description Item ID The ID of the item you are working with is displayed. Location The location you selected on the Item Locations screen is displayed. Description The description of the item is displayed. Units The default unit of measure is displayed. Serial Number The serial numbers for the item are displayed. Unit Price The unit price of the item is displayed. Unit Cost The unit cost of the item is displayed. Inventory User’s Manual File Maintenance Item Locations Field Name Description Status The status of the serialized item is displayed: Available: the item is new and available for sale In use: the item has been sold, but the invoice has not been posted Sold: the item has been sold, and the invoice has been posted Lost: the serialized item was lost when a physical count was taken Command Bar Definitions Command Description Enter = edit Move the prompt to the line you want to edit and press Enter. Append Press A to add a lot to the item. Next screen Press N to go to the next screen you selected or to return to the Item Locations screen if the Serial Numbers screen is the last screen you selected. Previous screen Press P to go to the previous screen or to return to the Item Locations screen if the Serial Numbers screen is the first screen you selected. Saving and Exiting To save the information and go to the next or previous screen, press N or P, respectively. To exit to the File Maintenance menu, use the Exit (F7) command. Inventory User’s Manual 11-39 Item Locations File Maintenance Append Location Window Field Definitions 11-40 Field Name Description Loc ID Enter the ID of the location record you want to add. Copy From Enter the ID of the location record you want to copy. Do You Want to Copy Enter Y or N for each option to indicate whether or not you want to copy the information from the location record. Inventory User’s Manual File Maintenance Item Locations Command Bar Definitions This window has no command bar. Saving and Exiting To save your entries and exit to the Item Locations screen, use the Proceed (PgDn) command. To exit to the Item Locations screen without saving your entries, use the Exit (F7) command. Inventory User’s Manual 11-41 Item Locations File Maintenance Edit Price Information Window Field Definitions 11-42 Field Name Description Unit of Measure The unit of measure for the item is displayed. Average Price Enter or change the average selling price of the item. Base Price Enter or change the selling price of each unit. List Price Enter or change the manufacturer’s suggested retail price of the item. Minimum Price Enter or change the minimum price the item will be sold at. Quantity 1–5 Enter or change one to five quantities that a customer must purchase to get the discount price. Inventory User’s Manual File Maintenance Item Locations Field Name Description %/$ Enter % to use a percentage adjustment; enter $ to use a dollar adjustment. Price Adj Enter the amount of the quantity adjustment. Command Bar Definitions This window has not command bar. Saving and Exiting To save your entries and exit to the Price Information screen, use the Proceed (PgDn) command. To exit to the Price Information screen without saving your entries, use the Exit (F7) command. Inventory User’s Manual 11-43 Item Locations File Maintenance Edit Vendor Information Window Field Definitions 11-44 Field Name Description Vendor ID If you are editing a vendor record, the vendor ID you selected to edit is displayed. If you are adding a vendor record, enter the vendor’s ID. Name If you are editing a vendor record, the name is displayed. If you are adding a vendor record, enter the vendor’s name. Lead Time Enter or change the number of days it usually takes the vendor to ship the item to you. Vendor’s Part Enter or change the number the vendor uses to identify the item. This information is printed on the orders produced in Purchase Order. Inventory User’s Manual File Maintenance Item Locations Field Name Description Last Order Qty Enter or change the last quantity ordered from the vendor. Units Enter or change the number of units you last ordered from the vendor. Last Order Cost Enter or change the cost of the last order. Last Order No Enter or change the order number of the last purchase made from the vendor. Last Order Date Enter or change the date the last order was placed with the vendor. Quantity 1–5 Enter or change the quantity you must purchase before receiving the cost adjustment from the vendor. Cost Enter or change the vendor’s unit cost for the quantity adjustment. Units The default unit of measure is displayed. Command Bar Definitions This window has no command bar. Saving and Exiting To save your entries and exit to the Vendor Information screen, use the Proceed (PgDn) command. To exit to the Vendor Information screen without saving your entries, use the Exit (F7) command. Inventory User’s Manual 11-45 Item Locations File Maintenance Edit Lot Information Window Field Definitions 11-46 Field Name Description Lot No Enter or change the number of the lot. Expires Enter or change the expiration date of the lot. Comment Enter a comment or additional information about the lot. Status Enter A if the lot is available, S if the entire lot has been sold, or E if the lot has expired. Received Enter or change the received quantity in the lot before any was sold or returned. Sold Enter or change the quantity sold in the lot. Returned Enter or change the quantity returned in the lot. Inventory User’s Manual File Maintenance Item Locations Field Name Description On Hand The quantity on hand in the lot is displayed. Committed Enter or change the number of units in the lot that is reserved. In Use Enter or change the quantity that has been invoiced but not posted in the lot. Available The quantity available for sale in the lot (the on-hand quantity minus the in-use and committed quantities) is displayed. On Order (PO) Enter or change the amount on order. Vendor ID The ID of the vendor the lot was purchased from is displayed. Name The name of the vendor the lot was purchased from is displayed. PO Number The purchase order number is displayed. PO Date The date the purchase order was made is displayed. Invoice Number The invoice number is displayed. Invoice Date The date of the invoice is displayed. Purch Unit Cost The unit cost of the purchase is displayed. Command Bar Definitions This window has no command bar. Saving and Exiting To save your entries and exit to the Lot Information screen, use the Proceed (PgDn) command. To exit to the Lot Information screen without saving your entries, use the Exit (F7) command. Inventory User’s Manual 11-47 Item Locations File Maintenance Edit Serial Numbers Window Field Definitions 11-48 Field Name Description Serial No Enter or change the serial number for the unit. Lot No Enter or change the lot number for the unit. Comments Enter information you want to note about the item. Cost Enter or change the cost for the unit. Inventory User’s Manual File Maintenance Item Locations Field Name Description Status Enter or change the status of the serialized item: A if the item is new and available for sale I if the item has been sold but the invoice has not been posted S if the item has been sold and the invoice has been posted L if the item was lost when a physical count was last performed Init Date The date you received the serialized item from the vendor is displayed. Price The price of the serialized item is displayed. Vendor ID The ID of the vendor you purchased the item from is displayed. Name The name of the vendor you purchased the item from is displayed. PO Number The purchase order number you used to purchase the item is displayed. PO Date The date of the requisition or purchase order is displayed. Invoice Number The vendor’s invoice number for the item is displayed. Invoice Date The date of the vendor’s invoice is displayed. Cost Enter the unit cost of the item. Customer ID The ID of the customer who last purchased the item is displayed. Name The name of the customer who last purchased the item is displayed. Order Number The last order number is displayed. Order Date The date the last customer placed the order is displayed. Invoice Number The last invoice number for the item is displayed. Invoice Date The last invoice date is displayed. Inventory User’s Manual 11-49 Item Locations File Maintenance Field Name Description Price Enter or change the unit selling price of the item. Command Bar Definitions This window has no command bar. Saving and Exiting To save your entries and exit to the Serial Numbers screen, use the Proceed (PgDn) command. To exit to the Serial Numbers screen without saving your entries, use the Exit (F7) command. 11-50 Inventory User’s Manual Locations Features Use the Locations function on the File Maintenance menu to set up and maintain the locations where you stock inventory. Reports To produce a list of the information entered in the Locations function, use the Item Locations List function on the Master File Lists menu. Screen Use Screen Description Locations Use the Locations screen to set up and maintain such information about a location as the address, contact person, and phone and fax numbers. You can also assign a carrying cost percentage and an ordering cost amount. Inventory User’s Manual 11-51 Locations File Maintenance Locations Screen Field Definitions 11-52 Field Name Description Location ID Enter or change the location ID. Copy From This field appears if you entered a new location. Enter the ID of the location whose information you want to copy. Name Enter or change the name or description of the location. Address 1/Address 2/ Address 3 Enter or change the address of the location. City/State Enter or change the city and state of the location. Zip/Country Enter or change the location’s zip code and the country. Contact Enter or change the name of the contact person at the location. Inventory User’s Manual File Maintenance Locations Field Name Description Phone Number Enter or change the phone number of the location. Fax Number Enter or change the fax number of the location. Carrying Cost Pct The carrying cost, expressed as a percentage of the total value of your inventory, is used in the EOQ calculation in the reorder process. Enter or change your costs to stock items at the location. Note: If you need to override the carrying cost percentage for an item, use the Location Information screen in the Item Locations function. Ordering Cost Amt The ordering cost includes the total shipping costs, labor, and stocking, and it is used in the EOQ calculation in the reorder process. Enter your cost to place orders at the location. Note: If you need to override the ordering cost for an item, use the Location Information screen in the Item Locations function. Command Bar Definitions This screen has no command bar. Saving and Exiting To save your entries, use the Proceed (PgDn) command. To exit to the File Maintenance menu, use the Exit (F7) command. Inventory User’s Manual 11-53 Price Structures Features Use the Price Structures function on the File Maintenance menu to set up price IDs for your customers. Price IDs are assigned to items in the Items function, and they are used when you enter invoices or orders in Accounts Receivable/Sales Order. If you use Inventory as a standalone system, you can enter price IDs in the Inventory Transactions function. Reports To produce a list of the information entered in the Price Structures function, use the Price Structure List function on the Master File Lists menu. To produce a price list for items and customer levels, use the Price Report on the Reports menu. Screen Use Screen Description Price Structures Use the Price Structures screen to set up and maintain price IDs for customer levels. Inventory User’s Manual 11-55 Price Structures File Maintenance Price Structures Screen Field Definitions 11-56 Field Name Description Price ID Enter or change the price ID you want to work with. Copy From This field appears if you entered a new price ID. Enter the price ID you want to copy. Description Enter or change the description of the price ID. Cust Lvl Enter or change the customer level. Description The description of the customer level is displayed. Inventory User’s Manual File Maintenance Price Structures Field Name Description Adjustment Base Enter the adjustment base for the promotional pricing: No base: fixed dollar amount Standard cost: cost of the item determined by the cost of the components Base cost: fixed cost Average price: weighted average of selling prices Price: selling (base) price List price: published price Minimum price: lowest selling price Calculated price: price at the time the price break is calculated %/$ Enter % to use a percentage adjustment; enter $ to use a dollar adjustment. Adj Amount Enter the amount of the adjustment. For negative quantities use the minus symbol; enter positive quantities without a plus sign. Inventory User’s Manual 11-57 Price Structures File Maintenance Command Bar Definitions Command Description Enter = edit Move the prompt (>) to the customer level you want to edit and press Enter. Append Press A to add a customer level. Delete Price ID Press D to delete an entire price ID and all the customer levels. Price ID Press P to enter a price ID. Saving and Exiting To save your entries, use the Proceed (PgDn) command. To exit to the File Maintenance menu, use the Exit (F7) command. 11-58 Inventory User’s Manual Promotional Pricing Features Use the Promotional Pricing function on the File Maintenance menu to set up markups or discounts for selected inventory items. If you set up more than one promotional pricing adjustment for the same item, the pricing adjustment that is closest to the current start date is the default. Reports To produce a list of the information entered in the Promotional Pricing function, use the Promotional Pricing List function on the Master File Lists menu. Screen Use Screen Name Description Promotional Pricing Use the Promotional Pricing screen to select the criteria for the promotional pricing and to enter the adjusted base, adjusted amount, and adjustment type. Inventory User’s Manual 11-59 Promotional Pricing File Maintenance Promotional Pricing Screen Field Definitions 11-60 Field Name Description Promo ID Enter the ID of the promotion you are setting up. Copy From This field appears if you entered a new promotional ID. Enter the ID of the promotion you want to copy. Description Enter a description of the promotion. Start Date Enter the date the promotional pricing will start. End Date Enter the date the promotional pricing will end. Promotion Criteria Enter the range of price IDs, customer levels, item IDs, locations IDs, units, product lines, and user-defined fields you want in the promotional pricing. Inventory User’s Manual File Maintenance Promotional Pricing Field Name Description Adj Base Enter the adjustment base for the promotional pricing: No base: fixed dollar amount Standard cost: cost of the item determined by the cost of the components Base cost: fixed cost Average price: weighted average of selling prices Price: selling (base) price List price: published price Minimum price: lowest selling price Calculated price: price at the time the price break is calculated Adj Type Enter % to use a percentage adjustment; enter $ to use a dollar adjustment. Adj Amount Enter the amount of the adjustment. For negative quantities, use the minus symbol; enter positive quantities without a plus sign. Command Bar Definitions This screen has no command bar. Saving and Exiting To save your entries, use the Proceed (PgDn) command. To exit to the File Maintenance menu, use the Exit (F7) command. Inventory User’s Manual 11-61 Tables Features Use the Tables function on the File Maintenance menu to set up and maintain the INPDxxx, INSTDxxx, INUDSxxx, and INUSRxxx tables. Tables store information about the system, data, options, and default settings for other applications. Reports To produce a list of the information entered for each table, use the Tables List function on the Master File Lists menu. Screen Use Screen Name Description Tables Use the Tables screen to maintain Inventory tables. Inventory User’s Manual 11-63 Tables File Maintenance Tables Screen Field Definitions 11-64 Field Name Description Table ID Enter or change the table ID. To set up a company-specific table, enter the table ID plus the one- to three-character company ID. To set up a terminal-specific table, enter the table ID plus the four-character terminal ID. Copy From This field appears if you entered a new table ID. To copy a company-specific or a terminal-specific table, enter the table ID plus the company and terminal ID. Description Enter or change the description of the table. Number of Cols The number of columns in the table is displayed. Column Length The length of the columns in the table is displayed. Inventory User’s Manual File Maintenance Tables Field Name Description Type The type of characters you can enter in the table is displayed—alphanumeric (A), numeric (N), or numeric with one to four decimal places. Although you can change the type, you cannot enter any other type of character than the table originally specified. Command Bar Definitions This screen has no command bar. Saving and Exiting To save your entries and exit to the File Maintenance menu, use the Proceed (PgDn) command. Inventory User’s Manual 11-65 Tables File Maintenance INPDxxx Table The INPDxxx table holds three fields that are used to define the fiscal year. The first field is unused, the second is the fiscal year, and the third is the number of periods per year. Enter the table ID INPDxxx (xxx is the company ID). INSTDxxx Table The INSTDxxx table holds one field that is used to define the standard cost materials code default. This field is the material code. Enter the table ID INSTDxxx (xxx is the company ID). INUDSxxx Table The INUDSxxx table holds three fields that are used to define the user-defined field sorts. This table is accessed through the User-Defined Field Sorts function on the Code Maintenance menu. Enter the table ID INUDSxxx (xxx is the company ID). INUSRxxx Table The INUSRxxx table holds two fields that are used to define the user-defined field prompts. This table is accessed through the User-Defined Fields function on the Code Maintenance menu. Enter the table ID INUSRxxx (xxx is the company ID). 11-66 Inventory User’s Manual Inventory User’s Manual Code Maintenance Sales Categories Customer Levels Product Lines Account Codes Forecast Types Standard Cost Makeup Codes User-Defined Fields User-Defined Field Sorts Inventory User’s Manual 12 12-3 12-5 12-7 12-9 12-13 12-17 12-19 12-23 12-1 Sales Categories Features Use the Sales Categories function on the Code Maintenance menu to set up and maintain sales categories. Sales categories codes are used to sort historical information from Accounts Receivable and Sales Order. Reports To produce a list of the information entered in the Sales Categories function, use the Sales Categories List function on the Master Code Lists menu. Screen Use Screen Description Sales Categories Use the Sales Categories screen to set up your sales categories codes. Inventory User’s Manual 12-3 Sales Categories Code Maintenance Sales Categories Screen Field Definitions Field Name Description Sales Category Enter the sales category whose information you want to add or change. Description Enter a description of the sales category. Command Bar Definitions This screen has no command bar. Saving and Exiting To save your entries, use the Proceed (PgDn) command. To exit to the Code Maintenance menu, use the Exit (F7) command. 12-4 Inventory User’s Manual Customer Levels Features Use the Customer Levels function on the Code Maintenance menu to categorize your customers. This information is used in Accounts Receivable, the Price Structures function, and the Promotional Pricing function. Reports To produce a list of the information entered in the Customer Levels function, use the Customer Levels List function on the Master Code Lists menu. Screen Use Screen Description Customer Levels Use the Customer Levels screen to set up your customer level codes. Inventory User’s Manual 12-5 Customer Levels Code Maintenance Customer Levels Screen Field Definitions Field Name Description Customer Level Enter the customer level whose information you want to add or change. Description Enter a description of the customer level. Command Bar Definitions This screen has no command bar. Saving and Exiting To save your entries, use the Proceed (PgDn) command. To exit to the Code Maintenance menu, use the Exit (F7) command. 12-6 Inventory User’s Manual Product Lines Features Use the Product Lines function on the Code Maintenance menu to categorize your inventory items into groups. Product lines are used to organize items in reports and to make group price changes. Reports To produce a list of the information entered in the Product Lines function, use the Product Lines List function on the Master Code Lists menu. Screen Use Screen Description Product Lines Use the Product Lines screen to set up your product line codes. Inventory User’s Manual 12-7 Product Lines Code Maintenance Product Lines Screen Field Definitions Field Name Description Product Line Enter the product line whose information you want to add or change. Description Enter a description of the product line. Command Bar Definitions This screen has no command bar. Saving and Exiting To save your entries, use the Proceed (PgDn) command. To exit to the Code Maintenance menu, use the Exit (F7) command. 12-8 Inventory User’s Manual Account Codes Features Use the Account Codes function on the Code Maintenance menu to assign general ledger codes to the following accounts: • • • • • • • • • sales cost of goods sold inventory work in process inventory adjustment COGS adjustment purchase price variance physical count adjustment transfer cost Account codes are used when you post sales, purchases, transfers, adjustments, and physical counts to General Ledger. Reports To produce a list of the information entered in the Account Codes function, use the Account Codes List function on the Master Code Lists menu. Screen Use Screen Description Account Codes Use the Account Codes screen to set up your account codes under one pairing ID. You can then link account codes with particular items in the Items function. Inventory User’s Manual 12-9 Account Codes Code Maintenance Account Codes Screen Field Definitions 12-10 Field Name Description Account Code Enter the account code whose information you want to add or change. Copy From This field appears if you entered a new account code. Enter the account code whose information you want to copy. Description Enter or change the description of the account code. Sales Enter or change the sales account to use when posting income. Cost of Goods Sold Enter or change the cost-of-goods-sold account to use when posting costs. Inventory Enter or change the inventory account to use when posting inventory value. Inventory User’s Manual Code Maintenance Account Codes Field Name Description Work in Process Enter or change the work-in-process account to use when posting jobs that are in process. Inventory Adjustment Enter or change the inventory adjustment account to use when posting adjustments made to inventory. COGS Adjustment Enter or change the COGS adjustment account to use when posting adjustments made to inventory. Purchase Price Variance Enter or change the purchase price variance account to use when posting differences between the standard cost and the actual cost. Phys Count Adjustment Enter or change the physical count adjustment account to use when posting physical count differences. Transfer Cost Enter or change the transfer cost account to use when posting transfer costs. Command Bar Definitions This screen has no command bar. Saving and Exiting To save your entries, use Proceed (PgDn) command. To exit to the Code Maintenance menu, use the Exit (F7) command. Inventory User’s Manual 12-11 Forecast Types Features Use the Forecast Types function on the Code Maintenance menu to predict seasonal or current trends of your inventory items and to calculate reorder quantities. Reports To produce a list of the information entered in the Forecast Types function, use the Forecast Types List function on the Master Code Lists menu. Screen Use Screen Description Forecast Types Use the Forecast Types screen to designate weight factors for the selected periods. You can also set up an adjustment factor to predict an increase or a decrease in demand. Inventory User’s Manual 12-13 Forecast Types Code Maintenance Forecast Types Screen Field Definitions 12-14 Field Name Description Forecast Type Enter the forecast type whose information you want to add or change. Copy From This field appears if you entered a new forecast type. Enter the forecast type whose information you want to copy. Description Enter or change the description of the forecast type. Period Back 1–13 The periods specified in the Period Setup function in Resource Manager are displayed. Weighting Factor Enter or change the weight factor for each period. The amounts you enter must total 100 percent. Inventory User’s Manual Code Maintenance Forecast Types Field Name Description Pd/Year The current period and year (according to how you set up your system) are displayed. Begin Date The first day of the period is displayed. End Date The last day of the period is displayed. Adjustment % Enter or change the percentage of increase/decrease you expect. Command Bar Definitions This screen has no command bar. Saving and Exiting To save your entries, use the Proceed (PgDn) command. To exit to the Code Maintenance menu, use the Exit (F7) command. Inventory User’s Manual 12-15 Standard Cost Makeup Codes Features Use the Standard Cost Makeup Codes function on the Code Maintenance menu to define the cost components used in determining the standard cost of an item. The information entered here is used on the Cost Information screen in the Item Locations function. Reports To produce a list of the information entered in the Standard Cost Makeup Codes function, use the Cost Makeup Codes List function on the Master Code Lists menu. Screen Use Screen Description Standard Cost Makeup Codes Use the Standard Cost Makeup Codes screen to define the cost makeup codes used in the calculation of standard costs. Inventory User’s Manual 12-17 Standard Cost Makeup Codes Code Maintenance Standard Cost Makeup Codes Screen Field Definitions Field Name Description Cost Code Enter the cost code whose information you want to add or change. Description Enter or change the description of the cost code. Command Bar Definitions This screen has no command bar. Saving and Exiting To save your entries, use the Proceed (PgDn) command. To exit to the Code Maintenance menu, use the Exit (F7) command. 12-18 Inventory User’s Manual User-Defined Fields Features Use the User-Defined Fields function on the Code Maintenance menu to set up and maintain user-defined fields, which identify particular information about items that can be selected for most reports. Reports To produce a list of the information entered in the User-Defined Fields function, use the User-Defined Fields List function on the Master Code Lists menu. Screen Use Screen Description User-Defined Fields Use the User-Defined Fields screen to set up additional information about your items. You can enter 16 userdefined fields. Inventory User’s Manual 12-19 User-Defined Fields Code Maintenance User-Defined Fields Screen Field Definitions Field Name Description User-Defined Field Enter a number between 1 and 16 for each user-defined field. Field Description Enter or change the description of the field that you want to appear whenever you are prompted for user-defined fields. Type The type of user-defined field, sorted or unsorted, is displayed. User-defined fields 1 and 2 are sorted; user-defined fields 3 to 16 are unsorted. 12-20 Field Value Enter or change the field values for the user-defined field you are working with. Description Enter or change the description of the field value. Inventory User’s Manual Code Maintenance User-Defined Fields Command Bar Definitions Command Description Enter = edit Move the prompt (>) to the field name and description you want to edit and press Enter. Append Press A to add a field name and a description. Delete Press D to delete a field name and description. Field no Press F to enter a new user-defined field number. Saving and Exiting To save your entries, use the Proceed (PgDn) command. To exit to the Code Maintenance menu, use the Exit (F7) command. Inventory User’s Manual 12-21 User-Defined Field Sorts Features Use the User-Defined Field Sorts function on the Code Maintenance menu to identify additional sorts to use in selected reports and to group items together for analysis purposes. If you change the original sort sequence you set up, back up your data files. The INVExxx (Items) and INKYxxx (Alternate Keys) files must be rewritten during this process. Reports To produce a list of the information entered in the User-Defined Field Sorts function, use the User-Defined Field Sorts List function on the Master Code Lists menu. Screen Use Screen Description User-Defined Field Sorts Use the User-Defined Field Sorts screen to set up two additional sorts for reports. You can identify three userdefined fields for each sort. Inventory User’s Manual 12-23 User-Defined Field Sorts Code Maintenance User-Defined Field Sorts Screen Field Definitions Field Name Description Field Descriptions The user-defined fields you set up in the User-Defined Fields function are displayed. Sort Sequence Enter or change the name for each sort sequence. The name you enter appears in selected reports. For each sort sequence, you can choose among 16 userdefined fields and product lines, but each user-defined field can be used only once in a sort sequence. Primary 12-24 Enter the number of the user-defined field that you want to appear first in the sort sequence. Inventory User’s Manual Code Maintenance User-Defined Field Sorts Field Name Description Secondary Enter the number of the user-defined field that you want to appear second in the sort sequence. Tertiary Enter the number of the user-defined field that you want to appear third in the sort sequence. Command Bar Definitions This screen has no command bar. Saving and Exiting To save your entries, use the Proceed (PgDn) command. To exit to the Code Maintenance menu, use the Exit (F7) command. Inventory User’s Manual 12-25 Inventory User’s Manual Master File Item Detail List Item Summary List Item Locations List Location Detail List Price Structure List Promotional Pricing List Tables List Inventory User’s Manual 13 13-3 13-7 13-11 13-15 13-19 13-23 13-27 13-1 Item Detail List Features The Item Detail List contains information about your inventory items: general information, alternate items, units of measure, and location summary information. Reports A sample Item Detail List is on page 13-6. Screen Use Screen Description Item Detail List Use the Item Detail List screen to select the items, product lines, and user-defined fields that you want in the list. Inventory User’s Manual 13-3 Item Detail List Master File Item Detail List Screen Field Definitions 13-4 Field Name Description Pick Enter the range of items, product lines, and user-defined fields you want in the list. Print By Select the option by which you want to organize the list. Print Enter Y for each type of item information you want to include in the list. Enter N for each type of information you want to exclude. Inventory User’s Manual Master File Item Detail List Command Bar Definitions Command Description Printer Select P to send the list to a printer. File Select F to send the list to a file. Screen Select S to send the list to the screen. End Select E to change your selections or exit to the Master File Lists menu. Saving and Exiting After the list is produced, the Master File Lists menu appears. Inventory User’s Manual 13-5 13-6 Location ID CA0001 MD0001 MN0001 TX0001 Type Bar Code Customer Part Customer Part Alias Vendor Part Base Alternates: Other Fields Sorted Fields Status Item Type Kitted Item? BUILDING Location Description OAKLAND WAREHOUSE BALTIMORE WAREHOUSE MINNEAPOLIS WAREHOUSE DALLAS WAREHOUSE ELL001 ACE001 SUN001 Alternate Item ID 8471065922 1358XQ-3D 34A4211-N ELECTRIC 757223DHIE %/$ % 08 09 10 11 12 Default PKG Location Summary Alternate Items Start Date End Date Penalty .0000 Units of Measure ELECTRIC 13 14 15 16 Sales Catagory P1 Product Line MATERIAL Item Price ID BUILD General Information Builders Supply Item Detail List By Item ID 02 Department Track Lots? No Auto Reorder? Yes Base UOM PKG Conversion Factor 1.0000 Source ID Units PKG 03 Color 04 05 06 07 01 Application Active 1 Nonserialized No Item ID 100 Description Electrical Package Includes Electrical Outlets and Breaker Box 08/07/1999 2:02 PM Tax Class 03 Ind/Agr Prod. Item Weight .0000 Page 1 Item Detail List Master File Item Detail List Inventory User’s Manual Item Summary List Features Use the Item Summary List function on the Master File Lists menu to produce a summarized list of general information about your inventory items. Reports A sample Item Summary List is on page 13-10. Screen Use Screen Description Item Summary List Use the Item Summary List screen to select the items, product lines, and user-defined fields that you want in the list. Inventory User’s Manual 13-7 Item Summary List Master File Item Summary List Screen Field Definitions 13-8 Field Name Description Pick Enter the range of items, product lines, and user-defined fields you want in the list. Print By Select the option by which you want to organize the list. Inventory User’s Manual Master File Item Summary List Command Bar Definitions Command Description Printer Select P to send the list to a printer. File Select F to send the list to a file. Screen Select S to send the list to the screen. End Select E to change your selections or exit to the Master File Lists menu. Saving and Exiting After the list is produced, the Master File Lists menu appears. Inventory User’s Manual 13-9 13-10 Builders Supply Item Summary List By Item ID Page 1 BUILD Active Nonserialized 200 Heating/Cooling Package End of Report BUILD Active Nonserialized 100 Electrical Package YES NO NO NO YES NO P1 HEAT/AIR P1 MATERIAL BUILDING BUILDING BUILDING ELECTRIC PKG PKG PKG PKG 03 0 03 0 Price ID Kitted Item? Item Status Auto Recorder? Sales Catagory User Field 1 Base UOM Tax Class Description Type Track Lots? Product Line User Field 2 Default UOM Weight ---------------------------------------------------------------------------------------------------------------------------------- 08/07/1999 2:03 PM Item Summary List Master File Item Summary List Inventory User’s Manual Item Locations List Features Use the Item Locations List function on the Master File Lists menu to produce a list of location, price, cost, vendor, bin, lot, and serial information about your inventory items. Reports A sample Item Locations List is on page 13-14. Screen Use Screen Description Item Locations List Use the Item Locations List screen to select the items, locations, and user-defined fields that you want in the list. Inventory User’s Manual 13-11 Item Locations List Master File Item Locations List Screen Field Definitions 13-12 Field Name Description Pick Enter the range of items, locations, and user-defined fields you want in the list. Print By Select the option by which you want to organize the list. Print Enter Y for each type of information you want to include in the list. Enter N for each type you want to exclude. Inventory User’s Manual Master File Item Locations List Command Bar Definitions Command Description Printer Select P to send the list to a printer. File Select F to send the list to a file. Screen Select S to send the list to the screen. End Select E to change your selections or exit to the Master File Lists menu. Saving and Exiting After the list is produced, the Master File Lists menu appears. Inventory User’s Manual 13-13 13-14 01 401000 501000 104400 GL Code Sales COGS Inventory Cust Lvl ACE001 Units PKG Description Ace Builders Contract Base Price 528.5400 Calc Calc Calc Status Builders Supply Item Locations List By Item ID 5.0 Active REG Adj Base Calculated Price Minimum Price 375.0000 Adjustment 20.0000- Cost Information %/$ % Customer Levels List Price 535.9500 1 2 3 4 5 18.0000 .0000 1.0000 17.0000 6.0000 504000 504000 503000 Page Promo? Yes Quantity Breaks Quantity %/$ Price Adj 8.0000 $ 52.8500.0000 $ .0000 .0000 $ .0000 .0000 $ .0000 .0000 $ .0000 Item Quantities Purch Price Variance Phys Count Variance Transfer Cost On Hand Committed In Use Available On Order (PO) Price Information 104200 104400 504000 GL Accounts Location MN0001 WIP Inventory Adj COGS Adj Lead Time Status Forecast Type Quantity 25.0000 12.0000 4.0000 12.0000 7.0000 Average Price 508.9415 Maximum Qty Order Point Safty Stock EOQ Min Order Qty Order Quantities ELL001 E-10 BUILD Vendor ID Bin Number Price ID Defaults Item ID 100 Description Electrical Package 08/07/1999 2:04 PM 1 Item Locations List Master File Item Locations List Inventory User’s Manual Location Detail List Features Use the Location Detail List function on the Master File Lists menu to produce a list of all your locations and their IDs, descriptions, and addresses. Reports A sample Location Detail List is on page 13-18. Screen Use Screen Description Location Detail List Use the Location Detail List screen to select the locations that you want in the list. Inventory User’s Manual 13-15 Location Detail List Master File Location Detail List Screen Field Definitions 13-16 Field Name Description Pick Enter the range of locations you want in the list. Print By Select the option by which you want to organize the list. Inventory User’s Manual Master File Location Detail List Command Bar Definitions Command Description Printer Select P to send the list to a printer. File Select F to send the list to a file. Screen Select S to send the list to the screen. End Select E to change your selections or exit to the Master File Lists menu. Saving and Exiting After the list is produced, the Master File Lists menu appears. Inventory User’s Manual 13-17 13-18 Builders Supply Location Detail List By Location ID Page 1 MINNEAPOLIS MANUFACTURING DALLAS WAREHOUSE MN0002 TX0001 End of Report MINNEAPOLIS WAREHOUSE MN0001 13302 WEST FREEWAY CT. 13771 CONCORD ST. 453 LAKE DRIVE DALLAS 77099 MINNEAPOLIS 55199 MINNEAPOLIS 55355 TX US MN US MN US 29 5 24 5 24 5 Location Name City, State, Phone Number Carry Cost Pct ID Contact Address Zip, Country Fax Number Order Cost Amt ------------------------------------------------------------------------------------------------------------------------------------ 08/07/1999 2:05 PM Location Detail List Master File Location Detail List Inventory User’s Manual Price Structure List Features Use the Price Structure List function on the Master File Lists menu to produce a list of the price structures that were set up, price IDs, customer levels, adjustment types, adjustment bases, and adjustment amounts. Reports A sample Price Structure List is on page 13-22. Screen Use Screen Description Price Structure List Use the Price Structure List screen to select the price IDs that you want in the list. Inventory User’s Manual 13-19 Price Structure List Master File Price Structure List Screen Field Definitions 13-20 Field Name Description Pick Enter the range of price IDs you want in the list. Inventory User’s Manual Master File Price Structure List Command Bar Definitions Command Description Printer Select P to send the list to a printer. File Select F to send the list to a file. Screen Select S to send the list to the screen. End Select E to change your selections or exit to the Master File Lists menu. Saving and Exiting After the list is produced, the Master File Lists menu appears. Inventory User’s Manual 13-21 13-22 Builders Supply Price Structure List Building Supplies Materials Price Breaks BUILD MATRL End of Report Appliance Price Breaks APPL NONE ACE001 JOBBER RETAIL WHSL NONE ACE001 JOBBER RETAIL WHSL NONE ACE001 JOBBER RETAIL WHSL Price Structure Default Ace Builders Contract Jobber Customer Retail Customer Pricing Wholesale Customer Price Structure Default Ace Builders Contract Jobber Customer Retail Customer Pricing Wholesale Customer Price Structure Default Ace Builders Contract Jobber Customer Retail Customer Pricing Wholesale Customer $ % % $ % $ % % $ % $ % % $ % Calculated Price Base Cost Calculated Price Calculated Price Base Cost Calculated Price Base Cost Calculated Price Calculated Price Base Cost Calculated Price Base Cost Calculated Price Calculated Price Base Cost .0000 10.0000 -10.0000 .0000 10.0000 .0000 5.0000 -5.0000 .0000 5.0000 .0000 10.0000 -10.0000 .0000 10.0000 Price Customer Adj Adjustment Adjustment ID Description Level Level Descriptioon Type Base Amount --------------------------------------------------------------------------------------------------------------------- 08/07/1999 2:06 PM Page 1 Price Structure List Master File Price Structure List Inventory User’s Manual Promotional Pricing List Features Use the Promotional Pricing List function on the Master File Lists menu to produce a list of promotional price IDs, amounts, start and end dates, and items affected. Reports A sample Promotional Pricing List is on page 13-26. Screen Use Screen Description Promotional Pricing List Use the Promotional Pricing List screen to select the promotional price IDs and start dates that you want in the list. Inventory User’s Manual 13-23 Promotional Pricing List Master File Promotional Pricing List Screen Field Definitions 13-24 Field Name Description Pick Enter the range of promotional price IDs and starting and ending dates you want in the list. Print By Select the option by which you want to organize the list. Inventory User’s Manual Master File Promotional Pricing List Command Bar Definitions Command Description Printer Select P to send the list to a printer. File Select F to send the list to a file. Screen Select S to send the list to the screen. End Select E to change your selections or exit to the Master File Lists menu. Saving and Exiting After the list is produced, the Master File Lists menu appears. Inventory User’s Manual 13-25 13-26 Builders Supply Promotional Pricing List By Promo ID End of Report YR-END 12/01/1995 12/31/1995 Year-End Closeout Price ID Customer Level Item ID Units Location Application Department <first> <first> <first> <first> <first> <first> <first> <last> <last> <last> <last> <last> <last> <last> % Calculated Price 10.0000- Start Date Adjustment Type Promo End Date Adjustment Base ID Description From Thru Adjustment Amount ----------------------------------------------------------------------------------------------------------------------- 05/28/1999 9:55 AM Page 1 Promotional Pricing List Master File Promotional Pricing List Inventory User’s Manual Tables List Features Produce the Tables List to get information from a particular Inventory table. This function is useful if you plan to change a table and want a list to compare it against. Reports A sample Tables List is on page 13-30. Screen Use Screen Description Tables List Use the Tables List screen to select the table IDs that you want in the list. Inventory User’s Manual 13-27 Tables List Master File Tables List Screen Field Definitions 13-28 Field Name Description Application IN is displayed as the application ID. You cannot change it. Table ID Enter the range of table IDs whose information you want in the list. Suppress blank lines? Most tables do not hold information in all 18 lines. If you want the list to include blank lines, enter Y; if not, enter N. Page break per table? If you want a page break between each table, enter Y; if not, enter N. Inventory User’s Manual Master File Tables List Command Bar Definitions Command Description Printer Select P to send the list to a printer. File Select F to send the list to a file. Screen Select S to send the list to the screen. End Select E to change your selections or exit to the Master File Lists menu. Saving and Exiting After the list is produced, the Master File Lists menu appears. Inventory User’s Manual 13-29 13-30 Description Period/Fiscal Year Table 3 Column Length 12 Type N Builders Supply Tables List Inventory Builders Supply Tables List Inventory 08/07/1995 2:08 PM Builders Supply Tables List Inventory - Round 41 Sort # User Field Description -------------------- -------------------- -------------------Primary 03 User-Defined Sort 1 Secondary 00 Tertiary 00 Primary 99 User-Defined Sort 2 Secondary 03 Tertiary 00 Table ID INUDSH Description User-Defined Sorts No. of Columns 3 Column Length 20 Type A 08/07/1995 2:08 PM PERIOD FISCAL YEAR PERIODS/YEAR ------------ ------------ -----------.00 1995.00 12.00 .00 .00 .00 .00 .00 .00 .00 .00 .00 .00 .00 .00 .00 .00 .00 .00 .00 .00 .00 .00 .00 .00 .00 .00 .00 .00 .00 .00 .00 .00 .00 .00 .00 .00 .00 .00 .00 .00 .00 Table ID INPDH No. of Columns 08/07/1999 2:08 PM Page Page Page 3 2 1 Tables List Master File Tables List Inventory User’s Manual Inventory User’s Manual Master Codes List Sales Categories List Customer Levels List Product Lines List Account Codes List Forecast Types List Cost Makeup Codes List User-Defined Fields List User-Defined Field Sorts List Inventory User’s Manual 14 14-3 14-7 14-11 14-15 14-19 14-23 14-27 14-31 14-1 Sales Categories List Features The Sales Categories List shows the information stored in the INCAxxx (Sales Categories) file: sales categories and descriptions. You can use the list as a reference when you assign sales categories to items. Reports A sample Sales Categories List is on page 14-6. Screen Use Screen Description Sales Categories List Use the Sales Categories List screen to select the category codes that you want in the list. Inventory User’s Manual 14-3 Sales Categories List Master Codes List Sales Categories List Screen Field Definitions 14-4 Field Name Description Pick Enter the range of sales categories you want in the list. Inventory User’s Manual Master Codes List Sales Categories List Command Bar Definitions Command Description Printer Select P to send the list to a printer. File Select F to send the list to a file. Screen Select S to send the list to the screen. End Select E to change your selections or exit to the Master Code Lists menu. Saving and Exiting After the list is produced, the Master Code Lists menu appears. Inventory User’s Manual 14-5 14-6 Builders Supply Sales Categories List Appliances Doors Supplies Interior Decorating Material 1 Material 2 Material 3 Packages Raw Materials 1 Raw Materials 2 Raw Materials 4 Structurals Windows 1 Windows 2 End of Report A1 D1 E1 I1 M1 M2 M3 P1 R1 R2 R4 S1 W1 W2 Category Description -------------------------------------- 08/07/1999 1:52 PM Page 1 Sales Categories List Master Codes List Sales Categories List Inventory User’s Manual Customer Levels List Features Use the Customer Levels List function on the Master Code Lists menu to produce a list of the customer levels. You can use it as a reference when you assign customer levels to items. Reports A sample Customer Levels List is on page 14-10. Screen Use Screen Description Customer Levels List Use the Customer Levels List screen to select the customer levels that you want in the list. Inventory User’s Manual 14-7 Customer Levels List Master Codes List Customer Levels List Screen Field Definitions 14-8 Field Name Description Pick Enter the range of customer levels you want in the list. Inventory User’s Manual Master Codes List Customer Levels List Command Bar Definitions Command Description Printer Select P to send the list to a printer. File Select F to send the list to a file. Screen Select S to send the list to the screen. End Select E to change your selections or exit to the Master Code Lists menu. Saving and Exiting After the list is produced, the Master Code Lists menu appears. Inventory User’s Manual 14-9 14-10 Builders Supply Customer Levels List End of Report ACE001 JOBBER RETAIL WHSL Ace Builders Contract Jobber Customer Retail Customer Wholesale Customer Customer Level Description --------------------------------------------- 08/07/1999 1:53 PM Page 1 Customer Levels List Master Codes List Customer Levels List Inventory User’s Manual Product Lines List Features Use the Product Lines List function on the Master Code Lists menu to produce a list of product lines. You can use the list as a reference when you assign product lines to items. Reports A sample Product Lines List is on page 14-14. Screen Use Screen Description Product Lines List Use the Product Lines List screen to select the product lines that you want in the list. Inventory User’s Manual 14-11 Product Lines List Master Codes List Product Lines List Screen Field Definitions 14-12 Field Name Description Pick Enter the range of product lines you want in the list. Inventory User’s Manual Master Codes List Product Lines List Command Bar Definitions Command Description Printer Select P to send the list to a printer. File Select F to send the list to a file. Screen Select S to send the list to the screen. End Select E to change your selections or exit to the Master Code Lists menu. Saving and Exiting After the list is produced, the Master Code Lists menu appears. Inventory User’s Manual 14-13 14-14 Builders Supply Product Lines List End of Report APPLIANCE COMPONENT HEAT/AIR MATERIAL Appliance Components Heating and Air Equ. Building Materials Product Line Description --------------------------------------------------- 08/07/1999 1:54 PM Page 1 Product Lines List Master Codes List Product Lines List Inventory User’s Manual Account Codes List Features Use the Account Codes List to make sure that the account codes are correct and as a reference when you assign account codes to items. Reports A sample Account Codes List is on page 14-18. Screen Use Screen Description Account Codes List Use the Account Codes List screen to select the account codes that you want in the list. Inventory User’s Manual 14-15 Account Codes List Master Codes List Account Codes List Screen Field Definitions 14-16 Field Name Description Pick Enter the range of account codes you want in the list. Inventory User’s Manual Master Codes List Account Codes List Command Bar Definitions Command Description Printer Select P to send the list to a printer. File Select F to send the list to a file. Screen Select S to send the list to the screen. End Select E to change your selections or exit to the Master Code Lists menu. Saving and Exiting After the list is produced, the Master Code Lists menu appears. Inventory User’s Manual 14-17 14-18 Raw Materials 02 End of Report Retail Sales 01 Builders Supply Account Codes List 402000 502000 104000 401000 501000 104400 104200 504000 104000 104200 504000 104400 504000 504000 503000 504000 504000 503000 Sales Acct. WIP Acct. Purch. Price Var. Acct. COGS Acct. COGS Adj. Acct. Phys. Count Adj. Acct. IN. Acct. IN. Adj. Acct. Trans. Cost Acct. -------------------------------------------------------------------------------------------------------- Description Account Code 08/04/1999 9:50 AM Page 1 Account Codes List Master Codes List Account Codes List Inventory User’s Manual Forecast Types List Features Use the Forecast Types List function on the Master Code Lists menu to produce a list of the forecast types that have been set up. Use it as a reference when you assign forecast types to items. Reports A sample Forecast Types List is on page 14-22. Screen Use Screen Description Forecast Types List Use the Forecast Types List screen to select the forecast types that you want in the list. Inventory User’s Manual 14-19 Forecast Types List Master Codes List Forecast Types List Screen Field Definitions 14-20 Field Name Description Pick Enter the range of forecast types you want in the list. Inventory User’s Manual Master Codes List Forecast Types List Command Bar Definitions Command Description Printer Select P to send the list to a printer. File Select F to send the list to a file. Screen Select S to send the list to the screen. End Select E to change your selections or exit to the Master Code Lists menu. Saving and Exiting After the list is produced, the Master Code Lists menu appears. Inventory User’s Manual 14-21 14-22 Builders Supply Forecast Types List Seasonal Forecast Method Regular REG SEAS Weighting on Last Month MTH Back Back Back Back Back Back Back Back Back Back Back Back Back Back Back Back Back Back Back Back Back Back Back Back Adj. Back Back Back Back Back Back Back Back Back Back Back Back Back Adj. 1 2 3 4 5 6 7 8 9 10 11 1 2 3 4 5 6 7 8 9 10 11 12 13 % 1 2 3 4 5 6 7 8 9 10 11 12 13 % 0 0 0 0 0 0 0 0 0 20 30 50 30 20 0 0 0 0 0 0 0 0 0 0 1.000 100 0 0 0 0 0 0 0 0 0 0 0 0 0.000 Forecast Type Description Period Wt. Factor --------------------------------------------------------------------- 08/07/1999 1:56 PM Page 1 Forecast Types List Master Codes List Forecast Types List Inventory User’s Manual Cost Makeup Codes List Features Use the Cost Makeup Codes List function on the Master Code Lists menu to produce a list of cost makeup codes. You can use the list as a reference when you assign cost codes to items. Reports A sample Cost Makeup Codes List is on page 14-26. Screen Use Screen Description Cost Makeup Codes List Use the Cost Makeup Codes List screen to select the cost codes that you want in the list. Inventory User’s Manual 14-23 Cost Makeup Codes List Master Codes List Cost Makeup Codes List Screen Field Definitions 14-24 Field Name Description Pick Enter the range of cost codes you want in the list. Inventory User’s Manual Master Codes List Cost Makeup Codes List Command Bar Definitions Command Description Printer Select P to send the list to a printer. File Select F to send the list to a file. Screen Select S to send the list to the screen. End Select E to change your selections or exit to the Master Code Lists menu. Saving and Exiting After the list is produced, the Master Code Lists menu appears. Inventory User’s Manual 14-25 14-26 Labor Materials Overhead End of Report LA MA OV Cost Makeup Code Description --------------------------- 08/07/1999 1:57 PM Builders Supply Cost Makeup Codes List Page 1 Cost Makeup Codes List Master Codes List Cost Makeup Codes List Inventory User’s Manual User-Defined Fields List Features Use the User-Defined Fields List function on the Master Code Lists menu to produce a list of your user-defined fields. Reports A sample User-Defined Fields List is on page 14-30. Screen Use Screen Description User-Defined Fields List Use the User-Defined Fields List screen to select the userdefined fields that you want in the list. Inventory User’s Manual 14-27 User-Defined Fields List Master Codes List User-Defined Fields List Screen Field Definitions 14-28 Field Name Description Pick Enter the range of field numbers (between 1 and 16) you want in the list. Inventory User’s Manual Master Codes List User-Defined Fields List Command Bar Definitions Command Description Printer Select P to send the list to a printer. File Select F to send the list to a file. Screen Select S to send the list to the screen. End Select E to change your selections or exit to the Master Code Lists menu. Saving and Exiting After the list is produced, the Master Code Lists menu appears. Inventory User’s Manual 14-29 14-30 Builders Supply User-Defined Fields List Page 1 Department Color 02 03 End of Report Application 01 BUILDING ELECTRIC EXTERIOR INTERIOR PLUMBING BUILDING CABINET HOME IMP MJR APPL WINDOWS N/A Buildling Materials Electric Materials Exterior Materials Interior Materials Plumbing Materials N/A Building Cabinets Home Improvement Major Appliance Windows Field No. Prompt Field Value Description ------------------------------------------------------------------------------ 08/07/1999 1:58 PM User-Defined Fields List Master Codes List User-Defined Fields List Inventory User’s Manual User-Defined Field Sorts List Features Use the User-Defined Field Sorts List function on the Master Code Lists menu to produce a list of the two sorted fields you set up. Reports A sample User-Defined Field Sorts List is on page 14-34. Screen Use Screen Description User-Defined Field Sorts List Use the User-Defined Field Sorts List screen to select one or both of your sorts to list. Inventory User’s Manual 14-31 User-Defined Field Sorts List Master Codes List User-Defined Field Sorts List Screen Field Definitions 14-32 Field Name Description Pick Enter 1 or 2 to indicate the user sorts you want in the list. Inventory User’s Manual Master Codes List User-Defined Field Sorts List Command Bar Definitions Command Description Printer Select P to send the list to a printer. File Select F to send the list to a file. Screen Select S to send the list to the screen. End Select E to change your selections or exit to the Master Code Lists menu. Saving and Exiting After the list is produced, the Master Code Lists menu appears. Inventory User’s Manual 14-33 14-34 5 6 7 8 User-Defined Sort 2 End of Report 2 Primary Product Line Secondary 03 Color Tertiary None Primary 03 Color Secondary None Tertiary None 9 10 11 12 Builders Supply User-Defined Field Sorts List Sort Description No. 1 User-Defined Sort 1 1 Application 2 Department 3 Color 4 Field Descriptions 08/07/1999 1:59 PM 13 14 15 16 99 Product Line Page 1 User-Defined Field Sorts List Master Codes List User-Defined Field Sorts List Inventory User’s Manual References Conversion Inventory User’s Manual Conversion A You can put this version of Inventory on the system in one of two ways: you can install a new system (see chapter 2), or you can convert an older version of Inventory to the current version, keeping your old files intact. Before you convert files, you must install the new version of Inventory. You can replace and update the programs properly only by using the Install Applications function in Resource Manager. Before you convert an application’s files, verify the version number of the application you are converting from. You can upgrade Inventory from version 3.2, 4.0x, 4.1x, 4.5x, or 5.x. (If you want to convert to version 6.00 from a version earlier than 3.2, contact a client support representative.) The Data File Conversion function cannot determine the information from the function. Note You must complete month-end tasks before converting. When you are ready to convert files, use the Data File Conversion function on the Company Setup menu in Resource Manager (see the Resource Manager User’s Manual). Consider Your Setup Before you try to convert your version of Inventory to the current version, consider the exact setup of your system. Modifications to your system might be lost if you install a new version of a program or update a file. If you are not sure whether your system is ready for conversion, consult your value-added reseller. Inventory User’s Manual A-1 Conversion References Because of the ways tax information is stored in Accounts Payable and depending on which other applications you are using, you must follow several steps to convert existing Accounts Payable data. If you are converting from version 4.5x to 6.00 and you are using Accounts Receivable, you have two choices: • Convert Accounts Receivable files from 4.5x to 6.00 first; then convert Accounts Payable from 4.5x to 6.00. • Create Inventory files first; then set up tax location and tax group information before converting Accounts Payable from 4.5x to 6.00. If you are converting from version 4.5x to 6.00 and you do not have Accounts Receivable on your system, you must create Inventory files first. Then set up tax location and tax groups information before converting Accounts Payable from 4.5x to 6.00. If you are converting from version 5.0x to 6.00, whether you are using Accounts Receivable or not, you have two options: A-2 • Convert Inventory from version 5.0x to 6.00. • Create Inventory files; then set up the location and tax group information before converting Accounts Payable. (This method is recommended only if you want to reenter all tax information.) Inventory User’s Manual References Conversion Converting to Version 6.00 When you select Data File Conversion from the Company Setup menu, the function screen appears. The conversion process is automatic and invisible to you. Simply specify path names of the source and destination files, the application, and a couple of preferences. 1. Select the target directory from the list. (The system assigns a number to each OSAS data path with assigned values.) 2. Enter the path (drive and directory) that has the files you want to convert. You cannot enter the same path as the destination path. 3. If you want source files to be erased after conversion, enter Y; if not or if you are not sure, enter N. When you are sure that the conversion has been completed successfully, you can delete your old data files. Inventory User’s Manual A-3 Conversion References 4. If you want the conversion process to pause when a problem occurs, enter Y; if not, enter N. The system considers evidence of data not converting correctly or file corruption a problem. Whether you enter Y or N, the system creates an error log called CNVTLOG in the DATA subdirectory. 5. Enter IN at the bottom of the screen in the APPL column. Then enter the present version number, and press Enter. When you enter OSAS, the copyrights screen shows the version of Inventory you have. 6. If data files already exist for Inventory in the intended destination path, the following prompt appears: IN Data files exist. Do you want this task to erase them? If you want to erase the existing files and convert the files from the version in the source path, enter Y. If you enter N, you must change your entries so that no conflict exists. 7. To convert, use the Proceed (PgDn) command. 8. The following prompt appears: Do you wish a printout of error log after each application? If you want the error log to be produced after the files are converted for each application, enter Y; if you want the log to be produced after all the files are converted, enter N. If you are converting only Inventory files, your answer to this prompt makes no difference. If a prompt appears when a problem occurs, enter Y to stop the conversion process or N to let the conversion run its course. 9. When the process is finished, the files are converted. Select the output device for the error log. After conversion is finished and the error log is produced, the Main menu with Inventory 6.00 added appears. A-4 Inventory User’s Manual References Inventory User’s Manual System Messages System Messages B Alternate item must be the same item type as current item ID When you are setting up alternate items, you cannot set up a service item as an alternate item for any other type of item. BASIC ERROR = nn HOST ERROR = xxx LINE = nnnn PROGRAM = xxxxxx BASIC ERROR = nn LINE = nnnn PROGRAM = xxxxxx A serious error has occurred. Write down the information that is displayed and get help from a support technician. Do you wish to change to using tags? If you respond YES, the system will change the batch from using worksheets for physical counts to using tags. Error creating INRQxxx file. File may be open on another terminal. Someone else is using one of the Reorder Processing functions on another terminal. Try again later. Field value already exists. Use the ‘Edit’ function to change values. You cannot append an existing field value in the User-Defined Fields function. Enter a different field value. Freezing has added items to the batch. Items were added to inventory between the time you prepared the batch and froze quantities. If you know that many items were added, reprint the tags and worksheets. These items will then be included in the batch. Inventory User’s Manual B-1 System Messages References Item entered is not set up for the location entered. Set up the item/location in the Items function, or enter a different location. Item status is xxxxxx (discontinued, obsolete, superseded). You cannot change the location status. Use the Items function to change the status. Items do not have the same base unit of measure. You cannot transfer items with different base units of measure to a different location. Change the unit of measure in the Items function for one of the items, transfer an item to a different location, or transfer a different item. Location does not exist in locations file. Enter a different location, or set up the location in the Locations function. Must use ‘Tag Entry’ for this batch. You selected Worksheet Entry when you were using a tag entry batch. Select a tag entry batch. No General Ledger Adjustments are on file. No COGS or purchase price variance adjustments are in the INCJxxx file for the GL Adjustments Journal or to post. No locations are on file for this item. Set up a location for the item in the Items function. No transactions or transfers are on file. Enter transactions before posting. B-2 Inventory User’s Manual References System Messages RMTB file not found. Set up the RMTB file in Resource Manager. See the Resource Manager User’s Manual. Secondary sort cannot be the same as primary sort. Tertiary sort cannot be the same as primary (or secondary) sort. You cannot use a user-defined field that is already being used in one of the sorts. Enter a different field number. Serial number must be available in order to be transferred. A serialized item must have the available status before it can be transferred. Enter a serial number with available status. Serial number must have a ‘Lost’ or ‘Sold’ status before it can be deleted. Change the status of the item in the Items function, or select a different item to delete. The bin ID does not match the from/thru criteria for this batch. When you append an item/location during physical counts, you must enter a bin ID that meets the from/thru criteria or work with a different batch. The cost bucket entered already exists for this item. Change the date or the cost to make the bucket unique. The product line does not match the from/thru criteria for this batch. When you append an item/location during physical counts, you must enter a product line that meets the from/thru criteria or work with a different batch. The superseded item selected is a recursive supersede. You cannot set up a superseded item that will supersede back to itself. Enter a different item ID. Inventory User’s Manual B-3 System Messages References There are items without tag numbers. Do you wish to reprint tags? If you answer YES, the system will reprint tags for that batch. If you answer NO, you can select a different batch. There are no items in this batch. When you set up the batch criteria, the system determined that no items fell into the from/thru range you specified. Change the from/thru criteria for the batch. There are no locations set up for this item to calculate prices on. You must set up a location for the item in the Item Locations function before you can calculate a price in the Price and Availability function. This alternate item already exists with the same item type. Enter a different alternate item ID or alternate type. This alternate item ID does not exist in the Items file. Enter a different item ID, or set up the item in the Items function. This customer already has an alternate item set up for them. You can set up only one customer alternate or vendor alternate per item. This item does not exist in the Inventory Item Master file. If the item associated with a tag is not in the Items file, you must add the item to inventory. This item does not match the from/thru criteria for this batch. This location does not match the from/thru criteria for this batch. Enter an item or a location that falls within the range you specified in the from/thru criteria for the batch. B-4 Inventory User’s Manual References System Messages This lot does not exist for this item. Set up lot information for the item in the Item Locations - Lot Information screen. This vendor already has an alternate item set up for them. You can set up only one alternate item per item for a vendor. This vendor is already set up for this item location. The vendor is already an alternate for the specified item. Edit the existing alternate vendor, or set up a new vendor for the item/location in the Item Locations function. Unable to allocate sort file. Someone else may be using the same terminal ID and filename as the sort file you are trying to use, or the system is creating the sort file in a directory where you do not have permissions set up. Unit of measure has previously been entered. Select a different unit of measure. Unposted adjustments exist in COGS Adjustments File. Unposted transactions exist in Inventory Transactions File. Unposted transactions exist in Location Transfers File. Post these adjustments or transactions before using the Year-End Maintenance function. User-defined field 1 does not match the from/thru criteria for this batch. User-defined field 2 does not match the from/thru criteria for this batch. When you append an item/location during physical counts, you must enter a user-defined field that meets the from/thru criteria or work with a different batch. Inventory User’s Manual B-5 System Messages References User-defined field will not be available if no description is given. User-defined sort will not be available if no description is given. If you do not enter a field description, the system will not recognize the user-defined field or sort. B-6 Inventory User’s Manual References Inventory User’s Manual File Descriptions File Descriptions C INAIxxx (Alternate Items) The INAIxxx file stores the alternate item information for each item. INBNxxx (Bin Locations) The INBNxxx file stores the bin ID and last physical count information for every bin in each item/location. INCAxxx (Sales Categories) The INCAxxx file stores information about sales categories. INCBxxx (Physical Count Batches) The INCBxxx file stores batch information in use by the Physical Counts functions. INCCxxx (Standard Cost Makeup Codes) The INCCxxx file stores the standard cost makeup codes. INCJxxx (COGS Journal) The INCJxxx file stores the COGS and purchase price variance adjustments that are produced in the Inventory Transactions function. If Accounts Payable, Accounts Receivable, Purchase Order, and Sales Order are interfaced with Inventory, they also send COGS and purchase price variance adjustments information to this file. INCLxxx (Customer Levels) The INCLxxx file stores customer level codes. Inventory User’s Manual C-1 File Descriptions References INCSxxx (Cost Makeup) The INCSxxx file stores cost makeup codes and cost amounts for each item/location. INCTxxx (Physical Counts) The INCTxxx file stores detail information for each item/location/bin ID when physical counts are processed. INFTxxx (Forecast Types) The INFTxxx file stores forecast codes and the weighting factors for each period. INGLxxx (Account Codes) The INGLxxx file stores general ledger account codes and accounts associated with each item/ location. INHIxxx (Detail History) The INHIxxx file stores detail history for each transaction processed in Inventory (and for Accounts Payable, Accounts Receivable, Purchase Order, and Sales Order if these applications are interfaced with Inventory). INHSxxx (Summary History) The INHSxxx file stores summary history for each transaction processed in Inventory (and for Accounts Payable, Accounts Receivable, Purchase Order, and Sales Order if these applications are interfaced with Inventory). INKYxxx (Alternate Keys) The INKYxxx file stores individual records for each item/location. INLDxxx (Location Detail) The INLDxxx file stores general information for each item/location. C-2 Inventory User’s Manual References File Descriptions INLHxxx (Lot History) The INLHxxx file stores detail lot history for each transaction processed in Inventory (and for Accounts Payable, Accounts Receivable, Purchase Order, and Sales Order if these applications are interfaced with Inventory). INLOxxx (Location Master) The INLOxxx file stores general information for each location currently used in Inventory. INLPxxx (Location Pricing) The INLPxxx file stores location-specific pricing information for each item location. INLSxxx (Transaction Lot/Serial Numbers) The INLSxxx file stores lot and serial transaction information used in the Inventory Transactions function. INLTxxx (Lot Detail) The INLTxxx file stores lot detail information for each lotted item/location. INPLxxx (Product Lines) The INPLxxx file stores product line codes. INPPxxx (Promotional Pricing) The INPPxxx file stores promotional pricing codes and the criteria used to evaluate whether to apply a promotion to a specific item when you sell it. INPSxxx (Price Structures) The INPSxxx file stores price structure information. Inventory User’s Manual C-3 File Descriptions References INQLxxx (Quantity Locations) The INQLxxx file stores detail cost information for each nonserialized item/location. INQTxxx (Quantity Totals) The INQTxxx file stores total quantity information for each item/location/lot number, and onhand, committed, in-use, and on-order information. INRQxxx (IN Requisitions) The INRQxxx file stores reorder information for each item/location when you use the Calculate Reorders function. INSHxxx (Serial History) The INSHxxx file stores detail serial history for each transaction processed in Inventory (and for Accounts Payable, Accounts Receivable, Purchase Order, and Sales Order if these applications are interfaced with Inventory). INSNxxx (Serial Numbers) The INSNxxx file holds serial number information for each serialized item/location. INTB (Tables) The INTB file stores Inventory tables. INTLxxx (Transfer Lot/Serial IDs) The INTLxxx file stores lot and serial number information used when processing a transfer for serialized, lotted, or lotted/serialized items. INTRxxx (Transactions) The INTRxxx file stores transaction information produced in the Inventory Transactions function. C-4 Inventory User’s Manual References File Descriptions INTTxxx (Transactions/Transfers) The INTTxxx file stores transfer information produced in the Inventory Transactions function. INUDxxx (User-Defined Fields) The INUDxxx file stores verification values for each user-defined field. INUMxxx (Unit of Measure) The INUMxxx file stores unit of measure, conversion factor, penalty type, and penalty amount information for each item. INUPxxx (Units Pricing) The INUPxxx file stores unit-of-measure pricing information for each item/location. INVExxx (Items) The INVExxx file stores general information for each item. INVIxxx (Vendor Information) The INVIxxx file stores vendor-specific information for each item/location. INXTxxx (Additional Descriptions) The INXTxxx file stores additional descriptions for each item. Inventory User’s Manual C-5 References Inventory User’s Manual Other Commands Other Commands D Calculator Use the Calculator function to do basic math calculations. You can store and retrieve totals and tapes, add comments to tapes, and print tapes. A common use is to calculate a total, exit from the Calculator, and enter the total into the field you started from. Select Calculator from the Other Commands menu. The function screen appears. Inventory User’s Manual D-1 Other Commands References Field Definitions Field Description Memory The number or total stored in memory is displayed. Tape The printout tape of a real calculator is simulated in the Tape display area. Numbers, operators, and a running total of the calculations are displayed. Each workstation has its own unique tape for the calculator. The last tape that was used is recalled when you start the calculator. The tape is stored as a file on the hard disk and reloaded each time you use the calculator. When you want to start a new tape, press F1 to erase the current tape. Entry The number or comment you are entering or have just entered is displayed. To enter a number, type the number. To enter a comment, type a quotation mark (“) and then a comment. Comments can be 16 characters long. To make calculations with the Calculator, use postfix notation. First, type a number. Then press the key of the operator (+, -, x, or /) you want to use. Type a second number, and press the key of another operator or press Enter to total the calculation. D-2 Functions The Calculator functions are displayed in the Functions field. Press S to see the subtotal, the quotation mark key (“) to start a comment, and T to print the tape. In the View Tape function you can use three keys: the up-arrow key to move up the tape, the down-arrow key to move down the tape, and the Esc key to jump to the bottom of the tape and exit from View mode. Keys Use the following function keys or the alphanumeric equivalents to work with figures in the Memory, Tape, Entry and Status fields. F1 or C (Erase Tape) Clear the tape. Once you clear the tape, it cannot be recalled. F2 or E (Clear Entry) Clear the Entry field so that you can enter a different number. Inventory User’s Manual References Other Commands Field Description F3 or M+ (Memory +) Copy the total at the bottom of the tape to the Memory field if the figure in memory is .00. Add the total at the bottom of the tape to the figure in the Memory field. F4 or M(Memory -) Subtract the total at the bottom of the Tape field from the number in the Memory field. F5 or MR (Memory Recall) Copy the number in the Memory field to the Entry field. F6 or MC (Memory Clear) Erase the number in the Memory field. F7 or Q (Exit) Exit from the Calculator without saving the total. F8 or P (Printer) Switch the printer on and off. If you turn the printer on, your subsequent entries will be printed until you turn the printer off or exit from the calculator. F9 or O (Decimal) Change the number of default decimal places displayed by the Calculator. The default number of decimal places is read from the current OSAS program. Valid values are 0, 1, 2, 3, 4, 5, FLOAT (Floating Point), and AUTO (Automatic). Numbers are saved and calculated with 1 to 14 decimal places, but only the default number of decimal places is shown. When you select FLOAT, the decimal floats from 0 to 5 places to correctly display a number (unless 5 places are not available after you enter the whole number). When you select AUTO, a decimal is placed before the last two numbers of each entry unless you include a decimal as part of the entry. F10 or W (Exit Total) Exit from the Calculator and copy the total into the field the cursor is in on the screen where you accessed the calculator. Status The status of the printer (on/off) and of the automatic placement of the decimal point (0–5 or FL for floating) is displayed. Inventory User’s Manual D-3 Other Commands References Making a Calculation Follow the same procedure for each of the Calculator’s four math functions (+, -, x, and /). For example, to add 32 and 99, follow these steps: 1. Enter the first number, 32 to load the new subtotal into the Calculator. The number appears in the Entry field as you type and is transferred to the tape when you press Enter. 2. Press one of these keys to enter the operator: + add - subtract * multiply / divide For example, if you press +, the number you entered (32) followed by the plus sign moves to the bottom of the Tape field. The Calculator inserts the decimal point (and the following zeros if you are working with round numbers). The subtraction operator works the same as those on adding machines. Press +, a number, and -. 3. Enter the second number, 99. It appears in the Entry field as you type and moves to the bottom of the tape when you press Enter. The calculation is then made and the total (131.00) followed by two asterisks (**) is shown at the bottom of the tape. 4. If you want to start a new tape, press F1 or C to clear the tape before you start another calculation. Making a String of Calculations You can make consecutive calculations, using the running total from each previous operation. 1. Enter the first number of the calculation to reset the current total. The new total appears on the tape. D-4 Inventory User’s Manual References Other Commands 2. Type the operator you want to use (do not press Enter). The number you typed in step 1 and the operator appear in the Tape field. 3. Enter the second number. The calculation is made and the total is displayed at the bottom of the tape. This total is used to start the next calculation. 4. Type the second operator (do not press Enter). The last total is recalled from memory. The operator is then displayed in the Tape field behind the last total. 5. Enter the next number. The calculation is made and the new total is displayed at the bottom of the tape. Repeat steps 2–5 until the calculation is complete. As new calculations are displayed at the bottom of the Tape field, the previous numbers and operators scroll up the display area to make room. When the Tape field is full, the numbers scroll off the top of the display area. To repeat the last calculation, using the same operator and number, press the same operator key again. You can repeat this operation indefinitely. Execute an Operating System Command You can execute an operating system command from any field in OPEN SYSTEMS Accounting Software. Follow these steps to execute an operating system command: 1. From the Other pull-down menu, select Execute an Operating System Command. 2. Enter the command you want to execute. 3. Use the Proceed (PgDn) command to execute the operating system command. If the operating system command works properly, the message Press F7 to exit appears. Inventory User’s Manual D-5 Other Commands References If the system issues a return value (an error message), see the operating system manual for information. If an error message appears, you must exit from OSAS before you can execute any more operating system commands. 4. Press F7 to go to the field where you accessed Other commands. CALL a BBx Program From any field, you can call any BBx program that does not require variables to be passed to it. Follow these steps to call a BBx program: 1. Use the Other (F4 twice from a menu, F4 once from a field) command. 2. Select Call a BBx Program from the menu. 3. Enter the program you want to call. 4. Enter the parameter (if any) for the program. 5. Use the Proceed (PgDn) command to start the program. 6. Press Enter to return to the field where you accessed Other commands. D-6 Inventory User’s Manual References Other Commands Product Suggestions From any field, you can make, edit and save suggestions for improving the product. If you have a suggestion, fax or mail it to Open Systems. Select Product Suggestions from the Other Commands menu (F4 twice from a menu, F4 once from a field). The function screen appears. Field Definitions Field Description Suggestion This number identifies the suggestion. Identification numbers start at 0001. If you want to create a new suggestion, press Enter; the editor creates a new suggestion number one unit higher than your last number (if any). If you want to recall a suggestion for editing, enter the number of the suggestion. Application Enter the application you want to make a suggestion for. Inventory User’s Manual D-7 Other Commands References Field Description Version Enter the version number of the application (4.5, 4.53, etc.). Menu Item Enter the name of the menu item you want to make a suggestion for. Status The cursor moves to this field when you enter the number of a suggestion you want to recall. If the suggestion has not been printed, N is displayed. If the suggestion has been printed, Y is displayed. You can change the print status of the current suggestion. Last Modified The last creation and/or last edit date of the current suggestion is displayed. Description Enter the description of the suggestion. When you have finished creating or editing a suggestion, save your entries (PgDn) and exit to the Main menu. Applications Options Inquiry Use the Applications Options Inquiry utility to view the options for any application. Select Applications Options Inquiry from the Other Commands menu (F4 twice from a menu, F4 once from a field). After you enter the application ID, the options and interfaces selected for the application appear. When you are finished viewing the information, press any key to continue. D-8 Inventory User’s Manual References Other Commands Global Inquiry Use the Global Inquiry command from the Other Commands menu to gather information from all the OSAS files (and applications) with a common field. To produce a list of the windows, use the Global Inquiry Window List function. To produce a report of occurrences where links between windows are not continuous, use the Global Inquiry Window Audit Report function. The options on the Global Inquiry menu are set up in the PARAM table in the Application Tables function. Each option is assigned a window ID, whose characteristics were either installed with Resource Manager or set up in the Global Inquiry Definitions function. You need the File Descriptions manual when you use this function. Setting up a Global Inquiry window is similar to setting up a report in Report Writer. If you are not familiar with Report Writer or the operations associated with Business BASIC, consult your value-added reseller when you add or change a Global Inquiry window. You can use the Global Inquiry Definitions and Application Tables functions to establish and update information about Global Inquiry window IDs. A simple installation accomplishes the same tasks. As a result, when you use the Global Inquiry command, the windows should be set up and logically connected to each other, with convenient categories (usually named after applications) as options. At that point you are ready to choose an option. Inventory User’s Manual D-9 Other Commands References Select Global Inquiry from the Other Commands menu (F4 twice from a menu, F4 once from a field); then select an application. A window appears. In the window above, the user selected Accounts Payable from the Global Inquiry menu. The window that appears lists the vendors, by vendor ID, and the total amount due. Because of the way the window is set up, the user can access five other windows: one that displays accounts payable invoices, one that displays invoice history, one that displays paid invoices, one that displays accounts payable transactions, and one that displays miscellaneous vendor information. From Global Inquiry, you can use the Other (F4) command to access the Global Inquiry menu again. To look up and select a previously accessed window, use the Inquiry (F2) command. The sequence number and description represent the window IDs that you have accessed with the Global Inquiry command. D-10 Inventory User’s Manual References Other Commands For example, when you use the Other (F4) command, the Global Inquiry command, and then the Inventory option, window A appears. When you use a command at the bottom of the screen, window B appears. When you use a command at the bottom of the screen, window C appears. You continue to use commands until you reach window G. (Windows are not lettered like this; they are lettered in the example to simplify the model.) If you wanted to return to one of the previous six windows that were displayed, you could use the Global Inquiry command again, but a simpler route would be to use the Inquiry (F2) command, where you would find six sequence numbers: 001001, 001002, 001003, 001004, 001005, 001006. Each number would appear with a description of a window: 001001 would be paired with the description of window A; 001002 would be paired with the description of window B, and so forth. In the window you could move the prompt (>) to the number that corresponds to the description of the window you want. The sequence number’s notation carries two pieces of information: the number of times you used the Global Inquiry command and the number of windows you accessed. As explained above, the number 001002 provides two details: you have used the Global Inquiry command only once (001), and this window was the second window you accessed during the usage of the Global Inquiry command. Therefore, 001002 indicates the second window you accessed during your first usage of the Global Inquiry command. Had you used the Global Inquiry command to select the Payroll option in window 7, the sequence number of the window that appeared would be 002001. Every time you enter Global Inquiry, the numbering starts at 001001, regardless of the sequence numbers the window had before. If you access more than 999 windows under the same use of Global Inquiry (for example, the first use), the counter turns back to 001000. If you use the Global Inquiry command more than 999 times before exiting (for example, at the first window), the sequence number becomes 000001. Inventory User’s Manual D-11 Other Commands References To exit from Global Inquiry at any point, use the Exit (F7) command. You are returned to the Access Code window; use the Exit (F7) command again to return to the point where you originally used the Other (F4) command. General Information Inquiry Use the General Information Inquiry function to view information from the Accounts Receivable, Accounts Payable, Sales Order, Purchase Order, and Payroll applications. Depending on which applications are installed, you can view information about vendors, customers, and employees. Select General Information Inquiry from the Other Commands menu (F4 twice from a menu, F4 once from a field). The function screen appears. D-12 Inventory User’s Manual References Other Commands Field Definitions Field Name Description Search For Press V to view information about a vendor, C to view information about a customer, or E to view information about an employee. Command Bar Definitions Command Definition View detail on/off Press V to toggle the detail display on or off. Search selection Press S to change your search selection. Change sort Press C to sort the displayed information in a different way. When you are finished viewing the information, use the Exit (F7) command to exit to the screen or menu you accessed the Other Commands menu from. Inventory User’s Manual D-13 Other Commands References Support Information Use the Support Information function to view information about whom to contact for technical support or how to contact your dealer. Select Support Information from the Other Commands menu (F4 twice from a menu, F4 once from a field). The function screen appears. When you are finished viewing the information, press any key to return to the screen or menu you accessed the Other Commands menu from. D-14 Inventory User’s Manual References Other Commands User Comments Use the User Comments function to enter comments or notes. Select User Comments from the Other Commands menu (F4 twice from a menu, F4 once from a field). The function screen appears. Field Definitions Field Name Description User ID The user ID is displayed. Shared/Private This field appears only if you have set up access codes for this function. If the comment is shared, SHARED is displayed. If the comment is private, PRIVATE is displayed along with the access name. Ref ID Enter a reference ID for the comment. You can use reference IDs to group comments. Inventory User’s Manual D-15 Other Commands References Field Name Description End Date The workstation date is displayed. Date Accept the displayed date, or enter a different date. Comment Enter a comment. Command Bar Definitions Command Definition new Id Press I to enter a different user ID. Ref id Press R to enter a different reference ID. end Date Press D to change the end date. Append Press A to add a comment. Enter = edit Move the prompt (>) to the line you want to edit and press Enter. print Online Press O to print the comment. Shared/Private This command appears only if you have set up access codes for this function. Press E to toggle between shared and private comments. Shared comments can be viewed by everyone; private comments can be viewed only by the person who enters the correct access code. First Press F to go to the first comment. Last Press L to go to the last comment. Next Press N to go to the next comment. Prev Press P to go to the previous comment. When you are finished entering comments, use the Exit (F7) command to return to the screen or menu you accessed the Other Commands menu from. D-16 Inventory User’s Manual References Other Commands Inventory Price Calculator Field Definitions Field Name Description Location ID Enter a location ID. Item ID Enter an item ID. Sale Units Accept the displayed unit of measure, or enter a different unit of measure. Price ID Enter a price ID (optional). Customer ID Enter a customer ID (optional). Cust Level Enter a customer level (optional). Sale Date Accept the displayed sale date, or enter a different date. Inventory User’s Manual D-17 Other Commands References Field Name Description Sale Quantity Accept the displayed sale quantity, or enter a different quantity. On Hand Qty The quantity on hand is displayed. Committed Qty The committed quantity is displayed. In Use Qty The in-use quantity is displayed. Available Qty The available quantity is displayed. On Order Qty The on-order quantity is displayed. LIFO/FIFO Cost This field appears if you elected in the Resource Manager Options and Interfaces function to show costs in the price and availability lookup. The LIFO/FIFO unit cost is displayed. Average Cost This field appears if you elected in the Resource Manager Options and Interfaces function to show costs in the price and availability lookup. The average unit cost is displayed. Standard Cost This field appears if you elected in the Resource Manager Options and Interfaces function to show costs in the price and availability lookup. The standard unit cost is displayed. Base Cost This field appears if you elected in the Resource Manager Options and Interfaces function to show costs in the price and availability lookup. The base unit cost is displayed. D-18 Calc Unit Price The calculated unit price is displayed. Calc Ext Price The calculated extended unit price is displayed. Base The base level is displayed. Quantity The sale quantity levels are displayed. Inventory User’s Manual References Other Commands Field Name Description Unit Price The calculated unit price for each quantity break is displayed. Command Bar This window has no command bar. Saving and Exiting To return to the Price and Availability screen, use the Exit (F7) command. Inventory User’s Manual D-19 References Inventory User’s Manual Price Calculator Price Calculator E Price Calculator Window Field Definitions Field Name Description Location ID Enter a location ID. Item ID Enter an item ID. Price ID Enter a price ID. Customer ID Enter a customer ID. Inventory User’s Manual E-1 Price Calculator References Field Name Description Cust Level Enter a customer level Sale Date Press Enter to accept the sale date displayed or enter a different date. Sale Quantity Press Enter to accept the sale quantity displayed or enter a different quantity. Sale Units Press Enter to accept the unit of measure displayed or enter a different unit of measure. Calc Unit Price The calculated unit price is displayed. Calc Ext Price The calculated external unit price is displayed. Base Quantity Unit Price Command Bar This window has no command bar. Saving and Exiting You cannot save information in this window. To exit to the Price Calculator, use the Exit (F7) command. E-2 Inventory User’s Manual Inventory User’s Manual Index A Abandon function key, 1-29 Access Codes parameter, 1-9 setting up, 2-12 Account Codes definition, 2-15 function, 12-9 setting up, 2-15 Account Codes List function, 14-15 sample, 14-18 Accounts Payable installation order, 2-3 interface, 2-9, 2-10, 5-3 Accounts Receivable interface, 2-9, 2-10, 5-3, 11-55 adding items, 3-3 locations, 2-25 lots, 2-30 additional descriptions option, 2-11 adjustment transactions, 3-4 adjustments T accounts, 3-12 alias alternate, 2-23 allow discounts on serialized items option, 2-12 alternate items alias, 2-23 bar code, 2-24 customer IDs, 2-23 IDs, 2-23 setting up, 2-23 superseded, 2-24 vendor IDs, 2-24 alternate units of measure, 2-21 Analysis Reports menu functions, 1-6 Inventory User’s Manual IX Applications Options Inquiry, D-8 available quantity, 2-28 average cost definition, 2-29 method, 2-9 average price, 2-28 B backing up data files, 2-33 operating system commands, 2-33 programs, 2-33 using Resource Manager, 2-33 Backup function, 2-33 bar codes, 2-24 base applications definition, 1-3 base cost, 2-29 base price, 2-28 batch IDs, 3-17 Batch List function, 10-33 producing, 3-20 sample, 10-36 bell turning on or off, 1-14, 1-30 Bill of Materials/Kitting interface, 2-9, 2-10, 2-21 bin information setting up, 2-30 C Calculate Reorders, 3-15 EOQ method, 3-16 forecast method, 3-16 function, 6-3 IX-1 Index min/max method, 3-16 Calculator consecutive calculations, D-4 description of, D-1 making calculations, D-4 Call a BBx Program, D-6 carrying cost, 2-18 changing costs, 3-22 prices, 3-22 check for alias on reports option, 2-12 Code Maintenance menu functions, 1-6 codes setting up, 2-5 COGS adjustments, 5-67 circumstances, 3-13 posting, 3-13 T accounts, 3-14 Command help, 1-13, 1-29 closing window, 1-13, 1-29 commands in-field editing, 1-31 report, 1-34 scroll region, 1-35 company parameter, 1-9 conventions report, 1-37 user’s manual, 1-7 conversion factors, 2-22 converting deleting source files, A-3 effect on modifications, A-1 erasing existing files, A-4 error log, A-4 from previous versions, A-1 pausing for problems, A-4 prerequisites, A-1 to version 5.21, A-3 cost changing, 3-22 history, 2-29 in transactions, 3-9 variance, 3-13 Cost Changes function, 9-7 log, 9-10 IX-2 Cost Makeup Codes List function, 14-23 sample, 14-26 Cost Variance Report function, 7-19 sample, 7-22 costing method option, 2-11 costing methods average cost, 2-9 choosing, 2-9 FIFO, 2-9 LIFO, 2-9 standard cost, 2-9 Costs and Vendors function, 4-49 costs in sale transactions option, 2-11 Ctrl + F function key, 1-30 Ctrl + G function key, 1-14, 1-30 Ctrl + V function key, 1-30 cursor moving up or back one field, 1-30 selecting item, 1-33 customer IDs alternate, 2-23 Customer Levels definition, 2-14 function, 12-5 setting up, 2-14 Customer Levels List function, 14-7 sample, 14-10 customer support, 1-3 customer-level pricing setting up, 2-29 D daily tasks, 3-3 Daily Work menu functions, 1-5 Data File Conversion screen, A-3 steps, A-3 default frozen quantities, 3-18 default location information setting up, 2-26 defining types of inventory items, 2-5 Inventory User’s Manual Index delete files, 3-24 information on a screen, 1-29 line item, 1-35 Detail History function, 4-17, 4-21 detail history option, 2-11 detail lookup command, 1-34 discounts on serialized items option, 2-12 Down Arrow inquiry command, 1-33 report command, 1-35 scroll region command, 1-35 E edit line item, 1-35 End inquiry command, 1-32 report command, 1-34 scroll region command, 1-35 Enter data, 2-13 customer levels, 2-14 establishing account codes, 2-15 establishing locations, 2-18 product lines, 2-14 sales categories, 2-14 setting up forecast types, 2-15 setting up item IDs, 2-20 setting up makeup codes, 2-16 setting up price structures, 2-18 setting up user-defined fields, 2-17 tables, 2-13 user-defined field sorts, 2-17 exceptions for physical inventory, 3-18 inquiry command, 1-33 location transfers, 3-10 physical counts, 3-20 scroll region command, 1-35 transactions, 3-4 lotted items, 3-4 lotted/serialized items, 3-4 serialized items, 3-4 serialized/lotted items, 3-4 Inventory User’s Manual entering prices for sales transactions option, 2-11 EOQ definition, 2-28 method, 2-29 for calculating reorders, 3-16 overriding cost information, 2-29 error log conversion, A-4 error messages, B-1 Esc Command help, 1-13, 1-29 inquiry command, 1-33 exceptions, 3-18 Execute an Operating System Command, D-5 exit from inquiry window, 1-33 from report to menu, 1-34 from screen or window, 1-13, 1-30 extended cost, 2-29 F F1 function key, 1-13, 1-18, 1-29 F2 function key, 1-29 F3 function key, 1-29 scroll region command, 1-35 F4 function key, 1-13, 1-29 F5 function key, 1-29 F6 function key, 1-30 F7 inquiry command, 1-33 report command, 1-34 F8 function key, 1-30 FIFO, 2-9 File Maintenance menu functions, 1-6 files deleting, 3-24 descriptions, C-1 purging, 3-24 source, A-3 forecast method for calculating reorders, 3-16 IX-3 Index Forecast Types function, 12-13 screen, 12-14 setting up, 2-15 Forecast Types List function, 14-19 sample, 14-22 Freeze Quantities function, 10-7 when to, 3-19 function keys Ctrl + F, 1-30 Ctrl + G, 1-14, 1-30 Ctrl + V, 1-30 Esc, 1-13, 1-29 F1, 1-29 F2, 1-13, 1-29 F3, 1-29 F4, 1-29 F5, 1-29 F6, 1-30 F7, 1-13, 1-30 F8, 1-30 PgDn, 1-30 PgUp, 1-14, 1-30 Shift + F2, 1-30 Tab, 1-14, 1-30 Up Arrow, 1-30 G general information setting up, 2-20 General Information Inquiry function, D-12 General Ledger installation order, 2-3 interface, 2-9, 3-21 Generate Purchase Requisitions, 3-17 function, 6-11 GL accounts setting up, 2-28 GL adjustments posting, 3-13 GL Adjustments Journal function, 5-67 producing, 3-12 IX-4 sample, 5-70 GL Adjustments log, 5-74 Global Inquiry command, D-9 goods received status purchase transactions, 3-7 Gross Profit Analysis Report function, 8-19 sample, 8-22 H Help function key, 1-29 Home inquiry command, 1-33 report command, 1-34 scroll region command, 1-35 I IDs setting up, 2-5 INAIxxx file purging, 3-24 Information function key, 1-30 Information Inquiry menu functions, 1-5 Information menu accessing, 1-30 INHIxxx file purging, 3-25 INHSxxx file purging, 3-25 INLHxxx file purging, 3-25 INLTxxx file purging, 3-24 INPDxxx table, 2-14, 11-66 INPPxxx file purging, 3-24 Inquiry function key, 1-29 partial-key, 1-32, 1-33 inquiry commands Down Arrow, 1-33 End, 1-32 Enter, 1-33 Esc, 1-33 F7, 1-33 Inventory User’s Manual Index Home, 1-33 Ins, 1-33 PgDn, 1-32 PgUp, 1-32 Up Arrow, 1-33 Ins inquiry command, 1-33 scroll region command, 1-35 Insert line item, 1-35 INSHxxx file purging, 3-25 INSNxxx file purging, 3-24 installation conversion, 2-3 methods, 2-3 preparing data access codes, 2-12 choosing costing methods, 2-9 defining types of inventory items, 2-5 options and interfaces, 2-9 organizing items, 2-5 setting up codes, 2-5 prerequisites, 2-3 INSTDxxx table, 11-66 interface Accounts Payable, 2-9, 2-10 Accounts Receivable, 2-9, 2-10 Bill of Materials/Kitting, 2-9, 2-10 General Ledger, 2-9, 3-21 Purchase Order, 2-9, 2-10, 3-17 Sales Order, 2-9, 2-10 INUDSxxx table, 11-66 INUSRxxx table, 11-66 Inventory functions, 4-1 installing, 2-3 inventory search commands, 1-33 Shift + F5, 1-34 Shift + F6, 1-34 Shift + F7, 1-34 Shift + F8, 1-34 Inventory Transactions function, 5-3 Lot/Serial Number Entry window, 5-30 service items, 5-3 Inventory User’s Manual updated, 5-3 inventory value setting up, 2-27 invoice status purchase transactions, 3-7 sales transactions, 3-6 item adding, 3-3 changing costs, 3-22 changing prices, 3-22 defining types, 2-5 IDs alternate, 2-23 setting up, 2-7, 2-20 locations setting up, 2-25 nonserial, 2-5 organizing, 2-5 quantities setting up, 2-28 updating, 3-25 serial, 2-5 service, 2-5 status, 2-20, 2-27 vs. item location status, 2-26 item description lookup command, 1-34 Item Detail List function, 13-3 sample, 13-6 Item Locations File Maintenance Edit Serial Numbers window, 11-48 function, 11-17 screen, 11-19 Item Locations Information Inquiry function, 4-39 Item Locations List function, 13-11 sample, 13-14 Item Price Change function, 9-3 log, 9-6 Item Status Report function, 7-3, 7-7 sample, 7-10 IX-5 Index Item Summary List function, 13-7 sample, 13-10 Items File Maintenance function, 11-3 Items Information Inquiry function, 4-29 keeping detail history option, 2-11 keeping lot detail option, 2-11 keeping serial history option, 2-11 kitted item, 2-21 function, 11-51 setting up, 2-18 Look Up inquiry command, 1-33 lost status, 2-31 lot adding, 2-30 information setting up, 2-30 lot detail option, 2-11 Lot History Report function, 7-27 sample, 7-30 Lot Numbers function, 4-55 lot-item lookup command, 1-34 lotted items, 2-21, 2-29, 3-4 lotted/serialized items, 2-29, 3-4 L M J Jump function key, 1-14, 1-30 K last cost, 2-29 Left Arrow report command, 1-34 LIFO, 2-9 List function key, 1-30 to printer or file, 1-30 list price, 2-28 location adding, 2-25 cost information setting up, 2-29 IDs setting up, 2-8 information setting up, 2-26 price information setting up, 2-28 Location Detail List function, 13-15 sample, 13-18 Location Transfers entering, 3-10 function, 5-37 Locations definition, 2-18 IX-6 Maintenance function key, 1-30 makeup codes setting up, 2-16 manual conventions, 1-7 organization, 1-7 Master Code Lists menu functions, 1-6 Master File Lists menu functions, 1-6 Menus conventions, 1-10 Information, 1-30 Other Command, 1-13, 1-29 messages, B-1 min/max method for calculating reorders, 3-16 minimum order quantity, 2-28 minimum price, 2-28 miscellaneous credit status purchase transactions, 3-7 sales transactions, 3-6 modifications and conversion, A-1 Movement Trending Report function, 8-27 sample, 8-30 Inventory User’s Manual Index N new order status purchase transactions, 3-7 sales transactions, 3-5 nonserialized items, 2-5, 2-20 O online editing of quantities option, 2-11 options additional descriptions, 2-11 allow discounts on serialized items, 2-12 check for alias on report options, 2-12 costing method, 2-11 entering prices for sales transactions, 2-11 keeping detail history, 2-11 keeping lot detail, 2-11 keeping serial history, 2-11 online editing of quantities, 2-11 post detail to General Ledger, 2-11 show costs in price and availability lookup, 2-12 show costs in sale transactions, 2-11 transaction item entry, 2-12 zero-quantity costing method, 2-11 options and interfaces, 2-9 order quantities setting up, 2-27 ordering cost, 2-18 organizing items, 2-5 OSAS conventions, 1-8 general information, 1-3 running, 1-8 structure, 1-3 Other Command menu accessing, 1-13, 1-29 Other Commands Applications Options Inquiry, D-8 Calculator, D-1 Call a BBx Program, D-6 Execute an Operating System Command, D-5 General Information Inquiry, D-12 Global Inquiry, D-9 Product Suggestions, D-7 Support Information, D-14 User Comments, D-15 Inventory User’s Manual Other function key, 1-29 output device printer, 1-38 overriding cost information EOQ, 2-29 Overstock Report function, 8-7 sample, 8-10 P parameters access code, 1-9 command to start OSAS, 1-9 company ID, 1-9 format, 1-9 general expression, 1-9 order, 1-9 terminal ID, 1-9 partial-key inquiry, 1-32, 1-33 penalty amount, 2-22 Periodic Processing menu functions, 1-6 periodic tasks, 3-15 calculating reorders, 3-15 procedures, 3-15 perpetual inventory updating, 3-21 PgDn function key, 1-30 inquiry command, 1-32 report command, 1-34 scroll region command, 1-35 PgUp function key, 1-30 inquiry command, 1-32 report command, 1-34 scroll region command, 1-35 Physical Count List function, 10-37 producing, 3-20 sample, 10-40 Physical Count Valuation Report function, 10-45 producing, 3-21 sample, 10-52 IX-7 Index physical counts entering, 3-20 Physical Counts Tag Entry function, 10-19 Physical Counts Worksheet Entry function, 10-27 Physical Inventory batch ID, 3-17 default frozen quantities, 3-18 entering counts, 3-20 exceptions, 3-18 freezing quantities, 3-19 frozen quantities, 3-18 selecting, 3-17 tag numbers, 3-17 tags, 3-19 worksheets, 3-20 zero quantities, 3-19 Physical Inventory menu functions, 1-6 Physical Inventory Selection function, 10-3 Physical Inventory Tags List, 10-14 Physical Inventory Worksheet, 10-18 post detail to General Ledger option, 2-11 Post GL Adjustments function, 5-71 log, 5-74 Post Transactions function, 5-63 log, 5-66 posting adjustments T accounts, 3-12 COGS adjustments, 3-13 COGS T accounts, 3-14 GL adjustments, 3-13 purchase price variance T accounts, 3-14 purchase price variances, 3-13 purchases T accounts, 3-12 sales T accounts, 3-12 transactions, 3-11 prerequisites, 3-11 transfers T accounts, 3-12 price changing, 3-22 IDs, 2-21, 11-55 setting up, 2-8 IX-8 variance, 3-13 Price and Availability function, 4-3 Price Calculator window, E-1 Price Calculator, E-1 Price Calculator window, E-1 Price Report function, 7-11 sample, 7-14 Price Structure List function, 13-19 sample, 13-22 Price Structures function, 11-55 setting up, 2-18 Print Physical Inventory Tags function, 10-11 list, 10-14 Print Physical Inventory Worksheets function, 10-15 sample, 10-18 printing reports, 3-26 screen contents, 1-30 tags, 3-19 worksheets, 3-20 Proceed function key, 1-30 Product Lines definition, 2-14 function, 12-7 setting up, 2-8, 2-14, 2-21 Product Lines List function, 14-11 sample, 14-14 Product Suggestions, D-7 programs updating, A-1 Promotional Pricing function, 11-59 setting up, 2-29, 2-31 Promotional Pricing List function, 13-23 sample, 13-26 Purchase Order installation order, 2-3 interface, 2-9, 2-10, 3-17, 5-3 Inventory User’s Manual Index purchase price variances posting, 3-13 T accounts, 3-14 purchase requisitions generating, 3-17 purchase transactions, 3-6 goods received, 3-7 invoice, 3-7 miscellaneous credit, 3-7 new order, 3-7 purchases T accounts, 3-12 Purge Selected Files function, 9-19 purging files, 3-24 INAIxxx, 3-24 INHIxxx, 3-25 INHSxxx, 3-25 INLHxxx, 3-25 INLTxxx, 3-24 INPPxxx, 3-24 INSHxxx, 3-25 INSNxxx, 3-24 Q quantities updating, 3-25 verifying, 3-23 quantities and transactions description of, 3-8 differences, 3-8 Quantity Cross Verification function, 9-11 log, 9-14 Quick entry turning on or off, 1-30 R Rebuild Item Quantities log, 9-26 Reorder Processing menu functions, 1-5 Reorder Report function, 6-7 producing, 3-16 sample, 6-10 Inventory User’s Manual reorders calculating, 3-15 report commands, 1-34 Down Arrow, 1-35 End, 1-34 Exit, 1-34 F7, 1-34 Home, 1-34 PgDn, 1-34 PgUp, 1-34 Right Arrow, 1-34 Tab, 1-34 Up Arrow, 1-35 Reports conventions, 1-37 including all information, 1-37 limiting information, 1-37 selecting information for, 1-37 reports printing, 3-26 Reports menu functions, 1-5 Resource Manager backing up, 2-33 operating systems, 1-3 Options and Interfaces, 2-10 Right Arrow report command, 1-34 S safety stock, 2-27 Safety Stock Alert Report function, 8-3 sample, 8-6 Sales Analysis Report function, 8-15 sample, 8-18 Sales Categories definition, 2-14 function, 12-3 setting up, 2-14, 2-21 Sales Categories List function, 14-3 sample, 14-6 Sales Order interface, 2-9, 2-10, 5-3, 11-55 IX-9 Index sales T accounts, 3-12 sales transactions, 3-5 invoice, 3-6 miscellaneous credit, 3-6 new order, 3-5 verify order, 3-5 Sales Trending function, 4-25 scroll region commands, 1-35 Down Arrow, 1-35 End, 1-35 Enter, 1-35 F3, 1-35 Home, 1-35 Ins, 1-35 PgDn, 1-35 PgUp, 1-35 Up Arrow, 1-35 seasonal items using forecast reordering method, 3-16 serial history option, 2-11 serial information setting up, 2-30 serial number-item lookup, 1-34 Serial Numbers function, 4-59 Serialized History Report function, 7-23 sample, 7-26 serialized items, 2-5, 2-20, 2-29, 3-4 serialized/lotted items, 2-29, 3-4 service items, 2-5, 2-20 adjusting, 5-3 setting up access codes, 2-12 account codes, 2-15 alternate items, 2-23 bin information, 2-30 codes and IDs, 2-5 customer levels, 2-14 customer-level pricing, 2-29 defining types of inventory items, 2-5 forecast types, 2-15 general information, 2-20 GL accounts, 2-28 installing, 2-3 IX-10 inventory value, 2-27 item IDs, 2-7 item IDs and descriptions, 2-20 item locations, 2-25 item quantities, 2-28 location cost information, 2-29 location IDs, 2-8 location information, 2-26 defaults, 2-26 location price information, 2-28 locations, 2-18 lot information, 2-30 makeup codes, 2-16 order quantities, 2-27 organizing inventory items, 2-5 price IDs, 2-8 price structures, 2-18 product lines, 2-8, 2-14 promotional pricing, 2-31 serial information, 2-30 tables, 2-13 units of measure, 2-21, 2-28 user-defined field sorts, 2-17 user-defined fields, 2-17 vendor information, 2-29 Shift + F2 function key, 1-30 Shift + F5 inventory search command, 1-34 Shift + F6 inventory search command, 1-34 Shift + F7 inventory search command, 1-34 Shift + F8 inventory search command, 1-34 show costs in price and availability lookup option, 2-12 show costs in sale transactions option, 2-11 Slow/Fast Movement Report sample, 8-14 source files deleting after conversion, A-3 standard cost, 2-9, 2-16, 2-29 Standard Cost Makeup Codes function, 12-17 Start Over function key, 1-14, 1-30 statuses goods received, 3-7 invoice purchase transactions, 3-7 sales transactions, 3-5 item, 2-20, 2-27 Inventory User’s Manual Index item location, 2-26 lost, 2-31 miscellaneous credit, 3-6 new order purchase transactions, 3-7 sales transactions, 3-5 verify order, 3-5 Summary History function, 4-13 superseded alternate items, 2-24 Support Information command, D-14 system messages, B-1 T T accounts for adjustments, 3-12 for COGS, 3-14 for purchase price variance, 3-14 for purchases, 3-12 for sales, 3-12 for transfers, 3-12 updating perpetual inventory, 3-22 Tab function key, 1-30 report command, 1-34 Tables entering data, 2-13 function, 11-63 INPDxxx, 2-14, 11-66 INSTDxxx, 11-66 INUDSxxx, 11-66 INUSRxxx, 11-66 Tables List function, 13-27 sample, 13-30 tag numbers, 3-17 tags and worksheets, 3-18 printing, 3-19 tax class, 2-21 terminal parameter, 1-9 toggle between halves of reports, 1-34 Inventory User’s Manual Transaction History Report function, 7-31 sample, 7-34 transaction item entry option, 2-12 transactions adjustments, 3-4 costs, 3-9 entering, 3-4 lotted items, 3-4 lotted/serialized items, 3-4 posting, 3-11 purchases, 3-6 relationship with quantities, 3-8 sales, 3-5 serialized items, 3-4 serialized/lotted items, 3-4 Transactions Journal function, 5-55 producing, 3-11 sample, 5-58 Transfers Journal function, 5-59 producing, 3-11 sample, 5-62 transfers T accounts, 3-12 Trend Analysis Report function, 8-23 sample, 8-26 types of inventory items, 2-5 U units of measure, 2-21 alternate, 2-21 base amount, 2-22 penalty amount, 2-22 setting up, 2-21, 2-28 Up Arrow function key, 1-30 inquiry command, 1-33 report command, 1-35 scroll region command, 1-35 Update Perpetual Inventory function, 10-49 log, 10-37 IX-11 Index updating perpetual inventory, 3-21 T accounts, 3-22 programs, A-1 upgrading from previous versions, A-1 User Comments function, D-15 screen, D-15 user’s manual conventions, 1-7 organization, 1-7 User-Defined Field Sorts function, 12-23 setting up, 2-17 User-Defined Field Sorts List function, 14-31 sample, 14-34 User-Defined Fields function, 12-19 setting up, 2-17, 2-21 User-Defined Fields List function, 14-27 sample, 14-30 utilities Applications Options Inquiry, D-8 Calculator, D-1 Call a BBx Program, D-6 Execute an Operating System Command, D-5 General Information Inquiry, D-12 Global Inquiry, D-9 Product Suggestions, D-7 Support Information, D-14 User Comments, D-15 vendor ID alternate, 2-24 vendor information setting up, 2-29 Verification function key, 1-30 verifying order status, 3-5 quantities, 3-23 View inquiry command, 1-33 W weight of item, 2-21 worksheets and tags, 3-18 printing, 3-20 Y Year-End Maintenance, 3-23 function, 9-15 log, 9-18 Z zero quantities for physical inventory, 3-19 zero-quantity costing method option, 2-11 V Valuation Report function, 7-15 sample, 7-18 variance cost, 3-13 price, 3-13 Variance Report function, 10-41 producing, 3-20 sample, 10-44 IX-12 Inventory User’s Manual