1
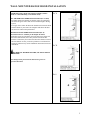
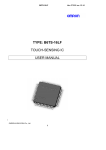
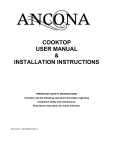
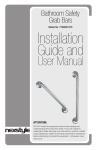
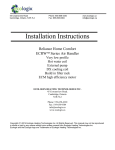
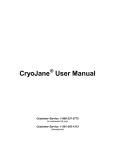
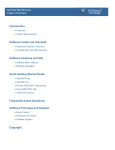
RANGE HOODS USER INSTRUCTIONS Model: Rapido 30 & 36 For Information you can reach us: Phone: 1-800-350-4562 Fax: 1-800-350-8563 e-mail: [email protected] IMPORTANT SAFETY INSTRUCTIONS Carefully read the following important information regarding installation safety and maintenance. Keep these instructions for future reference. 11/23/2012 1 IMPORTANT SAFETY INSTRUCTIONS TO REDUCE THE RISK OF FIRE OR ELECTRICAL SHOCK, DO NOT USE THIS RANGE HOOD FAN WITH ANY SOLID-STATE SPEED CONTROL DEVICE. INTENDED FOR DOMESTIC COOKING ONLY! CAUTION: Have a smoke detector in your kitchen and change the batteries regularly, i.e. in spring and fall when you move your clocks forward and backward. Never leave range top burners on unattended at high settings. Pots that boil over can smoke and greasy spillovers can ignite. Only heat oils slowly on low to medium settings. When cooking on high settings, always turn hood ON, especially if you plan to flambé. Don’t let grease accumulate on the fan or filter. Clean often. Make it a habit to use pots and pans that are the right size for the size of the range burner. TO REDUCE THE RISK OF INJURY IN CASE OF FIRE: FIRST, to prevent burns, SMOTHER the flames with a close-fitting lid or metal tray, i.e. a cookie sheet, THEN turn off the burner. If the flames are not smothered, EVACUATE and call 911. A fire can double in size in 2 to 3 minutes. NEVER PICK UP A POT OR PAN WITH FLAMING CONTENTS. Whatever you use to protect your hands, i.e. oven mitts or a towel could catch fire. SMOTHER FLAMES, DO NOT USE WATER or wet fabric such as a towel, as this can cause a steam explosion that will burn you. Use a fire extinguisher ONLY if you already know how to use it and you are sure it is Class ABC, if the fire is small and contained, if the fire department is on its way and if your back is to an exit so you can escape if your attempt to fight the fire fails. TO REDUCE THE RISK OF FIRE, ELECTRIC SHOCK, OR INJURY TO PERSONS, OBSERVE THE FOLLOWING: REQUIREMENTS: 120V, 60Hz, 15A circuit grounding TO REDUCE THE RISK OF FIRE, ELECTRIC SHOCK, OR INJURY TO PERSONS, OBSERVE THE FOLLOWING: (cont.) Installation work and electrical wiring must be done by a qualified person(s) in accordance with all applicable codes and standards, including fire rated construction. Structural framing, installation work and electrical wiring must respect all applicable codes and standards, including those for fire-rated constructions and must be performed by a qualified person(s). Follow the heating equipment manufacturer’s guidelines and safety standards such as those published by the: o Canadian Fire Safety Association (CFSA), and the Heating, Refrigeration and Air Conditioning Institute of Canada (HRAI), and the local code authorities. o National Fire Protection Association (NFPA) and the American Association for Heating Refrigeration and Air Conditioning Engineers (ASHREA) and the local code authorities. BEFORE wiring, servicing or cleaning this range hood, be sure that power is switched off at the service panel and to prevent power from being switched on by accident, block or put a tag on the panel. Ideally, the service panel should be locked. To prevent the fire hazard of back drafting, sufficient air is needed for proper combustion and exhausting of gases through the flue (chimney) of fuel burning equipment. To reduce risk of fire and to properly exhaust air, be sure to duct air outside. The hood has been designed to remove kitchen smells; any additional use shall be regarded as non-intended. Take care when the range hood is operating simultaneously with an open fireplace or burner as they both depend on the air in the environment to operate and the range hood will remove air while operating. Do not leave the range hood on if it is not being used. Constantly check frying food to prevent overheated oil becoming a fire hazard. Do not check the status of the filters while the range hood is operating. Do not touch the light bulbs shortly or immediately after the appliance has been used. Caution: This range hood is for general ventilating use only. Do not use it to exhaust dangerous materials or explosive vapors. Use this range hood correctly and only for domestic cooking, as intended by the manufacturer. Contact the manufacturer or distributor if you have any questions. 2 INSTALLATION SAFETY and USE & MAINTENANCE INSTALLATION SAFETY When cutting or drilling into wall or ceiling, do not damage electrical wiring and other hidden utilities. The appliance must be installed at a minimum height of 61 cm (24 in.) from an electric stove, or 76 cm (30 in.) from gas or combined stoves. Ducted fans must always be vented to the outdoors for best performance and safety; the discharge air should be directed to the building exterior. Follow the local laws applicable for external air evacuation. Do not connect the range hood exhaust to the same conductor used to circulate hot air or for evacuating fumes from other appliances powered by other than an electrical source. Do not vent exhaust air into spaces within walls or ceilings or in attics, crawl spaces or garages. Proper installation is the responsibility of the installer. Product failure due to improper installation is not covered under the warranty. METAL ANTI-GREASE FILTERS The metal anti-grease filters capture the grease particles of the vapors that develop during cooking; therefore they are subject to clogging depending on how often the appliance is used. In order to prevent fire hazard, it is recommended that the filter be cleaned every 2 months, according to the following instructions: Remove the filters from the range hood and wash them in a solution of water and neutral liquid detergent, leaving to soak. Rinse thoroughly with warm water and leave to dry. The filters may also be washed in a dishwasher. The aluminum panels may change in color after several washes; this is not cause for customer complaint or replacement of panels. CONTROL PANEL OPERATION Electronic Controls With Time Delay USE AND MAINTENANCE Unplug the hood or switch off the circuit breaker before carrying out maintenance operations. It is recommended that the hood be switched on before cooking. It is also recommended to leave the hood in operation for 10 minutes after cooking is terminated in order to completely eliminate cooking vapors and odors The proper function of the range hood is conditioned by the regularity of maintenance operations. Clean the fan and other surfaces of the range hood regularly using a moistened cloth or non-abrasive liquid detergent. Do not use cleaning products with combustible ingredients such as alcohol, benzol, ether or acetone as they can explode. To protect the main body from corrosion over a long period of time, the cooker hood should be cleaned with hot water plus non corrosive detergent every two months LIGHTING This range hood requires 2 halogen lamps (G4,12 Volt, 20 Watt max). Before undertaking any replacement, always disconnect the appliance from the electricity supply. Replace the lamp with one that has the same features otherwise this may cause severe damage to the electrical system. Caution: light bulbs may be hot! A- Lights: Press the light key once, the backlight is on, and the lights are on. Press it for a second time, the backlight is off, and the lights are off. B- Power settings: Press the key once and the motor starts to operate at low speed; Press the key again and the motor will reach Medium speed; Press the key once more and the motor will reach High speed Press the Key to lower speeds in succession until the motor stops working (power off). C- Timer function: The control module provides the option to run the motor for a predetermined time period in order to evacuate remaining vapors from the kitchen. Press the timer key when the motor is working and the motor will continue working for 5 minutes and will stop working thereafter. 3 GENERAL INSTALLATION INSTRUCTIONS PREPARATION A: GENERAL • Carefully unpack the hood but do not remove any protective film until after installation to avoid accidental damage or scratching. Place filters somewhere safe for the same reason. • Check for damage, and lay out the hood pieces and parts. • Range hoods do not come with wall or ceiling screws, as the type of structure determines the type of screws. • Check that you have the right tools. In addition to marking and measuring tools, a hammer, screwdrivers, pliers and scissors, you may need sheet metal sheers, and wire strippers. Safety glasses are recommended. B: ELECTRICAL CONNECTION • This range hood must be grounded. If the dwelling wiring is not 2-wire with a ground wire, a ground must be provided by the installer. Install a 5.08 X 10.16 cm (2” X 4”) wall outlet box and 3-blade 125 Volts, 15 amp grounded receptacle. • Use wire nuts to connect incoming ground, neutral and hot. • Push wires into the junction box and replace cover. Be sure wires are not pinched. C- INSTALLATION DISTANCE FROM TOP OF RANGE • Hood should be placed at a minimum of: – 61 cm (24”) for electric cooking surface – 76 cm (30”) for gas cooking surface WARNING TO REACH 9’ CEILINGS, HOOD NEEDS TO BE INSTALLED AT 30” ABOVE COOKING SURFACE. 4 WALL MOUNTED RANGE HOOD INSTALLATION Wall Mounted range hoods can be ducted outside (exhaust mode) or vented internally (recirculation mode) Pic 7a DUCTED EXHAUST MODE INSTALLATION (Pic 7a &7b) In exhaust mode hood models, the kitchen vapors are purified by the metal anti-grease filters and carried outside through a ducting system. To begin, choose where the ductwork should run between the hood and the outside of your home. The straighter and shorter the duct run, the more efficient the performance. RECIRCULATING MODE INSTALLATION (Pic 8) Recirculation kits are available for the Rapido II models. The kitchen vapors are purified by the metal anti-grease filters and an activated carbon filter, then conveyed back into the kitchen. In order to transform your cooker hood from the exhaust version to the recirculation version, you need to purchase a recirculation kit separately and then carry out the installation instructions enclosed with the kit. Pic 7b TO REDUCE THE RISK OF FIRE, USE ONLY METAL DUCTWORK. Note: Range hoods pictured in this manual are generic to represent all models. Pic 8 5 WALL MOUNTED STAINLESS STEEL RANGE HOOD INSTALLATION Make the holes that correspond with the centre of the cooktop, so that the lower part of the hood, which is to be assembled afterwards, is arranged at least 61 cm (24”) from the stove top for electric models and at least 76 cm (30”) for gas models. (See Pic 9) Installing range hood hook: Drill 3 holes in a suitable place according to size of hook, use screws to fix the hook on the wall. Installing chimney bracket: drill 2 holes according to size of inside chimney bracket in a suitable position, the position of bracket should be flush with the top of the outside chimney. (See Pic 10) Fix the damper on the top vent of hood with 4 screws (See Pic 4), then install the ducting pipes onto the damper. (See Pic 11) - If the ventilation system is equipped with an external air duct with a different diameter, apply a reduction fitting. However for maximum performance and safety 6” Ø ducting is recommended. Use 2 screws to fix two chimneys together with the outside chimney bracket, make sure inside chimney is moving freely. (See Pic 12) Install the chimneys on the hood. (See Pic 13) Fix the chimney and hood together with two screws. (See Pic 14) – This step is just for the models which have holes on bottom of outside chimney. Hang the hood on the range hood hook. (See Pic 15) Pull out the inside chimney and adjust height according to the position of inside chimney bracket on the wall, then fix the inside chimney on the bracket with two screws. (See Pic 16) 6 LIMITED PRODUCT WARRANTY Subject to the limitations, exclusions and disclaimers hereof, AMS warrants exclusively to the original purchaser (the “Purchaser”) of this Ancona Range hood product (the “Product”) that it shall be free from defects in material or workmanship (the “Limited Product Warranty”). The duration of the Limited Product Warranty is 12 months from the date of original purchase (the “Warranty Period”). The Limited Product Warranty does not extend to commercial or institutional use or installation and to residential or domestic use or installation outside of Canada and the USA. It is not transferable or assignable to any person. Any failure of the Product that is not traceable to a defect in material or workmanship is not covered by the Limited Product Warranty. These non-warrantable items include, but are not limited to: (i) consumable and accessory parts; such as light bulbs or filters; (ii) service outside of Canada and the USA; (iii) damage caused during shipping, handling or installation; (iv) labour costs related to installation, removal, reinstallation costs or other contingent expense; or (v) routine replacement of parts due to normal wear and tear of the Product. If the Purchaser discovers within the Warranty Period a defect in material or workmanship, the Purchaser shall promptly notify AMS in accordance with the Warranty Claim Procedure set forth below. Within a reasonable time after such notification, AMS shall, at no charge to the Purchaser: (i) perform any repair or replacement of parts that it determines is necessary or useful to correct any defect in material or workmanship; or (ii) replace the original Product with a new Product, the whole at AMS’ sole and absolute discretion. The remedy provided above shall be the Purchaser’s sole and exclusive remedy and AMS' sole and exclusive obligation under the Limited Product Warranty. Products or parts that are new or reconditioned to perform as new, shall be exchanged by AMS upon receipt of the original Product or parts from the Purchaser and, upon the completion of such exchange, the original Product or parts shall become AMS’ property. The Warranty Period shall not be extended due to suspension of the use of the Product because of repair, replacement, examination or for any other reason. Subject to the Purchaser’s compliance with the Warranty Claim Procedure set forth below, transportation and installation of warranty replacements shall be performed at AMS’ cost, and AMS shall bear the risk of loss or damage to returned Product or parts while in transit. AMS’ Limited Product Warranty shall be automatically void if: (i) any repair, alteration, modification, customization, disassembling, addition or any other work is performed on the Product by any person not authorized by AMS to do so; (ii) any alleged material defect, including deterioration or wear, is a result of failure to observe the manufacturer’s instructions or guidelines, abuse, misuse, improper operation, care or maintenance, unusual physical or electrical stress and/or power surges, brown-out, chemical abrasion or improper chemical or environmental conditions, leaking, fire, lightning, force majeure or superior force, accident, error, negligence, or is a result of use for nondomestic or non-residential purposes or for any purpose other than the Product’s intended purpose; (iii) the Product is operated in conjunction with accessories, other products, ancillaries or peripheral equipments or substances that have not been previously approved in writing or validated by AMS; or (iv) Purchaser fails to comply with the Warranty Claim Procedure set forth below. THE LIMITED PRODUCT WARRANTY IS EXCLUSIVE AND IN LIEU OF ALL OTHER WARRANTIES OR CONDITIONS INCLUDING, BUT NOT LIMITED TO, IMPLIED WARRANTIES OR CONDITIONS OF MERCHANTABILITY, FITNESS FOR A PARTICULAR PURPOSE AND NON-INFRINGEMENT OF THIRD PARTY RIGHTS OF ANY KIND, MADE OR INTENDED BY AMS OR ITS AUTHORIZED DISTRIBUTORS. IN NO EVENT SHALL AMS BE LIABLE FOR DAMAGES IN EXCESS OF THE PURCHASE PRICE PAID BY THE PURCHASER FOR THE PRODUCT, OR FOR ANY INDIRECT, INCIDENTAL, SPECIAL, CONSEQUENTIAL, PUNITIVE, EXEMPLARY OR OTHER SIMILAR DAMAGES, WHETHER FORESEEABLE OR UNFORESEEABLE, ARISING OUT OF OR IN CONNECTION WITH THE USE OF THE PRODUCT, INCLUDING THE ABILITY OR THE INABILITY TO USE THE PRODUCT. The terms hereof and any action in connection therewith, regardless of form, shall be interpreted and construed in accordance with the laws of the Province of Québec and the laws of Canada applicable therein, without giving effect to principles of conflicts of laws. If a provision of this Limited Product Warranty is determined to be invalid, illegal or unenforceable, all other provisions will remain in full force and effect. WARRANTY CLAIM PROCEDURE In the event a claimable defect occurs, the Purchaser shall call AMS’ customer service department at 1-800-350-4562 in order to obtain a return authorization number and shipping instructions (the “Authorized Shipping Instructions”). The Purchaser shall then promptly ship the Product, in accordance with the Authorized Shipping Instructions with the following documentation/information: the name and address of the Purchaser; the Product model number; the date and location of the purchase of the Product; the original sales receipt of the Product; the complete description of the problem; the name and address of the installer of the Product. Claims must be filled out in writing and received by AMS within six months of the appearance of the claimable defect. For service and assistance, please call: 1-800-350-4562, or email us at: [email protected]