1
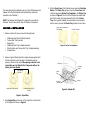
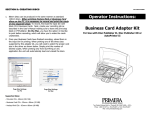
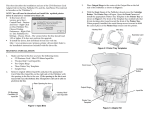
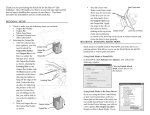
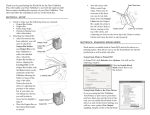
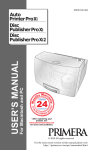
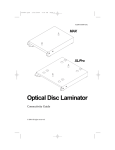
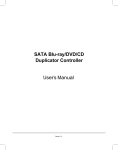
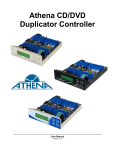
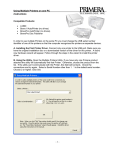
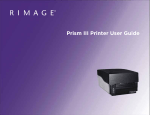
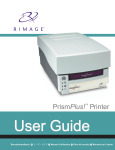
Operator Instructions:
S EC T IO N II: CR E A TIN G D ISC S
1. 80mm Discs can be produced in the same manner as standard
120mm discs. When printing one of the two card types on the
PC, it is necessary to record and print the cards in two
separate steps. To record, first load the input bin with blank CD-R
Business Cards. Next, create your recording job as described in the
User’s Manual making sure to disable the Print option in Primo DVD’s
Recording Job Window. On the Mac, you have the option in
Discribe under the Robot Write pane to print before recording,
which will allow you to make the cards unattended.
2. Once your Business Cards have finished recording, reload them in
the input bin for printing. When printing one of the three sizes
supported by this adapter kit, you will need to select the proper card
size in the driver as shown in Figure 4. Simply print the number of
desired copies. The Publisher will automatically load and unload the
discs.
Page Size Settings
for Mac
Page Size Settings
for PC
Print First Option
For Mac
Figure 4: Disc Type
Congratulations! You are now ready to create your own CD Business
Cards and Mini CDs.
PN 510725-121304
Business Card Adapter Kit
For Use with Disc Publisher or
AutoPrinter
This sheet describes the installation and use of the CD-R Business Card
Adapter Kit for the Disc Publisher and the AutoPrinter (referred to
hereafter as the “Publisher”).
NOTE: The Business Card Adapter Kit is designed to work with the
Publisher. This will not work with other CD Printers or Duplicators.
S EC T IO N I: INS T AL LA T IO N
4. With the Front Cover of the Publisher closed, press the Cartridge
Button. The Printer Tray will open. Open the Front Cover and
install the appropriate Printer Tray Template in the Printer Tray
as shown in Figure 3. The front of the Template has molded tabs
that fit into locating slots found toward the front of the Printer
Tray. When properly installed, the metal clamp moves forward to
hold the card in place as the Printer Tray retracts into the printer.
“Hockey Rink” and Business
Card Template
Mini Disc Template
1. Make sure that in this box you have the following items:
•
•
•
•
•
•
CD Business Card/ Mini CD 80mm Input Bin
“Hockey Rink” Card Input Bin
Output Ring
CD Business Card Tray Template Assembly
Mini Disc 80mm and “Hockey Rink” Tray Template Assembly
9 Sample Discs
2. Remove original 120mm Input Bin and place the appropriate Card/
Mini Disc Input Bin on the right side of the Publisher with the
opening in the bin to the rear. If the opening in the bin is not
toward the rear, the Robotic Disc Transporter will not be
able to pick from the bin.
Rear Opening
Figure 2: Printer Tray Templates
Front Cover
Cartridge
Button
Output
Ring
For Arm
Input Bin
Printer Tray
Template
“Hockey Rink” Card Input Bin
CD Business Card/ Mini CD
Input Bin
Figure 1: Input Bins
3. Place Output Ring in the center of the Output Bin on the left side
of the Duplicator as shown in Figure 3.
Figure 3: Adapter Kit