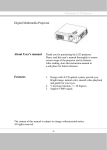
1
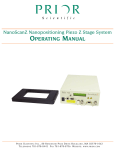
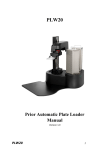
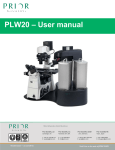
PL-200
Prior Automatic Slideloader Manual
Version 3.1
PL-200
1
Table of Contents
Contents
Section 1 Safety Information
4 Important Safety Information
SAFETY WARNINGS
SAFETY SYMBOLS
GENERAL GUIDELINES FOR USE/OPERATION.
Section 2 4 4 4 5 Specification
6 Specifications
Section 3 6 Unpacking The System
7 Unpacking The System
SAFETY - UNPACKING AND INSPECTION
SAFETY - SYSTEM INTEGRATOR
THE PACKAGE - PART IDENTIFICATION
SLIDELOADER MOVEMENT AXIS IDENTIFICATION
Section 4 7 7 7 8 10 Installation
11 Installation
SAFETY - INSTALLATION
INSTALLING THE MICROSCOPE ON THE SLIDELOADER
BAR CODE READER
STAGE PREPARATION
REMOVING AN EXSISTING STAGE
FITTING THE PROSCAN STAGE
USB OPERATION OF PROSCAN
CONNECTING THE SLIDELOADER
SETTING UP THE PRIOR COMMUNICATIONS SOFTWARE
INSTALLING THE PRIOR DEMONSTATION AND SETUP SOFTWARE
GRIPPER ALIGMENT - CASSETTES
GRIPPER ALIGMENT - MICROSCOPE.
GRIPPER ALIGMENT - ON MICROSCOPE
THE DEMONSTRATION SOFTWARE
Options menu:
Section 5 Routine Maintenance
35 SAFETY - MAINTENANCE
SERVICING (only to be undertaken by a competent person)
35 35 Oil and residue removal
Section 6 35 Advanced Operation
36 Software Integration.
Section 7 2
11 11 11 14 14 17 17 17 19 19 23 25 28 31 33 33 36 Troubleshooting
37 Prior Scientific
Fitting a replacement gripper arm.
REMOVAL OF ARM
INSTALLATION OF ARM
37 37 38 Fitting a barcode reader.
Section 8 38 Replacement Parts
41 Replacement Parts
Section 9 41 Returns and Repairs
42 Returns and Repairs
Section 10 42 Appendices
43 Appendix A
43 Appendix B
47 PL-200
3
Section 1
Safety Information
Important Safety Information
SAFETY WARNINGS
Always observe the following safety precautions
The PL200 must only be connected to a power outlet, which provides a
protective earth.
Use only the mains cord supplied. If this does not fit your power outlet, contact your
distributor for the correct power lead.
The unit is heavy and weighs 37kg. Remove the microscope before transporting.
It should only be lifted by two people: use side handle and lip of the rear cable entry area
to lift safely.
Always disconnect the equipment before moving.
This equipment is for use in moderate climates only. NEVER use the equipment in damp
or wet conditions.
Avoid excessive heat, humidity, dust & vibration.
Do not use where the equipment may be subjected to dripping or splashing liquids.
This equipment contains no user-serviceable parts. Refer all repairs to qualified service
personnel.
Keep fingers and hands clear of the PL200 moving parts when it is
operating.
It is the user/operators responsibility to ensure good laboratory practise is
followed if slides contain hazardous material.
SAFETY SYMBOLS
Retain these instructions.
The following symbols mean:
Warning: read instructions to understand possible hazard
Warning: hazardous voltage
4
Prior Scientific
GENERAL GUIDELINES FOR USE/OPERATION.
The PL200 forms part of an automated microscopy system, which may be
used in research or production laboratories. It will pick-up, present, sort
and return slides to any of the four preloaded racks that are positioned at
the front.
Whilst operating if a slide becomes misaligned, do not attempt to correct this during the
operation cycle. Turn off the mains power before correcting slide position or removing
any obstruction. Reinitialise the system.
The PL200 rotary arm may move unexpectedly, under automatic control.
PL-200
5
Section 2
Specification
Specifications
This equipment is for indoor use and will meet its performance figures within an ambient
temperature range 5 to 40°C with maximum relative humidity of 80% humidity
(deteriorating linearly to 50% above 31ºC).
− Size 60cm deep x 70cm wide x 71cm high
− Weight 57Kg gross, (includes Slide loader, all accessories and packaging). 37Kg Net
(slide loader fully assembled with accessories, but no packaging). The weight of the
microscope is not included in these figures.
− Capacity of 200 slides (4 racks of 50)
− Slide type 75mm x 25mm conforming to ISO8037/1
− Slide change time of 25 seconds
− Input Voltage 100v to 240v
− Fuse rating for both fuses is T2A
− Communication Via USB
6
Prior Scientific
Section 3
Unpacking The System
Unpacking The System
SAFETY - UNPACKING AND INSPECTION
Carefully unpack the PL200 and retain packaging should the unit need to be returned.
If the PL200 appears damaged in any way, return it to your sales outlet in its original
packaging. No responsibility for damage arising from the use of non-approved packaging
will be accepted. The packaging includes a pallet, user appropriate pallet lifting equipment
to transport the PL200 in the packaging.
Ensure all items and accessories specified are present. If not, contact your sales outlet or
us at the address given below.
− PL200 slide loader and microscope mounting plate
− 50 position slide cassette (x4)
− Installation/Operating manual
− Microscope Fitting kit
− Set up jigs
− Installation spacer for Y axis cover
Use only as specified by these operating instructions or the intrinsic protection provided
by the unit may be impaired.
SAFETY - SYSTEM INTEGRATOR
The Prior PL200 is designed and assessed to have no serious hazards.
However it is always used as a component within a complete microscopy system.
The PC terminal must be positioned close to the slide loader so that the PC operator has
a clear, unobstructed view of the slide loader. This ensures that the PC operator will be
aware of any person or obstruction in the vicinity of the slide loaders moving parts, before
starting the slide loader.
If the slide loader is to be operated remotely, via a web link etc. then adequate
procedures should be put in place to either ensure that the operator can view the slide
loader, or ensure that no untrained personnel have access.
Each ProScan System will consist of the ProScan Controller with its specific model
number and one or more of the following components.
PL-200
7
THE PACKAGE - PART IDENTIFICATION
Layer 1 & 2 contain a multitude of small parts and cable and quick start sheet.
Y Layer consists of the Slideloader tower and cover
Bottom consists of the slide loader mount, base and cover.
LAYER 1
4x Slide Cartridges (racks)
1 USB Cable (plus screws & PTFE pads)
Quick Start Sheet
Installation spacer for Y axis cover – not shown
8
Prior Scientific
LAYER 2
*Magnetic Block
*Sample Holder
5 x Microscope Clamps
1x Actuator Block (Slide Arm Catch Plate)
Setup Jig ( Dummy Slide/Sensor Alignment Device)
*If a stage was purchased with the slide loader these items may be shipped with the stage
in a separate box.
Bottom Layer
Slide loader base assembly
Layer Y
Slideloader tower
(Arm and cover assembly)
PL-200
9
SLIDELOADER MOVEMENT AXIS IDENTIFICATION
Slide loader movement is defined as X, Y and Z. X being the rotational movement of the
slide loader. Y being the up and down movement of the gripper arm. And finally the Z
movement is the in and out movement of the extension on the gripper arm.
X
Y
Z
The parts of the gripper arm.
Bar code Reader
Fixed Gripper Arm
Gripper Jaws
Detachable Gripper Arm
10
Prior Scientific
Section 4
Installation
Installation
SAFETY - INSTALLATION
To be mounted as a system with a microscope and PC. See picture for description of all
connections, and markings.
The system requires a bench footprint of 70 cm wide x 60 cm deep and additional space
for the PC.
The bench must be level and strong enough to support the weight of the PL200 and
microscope.
Ensure that once mounted there is sufficient room around the PL200 and any other part
of the system to enable reaching mains switch(es) or power outlets easily.
Ensure that there is sufficient room around the system to enable connecting cables to be
fitted without trapping or sharp bends.
Ensure all cables are routed safely to avoid tripping or entanglement hazards.
Ensure that only the specified cables are used for interconnection of equipment
Ensure all covers are in place before operating the PL200.
INSTALLING THE MICROSCOPE ON THE SLIDELOADER
Carefully position the base and base mount in its final resting place. With the prior logo
facing the front. It is also important to note that the switch and leads will need to be
readily accessible from the back for later connection and that other Prior equipment will
need additional space.
PL-200
11
Remove the transport screw from the base and retain for future transport.
Remove the three screws holding the y axis cover:
There are two ways in which to remove the y axis from its cover the first is to hold the y
axis upright on a table with one hand, unscrew the bolts with the other, whilst offering
support to the cover with the back of your hand. This is because once the final screw is
removed the cover will drop down slightly.
The second is to try to support the y axis from within the cover using your arm, as you
cradle it, remove the screws and then remove the cover.
Screws to hold casing in
place
12
Prior Scientific
Ensure that both the base of the y arm and the adjoining face on the base are free from
debris. Align D connector on tower flange with D connector on base.
Align
Insert the screw and carefully lower the arm into the D-shaped position.
Once in place ensure that the bottom of the arm is level with the sides of the slide loader
before tightening.
Insert Screw
PL-200
13
BAR CODE READER
If you have ordered a slide loader with a bar code reader it will be fitted prior to shipment
If you have ordered the bar code reader after installation, assembly is covered in Section 7
Trouble Shooting.
INSTALLING THE Y AXIS COVER
Place the installation spacer for the Y axis cover on top of the slide loader base. Place the
Y axis cover on top of the spacer. See image below. The spacer will provide the proper
gap between the Y axis cover and the base. The spacer will also align the holes in the
cover with the threaded mounting nuts in the Y axis tower. Install the Y axis cover with
the three screws provided, leaving the screws somewhat loose. The threaded nuts in the
Y axis tower have a small amount of horizontal play. Gently push the Y axis cover in the
negative Z axis direction (away from the gripper). This will ensure the proper clearance
within the tower cover for Y and Z axis movement. Tighten the three mounting screws.
Add the small PTFE pads to the feet of the microscope, this will allow you to adjust the
microscope position during setup.
14
Prior Scientific
STAGE PREPARATION
To prepare the stage for slide loader operation, the sample holder must first be attached
to the stage.
You may have to adjust the grub screws to level the insert. These can be found next to
the screws.
It is not advisable to attach the stage to the microscope until the components are added.
3 Holding screws
Next attach the actuator block on the 2nd and 3rd holes from the left hand side of the
stage, ensuring the orientation is the same as the picture below.
Actuator block
Attach the magnet block to the stage, pushed as far back as possible leaving the screws
slightly loose for later adjustment.
PL-200
15
Magnet
Block
Manually move the slide loader arm in a clockwise direction, away from the microscope.
Install the stage onto the microscope using the model specific stage installation procedure.
16
Prior Scientific
REMOVING AN EXSISTING STAGE
To avoid damage to the optics when removing an existing stage, ensure that it is moved as
far away from the objectives as possible and that the condenser is also clear.
Removal of the stage is normally a straightforward procedure, in most cases just by the
removal of fixing screws or the loosening of a clamp screw.
FITTING THE PROSCAN STAGE
The Prior ProScan stage is supplied with the correct base plate to suit the microscope
specified. Place the stage onto the microscope stage mount and attach using the fixing
screws or clamping screw supplied. Confirm that the ProScan controller unit is switched
off before connecting the stage to the controller with the cable provided.
The cable connections to the ProScan controller are located on the rear panel of the
control box. Before making any of these connections, ensure that the ProScan controller
is switched off. Each connection is well labelled but great care should be taken not to try
and connect your computer's serial port cable to the `Z' axis connector on the controller.
The RS232 connection from your computer should be made to the RS232-1 port on the
controller. For USB connection to your computer see separate section on this subject.
USB OPERATION OF PROSCAN
To use the ProScan II controller (H130 series) via the USB connection the user will need
to install the USB connection software. This can be found in the USB folder on the SDK
download.
Installing USB software on a PC running Microsoft Window98/2000.
1) WARNING. Do not connect ProScan II to PC at this point.
2) Open USB folder and run HidComInst.exe
WARNING. The only indication that the utility has installed correctly is the momentary
appearance of the hourglass. There is no message indicating successful completion.
3) Connect ProScan II to PC using supplied USB cable.
4) Switch power to ProScan II on.
5) Select My Computer, Control panel, System, Hardware, Device Manager.
6) Expand Ports (COM & LPT) to see list of ports.
7) USB-HID->COM n will now be added. Make a note of the COM port number.
Select this port when writing applications or running a terminal emulation application, such
as HyperTerminal. This will enable communication between the PC and ProScan II via the
USB port.
If HyperTerminal is used, none of the default settings within this application will need to
be modified.
Installing USB software on PC running Microsoft XP Professional
This does not install automatically. Extra care must be taken.
1) WARNING. Do not connect ProScan II to PC at this point.
2) Open USB folder and run HidComInst.exe
PL-200
17
WARNING. The only indication that it has installed correctly is the momentary
appearance of the hourglass. There is no message indicating successful completion.
3) Connect ProScan II to PC using USB cable provided.
4) Switch ProScan II on.
5) Select My Computer, Control panel, System, Hardware, Device Manager.
6) Expand Ports(COM &LPT) to see list of ports
7) If USB-HID->COM n is listed (where n is number of COM port), then
installation is complete. If not continue as follows:8) Select Human Interface Device in USB list, right click, select Properties, select
update driver, select “Install” from a list or specific location. Click Next, select “Don't
search I will choose the driver to install”, Click Next, Select Cyprus USB-HID->COM
device, Click Next. Ignore warning message and click continue then select Finish.
9) Cyprus USB-HID->COM n will now have been added to the list of Ports (COM
and LPT). Note; this will only be the case if the ProScan II is still connected to USB and
switched on.
User will then be able to communicate to the ProScan II using designated connection
COM n (e.g. COM3). This can be confirmed using a terminal emulation program such as
HyperTerminal.
18
Prior Scientific
CONNECTING THE SLIDELOADER
Power
Connection
Stage
Sensor
USB
Connector
Connect the power connection with the supplied cable.
Ensure the system is switched off.
Connect the slide on stage connector cable.
Connect the USB cable.
SETTING UP THE PRIOR COMMUNICATIONS SOFTWARE
Setting up after a previous installation.
Delete the file “LOADER.ini” from the folder c:\Documents and Settings\All
Users\Application Data\Prior\
(you may need to activate “show hidden folders” to view this file).
Follow the instruction for setting up for the first time.
Setting up for the first time.
Installing the USB-COM port for Slideloader.
PL-200
19
Plug in the USB cable to the Slideloader and computer, power on the Slideloader.
When prompted select No, not at this time, then click NEXT.
Select “Install from a list or specific location (advanced)”
20
Prior Scientific
Browse to the location of Eval232R, click NEXT.
The Eval232R folder can be found in the SDK. This can be downloaded from
www.prior.com.
Contents of SDK.
PL-200
21
Click Finish,
Your computer may ask you to repeat this process.
22
Prior Scientific
INSTALLING THE PRIOR DEMONSTATION AND SETUP
SOFTWARE
Install the Prior applications from the SDK download provided at www.prior.com or the
CD if provided.
Ensure that you have connected both the Slideloader and ProScan controller, and that you
have identified the communications port (COM) to which each piece of equipment is
assigned. (This can be found in windows device manager under ports).
Run “Slideloader Demo”
This can be found at:: Start>>All Programs>>Prior Scientific>>Visual Basic>>Slideloader
Demo
The following screen will appear.
Menu
Cassette
informati
System
Status
Slide
information
Emergency Stop –
Stop all motion
immediately
Status Bar
Select connect from the menu.
Enter the slide loader com port.
Press Ok.
PL-200
23
Enter the ProScan controller com port
Press Ok.
Ensure the arm of the Slideloader can be retracted and raised safely and that the arm can
be rotated. Pay particular attention to any obstructions. Remove any cassettes on the
Slideloader or any slides in the gripper on the arm.
Select:
Yes: if it is safe to do so.
No, to move the arm into a safe location using a secondary dialogue box, close the
secondary dialog box to proceed.
24
Prior Scientific
GRIPPER ALIGMENT - CASSETTES
The Slideloader will initialise and may move the ProScan stage away from the Slideloader.
For this setup you will require the setup jig which comprises of two detachable metal
parts and a screw which holds them together.
Detach the top part of the setup jig and slot the bottom half into the cassette 1 position
furthest away from the microscope. The Jig should snap into place and be sitting flat on
the cassette mounting plate.
Check it is secure. If not tighten the ball ended screw and lock with locking nut.
Check all four cartridge positions before returning the setup jig to position 1.
Screw and locking
nut
Bottom half of
setup Jig
Cassette alignment:
The software application will lead you through a series of windows for the alignment
procedure.
PL-200
25
Each window will have a control panel for you to operate the slide loader arm. The
Slideloader speed can be adjusted using the on screen slider. Care should be taken to
ensure the loader is move at an appropriate speed.
Place the lower portion of the set up jig firmly in place and move the gripper arm so that
the lower jaw of the gripper is flush with the jig.
Top down view.
Position the gripper in the recess of
the setup jig as show in the picture,
the side and front of the gripper
should be touching the setup jig.
Side view.
The top of the bottom jaw of the
gripper should be level with the top
of the setup jig.
Note: You may wish to run your
finger over the top of the jig and onto
the gripper surface to judge how level
the setup is.
26
Prior Scientific
Gripper alignment picture.
Gripper alignment picture.
Place the lower portion of the set up jig firmly in place and move the gripper arm so that
the lower jaw of the gripper is flush with the jig.
The alignment here is very important. Ensure you have are not pushing against the setup
jig.
Store your cassette position when you are confident that the alignment is correct.
The software will store the position and move to the next cassette position repeat the
above procedure for all four positions.
The Slideloader will now move so that the gripper arm points to the microscope.
PL-200
27
GRIPPER ALIGMENT - MICROSCOPE.
Move the stage to the load position: This is normally driving the stage to the back and left
limit switches, ensure that the stage cannot hit anything during this process.
Fit the bottom and top setup jig together.
NOTE: You may wish to remove the microscope objectives before completing this
section.
IMPORTANT: Ensure the stage is at the uppermost focus position.
Important: For the next alignment section ONLY move the microscope. Do not move
the gripper arm.
Align the sensor to the magnet on the magnetic block.
Take care to ensure the setup jig is in the sample holder located correctly. Do this by
pulling the jig forwards and to the right (away from the loader), you may find it can be
knocked easily and moved, continually check this is in the correct position during the
following procedure.
Sensor on Gripper
arm
Magnetic Block
Height sensor on
stage
28
Prior Scientific
Magnetic Block
Height sensor on
stage
Adjust the screws on the magnetic block so it is within 3-5mm distance from the gripper
arm.
Isometric view.
Move the gripper arm out
and down. Do not move
to far down as the setup
tool will be obstructed by
the slide detector.
Align the setup tool to the
arm by moving the
microscope.
Side view.
Move the gripper arm out
and down. Do not move
to far down as the setup
tool will be obstructed by
the slide detector.
PL-200
29
Top down view
Align the setup tool to the
arm by moving the
microscope.
Place the microscope locking blocks in position and gently rest the rubber pads against the
microscope to hold the microscope in position.
Locking Blocks
30
Prior Scientific
GRIPPER ALIGMENT - ON MICROSCOPE
Remove the top section of the setup Jig and replace the bottom section of the jig into the
sample holder.
Fit the setup jig to the stage sample holder by locating the 3x1 slide shaped protraction on
the bottom of the setup jig into the front right hand side corner of the slide holder, See
below.
Do not use the rotation functions at this point.
Top down view.
Position the gripper in the recess of
the setup jig as show in the picture,
the front of the gripper should be
touching the setup jig. There may be a
small gap between the side of the
gripper and the setup tool.
The top of the bottom jaw of the
gripper should be level with the top
of the setup jig.
Note: You may wish to run your
finger over the top of the jig and onto
the gripper surface to judge how level
the setup is.
PL-200
31
Gripper alignment picture.
Gripper alignment picture.
Click store this position.
Click yes I am sure.
Remove the setup jig.
The Slideloader is now ready to test.
32
Prior Scientific
THE DEMONSTRATION SOFTWARE
Slide Present
Stage Position
Inactive Cassette
Active and scanned
cassette
Options menu:
Place a number of slides in one or more cassettes and place them on any of the positions.
Ensure that each of the cassette sits firmly in its location, if not adjust the locking nut and
ball headed screw.
Once the cassette is correctly located the Scan button will be highlighted in the program.
Press Scan to search the cassette for slides these will appear as green lines in the program.
PL-200
33
Move a single slide from the loader to the stage.
Ensure the stage is in load position.
Click on the slide (green line) and then click on the stage position.
The loader will now load the slide onto the stage.
Ensure the slide is in the correct position, if not consult trouble shooting or repeat
alignment process.
Move the stage to the centre of it’s travel range, you will note that the sliver arm pushes
the slide into the sample holder. If this does not happen consult troubleshooting.
Move a single slide from the stage to the loader.
Ensure the stage has been return to the load position
Click on the stage position and then click on a cassette position.
The loader will now remove the slide from the stage and return it to the allotted position
in the chosen cassette.
Repeat this for every fifth position in the cassette.
If these actions have been completed successfully, repeat for each cassette position.
To confirm the reliability of your setup now run a soak test, this will sequentially load and
unload all of the slides placed in the attached cassettes. Choose the soak test with stage
movement.
Should slides not load reliably a complete re-alignment is required. Select “redo setup”
from the Options menu on the setup program.
Your Slideloader is now ready to use.
34
Prior Scientific
Section 5
Routine Maintenance
SAFETY - MAINTENANCE
Clean with a clean, slightly dampened cloth. Do not wet or allow moisture to penetrate
the unit.
Do not use solvents on the slide loader as these may stain or damage the
plastic covers.
To ensure correct slide handing it is important that the interface between
the slide racks and the slide rack mounting face is kept clean and free of
debris.
Remove dust and debris from the slide rack mounting plate using a brush.
If the slide racks should become soiled with slide mounting media they can be cleaned
using your laboratories standard cleaning procedure.
The PL200 only contains primary circuits with EMC filters. If PAT testing, apply DC flash
tests only. Avoid repeated application of such tests as this may damage insulation.
SERVICING (only to be undertaken by a competent person)
This equipment contains no user-serviceable parts. Refer all repairs to qualified service
personnel.
Opening the product voids the warranty.
Oil and residue removal
Rinse the slide racks in your laboratories designated cleaning solvent to remove the oil
(Refer to your health and safety procedures on using this solvent).
PL-200
35
Section 6
Advanced Operation
Software Integration.
The information required for software integration is included in the software development
kit. This can be downloaded from the Prior Scientific website at www.prior.com.
36
Prior Scientific
Section 7
Troubleshooting
Fitting a replacement gripper arm.
The moving gripper arm is the mostly likely component to be exposed to a collision
Any damage to this component requires the whole of this moving gripper assembly to be
replaced
REMOVAL OF ARM
•
•
Remove the lower cap by sliding the cover forward. This covers the gripper arm
plug.
Release the plug catch and pull the plug out of its socket.
Loosen the three screws to release the cable.
PL-200
37
Remove the two screws found underneath the gripper arm and carefully remove the
moving gripper arm assembly.
INSTALLATION OF ARM
Place new gripper arm on Slideloader and fix with the two provided screws, while fixing in
place push the cable into slots as shown.
Push cable
into slots.
Firmly attach connector.
Replace the Y axis cover
Fitting a barcode reader.
38
Prior Scientific
Remove the y axis cover
Remove the gripper arm cover by removing the screws
Attach the bar code reader with the two screws provided to the plate
Fixing
Screws
Cover Plate
Screws
Remove the gripper cover and feed the wire through the side of the gripper arm, the red
line is the route the barcode wire should take.
Re- attach the gripper cover.
PL-200
39
Bar code reader
communications
port
Plug the cable into the port shown here, located at the back of the gripper arm and tidy
the additional length of cable using cable ties
Your barcode reader is now fitted.
40
Prior Scientific
Section 8
Replacement Parts
Replacement Parts
Description Part Number
USB cable
Slide Racks
Fuse T2A
W3045
PL303
W507
Accessories
Q-Mini Barcode reader
Focus Drive and Adapter
Focus Drive and Adaptor with Rotary Encoder
PL304
H122
H122E
PL-200
41
Section 9
Returns and Repairs
Returns and Repairs
Should you experience problems with your PL-200 Slideloader System and want to send it
back for service, warranty or otherwise, a Return Material Authorisation (RMA) number
must be obtained from the appropriate Prior Scientific office before returning any
equipment. For North and South America contact Prior Scientific Inc., for Germany,
Switzerland and Austria contact Prior GmbH and for the rest of the world call Prior
Scientific Instruments Limited on the telephone numbers shown below.
Prior Scientific Instruments Limited
Unit 4,
Wilbraham Road,
Fulbourn,
Cambridge,
England,
CB1 5ET
Telephone 01223 881711
FAX 01223 881710
email: [email protected]
Prior Scientific Inc.
80 Reservoir Park Drive,
Rockland,
MA 02370-1062
USA
Telephone 781 878 8442
FAX 781 878 8736
email: [email protected]
Prior GmbH
Prior Scientific Instruments GmbH
Wildenbruchstr. 15
D-07745
JENA
GERMANY
Telephone +49 (0)3641 675 650
FAX +49 (0)3641 675 651
email: [email protected]
42
Prior Scientific
Section 10
Appendices
Appendix A
How to Run HyperTerminal
Instructions for using Windows Terminal Emulation Program (Windows 3.1) for
communication with a ProScan Controller.
Double-click the ACCESSORIES Group symbol in WINDOWS 3.11
Double-click the TERMINAL Icon.
From the SETTINGS menu select COMMUNICATIONS.
Choose: Baud Rate
9600
Data Bits
8
Stop Bits
1
Parity
None
Flow Control
None
Connector
Com1 or Com2 depending
on which port is required
to be used.
Parity Check
Off
Carrier Detect
Off
Press OK button.
From SETTINGS menu select TERMINAL PREFERENCES
Choose: Line Wrap
On
Local Echo
On
Sound
Off
cr-cr/lf Inbound
On
cr-cr/lf Outbound
Off
Columns
80
Translations
United Kingdom
IBM to ANSI
Off
Buffer Lines
100
Press OK
PL-200
43
From SETTINGS menu select TERMINAL EMULATION
Choose: - DECVT-100 (ANSI)
Choose OK
Select SAVE AS --- from FILE menu and save settings as PRIOR
These settings can be retrieved at any time by selecting it from FILE menu at start of a
new session.
Instructions for using Windows HyperTerminal Emulation Program (Windows 95/98) for
communication with a ProScan Controller.
Click Start, then Programs, then Accessories, then HyperTerminal.
Double-click the the "Hypertrm" icon.
Enter filename eg priorterm, select an icon and press OK.
For the "Connect using..." option, select COM1 or COM2 as appropriate
Press OK.
Enter the following parameters in the Port Setting Box,
Bits per second
Data bits
Parity
Stop bits
Flow control
9600
8
None
1
None
Press OK.
From the menu bar select File and then Properties.
In the Properties dialogue box select the Settings tab.
Press ASCII Setup...
Select "Echo typed characters locally" and "Append line feeds to incoming line ends". Then
click OK twice.
Instructions for using Windows HyperTerminal Emulation Program (Windows NT)for
communication with a ProScan Controller.
Click Start, then Programs, then Accessories, then HyperTerminal.
Select the “HyperTerminal” icon.
In the “Connection description” dialog box enter filename e.g. prior, select an icon and
press OK.
In the “Connect to” dialog box enter Phone Number (if required) and Select COM1 or
COM2 as appropriate and press OK.
Enter the following parameters in the Port Settings box ;
Bits per second
9600
Data bits
8
Parity
None
Stop bits
1
Flow control
None
Press OK button.
44
Prior Scientific
Select File, Properties and Settings tab.
Press ASCII Setup...
Select “Echo typed characters locally” and “Append line feeds to incoming line ends” (you
should find that “Wrap lines that exceed terminal width” has already been selected).
Press OK
Press OK
Instructions for using Windows HyperTerminal Emulation Program (Windows 2000) for
communication with a ProScan Controller.
Click Start, then Programs, then Accessories, then Communications and finally
HyperTerminal.
A window called ‘Location Information’ will appear, press cancel. The ‘Confirm Cancel’
window will appear, press yes. This will be followed by another window ‘HyperTerminal’
press OK.
Enter filename e.g. priorterm, select an icon and press OK.
A window called ‘Location Information’ will appear, press cancel. The ‘Confirm Cancel’
window will appear, press yes. This will be followed by another window ‘HyperTerminal’
press OK.
For the "Connect using" option, select COM1 or COM2 as appropriate.
Press OK.
Enter the following parameters in the Port Setting Box,
Bits per second
Data bits
Parity
Stop bits
Flow control
9600
8
None
1
None
Press OK.
From the menu bar select File and then Properties.
In the Properties dialogue box select the Settings tab.
Press ASCII Setup.
Select "Echo typed characters locally" and "Append line feeds to incoming line ends". (You
will also notice that “Wrap lines that exceed terminal width” will already be selected).
Press OK.
Press OK.
Instructions for using Windows HyperTerminal Emulation Program (Windows XP) for
communication with a ProScan Controller.
Click Start, then Programs, then Accessories, then Communications and finally
HyperTerminal.
A window called ‘Default Telnet Program’ will appear, close the box and ignore.
Enter filename e.g. priorterm, select an icon and press OK.
For the "Connect using" option, select COM1 or COM2 as appropriate.
Press OK.
PL-200
45
Enter the following parameters in the Port Setting Box,
Bits per second
Data bits
Parity
Stop bits
Flow control
9600
8
None
1
None
Press OK.
From the menu bar select File and then Properties.
In the Properties dialogue box select the Settings tab.
Press ASCII Setup.
Select "Echo typed characters locally" and "Append line feeds to incoming line ends". (You
will also notice that “Wrap lines that exceed terminal width” will already be selected).
Press OK.
Press OK.
46
Prior Scientific
Appendix B
Adjusting Stage Limit Switches
Introduction
Every ProScan motorized stage is fitted with limit switches in both the X and Y axes so
that the stage automatically comes to a halt when it has reached its maximum travel in all
directions. These limit switches are normally factory set to give the correct amount of
movement for a particular microscope stand. It may be necessary at some time to make
adjustments to the limit switch positions. For example different optics may need to be
mounted onto the microscope which may cause clearance problems, to avoid damage to
these components the stage travel may need to be restricted.
The following procedure explains how to make these adjustments.
Tools Required
Small flat blade instrument screw driver.
Adjustment Procedure
Due to the positions of the drive cover fixing screws it may be necessary to remove the
stage from its microscope or mounting stand before attempting this procedure.
1.
Ensure that the stage is disconnected from the controller before removing any
covers.
2.
Loosen and remove the drive cover fixing screws (see fig.1).
3.
Remove drive cover.
PL-200
47
4.
Loosen limit switch fixing screws (do not remove) so that the limit switch and
clamping plate (see fig.2) can be freely moved along the adjustment slot in the limit switch
mounting plate.
5.
Move limit switch to the desired position and re-tighten the fixing screws.
6.
Before replacing the drive cover, mount the stage onto its stand and check that the
limits are correctly adjusted. If further adjustment is required, repeat the above procedure
until limit switches are positioned correctly.
7.
When the limit switches are correctly positioned, replace the drive cover.
48
Prior Scientific
Specification subject to change without notification
PL-200
Part No. W3756 Issue 3.1 10/12
49