1
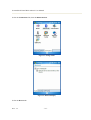
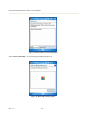
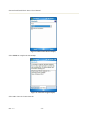
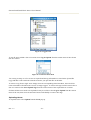
Seaward PATGuard Work About 2 User Manual
PATGuard
Work About 2
User Manual
Rev. 1.3
-i-
Seaward PATGuard Work About 2 User Manual
Contents
Disclaimer ......................................................................................................................................................... v
License Agreement ............................................................................................................................................... vi
Introduction ........................................................................................................................................................... 7
Installing PATGuard Work About.......................................................................................................................... 7
Starting the Program .............................................................................................................................................. 7
Additional Licences ........................................................................................................................................... 9
Unregister .......................................................................................................................................................... 9
Evaluation.......................................................................................................................................................... 9
Moving the Program to Another PC ....................................................................................................................... 9
Program Overview................................................................................................................................................. 9
PATGuard Files ................................................................................................................................................... 10
Upload Files (xpg) ........................................................................................................................................... 10
Download Files (sss) ........................................................................................................................................ 11
PATGuard Work About Records.......................................................................................................................... 11
Re-locating Assets ........................................................................................................................................... 12
Editing an Asset Record ................................................................................................................................... 13
Edit Site Name................................................................................................................................................. 14
Edit Location Name ......................................................................................................................................... 15
Add Site........................................................................................................................................................... 16
Add Location ................................................................................................................................................... 17
Add Assets....................................................................................................................................................... 18
Add Tests......................................................................................................................................................... 19
Test Sequences................................................................................................................................................. 21
Toolbar ................................................................................................................................................................ 23
File .................................................................................................................................................................. 23
Edit.................................................................................................................................................................. 23
View ................................................................................................................................................................ 23
Tools................................................................................................................................................................ 23
Help................................................................................................................................................................. 23
Direct entry of Test Results.................................................................................................................................. 24
Using Bluetooth................................................................................................................................................... 27
Using Bluetooth with Microsoft Pocket PC .......................................................................................................... 27
Bluetooth Pairing – PrimeTest 300 / 350 .......................................................................................................... 29
Bluetooth Pairing – Supernova and Europa PAT Testers .................................................................................. 29
Using Bluetooth with Windows Mobile v5.0 ........................................................................................................ 33
Establishing Bluetooth Partnerships – PrimeTest 300 / 350............................................................................... 33
Establishing Bluetooth Partnerships – Supernova and Europa PAT Testers....................................................... 33
Establishing Bluetooth Partnerships – PDA ...................................................................................................... 33
Upload................................................................................................................................................................. 40
Tagging Assets................................................................................................................................................. 40
Uploading Assets ............................................................................................................................................. 41
PrimeTest 300 / 350 ......................................................................................................................................... 42
Supernova / Europa PAT Testers...................................................................................................................... 42
Download ............................................................................................................................................................ 46
PrimeTest 300 / 350 ......................................................................................................................................... 47
Supernova / Europa PAT Testers...................................................................................................................... 48
System Requirements........................................................................................................................................... 53
Accessories.......................................................................................................................................................... 53
Warranty and Support .......................................................................................................................................... 53
Rev. 1.3
- ii -
Seaward PATGuard Work About 2 User Manual
Figures
Figure 1: Activation window.................................................................................................................................. 8
Figure 2: Registration Window .............................................................................................................................. 8
Figure 3: PATGuard Upload window ................................................................................................................... 10
Figure 4: Save As window ................................................................................................................................... 11
Figure 5: Asset Records display ........................................................................................................................... 12
Figure 6: Asset Context Menu.............................................................................................................................. 12
Figure 7: Location Context Menu......................................................................................................................... 13
Figure 8: Asset Context Menu.............................................................................................................................. 13
Figure 9: Edit Asset display ................................................................................................................................. 14
Figure 10: Site Context Menu .............................................................................................................................. 14
Figure 11: Edit Site Name display ........................................................................................................................ 15
Figure 12: Location Context Menu....................................................................................................................... 15
Figure 13: Edit Location Name display ................................................................................................................ 16
Figure 14: Root Context Menu ............................................................................................................................. 16
Figure 15: Add Site display.................................................................................................................................. 17
Figure 16: Site Context Menu .............................................................................................................................. 17
Figure 17: Add Location display .......................................................................................................................... 18
Figure 18: Add Asset display ............................................................................................................................... 18
Figure 19: Save As display................................................................................................................................... 19
Figure 20: Add Test display ................................................................................................................................. 20
Figure 21: Add Test Parameters display ............................................................................................................... 20
Figure 22: Edit Test Sequence display.................................................................................................................. 21
Figure 23: Add Test display ................................................................................................................................. 22
Figure 24: Asset Context Menu ............................................................................................................................ 22
Figure 25: Choose Test Type display.................................................................................................................... 24
Figure 26: Tests display ....................................................................................................................................... 24
Figure 27: Test Result Direct Entry display .......................................................................................................... 25
Figure 28: Visual Test display.............................................................................................................................. 26
Figure 29: Download File Browse display............................................................................................................ 26
Figure 30: Start Menu .......................................................................................................................................... 27
Figure 31: Settings Menu ..................................................................................................................................... 28
Figure 32: Bluetooth: Serial Port display .............................................................................................................. 28
Figure 33: Bluetooth Manager display.................................................................................................................. 29
Figure 34: Connection Wizard display ................................................................................................................. 30
Figure 35: Explore a Bluetooth device display...................................................................................................... 30
Figure 36: Bluetooth Browser display .................................................................................................................. 31
Figure 37: Bluetooth Service Selection display..................................................................................................... 31
Figure 38: Bluetooth Connection Wizard - final display ....................................................................................... 32
Figure 39: Bluetooth My Shortcuts display........................................................................................................... 32
Figure 40: Start Menu .......................................................................................................................................... 33
Figure 41: Settings Menu ..................................................................................................................................... 34
Figure 42: Bluetooth display ................................................................................................................................ 34
Figure 43: Bluetooth New Partnership display...................................................................................................... 35
Figure 44: Bluetooth Scanning display ................................................................................................................. 35
Figure 45: Bluetooth Device Selection display ..................................................................................................... 36
Figure 46: Bluetooth Enter Passkey display.......................................................................................................... 36
Figure 47: Bluetooth Partnership Settings display................................................................................................. 37
Figure 48: Bluetooth Partnerships display ............................................................................................................ 37
Figure 49: COM Ports Tab................................................................................................................................... 38
Figure 50: Add a Device display .......................................................................................................................... 38
Figure 51: Bluetooth COM Port display ............................................................................................................... 39
Figure 52: COM Port assigned display ................................................................................................................. 39
Rev. 1.3
- iii -
Seaward PATGuard Work About 2 User Manual
Figure 53: Settings display ................................................................................................................................... 40
Figure 54: Tagged Assets ..................................................................................................................................... 41
Figure 55: Location Context Menu....................................................................................................................... 41
Figure 56: Upload display .................................................................................................................................... 42
Figure 57: Bluetooth Manager My Shortcuts display ............................................................................................ 43
Figure 58: Connect to the Adaptor........................................................................................................................ 44
Figure 59: Brainboxes RS232 Adaptor Connecting…........................................................................................... 44
Figure 60: Adaptor Connected ............................................................................................................................. 45
Figure 61: Upload display .................................................................................................................................... 45
Figure 62: Download File Browse display............................................................................................................ 46
Figure 63: Download display ............................................................................................................................... 47
Figure 64: Bluetooth My Shortcuts display........................................................................................................... 49
Figure 65: Connect to the Adaptor........................................................................................................................ 49
Figure 66: Brainboxes RS232 Adaptor Connecting…........................................................................................... 50
Figure 67: Adaptor Connected ............................................................................................................................. 50
Figure 68: Download File Browse display............................................................................................................ 51
Figure 69: Download display ............................................................................................................................... 51
Rev. 1.3
- iv -
Seaward PATGuard Work About 2 User Manual
PATGuard Work About
Disclaimer
Although all Seaward Electronic Ltd. software programs are tested before release, no claim is made concerning the accuracy of
the software or its associated documentation. Seaward Electronic Ltd., and Distributors of this software, cannot assume
liability or responsibility for any loss or damage arising from the use of this program.
Copyright Notice
Copyright (c) 2008 Seaward Electronic Ltd.
All rights reserved. No part of this publication or software may be reproduced or transmitted in any form or by any
means, electronic or mechanical, including photocopying, recording, or any information storage and retrieval
system without the permission in writing from Seaward Electronic Limited.
Rev. 1.3
-v-
Seaward PATGuard Work About 2 User Manual
License Agreement
This is a legal agreement between you (either an individual or an organisation) and Seaward Electronic Ltd. By installing this
software you are agreeing to be bound by the terms of this Agreement. If you do not agree to the terms of this Agreement, do
not install the software and promptly return the software and the accompanying items (including written materials and binders
or other containers if any) to the place you obtained them for a full refund.
SOFTWARE LICENCE
1.
GRANT OF LICENCE. Seaward Electronic Ltd. grants to you the right to use one copy of the enclosed Seaward Electronic Ltd.
software program (the "Software") on a single computer. The Software is in "use" on a computer includes when it is loaded into temporary
memory (i.e. RAM) or installed into permanent memory (e.g. hard disk or any other device).
2.
COPYRIGHT. The Software is owned by Seaward Electronic Ltd and is protected by copyright laws. Therefore you must treat
the Software like any other copyright material (e.g. a book or musical recording). You may not copy the written materials accompanying the
Software.
3.
OTHER RESTRICTIONS. You may not rent or lease the Software. You may not reverse engineer, decompile, or disassemble the
Software than otherwise provided for by law.
USE ON ONE COMPUTER ONLY. This license allows the Software to be installed into the permanent memory (hard disk) of only one
computer at a time.
LIMITED WARRANTY. Seaward Electronic warrants that (a) the Software will perform substantially in accordance with the
accompanying written materials for a period of one year from the date of receipt and (b) any hardware accompanying the Software will be
free from defects in materials and workmanship under normal use and service for a period of one (1) year from the date of receipt. Any
implied warranties on the Software and hardware are limited to one (1) year and one (1) year respectively.
CUSTOMER REMEDIES. Seaward Electronics' entire liability and your exclusive remedy shall be at Seaward Electronic' option, repair or
replacement of the Software or hardware that does not meet Seaward Electronic' Limited Warranty and which is returned to Seaward
Electronic with a copy of your receipt. This Limited Warranty is void if failure of the Software or hardware has resulted from accident,
abuse or misapplication. Any replacement Software or hardware will be warranted for the remainder of the original warranty period.
NO LIABILITY FOR CONSEQUENTIAL DAMAGES. In no event shall Seaward Electronic Ltd. be liable for any damages whatsoever
(including, without limitation, damages for loss of business profits, business interruption, loss of business information, or any other
pecuniary loss) arising out of the use of or inability to use this Seaward Electronic product, even if Seaward Electronic has been advised of
the possibility of such damages.
REGISTRATION. Within seven days of installing the software you are required to register the software with Seaward Electronic Ltd. By
registering you acknowledge that you have read this Agreement and understand and agree to be bound by its terms and conditions without
exception, deletion or alteration. You also agree that this Agreement sets out in full the Agreement between you and Seaward Electronic Ltd.
which supersede any proposal or prior Agreement, oral or written, and any other communication between you and Seaward Electronic
relating to the subject matter of this Agreement.
INDEMNITY. You agree to indemnify Seaward Electronic Ltd. against any loss damage or expense arising out of or in connection with any
unauthorized use, reproduction, sale, making available, by you of the Software including any loss, damage or expense arising out of the
subsequent use of the Software by any other person.
GOVERNING LAW. This Agreement is governed by the laws of England and Wales.
Rev. 1.3
- vi -
Seaward PATGuard Work About 2 User Manual
Introduction
Welcome to PATGuard Work About, the easy way to work remote from your main PATGuard records
database. PATGuard Work About will allow you to open Upload Files created by PATGuard database
programs to display the Asset records on the PDA (Personal Digital Assistant). Once opened the Assets
can be Uploaded into the appropriate Seaward PAT tester. Or you could simply enter the results of tests
and inspections directly into the PATGuard Work About program for later transfer back to the PATGuard
database program to update your records. PATGuard Work About can also store download files directly
from the PAT tester for later onward transfer to your PATGuard database program.
Note
The PATGuard Work About program requires a PATGuard Plus v5.2 or other advanced PATGuard
database program to already be installed on a PC. The PATGuard Work About program can only
transfer and receive data with the Seaward Supernova, Europa PAT or PrimeTest 300 / 350 family of
PAT testers directly.
This program runs on Microsoft Windows CE platform.
Installing PATGuard Work About
Before installing the program ensure the PDA is docked with the PC (see the User Instructions for the
PDA).
Installing PATGuard Work About is easy; simply insert the CD into the CD drive of the PC and the
installation should commence automatically.
If the CD does not automatically start up, then use Windows Explorer or other file management
applications to select your CD drive, double click with the mouse on the setup.exe file to start the
installation.
Follow the on-screen instructions.
Starting the Program
If PATGuard Work About has been purchased, complete the installation by activating the program. Do
this by starting the Register PATGuard Work About program either from the desk top icon or Start Menu
on the PC then entering the Serial Number from inside the CD ROM case. The Serial Number will then
try to activate the program – by default this will be on-line via the Internet. If an Internet connection is
not available select an alternative activation method and follow the on-screen instructions.
Rev. 1.3
-7-
Seaward PATGuard Work About 2 User Manual
Figure 1: Activation window
Once complete the Registration window below will be displayed, which will enable you to Register a
particular PDA and release it from the 30 day time lock. To do this, simply ensure the PDA is in its
docking port, select Connect and when a Device Name appears on the PC screen select Register.
Figure 2: Registration Window
You can do this for as many PDAs as you have PATGuard Work About licences. Each PDA registration
will use up one licence. Licences are transferable between PDAs in that a licence can be freed up on one
PDA by un-registering it and then re-used to licence another PDA.
Rev. 1.3
-8-
Seaward PATGuard Work About 2 User Manual
The PATGuard Work About program can be installed on as many PDAs as the user chooses. However
any PDA that cannot be unlocked with a licence will remain in the 30 day time lock. By default only one
PDA can be unlocked unless additional licences have been purchased.
Additional Licences
Additional Licences are also available subsequent to program installation which will allow additional
PDAs to run the program (see Accessories).
Once initially registered use the Change License… button on the Register PATGuard Work About
program to open the License Viewer then select Activation Key. Enter your new Serial Number to
enable the additional licences.
Unregister
Unregister is used to free up a Licence on one PDA in order to assign it to another PDA.
Open the Register PATGuard Work About program on the PC, ensure the relevant PDA is in its docking
port, select the Next > button until the relevant PDA registration is displayed then simply select
UnRegister to free up the licence. Assign the Licence to another PDA as described above.
Evaluation
If the PATGuard Work About Evaluation program has been installed no Activation or Registration is
possible simply use the PDA program in the Evaluation mode for 30 days.
Moving the Program to Another PC
Note
This is only possible via an Internet connection and when all PDA’s have been unregistered – see
Unregister procedure above.
It is possible to move PATGuard Work About from one PC to another. To do this select the Change
License… button on the Register PATGuard Work About program to open the License Viewer. Select
Transfer License.
Program Overview
Asset Upload files are created in a PATGuard database program. These files can be created for different
Clients, Sites and Locations. The files can be sent to the PDA using normal PC to PDA file transfer
methods for example; email, file synchronisation, Bluetooth, memory cards etc.
When a file is opened in the PATGuard Work About program any Sites, Locations and Assets are
displayed as they appear in PATGuard databases, thus giving a graphic display of the Assets’ records to
be tested and their expected location. This display acts as a work schedule.
The Asset Upload file can be used to Upload Seaward PAT testers directly from the PDA via Bluetooth.
Rev. 1.3
-9-
Seaward PATGuard Work About 2 User Manual
Note
Only the Seaward Supernova, Europa PAT and PrimeTest 300 / 350 family of testers can be Uploaded
directly from PATGuard Work About.
Once the tester has been Uploaded then the testing can proceed. After the testing is complete, the Seaward
PAT tester can be Downloaded via Bluetooth to PATGuard Work About.
These downloaded sss files can be transferred to the PC to be processed by PATGuard database programs
to update the Asset records.
PATGuard Work About also allows test results to be directly entered, including editing and deleting
existing Assets directly at the PDA as well as creating new Asset records and Tests.
PATGuard Files
PATGuard Work About uses Upload files (xpg) from PATGuard database programs. When opened these
files display PATGuard style Asset records.
Direct entry of test information can be carried out to create a Download file (sss) which is then used to
update the original PATGuard database. Relocation and additional Sites, Locations, Assets, Test and Test
Results can be added as well as edited or deleted.
Or the original Upload re-test information can be Uploaded into a Seaward PAT tester so that the tests can
be carried out automatically by the tester.
Note
Re-location or deletion of Assets by manual entry will affect the Upload re-test data. That is deleted
Assets will not appear in the Upload and any re-location will be true for Uploaded Assets. Otherwise the
Upload data sent to the tester will be the original data from the PATGuard database program. Other
editing for example adding Assets will not be included in the Uploaded data.
Upload Files (xpg)
Asset Uploads can be saved as a file in PATGuard database programs. When Asset Upload is selected,
the window below will be displayed.
Figure 3: PATGuard Upload window
Select the Destination: PDA to create an Upload file, then OK to display the following Save As…
window so that a path and filename can be chosen.
Rev. 1.3
- 10 -
Seaward PATGuard Work About 2 User Manual
Figure 4: Save As window
Upload files have an xpg extension. For a context selected Upload the file name will default to the Site
name from where the Upload was initiated. Having set a file name and folder, select Save to create the
Upload file (xpg). This file can be opened by PATGuard Work About once transferred to the PDA.
Download Files (sss)
Downloads to PATGuard database programs can be captured as an sss file for later processing by the
program. Similarly, downloads to PATGuard Work About via Bluetooth can be captured and stored on
the PDA for later transfer to the PC and processing by the PATGuard database program.
Also direct-entry of Test Results are stored in an sss file format on the PDA and these files can be
processed by PATGuard database programs as above. These files cannot be opened in PATGuard Work
About and are used to update PATGuard database programs only.
PATGuard Work About Records
Select the PATGuard Work About program icon to start the program. Then from the File pop-up select
New to create new records or Open to open an Upload file (xpg) that originated from a PATGuard
database program.
When an Upload file (xpg) is opened in PATGuard Work About, a path and database filename is
displayed. This is the path and database filename from where the Upload file originated in the PATGuard
database program. This is important as it identifies the database that must be updated by a subsequent sss
file created by PATGuard Work About.
Selecting the + symbol next to the database path will cause the next level of the tree to be displayed,
which consists of all the Sites associated with the Upload file.
A + symbol next to a Site will indicate that Locations are contained within that Site. Selecting this will
cause the Locations associated with the Site to be displayed.
Rev. 1.3
- 11 -
Seaward PATGuard Work About 2 User Manual
Choosing a particular Location will cause the Assets to be displayed at the selected Location.
For Sites that do not have Locations, selecting the Site will cause the Assets to be displayed at the
selected Site.
Figure 5: Asset Records display
Re-locating Assets
Assets can be re-located in PATGuard Work About. To do this choose the Asset and hold the stylus on
the Asset until the Context menu pops up.
Figure 6: Asset Context Menu
Select Cut. Select and hold the stylus on the Site or Location where you wish to re-locate the Asset, to
display the context menu.
Rev. 1.3
- 12 -
Seaward PATGuard Work About 2 User Manual
Figure 7: Location Context Menu
Select Paste Asset to complete the re-location.
Note
For Asset tracking – re-location in PATGuard Work About within an Upload file from a PATGuard
database program the following applies: Assets can not be re-located to an alternative Site. They may be
re-located to a different Location within the original Site or from a Location up to the Site level and vice
versa only.
Editing an Asset Record
The details of Asset Records can be changed on PATGuard Work About. To do this, select and hold
stylus on the required Asset to display the context menu.
Figure 8: Asset Context Menu
Select Edit to display the following.
Rev. 1.3
- 13 -
Seaward PATGuard Work About 2 User Manual
Figure 9: Edit Asset display
Edit the Asset Id and/or Description then select OK to complete the change.
Edit Site Name
Select and hold the stylus on the Site Name you wish to edit to display the context menu.
Figure 10: Site Context Menu
Select Edit.
Rev. 1.3
- 14 -
Seaward PATGuard Work About 2 User Manual
Figure 11: Edit Site Name display
Edit the Site Name and select OK.
Edit Location Name
Select and hold the stylus on the Location Name you wish to edit to display the context menu.
Figure 12: Location Context Menu
Select Edit.
Rev. 1.3
- 15 -
Seaward PATGuard Work About 2 User Manual
Figure 13: Edit Location Name display
Edit the Location Name and select OK.
Add Site
Sites can only be added at the root level. Select and hold the stylus on the root level to display the context
menu.
Figure 14: Root Context Menu
Select Add Site to display the following.
Rev. 1.3
- 16 -
Seaward PATGuard Work About 2 User Manual
Figure 15: Add Site display
Enter the Site Name then select OK to add the Site.
Add Location
Locations can only be added within a Site. Select and hold the stylus on the appropriate Site to display the
context menu.
Figure 16: Site Context Menu
Select Add Location to display the following.
Rev. 1.3
- 17 -
Seaward PATGuard Work About 2 User Manual
Figure 17: Add Location display
Enter the Location Name then select OK to add the Location.
Add Assets
Assets can be added at both Sites and Locations. Select and hold the stylus on the appropriate Site or
Location. From the context menu select Add Asset to display the following.
Figure 18: Add Asset display
Rev. 1.3
- 18 -
Seaward PATGuard Work About 2 User Manual
Enter the Asset Id and Description, then enter a Re-Test Period or select the No Test Required
checkbox.
Note
If the No Test Required checkbox is selected no tests can be added to this Asset.
Then select OK to add the Asset.
For any given Upload file (xpg) the first time an Asset is added, a Save As… window is displayed for the
user to enter a path and filename, so that a Download file (sss) can be created.
Figure 19: Save As display
All subsequent information will be saved into this Download file (sss) such as Assets, Tests and Test
Results, for later Download into a PATGuard Database program.
Add Tests
Note
New tests can only be added to Assets that do not have any existing tests. For Asset records with tests that
originated on a PATGuard database the tests cannot be altered, deleted or added to. Also if the No Test
Required checkbox was selected for an Asset created on the PDA, tests cannot be added.
By default selecting an Asset without any tests will enable you to select tests one by one from a dropdown menu and add them individually. But in fact tests can also be added by compiling a test sequence,
which can then be added to numerous Assets.
If the Asset selected had tests assigned to it then these would be displayed for you to enter values (see
Direct Entry of Test Results). Should the Asset have no tests the following will be displayed.
Rev. 1.3
- 19 -
Seaward PATGuard Work About 2 User Manual
Figure 20: Add Test display
A User name is required to add tests to an Asset. Enter a User name and select Add Test to display the
following.
Figure 21: Add Test Parameters display
There are pre-determined PAT tests available from the Test drop down. But in fact the user can enter any
Test name directly into the Test field. Tests selected from the drop down will have their UOM (Unit of
Rev. 1.3
- 20 -
Seaward PATGuard Work About 2 User Manual
Measurement) predefined whereas for Tests you have created the UOM field will be blank so you can
enter the appropriate UOM.
You can enter the Value if required and Status at this point or enter it later by leaving the Status set to
Skip. Select OK to save the Test.
The Test you have added will appear in the Add Test display list. By selecting Add again and repeating
the above you can compile a list of Tests. Once the list is complete select OK
Note
Once OK is selected in the Add Test display it will not be possible to add any further Tests. If you wish to
change the Tests in the list, select Cancel and restart over again.
Test Sequences
Tests can also be added to an Asset using a Test Sequence. A Test Sequence is compiled be selecting
Tools then Test Sequence, which will display the following.
Figure 22: Edit Test Sequence display
Select Add Test.
Rev. 1.3
- 21 -
Seaward PATGuard Work About 2 User Manual
Figure 23: Add Test display
There are pre-determined PAT tests available from the Test drop down. But in fact the user can enter any
Test name directly into the Test field. Tests selected from the drop down will have their UOM (Unit of
Measurement) predefined whereas for Tests you have created the UOM field will be blank so you can
enter the appropriate UOM. Select OK to save the Test into the Test Sequence.
The test added will appear in the Test Sequence display list. By selecting Add again and repeating the
above you can compile a list of Tests. Once the list is complete select OK.
This stored Test Sequence can be added to as many Assets as is necessary in the current file. To do this
select Add Test Sequence from the context menu of the required Assets individually.
Figure 24: Asset Context Menu
The Test Sequence can be altered by selecting Test Sequence from the Tools pop-up, this allows
different test sequences to be added to further Assets. Altering this Test Sequence will not affect those
sequences already stored in any Asset.
To remove a Test Sequence from an Asset select Remove Test Sequence from the context menu of the
relevant Asset.
Note
Remove Test Sequence is only available for Assets that have no test results and previously had tests
added as a complete test sequence.
Rev. 1.3
- 22 -
Seaward PATGuard Work About 2 User Manual
The user-defined Test Sequence is saved in the Download file (sss) and will be available on the PDA each
time the associated Upload file (xpg) is opened, similarly if this Test Sequence is altered the Download
file (sss) is updated and the new sequence will be available instead.
Toolbar
File
Selecting File then Open allows you to select the appropriate Upload file (xpg) that you wish to display
and later optionally Upload into a tester.
Selecting File then New allows you to create a new file in which Sites, Locations, Assets and if required
Tests and Test Results can all be added directly into the PDA.
Note
Assets created in a New file cannot be Uploaded to a tester.
Edit
The Find option allows the user to search for an Asset by entering the Asset ID.
If found the Asset is then highlighted and displayed on the main screen.
View
The View pop-up menu allows you to filter the Asset display according to re-test type.
All is the default setting. With this setting all Assets will be displayed.
Visual is selected when Visual re-tests are to be carried out with results entered directly in the PDA.
Full is selected when only Assets with Full re-tests are to be displayed.
Assets with no tests will be displayed in all selections.
Note
Regardless of the View option selected, only Assets with Full re-tests will be Uploaded into a tester. And
these Assets will be filtered according to re-test data from the PATGuard database of the Asset record
and tester selected.
Tools
The Download option enables the program to receive download data direct from a PAT tester.
The Upload option enables the program to send re-test data direct to a PAT tester.
The Test Sequence option allows the user to compile a list of tests into a sequence to be added to
numerous Assets one by one.
Help
The About option will display information about PATGuard Work About.
Rev. 1.3
- 23 -
Seaward PATGuard Work About 2 User Manual
Direct entry of Test Results
Test results can be manually entered directly into PATGuard Work About. Select the Asset for which
Test Results are to be recorded to display the associated tests.
If both Full and Visual re-tests are possible for the selected Asset the following message will prompt you
choose the test type.
Figure 25: Choose Test Type display
Select the appropriate Test Type to display the Tests.
Note
Visual Tests are defined as Tests for which no measurement value is required. The converse is true for
Full Tests i.e. they are defined as having a measurement value.
Figure 26: Tests display
Rev. 1.3
- 24 -
Seaward PATGuard Work About 2 User Manual
Note
The individual tests will vary depending on Tests assigned to the Asset Record in the PATGuard database
or directly entered earlier on the PDA.
Tests can only be added to an Asset which does not have any Tests (see Add Tests).
As a User name needs to be assigned when Test Results are entered directly, it is necessary for you to
enter your name into the User name field before selecting the Test. The User name will then remain for
every test entry window until changed.
To enter the Results for a Test, simply select the Test.
Figure 27: Test Result Direct Entry display
Enter the Test Result into the Value field, select the appropriate Status and select OK to record the Test
Result.
Note
While the format of the Test Result Entry window will remain as shown above, the content will vary
depending upon the specific test and parameters as defined by the Asset record in the PATGuard
database or Tests entered directly earlier on the PDA.
The Visual Test display for portable appliances is different from other tests and is shown below.
Rev. 1.3
- 25 -
Seaward PATGuard Work About 2 User Manual
Figure 28: Visual Test display
If this Upload file (xpg) was created on the PDA all directly entered Test Results will be saved to the
Download file (sss) already associated with it.
However if this Upload file (xpg) was created in a PATGuard database program it will not yet be
associated with a Download file (sss) and you will be prompted to create one at this stage. The following
will be displayed in this case.
Figure 29: Download File Browse display
All subsequent test results will be stored in this Download file (sss) for later transfer back to a PATGuard
database.
Rev. 1.3
- 26 -
Seaward PATGuard Work About 2 User Manual
Using Bluetooth
Before a Bluetooth connection can be used by the program it is necessary to establish a partnership
between the tester Bluetooth and the PDA Bluetooth. This is only required on initial set up, not during
every data transfer.
Establishing partnerships can vary with the Microsoft platform on the PDA.
Using Bluetooth with Microsoft Pocket PC
Note
Some of the Figures in this section may be different from those shown on your PDA due to differences in
operating platforms, build level, Microsoft application versions and other Bluetooth devices and
partnerships.
It is necessary to establish the correct COM Port for PATGuard Work About. Use the Bluetooth setting
information on the PDA. From Start select Settings.
Figure 30: Start Menu
Select the Connections Tab, then the Bluetooth icon.
Rev. 1.3
- 27 -
Seaward PATGuard Work About 2 User Manual
Figure 31: Settings Menu
Figure 32: Bluetooth: Serial Port display
Scroll the tabs at the bottom until the Serial Port tab is displayed. Select this tab. Ensure the Enable
service option is checked. Two Ports are shown; Inbound COM Port and Outbound COM Port.
The Inbound COM Port is for PrimeTest 300 / 350.
Rev. 1.3
- 28 -
Seaward PATGuard Work About 2 User Manual
The Outbound COM Port is for Supernova and Europa PAT testers.
Make a note of the COM Port numbers for the testers you will be using. The COM Port number is
required for both Upload and Download actions.
Bluetooth Pairing – PrimeTest 300 / 350
Before any data transfer can take place it will be necessary for the PDA Bluetooth to be paired with the
PrimeTest Bluetooth.
With the PDA powered on, Search for the PDA Bluetooth signal and set it into the Bluetooth Favourites
PC field. Please refer to your tester Operating Instruction booklet for details.
Bluetooth Pairing – Supernova and Europa PAT Testers
Note
This is only required if your PDA does not have an RS232 serial port and relies upon a Bluetooth SNEU
Adaptor (see Accessories) to communicate with the tester.
Before any data transfer can take place with Supernova and Europa PAT testers via the Bluetooth SNEU
Adaptor it will be necessary to pair this with the PDA Bluetooth.
To do this, plug the Adaptor into the RS232 port of the tester. The Adaptor, when used with Europa PAT
testers will also require external power. Connect the power lead to the Adaptor and plug the power supply
into a suitable mains outlet. Adaptors used with Supernova testers do not require any external power.
Ensure the tester is power up.
To pair the Adaptor with the PDA, start the Bluetooth Manager program on the PDA.
Figure 33: Bluetooth Manager display
Rev. 1.3
- 29 -
Seaward PATGuard Work About 2 User Manual
Note
This display may show icons for other Bluetooth devices that have previously been connected.
Select New then Connect to display the following.
Figure 34: Connection Wizard display
Select Next to display the following.
Figure 35: Explore a Bluetooth device display
Rev. 1.3
- 30 -
Seaward PATGuard Work About 2 User Manual
Tap in the Device box as indicated on the screen to search for the Adaptor.
Figure 36: Bluetooth Browser display
Note
Other Bluetooth devices in the vicinity may have been picked up or added earlier and displayed here.
Select the Brainboxes RS232 Adaptor as this is the Adaptor plugged into the tester. This will display the
following.
Figure 37: Bluetooth Service Selection display
Rev. 1.3
- 31 -
Seaward PATGuard Work About 2 User Manual
Select Serial 01, to display the following.
Figure 38: Bluetooth Connection Wizard - final display
Select Finish to complete the Bluetooth pairing. The following display shows the icon that will need to be
activated before each Upload or Download.
Figure 39: Bluetooth My Shortcuts display
Rev. 1.3
- 32 -
Seaward PATGuard Work About 2 User Manual
Using Bluetooth with Windows Mobile v5.0
Note
Some of the Figures in this section may be different from those shown on your PDA due to differences in
build level, Microsoft application versions and other Bluetooth devices and partnerships.
Establishing Bluetooth Partnerships – PrimeTest 300 / 350
It will now be necessary to set the PDA Bluetooth in the PrimeTest unit. Ensure the PDA is powered on
with Bluetooth active. At the PrimeTest select Configuration > Bluetooth Favourites from the Menu.
Select Computer. Press Setup then Search to find the PDA Bluetooth. Select the appropriate Bluetooth
identifier and press Add New. Select OK when the identifier is set in the Computer field. Then OK to exit
Bluetooth Favourites. Please refer to your tester Operating Instruction booklet for further details.
Establishing Bluetooth Partnerships – Supernova and Europa PAT Testers
Note
This is only required if your PDA does not have an RS232 serial port and relies upon a Bluetooth SNEU
Adaptor (see Accessories) to communicate with the tester.
Before any data transfer can take place with Supernova and Europa PAT testers via the Bluetooth SNEU
Adaptor it will be necessary to pair this with the PDA Bluetooth.
To do this, plug the Adaptor into the RS232 port of the tester. The Adaptor, when used with Europa PAT
testers will also require external power. Connect the power lead to the Adaptor and plug the power supply
into a suitable mains outlet. Adaptors used with Supernova testers do not require any external power.
Ensure the tester is power up.
Establishing Bluetooth Partnerships – PDA
From the Start menu select Settings.
Figure 40: Start Menu
Rev. 1.3
- 33 -
Seaward PATGuard Work About 2 User Manual
Select the Connections Tab, then the Bluetooth icon.
Figure 41: Settings Menu
Figure 42: Bluetooth display
Select the Devices tab.
Rev. 1.3
- 34 -
Seaward PATGuard Work About 2 User Manual
Figure 43: Bluetooth New Partnership display
Select New Partnership… to start scanning for Bluetooth Devices.
Figure 44: Bluetooth Scanning display
Rev. 1.3
- 35 -
Seaward PATGuard Work About 2 User Manual
Figure 45: Bluetooth Device Selection display
Select the appropriate device, then select Next.
Figure 46: Bluetooth Enter Passkey display
Enter the default Passkey of four zeros. Then select Next.
Rev. 1.3
- 36 -
Seaward PATGuard Work About 2 User Manual
Figure 47: Bluetooth Partnership Settings display
Tap the Serial Port checkbox. Select Finish.
Figure 48: Bluetooth Partnerships display
Select the COM Ports tab.
Rev. 1.3
- 37 -
Seaward PATGuard Work About 2 User Manual
Figure 49: COM Ports Tab
Select New Outgoing Port for the Blue Tooth SNEU Adaptor or New Incoming Port for the PrimeTest
300 / 350. The following will be similar for either connection.
Figure 50: Add a Device display
Select Next.
Rev. 1.3
- 38 -
Seaward PATGuard Work About 2 User Manual
Figure 51: Bluetooth COM Port display
Select Finish to complete the Partnership.
Figure 52: COM Port assigned display
Select ok to close the Connections tab.
Rev. 1.3
- 39 -
Seaward PATGuard Work About 2 User Manual
Figure 53: Settings display
Close the Settings window by selecting the cross in the top right hand corner.
Upload
Note
Only the Seaward Supernova, Europa PAT and PrimeTest 300 / 350 family of testers can be Uploaded
from PATGuard Work About directly. Supernova and Europa PAT type testers will require a Bluetooth
SNEU Adaptor (see Accessories) if your PDA does not have an RS232 serial port.
You can Upload Assets from PATGuard Work About into the tester either by tagging which Assets you
want or you can Upload all the Assets in the Upload file (xpg) currently open.
Note
You can only Upload Assets from PATGuard Work About into a tester if the Upload file (xpg) originated
from a PATGuard Database program.
Tagging Assets
To tag individual Assets for Upload simply select the box immediately to the left of the required Asset’s
Description. A tick will appear in the box to denote its selection.
Rev. 1.3
- 40 -
Seaward PATGuard Work About 2 User Manual
Figure 54: Tagged Assets
To tag all Assets within a Site or Location select Tag for Upload from the context menu of the relevant
Site or Location.
Figure 55: Location Context Menu
You can tag as many or as few Assets as required and the tag information is stored in the Upload file
(xpg) and thus it will remain the same the next time you open that file on the PDA.
To remove a tag from a single Asset simply select the corresponding ticked checkbox, the tick will be
removed and this will indicate the Asset is no longer tagged. To remove the tags from all Assets below a
Site or Location select Clear Upload Tags from the context menu of the required Site or Location.
If almost all the Assets need to be Uploaded it may be useful to select Tag for Upload from the context
menu of the root, then select the unwanted Assets individually to remove their tags.
Uploading Assets
To Upload Assets select Upload from the Tools pop-up.
Rev. 1.3
- 41 -
Seaward PATGuard Work About 2 User Manual
Figure 56: Upload display
PrimeTest 300 / 350
At the tester use the tester menus to select ‘Upload from PC’ and ensure the Bluetooth connection is
established. Please refer to the tester Operating Instructions concerning Upload from PC.
Ensure the Prime Test box is checked. It may be necessary to set the correct COM Port before the first
Upload (see Using Bluetooth). Once set the program will remember the port number until changed by the
user.
If you have Tagged Assets in the Upload file (xpg) the Only upload tagged assets checkbox will be
available and if you only wish to Upload tagged Assets then ensure this box is checked.
Select Upload and acknowledge the advisory message and the Upload will commence.
Having prepared the tester for re-testing, use PATGuard Work About as a ‘To do’ list of Assets to be
tested while carrying out re-tests. Please refer to the tester Operating Instructions concerning automatic
testing from Upload Assets.
Supernova / Europa PAT Testers
Note
If your PDA does not have an RS232 serial port you will need a Bluetooth SNEU Adaptor (see
Accessories) to communicate with these testers. If this is the case the Bluetooth SNEU Adaptor will need
to be paired or partnered with the PDA (see Using Bluetooth) before the first Upload or Download
action.
If using a Bluetooth SNEU Adaptor, plug the Adaptor into the RS232 Port of the tester. The Adaptor,
when used with Europa PAT testers will require external power. Connect the power lead to the Adaptor
and plug the power supply into a suitable mains outlet. Adaptors used with Supernova testers do not
require any external power. Ensure the tester is powered up.
Rev. 1.3
- 42 -
Seaward PATGuard Work About 2 User Manual
Ensure the PrimeTest box is not checked. If you have Tagged Assets in the Upload file (xpg) the Only
upload tagged assets checkbox will be available and if you only wish to Upload tagged Assets then
ensure this box is checked.
Select Upload on the Upload display of the PDA. Use the tester’s menu system to select Remote Mode
then acknowledge the advisory message on the PDA and the Upload will commence.
Having prepared the tester for re-testing, use PATGuard Work About as a ‘To do’ list of Assets to be
tested while carrying out re-tests. Please refer to the tester User Instructions concerning Automatic testing
from Upload Assets.
Windows Pocket PC
Note
For Windows Pocket PC to Upload to the tester via a Bluetooth SNEU Adaptor the following procedure
is necessary to make the Bluetooth connection. For Windows Mobile 5.0 no connection procedure is
necessary.
Prior to the Upload action we need to establish the Bluetooth connection. Start the Bluetooth Manager
program on the PDA.
Figure 57: Bluetooth Manager My Shortcuts display
Select and hold the Brainboxes RS232 Adaptor:Serial 01.
Rev. 1.3
- 43 -
Seaward PATGuard Work About 2 User Manual
Figure 58: Connect to the Adaptor
Select Connect. The following message will be displayed for a short time.
Figure 59: Brainboxes RS232 Adaptor Connecting…
When the message is no longer displayed, select the Active Connections tab.
Rev. 1.3
- 44 -
Seaward PATGuard Work About 2 User Manual
Figure 60: Adaptor Connected
As long as the Outgoing Connections is established Upload is possible.
Note
Bluetooth connection can become disconnected if not activated. Do not delay, commence the Upload
immediately. If it becomes disconnected re-connect as described above before retrying Upload.
Select the PATGuard Work About program. From the Tools pop-up select Upload.
Figure 61: Upload display
Rev. 1.3
- 45 -
Seaward PATGuard Work About 2 User Manual
Ensure the Prime Test box is unchecked. It will also be necessary to set the correct COM Port before the
first Upload action (see Using Bluetooth). Once set the program will remember it unless changed by the
user.
If you have Tagged Assets in the Upload file (xpg) the Only upload tagged assets checkbox will be
available and if you only wish to Upload tagged Assets then ensure this box is checked.
Select Upload on the Upload display. Use the tester’s menu system to select Remote Mode then
acknowledge the advisory message on the PDA and the Upload will commence.
Having prepared the tester for re-testing, use PATGuard Work About as a ‘To do’ list of Assets to be
tested while carrying out re-tests. Please refer to the tester User Instructions concerning Automatic testing
from Upload Assets.
Download
Note
Only the Seaward Supernova, Europa PAT and PrimeTest 300 / 350 family of testers can be downloaded
direct to PATGuard Work About. Supernova and Europa PAT type testers will require a Bluetooth SNEU
Adaptor (see Accessories) if your PDA does not have an RS232 serial port. If this is the case the
Bluetooth SNEU Adaptor will need to be paired with the PDA (see Bluetooth Pairing- Supernova and
Europa Testers) before the first Upload or Download action.
To Download Test Results to PATGuard Work About, select Download from the Tools pop-up. A Save
As… window is displayed so that a directory can be chosen and filename given for the Download file.
Figure 62: Download File Browse display
Once the file Name has been entered and Save selected, the Download display appears.
Rev. 1.3
- 46 -
Seaward PATGuard Work About 2 User Manual
Figure 63: Download display
The COM Port and Baud rate settings are dependent on the PrimeTest check box. The Baud rate will
be the default setting for the tester. If this has been changed on the Tester then it will necessary to change
it here.
The correct COM Port will have to be set initially (see Using Bluetooth) but will be remembered by the
program according to the PrimeTest checkbox selection.
A Download action can be performed without any Upload file (xpg) being open whereas an Upload action
to a tester always contains the data from the opened Upload file (xpg) which maybe modified by direct
entry at the PDA. So when downloading it is possible to associate the Download file (sss) created with the
currently displayed PATGuard database. This is useful as it can help prevent the wrong database in
PATGuard database programs from being updated when processing the Download file (sss). Checking the
box for This download is for this database will place a marker in the Download file (sss) so that a
warning message is displayed should an attempt be made to open the Download file in the wrong
database on the PC.
PrimeTest 300 / 350
Ensure the Prime Test box is checked. It will also be necessary to set the correct COM Port before the
first Download. Once set the program will remember this port number until changed by the user.
Use the tester menu to select Download to PC and ensure the Bluetooth connection is established. Please
refer to the tester Operating Instructions concerning Download to PC.
Select Download on the Download display of the PDA. Then select Send on the tester.
The Bytes received value should count up on the PDA as the download proceeds.
Rev. 1.3
- 47 -
Seaward PATGuard Work About 2 User Manual
The Download file (sss) that has been created can be sent to the PC using normal PDA to PC file transfer
methods for example; email, file synchronisation, Bluetooth, memory cards etc.
The Download file (sss) will be processed when opened in a PATGuard database.
Supernova / Europa PAT Testers
Note
If your PDA does not have an RS232 serial port you will need a Bluetooth SNEU Adaptor (see
Accessories) to communicate with these testers. If this is the case the Bluetooth SNEU Adaptor will need
to be paired or partnered with the PDA (see Using Bluetooth) before the first Upload or Download
action. Also if the default Baud Rate has been changed on the tester (and on the PATGuard program) it
must be changed back to 9600 as this is the necessary Baud Rate for the Bluetooth SNEU Adaptor.
If using a Bluetooth SNEU Adaptor, plug the Adaptor into the Serial Port of the tester. The Adaptor,
when used with Europa PAT testers will require external power. Connect the power lead to the Adaptor
and plug the power supply into a suitable mains outlet. Adaptors used with Supernova testers do not
require any external power. Ensure the tester is powered up.
Ensure the Prime Test box is unchecked. It may be necessary to set the correct COM Port before the
first Download (see Using Bluetooth). Once set the program will remember this port number until
changed by the user.
On the Main Menu of the tester select DOWNLOAD RESULTS. Ensure the following are set on the
Download screen:
Destination is set to PC
Baud Rate is 9600
Download Format set to SSS.
Select OK.
On the Search screen set search criteria or leave default (for all results).
Select Download on the Download display of the PDA. Then select Search on the tester.
The Byte received value should count up on the PDA as the download proceeds.
The Download file (sss) that has been created can be sent to the PC using normal PDA to PC file transfer
methods for example; email, file synchronisation, Bluetooth, memory cards etc.
The Download file (sss) will be processed when opened in a PATGuard database.
Windows Pocket PC
Note
For Windows Pocket PC to Download to the tester via a Bluetooth SNEU Adaptor the following
procedure is necessary to make the Bluetooth connection. For Windows Mobile 5.0 no connection
procedure is necessary.
Rev. 1.3
- 48 -
Seaward PATGuard Work About 2 User Manual
Prior to the Download action the Bluetooth connection needs to be established. Start the Bluetooth
Manager program on the PDA.
Figure 64: Bluetooth My Shortcuts display
Select and hold the Brainboxes RS232 Adaptor:Serial 01.
Figure 65: Connect to the Adaptor
Select Connect. The following message will be displayed for a short time.
Rev. 1.3
- 49 -
Seaward PATGuard Work About 2 User Manual
Figure 66: Brainboxes RS232 Adaptor Connecting…
When the message is no longer displayed, select the Active Connections tab.
Figure 67: Adaptor Connected
As long as the Outgoing Connections is established Download is possible.
Rev. 1.3
- 50 -
Seaward PATGuard Work About 2 User Manual
Note
Bluetooth connection can become disconnected if not activated. Do not delay, commence the Download
immediately. If it becomes disconnected re-connect as described above before retrying Upload.
Select the PATGuard Work About program.
To Download Test Results to PATGuard Work About, select Download from the Tools pop-up. A Save
As… window is displayed so that a directory can be chosen and filename given for the Download file.
Figure 68: Download File Browse display
Once the file Name has been entered and OK selected, the Download display appears.
Figure 69: Download display
Rev. 1.3
- 51 -
Seaward PATGuard Work About 2 User Manual
The COM Port and Baud rate setting are dependent on the PrimeTest check box. The Baud rate will
be the default setting for the tester. If this has been changed on the Tester then it will necessary to change
it here.
The correct COM Port will have to be set initially (see Using Bluetooth) but will be remembered by the
program according to the PrimeTest checkbox selection.
A Download action can be performed without any Upload file (xpg) being open whereas an Upload action
to a tester always contains the data from the opened Upload file (xpg) which maybe modified by direct
entry at the PDA.. So when downloading it is possible to associate the Download file (sss) created with
the currently displayed PATGuard database. This is useful as it can help prevent the wrong database in
PATGuard database programs from being updated when processing the Download file (sss). Checking the
box for This download is for this database will place a marker in the Download file (sss) so that a
warning message is displayed should an attempt be made to open the Download file in the wrong
database on the PC.
Note
If your PDA does not have an RS232 serial port you will need a Bluetooth SNEU Adaptor (see
Accessories) to communicate with these testers. If this is the case the Bluetooth SNEU Adaptor will need
to be paired or partnered with the PDA (see Using Bluetooth) before the first Upload or Download
action. Also if the default Baud Rate has been changed on the tester (and on the PATGuard program) it
must be changed back to 9600 as this is the necessary Baud Rate for the Bluetooth SNEU Adaptor.
Plug the Adaptor into the Serial Port of the tester. The Adaptor, when used with Europa PAT testers will
require external power. Connect the power lead to the Adaptor and plug the power supply into a suitable
mains outlet. Adaptors used with Supernova testers do not require any external power. Ensure the tester is
powered up.
Ensure the Prime Test box is unchecked. It may be necessary to set the correct COM Port before the
first Download (see Using Bluetooth). Once set the program will remember it unless changed by the user.
On the Main Menu of the tester select DOWNLOAD RESULTS. Ensure the following are set on the
Download screen:
Destination is set to PC
Baud Rate is 9600
Download Format set to SSS.
Select OK.
On the Search screen set search criteria or leave default (for all results).
Select Download on the Download display of the PDA. Then select Search on the tester.
The Byte received value should count up on the PC as the download proceeds.
The Download file (sss) that has been created can be sent to the PC using normal PDA to PC file transfer
methods for example; email, file synchronisation, Bluetooth, memory cards etc.
The Download file (sss) will be processed when opened in a PATGuard database.
Rev. 1.3
- 52 -
Seaward PATGuard Work About 2 User Manual
System Requirements
Microsoft Windows CE
Pocket PC
Pocket PC 2002
Windows Mobile 2003
Windows Mobile 2003 Second Edition
Windows Mobile 5.0
Bluetooth for Windows CE
Accessories
Product Description
Additional PDA Licences
Bluetooth SNEU Adaptor
PATGuard Work About Update (to latest version)
Part Number
336A913
339A962
336A914
Warranty and Support
•
Seaward Electronic Ltd. provide a 1 year warranty for this software program.
•
Telephone Support is provided free for PATGuard Work About for the first 30 days after
installation and is subject to registration. Please use the Registration Fax Back form below to
register this software program.
•
To receive Telephone Support after the first 30 days, a PATGuard Software Support Agreement
would need to be in force or a new agreement taken out directly with Seaward Electronic Ltd.
For this and further information contact:
Seaward Electronic Limited
Bracken Hill
South West Industrial Estate
Peterlee
Co. Durham
SR8 2SW
England
www.seaward.co.uk
e-mail: [email protected]
Telephone Support Helpline:
Fax:
Rev. 1.3
+44 (0)191 5878718
+44 (0)191 5860227
- 53 -