1
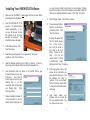
12. Once the software is installed, an additional installer installs the drivers
for your EDKEY. This dialog appears as the Sentinel Protection
Installer, and will go through a complete process of installing the
EDKEY drivers. This may take a minute or two.
13. After the Installation is complete, you may wish to restart the computer.
Click “Finish” to restart the computer.
14. After your computer has been
restarted, insert the EDKEY
into the desired port. Your
computer will recognize the
key and should notify you
there is a “New Piece of
Hardware” installed.
Getting Started
Congratulations on the purchase of your HVE or HVE-2D software package.
Before installing the software, please unpack the box and ensure you have
all of the items indicated on your Packing Slip. They may appear as shown
in the picture below:
�
�
�
Manuals and Binders (User’s and Physics)
HVE/HVE-2D Program CD inside License Envelope (your license file
may be included directly on the CD – read the label)
EDKEY (USB or parallel port style) inside the EDKEY box
15. Now you can begin to use
your new software. Click the
“Start” button, select All
Programs, find the HVE or
HVE-2D selection and then click to run HVE or HVE-2D from the list of
programs for that folder. You will see the main viewer window appear
and you are ready to start working! You may want to refer to the
Tutorials found in Chapter 32 in the User’s Manual or Chapter 5 of
each Physics Manual for details on using the interface and each
physics program.
If you have any problems, please contact
EDC Technical Support
503.644.4500
[email protected]
4
1
Installing Your HVE/HVE-2D Software
1.
2.
Make sure that the EDKEY is not plugged into the computer before
proceeding with the installation.
Insert the HVE/HVE-2D CD in
the drive. The installer should
launch automatically. If not,
use your file browser to view
the contents of the CD drive
and then run “setup.exe”. The
installation process will begin.
3.
At the Welcome screen, click
“Next” to continue.
4.
Read the License Agreement. If you agree to the “Terms and
Conditions”, click “Yes” to continue.
5.
Read the Release Notes then click “Next” to continue. (There is a
printed copy of the Release Notes included in the shipping box.)
6.
User Information: Enter the Name of the Contact Person, your
Company Name and your User
ID Number.
(Your User ID
number may be found on your
Packing Slip or on the
introduction letter included with
your Packing Slip).
Click
“Next” to continue.
7.
Choose Destination Location: It
is recommended to use the
default location displayed, but
you may choose to install to any location on your computer. (Please
ensure that you have Full User Permissions to use the HVE or HVE-2D
folder at your selected installation location). Click “Next” to continue.
8.
Select Program Folder. Click “Next” to continue.
9.
Choose License Options:
Select to use the license
provided by EDC. Click
“Next” to continue.
A dialog will appear with
the title “Select License
File”. In the “Look in”
box, click the arrow to
drop down a list of all
drives. Choose the CD
drive.
Find the file
named similar in format
to hveXXX-X.lic. Select
the file and click “Open” to continue.
10. Start Copying Files: The box will
display all the information you
have entered to this point. If you
are satisfied, click “Next” to
continue. If not, use the “Back”
button to find the correct dialog
to change the information before
continuing.
11. HVE Setup installs your
software and your license file
into your selected location. This
may take a minute or two.
2
3