1
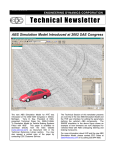
WINTER 2010 ENGINEERING DYNAMICS CORPORATION Technical Newsletter Available on-line in the EDC website Library at www.edccorp.com Exciting Developments for HVE & HVE-2D Version 7.1 - Full of Enhancements Version 7.1 was released in December 2009 and the majority of HVE and HVE-2D users report they are now using this version. This latest release continued to add to the features and enhancements included in Version 7, released in August 2009. A great recap of all of the new capabilities is on page 6 of this Newsletter. Preview of Version 8 Work is already underway on new features for Version 8. One of these new features, DamageStudioTM, will revolutionize how you work with vehicle damage information. Details about this exciting new feature will be posted on the EDC website very soon. Stay Tuned! 2010 HVE Forum Come on Down By The River and join your colleagues in workshops at the 2010 HVE Forum, March 1 - 5, 2010, at the Hotel Contessa on the Riverwalk in San Antonio, Texas. Whether youre a brand new user of HVE and HVE-2D, or youve been attending the Forum for 14 years (Yes, you read that number right! The first HVE Forum was held in San Francisco back in 1996!), youll find that the workshops are full of helpful tips and techniques for using the latest release. Hydroplaning Scenario Now Available The new HVE Hydroplaning Model in Version 7 makes it possible to simulate the handling effects of reduced traction due to water depth on a roadway. Take this scenario for example: An SUV was traveling on a 2-lane mountain road at 55 mph as it entered a downhill curve to the right. The cut bank exposed a natural spring and the road surface in the curve was covered with a thin layer of water. As the vehicle traveled across the wet region it began to sideslip and lose control. You can find out why this vehicle lost control and what happened by visiting www.edccorp.com/hydroplaning. This scenario is the latest featured capability available on the EDC website. The Featured Capabilities section describes the scenario, presents a table of questions and answers and guides you through the presentation of a detailed, menu-driven reconstruction of the event. The reconstruction includes descriptions, screenshots of vehicles and environment models, screenshots of the events and outputs, and also includes simulation movies of the scenario from various viewpoints. Environment Modeling Strategy An important part of your analysis often involves the environment model. You may need to build a highly-detailed environment model to capture the physical roadway characteristics in order to study their effect on vehicle handling and controllability. Or it may be a issue of visibility, where you need a detailed model that includes all of the buildings and fixtures surrounding an intersection. How do you go about building the model if youve never built one before? Turn to page 4 to learn more about determining what strategy works best for you. Technical Newsletter Technical Session This edition of the Technical Session focuses on providing basic advice for preparing a DXF file for importing into HVE & HVE-2D. Two formats of environment models created in external CAD programs can be imported into HVE: DXF and VRML. Typically, AutoCAD users are creating DXF format 2-D drawings and low to medium-detail 3-D models, while Rhinoceros and 3DS Max users are creating medium to highly-detailed 3-D VRML models. DXF files are converted to HVE format using a translator, but VRML models are directly displayed in HVE. No matter which CAD program you use, always follow proper protocol by dividing your drawing or model into layers, such as using separate layers for survey data points, construction lines, finish lines and surfaces. You may also further subdivide these layers based upon the specifics of your scene. Dividing your scene into layers allows you to easily turn objects on and off before saving as a DXF. The type of drawing objects you use, and also the colors you assign, are very important in planning for the DXF translator. Below is a summary of key behaviors of the DXF translator in Version 7.10: _ _ _ The best formats for conversion are ACAD R12 and R14. However, R12 through 2004 DXF files may possibly be converted. The ACAD R12 format is a legacy format, therefore users of newer versions of AutoCAD should be able to output an R12 DXF. (If using a different program, you may need to use a DXF version convertor program as discussed in the Fall 2009 Technical Newsletter.) If you are creating a line drawing, the preferred drawing element is a polyline. Lines of varying width and type will be converted as solid lines of uniform width. If you are using drawing elements such as splines and arcs, these will only convert from an R12 format. HATCHES and BLOCKS may need to be exploded in order to be converted. However, each separate line in a hatch may become its own object, resulting in a very heavy environment. The R12 format is recommended for all line drawings. If creating a model, the translator provides excellent conversion of faces. These may be 3DFACES, SURFACES created using RuleSurf, EdgeSurf or similar commands, or defined polygon/polyface meshes. SOLIDS are not directly supported, but the 3DSOUT/3DSIN functionality in AutoCAD, can redefine solids as faces, which can be converted. 2 WINTER 2010 _ _ _ All TEXT will be converted to a uniform font type and size, without other attributes from the CAD drawing. If an element is not already included in a mesh, the assigned color may result in combining the element with others into a grouped object in the 3-D Editor. Elements that are the same type (e.g. 3DFACE or Polyface Mesh) and the same color will be converted to a grouped object. Elements that are the same type but not the same color will be converted as separate objects. Elements that are not the same type, but are the same color will be converted as separate objects. If possible, optimize polygon and surface meshes by converting them to polyface meshes using the 3DSOUT and 3DSIN capabilities of AutoCAD. This functionality converts repetitive point descriptions of connected surfaces to actually using the points alone to define the extent of the mesh. This functionality also converts many elements to faces with can then be converted. (Previously this was only available in pre-2007 AutoCAD. Autodesk now offers a download for the 3DSOUT for AutoCAD 2007 and 2008. Visit www.autodesk.com and search the site for Autodesk 3DSOUT Command.) In preparation for saving as a DXF from AutoCAD, the following steps are recommended: _ _ Turn off all Layers that you do not want included in your environment in HVE, then Purge the drawing to remove extraneous descriptors and information. Select the specific elements to be included in the DXF file. In AutoCAD, choose File, Save, and then select the Release 12 DXF format. In the upper corner of the Save dialog change the Tools, DXF Options setting to be Select Objects by clicking the checkbox. You will then drag a box around all of the displayed objects to select them for saving in the file. In summary, if you plan ahead by using good layer management, the right elements, the right colors and the right DXF format, you will successfully import your DXF files. However, if your goal is to produce highly detailed 3-D terrain models with texture mapping, it is recommended to use Rhinoceros or 3DS Max as your modeling program. These programs provide efficient tools for the development of surface meshes (terrains), plus they output VRML files that are directly supported in HVE. The next page highlights two workshops at the 2010 HVE Forum that are specifically designed to help you identify which approach to modeling best serves your needs. WINTER 2010 Technical Newsletter 2010 HVE Forum: Environment Building for the Professional Graphic Artist This new workshop is designed to give your professional graphic artist insight into the basic workings of HVE and how to quickly build 3-D environment models for use in HVE. The course content will provide step-by-step instructions for building high quality 3-D environments that are easily imported into HVE for vehicles to drive on and interact with. The software program discussed and used in the construction of the models will be 3-D Studio MAX. 2010 HVE Forum: Advanced 3-D Environments This workshop is designed to extend a HVE Users ability to build detailed terrain models for simulations. Using a combination of CAD tools, Rhinoceros NURBS modeling software and the 3-D Editor, a terrain model will be built of a real-world roadway example. Specific course topics include: _ Review of site and identification of key elements _ Planning terrain model requirements _ Discussion of surveying and data collection methods _ Creating a preliminary terrain model _ Add additional roadway markings such as center lines and fog lines _ Mesh density and surface normal orientation _ Importing 3-D Environment from 3 party CAD or COGO software _ Quality checking the finished terrain model using simulations of vehicles driving on the surface Upon completing the Advanced 3-D Environments workshops, the student will understand the methodology used to build a preliminary model and be able to acquire point data themselves, or work with a surveying company to develop a model for use in HVE. Additionally, the student will be familiar with the processes required to build detailed models of any roadway or terrain required for detailed simulation studies. H@ Specific course topics include: _ Working as a Team With The HVE User _ The Production Mindset You Must Have (For admissibility, foundation is everything!) _ The Basic Site Information You Need _ Additional Site Information To Add Detail and Accuracy for the HVE Simulation _ Environment Surveying Overview: Simple Total Station to Complex Professional Surveys _ Reference Photographs - Scene and Vehicles _ Cleaning up the Initial Survey Data _ Importing the Survey Data into MAX and Positioning the Base Model _ Identifying Essential Objects to Include in the Environment Model _ Adding Necessary, Additional Interactive Objects Other Than Road Surfaces _ Adding Visual Reference Elements to the Environment Model _ Using Texture Maps - What Works and What To Avoid _ Exporting the Model From MAX Into HVE _ Importing HVE Output Into MAX To Produce High-end Visual Presentations _ Practical Examples - Good, Bad and Start Over Professional graphic artists who attend this workshop will fully understand how to build environment models for HVE that provide for a smooth, accurate and admissible presentation to the court or mediator. All users should encourage their graphics partners to attend this workshop! Its in your best interest! 3 Technical Newsletter What’s Your Strategy For Environment Modeling? What does it take to build a highly-detailed environment model? If youve built one before, you are familiar with the typical process and effort involved, such as shown in the diagram below. Youve figured out the best approach and modeling program to use depending upon the specifics of the terrain you need to drive on and display in your simulations. Youre past the learning curve and can now easily provide this level of presentation as part of your regular services. However, if you havent built one before and want to start doing so for your HVE (or even HVE-2D+) simulations, you will want to think about your overall business model and strategy before just diving in. WINTER 2010 First and foremost, does your company have the required in-house resources? You may already have an internal graphics department supporting you with CAD modeling and high resolution graphics. You can leverage the skills of your existing staff to quickly and efficiently build models for use in HVE. However, if you are a sole practitioner or small organization, you may not have the in-house resources. You have to go through the effort of recruiting and employing additional staff, and also providing training for specific expertise that needs to be developed. In such instances, it is probably much more efficient to develop a relationship with an outside vendor or service provider that specializes in graphics and modeling. A service provider who is already skilled at using 3-D modeling tools can quickly and easily learn what it takes to build a model for use in HVE. When working with a service provider, think of them as part of your team. They support your level of professionalism and the HVE-related services you offer to your clients. In fact, they can allow you to spend more time doing the analysis work you prefer to do! This is a win-win scenario for you and your clients! HVE Environment Modeling Partners To help users who need highly-detailed environments for simulations but dont have the internal resources to build them, EDC is establishing a network of CAD and graphics professionals experienced in building environments for HVE and HVE-2D. This network also includes HVE users offering to help other users with their expertise in environment (and even vehicle) model building. A list of Environment Modeling Partners will soon be available through the Partners link on the EDC website or by contacting EDC Customer Service. If you already have an outside resource for your environment modeling and they are interested in working with more HVE users, please encourage them to complete an application to become an Environment Modeling Partner. If you or someone else in your organization would like to be listed as an Environment Modeling Partner, you may also complete an application. Typical workflow when working with highly detailed environment models for 3-D simulations and visualizations using HVE. 4 The application form requires contact information as well as a list of services offered and samples of models that have been used in HVE. Application forms will be available on the Partners page of the website and also by contacting EDC Customer Service at 503.644.4500. WINTER 2010 Environment Modeling Partner Example: The following is an advertisement from an environment modeling service provider. This example presents the types of services available to HVE users who choose to outsource the building of highly-detailed models for HVE simulations. Technical Newsletter accident site and provide an HVE compatible file for use in your analysis. They will read the positional data directly from your HVE file and create a computer video file at any resolution or aspect ratio you specify. Baker Sneddon Consulting is an HVE Partner and an experienced user of HVE. For more information about these services, please contact James Sneddon at (847) 987-4118 or [email protected]. HVE Visualizations in HD The graphic output from an HVE simulation can be a persuasive exhibit at trial or other proceeding. HVE videos have a fixed resolution of 640 x 480. However, high definition television is capable of displaying resolutions as high as 1920 x 1080. can produce a high definition video of your HVE simulation. This video can be created using photorealistic rendering which includes textured surfaces, shadows, reflections, detailed plants and computer generated sky and lighting attributes. They also have a library of highly detailed vehicle models and common roadway objects. Baker Sneddon Consulting Using survey data or construction plans, they can build a three dimensional environment model of your Image from the HVE Playback Window rendered at a resolution of 640 x 480, correspondingto NTSC video. Photorealistic rendering of the above HVE Playback Window. This rendering includes detailed plants, sky, shadows and reflections. The original image was rendered at 1920 x 1080, and is to scale with the image at the top of the page. 5 Technical Newsletter HVE & HVE-2D Version 7.1 Features Overview Version 7.1 is loaded with powerful new capabilities and advanced features. The Distance Tool, the HVE Hydroplaning Model, the HVE Automatic Transmission Model, and the HVE Driver, Speed Follower option are just a few examples. With the 2010 HVE Forum coming up later this month, now is a great time to start using HVE or HVE-2D and take advantage of the features described below: - HVE-2D Version 7.1 allows an upgrade option that replaces the standard overhead 2-D view with the same 3-D viewers used in HVE. The 3-D viewers in HVE-2D+ allow cameras to be positioned anywhere and look everywhere in a 3-D world, just like HVE. HVE-2D+ users can easily set up ground level views and target-following cameras, such as those used to display a drivers view of an impending crash or show the view of an eyewitness observing a crash. HVE-2D+ - Users can now quickly use aerial photos or Google Earth images as their environment models. The enhanced Environment Information dialog allows the user to create a scaled environment using the photographic image. Using Aerial or Google Earth Images - The Distance Tool can determine the distance and angle between any two points selected in the Event Editor. The points may be on humans, vehicles or environments; any object can be selected. Users are finding the Distance Tool extremely helpful when setting up and running reconstructions and simulations. Want to know the distance between two vehicles? Just turn on the Distance Tool and click on the front of one vehicle and the rear of the other. Want to calculate trailer off-tracking? Just click on the tire tracks and the reference point. Its that easy. Distance Tool Enhancements to EDCRASH - EDCRASH now replaces your old skid-to-stop program with an easy-to-use visual approach. Simply place a vehicle at the start and end of its path. EDCRASH calculates the initial velocity. This new feature takes users beyond the simplistic formula for straight-line skid-to-stop calculations. New Camera Paradigm - The toolbar now includes a Camera button next to a dropdown list of user-defined camera views. If you manipulate the viewer, the view name changes to Current (Untitled) View. Move around all you want, and when you click on the dropdown list 6 WINTER 2010 and choose a named view, you go right to the selected view. Up to 10 named views can be assigned to each viewer in the Event and Playback Modes. HVE Driver Model, Speed Follower Option - SIMON users can now take advantage of this long awaited enhancement to the HVE Driver Model. When assigning target positions for the Path Follower, simply assign a Total Velocity at each position in order to use the Speed Follower. SIMON will then determine the throttle and/or brake applications required to maintain the desired speed. Automatic Transmission - The Transmission dialog now not only displays the gear ratios of the transmission, but also a Type selector for Manual or Automatic. If you select Automatic, SIMON automatically determines the correct gear at the start of your simulation according to the user-entered Initial Velocity, then shifts the transmission accordingly. In general, shifting is controlled according to engine speed and throttle position, exactly like a real automatic transmission. More details regarding the HVE Automatic Transmission model were included in the Summer 2009 Newsletter. - When a tire skids, the width of the resulting tire mark naturally depends on the width of the tire. If the tire has a sideslip angle, the skid width is also affected by the angle and contact patch length. If the tire is inclined sufficiently, the entire width of the tread surface is no longer in contact with the terrain, so the width of the resulting tire mark is reduced. HVE now takes all of these factors into account when a skidmark is displayed. Tire Skid Width Hydroplaning Simulation - The new HVE Hydroplaning Model in Version 7.1 calculates the reduction in tire-roadway friction at each tire contact patch as the vehicle drives through wet pavement or standing water, as shown in the simulation to the left. SIMON and EDSMAC4 users can now include the effects of hydroplaning on vehicle handling directly in their simulations. The Technical Session of the Fall 2009 newsletter provided an overview describing how to use this exciting new capability. - Users can now quickly modify the basic Inertial and Dimensional Properties for a Generic Vehicle as it is added to the Vehicle Editor. The Vehicle Wizard is a new feature located on the Vehicle Information dialog, and is available at the press of a button. The Vehicle Wizard provides an excellent template for quickly assigning vehicle dimensions, weights and weight distribution. Vehicle Wizard WINTER 2010 HVE and HVE-2D F.A.Q. This section contains answers to frequently asked questions submitted to EDC Technical Support staff by HVE and HVE-2D users. Q. My SIMON simulation terminates with a message of Event Termination: Excessive Wheel Deflection. (Broke a Rim?) What causes that message to appear and how do I overcome it? A. The termination is caused by a tire deflection greater than allowed, about 120% of the tire section height. If this is an unexpected situation, here are suggested troubleshooting steps that may help you get past the message: 1. The first thing to confirm is that the event does not include an intended elevation change that a tire might encounter (i.e., a curb) that is greater than 120% of the tire section height. 2. If the answer in Step 1 is NO, then carefully check the environment in the vicinity where the tire deflection was too great (use your Key Results and monitor the deflection of each tire to identify the culprit tire). Do you see an open seam, gap or crack in the terrain model at that tire location? You may need to look REALLY close; cracks can be very small. Again, use Key Results to monitor the terrain elevation (Tire group, Z value). If the tire finds a crack, the terrain elevation reported will be zero. In order to proceed, fix the crack by welding the seams together in your CAD program, or by putting a surface immediately under the crack to patch the crack. 3. If the answer to Step 1 is YES (i.e., a tire is hitting a curb as intended), then use the radial spring tire model for that tire (and maybe for other tires as well, depending on whether other tires might encounter the curb). The extra radial springs used by this model will help the tire climb the curb rather than letting the tire embed itself up to the rim in the curb. 4. If the answer to Step 1 is NO and the termination occurs during a rollover when the vehicle roll angle approaches 90 degrees, check to see if a tire is hitting the terrain and the tire plane is parallel to the terrain. In this case, the tires radial deflection is undefined, which is a condition that has been described in several previous Newsletter and papers. Sometimes reducing the integration timestep helps to solve the problem (depending on whether tire deflections calculated in the vicinity of parallel change the outcome), but this does not guarantee a solution. Technical Newsletter Another thing to try is to turn on the radial spring tire model (not all the radial spring vectors are likely to be parallel to the terrain). Finally, if this doesnt solve the problem, it might be possible to use the Wheel Damage model to move the wheel up into the body and let the vehicles body take the force (i.e., DyMESH). Again, this particular issue occurs only during rollovers, so you will need to use DyMESH to model the interaction between the vehicle body and the terrain model anyway. Q. I need to simulate a downhill loss-of-control scenario that is 45 seconds long. Is there a way to increase the maximum simulation time beyond 20 seconds? A. In order to extend the default limits of any input parameters or settings in HVE, the user can edit the warning and error limits for the appropriate parameters in the language.rsc file. This file is a text file located in the supportFiles/sys folder. (Users are encouraged to review Appendix II in their Users Manual for more details about the warning and error limit values used by HVE.) Since the language.rsc file contains every text string and parameter used in HVE, it is helpful to use the Find functionality of your text editor to quickly search for the string associated with the parameter you wish to edit. The following table contains the strings for the Maximum Simulation Time value, as well as Driver Controls table entries. Time Parameter String Values to Edit Simulation Time Brake Table Steer Table Throttle Table Gear Selection OpSimMaxTime BrakeTimeCol SteerTimeCol ThrottleTimeCol GearTimeDisplay 20.0 20.0 20.0 20.0 20.0 If you need to increase the range of other parameters beyond the default limit of 20 seconds (e.g. Tire Blowout and Wheel Damage), you will need to edit their limits in the language.rsc file, too. If you make a mistake in the format of your language.rsc file during your editing, you can download an original copy of that file from the Support, Downloads section of the EDC website. Visit the Support section of www.edccorp.com for the latest Downloads and answers to F.A.Q.’s 7 Technical Newsletter EDC Training Courses EDC Reconstruction & EDC Simulations EDC offers an excellent training course on the use of the EDC reconstruction program, EDCRASH. Both new and long-time users of EDCRASH agree that the EDC Reconstruction course is extremely beneficial and challenging. EDC also offers an excellent training course on the use of EDC simulation programs, such as EDSMAC, EDSMAC4, EDSVS and EDVTS. The EDC Simulations course offers the fastest way to learn what you really need to know how to efficiently use the program and get the right results. These one-week courses are designed to fully investigate the programs inner workings. Lectures are full of helpful hints gained from years of experience. During the course, students will use the programs (e.g. EDCRASH, EDSMAC4) in either the HVE or HVE-2D simulation environment to complete several workshops highlighting the capabilities of the programs. HVE Forum The HVE Forum is an excellent opportunity for HVE and HVE-2D users to jump to a new level of ability. By WINTER 2010 Vehicle Dynamics Theoretical and Applied Vehicle Dynamics extends the theory of the basic SAE course and includes direct applications using several vehicle simulation programs (e.g. SIMON, EDVSM) within the HVE simulation environment, as well as a solid theoretical background for such simulations. The course is focused towards vehicle design engineers and safety researchers with an interest in a greater understanding of vehicle dynamics and automotive chassis systems development. In-House Training Intensive hands-on training on how to use your HVE or HVE-2D system software, physics programs and databases is available. Contact EDC Customer Service for more information about bringing this two-day on-site course to your office. Course Registration You may register for a course by contacting EDC Customer Service at 503.644.4500, or by email to [email protected]. You can also visit the Training pages on our website and download a registration form. All courses are eligible for Continuing Education Units and ACTAR credits. See you at our next course! participating in workshops, attendees brush up on their present skills, learn new techniques, and learn how to use the latest advancements in the software. The HVE Forum also presents a great opportunity to meet other users and expand your network of resources. Websites hosted by experienced HVE Users offer information about using HVE as wells as hosted online discussions with other users. Be sure to visit: Engineering Dynamics Corporation Training Course Schedule tech.groups.yahoo.com/group/HVErecon - Discussion group hosted by Roman Beck of Casteel, Beck & Associates. EDC Simulations DiscoverHVE.com - Online training and discussion group hosted by Wes Grimes of Collision Engineering Associates Los Angeles, CA . . . . . . . . . . January 2011 Miami, FL . . . . . . . . . . . . . . November 2011 EDC Reconstruction Los Angeles, CA . . . . . . . . . . January 2012 Miami, FL . . . . . . . .. . . . . November 8-12, 2010 Theoretical & Applied Vehicle Dynamics Upon Request . . . . . . . . . . .. . . . . . . . . . . . . . . . . TBA 2010 HVE FORUM San Antonio, TX. . . . . . . . . . . March 1 - 5, 2010 8 HVE User Websites Engineering Dynamics Corporation 8625 SW Cascade Blvd, Suite 200 Beaverton, Oregon 97008 USA Phone 503.644.4500 / FAX 503.526.0905 Email: [email protected] Website: www.edccorp.com DamageStudio, EDCRASH, EDSMAC, EDSMAC4, EDSVS, EDVTS, EDHIS, EDVSM, EDVDS, EDGEN, EDVDB, HVE, HVE-2D, HVE Brake Designer and GetSurfaceInfo() are trademarks of Engineering Dynamics Corporation. All Rights Reserved. SIMON and DyMESH (Patent number 6,195,625) are registered trademarks of Engineering Dynamics Corporation. All Rights Reserved. GATB, GBF, DiscoverHVE.com and PhotoIntoHVE are trademarks of Collision Engineering Associates, Inc.