1
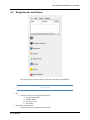
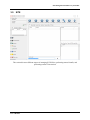
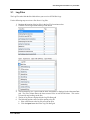
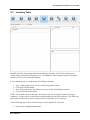
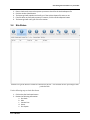
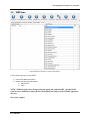
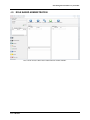
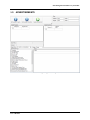
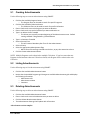
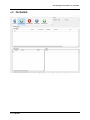
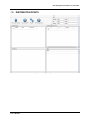
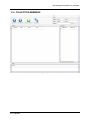
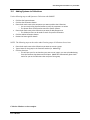
Site Management and Recovery Tool 2007 V1.0 USER MANUAL By: Darrell Childress October 1st, 2015 Site Management and Recovery Tool 2007 Revision Sheet Release No. 1.0 1.1 Date 10/1/2015 11/19/2015 Version 1.0 Release Notes: User’s Manual Revision Description Initial Revision Removed Full HINV and SINV buttons Site Management and Recovery Tool 2007 1.0 User’s Manual General Information Site Management and Recovery Tool 2007 1.0 GENERAL INFORMATION 1.1 System Overview Site Management and Recovery Tool 2007 (SMART) is an application designed to assist in many areas of Software Deployment, Package, Program, Collection, and Advertisement creation, modification, and deletion, as well as, Site and Security Management. 1.2 Authorized Use Permission 1.3 Points of Contact Contact Darrell Childress at [email protected] with Technical questions. User’s Manual Site Management and Recovery Tool 2007 2.0 User’s Manual Connection Properties Site Management and Recovery Tool 2007 2.0 CONNECTION PROPERTIES The following section discusses connecting to SCCM Sites with SMART. User’s Manual Site Management and Recovery Tool 2007 2.1 Connecting to a Site Use the following steps for connecting to a SCCM Site. 1. Type the name of the Site Server in the Server Name text box. 2. Type the domain\username of the account you with to connect with in the User Name text box. This step is optional. Not entering credentials will cause the tool to connect with the same credentials that are currently running the tool. 3. Type the user’s password in the Password text box. 4. Click the Connect button. 5. Once the tool has connected to the Site, a status message will appear in the bottom left corner of SMART showing which Site you are connected to and the current overall health of that Site. 6. The Sites Datagrid also populates showing any Site Information including Child Sites, Site Codes, and overall Site Health. 7. Step 6 can be bypassed by checking the Bypass Health Check checkbox on the Options tab before connecting. User’s Manual Site Management and Recovery Tool 2007 2.2 Navigation bar and Options The following topic discusses the Navigation bar and Options for SMART. Navigation Bar: 1. Site a. Displays utilities for managing the following: i. Log File Monitoring ii. Manual Installs iii. Inventory Tools iv. Site Status 2. Role Based Administration a. Displays utilities for managing the following: User’s Manual Site Management and Recovery Tool 2007 i. Local Administrators 3. Advertisements a. Displays utilities for managing the following: i. Creating Advertisements ii. Listing Advertisements iii. Deleting Advertisements 4. Packages a. Displays utilities for managing the following: i. Creating Packages ii. Listing Packages iii. Deleting Packages iv. Creating Programs v. Listing Programs vi. Deleting Programs 5. Distribution Points a. Displays utilities for managing the following: i. Assigning Packages to Distribution Points ii. Removing Packages from Distribution Points iii. Retrieving Package Status iv. Ping Distribution Points v. Retrieving Package Source Site 6. Boundaries a. Displays utilities for managing the following: i. Creating Boundaries ii. Listing Boundaries iii. Deleting Boundaries 7. Collections a. Displays utilities for managing the following: i. Creating Collections ii. Deleting Collections 8. Collection Members a. Displays utilities for managing the following: i. Listing Systems ii. Ping Systems iii. Listing Collections iv. Adding Systems to Collections v. Adding Queries to Collections User’s Manual Site Management and Recovery Tool 2007 Options: The following options are available within SMART. Notes: o Some Navigation Bar items have notes associated with them. Advertisements Distribution Points Boundaries Path to Trace32.exe: o This option allows you to specify the location of the Trace32 utility for opening SCCM Log files Log File Location (Site Node / Log Files Tab): o This option allows you to specify the location of the Site Server’s Log files. This will allow SMART to open Logs and display SCCM inbox counts Favorites (Collection Members Node): o Allows you to save selected Collections into groups For example, if you have 5 Collections specific to your Marketing group, you can select those 5 Collections and save them as a Marketing favorite. The next time you build a machine for the Marketing group, you can select Marketing from your favorites list and it will select the appropriate Collections for you Bypass Health Check o This option allows you to bypass the overall Site Health Check of all Sites connected to the Site you are connecting to Prompt for Deletion o This option allows you to prompt for deletion confirmation before actually deleting objects from SCCM WMI Base Path o This option allows you to specify the starting point of the WMI Scan feature. The default is “root\sms” but can be changed to other WMI Namespaces to confirm WMI connectivity Filtering: o Some tabs allow you to filter your search criteria Advertisements Filter Collections by: o Name o Collection ID Filter Programs by: o Package ID o Program Name Distribution Points Filter Packages by: User’s Manual Site Management and Recovery Tool 2007 o Name o Package ID Filter DP by: o Name o Site Code Filter Pending by (Package Status): o Status Boundaries Filter Boundary by: o Display Name o Value o Boundary Type Collections Filter Collection by: o Name o Collection ID Collection Members Filter Collection by: o Name o Collection ID Filter System by: o Name o Resource ID Validation o Several Items can be validated within SMART using the Validation tab Package ID Package Name Program Name Collection ID Collection Name Resource ID System Name Advertisement ID Advertisement Name Boundary Value Boundary Name Distribution Point Name Distribution Point Package ID Distribution Point Package Name User’s Manual Site Management and Recovery Tool 2007 3.0 Site User’s Manual Site Management and Recovery Tool 2007 3.0 SITE This section discusses different aspects of managing SCCM Sites, performing manual installs, and performing certain Client Actions User’s Manual Site Management and Recovery Tool 2007 3.1 Log Files The Log Files tab within the Site Node allows you to review SCCM Site Logs. Use the following steps to review a Site Server’s log files. 1. Populate the location of the log files in the Log File Location text box 2. Click the Check Logs button at the top of the screen 3. 4. The inboxmon.log file is parsed and the latest information is displayed in the inboxmon Data grid. The Files column shows the latest count of files in each SCCM inbox. This can be reviewed for any backlogs at the Site. 5. The list of log files are displayed in the Log File Data grid 6. The following options can be used for opening a log file a. Place a check next to the log file you want to open b. Click the Open button above the Log File Data grid User’s Manual Site Management and Recovery Tool 2007 c. d. The name of the log file and the log file details are displayed in the Log Details data grid. Any lines containing the word Failed will be highlighted Red e. Click the Open Errors button to only show the error lines within the log file. This will also highlight the log file line Red, in the Log File data grid. Selecting all in the Log File data grid and clicking Open Errors will allow you to see which log files contain errors at a glance f. Click the Open with CMTrace button to open the selected log files in the CMTrace log file reader g. Click the Open Folder button to open a Windows Explorer window in the Log File location User’s Manual Site Management and Recovery Tool 2007 3.2 Manual Installs SMART gives you the ability to create and deploy manual installation command lines. Use the following steps to prepare an MSI installation using SMART: 1. Click the Browse button next to the Install File text box 2. Navigate to your MSI install file, select it, and click the Open button 3. 4. Notice that the Install File Name, Source Folder, and Product Code are automatically populated User’s Manual Site Management and Recovery Tool 2007 5. 6. If needed, enter the name of the Transform File (can use full path if in different location) 7. If needed, enter the Log File Name 8. Select the appropriate MSI and Logging options (notice that the Command Line field updates based on your selections) 9. User’s Manual Site Management and Recovery Tool 2007 10. 11. If connected to a SCCM Site, click the Get Available Systems button. You can also ping the machines to make sure they are available by placing a check next to the ones you want to ping and clicking the Ping Systems button 12. 13. Place a check next to the system(s) to perform the manual installation on 14. If you would like to cache the installation on each client, enter the folder name you would like to cache the installation to (i.e. C:\Temp), place a checkmark in the Cache Installation on client checkbox, and click the Begin Caching button 15. NOTE: The Command Line may require some modification if you want to run the installation locally 16. When you are ready to perform the installation, click the Install button User’s Manual Site Management and Recovery Tool 2007 3.3 Inventory Tools SMART will allow you to manage Hardware and Software Inventory for SCCM by allowing you to exclude folders from Software Inventory, Force a Full Hardware and/or Software Inventory, and gather Inventory files for review and troubleshooting. Use the following steps to exclude folders from Software Inventory 1. 2. 3. 4. Type a starting folder (local or UNC) in the Starting Folder text box Click the Get Folders button Place check marks next to the folders you wish to exclude from Software Inventory Click the Exclude Folders button NOTE: The Available Systems data grid is for reference only (for creating UNC paths and pinging computers). A future release of this tool may include translation of the folder locations. Also, make sure that you have permissions to create the skpswi.dat file in the folders you are selecting. Use the following steps to check for the Inventory Archive Reports file on systems 1. Click the Get Available Systems button User’s Manual Site Management and Recovery Tool 2007 2. 3. 4. 5. 6. 3.4 Place a check mark next to the systems you want to check for the Archive Reports file Click the Archive Check button The Status grid will populate and notify you if the Archive Reports file exists or not If the file does not exist and you want to create it, Click the Archive Reports button The Status grid will notify you of the file creation Site Status SMART will get the Status of each Role connected to the Site. This includes the free percentage of that particular Role. Use the following steps to check Site Status: 1. Click on the Get Site Status button 2. Review the following information a. Site Code b. Role c. Percent Free d. Status e. Site System User’s Manual Site Management and Recovery Tool 2007 3.5 Component Status SMART will get the Status of each Component for SCCM Use the following steps to check Component Status: 1. Click on the Get Component Status button a. SMART may require you to run the application as Administrator for this feature to work 2. Review the following information a. Component b. Status c. Startup Type User’s Manual Site Management and Recovery Tool 2007 3.6 WMI Scan SMART will connect to WMI Namespaces and list available Classes. These Classes can be compared to a specified list of Classes to verify consistency. Use the following steps to check WMI: 1. Click on the WMI Scan button 2. Review the following information a. Namespace b. Class NOTE: WMI Base path can be changed using the options tab within SMART. Specified WMI Class list can be modified by editing the file called WMIClassConfig.txt in the SMART application directory. Site section complete. User’s Manual Site Management and Recovery Tool 2007 4.0 User’s Manual Role Based Administration Site Management and Recovery Tool 2007 4.0 ROLE BASED ADMINISTRATION This section discusses Role Based Administration within SMART. User’s Manual Site Management and Recovery Tool 2007 4.1 Administrators To list the Local Administrators on a computer: Click the Get Available Systems button Place a check mark next to the System you want to query Click the Get Local Administrators button To Add Local Administrators to a computer: Click the Get Available Users button Click the Get Available Systems button Place a check mark next to the User you want to add Place a check mark next to the System you want to add the user to Click the Add Administrators button NOTE: You can type in the User name and System name without clicking the Get Available Users and Get Available Systems buttons. Role Based Administration section complete. User’s Manual Site Management and Recovery Tool 2007 5.0 User’s Manual Advertisements Site Management and Recovery Tool 2007 5.0 ADVERTISEMENTS This section discusses creating, listing, and deleting Advertisements. User’s Manual Site Management and Recovery Tool 2007 5.1 Creating Advertisements Use the following steps to create an Advertisement using SMART: Click the Get Available Programs button o The Program filter can be used to search for specific Programs Click the Get Available Collections button o The Collection filter can be used to search for specific Collections Place a check mark next to the Program you want to Advertise Place a check mark next to the Collection you want to Advertise to Type in an Advert Prefix if needed o This allows you to specify a unique beginning of the Advertisement name. Default naming standard is ProgramName_CollectionName Type in a Comment if needed Select a Present Time o This will create a Mandatory Run Time for the Advertisement Select a Priority Select the appropriate Advertisement flags o NOTE: Some of these flags contradict each other, so pay close attention to them Click the Create Advertisement button NOTE: Multiple Programs can be advertised to multiple Collections. If you have more than one Program selected and more than one Collection selected, each Program will be advertised to each Collection. 5.2 Listing Advertisements Use the following steps to list Advertisements using SMART: 5.3 Click the Get Available Advertisements button Notice that the Available Programs grid changes to Available Advertisements grid and displays the following information: o Advertisement ID o Advertisement Name o Comment Deleting Advertisements Use the following steps to delete an Advertisement using SMART: Click the Get Available Advertisements button Place a check mark next to the Advertisement you want to delete Click the Delete Advertisements button The Advertisement Status grid will update with information Advertisement section complete User’s Manual Site Management and Recovery Tool 2007 6.0 User’s Manual Packages Site Management and Recovery Tool 2007 6.0 PACKAGES This section discusses creating, listing, and deleting Packages and Programs. User’s Manual Site Management and Recovery Tool 2007 6.1 Creating a Package Use the following steps to create a Package using SMART: Type the following information into the Create Package data grid o Name o Version o Manufacturer o Language o Comment o Path This is the path to the source files for the Package Place a check mark next to the Package information you just entered Click the Create Packages button Review the Package Status grid for details NOTE: You can paste a list of Packages into the Create Package data grid, if you have the information contained in a spreadsheet or gathered it from another Site 6.2 Listing a Package Use the following steps to list Packages using SMART: 6.3 Click the Get Packages button o The Package filter can be used to search for specific Packages Notice the Current Packages grid now displays the following information: o Package ID o Name o Version o Manufacturer o Language o Comment o Path Deleting a Package Use the following steps to delete a Package using SMART: 6.4 Click the Get Packages button Place a check mark next to the Package you want to delete Click the Delete Packages button Review Package Status data grid for details Creating a Program User’s Manual Site Management and Recovery Tool 2007 Use the following steps to create a Program using SMART: 6.5 Type the following information into the Create Programs data grid o PackageID This will be the Package ID of that Package to create the Program in o Name o Comment o Command Line o Max Runtime Place a check mark next to the Program you want to create Click the Create Programs button Review the Program Status data grid for details Listing a Program Use the following steps to list Programs using SMART: 6.6 Click the Get Programs button Notice the Current Programs grid now displays the following information: o Package ID o Name o Comment o Command Line o Max Runtime Deleting a Program Use the following steps to delete a Program using SMART: Click the Get Programs button Place a check mark next to the Package you want to delete Click the Delete Packages button Review Package Status data grid for details Packages section complete User’s Manual Site Management and Recovery Tool 2007 7.0 User’s Manual Distribution Points Site Management and Recovery Tool 2007 7.0 DISTRIBUTION POINTS This section discusses adding and removing Packages to and from Distribution Points User’s Manual Site Management and Recovery Tool 2007 7.1 Adding Packages to Distribution Points Use the following steps to add Packages to Distribution Points using SMART: 7.2 Click the Get Available Packages button o The Package filter can be used to search for specific Packages Click the Get Available DPs button o The DP filter can be used to search for specific Distribution Points o The Ping DPs button can be used to verify the Distribution Points are online Place a check mark next to the Package you want to assign Place a check mark next to the Distribution Point you want to assign the Package to Click the Assign Packages button Review the Status data grid for details Removing Packages from Distribution Points Use the following steps to remove Packages from Distribution Points using SMART: 7.3 Click the Get Available Packages button o The Package filter can be used to search for specific Packages Click the Get Available DPs button o The DP filter can be used to search for specific Distribution Points o The Ping DPs button can be used to verify the Distribution Points are online Place a check mark next to the Package you want to remove Place a check mark next to the Distribution Point you want to remove the Package from Click the Remove Packages button Review the Status data grid for details Listing Package Status Use the following steps to list Package Status using SMART: Click the Get Package Status button o By default, only Packages that are in a Waiting to Install state will be displayed o The Pending filter can be used to look for Packages in an Installed state Review the Notes tab for available states Notice the Package Status grid now displays the following information: o Server Name o Site Code o Package ID o Install State o Date Last Copied Distribution Point section complete User’s Manual Site Management and Recovery Tool 2007 8.0 User’s Manual Boundaries Site Management and Recovery Tool 2007 8.0 BOUNDARIES This section discusses creating, listing, and deleting Boundaries User’s Manual Site Management and Recovery Tool 2007 8.1 Creating a Boundary Use the following steps to create a Boundary using SMART: Type the following information into the Create Boundaries data grid o Display Name o Value o Boundary Type The Boundary Type drop down list can be used to automatically populate Boundary Type as you create Boundaries Place a check mark next to the Boundary information you just entered Click the Create Boundaries button Review the Status grid for details NOTE: You can paste a list of Boundaries into the Create Boundaries data grid 8.2 Listing Boundaries Use the following steps to list Boundaries using SMART: 8.3 Click the Get Boundaries button o The Boundary filter can be used to search for specific Boundaries Notice the Current Boundaries grid now displays the following information: o Display Name o Value o Boundary Type Deleting a Boundary Use the following steps to delete a Boundary using SMART: Click the Get Boundaries button Place a check mark next to the Boundary you want to delete Click the Delete Boundaries button Review Status data grid for details Boundary section complete User’s Manual Site Management and Recovery Tool 2007 9.0 User’s Manual Collections Site Management and Recovery Tool 2007 9.0 COLLECTIONS This section discusses creating and deleting Collections. User’s Manual Site Management and Recovery Tool 2007 9.1 Creating Collections Use the following steps to create a Collection using SMART: 9.2 Type the following information into the Create Collections data grid o Name o Comment Place a check mark next to the Collection information you just entered Click the Create Collections button Review the Status grid for details Listing Collections Use the following steps to list Collections using SMART: 9.3 Click the Get Collections button Notice that the Current Collections data grid displays the following information: o Collection ID o Collection Name o Comment o Collection Variables Count of Collection Variables within Collection Deleting Collections Use the following steps to delete a Collection using SMART: Click the Get Collections button Place a check mark next to the Collection you want to delete Click the Delete Collections button Review the Status grid for details Collection section complete User’s Manual Site Management and Recovery Tool 2007 10.0 Collection Members User’s Manual Site Management and Recovery Tool 2007 10.0 COLLECTION MEMBERS This section discusses adding Computers to various Collections. User’s Manual Site Management and Recovery Tool 2007 10.1 Adding Systems to Collections Use the following steps to add Systems to Collections with SMART: Click the Get Systems button Click the Get Collections button Place check marks next to the computers you want to add to the Collections o You can use the Ping Systems button to verify the computers are online o The System filter can be used to search for specific Systems Place check marks next to the Collections you want to add computers to o The Collection filter can be used to search for specific Collections Click the Add to Collections button Review the Status grid for details NOTE: The following steps can be used to make Favorite groups of Collections for use later Place check marks next to the Collections you want to save as a group Type a Name for the group in the Favorites text box (i.e. Marketing) Click the Save icon o This will save your list so that when you want to use it again, you can select Marketing from the Favorites drop down and click Open. SMART will automatically place check marks for you on the Collections that are part of that group Collection Members section complete User’s Manual