1
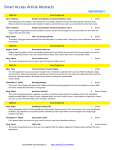
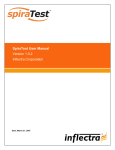
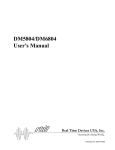
Drift Catcher
Users’ Manual
Pesticide
Action
Network
Copyright ©2005 Pesticide Action Network
All rights reserved.
Pesticide Action Network
415-981-1771
www.panna.org
www.pesticideinfo.org
Contents
Welcome!
............................................ 1
Section 1:
Getting Started. . . . . . . . . . . . . . . . . . . . . . . . . . . . . . 2
Section 2:
The Drift Catcher System . . . . . . . . . . . . . . . . . . . . 4
Section 3:
Setting up the Drift Catcher . . . . . . . . . . . . . . . . . . 10
Section 4:
Starting the Sample . . . . . . . . . . . . . . . . . . . . . . . . 11
Section 5:
Filling Out the Site Information Sheet . . . . . . . . 19
Section 6:
Stopping the Sample . . . . . . . . . . . . . . . . . . . . . . . 20
Section 7:
Preparing Trip Blank Samples. . . . . . . . . . . . . . . 22
Section 8:
Storing the Sample . . . . . . . . . . . . . . . . . . . . . . . . 22
Section 9:
Filling out the Chain of Custody Form. . . . . . . . . 23
Section 10:
Handling Trip Spike Samples . . . . . . . . . . . . . . . . 24
Section 11:
Disassembling the Drift Catcher . . . . . . . . . . . . . 25
Appendix A: Troubleshooting . . . . . . . . . . . . . . . . . . . . . . . . . . . 26
Appendix B:
Quick Checklist for Drift Catcher Operation . . . 30
Welcome!
We are glad you want to learn how to use the Drift Catcher. This manual
provides information on how to set up and use the Drift Catcher to look
for pesticides in air. It is intended for use in conjunction with PANNA’s
training and certification program for using the Drift Catcher.
If something in the manual is not clear, please call PANNA and ask for
help. PANNA’s phone number is (415) 981-1771. Ask for Katherine Mills
or Susan Kegley. Katherine’s cell phone number is (415) 640-3129 and
Susan’s is (415) 999-9071.
Important!
Page 1
Please read the directions thoroughly before
you start!
Section 1:
Getting Started
What you need
•
•
•
•
A sheltered and secure place to set up the Drift Catcher
Access to an electrical outlet (call us if you need a battery-powered
Drift Catcher instead)
Approximately an hour to set up the Drift Catcher the first time and
do a comprehensive site description that includes taking pictures and
sketching a map of the site. Once you are familiar with the Drift
Catcher system, it will only take about 15 minutes or so to change
tubes and record sampling times.
A sense of smell and an awareness of your surroundings
Page 2
Things to know
•
•
•
•
Samples are always taken in duplicate—two at a time—to ensure
greater precision and accuracy and provide flexibility in analysis of
the samples.
Careful note-taking is very important to the success of your sampling.
If you do something that is not exactly like the instructions, be sure to
write it down.
If you make a mistake, all is not lost! But it is very important to write
down exactly what happened so you don’t spend money analyzing a
sample that may not give you valid information.
Pesticide concentrations in air are highest during and soon after
applications. For your safety, it is best to stay far away from locations
where pesticide applications are occurring. If you wish to sample a
particular application, start the sampler before the application begins,
then leave the area to avoid exposure. Alternatively, begin sampling
after the application has ended and the spray drift has settled.
Important!
•
While it is optimal to take samples while
pesticides are in the air, your safety comes
first. The pesticides you are catching could be
harmful to your health, and you should be
aware that exposure to pesticides can occur
not only by breathing , but also through skin
contact . It is important to minimize the time
you spend near an application site.
If you have questions, please call PANNA at (415) 981-1771.
Page 3
Section 2:
The Drift Catcher System
How it works
The Drift Catcher works by using a small vacuum pump to pull a known
amount of air through a sample tube that traps pesticide spray, dust, and
vapors. Figure 1 shows how the device works.
Figure 1:
This diagram shows the air flow through the Drift Catcher.
Airborne pesticides are pulled into the sample tube, where they
are trapped .
After sampling is complete, the tubes are sent to a laboratory for
analysis to determine the amount of pesticide present. Once we know
both the amount of pesticide trapped and the volume of air pulled
through the tube during the sampling period, it is possible to
determine the concentration of pesticides in the air, usually in units of
nanograms of pesticide per cubic meter of air.
Page 4
Parts of the Drift Catcher Kit
Large Plastic Box Contains:
•
•
•
•
•
•
•
•
Manifold with bracket and tube adapters (Figure 2 and Figure 3)
uum pump (Figure 3)
Metal stand
Extension cord (50 or 100 ft.)
Tape measure (100 ft.)
Shipping box with cold packs
Clipboard
Pictures to help you re-pack the kit when you are finished sampling.
Small Parts Box Contains:
•
•
•
•
•
•
Rotameter (Figure 3)
Light shields (Figure 3)
Glass sample tubes and red end caps (Figure 3) in Ziploc bags with
Sample Log Sheet and tube labels. Extra tubes and labels.
Tube cracker (Figure 3)
Battery-powered compass (Figure 3)
Wind/temperature meter (Figure 3)
A
Manifold
B
Valve
Knobs
Sample
Tubes
Figure 2:
Page 5
The Drift Catcher sampling manifold allows you to take two
samples at once. The valve knobs control the air flow through
the sample tubes.
Vacuum pump
Rotameter to
measure air flow
Glass sample tube
with caps
Rotameter
adapter
Tube
adapter
Light shield
Tube cracker
Compass
Figure 3:
Wind & temperature
meter
Parts of the Drift Catcher kit include a rotameter to measure air
flow, glass sample tubes that trap pesticides, light shields to
protect the sample tubes from light that might degrade the
pesticides, various adapters to connect the tubes to the manifold
and the rotameter, a vacuum pump to pull air through the
sampling tubes, a tube cracker, a compass and a wind/
temperature meter.
Page 6
How long should you sample to get the best
results?
Since you do not know the concentration of pesticides in the air before
you take the samples, you have to use your sense of smell and any extra
information (like when an application might have occurred) to determine
the optimum length of time to sample. In order to be able to compare your
results with Reference Exposure Levels (“acceptable” levels determined
by U.S. EPA), you must sample for a total of 24 hours. This can be
accomplished in several different ways—with a single 24-hour sample, or
if you are expecting high concentrations, you might change the sample
tube several times during the 24-hour period (see Figure 4). If you change
the tubes too often though, you may not trap enough pesticide to be able
to detect it in the laboratory analysis.
Figure 4:
There are many different possibilities for timing sample
collection. Two common sampling schemes are shown in this
figure.
Sampling times will typically depend on how much time has elapsed
since the application occurred and how close the application is to the
sampling site. If the application happened within the previous half-day
within several hundred yards of the sampling site, a good plan would be to
pull air through one set of tubes for four hours, change to a new set and
leave it in place for another four hours, then another set for four hours, 12
hours, 24 hours and 24 hours, for a total of three days (see Figure 4). If
you are not able to sample during and/or soon after the application, but
know pesticides were applied within the last day or two, take three backto-back 24-hour samples. The 24-hour samples also work well to estimate
longer-term exposures over the course of several weeks to several months.
Page 7
Dividing the sampling time into smaller blocks can help
showconcentration peaks, but concentrations must be relatively high to
get good results for sampling times less than 24 hours. Obtaining a 24hour background sample before the pesticide application occurs is very
useful if you can do it, although this may be impossible if you don’t know
when the application is scheduled to occur.
Figure 5:
A typical plot of concentration over time for a semi-volatile
pesticide.
Forms you will use
To make it easy to record information about the site and the samples, we
provide the following forms.
1. Site Information Sheet
Use this sheet to record information about the sampling site. Include
distances to potential sources of pesticide drift and to locations where
people may be exposed. If you observe any nearby pesticide applications,
use the Site Information Sheet to record the time the application was
made and describe the application (how the pesicide was applied and
identity of the products, if you can find out). It is also helpful to note any
additional chemicals/pesticides that might have been used or stored near
Page 8
or in the sampling location that might interfere with the pesticide analysis.
Such interferences include mosquito-repellent candles or coils, insect
repellent, solvents, air fresheners, toilet bowl deodorizers, paint thinner,
other solvents, smoke and dust. See Section 5: Filling Out the Site
Information Sheet on page 19 for more information on filling out the
Site Information Sheet.
Important!
Do not use any other chemicals in or around
the sample site during the sampling period.
2. Sample Log Sheet
The Sample Log Sheet is used to record information for each sample
taken.
•
•
•
•
Start time and stop time for each sample
Air flow rates at the beginning and end of each sampling period
Weather, wind, and temperature
Odors and other observations, especially about the timing of pesticide
applications, or notes about problems with that particular sample.
3. Freezer Log and Chain of Custody form
The Freezer Log sheet is taped to the door of your freezer so you can
make a note of the time each sample is placed in the freezer. The Freezer
Log sheet also serves as your Chain of Custody (COC) form, which
always stays with the samples to track where they have been, how they
have been stored (on ice or dry ice or in a refrigerator or freezer), and who
has had responsibility for holding them. If you ever want to use the results
of a sampling run in a court case, you must have a valid Chain of Custody
form. See Section 9: Filling out the Chain of Custody Form on page 23
for more information.
Remember! It’s very important to write down what you do and what you
observe.
Page 9
Section 3:
Setting up the Drift Catcher
Set up the Drift Catcher in a location where you wish to measure pesticide
concentrations in the air. For example, you might want to sample a child’s
play area, your front yard, deck or porch, or near the edge of your
property boundary. You can use the Drift Catcher inside, but it is best not
to set the system up in the kitchen because smoke from cooking can
interfere with the laboratory analysis. It is also best to avoid setting up the
Drift Catcher in areas where people smoke. Be sure air can circulate
freely near the Drift Catcher—don’t put it right up against a wall or a
fence if you can help it. The pump makes some noise, so take that into
consideration when you decide where to put it. Be sure the Drift Catcher
is secure from theft and that the pump is protected from rain or direct
sunlight.
1.
Check that the extension cord can easily reach the pump. Plug in the
extension cord but do not plug in the pump just yet.
Assemble the stand by placing the 18-inch pole into the flat base of
the stand, then adding a second pole segment, and then the third one.
Use the flat-head screwdriver provided to tighten the screws holding
the stand together.
Page 10
Add the manifold to the top by slipping the manifold bracket over the
top of the pole and tightening the screw to keep it in place. Place a
heavy object on top of the stand base to keep it from tipping
2.
Position the pump on a stable surface out of direct sunlight and
protected from rain or irrigation water. To prevent overheating, be
sure the airflow around the pump is not blocked.
3.
Check that both black valve knobs are open (turn them to the left or
counterclockwise) about one complete turn from being fully closed.
These knobs control air flow through the sample tubes.
Section 4:
Starting the Sample
Starting the sample requires attaching the tubes, starting the pump, and
adjusting the air flow rate through the tubes. The Sample Log Sheet
should be used as a checklist and as a place to write down the detailed
information about each set of samples, including start and stop times, flow
rates and weather conditions. Each set of two sample tubes comes prelabeled and packaged in a Ziploc bag with a single Sample Log Sheet. At
the top of the Sample Log Sheet, fill in the name of your project and a
descriptive name for the specific location where you are using the Drift
Catcher. This last step is especially important if multiple Drift Catchers
are being used in your project.
1. Check the labels
Labeling tubes is important for keeping track of your samples. The two
tubes in each Ziploc® bag have the same name, except that one ends with
the letter A and the other ends with the letter B to match the two ports on
the manifold (for example, CAT-A and CAT-B). Labels are included in the
Ziploc® bags containing the sample tubes. When you open a ZipLoc®
bag, check that the labels on the tubes and in the bag match. If they don’t,
try another packet and set the unmatched one aside. If they do match,
stick the label that ends in A next to the phrase“Tube A” under Step 4 and
Step 11 on the Sample Log Sheet. Do the same for the two labels ending
in B. (Note: Extra blank labels are included in case a tube breaks or you
need to relabel a tube.)
Page 11
Important!
Be sure that the labels on the sample tubes
and the Sample Log Sheet are the same.
2. Attach the sample tubes
To attach sample tubes to the manifold, crack the sealed ends open, then
attach the tubes to the manifold using the adapter provided.
a.
Cracking: Crack both sealed ends of each tube by placing the end of
the tube in the small hole in the tube-cracker and pressing the tube
firmly against the tube-cracker, as shown below. Hold the tube over
the spare Ziploc® bag provided to catch the broken glass. Both ends
of the tube must be cracked before the tube can be used.
Each end of the tube should have an opening approximately 2 mm in
diameter—about the size of the circle below.
Important!
b.
The tube ends are very sharp!! Handle with
care and watch out for broken glass!
If a sample tube cracks all the way down the side, discard it and get a
new one from the bag of extra tubes in the Small Parts Box. Peel off
one of the extra labels provided in the ZipLoc bag, label it with the
sample name on the broken tube and stick it on the new tube. Put an
arrow on the label pointing the same direction as the arrow on the
glass tube (see Figure 6).
Figure 6:
In the photo above, note the arrow pointing left on right side of
this unbroken sample tube. When the tube is attached to the
manifold, the arrow should point up and towards the manifold.
Page 12
c.
Attaching: You will now attach the A tube to the A port and the B
tube to the B port . To do this, partially unscrew the bottom part of the
white adapter (DON’T unscrew it all the way, just loosen it several
turns). Look at the tube and make sure the small arrows printed both
on the label and on the tube are pointing up and towards the manifold,
in the direction of the air flow. Fit the tube up into the adapter as far as
it will go without forcing it, then screw the bottom part of the adapter
shut tight, using only your fingers to tighten it firmly (no tools!). Tug
on the tube several times to be sure the tube is tightly attached.
Repeat steps a and b for the second glass sample tube, attaching it to
valve B. Figure 7 below shows the sampling manifold with the glass
sample tubes inserted into the adapters.
Important!
Check the labels—is tube A attached to the A
port and tube B to the B port? If not, swap
them.
A
Figure 7:
Page 13
B
The photo above shows glass sample tubes correctly inserted
into the white plastic tube adapters that are attached to the brass
valves on the sampling manifold. Note that the empty ends of
the tubes are on the bottom. Light shields are then attached to
protect the sample from exposure to light.
3. Plug in the pump
Before starting the pump, check that both black valve knobs are open
approximately one turn to the left (counterclockwise) from fully closed.
When you plug in the pump, the sampling period officially starts. Look at
the time on the compass provided in the Small Parts Box and write it
down to the nearest minute on the Sample Log Sheet. Don’t forget to
circle AM or PM and write the date in the appropriate box on the sheet.
4. Measure the air flow rate with the rotameter
a.
Hang the rotameter on the manifold bracket. This frees up your hands
so you can adjust the flow rate and make notes.
b.
Attach the rotameter to the sample tube on Port A. To do this,
partially unscrew the bottom part of the white adapter (DON’T
unscrew it all the way, just loosen it several turns). Fit the tube up into
the adapter as far as it will go without forcing it, then screw the
bottom part of the adapter shut tight, using only your fingers to
tighten it firmly (no tools!). Tug on the adapter several times to be
sure the tube is tightly attached. You should now see the metal ball
floating gently up and down on the air that is flowing through the
system. If not, check to be sure the valve is open and that all of the
white adapters are as tight as you can get them with your fingers. If
there is still no air flow, see Troubleshooting on page 26.
Important!
c.
Be careful of the sharp glass on the tube.
Read the flow rate by making sure the floating metal ball is exactly at
eye level. The rotameter should be straight up and down, not tilted
backward or forward. Read the scale where the center of the metal
ball floats. See the diagram and photo below. Have your partner check
that you are reading the meter correctly.
Page 14
Figure 8:
When measuring air flow, it is important to that your eyes are on
the same level as the meter and that the meter is straight up and
down.
Important!
Be careful not to block the air flow through
the nozzle on the back of the rotameter by
accidentally covering it with your hand.
d.
Adjust the flow rate on valve A to approximately 2.2 liters per minute
on the scale by turning the valve in the appropriate direction. Turning
the valve to the left (counterclockwise) increases the flow and turning
it to the right (clockwise) decreases the flow.
e.
Detach the rotameter from valve A. Attach it to valve B and repeat
step d to set the flow rate through the tube on valve B to
approximately 2.2 liters per minute.
Important!
A flow rate of 2.2 liters per minute works for
many applications, but not all. Check with
PAN staff for tips on flow rates to use for the
pesticides of interest in your sampling
project.
f.
Aim for having equal flow rates through the two tubes. Because
changing the flow on one tube also affects the flow through the other
tube, you will need to repeat steps d and e several times to make the
flow rates the same.
g.
After you have adjusted the flow rates to make them equal and close
to the desired flow rate, attach the rotameter to each tube one more
Page 15
time and record the flow rate on the Sample Log Sheet in the
Starting Flow Rate box to the nearest 0.05 unit on the scale. For
example, write down “2.20” liters per minute, not just “2.2”. Have
your partner check your readings to verify that you are reading the
rotameter correctly.
Important!
h.
Once you have written down the flow rates,
DO NOT adjust the valves further during that
sampling period.
Finally, detach the rotameter from the tube and put it back in the
Small Parts Box. Do NOT leave the rotameter attached during
sampling, since the plastic in the rotameter and the tubing may
contaminate your sample.
5. Attach the light shields
Make sure the velcro strip on the mylar light shield lines up with the
velcro on the white plastic tube adapter. Wrap the light shield around the
adapter and fasten it by gently running your finger up and down the seam
to press the velcro together. Repeat for the second light shield.
Page 16
6. Determine the wind direction
There should be a piece of orange flagging tied onto the stand that is used
as a wind direction indicator. If the flagging is not there, check the Small
Parts Box—it should be in there. Watch the strip of orange flagging on
the Drift Catcher stand to see what direction the wind is blowing from.
Use the compass to determine the direction by facing into the wind (flag
blowing towards you), holding the compass in that direction, and reading
the compass. Hold the compass flat and allow it to stabilize to obtain an
accurate reading.
Do a common sense check of the direction—does the direction given by
the compass agree with what you know about which way is north at your
location? If so, circle the direction(s) on the Sample Log Sheet. If the
wind is coming from several different directions, just circle all directions
that apply.
Important!
Be sure the compass is well away from large
metal objects (like a car) or electronic devices
that may interfere with a correct reading.
If your compass reading doesn’t make sense or if you are otherwise
having trouble with the compass, see Troubleshooting on page 26.
Page 17
7. Determine the wind speed and temperature
Use the wind/temperature meter to measure the wind speed and
temperature. On some models, the “Mode” button toggles between
temperature, temperature with wind chill, current wind speed, maximum
wind speed and average wind speed. On other models, there will be arrow
keys that step through these functions.
Once you know which direction the wind is blowing from, face that
direction, set the meter to read the average wind speed, hold the meter up
in front of you for several minutes, then read the average wind speed and
write it down in the space provided on the Sample Log Sheet. Step
through the modes until you get to maximum wind speed and write this
value down on the log sheet too.
Push the “Mode” button (or one of the arrow keys) on the wind/
temperature meter until you get to the temperature readout. Wave the
wind meter back and forth rapidly for 30 seconds then IMMEDIATELY
write down the temperature in the space provided on the Sample Log
Sheet. Be sure your hand is not right next to the temperature coil, so you
are measuring the temperature of the air, not your hand.
Important!
You will need to measure wind and
temperature once when you start the pump
and again when you remove the sample
tubes.
8. Describe the weather, odors, and nearby pesticide
applications
On the Sample Log Sheet, circle the best description of the weather or
write in your own. Also circle any odors you can smell or write in your
own description. In the space for other observations on the sheet, write in
whatever you know about when and where a pesticide application might
have occurred.
Page 18
Section 5:
Filling Out the Site
Information Sheet
1.
Go to MapQuest at http://www.mapquest.com and print a map of the
site address both at a large scale and with a blowup view.
2.
Sketch a map of the immediate area, including adjacent streets, in the
space provided on the Site Information Sheet. Use the compass
provided to orient your map and be sure to put an arrow pointing
north on your map. Hold the compass flat and allow it to stabilize to
obtain an accurate reading.
Important!
Be sure the compass is well away from large
metal objects (like a car) or electronic devices
that may interfere with a correct reading.
If you have problems with the compass, see Troubleshooting on
page 26.
3.
Using the tape measure, measure the distance from the Drift Catcher
to possible sources of pesticide drift and to other relevant locations
(e.g., your house, the playground, etc.). Note these distances to the
nearest foot on your map.
4.
Using the disposable camera provided (or if you have a digital
camera, that’s even better), take photographs of the sampler from
angles that clearly show its location relative to the sampling location,
application site, and any other relevant landmarks. Take photographs
of the surrounding area as well, making sure to photograph the source
of potential pesticide drift and affected locations.
Page 19
Section 6:
Stopping the Sample
Allow at least 15–20 minutes to remove and/or change the sample tubes,
record the necessary information, and store the samples properly.
But First!
1. Check to be sure the pump is still running
If the pump is running, proceed to Step 2. If not, make a note of it and any
information you might have about how long it ran before stopping, then
skip to Step 5.
Important!
Leave the pump running! You need to
measure the flow rates before you stop the
pump.
2. Remove the light shields
Carefully remove the light shields by running your finger up the seam and
then unwrapping them from the white plastic tube adapters.
3. Measure the air flow rate
a.
Attach the rotameter to the sample tube on Port A. To do this,
partially unscrew the bottom part of the white adapter (DON’T
unscrew it all the way, just loosen it several turns). Fit the tube up into
the adapter as far as it will go without forcing it, then screw the
bottom part of the adapter shut tight, using only your fingers to
tighten it firmly (no tools!). Tug on the adapter several times to be
sure the tube is tightly attached.
b.
Record the flow rate on the Sample Log Sheet in the Ending Flow
Rate box to the nearest 0.05 unit on the scale. For example, write
down “2.20” liters per minute, not just “2.2”. Have your partner check
your readings to verify that you are reading the rotameter correctly.
Important!
Be careful of the sharp glass on the tube.
Page 20
4. Unplug the pump
After you measure the flow rate, turn off the pump by unplugging it. Look
at the time on the compass provided in the Small Parts Box and write it
down to the nearest minute on the Sample Log Sheet. Don’t forget to
circle AM or PM and write the date in the appropriate boxes under Step
12 on the Sample Log Sheet.
5. Remove the sample tubes
Detach the glass sample tubes from the manifold by unscrewing the white
adapters until the tube easily slips out of the adapter. Do not unscrew the
adapter all the way, just loosen it several turns. Cap both ends of each
sample tube with the red plastic caps from the Ziploc® bag. Carefully but
firmly wiggle them on until approximately 1/4 inch of the sample tube is
solidly into the red caps (see below). Place the two tubes into the Ziploc®
bag.
Important!
Putting the caps on the tubes on is difficult to
do, but don’t give up! If your samples are not
capped, they will not be analyzed because
the pesticide may escape from uncapped
tubes.
Important!
Be careful of the sharp glass on the tube.
6. Determine the wind direction
Use the procedure given on page 17 to determine the wind direction.
Record this information on the Sample Log Sheet.
7. Determine the wind speed and temperature
Use the procedure given on page 18 to determine the wind speed and
temperature. Record this information on the Sample Log Sheet.
Page 21
8. Describe the weather, odors, and nearby pesticide
applications
On the Sample Log Sheet, circle the best description of the weather or
write in your own. Also circle any odors you can smell or write in your
own description. In the space for other observations on the sheet, write in
whatever you know about when and where a pesticide application might
have occurred.
Section 7:
Preparing Trip Blank Samples
A trip blank is used to find out if contaminants might be getting into your
sample tubes from some source besides the sampling process. For
example, if you are using a cooler to hold your samples that has
inadvertently been contaminated with pesticides or other chemicals that
might interfere with your analysis, the trip blank might also become
contaminated. If all is well, your trip blank should come out “clean,” with
no pesticide residues or other contaminants present.
To prepare the trip blank samples, simply take a set of sample tubes, crack
them open, then cap them. Stick the labels onto the Trip Blank Log
Sheet and fill in the blanks, including the project name, your name, the
date and time. Prepare your trip blank samples at the end of your first
sampling period.
Section 8:
Storing the Sample
After you have stopped the pump and finished filling out the Sample Log
Sheet (both sides), the sample should be stored in a freezer or ice chest as
soon as possible. Heat is your enemy and will degrade your sample! Get
the samples to a freezer quickly!
1.
Check to be sure that the labels on the Sample Log Sheet match
those on the tubes.
2.
Fold the Sample Log Sheet, place it in the ZipLoc® bag with the
tubes, and make sure the bag is tightly zipped.
3.
Place the samples in the bubble-wrap bag provided to protect them
and place them in your freezer as soon as possible. Make a note of the
Page 22
date and time the samples were placed in the freezer on the Freezer
Log/Chain of Custody form.
4.
Tape the Freezer Log/Chain of Custody form to your freezer door
for easy access for the next sample.
Section 9:
Filling out the Chain of
Custody Form
The Freezer Log/Chain of Custody (COC) form provides a record of
who is responsible for the samples, how long they have been stored and at
what temperature they were held. Samples stored for too long or at high
temperatures may degrade and give unreliable results when they are
analyzed. If samples are lost during the process of transporting them from
one location to another, the COC form allows you to track where the
sample was lost. You will use this form first when you store the samples in
your freezer and then again when you are ready to hand off a set of
samples to someone else for transport or to the lab for analysis.
The procedure for filling out the COC form when you hand the samples
off to someone else for shipping is as follows:
1.
Fill in the date (or range of dates) for the project and the sampling
location at the top of the form.
2.
Fill in the date (or range of dates) over which the samples were
collected at the bottom of the form. In the Taken By column, put your
initials in the #1 slot and note the method of storage for the samples.
Print and sign your name in the #1 slot at the bottom of the page.
Important!
3.
Your signature here verifies that the
information you entered into the form is true
and correct.
When you hand off the samples to the next person or put them in the
mail for shipping, put your initials in the Given By column and have
the person taking the samples from you put his or her initials in the
Received By column. Every person who handles the samples must
enter their name, signature and method of storage while the samples
were in his or her possession. This doesn’t apply to the express mail
Page 23
carrier, but you should save your shipping receipts on both ends of the
trip so you can verify that the samples made it to their destination in a
timely way.
4.
If you put the samples in the mail for shipping, make a note of the
shipping method and the temperature at which they were shipped.
Each Drift Catcher kit comes with a styrofoam shipping box with
cold packs for this purpose. The night before you ship, place the cold
packs in the freezer. While packing the samples, be sure they are
padded so they don’t break, and use the fastest possible shipping
method so your samples will stay cold throughout the shipping
process.
Section 10:
Handling Trip Spike Samples
A trip spike sample allows you to determine if there is any loss of sample
under the sample handling conditions. Trip spikes will have to be
provided for you by a laboratory and are most useful when you know
precisely which pesticide(s) you will be finding in your samples.
The lab will add a small amount of pesticide(s) you are likely to find to
the sample tube, cap it with the red caps and send it to you in a cooler.
Store the trip spikes in the freezer as sooon as you unpack them, then fill
out the special Freezer Log/Chain of Custody form that comes with the
spikes. If the shipping cooler is no longer cool when you open it, make a
note of this on the form. Be sure to enter the date and time the samples
were received and your method of storage (preferably the freezer, with the
other samples).
The trip spikes should be shipped back to the lab with the rest of the
samples at the end of your sampling run. The lab will analyze the spikes
as if they were samples and tell you the percent of the spiked amount they
were able to recover. If all goes well, the full amount of pesticide(s)
spiked onto the tube will be recovered.
Page 24
Section 11:
Disassembling the Drift
Catcher
When you completely finish your sampling project, remove the final
sample tubes (see Section 6: Stopping the Sample) and dismantle the
Drift Catcher in the reverse order of how it was set up (see Section 3:
Setting up the Drift Catcher).
Return all parts to the plastic box. Use the checklist and the pictures
provided to be sure that all the parts of the kit are present and accounted
for.
Page 25
Appendix A: Troubleshooting
Before sampling:
Q.
Is it OK to set up a Drift Catcher in my city park or near my
child’s school?
A.
Yes. It is OK to sample on public property, although asking
permission is a good idea. Remember that if you sample on public
property, it will be important to stay with the equipment during the
sampling time to keep it from being broken or stolen. Alternatively,
you may wish to work with the property owner to get permission to
place your sampler in a secure location on the site.
Q.
I can’t find a good spot outside. Is it OK to have the sampler in
my house?
A.
Yes. It’s important to measure pesticides in air in places where people
spend time. Putting the pump outdoors is less noisy for you, but
inside is OK too. Make sure to record the specific location of the
sampler. Is it near windows? How many? Are they open or closed? Is
it near a door? Be sure to write down all relevant information. Better
yet, take a picture!
Q.
What if the sample tube is cracked, or the hole I made is too big?
A.
Discard the broken tube and make a note of what happened. Extra
labels and tubes are provided in the Small Parts Box. Peel off one of
the extra labels provided, label it with the sample name on the broken
tube and stick it on the new, unlabeled tube. Put an arrow on the label
pointing the same direction as the arrow on the glass tube (see Figure
6 on page 12 for a picture).
During sampling:
Q.
What if the pump stops?
A.
Be sure you write down on the Sample Log Sheet that the pump
stopped. Feel the pump to see if it is warm. If so, make a note of that
too. Here are some things to check:
Page 26
The air flow could be blocked. Did you crack both ends of the tube
before putting it on the sampler?
The pump might have overheated. Although it runs quite hot under
normal operation, it will overheat if airflow is blocked or if it is in
direct sunlight on a hot day.
The pump might not be plugged in or a fuse may have blown. Follow
the extension cord to its outlet to make sure it is plugged in, and check
the fuse.
Q.
What if I forget about my samples and the pump runs for a really
long time?
A.
While this is not ideal, there is no need to be too concerned for most
pesticides. In fact, if the pesticide you are sampling for is stable, you
will get better sensitivity by allowing the sample to run for a longer
time. What is important is to measure and record the air flow rate, the
time you stopped the pump, and the date, so you know how much air
was pulled through the sample tube.
Q.
I accidentally unscrewed the white adapter all the way and all the
pieces went flying away. What should I do?
A.
If you can find all the pieces, gather them up and clean them off in tap
water, drying them carefully with a paper towel. Dust particles on the
parts will cause the adapter to leak. Reassemble the pieces in the
correct order, using the other end of the adapter as a guide. If you put
it together incorrectly, it will not work, so you’ll know right away.
If you lost the pieces altogether, call us and we’ll send you another
adapter. In the meantime, just close the black valve with the broken
adapter all the way clockwise to turn off the airflow. You will now
ONLY be able to take one sample at a time through the other valve,
but those samples should be fine.
Q.
The rotameter doesn’t respond when I attach it to the tube.
A.
Check to be sure that both ends of the tube are cracked so air can flow
freely through the tube.
Check to be sure the pump is running.
Page 27
Did you unscrew the white adapter all the way and drop some of the
pieces? If the pieces are missing or assembled incorrectly, the
rotameter adapter will leak and no air will pass through the meter.
Is the little metal ball in the rotameter stuck at the top of the meter?
This happens when the air flow on the bottom rotameter nozzle is
blocked and then released suddenly, usually when someone puts their
hand over the nozzle by accident, then releases it suddenly.
Sometimes a sharp rap on a flat surface will dislodge the metal ball. If
this doesn’t work, you’ll need to take the rotameter apart at the top
where the ball is stuck.
Q.
The rotameter is behaving erratically and won’t give a constant
flow reading.
A.
Is the flow through the meter blocked by your hand being too close to
the nozzle on the bottom of the meter? Be sure to keep this area clear
of obstructions
Does the pump sound like it’s varying in pitch? If so, stop the pump
and check the electric cord to be sure it’s plugged in properly and
check to be sure other appliances or equipment are not straining the
capacity of the circuit.
Q.
The compass doesn’t seem to be working properly.
A.
If the word “Distortion” appears in the compass display, you may be
getting interference. Try moving it to another location. If the
“Distortion” indicator doesn’t go away no matter what you do, then
you need to re-calibrate the compass (see below).
If your compass reading doesn’t make sense compared to your
knowledge of where north is, it’s possible that the battery is dead.
Call us and we’ll send you a new compass.
Recalibrating the compass: Push the “ADV” button until the display
reads “Basic.” Then hold down the “ADV” button for several seconds
until the word “CAL” flashes in the display. Press the “ENT” button
and you will see a triangle revolving around a circle. Slowly turn
around in two complete circles in a clockwise direction. (It should
take you about 8 seconds to complete both turns [four seconds each]).
Page 28
Then press the “ENT” button again. You should now be getting a
correct reading.
Q.
Those red caps are really hard for me to get on the sample tube. Is
it OK if I leave them off since it will be in a sealed bag anyway?
A.
No! Hold the tube and the cap close to your body and carefully and
gently wiggle the cap back and forth while you push it on. If you still
can’t get it on, ask someone to help. It is important for the sample
tube to be capped until it is examined in the lab.
Q.
People are asking me about the Drift Catcher in my yard. Can I
tell them about it?
A.
Yes! The Drift Catcher was developed to be a tool for community
members to gather reliable scientific data on pesticides in air. If they
are interested in learning more, give them the PAN or CPR phone
number. Be aware that some people who use pesticides may not want
you to know the pesticide levels of the air you breathe. If you are
uncomfortable talking about it, it is OK to simply say that you are
taking an air sample. If they want to know more, suggest they call
PANNA at (415) 981-1771.
Page 29
Appendix B: Quick Checklist for Drift
Catcher Operation
To ensure good data quality, use this checklist every time you use the
Drift Catcher. For more detail on any of the instructions below, please see
the appropriate section in this Users' Manual.
Set up the Drift Catcher (Section 3:)
1.
Choose a site that will provide representative air concentrations
without undue interference from other airborne contaminants.
2.
Make sure the Drift Catcher is protected from rain and excessive dust
(especially the pump).
3.
Make sure you are close enough to a power outlet so that the
extension cord will reach—but don't plug in the pump just yet!
4.
Assemble the stand and attach the manifold and wind direction
indicator (strip of orange flagging).
5.
On the Site Information Sheet, sketch a map of the site, writing
down the distances you measured on the map. Use the compass
provided to orient your map relative to compass points.
6.
Using the tape measure, measure the distance from the Drift Catcher
to the presumed source of pesticide drift and to other relevant
locations (e.g., your house, the playground, etc.). Make a note of
these distances to the nearest foot on your map.
7.
Take photographs of the Drift Catcher and the surrounding location,
making sure to photograph the source of potential pesticide drift and
affected locations.
Page 30
Start Sampling (Section 4:)
1.
Write the name of your project and the specific location where you
are sampling at the top of the Sample Log Sheet.
2.
Follow the instructions on the Start side of the Sample Log Sheet to
get your sample started.
3.
Don’t forget to write down any relevant observations, especially clues
as to the identity of the pesticide or when it was applied.
4.
Voila! Go have a mint julep on the veranda and let your Drift Catcher
catch!
Stop Sampling (Section 6:)
1.
Follow the instructions on the Stop side of the Sample Log Sheet to
stop the sample properly.
2.
Don’t forget to write down any relevant observations, especially clues
as to the identity of the pesticide or when it was applied.
3.
Place the two sample tubes in a Ziploc® bag along with the Sample
Log Sheet.
4.
Open the trip blank samples and fill out the trip blank form right after
you remove your first set of tubes. Treat the blanks as you would a
sample and get them to the freezer ASAP.
5.
Put the Ziploc bags (with the sample tubes and/or trip blanks with
their respective log sheet) in the bubble-wrap bag provided and put
samples in the freezer ASAP, noting the sample name and the time
and date the tubes were placed in the freezer on the Freezer Log/
Chain of Custody form.
6.
Start another sample if you wish, using a new set of tubes and new
Sample Log Sheet (start at Starting the Sample).
7.
Fill out the Freezer Log/Chain of Custody form when you are ready
to ship your set of samples to the laboratory or hand them off to
someone else for transport.
Page 31