1
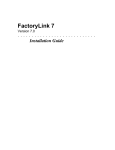
-1-
TECHNICAL INFORMATION FOR
NETWORK TECHNICIANS
Dated: 20.7.2004
Technical Support contacts:
Tel:
01865-888108 (9am-5pm Monday – Friday not including public holidays)
Email:
[email protected]
Online FAQs:
http://www.heinemann.co.uk/secondary/software/centre.aspx?d=s
Support Forum:
http://forums.harcourteducation.co.uk/software/
Please supply:
•
•
•
•
•
Contact details.
Type of system e.g.: Windows 2000 server/Win98SE clients.
Description of problem.
Any steps you have taken to resolve the problem.
Screenshot or full transcript of any error message.
-2-
CONTENTS
Contacts:
Page 1
Contents:
Before you start:
Page 2
Page 3
How to contact us if this Technicians Guide
does not supply the answer.
Technician Manual listings
Information for Network Admins including:
Î What is Métro Électro? – Pack
contents, general info, IIS,
Unsupported Systems.
Î What do you need to know? –
Serial numbers, how to obtain
a permanent code, Upgrading
Î Permissions
Î Paths and Addresses
Minimum
Requirements:
Stand Alone Install:
Page 8
Server and client
Page 10
Network Install:
The role of the
Métro Électro
Administrator:
Installing out of order:
Page 11
Page 16
Installing the content browser to e.g. a
laptop.
Full networking instructions
How to get Métro Électro started
RM Connect 2.4:
RM Community
Connect 3:
Viglen Classlink 2000:
Uninstalls:
Troubleshooting:
Métro Électro licence:
Page 22
Page 24
Page 21
Page
Page
Page
Page
27
28
29
38
What to do if you already have a part
install
FAQs and guidance
-3-
BEFORE YOU START
What is Métro Électro?
Métro Électro is essentially a locally held Intranet site that runs via IIS and is
driven by a database that sits on your server.
It is split into a Pupil Activity Package and a Teacher Presentation Package at
each level 1, 2 & 3.
It uses Macromedia Flash based animations and records pupils progress through
the software to a database. Flash needs to be installed at each workstation using
the software.
It runs through a browser so there is no install to be done on the workstation.
Much like an Intranet site it is accessed through an internal web address e.g.
http://Server1/metro/default.htm.
It does not matter what Windows version you are running on the workstations,
but you will need Internet Explorer 5.5 or above installed.
Métro Électro needs IIS4 (Internet Information Server) or above installed at the
server. Windows NT users will find it as part of the Windows NT 4 Option pack.
Please install IIS4 or above prior to installing Metro if you do not already have it.
You will need to re-boot and re-install if doing so.
Windows 2000 server comes with IIS 5 and Windows 2003 with IIS 6.0 as
standard. More info can be found here:
IIS 6.0:
http://www.microsoft.com/iis
IIS Community:
http://www.microsoft.com/windows2000/community/centers/iis/default.mspx
Your IIS administrator can be found under Start > Settings > Control panel >
Administrative Tools > Internet Information Services.
IIS sits behind your firewall so there should be no concerns about security. If you
have concerns about IIS please see the addresses above.
-4-
Unsupported Systems:
Métro Électro is not designed for:
•
•
•
•
Apache webservers
Novell networks
Linux or Unix networks
Stand alone installs using the system or code discs. Please see Page 10 for
information on installing the content discs.
-5-
What do you need to know?
Métro Électro is a server based product. It MUST be installed at the server.
SERIAL NUMBERS, USERNAMES AND PASSWORDS:
Métro Électro should arrive with a Welcome pack that contains the 60 day serial
codes. If not please use the appropriate one from this list:
60 day trial codes - Metro 1
Pupil Package:
Teacher Package:
4074-94681-364-718
4074-94681-364-571
60 day trial codes - Metro 2
Pupil Package:
Teacher Package:
4074-94681-364-618
4074-94681-364-891
60 day trial codes - Metro 3
Pupil Package:
Teacher Package:
4074-94681-364-477
4074-94681-364-715
It is possible to extend this trial period by 30 days if needed. Please contact us for
further details. Extensions are granted at our discretion.
The 60 day trial period starts from the day of installation. Once the trial period is
over you will be prompted for a permanent code to unlock the software.
OBTAINING THE PERMENANT SERIAL CODE:
1. Call our Technical Support team on 01865-888108 with your invoice
number.
2. We will check the invoice has been cleared and then we will issue you with
your serial code. Please have your phone number, which levels of Métro
Électro you need a code for and a contact name.
3. It will be in this format:
XXXX-XXXXX-XXX-XXX
•
•
Network version: you input the hyphens
Standalone version: you put it in 4 boxes - no hyphens needed
To obtain your code the invoice needs to be paid in full and recognised as such on
our system.
UPGRADING WHEN YOU HAVE YOUR NEW NUMBER:
1. Log into Metro as the Métro Électro Administrator > Click "Upgrade".
2. Enter your new code(s) and click to show you have accepted the licence
agreement.
-6-
Permissions:
•
The virtual directory needs to be able to be accessed by the Microsoft
Guest user (anonymous user) account: “IUSR_servername”.
•
NT 4.0: If you do not have an Anonymous User account you can't
manually "create" the IUSR account, it needs to be created, (in IIS4 at
least), by the installation of option pack 4. If it's not, then the only option
is to reinstall option pack 4. If you manually create it IIS cannot use it
properly as it is unable to automatically control its associated password.
The ISUR account itself is the "property" of IIS. A machine that doesn't
have IIS installed on it will not have an IUSR account; it is actually created
by IIS.
•
You may also want to apply the profile “everyone” with “full control” over
the heinemann online directory and inherit/cascade it down the path.
-7-
Paths and Addresses:
The default install path at the server is:
C:\program files\heinemann online
You are able to browse to another location if needed.
The default install path for the virtual directory is in IIS:
Servername > Websites > default websites > Metro
The default URL after install is:
http://<servername>/metro/
If you have Flash already installed on the client the URL will display as:
http://<servername>/metro/yesflash.asp
Shortcuts or browser favourite links will need to point to the full
http://servername... address.
-8-
Minimum Requirements
Server requirements:
•
•
•
•
•
•
Windows NT4 Server with service pack 6a, Option pack 4 or Windows 2000
server with service pack 4 or Windows 2003 server
Internet Information Server (IIS) 4 or above
Processor: 500 MHz Pentium
A minimum of 128 MB memory (256 MB is recommended)
500 MB free hard disc space
Network 10 BASE-T Ethernet or 10/100 Ethernet
(MDAC 2.7 and JET 4 are also required – these will be installed by the system disc
if required.)
Client PC requirements for Pupil Activity Package(s)
233 MHz Pentium II processor
A minimum of 64 MB RAM (128 MB is recommended)
Colour depth: minimum 16 bit colour (True Colour (32 bit) is recommended)
Windows 98SE, NT4 Workstation, 2000 or XP
Sound card
Screen resolution set at 800 x 600 pixels
Internet Explorer 5.5 or later
Flash Player 6 plugin or later
Headphones or speakers
(Microphones as an optional extra)
Client PC requirements for Teacher Presentation Package(s)
233 MHz Pentium II processor
A minimum of 64 MB RAM (128 MB is recommended and 256 MB is recommended
for playing the videos)
Colour depth: minimum 16 bit colour (True Colour (32 bit) is recommended)
Windows 98SE, NT4 Workstation, 2000 or XP
Sound card
Screen resolution set at 800 x 600 pixels
Internet Explorer 5.5 or later
Flash Player 6 plugin or later
Additional requirements for Teacher Presentation Package(s)
•
•
•
•
•
•
Standalone or networked computer (can be a laptop) in classroom where
Presentations will be projected.
Data projector and screen or interactive whiteboard
Classroom-quality speakers
Microsoft Word 2000 or later (to view Teacher Notes)
Adobe Acrobat Reader 4 or later (to view Grammar Worksheets)
Windows Media Player (to play videos)
-9-
Server compatibility:
Microsoft® Windows® NT4 server
Microsoft® Windows® 2000 server / advanced server
Microsoft® Windows® 2003 server.
All should have latest service packs installed.
Management system compatibility:
RM Connect 2.4
Community Connect 3.0 Note - No msi is required as no client install
Client workstation components:
Networks with workstation restrictions: Flash 6 plugin and the voice
recording components may need to be installed over the network.
The latest Flashplugin can be downloaded from the Macromedia website. You will
need to be connected to the Internet.
1. Open Internet Explorer and type in
www.macromedia.com/go/getflashplayer/
2. At the Flash Player Download Center page click on the 'Install Now' button.
Depending on your security settings, you may see a Security Warning
Dialog box. Click 'Yes' to accept the ActiveX control.
3. When you see the Macromedia Flash Player Logo and text the installation
was successful.
If you have any trouble installing the Flash Player, consult
www.macromedia.com/support/flash/ts/documents/playerfaq.htm
The voice recording components (needed for Pupil Activity Package(s) only) can
be installed using the ‘setup.exe’ file in the following folder on the system CDROM: “Harcourt Education Voice Recording”. Follow your network provider's
instructions on how to load these extras onto client PCs.
Other Windows networks: the first time Métro Électro is used on a client PC a
message will display if Flash version 6 or later is not detected. The message
includes a link to the Macromedia download website (see above).
On the first occasion a voice recording activity is used the system will prompt you
to install the voice recording component. The component must be allowed to
install for voice recording to work.
- 10 -
STAND ALONE INSTALLATION
The Content browser is designed to be used as a way of presenting the content
to a whole class via e.g. a laptop and interactive whiteboard.
Some teachers use the content browser as a way of evaluating Métro Électro if
they cannot get a network installation arranged. You can run it on your laptop to
view Metro content. Although please bear in mind that the real functionality is
unlocked when you install the system and content discs over your network.
1. Insert the CD into your CDROM drive, the CDROM should run
automatically.
If your PC does not support autorun:
1. Go to My Computer and double-click on your CD-ROM drive.
2. The CD-ROM should run.
If it does not run, but instead displays a list of the files on the CD-ROM:
1. Double-click on the file “metroelectroX_teacher.exe” (where X is the level
of Metro you are using and the teacher/pupil name will of course change
too).
It will immediately prompt you for a serial number:
You need to enter the same code for the appropriate level as you would enter for
the full network version. Except in this instance you do NOT need to include the
hyphens.
Click OK when done. If you see the error message “invalid serial number” please
check you are inputting the right code for the right teacher/pupil/level
combination. Codes are printed on Page 4.
If this does not solve it please see the Trouble shooting section of this manual
and the question: “Problems with the "content browser" (stand alone disc)
serial code.”
Then you will see the Welcome screen. Please now follow the
instructions as laid down in the user manual.
- 11 -
NETWORK INSTALLATION
INSTALL AT THE SERVER
A system disc is supplied with both the Pupil Activity Package(s) and the Teacher
Presentation Package(s) at each level of Métro Électro (1, 2 or 3). You only need
to install the system disc once at each level, even if you are installing both the
Pupil Activity Package and the Teacher Presentation Package at that level.
Install the system disc first, before any content disc(s).
NOTE:
The levels of Métro Électro are designed to be installed in order.
You cannot easily install, for example, a Métro Électro 1 package over
Métro Électro 2 or 3 package(s). If this effects you for further
information, see Page 21 “Installing Métro Électro out of order”.
Otherwise please follow the instructions as follows. All installs must occur directly
at the server.
1. Place the system disc in the CD drive on your server. The disc should start
the installation process. During installation the default options will usually
apply.
2. During installation you will be asked to agree to the trial period Licence
Agreement. You must agree to this in order to complete the installation.
- 12 -
3. You will be prompted to select a destination for the program files and
content. The default is C:\Program Files.
4. You may be prompted to choose a website on your web server. All
websites on your server will be listed. In most cases the website to choose
will be 'Default Website'.
- 13 -
5. Select the 'Typical' setup type.
6. Once the system disc has completed installation and you have carried out
any reboots as prompted by the installation routine, insert the Teacher /
Pupil Activity Package content disc(s) into the CD drive. The disc will
autorun. Accept the defaults displayed on screen and the content will be
placed in the destination folder as chosen during system install.
7. Once the first content disc has installed, repeat the process with any
additional pupil / teacher content disc(s).
8. From the desktop click on Start/Programs/Métro Électro/Launch Métro
Électro.
9. Enter the user name 'admin'. You will then be asked to change the
password.
10. Enter the serial number for the package / one of the packages that you
have. If you have more than one content package you will need to log into
Métro Électro using your administrator user name and password. Click on
'Upgrade' and enter the serial number to enable access to each additional
package. You must agree to the User Licence before you can log in.
- 14 -
Installation Advice
1. During installation you will be asked to "select a website from the options
below". The install routine has simply scanned your IIS settings and listed
the websites that Métro Électro could be installed under. Usually there will
only be one ("Default Website"), but you can choose a more suitable area
if you wish.
2. During install please make a note of the Install Path, Root website
and Client shortcut. The client shortcut is the address that you would
cut and paste into your workstation browser address bar to open Métro
Électro.
It can be found by opening Start > Programs > Métro Électro > Server
Information to open "Metroserver.txt" or browse to Start > Programs >
Métro Électro > Launch Métro Électro (the first way simply opens the text
file with the addresses in it, the latter opens a browser with the address
already entered).
Either listed address would do.
Example addresses:
http://Server1/metro/default.htm
http://172.168.169.224/metro/default.htm
You HAVE to enter one of the addresses quoted in your "metroserver.txt" file. If
you physically browse to the default.htm page it will NOT work and all that will
appear in your browser window is pages of ASP code.
- 15 -
If one address does not work try the other.
Please also try entering your IP address and servername into the exceptions field
of the workstation browser (Tools > Internet Options > Connections > LAN
Settings > Advanced > Exceptions) if you receive a "Page not found" error.
Métro Électro is essentially a local website so your proxy server does not
necessarily have to be involved.
After installing the system disc you will need to install the content disc(s).
- 16 -
THE ROLE OF THE MÉTRO ÉLECTRO
ADMINISTRATOR
Creating teacher users
One user needs to be assigned the role of Métro Électro administrator (this could
be the network manager or a member of the MFL department). This user logs into
Métro Électro using the administrator login. The administrator adds all teacher
users using the 'Add Users' tab on the Administration home page. The
administrator creates user names and passwords for the teacher users. The
Teacher then creates pupil records as discussed in the user manual.
Technical knowledge of the network is not required to carry out system Métro
Électro administration tasks. You will need an administrator user name and
password to use the administration functions.
Administrator log-in
After the network manager has installed Métro Électro on the school's server,
they (or a designated administrator) must log in as:
user name: admin
They are then directed to the Administrator home page. On first logging in, the
administrator must enter the serial number(s) for the package(s) just installed.
The 60 day codes are included at the beginning of this manual or with an
accompanying Welcome letter. Permanent codes are obtainable from Heinemann
ICT support (tel: 01865 888108) – THEY CANNOT BE ALLOCATED UNTIL THE
INVOICE HAS BEEN PAID IN FULL.
The Licence Agreement must be agreed to before the serial number is accepted
(just check the box).
On first using the system, the administrator is asked to change their password
and can also change their user name.
- 17 -
On subsequent log-ins the administrator will see a welcome screen:
Administrator menu
The menu panel is located on the left hand side of the screen. The features
available via the menu are as follows:
Upgrade:
This page lists all the packages registered on the system and allows the
administrator to register new packages. Each new package installed requires a
new serial number. The Licence Agreement must be agreed to before the serial
number is accepted by the system. (The 'Enter new serial number' button only
becomes active once you have checked the User Licence agreement box.).
When entering the code into the network version you need to include the
hyphens.
- 18 -
Change Password:
This page allows the administrator to change their password. It is good practice
to use passwords that contain two numbers and are at least eight characters
long.
Add New User:
The administrator must add teacher users before teachers can access
Métro Électro.
Select the title from the drop-down menu and type in:
•
•
•
•
first name
last name
user name and password. (note that only the administrator can change a
teacher user's password)
Select the 'Group' (Teacher or Administrator) from the drop-down menu.
It is good practice to have more than one administrator.
Pupil users are added by teachers (Pupil Activity Packages only).
- 19 -
Edit Users:
This page displays a list of all users registered on the Métro Électro system. Only
'active' users are listed on this page.
Î Users who have been deleted do not appear on the page and must be
re-entered.
Î Pupil users and classes who have been deleted by Teachers can be “reactivated” by the Métro Électro administrator.
Note:
Deleted administrators and teachers cannot be recovered; their information will
have to be entered again if they are deleted. There are two warnings before
deleting is successful.
Clicking the 'Edit' link beside a user brings up the 'Amend User Details' screen.
Any of the user's details can be changed, including title, first name, last name,
user name and password.
Clicking the 'Delete' link on this page brings up two warnings before the user can
be deleted successfully.
Please note that when a teacher user is deleted, all that teachers' classes and
records are deleted from the system. You may choose to do one of the following:
1. Leave the teacher on the system, even if they have left the school
or
2. Edit a former teacher's details, changing them to those of a different
teacher within the school.
- 20 -
Edit Classes:
(This feature is only used when Pupil Activity Packages are installed.)
This page lists all classes registered on the system: both active and deleted. As
administrator you can reactivate a class that has been deleted by a teacher, by
clicking the 'Activate' link.
To delete a class permanently, click the 'Delete' link. This will bring up a warning
asking you to confirm permanent deletion of the class.
All class administration is done by a logged in Métro Électro Teacher user.
- 21 -
Installing Métro Électro out of order
The Métro Électro software is designed to be installed in the order of the levels 1,
2, 3. You can install a Métro Électro 1 package after Métro Électro 2 and/or 3
packages are already installed on your server; just follow the procedure described
below.
This procedure must be followed so that the user database is made compatible
with the installed Métro Électro levels. The user database is used by the Pupil
Activity Package to store information about pupils’ results, as well as custom
activity sequences. The database is used by the Teacher Presentation Package to
store information about custom presentation sequences. It is also used by both
these packages to store information about user names and passwords.
If Métro Électro 2 and/or 3 packages are already installed on your server, do not
install the Métro Électro 1 system disc. Follow these steps to install Métro Électro
1 Pupil Activity Package or Teacher Presentation Package on your server.
1. If you do not wish to install Métro Électro 1 Pupil Activity Package, skip to
step 4. Otherwise, install the Métro Électro 1 Pupil Activity Package
content disc. Do not install the Métro Electro 1 system disc.
2. Insert in the CD drive the content disc for any one of the Métro Électro
packages at levels 2 or 3 that are already installed on your server.
3. Allow the disc to autorun and select the “Repair” option from the screen it
presents.
4. Repeat steps 1 to 3 for Métro Électro 1 Teacher Presentation Package if
required.
You will need to use the same procedure if you are installing a Métro
Électro 2 package or packages on a server which already has Métro Électro 3
installed.
Note:
If you are installing the levels of Métro Électro in order, you should use
the system disc as well as the content discs for each package that you are
installing. In this case, follow the normal install routine as described on Page 11
“Network Installation”
You may want to make a back up copy of any Métro Électro databases before
attempting an out of order installation for contingency reasons. We cannot
recover lost data.
- 22 -
RM Connect 2.4
Métro Électro MUST be installed DIRECTLY on the server, NOT at a workstation.
IIS4 (Internet Information Server) and SP6a (Service Pack 6a) must also be
installed to the server. If you have needed to install IIS4 please remember to reapply SP6a afterwards. Please see the minimum requirements for more
information.
Follow the general installation instructions on Page 10.
Things to watch out for :
1. Do the install at a time of day when the server can be rebooted. This may
have to be done 2 or 3 times during the install. The product requires
Windows Installer 2.0, MDAC 2.7 and Jet 4.0a to be on the server. If they
are not present, Métro Électro will put them on during setup. Both the
installation of Windows Installer 2.0 and MDAC 2.7 will force reboots.
These reboots must not be ignored.
2. Rarely Connect 2.4 servers produce an "ADOB error" after Métro Électro is
installed and you have entered the serial number. This is caused by Jet not
having updated correctly. Installing the Jet SP provided in a folder at the
root of the Métro Électro System disc and then REBOOTING the server will
cure this.
3. Workstations require the Internet Explorer Flash plugin and a voice
recording package to be loaded before Metro can be used. Ideally IE5.5
should be present on the machines as well, but this is not easy to achieve
on RM Connect 2.4 and IE5 will suffice. For more info on installing
packages to RM Connect 2.4 workstations please contact RM Support or
see the info below:
Packaging The Flash plugin:
The Flash plugin needs to be packaged and delivered to all machines that will be
running Métro Électro. It is very important that the correct plugin is used as some
versions of Flash enable Flash content to be displayed, but do not work correctly
with IE. It is recommended therefore that the following method is employed :
On a workstation:
1. Log on as an Administrator and start the RM Application Wizard. Select the
“Create a new application package” option.
2. Instead of selecting a command line for the installation, select the “No
installation program” box.
3. When you are prompted to make the changes you wish to make, navigate
to the Macromedia web site. The exact URL you need is (at time of
writing): http://www.macromedia.com/go/getflashplayer/. Install the free
Flash plugin.
- 23 -
4. Once the plugin is installed, restart the RM Application Wizard and
continue building the Flash package. Once the build is finished exit the
wizard.
Packaging The Harcourt Education Voice Recorder:
The files for the installation are contained in the “Harcourt Education Voice
Recording” folder on the root of the Métro Électro System CD.
On a workstation:
1. Log on as an Administrator and start the RM Application Wizard. Insert the
Métro Électro System CD and select the “Create a new application
package” option.
2. This time there is a command line for the installation which is “D:\Harcourt
Education Voice Recording\setup.exe” (where “D” is the drive letter of
your CD-ROM drive).
3. Once installed, run the RM Application Wizard again and continue building
the voice recording package.
4. Once the build has finished, finish the RM Application Wizard.
Allocating the Flash and Voice Recorder packages:
Once the packages have been made RM Application Wizard needs to be run again
to allocate the two new packages to the workstations that will be running Métro
Électro (for more info on allocating packages to RM Connect 2.4 workstations
please contact RM Support).
Adding a shortcut to the Workstations:
You may wish to add a shortcut for Métro Électro to a suitable topic by using the
Topic Manager.
The url for the Metro Intranet will be e.g. http://your_server_name/metro. The
Métro Électro icon is called “M.ico” and can be found in:
……\your_server_installation_path\Heinemann Online\Metro.
- 24 -
Community Connect 3
Métro Électro MUST be installed DIRECTLY on the server. IIS5 and the latest
Windows 2000 service pack, (SP3 at time of writing) must also be installed. IIS5
is standard part of Windows 2000 and is usually pre-installed on Community
Connect 3 servers.
Follow the general installation instructions on Page 10. There is no need for an
MSI as the entire install is done at the server.
Things to watch out for :
1. Do the install at a time of day when the server can be rebooted although,
if the server has the latest service packs installed as above it is unlikely
that any reboots will be required. Do not ignore any requests for a reboot.
2. Client stations require the IE Flash 6 plugin and a voice recording package
to be loaded before Métro Électro is used. The Flash 6 plugin can be
downloaded individually to each client machine or, as with the voice
recorder msi, can be packaged and delivered to the clients.
3. Community Connect 3 servers have a "Default Website" in IIS5, but it is
disabled by default. The installation should therefore be pointed at the
"Intranet" website instead.
4. Occasionally, during System disc installation, a DLL registration error
occurs. This will be of the form "Error 1904. Module
C:\WINNT\System32\msxml4.dll failed to register. HRESULT 2147319780". Should this occur simply click on "Ignore".
5. Some CC3 servers have a rather unusual Anonymous user account of the
form IUSR_24234562457 - i.e. a serial number. This can cause the install
to stop with an Install Shield error 1609. Please see the fix on page 21.
Downloading the Flash plugin to each client machine:
The Flash plugin needs to be loaded on all machines that will be running Métro
Électro. It is very important that the correct plugin is used as some versions of
Flash enable Flash content to be displayed, but do not work correctly with IE. It is
recommended therefore that the following method is employed :
On a workstation:
1. On each client machine that will be using Métro Électro log on as an
administrator.
2. Navigate to the Macromedia web site. The exact URL you need is
http://www.macromedia.com/shockwave/download/download.cgi?P1_Prod
_Version=ShockwaveFlash&P5_Language=English. Install the Flash plugin.
3. Once the plugin has been installed on a client machine then it is available
for all users of that machine.
- 25 -
Packaging The Harcourt Education Voice Recorder:
On a workstation:
The files for the installation are contained in the "Harcourt Education Voice
Recording" folder on the root of the System CD. A Métro Électro Voice
Recording.msi, (Windows Installer Package), is included on the disc for the voice
recording software.
1. Log onto a workstation as an administrator. Browse to the "Applications"
folder on the "Q" drive, (The package share on the server), and create a
folder structure to store the voice recording package in as per your RM
instructions. Note - there is no shortcuts folder for the package as all the
install does is place files in a given folder on the client machine(s).
2. Log onto the server as an administrator and run the RM Management
Console. Use the "Update Package List" option to make the voice recorder
package visible.
3. Allocate the voice recorder package to any workstations that will be
running Métro Électro and then reboot the workstations to enable the
allocation to take place.
4. You may wish then to add Métro Électro to workstation IE favourites and /
or the desktop learning resources. To do this, on the server, log on as
systemadmin and open the RM Management Console. You may need to
add a new subject area for French which can be done via "Create New
Staff Subject Area" in "Staff Subject Areas".
5. Having added the French subject area, go into "Create a Learning
Resource". The url for the Metro Intranet will be
http://your_server_name/metro.
Please be aware that the Pupil and Teacher discs are purely content files.
- 26 -
RM CC3 server install error 1609 while installing Métro Électro:
Reason: On RM Connect servers IUSR_servername does not exist. Instead the
servername is replaced by the server’s serial number and even if changed this
will be purely cosmetic and still will not be recognised by Métro Électro.
Fix: Create a user in Active Directory Users and Computers (2000/2003). The
details of the users account are below:
Once the Métro Électro install is complete delete the account and then add the
real IUSR_RMserialnumber to the NTFS permissions of the Métro Électro
databases folder with full control. For a default installation the path will be
“C:\Program Files\Heinemann Online\Databases.
- 27 -
Viglen Classlink 2000
Métro Électro can be installed on Viglen ClassLink 2000 networks by following the
network installation instructions on Page 10. The following points should be
noted, however:
1. The product CDs must be loaded directly onto the server.
2. The Flash plugin should be downloaded to each workstation that is going
to be using Métro Électro - this must be done whilst logged on to the
workstation as an administrator.
The Métro Électro voice recording package installation should be run on each
workstation that is going to be using Métro Électro - this must be done whilst
logged on to the workstation as an administrator.
- 28 -
Uninstalls
At the server:
Control Panel > Add/Remove programs > Métro Électro > Add/Remove in full.
Please be aware that the Uninstaller does not delete the Log file or the folder
structure.
To completely remove Métro Électro from your network:
Uninstall through Add/Remove > reboot > delete folder structure from hard disc.
The default path is:
C:\Program Files\Heinemann Online\
At the workstation:
NOTE:
There is no workstation install as it runs through a browser, much like a website.
If you have created a shortcut on the workstation desktop simply move it to the
Recycle Bin.
If you wish to uninstall one out of two or more Métro Électro packages then the
other package(s) may not work, but this is overcome by following the procedure
described below.
This procedure must be followed so that the user database is made compatible
with the installed Métro Électro packages. The user database is used by the Pupil
Activity Package to store information about pupils’ results, as well as custom
activity sequences. The database is used by the Teacher Presentation Package to
store information about custom presentation sequences. It is also used by both
these packages to store information about user names & passwords.
1. Uninstall the package as normal using Start > Settings > Control Panel >
Add/Remove Programs > Remove.
2. Insert in the CD drive the content disc for the highest level Métro Électro
package that is still remaining on your server.
3. Allow the disc to autorun and select the Repair option from the screen it
presents.
- 29 -
TROUBLE SHOOTING
If you experience a problem that isn’t listed here please try to take a
transcript or screenshot of the error message as we may request that info if
you contact us. If there is no clear error being reported in the browser window
please check you have “friendly HTTP error messages” switched off before
refreshing the page to see if the error reporting changes.
Browser > Tools > internet options > advanced > uncheck "show friendly http
error messages".
Checklist:
Métro Électro MUST be installed DIRECTLY on the server, NOT at a
workstation. IIS4 (Internet Information Server) and SP6a (Service Pack 6a - if
you are using NT4.0) must also be installed to the server. If you have needed
to install IIS4 please remember to reapply SP6a afterwards and reboot. Please
see the minimum requirements for more info.
More info on Service Pack 6a:
http://www.microsoft.com/ntserver/nts/downloads/recommended/SP6/allSP6.
asp
- 30 -
Question:
What is the difference between the standalone and network versions of
Métro Électro?
Answer:
The Teacher standalone disc is designed for teachers to prepare and present
lessons using the animations at the front of class from their laptop onto e.g. an
interactive whiteboard. The Pupil standalone disc is really just an evaluation tool
so you can view the content without running a network install.
The network version contains all the functionality. It records pupil data to the
server providing excellent diagnostic feedback amongst a range of other things.
Please see the website for more info www.metro-electro.co.uk
While it is possible to load the Standalone version onto each computer in a
network, we cannot think of a good reason to do so as this would result in a
decrease in functionality.
1 None of the scoring would work
2 The recording activities would not work
3 The customisability would be much reduced.
If this is what the teacher wants to do, you are welcome to go ahead, but as we
do not recommend this we would not be able to give support. If your network
manager in the school is unsure about installing the network product on the
school network, they will receive full support from us on (01865) 888108.
There is only one package available for each version of Métro Électro, this is the
complete network version with site licence (including standalone disc that was
prepared for previewing the activities on home computers by teachers).
Question:
Error logging in with correct username: "Sorry, the username you
entered does not exist"
Answer:
If you log in with a perfectly valid username and password and you see this
message, it could be because per session cookies are disabled.
Your local intranet security options don't allow session cookies. This can be
changed through Tools > Options > Security. If your settings are "greyed out" on
your browser it was probably set up by a third party. Check with your
hardware/software vendor to see if this setting can be amended.
Otherwise please log into Métro Électro as an Administrator or Teacher user to se
if you can amend details there.
- 31 -
Question:
I have installed ME but the browser window simply shows the ASP code
instead of the graphics.
Answer:
There 2 things it might be:
1) ASP is a server side scripting technology and as such the .asp pages need to
be served via a webserver (IIS) and not just loaded in the browser. You may be
trying to just load the .asp page in IE rather than let the server do its work.
E.g. the following links will reproduce the error.
//servername/metro/default.asp
OR
c:\program files\metro\default.asp
Where as the following (replicated in metroserver.txt too) will work:
http://servername/metro/default.asp
Question:
Error In browser window:
Microsoft VBScript runtime error '800a01f4'
Variable is undefined: 'session'
Answer:
This could be because "Session State" is not enabled in IIS for the Métro Électro
virtual directory - in fact it may be disabled for the entire root web.
Within IIS > on the Metro virtual directory (Heinemann_online) Right click >
select "properties" > Go to the "Configuration Tab" and make sure that "Enable
Session State" is enabled in the "App Options" tab.
- 32 -
Question:
Error In browser window:
"Active Server Pages error 'ASP 0131'
Disallowed Parent Path
...asp, line xxx
The Include file '../../copyright.asp' cannot contain '..' to indicate the
parent directory."
Answer:
This is an IIS security issue, and one that is not a default option when you install
IIS (may happen on 2003 servers):
1. Within IIS > on the Metro virtual directory (Heinemann_online) Right click
> select "properties" > Choose the “Home Directory” tab > then click on
the "configuration tab"
2. Then make sure the "enable parent paths" checkbox is checked in the
options tab.
- 33 -
Question:
I cant use/have forgotten my admin password.
Answer:
This may happen if the details for the administrator log in have been changed, or
are no longer "admin/admin".
You can solve this by deleting a file called 'serial.txt' from the "serial" folder on
your server. If installed on a default path the file can be found in:
C:\Program Files\Heinemann Online\websites\Metro\serial
When the user re-opens Métro Électro the will be asked to create a new
administrator and enter their serial code. This will allow all users, teachers or
pupils to remain in Metro and is much easier than reinstalling the whole program.
Question:
Métro Électro keeps asking for a serial code every time I try to use it, and
will not load fully.
Answer:
There are two discs for Métro Électro Network CD-ROM, both discs must be
installed to prevent this occurrence. Once both discs have been installed the
serial code can be entered, and the program should work.
Question:
Error In browser window:
"Error 1311, source file not found"
Answer:
This may happen on a Windows 2000 server (possibly with RM Community
Connect 3 users also).
This behaviour may occur if the Windows server security policy is set to restrict
CDROM access to the locally logged-on user only. The Windows Installer does not
install the software as the locally logged-on user; if that policy is in effect,
Windows Installer cannot access the CD.
To resolve this problem, simply copy the contents of the Métro Électro System
CDROM to a folder on your hard disc e.g. to the desktop or to a network share,
and then run “setup.exe” from this folder.
More info can be found here:
http://support.microsoft.com/default.aspx?scid=kb;en-us;290896
- 34 -
Question:
Problems with the serial code on the Network version:
Error:
"XXXX-XXXX-XXX-XXX is a valid serial number, but has already been activated.
Please enter another serial number to upgrade"
Answer:
This is probably a confliction with your Windows time settings. Even when you
change the locale of your server to UK it doesn't change what is known as the
default locale. ASP uses the default locale to do its date comparisons and
consequently relies on the correct locale setting.
Resolution:
NT4 server - Go to Control Panel > Regional Settings. Make sure the settings are
"English (United Kingdom)" and then tick the "Set as system default locale" box
at the bottom of the page and click "Apply". It may ask for the NT4 server CD,
although RM2.4 machines may not, but just follow the instructions. The server
will need to be rebooted, however.
Win2000 server - very similar except there is a "Set as default" button rather
than a tick box and it brings up a list. Set it to UK again. Win2000 seems to have
all the files it needs to do the job so you won't need the CD, but it will need a
reboot.
Once you've reset the system locale, uninstall the Metro system disc and reinstall
it. The content installs are fine and can stay there.
Question:
Problems with the "content browser" (stand alone disc) serial code.
Answer:
There are two reasons for the failing trial serial codes on the Métro Électro
Standalone CD ROMs.
USER ERROR: please check you are inputting the right code for the right
teacher/pupil/level combination. You need to tab form one box to the next in this
format:
XXXX-XXXXX-XXX-XXX
or
TECHNICAL ERROR: Once the CD ROM has been installed on a PC you may
have difficulties logging in as another user and accessing the software. It will
prompt you to enter the serial code again and then it either crashes or claims
"serial code invalid", even though you are using the right code. This may be due
to the security on the registry. You can install the software on another PC as a
new user, enter the serial code and this will work fine.
- 35 -
These issues apply to Windows 2000 and will therefore probably apply to XP
Professional as well, but not Windows 95 or 98.
Windows 2000 user permissions:
If you create a user on Windows 2000 this automatically adds them to the
"Users" group, but will only give them what is termed "Restricted" access, in that
they cannot install software, change the registry, etc. A "Standard" user,
however, has Power User status and can do a lot of the things that an
Administrator can do.
If you install the standalone disc as a restricted user AND NOBODY ELSE it will
work, but will ask for the serial number every time as it can't write to the
registry.
If the disc is EVER installed as either an administrator or a Standard User on that
machine the registry entry will be made and after that the restricted user will just
get a "C++ runtime error" every time they try and run it.
A typical scenario:
A Teacher has a school laptop, gives it to the network technician to load the
standalone disc on. He/she logs on as administrator and it all works successfully.
The Teacher connects the machine to school network and logs on - all is fine
again as the machine should have all Domain Users set up as local admins.
The Teacher then goes home and logs on locally to the machine using an account
they use so they can do some personal work as well. Result - The Teacher is
likely to be a restricted user and they get a runtime error.
Resolution:
Make sure that all users that log on to the machine are, at the very least,
"Standard" users. You can set this by going into Control Panel and selecting
"Users and Passwords". If you look at the user properties you will see the
following :
- 36 -
Question:
Error In browser window:
The page cannot be displayed
There is a problem with the page you are trying to reach and it cannot be
displayed.
Microsoft JET Database Engine (0x80004005)
Could not find file 'c:\program files\merto\heinemann
online\databases\metro_content.mdb'.
/Metro/common/functions.asp, line 194
Answer:
You need to install the content disc as well as just the system disc.
- 37 -
Question:
Error in browser:
Description : Operation must use an updateable query.
Source : Microsoft JET Database Engine
Help Context :5003073
Help File :
Error Number : -2147467259
Answer:
This is a permissions issue. It is rare as the correct permissions should be applied
during the install routine.
The "internet guest account" will be a user called "IUSR_[servername]" and it
needs to be added to the following directories and "Modify" permissions applied
(Make sure that these folders are set to propagate the settings to any
subfolders/files:
Assuming that [INSTALLDIR] is the default c:\program files folder
[INSTALLDIR]\Heinemann Online\databases\
[INSTALLDIR]\Heinemann Online\websites\Metro\serial\
[INSTALLDIR]\Heinemann Online\websites\Metro\uploads\
NOTES:
All external support links were current at time of writing.
- 38 -
Metro Electro Licence
HARCOURT EDUCATION LIMITED
LICENCE AND WARRANTY: MULTI-USER/SITE WITH PRIVATE HOME USE (60
DAY TRIAL)
Product: Métro Électro
Licence Terms:
(i)
for use on an unlimited number of computers, or on an internal network,
within the purchasing institution.
(ii)
for private use only by individual members of the purchasing institution,
outside the purchasing institution.
for sixty (60) days from installation of discs.
This is a legal agreement between you, the purchasing institution and
Harcourt Education Ltd (‘Harcourt’) relating to the enclosed software or
database product ('the Product'). In using the Product you agree to be bound
by the terms set out below. If you do not agree to these terms, return the
Product and all accompanying materials and the purchase price will be
refunded to you.
1. Copyright
© Harcourt Education Limited 2003. A member of the Reed Elsevier Group plc
group of companies. All rights reserved. The Product and all data, software,
documentation and other materials contained in it together with the
accompanying materials and all intellectual property therein are the property
of Harcourt or its suppliers and are protected by law. Heinemann is a
trademark of Harcourt Education Limited.
All other trademarks appearing on the Product are the property of their
respective owners.
The provisions of this clause shall continue in force after expiry or termination
of this licence for any reason.
2. Licence
Harcourt hereby grants you a non-exclusive, non-transferable licence on the
terms in this Agreement to use the Product for its intended purpose only as
set out in the accompanying documentation.
- 39 -
3. You may not:
a. Copy the Product, other than to make a single backup copy or as part of
the installation procedure.
b. Distribute copies of the Product or accompanying materials to any third
party.
c. Modify, adapt, translate, reverse engineer, decompile, disassemble, or
create derivative works based on the Product or accompanying materials
other than as specified in the accompanying documentation.
d. Copy, download, save, store in a retrieval system, publish, transmit, to
otherwise reproduce, transfer, save store, disseminate or use, in any form or
by any means, any part of the data contained within the Product, unless
specifically stated in the accompanying materials.
e. Transfer, resell, or grant any other rights of any kind to any individual copy
of the Product, including the accompanying materials, to any third party.
f. Remove any proprietary notices, labels or makes on the Product or
accompanying materials.
4. Permitted use
You may annotate, copy or print out sections of text or pictures only where
expressly allowed in the Product and the accompanying materials, solely for
use within your institution.
5. Warranty of original discs
Harcourt warrants that the original discs on which the Product is delivered are
free from defects in material and workmanship, assuming normal use, for a
period of ninety (90) days from the date of purchase. If a defect occurs during
this period, you may return the faulty disc(s) and Harcourt will replace it free
of charge.
6. Liability
Except for the express warranty regarding the original discs in 5 above,
Harcourt gives no other warranty expressed or implied, by statute or
otherwise regarding the discs and accompanying materials or their contents,
their fitness for any purpose, their quality, their merchantability or otherwise.
The liability of Harcourt under 5 above shall be limited to the amount paid by
you for the Product. In no event shall Harcourt be liable for special,
consequential or other damages for breach of warranty.
7. Termination
If you should fail to comply with the terms and conditions of this Agreement,
Harcourt may terminate this Agreement or exercise any other rights it may
have. Upon termination, you shall immediately return all discs containing the
Product as well as the accompanying materials. Alternatively, Harcourt may
- 40 -
require that you destroy all of these materials and so certify, in writing, to
Harcourt.
8. Expiry of licence
The licence granted in clause 2 above shall expire sixty (60) days from the
date of installation of the Product and this Agreement shall terminate. On or
before expiry of this licence you may either:
a. return the Product and any accompanying materials in good condition and
in its original packaging to Heinemann and we shall have no further
obligations to each other; or
b. pay the purchase price to Heinemann and continue to use the Product
subject to your acceptance of a new licence agreement as provided by
Harcourt.
9. Applicable law
This agreement shall be governed by the laws of England and Wales and shall
be subject to the non-exclusive jurisdiction of the English Courts.