1
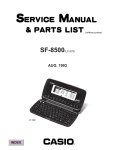
eCommerce User Manual
VTM2210
Contents
1.0
Introduction .............................................................................................................................................. 4
1.1
Target Audience ................................................................................................................................... 4
1.2
Knowledge Prerequisites ..................................................................................................................... 4
1.3
Security ................................................................................................................................................ 4
2.0
The Home Page....................................................................................................................................... 5
2.1
Behaviour of the homepage and the need for User login ..................................................................... 6
2.2
The key elements of the homepage ..................................................................................................... 7
2.2.1
Login Panel ..................................................................................................................................... 7
2.2.2
Account Customer Navigation Panel (Left-side)............................................................................. 7
2.2.3
Product Selection Links (Centre Page) ........................................................................................... 8
3.0
User Login ............................................................................................................................................... 9
3.1
Account Customer Login ..................................................................................................................... 9
3.1.1
‘Account selection’.......................................................................................................................... 10
3.1.2
Which Account to Choose: ............................................................................................................. 11
3.2
Private (Cash) Customer Registration................................................................................................. 12
3.3
Type of customer and behavior of buy-on-line (eStorefront) functions............................................. 13
3.3.1
Private Cash Customers:................................................................................................................ 13
3.3.2
Account Customers: ....................................................................................................................... 13
4.0
Product Selection.................................................................................................................................... 14
4.1
Ecodes ................................................................................................................................................ 14
4.2
Standard Product Ranges .................................................................................................................. 14
4.2.1
Standard models ........................................................................................................................... 15
4.2.2
Links to purchase a model............................................................................................................. 16
4.2.3
PPL Models ................................................................................................................................... 16
4.3
On-line Product Configurator.............................................................................................................. 17
4.3.1
Introduction.................................................................................................................................... 17
4.3.2
Questions List & Screen Layout ................................................................................................... 17
4.3.3
Making changes to configurator options ....................................................................................... 18
4.3.4
Problems detected by the configurator ......................................................................................... 19
4.3.5
Special Instructions ....................................................................................................................... 20
4.4
Special Offers..................................................................................................................................... 20
4.5
Component Selection (Parts) ............................................................................................................ 21
4.5.1
Description Link ............................................................................................................................. 21
4.5.2
Price .............................................................................................................................................. 21
4.5.3
Adding Components to Basket ..................................................................................................... 22
5.0
The Shopping Basket............................................................................................................................ 23
5.1.9
Continue shopping (B).................................................................................................................. 24
5.1.10
Parts Only Delivery Charge ..................................................................................................... 24
6.0
eStoreFront Saved Quotes ................................................................................................................... 25
6.1.1
Print ............................................................................................................................................... 25
6.1.2
Delete ............................................................................................................................................ 25
6.1.3
Proceed ......................................................................................................................................... 25
7.0
eStoreFront Order Processing Steps ................................................................................................... 26
7.1
Shipping - Ordering Step................................................................................................................... 26
7.1.1
Shipping information..................................................................................................................... 27
7.2
Billing – Ordering Step (Account Customer)...................................................................................... 27
7.3
Billing – Ordering Step (Cash Customers) ........................................................................................ 28
7.3.1
For cash customers payment information: - ................................................................................. 28
7.4
Order - Preview Stage....................................................................................................................... 29
7.5
Order Validation and error messages: .............................................................................................. 29
7.6
Order Confirmation............................................................................................................................ 30
7.6.1
Cash Customers........................................................................................................................... 30
7.6.2
Account Purchase Card Orders.................................................................................................... 30
7.6.3
Account Orders ............................................................................................................................ 30
8.0
Web Sales Order Review..................................................................................................................... 32
9.0
ePortal Element of the eCommerce website ........................................................................................ 33
9.1
ePortal - Your Sales Orders .............................................................................................................. 33
9.1.1
Sales Order Search Facility.......................................................................................................... 34
9.1.2
Sales Order Display ..................................................................................................................... 35
9.1.3
Sales order list navigation ............................................................................................................ 35
9.1.4
Sales Order Information drill downs ............................................................................................. 36
9.2
ePortal - Accounts Receivable .......................................................................................................... 38
9.2.1
AR Aging balance periods used. .................................................................................................. 38
9.2.2
Accounting Search Facility ........................................................................................................... 39
9.2.3
Invoice List Display....................................................................................................................... 40
9.2.4
Navigation Invoice List.................................................................................................................. 40
9.2.5
Invoice Detail Information ............................................................................................................. 41
Table of figures
Figure 1 - Standard homepage (small)
Figure 3 - Generic Homepage
Figure 4 - Account Customer
Figure 5 - Login page
Figure 6 - Account Customer Login Stages
Figure 7 - Account hierarchy
Figure 8 - Account Selection ‘Global’
Figure 9 - Account Selection ‘Personal’
Figure 10 - Account Selection guide
Figure 11 - eStoreFront function map
Figure 12 - Storefront Product Range Page
Figure 13 - Product Model Example
Figure 14 - Browser Progress Bar
Figure 15 - Standard Configurator Options
Figure 16 - Special Instruction Default
Figure 17 - Tick box configurator question
Figure 18 - Configurator Auto-correct
Figure 19 - Component Parts Search
Figure 20 - Component Part list
Figure 21 - Shopping Basket Example
Figure 22 - Saved Quotation list
Figure 23 - Order processing overview
Figure 24 - Shipping confirmation
Figure 25 - Billing confirmation – account customers
Figure 26 - Payment Details (Cash Customer)
Figure 27 - Final order preview
Figure 28 - Order Ok
Figure 29 - Order Error
Figure 30 - Web Order History
Figure 31 - Order Detail Review
Figure 32 - Access to the ePortal
Figure 33 - Sales ePortal Query Panel
Figure 34 - ePortal Sales order list
Figure 35 - Sales ePortal Drill down diagram
Figure 36- ePortal-Accounts Receivable
Figure 37 - Accounts ePortal Query Panel
Figure 38 - Invoice List
Figure 39 - invoice detail
Figure 2 - Account homepage (small)
4
5
6
9
9
10
10
11
11
14
15
15
17
18
18
19
19
21
21
23
25
26
26
27
28
29
29
30
32
32
33
34
35
36
38
39
40
41
Viglen Ltd Training Manual (VTM) Approval:
Implemented by:
Date
(Management Representative
of group operating with the
Training Manual)
Date
Technical content approved by:
(Technical management)
Date
QA Admin. & Issue by:
Version 1.0
Page 3 of 41
6 November 2013
1.0 Introduction
This guide provides commented examples of how to use the eStoreFront and ePortal sections of the
website, identifying the different processing steps required for the different user types.
1.1
Target Audience
The target audience for this guide is:
•
•
•
1.2
Cash customers (I.e. those ordering by credit card)
Account customers who can browse only (Will be referred to as browsers)
Account customer purchasing staff who can place or authorise orders (Authorisers)
Knowledge Prerequisites
This manual assumes working knowledge of the Internet Explorer or Netscape navigator, and
common web page conventions.
1.3
Security
The eCommerce Website has security measures in place to protect it. These include IP address
checking, timeouts, Username & Password and secure pages. The IP address is checked when the
user enters the website, checking to see if the user location is recognised. If the IP is recognised, then
the user will be taken to their account homepage, otherwise they will be taken to the standard Viglen
homepage.
Browser
requests site
IP Recognition
Figure 1 - Standard homepage (small)
Figure 2 - Account homepage (small)
An IP stranger can gain access to the accounts home page but must login to the website with a valid
account user name and password.
Version 1.0
Page 4 of 41
6 November 2013
2.0 The Home Page
When an Internet browser first opens the Viglen eCommerce website the home page is displayed:
Figure 3 -Generic Homepage
If you are an account customer of Viglen and you see the above version of our Homepage, then your
IT department have not provided Viglen with your organisation’s ‘IP’ address range(s). If this is the
case please contact your Viglen Sales Administrator or your Viglen Sales Account Manager, so that
we may determine the ‘IP’ information we require for future recognition..
The generic home page (shown in figure 3) has no customer specific information within it and allows
browsers to view Viglen company information, and have access to view products at retail pricing.
Version 1.0
Page 5 of 41
6 November 2013
Figure 4 – Account Customer
The account customer homepage (shown in figure 4) is presented with customer specific information
and has the facility for displaying a customer’s own main body text, therefore allowing your
organisation to address its own users.
The main visual additions to the account customer’s homepage are:
• The Account customer navigation panel (left of screen)
• Customer logo’s (If provided by the customer owning the recognised customer account).
• PPL and Special Offers options (if available to the recognised customer account).
2.1
Behavior of the homepage and the need for User login
If the shopping basket is accessed (by the “Add To Basket” button or “Buy It” button) the user will be
presented with a User login / new user registration option. This will also happen if the browser tries to
use any of the links on the webpage to account information.
Login can be as a private customer by registering on-line as a user or login can be made as an
account customer by using a login name provided by your Viglen sales account manager.
Logging in as an account customer will give you access to the account customer homepage,
regardless of being recognised or not by IP address.
The additional benefit of registering your IP address with Viglen is for private customers logging in
from your organisations network. For example staff and students on campus at a university will attract
the university’s discounts and special offers (when recognised by IP address) while only being able to
place orders using their credit card payment. The same users logging in from their home computer
will not be IP recognised and therefore will no longer receive preferential pricing.
Version 1.0
Page 6 of 41
6 November 2013
2.2
The key elements of the homepage
While many of these links are visible before a User logs in, most links (with the exception of ‘ConfigIt’) will direct the browser to the User login page before allowing further access.
2.2.1 Login Panel
•
Allows returning users to login entering their username and password details. Account
customer browsers and authorisers must login to access their personal security setup
enabling them to quote and order against their Account.
•
Allows entry of an email address for product updates.
•
Allows cash customers to register their details. Please note that new users who wish to quote
or purchase against your account will need to contact your Viglen Account Manager who will
be able to register your details. (3.2)
•
Allows entry of a product Ecode, enabling direct access to configuring a standard product line
or Partnership Price List specification at your account discounted price. (4.1)
2.2.2 Account Customer Navigation Panel (Left-side)
The options presented will vary depending on whether you have logged on or not and the personal
user rights that you have been given against your login. The menu is divided into 3 sections.
2.2.2.1 eStoreFront Links
•
“Order History” – Allows browsers and authorisers to view any web orders previously raised
or authorised. 8.0)
•
“Your Quotes” – Allows browsers to view valid previously raised web quotes. Authorisers can
view all quotes raised the account. 7.0)
•
“Customer Selection” – Allows browsers and authorisers with multiple accounts to change
account without having to login again. 3.1.1)
•
“ClassLink Kbase” – Allows user access to the ClassLink Knowledgebase (Access only
available to ClassLink customers)
•
“Your Account” – A link to the user details page for cash customers, allowing the user to
modify their password / address details.
2.2.2.2 eStoreFront / ePortal Navigation
•
“StoreFront” – A link that takes user back to eStoreFront homepage. “Home” on the main
menu bar will have the same result. 4.0)
•
“Accounts Receivable” – ePortal access allowing user to access customer account invoice
details, including agreed terms, credit limit and account balance. 9.2)
•
“Your Sales Orders” – ePortal access allowing user to access open sales orders,
configurations and to track order status. 9.1)
2.2.2.3 Administration / Logoff
•
“Admin” – Allows browsers and authorisers to change their password. Account
Administrators can add and change user details (Refer to the Account Administrator Manual).
•
“Logoff” – Allows user to log off from current connection and settings.
Version 1.0
Page 7 of 41
6 November 2013
2.2.3 Product Selection Links (Centre Page)
•
“Config-IT” – Allows user to configure, quote and buy (authorisers only) standard
specification models at account discount prices with account customer special instructions
being applied. “Buy On-Line” from the main menu bar will also have the same effect. (4.3)
•
“PPLs” – Allows user to configure, quote and buy (authorisers only) Partnership Price List
specifications which are customised to your accounts requirements. 4.2.3)
•
“Special Offers” – Allows users to quote and buy (authorisers only) the latest special offers
that are attracted by your account. (4.4)
Version 1.0
Page 8 of 41
6 November 2013
3.0 User Login
Figure 5 – Login page
Private (cash) customers see section 3.2 for details of login and registering process.
Please note new account customers cannot register on line for security reasons. Please contact your
Viglen Sales Account Manager to be set-up as a web enabled account customer.
An existing Account customer wishing to make a private purchase may do so but must register as a
new shopper. Your existing account customer login is linked to your organisations credit account at
Viglen and cannot be used for private purchases. W hen you are registering as a private customer
you must choose a new User name that is unique however you can reuse your account password /
email address etc... See section 3.2 – Private (cash) customer registration.
3.1
Account Customer Login
An overview of the login process:
User Login
Account selection
Access to your
personalised view of the
eCommerce website
Version 1.0
Stage 1
During the login process the eCommerce Website determines what
type of User you are and what access rights and authority you have
via your login name and password.
Stage 2
‘Account selection’ allows a User to select a particular customer
account from a list of accounts that have been set-up for you to access
as a User. This is a second stage because some account users will
have access to more than one customer account.
Figure 6 - Account Customer Login Stages
Page 9 of 41
6 November 2013
3.1.1 ‘Account selection’
Returning Private customers (registered on-line) bypass the account selection page (figures 8 & 9)
and are taken directly to the homepage on the entry of a valid User name. (see section 3.2)
As an account User you may have access to both the Billing account (invoice/credit account) that
exists for your organisation, and your own ‘contact account’ that exists to identify you as an individual
at Viglen.
Each ‘contact account’ belongs to a single ‘Billing account’. This structure is common to most
accounting systems, and is essential for consistency with Viglen’s internal systems.
Account Structure:
Contact / shipping account
Billing Account
Contact / shipping account
Contact / shipping account
Etc...
Account ID Convention:
"0001234"
"ABC1"
(Code made up of letters and
numbers)
(At least a six digit number)
Terminology used within the eCommerce web site :
"Global Account"
"Personal Account"
Figure 7 - Account hierarchy
The naming convention shown above indicates what kind of account you are selecting at the second
stage of logging into the Viglen eCommerce website. This is aided by the terms “Global and Personal
used by the website and displayed in the account selection page. Examples of the Account selection
page are shown below Figure 8 & 9). The pages use a dropdown box to allow selection of an account
from your username’s account selection list.
Global Account (Billing Account)
with dynamic text describing tasks that
can be performed while logged in as a
Global User.
Figure 8 –Account Selection ‘Global’
Version 1.0
Page 10 of 41
6 November 2013
The majority of Viglen’s Web enabled Account Users of the eCommerce website will have access
only to their own ‘Personal’ account.
Personal Account (Shipping Account)
with dynamic text describing tasks that
can be performed while logged in as a
Personal User.
Figure 9 – Account Selection ‘Personal’
From the point of selecting an account onwards, all information viewed and all quote/orders raised
will be against this specific customer account that is selected in this page.
3.1.2 Which Account to Choose:
N**
Y*
Y
Y*
Review all sales
order information
Authorise
anyone’s quotes
/place sales
orders
Y
Y
Review
‘Accounts
Receivable’
information
Revise anyone’s
existing quotes
N**
Y
Track own sales
orders only
Authorise your
own quotes
/place sales
orders
Account
Selection
‘Global’ Account
‘Personal’ Account
Revise your own
existing quotes
Activity:
Save new quotes
For those who have access to both a global account and a Personal account the below table is a
quick guide to which account type to use for different activities.
Y*
Y*
Y
* These activities require additional access rights
** This is not permissible for fraud prevention reasons.
Figure 10 – Account Selection guide
Once an account is selected the row of links that are displayed along the bottom of the account
selection page will re-fresh. These provide direct access to the storefront, or to the other areas of the
ePortal. The quantity of links that are available are determined by the access rights of the User (as
assigned against their Login name see VTM2215 – eCommerce W ebsite ‘account administrator’
manual for detailed User set-up information).
Returning Private customers (registered on-line) bypass the above account selection page and will
be taken to the homepage on the entry of a valid User name. (see section 3.2)
Version 1.0
Page 11 of 41
6 November 2013
3.2
Private (Cash) Customer Registration
New users can register as a private customer by using the “Register” link in the Login webpage (Figure 5
– Login page)
Customers cannot register on-line as an account customers, registering on-line is only as a private
customer. (Customers with accounts at Viglen please contact your Viglen Sales Account Manager for
the web enabling of your account).
The User Registration page shows all mandatory fields as labelled in bold.
•
Username – Must be at least 6 characters in length. These can be alphanumeric but must
contain no spaces. This name must be unique amongst all existing users of the Viglen
website.
•
Password – No length restriction, alphanumeric characters can be used. Confirmation of the
password must be identical.
•
Name, email & Address Details – These are required for order confirmation.
Once the form is complete, click “Register” to create the new website User, and gain access back
into the eCommerce website.
On-line registered users will only be able to pay by credit card as a private customer, quotes raised
as a private customer cannot be used by account customers and vice-versa.
Account customers can only be web enabled by Viglen personnel – please contact your Viglen Account
Manager for details.
Version 1.0
Page 12 of 41
6 November 2013
3.3
Type of customer and behaviour of buy-on-line (eStorefront) functions.
The behaviour of the buy-on-line functions (eStoreFront) is determined by the type of customer you
have logged in as, to recap these from the previous section.
3.3.1 Private Cash Customers:
•
•
Private Cash Customers
Private Cash Customers (with account customer discounts via IP address recognition)
NB. Credit card payment required for both the above.
3.3.2 Account Customers:
The Account customer Users are subdivided into browsers and authorisers.
•
Browser’s can select products, configure PC’s and add them to their basket, but can
only progress to the stage of saving a basket as a quote. (Figure 23 - Order processing
overview)
•
Authoriser’s can perform the actions of a browser, but in addition has the authority to
progress quotes and shopping baskets to a sales order.
User types and browser / authoriser options are detailed in the VTM2215 - Account Administration
Manual and initially will be maintained at Viglen by your Viglen Sales Account Manager.
Version 1.0
Page 13 of 41
6 November 2013
4.0 Product Selection
The ‘Product Selection’ section encompasses a description of each of the routes to selecting Viglen’s
products on the eStoreFront section of the website. This includes an explanation of some of the
conventions and terminology used, Viglen’s main product ranges and use of the “Config-It” product
configurator.
Homepage
Shortcut to the
Configurator
OR 'Buy-On-Line'
eStorefront
Select a
PPL
Page
Product Range
Page
Special Offers
Page
Config-IT
Models
Page
Config-IT
Product
Configurator
Buy-IT
Save to basket
Shopping Basket
Buy-IT
"Purchase" *
"Save Basket"
Web Quote
Buy-IT
OR
"Empty Basket"
Sales Order
* Only Available to
"Authorisers" or Private
cash customers
Figure 11 – eStoreFront function map
4.1
Ecodes
Ecodes are unique numbers assigned all standard models and special offers. Ecodes are shown in
our price lists and all marketing brochures. The eStoreFront has a facility to use the Ecodes to easily
identify products seen in our marketing material and also shortcut directly to the Product configurator
so that the full specification can be reviewed, and options selected. In addition Ecodes are used to
identify each PPL specification that has been setup for your organisation to increase the ease of
repeat ordering.
The Ecode function is set in the homepage login panel. Entering an Ecode here take you directly into
the Product Configurator, with the configuration options and details of this predefined configuration
loaded.
4.2
Standard Product Ranges
Viglen standard product range is accessed via the “Storefront” link when you first login or via ‘Buy
On-Line” from the main menu bar (top of screen). Both links open the eStoreFront homepage. This
displays Viglen’s main product ranges, and allowing further access to explore each range further.
Version 1.0
Page 14 of 41
6 November 2013
Figure 12 – Storefront Product Range Page
Account customers be aware before making any product selections (unless editing an existing quote)
that the account you are logged in under (shown in figure 12 above annotation ‘B.’) is showing a
personal account and your organisations global account. (3.1.2 for the reasoning)
Clicking on a particular Range will display a scrolling list of all of the models (base specifications)
available for that product range. For example clicking on the Genies product range will open a list of
Genie models Figure 13 – Product Model Example shows an example model below.
4.2.1 Standard models
Figure 13 – Product Model Example
When the Models are displayed on screen they are shown in a scrolling list so that ready comparison
can be made between the models in a range. The above figure (Figure 13) shows the common
format of information displayed for each model. This example has been isolated to allow clear
annotation.
Version 1.0
Page 15 of 41
6 November 2013
4.2.1.1 Standard model pricing
The price shown for each specification is at standard Viglen prices (ex. VAT) and includes standard
delivery charges. To view the price which your account attracts either use the “Buy-IT” button or the
Config-IT button to trigger the website to invoke your accounts pricing and delivery charges. No
models have a monitor selected, therefore the cost of a monitor is not included)
4.2.2 Links to purchase a model
The two main links in this page are:
•
Config-IT – launches the on-line product configurator for the model selected. This link allows
the standard model to be modified within available options and rules. Account discounts and
special instructions will be applied automatically as pricing is recalculated after each change
is made. See section 4.3
•
Buy-IT – Use this if the base model specification is what you wish to buy. Using this link will
add the model’s (base) configuration to your shopping basket with the default options
selected. Account discounts will be applied automatically but account special instructions will
not (eg. least memory modules / Quiet PC option etc.)
4.2.3 PPL Models
If PPL’s have been created for your organisation the link the storefront page (see Figure 12 –
Storefront Product Range). Following this link will present a list of models in the same format as if the
website was showing one of Viglen’s standard product range’s as shown above in Figure 13 –
Product Model Example. For all intent and purpose the PPL is a bespoke product range for your
organisation.
Key differences of PPL’s compared to Viglen’s standard models are:
•
•
•
Version 1.0
Pricing is already calculated to take into account your organisations discounts.
Special instructions will have been applied when the PPL is created.
Using “Config-IT” will only allow access to options that your organisation have pre-agreed as
acceptable. It is possible that a PPL model has no options available for change if you use the
“Config-IT” button.
Page 16 of 41
6 November 2013
4.3
On-line Product Configurator
4.3.1 Introduction
The On-line configurator is rules based and utilises dropdown selection boxes to present valid
options to the User. After each change made by the User, the configurator will apply rules and refresh
the page (a few changes will however be ignored). When making a change to an option please wait a
moment to see if the configurator needs to refresh the page, this can be determined by viewing the
progress bar on the foot of your Internet-browser window:
Figure 14 – Browser Progress Bar
If the progress bar appears please wait for it to complete and then disappear before making any
tm
tm
further selections. Both Netscape and Internet Explorer display the progress bar in the footer of
the browser window (however the exact appearance does vary IE is shown in diagram).
4.3.2 Questions List & Screen Layout
Configurations typically have 15 to 22 questions and two additional questions for choosing warranty
type and delivery method. When making a change to some options this will affect the number of
questions displayed. This is because some of the options will have dependencies and will trigger a
related question to be revealed.
Because of the number of questions the user must scroll the page up & down to view all the options.
Pricing and warnings are displayed on a “Running Total” panel that floats in the left column to ensure
it is always visible while the page is scrolled. (Also see section 4.3.2.1 for pricing display description)
When appropriate the configurator will default to a short-form version to reduce the number of
questions listed to those, which are most commonly required. If the configurator has done this, the
“extra configurations options” tick-box will be visible and unchecked. The user can override this at
any time by ticking this box.
The advantage of a reduced question list is increased browser performance while using the
nd
configurator, while allowing the user to chose to view extra options such as 2 hard drive or backup
storage. (This functionality is available on Desktop Range products only)
4.3.2.1 Pricing display
The configurator refers to all account customers specific discounts, and is able to distinguish
discounts against Viglen’s negotiated price list and additionally discounts that apply to specific
models. These are all calculated after every option change is made in the configurator to ensure
pricing reflects the current options selected on the web page. Each option has pricing displayed in
brackets which represents the option-price / change to the base price for the model.
Version 1.0
Page 17 of 41
6 November 2013
4.3.3 Making changes to configurator options
Most questions will be presented with a dropdown selection box so that you can make a selection
from a list, some questions however do not have options available. This maybe fixed because of the
model you have selected or if you have selected a PPL the specification may be fixed deliberately at
you organisations request. See Figure 15 – Standard Configurator Options below:
Figure 15 – Standard Configurator Options
4.3.3.1 “Special Instruction” defaulted options
Figure 16 –Special Instruction Default
Some account customers have special instruction requirements, specific to their account, and set up
against certain model ranges and specific questions.
The on-line configurator will automatically detect these instructions if you are an account customer.
The default answers are highlighted in yellow and have an asterix at the end of the item description.
It is at the Users discretion whether they keep that special instruction item or change it to another
available in the list.
If an instruction you have given Viglen has not appeared for you or you have special instructions you
would like applying in the future please discuss this with your Viglen Sales Account manager.
4.3.3.2 Tick–box Questions
Tick-box questions may be used in place of dropdown selections when the question requires a simple
Yes No answer.
Tick-boxes may also appear at the bottom of the configuration questions list as the result of special
instructions setup on your customer account and the particular model being configured. These are
Version 1.0
Page 18 of 41
6 November 2013
Special Instructions that do not relate specifically to any of the standard configurator questions so
these are catered for through the use of additional questions and tick-boxes.
Below Figure 17 –Tick box configurator question is an example of a tick-box question, which is a
special offer.
Figure 17 –Tick box configurator question
4.3.4 Problems detected by the configurator
If a sequence of choices that have been made that violate a rule in the configurator, the configurator
will alert you. In the below example (Figure 18 – Configurator Auto-correct) a high amount of memory has
been selected which made the ‘fewest memory modules?’ question’s answer invalid. Because it is
the “fewest memory modules question that has become invalid this is identified with the attention
logo and auto-corrected.
Figure 18 – Configurator Auto-correct
If the you are happy with the auto-correction please continue to make changes or complete the
configuration by “adding to Basket”. (when the Page refreshes the attention logo will clear)
4.3.4.1 Undoing an auto-correction
If the auto-correction is not desired please do not use your browsers back button to undo the last
choice you made, as this will not reset the configuration properly. Please use the “Undo" button on
the running total box.
Version 1.0
Page 19 of 41
6 November 2013
4.3.5 Special Instructions
(Also see 4.3.3.1)
Some account customers have special instruction requirements, specific to their account, set up
against certain model range questions. The on-line configurator will automatically detect these
instructions for these account customers and pre-populate the items as the default answers to
the question, highlighting the item in yellow. It is then up to the Users own discretion whether
they keep that special instruction item or change it to another. Additional Special Instructions that
do not relate specifically to the questions already covered will appear below the main questions;
these can be confirmed by the use of the adjacent check boxes.
Once the configuration is complete, clicking the “Add To Basket” button at the bottom of the list
will add / update the users shopping basket with the configured item.
4.4
Special Offers
Special Offers can be accessed by either clicking the “Special Offers” link from the eStoreFront
homepage or from the main menu bar. “Special Offers” are assigned to customer types (Education,
Schools, Corporate, Government, etc.) via their Ecode so you will only see special offers directly
related to your organisation.
Upon clicking the “Special Offers” link the user will be presented with a list of the different categories
of offers available. Each category may have one or more different standard configurations that can be
viewed and purchased.
Clicking one of the category links will bring up it’s special offer page showing the available models,
their Ecode, image, specification and price (same as shown in Figure 13 – Product Model
ExampleDisplay). As with standard product configurations and PPLs the user can either add the item
to their basket via the “Buy-IT” button or modify the configuration via the “Config-IT” button.
When configuring a Special Offer specification, the on-line configurator will work as already described
with one main difference. The difference is that the price for the default specification will have no
account discount applied, this is because a discount has already been applied when creating the
special offer. However if the user makes option changes the pricing of these changes will have
account discount applied.
Version 1.0
Page 20 of 41
6 November 2013
4.5
Component Selection (Parts)
Component parts may be purchased from the web by clicking on “Parts” from the storefront page
(See Figure 12 – Storefront Product Range Page). The user can now select items, using the centre panel,
from the product catalogue. Selection may be by either choosing a Product Class (category) from the
drop-down list and/or using the Product Code search facility by using a full or partial item number or
product description. Clicking the “Go” button returns the list of select items available.
Figure 19 – Component Parts Search
Figure 20 – Component Part list
If the list is empty or the item you are looking for is not available as a web saleable item or check the
search criteria are correct. Please note that not all Viglen components are available on the web. If
you cannot find the item you are looking for then contact your Viglen Internal Account Manager or our
service sales department.
4.5.1 Description Link
Each component on the list will have its own details, such as image, and marketing and/or
technical details that can be viewed by clicking on the product description link for the item. From
this link the user can change the quantity required and add the item directly into the basket.
4.5.2 Price
Each component will be priced at the discount level for the account.
Version 1.0
Page 21 of 41
6 November 2013
4.5.3 Adding Components to Basket
Items are added to the shopping basket by ticking the tick box against the item required. The
quantity field will default to 1 but may be changed to any quantity required. Multiple items may be
selected before clicking the “Update Basket” button to an them to your current Basket.
Once updating the basket, the product list will be re-displayed and the left hand panel basket
status will be updated with the added basket contents.
The basket can be accessed at any time by clicking on the shopping trolley icon, or further parts
can be selected by using the “back” button on the page to return to the parts search page. DO
NOT use the back button on your browser.
Version 1.0
Page 22 of 41
6 November 2013
5.0 The Shopping Basket
Once products have been selected, they can be viewed, removed or progressed to quote/order via
the shopping basket. This metaphor of shopping basket is used throughout the web and the basic
layout should be familiar to most Users that have had any experience of commercial websites.
The shopping basket page will be slightly different dependant on the User type. Specifically for
Account Customer Browsers they will not see the “Purchase” button (D.), as they have the rights to
raise quotes only. Account authorisers and cash customers will see the “Purchase” button.
Figure 21 –Shopping Basket Example
The key elements of the shopping basket are as follows: -
5.1.1 Product Description Link
This link will take the user to a further information page, detailing the key product features and
display a product image.
5.1.2 Quantity Field
Product quantities may be amended by overtyping the original quantity and pressing “Tab” or
“Return”. The web will then recalculate the subtotal price for the basket.
5.1.3 Remove Item
This button allows the user to remove a product from their basket. The subtotal price of the
basket will then be automatically recalculated.
5.1.4 Reconfigure (A)
If the basket line contains a configured part, then this items configuration may be viewed /
amended by clicking the <spanner> icon link. This will launch the online product configurator and
display the configuration of the product. Item details can then be changed and loaded back into
the basket. Please note that when loading an old quotation into the basket this spanner icon may
turn red. This means that one or more options from that products original configuration are no
Version 1.0
Page 23 of 41
6 November 2013
longer available and have been substituted with default option items. The user will need to
reconfigure the product to ensure these new default items are acceptable or amend accordingly.
5.1.5 Address Details
If the order / quote requires a different delivery address to the customer’s default, this can be
entered via a page accessed by clicking the “Address Details” button. The address details
entered here will be saved against the quote and /or taken through to the final sales order.
5.1.6 Create Quote (C)
The contents of the shopping basket may be saved against a quote reference for printing and
later retrieval via the “Your Quotes” link. Click the “Create Quote” button to save the basket, and
display a quote reference. The “Print Quote” button is shown also, and clicking this will display
the quote details in a popup window, from where it can be printed.
5.1.7 Purchase (D)
The “Purchase” button will be displayed for cash customers and account customer authorisers
only. Clicking it will progress the basket contents to the shipping stage for a sales order to be
generated.
5.1.8 Empty Basket
Clicking the “Empty Basket” button will clear the basket contents. Once cleared, the basket
contents cannot be retrieved.
5.1.9 Continue shopping (B)
This button returns the user to the storefront page from which further product selections can be
made.
5.1.10 Parts Only Delivery Charge
If the basket contains only component items (parts) then a delivery charge will appear as a
configurable item at the bottom of the basket. This will default to the standard delivery service
and cost but can be changed by the user using the reconfigure button. If the basket contains any
configured PCs / servers then this additional charge will be waived as delivery is included in the
configured item(s).
Version 1.0
Page 24 of 41
6 November 2013
6.0 eStoreFront Saved Quotes
The contents of a user’s shopping basket may be saved as an eStoreFront quote for later retrieval
and progression to a sales order. Quotes may be reviewed en masse, viewed or printed in detail, and
removed from the system if no longer required by clicking on the ‘Your Quotes’ link once the user has
logged in. Cash customers and account browsers may only access their own quotes. Account
authorisers can access all quotes for the account by using the additional link at the top of the screen.
Please note that only eStoreFront-generated quotes can be viewed via “Your Quotes” and will only
remain valid for 30 days from date of generation, after which time they will no longer be viewable.
Figure 22 – Saved Quotation list
The actions available from this page are: -
6.1.1 Print
Display the quote details in a popup window for review / printing. This will include the
configuration details of any configured items on the quote.
6.1.2 Delete
Clicking “Delete” will remove the quote from the system. Once deleted the quote cannot be
retrieved.
6.1.3 Proceed
Clicking “Proceed” will populate the shopping basket with the contents of the quote. This action is
additive, in that the quote contents will be added to any items currently in the basket. Please note
that is some cases, items on a quote may no longer be available when the quote is eventually
proceeded with. In such an eventuality the reconfigure <spanner> icon will turn red on the
shopping basket. This means that one or more options from the products original configuration
are no longer available and have been substituted with default option items. The user will need to
reconfigure the product to ensure these new default items are acceptable or amend accordingly.
Version 1.0
Page 25 of 41
6 November 2013
7.0 eStoreFront Order Processing Steps
Overview of the web sales order process for account customers:
Account browsing User
User with Authoriser rights or
Cash Customers
Enter & Confirm
shipping
information
Save the Shopping
Basket as a new
revised quote using
'Create Quote'
Saved Quotation
Nbr: W001
OR
Item selections
saved to the
shopping basket
Account Customers
OR
Current Shopping
basket containing
a list of items to
be purchased
Make additions or
deletions of items /
reconfigure systems
Cash
Customers
Enter and Confirm
the customer PO
Number
"Purchase Button"
Credit Card
Secure Payment
Page
Confirm
Purchase
Problems found
with configurations
User is returned
to 'Shopping Basket' screen
(Problem configurations are
indicated in red)
Order Preview
Configurations revalidated
against current
rules / products
No
Config.
issues
found
Confirmation /
Order Loaded into
Avante
Figure 23 - Order processing overview
When a shopping basket is ‘Purchased’ the first step is the shipping address confirmation page.
Amend the shipping address as necessary. The Shipment date is automatically calculated from either
Viglen’s default lead-time or from a default lead-time negotiated for your customers account.
7.1
Shipping - Ordering Step
Figure 24 - Shipping confirmation
Version 1.0
Page 26 of 41
6 November 2013
7.1.1 Shipping information
Shipping Date
The shipment date will be automatically calculated by the system according to the lead-times of the
contents of the basket and the accounts terms and conditions.
Shipping Address
The shipping address will be populated with the data from the quotes / basket, or if none was entered
then with the default shipping address for the customer. Lines marked in bold must be populated prior
to the user progressing by clicking the “Continue” button.
When account authorisers are authorising quotes into orders, the default customer shipping details
will be those of the user who raised the quote and not that of the authoriser.
Private (Cash) customers, please ensure that the delivery address is the same as your payment
card’s statement address.
7.2
Billing – Ordering Step (Account Customer)
(cash customers see next section )
After accepting the shipping address you must enter your Purchase Order number.
Figure 25 - Billing confirmation – account customers
The customer’s purchase order number should be entered in the text box provided. This must be an
alphanumeric string, with no spaces or control characters no more than 10 characters long.
For purchase card accounts, an additional field will appear under PO Date for the valid purchase card
number to be added. Purchase card numbers will be validated by our Accounts Department. If they
cannot be processed then the order will not be progressed.
The Billing Address details will automatically be populated from the organisations main billing details.
If the details are fully populated then the invoice for the order will be sent to this address. Otherwise
the invoice will be sent the shipping address.
Clicking “Submit” on this page will present the Purchase Confirmation Screen.
Version 1.0
Page 27 of 41
6 November 2013
7.3
Billing – Ordering Step (Private Cash Customers)
Figure 26 – Payment Details (Cash Customer)
7.3.1 Cash customer’s payment information: Name on Card
The exact name on the card of the customer must be entered.
Credit Card Number
The 16-digit card number from the front of the customer’s card must be entered.
Credit Card Type
Select the card type from the drop-down list. At present VISA, MasterCard and American Express
cards are accepted.
Expiry Date
The month and year of the credit card expiry date must be entered using the drop-down lists.
CV2 Number
Enter the three-digit fraud prevention security card number from the signature strip on the
customer’s card. For cards with more than three digits, the user should enter the last three digits
of the number.
Billing Address
The address of the person paying for the order needs to be entered. This address must be the
same as the address the card is registered too, otherwise payment will not be accepted and the
order will not be processed.
Version 1.0
Page 28 of 41
6 November 2013
7.4
Order - Preview Stage
The Order preview screen follows on from the billing screen and allows you to return to the shipping
basket or proceed and place the order onto Avante.
Figure 27 - Final order preview
The screen shows the details of the order so the user can double check all details entered are correct
and is the last point at which the user can return to the shopping basket. Clicking “Purchase” will
raise a sales order directly in Viglen’s internal system.
7.5
Order Validation and error messages:
As a final check to prevent errors from Web Quotes being recreated in the placed sales order, a final
validation check is processed when the Purchase button is pressed on this page. If an error is found
a red text message will displayed. If there are no errors found the web order will become an Avante
sales order and an order number will be displayed.
Figure 28 - Order Ok
Version 1.0
Page 29 of 41
6 November 2013
Error message should identify the product line that has caused the error (see first circled area in
figure below).
Figure 29 - Order Error
If an error is found use the “Return to Basket” button you should find the product(s) that have been
found to have an error will have the configure (spanner) symbol coloured in red. Determine what
caused the error and what needs changing to allow the order to be processed (refer to section 4.3.4)
Once the problem has been determined you will need to repeat the steps to purchase the shopping
basket contents.
7.6
Order Confirmations
7.6.1 Cash Customers
Cash customers will receive email confirmation that the order has been received. Although a sales
order will be generated, this will be put on hold until credit card details have been confirmed and full
payment has been taken. The order will then be processed through our manufacturing facilities. If
there is a delay or problem with taking payment then the customer will be contacted by a member of
Viglen. Such delays will affect the delivery lead-time of the order. Viglen reserve the right to null and
void any such orders if deemed necessary.
Once the order has been processed the customer will receive a sales order acknowledgement
confirming the contents of the order placed.
7.6.2 Account Purchase Card Orders
An email will be sent to the customer confirming receipt of order. This email will be sent to the user
who raised the quote or order. Account authorisers, authorising someone else’s quote will not receive
this email order confirmation. Purchase card orders will be automatically processed through the
manufacturing facility but will not be shipped until the purchase card payment has been taken. If there
is a problem with taking payment then the customer will be contacted by their Viglen Account
Manager. Such problems may delay the shipping of the order.
Once the order has been processed a Sale Order Acknowledgement will be emailed to the customer
as per normal Viglen procedures.
7.6.3 Account Orders
An email will be sent to the customer confirming receipt of order. This email will be sent to the user
who raised the quote or order. Account authorisers, authorising someone else’s quote will not receive
this email order confirmation. The order will be automatically processed through the manufacturing
Version 1.0
Page 30 of 41
6 November 2013
facility and dealt in the same way as any other order received by Viglen by the customers
organisation.
Once the order has been processed a Sale Order Acknowledgement will be emailed to the customer
as per normal Viglen/Account procedures.
Version 1.0
Page 31 of 41
6 November 2013
8.0 Web Sales Order Review
Orders raised for or by a particular user can be viewed using the “Order History” link on the left hand
navigation panel, which is available throughout the whole of the eStoreFront site.
Figure 30 – Web Order History
This list shows all order numbers, order dates and total cost of the order. For further details the
customer can click on the individual order number link to open the order review page.
Figure 31 –Order Detail Review
The whole order is displayed, and clicking the “Repeat Order” button will populate the shopping
basket with the contents of the order in the same way as if you were ‘proceeding’ with a saved web
quote.
Version 1.0
Page 32 of 41
6 November 2013
9.0 ePortal Element of the eCommerce website
The ePortal element of the website is a query tool to allow access to your Account’s trading
information with Viglen and is available to you in two flavours: “Sales orders” and “Accounts”. The
ePortal provides access to Viglen’s live information.
Access to these is restricted by user access rights and each access right is independent of each
other i.e. access can be granted to one and not the other.
“Sales orders” views and allows queries based a sales order perspective of your account at Viglen.
”Accounts” views and allows queries based on an invoice perspective of your account at Viglen.
Both of the ePortal flavours can be accessed via the Account customer navigation panel (if you as a
user has access rights).
Figure 32 – Access to the ePortal
Use of each flavour of the ePortal is described in detail below (9.2 ePortal - ePortal - Accounts
Receivable)
9.1
ePortal - Your Sales Orders
This function differs from the “Order History” link on the same menu. “Order History” will only allow
the user to view web orders raised against the users own specific personal account number and not
the organisations billing account. However, “Your Sales Orders” will give the user access (via the
ePortal) to Viglen’s live information allowing the user to browse all sales orders for the user, web or
otherwise and can be used to view / track orders through the manufacturing process.
Account authorisers, and those who also have access to their organisation’s global account, will be
able to view all sales orders if logged in against the global account (for a recap of account types see
3.1.1 - ‘Account selection’). All other users will only be able to view their own personal sales orders.
Version 1.0
Page 33 of 41
6 November 2013
9.1.1 Sales Order Search Facility
ePortal Query panel appears on the left of the page. Each search field is case sensitive and should
be entered in UPPERCASE. Results will be displayed in a list to the right of ePortal Query panel.
The following search criteria are available to the user: Start Date
Enter the starting sales order date in the format dd/mm/yy. All sales
orders containing sales order dates greater than the specified start date
will be displayed. For example, enter 01/01/03 for all sales orders with a
sales order date greater than 01/01/03. Leave the field blank if no
starting date is required.
End Date
Enter the ending sales order date in the format dd/mm/yy. For example,
enter 05/10/03 for all sales order with a sales order less than 05/10/03.
Leave the field blank if no ending date is required.
SO Number, PO Number, Invoice Number, Serial Number
To select a specific number in one of these fields, enter the number (a
PO may contain characters also) into the required field. If you do not
know the full number, you can use these fields to search using a 'wildcard' search. The 'wild-card' characters are '[' (before the search
characters) and ']' (after the search characters).
•
•
•
To select sales orders beginning with a specific character (or
characters), enter the character string, followed by a right bracket (])
For example, enter 81] to select sales order starting with "81".
To select sales orders ending with a specific character (or
characters), enter a left bracket ([), followed by the character string.
For example, enter [52 to select all sales orders ending with "52".
To select sales orders containing a specific character (or
characters), enter a left bracket ([), followed by the character string
and the right bracket (]). For example, enter [52] to select all sales
orders containing "52".
Figure 33 – Sales ePortal Query Panel
Model Number
Select from this drop down menu to search for Sales Orders containing specific categories of
product.
Include Completed Orders
•
•
To include completed and open Sales Orders tick the check box.
To include open Sales Orders only ensure the check box is clear.
To search for all sales orders, leave all fields blank and tick the “Include completed orders”
checkbox. To select all open sales orders, leave all fields blank.
Submit Query
To submit your search criteria click the “Submit Query” button and a list of sales order will be
presented to the user.
Version 1.0
Page 34 of 41
6 November 2013
9.1.2 Sales Order Display
A list of the sales orders found within the search criteria will be displayed.
Sales order numbers with the prefix CR relates to a credit note CV relates to a debit note that have
been raised against the customer by Viglen.
To view further information of a Sales Order the user can click on the Sales Order number link.
Figure 34 – ePortal Sales order list
9.1.3 Sales order list navigation
If more records have been retrieved than can be displayed on screen, the following buttons
display at the bottom of the page: “First” - Click to display the first set of returned records in the selected list.
“Prev” - Click to display the previous set of returned records.
“Next” - Click to display the next set of returned records.
“Last” - Click to display the last returned records in the selected list
Version 1.0
Page 35 of 41
6 November 2013
9.1.4
Sales Order Information drill downs
Figure 35 - Sales ePortalDrilldown diagram
Version 1.0
Page 36 of 41
6 November 2013
9.1.5
Order Line -link
The “Line No.” link allows the user to track the Production status of a particular product through
the manufacturing facility. The status will be one of the following stages in production: Preassembly, Being Assembled, In Inspection, Passed QA (Quality Assurance), Ready to Despatch
and Despatched from Viglen.
As the products move through the manufacturing process the number of products in each stage
is displayed in a summary flowchart of the stages.
Currently the Production status data is being transferred from VOPs to Avante, which means
there may be a slight time delay in updating the PC Number to invoice number fields. Status Date
is the date at which the item enters the stage and not the date when it was last updated.
By clicking on the Consignment number on the Sales Order Status page the courier details and
status should be displayed. Currently two of our main couriers have websites, which we have
linked to our ePortal so that the user can track deliveries.
9.1.6 Product - link
The “Product” link will open up a popup window where the configuration details of the line item are
displayed. The breakdown shown is as ordered through the configurator (internal or web) and not
as built with the Bill of Materials e.g. 256MB memory ordered will not show whether this is 1 x
256MB or 2 x 128MB used in the build of the machine.
Version 1.0
Page 37 of 41
6 November 2013
9.2
ePortal - Accounts Receivable
Some users will have their personal user rights set to view all invoices for orders raised against the
whole global account. This can be accessed by clicking the “Accounts Receivable” link on the left
hand menu, which will open the Accounts Receivable Selection page.
Figure 36- ePortal-Accounts Receivable
This summary page displays Accounts Receivable information retrieved from the customer account
data held within Viglen’s internal systems. The details displayed include invoice address; agreed
terms, credit limit, account balance, AR aging balance.
For the AR Aging balance clicking on the time periods (except current balance), executes an
automatic search and lists all the invoices falling due within the selected time period.
9.2.1 AR Aging balance periods used.
•
•
•
•
•
Version 1.0
Current Balance - Customer account balance of invoices that have not yet reached due date
30 Days - Customer account balance of invoices that are between 30 and 59 days due.
60 Days - Customer account balance of invoices that are between 60 and 89 days due.
90 Days - Customer account balance of invoices that are between 90 and 119 days due
120+ Days - Customer account balance of invoices that have past 120 days due.
Page 38 of 41
6 November 2013
9.2.2 Accounting Search Facility
Field Searches are Case Sensitive and should be entered in UPPERCASE and results will be
displayed in Accounts Receivable Invoices page. The following search criteria are available to the
user: Start Date
Enter the starting invoice date in the format dd/mm/yy. All invoices
containing invoice dates greater than the specified start date will be
displayed. For example, enter 01/01/03 for all invoices with an invoice
date greater than 01/01/03. Leave the field blank if no starting date is
required.
End Date
Enter the ending invoice date in the format dd/mm/yy. For example,
enter 05/10/03 for all invoices with an invoice date less than 05/10/03.
Leave the field blank if no ending date is required.
SO Number, PO Number, Invoice Number, Serial Number
To select a specific number in one of these fields, enter the number (a
PO may contain characters also) into the required field. If you do not
know the full number, you can use these fields to search using a 'wildcard' search. The 'wild-card' characters are '[' (before the search
characters) and ']' (after the search characters).
•
•
•
To select invoices beginning with a specific character (or
characters), enter the character string, followed by a right bracket
(]) For example, enter 81] to select invoices starting with "81".
To select invoices ending with a specific character (or characters),
enter a left bracket ([), followed by the character string. For
example, enter [52 to select all invoices ending with "52".
To select invoices containing a specific character (or characters),
enter a left bracket ([), followed by the character string and the
right bracket (]). For example, enter [52] to select all invoices
containing "52".
Invoice Amount
To select a specific amount of an invoice, enter the amount into this
field, ignoring the £ signs and commas. e.g. To search for
£2,190.20, enter in the field 2190.20. To select number beginning,
ending or containing specific characters see above wild card
searches.
Figure 37 - Accounts ePortal Query Panel
Include Paid Invoices
•
•
•
•
To include paid and unpaid invoices tick the check box.
To include unpaid invoices only ensure the check box is blank.
To search for all unpaid invoices only, leave all fields blank.
To search for all invoices, leave all fields blank and tick the Include Paid Invoices checkbox.
Submit Query
To submit your search criteria click the “Submit Query” button.
Version 1.0
Page 39 of 41
6 November 2013
9.2.3 Invoice List Display
Figure 38 - Invoice List
A list of the invoice orders found within the search criteria will be displayed as shown above. To view
further information of an invoice the user can click on the “Invoice Number” link, and to view related
payment or adjustment details for an invoice the user may click on the “Balance Due/Amount” link.
9.2.4 Navigation Invoice List
If more records have been retrieved than can be displayed on screen, the following buttons
display at the bottom of the page: “First” - Click to display the first set of returned records in the selected list.
“Prev” - Click to display the previous set of returned records.
“Next” - Click to display the next set of returned records.
“Last” - Click to display the last returned records in the selected list
Version 1.0
Page 40 of 41
6 November 2013
9.2.5 Invoice Detail Information
Figure 39 – invoice detail
The Invoice Detail Information page will display the details of an invoice.
To view the configuration of a line item, click on a Product name, where available.
To print a copy of a VAT invoice, click on the button, as shown below, and a printable version of the
invoice will display in a pop up window. Then to print as you would normally from a Web page.
(File, Print, check print settings, OK)
Version 1.0
Page 41 of 41
6 November 2013