1
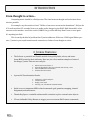
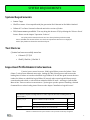
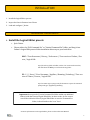
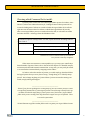
C_brains Powerful MIDI Editor for Cubase 1 Table of Contents Introduction 3 System Requirements 4 Installation Logical Presets 5 Generic Remotes 7 Configuration 9 Command Set Reference 11 Operation Overview 13 Selector 14 Transformation Panels 21 Control Bar 24 Pencil Bar 27 Thumb-Key 28 Utility Buttons 30 Transferring Settings 31 Disclaimers 36 2 INTRODUCTION From thought to action... Composing music should be a fluid process. The time between thought and action must be as short as possible. For example, say the words out loud: “I’d like to hear more accent on the downbeats”. Did you do it? It took me about 2.5 seconds. Now try to make such a change in your DAW. Hold down shift...select one note..select another...scroll the screen...DAMN! I let go of the shift key! Now I have to start again. It’s anything but fluid. This is exactly the kind of problem that C_brains addresses. With over 1200 Logical Editor presets, C_brains is your rapid-transit neural connection to Cubase: from thought to action. in an elegant and powerful interface. C_brains Features: The Selector: a powerful and flexible module that quickly finds, selects, and transforms MIDI events by their attributes. Here are just a few random examples of some of the things C_brains' Selector can easily do: Delete notes lower than C-2. Select all downbeats, then copy selected with velocity < 100. Filter all MIDI data on channel 2. Unmute all muted events. 4 powerful Transformation Panels: Transpose / Copy Transpose CC# Conversion Nudge / Note Trim Velocity / CC / PB Amount Transformation. Quick-access to important MIDI-related commands: grid, quantize, snapping, channel assignment, and much more. Thumb-Key Space: a resizable and moveable container to place custom Lemur objects. 35 user-definable Utility Buttons to trigger your own custom DAW remote commands. 3 SYSTEM REQUIREMENTS System Requirements Lemur 5 app. iPad 2 or newer. Not compatible with first-generation iPad. Untested on iPad Mini. & Android. Cubase 6.5 or later. Untested on Nuendo and earlier versions of Cuabse. 38% Lemur memory available. *You may bring this down to 27% by deleting the “Selector-Zoom” feature. Please see the chapter “Operation : Selector”. Use of this product assumes that the user has a basic familiarity with their DAW, Lemur, and MIDI. The manual will not cover this basic information. New users are highly advised to first familiarize themselves with these subjects. Test Devices C_brains has been successfully tested on: Cubase 6.5/7.5/8. iPad 2/ iPad Air / iPad Air 2. Important Performance Information C_brains’ power comes from over 1200 Logical Editor presets for Cubase. Since Cubase 7, with its new enhanced menu style, loading all 1300 of these presets will increase the loading time of Cubase as it works to build the Logical Editor UI. It will also again increase the time it takes for Cubase to rebuild the Logical Editor UI, but only when a new Logical Editor preset is created and saved to disk, or selected from within the Editor UI itself— selecting it from the Edit Menu is fine. These are minor inconveniences. C_brains gives you the option of installing a Limited Command Set to reduce loading times. Please see the chapter “Installation: Logical Presets”. On a modern computer running Cubase 7 or later, expect an increase in loading times between 7-20s ** Cubase 7 / 7.5 / 8 Cubase 6.5 Windows i7 4960X 6-core @ 3.6 GHz, SSD +7 s iMac 27” (Late 2012) 4-core @ 3.4Ghz, Hybrid Drive +17s Mac Pro (Early 2009) dual 4-core @ 2.93 Ghz, Hybrid Drive +20s Macbook Pro (late 2011) 4-core @ 2.6 Ghz, SSD +2s **Based on a limited number of test machines. Your particular results may be different 4 INSTALLATION 1. Install the Logical Editor presets. 2. Import the Generic Remotes into Cubase. 3. Load and configure C_brains. INSTALLATION : LOGICAL PRESETS 1. Install the Logical Editor presets Quit Cubase. Choose either the “Full Command Set” or “Limited Command Set” folder, and drag it into Cubase’s Logical Edit presets folder installation directory on your hard drive: MAC : *Your Username / Library / Preferences / *Your version of Cubase / Presets / Logical Edit Tip: If the Library folder is hidden, click on “Go’ in the Finder menu bar, then hold down the alt key to reveal the Library folder. PC: C: // Users / *Your Username / AppData / Roaming / Steinberg / *Your version of Cubase / Presets / Logical Edit Tip: The easiest way to jump to this file location is to open the command prompt and type %appdata%/Steinberg Important: do not put the C_brains Command Set folder within any additional folders inside the Presets/Logical Edit folder. In other words, do not create a new folder within the Presets/Logical Edit folder to store the Command Set folder; it should reside at the “root” level. For more information on the Logical Editor, please see the Cubase User Manual. 5 INSTALLATION : LOGICAL PRESETS Choosing which Command Set to install: C_brains’ power comes from over 1200 Logical Editor presets for Cubase. Since Cubase 7, with its new enhanced menu style, loading all 1200 of these presets will increase the loading time of Cubase as it works to build the Logical Editor UI. It will also again increase the time it takes for Cubase to rebuild the Logical Editor UI, but only when a new Logical Editor preset is created and saved to disk, or selected from within the Editor UI itself— selecting it from the Edit Menu is fine. On a modern computer running Cubase 7 or later, expect an increase in loading times between 7-20s ** Cubase 7 / 7.5 / 8 Cubase 6.5 Windows i7 4960X 6-core @ 3.6 GHz, SSD +7 s iMac 27” (Late 2012) 4-core @ 3.4Ghz, Hybrid Drive +17s Mac Pro (Early 2009) dual 4-core @ 2.93 Ghz, Hybrid Drive +20s Macbook Pro (late 2011) 4-core @ 2.6 Ghz, Cubase 6.5, SSD +2s **Estimates are based on a limited number of test machines. Your particular results may be different. If this minor inconvenience is unacceptable to you, you may opt to install only a limited number of presets. Please refer to the end of this chapter for a detailed comparison between the Full and Limited Command Sets. At any time, you may easily de-install or re-install either Command Set by swapping out the folders. To further reduce the number of presets, you could simply go ahead and delete the logical presets that you never plan on using— though doing so is “officially unsupported”. Don’t change anything in C_brains. When C_brains executes the missing commands, simply nothing will happen. _______________________________________________ TIP #1: If you plan on spending time creating many of your own custom presets, it is wise to temporarily uninstall the C_brains Logical presets to avoid having to wait for the Logical Editor UI rebuilds. Simply drag C_brains’ presets out of the Presets / Logical Editor folder while you are working, then drag them back in again once you are finished. There is no need to quit Cubase. _______________________________________________ TIP #2: Eliminate any folders-within-folders used to organize your Logical Editor Presets. 6 INSTALLATION : GENERIC REMOTES 2. Import the Generic Remotes Launch Cubase. Go to the “Devices” menu and select “Device Setup…” Click on the “+” button at the top left, and create TWO new Generic Remote: 2 x Select the first Generic Remote, press “Import”, and open the “C_brains Part 1/2” remote, and press “Apply’. Select the second Generic Remote and do the same, this time for “C_brains Part 2/2”: 7 INSTALLATION : GENERIC REMOTES Assign both Generic Remotes to the MIDI port that is connected to your Lemur: In MIDI Port Setup, make sure you have excluded this port from your All-MIDI Inputs. You don’t want to accidentally record C_brains’ output! Press “OK”. For more information on Generic Remotes, please see the Cubase User Manual 8 INSTALLATION : CONFIGURING LEMUR 3. Load and configure the C_brains project on your tablet Important note for iPads earlier than iPad Air: Please disable “Anti-alias Canvas objects” in Lemur Settings before attempting to upload the project; it may cause a crash. Open the C_brains Lemur project on your Mac/PC Lemur Editor and upload it to your tablet. Once C_brains is loaded onto your tablet , open the C_brains Preferences and point it to the desired Lemur Target. Don’t forget to confirm that the Lemur Target is actually connected to the same MIDI port that you specified in Cubase! C_brains Preferences Lemur Preferences Cubase Generic Remote Device Setup 9 INSTALLATION : CONFIGURING LEMUR Tell C_brains which Command Set you installed: Optional: Specify an alternate port for the Utility Buttons: C_brains reserves channels 1-14 for its commands. If you need to use these channels for your Utility Buttons, you may specify a different output port for the Utility Buttons only. You might want to do this if you already have another Generic Remote that you want C_brains’ Utility Buttons to control. Utility Buttons on a separate port. C_brains is now ready. For more information about making connections to Lemur, and importing and syncing Lemur projects to your tablet, please see the Lemur User Guide. _____________________________________________________________________________________ 10 INSTALLATION : COMMAND SET REFERENCE C_BRAINS FULL COMMAND SET Transformations Transpose: Transpose: ±12 Semitones Copy Transpose: ±12 Semitones Convert CC / PGM # — # Convert: 0-127 Vel / CC % / PB %: Set to Value: 0-127 Increment: ± 1, 5, 10 Nudge / Trim Nudge: ± Grid, 10 Ticks, 1 Frame Note Trim: ± Grid, 10 Ticks, 1 Frame Selections Notes: All Pitches: > < , < , > , = , ≠ 0-127 Velocities: > < , < , > , = , ≠ 0-127 Channels: > < , < , > , = , ≠ 0-16 Rhythms: 16th & 16th triplets in 2/2, 2/4, 3/4, 4/4, 5/4, 6/4, 7/4. Sixteenths in 5/8, 6/8, 7/8, 12/8. Lengths: < 50, 100 ms Muted/Unmuted CCs: All CC#: > < , < , > , = , ≠ 0-127 CC %: > < , < , > , = , ≠ 0-127 Channels: > < , < , > , = , ≠ 0-16 Muted/Unmuted PGM: All PGM#: > < , < , > , = , ≠ 0-127 Channels: > < , < , > , = , ≠ 0-16 Muted/Unmuted Others Grid: 1/1, 1/2, 1/4, 1/8, 1/16, 1/32, 1/64, 1/128, dotted, triplet Channel Assign: 0-16 Humanize: velocity/position/note ends ± 5 Snapping: On/Off Type: Grid, Grid Relative, Events, Shuffle, Magnetic Cursor, Gird + Cursor, Events + Cursor, Grid + Events + Cursor Quantize Quantize Note Ends iQ Quantize On/Off Legato Fixed Lengths Undo/Redo PB: Copy, Cut, Paste, Paste at Origin, All Delete PB %: > < , < , > -8192 - 8192 Step-Edit Limited to increments of 512 Mute/Unmute Channels: > < , < , > , = , ≠ 0:-6 Duplicate Muted/Unmuted Select All All Events: Select All in Cycle Channels: > < , < , > , = , ≠ 0-16 Velocity to CC1 / CC11 Muted/Unmuted Mirror, Reverse Additional Actions (post selection): Delete Overlaps (mono, poly) Delete, Filter, Mute, Unmute Transpose Setup Open Logical Editor UI 11 INSTALLATION : COMMAND SET REFERENCE C_BRAINS LIMITED COMMAND SET Transformations Transpose: Transpose: ±12 Semitones Copy Transpose: ±12 Semitones Convert CC / PGM # — # Convert: 0-127 Vel / CC % / PB %: Set to Value: 0-127 *Limited to increments of 4 Increment: ± 1, 5, 10 Nudge / Trim Nudge: ± Grid, 10 Ticks, 1 Frame Note Trim: ± Grid, 10 Ticks, 1 Frame Selections Notes: All Pitches: > < , < , > , = , ≠ 0-127 Velocities: > < , < , > , = , ≠ 0-127 *Limited to increments of 4 Channels: > < , < , > , = , ≠ 0-16 Rhythms: 16th & 16th triplets in 2/2, 2/4, 3/4, 4/4, 5/4, 6/4, 7/4. Sixteenths in 5/8, 6/8, 7/8, 12/8. Lengths: < 50, 100 ms Muted/Unmuted CCs: All CC#: > < , < , > , = , ≠ 0-127 CC %: > < , < , > , = , ≠ 0-127 *Limited to increments of 4 Channels: > < , < , > , = , ≠ 0-16 Muted/Unmuted PGM: All PGM#: > < , < , > , = , ≠ 0-127 Channels: > < , < , > , = , ≠ 0-16 Muted/Unmuted PB: All PB %: > < , < , > -8192 - 8192 Limited to increments of 512 Channels: > < , < , > , = , ≠ 0:-6 Muted/Unmuted All Events: Channels: > < , < , > , = , ≠ 0-16 Muted/Unmuted Additional Actions (post selection): Delete, Filter, Mute, Unmute Others Grid: 1/1, 1/2, 1/4, 1/8, 1/16, 1/32, 1/64, 1/128, dotted, triplet Channel Assign: 0-16 Humanize: velocity/position/note ends ± 5 Snapping: On/Off Type: Grid, Grid Relative, Events, Shuffle, Magnetic Cursor, Gird + Cursor, Events + Cursor, Grid + Events + Cursor Quantize Step-Edit Quantize Note Ends iQ Quantize On/Off Legato Fixed Lengths Undo/Redo Copy, Cut, Paste, Paste at Origin, Delete Mute/Unmute Duplicate Select All Select All in Cycle Velocity to CC1 / CC11 Mirror, Reverse Delete Overlaps (mono, poly) Transpose Setup… Open Logical Editor UI 12 OPERATION : OVERVIEW TRANSFORMATION PANELS Convert one CC or program change message into another Transpose or copy-transpose notes Increment velocities/CC/pitch-bend amount, or set to fixed value Nudge MIDI or trim note starts/ends by grid, 10 ticks, or 1 frame. SELECTOR: Search for and manipulate MIDI data based on its properties— for example, delete notes within a range, select notes that fall rhythmically on a certain beat, mute a specific CC#, or filter a specific channel. Preferences Thumb Key A user-definable pop-up space. Control Bar A contextual menu with rapid access to a variety of important MIDI editing actions such as grid, snapping, and quantize. Pencil Bar Rapid access to common editing commands such as undo, copy/paste, select all, and mute events. Utility Buttons 35 user-definable buttons that can send any note, CC, or program change message. 13 OPERATION : SELECTOR 1. Selector Before MIDI data can be edited, it must first be selected. The Selector finds, selects, and manipulates MIDI events by its attributes. The Selector can be a powerful time-saver, eliminating the tedious process of using a mouse to dig into controller lanes and select many MIDI events. First decide if the Selector must find events within the current selection, or, in the entire region (MIDI part). As you drill down the selection rows, the Selector will present different options based on the type of MIDI data, for example: In the entire region, select every 2nd triplet of every beat Within the current selection, select notes between D#0 and C3 Within the current selection, select pitch bend greater than 0 In the entire region, select CC #11 In the entire region, select all MIDI events not on channel 1 In the entire region, select all unmuted MIDI events 14 OPERATION : SELECTOR Press Zoom to enlarge the rulers. (Press Reset to drill back up to the top.) Important Note: All range values assume the “or equal to” mathematical operator: > < is ≥ ≤ within range, or equal to < is ≤ less than, or equal to > is ≥ greater than, or equal to. Pro Tip: The Selector-Zoom feature can be safely deleted from the program to save 10% of Lemur memory. Please see “Deleting Selector-Zoom to Save Lemur Memory” at the end of this chapter. Pressing Select will reveal a few convenient postselection optional actions. 15 OPERATION : SELECTOR The command is sent once your finger has lifted off. 1a. Making Rhythmic Selections: The Selector can find notes based on their rhythmic position in the bar or beat. This makes it easy to edit ostinatos, repeated rhythmic figures, and drum parts— a common process that is otherwise slow, tedious, and cumbersome. Catch Range Rhythmic selections have a “catch range” of ± y (thirty-second note). When the subdivision is duple, the catch range is ± y When the subdivision is triple, the catch range is ± y triplet The duration of notes doesn’t matter; it only matters that the note should start in the specified range. In the example below, this note will be selected even if it is 10 bars long. Grid = y Catch Range: Searching for downbeats will still select this note, even though it is not exactly quantized, because it falls within a 32ndnote on either side. 16 OPERATION : SELECTOR Bar Button-Strip Swipe your finger across the Bar button-strip to choose a rhythm in the bar. Hint: Swipe along the upper region, near the beams. This was a design choice— otherwise your finger gets in the way of seeing what you are selecting! Bar 1 Bar 2 Selecting notes that fall within the 9th note of every bar (± y) x Beat Buttons Use a Beat button to choose a rhythm in every beat. Bar 1 Bar 2 Selecting the first x note in every beat (± y ) 17 OPERATION : SELECTOR Beaming The beaming option helps you metrically visualize your music on Lemur. It has no effect on the output of the Selector or on Cubase. Beaming 7/8 as 2+2+3 or 3+2+2. Both beaming options will select the 6th x in 7/8 . Important Note on Multi-Meter Selections When notes aren’t quantized, be careful when selecting musical passages that contain more than one meter; the Selector could produce unwanted results. 4/4 3/4 Multi-Meter Selection with Unquantized Music: Since the Selector only looks at note starts, searching for the 4th beat in a bar of 4/4 could also select the 1st beat when the next bar is 3/4. 18 OPERATION : SELECTOR 2. Selector Technical Considerations 2a. Screen Redraw Bug Correction Cubase has a Logical Editor bug that sometimes causes deselected notes to appear selected or even partially selected. This is easily fixed by executing any command that redraws the screen. C_brains does this automatically. 2 messages are sent, one to zoom-in slightly, then one to zoom back out. This has happens very quickly and should be more or less invisible to you. You can disable this feature in Preferences, but there is no apparent reason to do so. What’s this??? The last two notes appear selected...well, one is, um, half-selected… even though they aren’t actually selected! 2b. Deleting Selector-Zoom to Save Lemur Memory The Selector-Zoom function is a helpful addition, but it also uses nearly 10% of Lemur memory. If you need more room in your Lemur template, you can safely delete it from C_brains. In the Lemur Editor, open the C_brains project folder and container. Open “_appData”. Scroll down to the “0. C_brains” folder and open it. Choose “SelectorZoom” and hit delete. 19 OPERATION : SELECTOR 2c. MIDI Display Resolution For the Selector to properly perform rhythmic selections, Cubase’s MIDI display resolution must be set to the default setting of 480 PPQ (120 Ticks). This setting can be found in “Preferences: MIDI”. ____________________________________________________________________________________ 20 OPERATION : TRANSFORMATION PANELS 2. Transformation Panels Use Transformation Panels to modify selected MIDI events. The Transformation Panels are type-sensitive. For example, if an entire region is selected, using the CC/PGM # Conversion panel won’t accidentally convert notes. Likewise, transposing notes up by a minor 2nd won’t accidentally convert CC#1 into CC#2. Nudge works on all selected MIDI events regardless of the type, but Note Trim won’t accidentally trim CC data. _____________________________________________________________________ CC / PGM # — # Conversion: Select the CC/PGM data to be converted. Dial in the new CC/PGM # (0-127). Press Enter. This is useful, for example, when one of your virtual instruments uses CC#11 to control dynamics, and you want to copy the part to another virtual instrument that uses CC#1. __________________________________________________________________ Velocity/ CC /Pitch Bend Amount This Transformer applies to all selected MIDI messages, so if you only want to change note velocities, make sure no CCs are selected. Select the MIDI data to be changed. Use the Wheel to set all to the same value (0-127). The Wheel’s command is sent once your finger is lifted off. Use the + or - buttons to increment/decrement by the selected value (1, 5, 10). Hold down the + or - buttons to repeat. 21 OPERATION : TRANSFORMATION PANELS Transpose Notes Select the notes to be transposed. Choose the interval from the menu (±12). Use the ˅ or ˄ buttons to transpose up or down. Hold down the ˅ or ˄ buttons to repeat. Hold the Copy button before pressing the ˅ or ˄ buttons to copy-transpose; new notes will be created at the interval. m2 and P8 are conveniently located first, directly next to the menu-open button. They are always only a swipe away! _______________________________________________________________________ Nudge / Note Trim Nudging applies to all selected MIDI messages, regardless of type. Note trim only affects notes. Select the data to be nudged, or the notes to be trimmed. Choose the amount from the menu (Grid, 10 Ticks, 1 Frame). To nudge, use the < or > buttons to move the data left or right. Hold down the < or > buttons to repeat. 22 OPERATION : TRANSFORMATION PANELS ↔ ↔ Trim note start Trim note end To trim note starts/ends, press one of the handles and swipe it slightly in the direction that you would like to extend or contract. Hold down the handle while swiped to repeat. Opening the nudge value menu also reveals 3 extra quick-commands related to note length. Tips for Nudging: Nudge by grid when you want to nudge amounts relative to a rhythmic value. 10 Ticks is useful as a general nudge value when you need to slightly move data ahead or behind the beat, for example to compensate for “laggy” virtual instrument response, or to introduce slight humanization. There is a dedicated Humanize button in the Control Bar which randomly nudges ± 5 Ticks. Nudging by 1 Frame is indispensable to film composers who need to closely match video. 23 OPERATION : CONTROL BAR 3. Control Bar In its default state the Control Bar appears as an elegant looking grid selector. Pressing the middle button exposes a menu with different commands. Notice how “Quantize” and “Snapping Toggle” are located directly next to the menu-open button. They are always only a swipe away. 24 OPERATION : CONTROL BAR The white buttons take you to different sets of commands. By swiping over to “Snap Type…” ...the Snapping options are revealed. There’s also “Humanize”… “Channel Assignment”… and “Specials”, that has a mix of MIDI related stuff in there. 25 OPERATION : CONTROL BAR Grid return is farthest to the right, but that’s a good thing; just do a big swipe to the right and you’ll hit it. _____________________________________________________________ 26 OPERATION : PENCIL BAR 4. Pencil Bar In its closed state, the Pencil Bar always shows “Undo” and “Redo”. We all make mistakes. Press the center button to open the Pencil Bar, revealing its full glory. Swipe over to a command. The command is sent once your finger has lifted off, returning the Pencil Bar to its closed state. _____________________________________________________________ 27 OPERATION : THUMB-KEY 5. Thumb-Key The Thumb-Key is a floating Lemur container for you to put whatever you like — transport, a few faders, some of your own custom creations, etc. The container may be freely moved or resized onscreen. By default, the Thumb-Key container disappears when the thumb is released, but it can be set to “latch” in C_brains Preferences. 28 OPERATION : THUMB-KEY Just drag objects into the container in the normal way: Always make sure to save your project whenever you make a change. Note: In the event of a future software upgrade, you will need to move your Thumb-Key’s contents to the new version. For instructions, please see the chapter “Transferring Settings”. _________________________________________________________________________________________ 29 OPERATION : UTILITY-BUTTONS 6. Utility Buttons The Utility-Buttons are a set of 35 customizable buttons that can send note, CC, or program change messages. Use them for anything you like, for example, opening controller lanes, triggering your own custom logical presets, or executing DAW commands. Press any Utility Button to reveal all 35. The selected command is sent once your finger has lifted off. To edit a Utility Button, swipe over to it but don’t release. Then, with the other hand, press “Edit Selected” and release. Name the button and set the message type, channel, and value. Channels 1-14 are reserved for C_brains. If you need to send messages on these channels, specify an alternate port in C_brains Preferences.. Always make sure to save your project whenever you make a change. Note: In the event of a future software upgrade, you will need to move your Utility Buttons to the new version. For instructions, please see the chapter “Transferring Settings”. _________________________________________________________________________________________ 30 TRANSFERRING SETTINGS 1. Copy /Paste the Thumb-Key contents. 2. Use the C_brains_Migration_Assistant to transfer the Utility Buttons and Preferences. TRANSFERRING SETTINGS : THUMB-KEY 1. Copy/Paste the Thumb-Key contents. Open the Lemur Editor on your Mac/PC and download your working copy of C_brains. Once it’s finished downloading, disconnect. C Disconnect or you could accidentally change your old, working copy! Open the C_brains folder and container, and choose “Thumb_Key”. Press CMD+C (Mac) / CTRL+C (PC) to copy it to your clipboard. Copy 31 TRANSFERRING SETTINGS : THUMB-KEY Now load the new version of C_brains into the Lemur Editor. Again, open the C_brains folder and container, but this time delete the Thumb-Key that is there. Delete Re-select the C_brains container and press CMD+V (Mac) / CTRL+V (PC) to paste it into the C_brains container. Paste Make sure C_brains is selected as the paste destination! Save this new copy of C_brains, you will need to come back to it. SAVE 32 TRANSFERRING SETTINGS : UTILITY BUTTONS 2. Use the C_brains Migration Assistant to transfer the Utility Buttons and Prefs. Once again, download your working copy of C_brains. Once it’s finished downloading, disconnect. C Disconnect or you could accidentally change your old, working copy! Drag the “C_brains_Migration_Assistant” file into the editor. Hold down the “E” key on your keyboard to put Lemur into touchemulation mode. Click “COPY”. Hold E & Click 33 TRANSFERRING SETTINGS : UTILITY BUTTONS The data is now stored inside the Migration Assistant: Now select the Migration Assistant and Press CMD+C (Mac) / CTRL+C (PC) to copy it to your clipboard. Copy Open the saved version that you created. 34 TRANSFERRING SETTINGS : UTILITY BUTTONS Paste the Migration Assistant into the new Project with CMD+V (Mac) / CTRL+V (PC). Paste Hold down the “E” key to put Lemur into touchemulation mode. Click “PASTE”. Hold E & Click The settings have been transferred. You may now delete the Migration Assistant and re-upload your project back onto your tablet. ________________________________________________________________ 35 DISCLAIMERS EULA DON'T PIRATE OR SHARE. You may not share, sell, post online, make available to a file sharing service, redistribute, transfer to another user, or otherwise republish any MIDI Kinetics product, in whole or in part. This restriction applies both to the file itself and to the source code contained therein, and any accompanying product files of any type. ONE LICENSE PER USER. Purchasing from MIDI Kinetics entitles you, the purchaser, to a single license to the product for personal use only. You may install MIDI Kinetics products on all your personal devices without restriction, however you may not install them on all the devices for all users in a multi-user environment, such as those found in music production or educational facilities, unless you are the full-time and primary user of those devices. Please purchase separate licenses for each user workstation. DON'T REPUBLISH THE CODE OR CREATE DERIVATIVES FOR PUBLIC USE. You may modify the software for your personal use, but you may not reuse and share, resell, post online or in any public or private forum, or otherwise republish the original code nor derivative works created using the code or product files, in whole or in part, without permission. SOFTWARE SOLD AS IS. The software is sold as is and all sales are final. Prior to purchasing you have ensured that your system meets the system requirements, and that you understand the software’s intended use. No guarantees are offered that it will meet your requirements or work on your specific system; nor are any guarantees of compatibility made in the future event that any other 3rd party releases an update to their software or hardware which results in the software ceasing to function. No returns or refunds. LIMITATIONS OF SUPPORT. Use of MIDI Kinetics products assumes that the user has a basic operational understanding of their hardware, DAW, Lemur, and MIDI. No support is offered for any 3rd party product. NO LIABILITY. USE AT OWN RISK. You assume full responsibility for any damage, loss, or data corruption that occurs as a result of using any MIDI Kinetics product. No warranty is offered or implied. ________________________________________________________________________________ Some of the images or features depicted or mentioned in this manual may differ from release versions. ________________________________________________________________________________ Names and images of 3rd party products are used for demonstration purposes only. 36