1
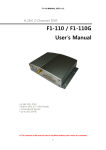
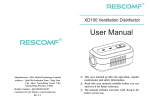
Confined Space
Tripod Unit
M10
User’s Manual
Updated 09-04
Doc 90-032020004
AO Safety/SafeWaze Tripod Model M10
The AO Safety/SafeWaze Tripod Model M10 is a portable, lightweight, high-strength anchor point
for AO Safety/SafeWaze confined space and rescue equipment. The major parts for the AO Safety/
SafeWaze Tripod are illustrated described below.
The cast aluminum head (1) of the Tripod include either (3) two 5/8” diameter forged steel eyebolts
or two locking swivel hooks and locking leg hinge pins (2). The lengths of the three aluminumtelescoping legs (5) can be adjusted using attached lock pins (4). The cast aluminum Tripod feet
(6) have rubber skid pads to limit movement on slippery surfaces. A safety chain (7) provides
secondary back up by preventing the legs from spreading- includes adjustment buckle. A mounting
Bracket (8) is attached to mount the 3 way units. Easy release of lower leg from extended position
by pressing and holding leg latch release button (9) and sliding leg up into larger leg piece..
2
2
205G-100,
100ft unit
with bracket
1
3
3
Pulley &
carabiner
supplied.
8
9
4
9
4
Holes spaced
to mount 3
way unit205G-X
50ft, 75ft, 3
way unit
shown for
illustration,
not included,
purchase
separately
5
9
6
9
7
6
Figure 1
Doc 90-032020004
Page 2
M10 Tripod
3-way unit shown for illustration
B
48.875 ” min
94.5” max
55.125” mini
A
Overall Dimensions
70”
C
D
78” max
49” min
Basing Dimensions
Doc 90-032020004
Page 3
Technical Specifications
7 ft 7” M10 Tripod
Interior headroom height with legs at maximum
extension with pulley and carabiner attached
Absolute Maximum hole diameter
Working load
Overall height when set up with legs at maximum
extension
Storage length
Leg length adjustment increments, after initial
set up.
Weight-includes carabiner and pulley and bracket
Max distance from leg to leg- max extension
Minimum height-legs not extended up but out.
Minimum distance between legs, legs not
extended up but are stretched out
78
78
350
90.5
55
4
55
70
54”
42
NOTE:
All lengths are in inches and all weights are in pounds. Leg webbing will cross over a
portion of the opening. Max load 3300 lbs. Tested: Static load with webbing – 5400lbs
Installation Instructions
All individuals who may use or be required to use the Tripod Model M10 must be instructed on how
to use in correctly. They must read, understand, and follow all instructions and warnings stated on
the Tripod or contained in or attached to the Tripod. A review of the proper procedure should be
made before each use.
Assembly
Before using, make sure that the type of Tripod meets the application requirements as described in
the technical specification, that is:
•
•
•
The center of the opening corresponds to the center of the Tripod.
The diameter of the opening is within the range specified in the technical specification.
The interior height of the Tripod is chosen correctly.
Before assembling, inspect the vicinity around the work area for debris and other material that could
cause injuries or interfere with the operation of the system. Be sure that the Tripod is positioned on
a hard, stable surface before use, and that the web strap (7) is in place and secured. Also, before
descent, caution should be taken to ensure that all equipment is clear of any electrical hazard and
that proper ventilation has been provided in the work area. There is more than one way to
assemble the Tripod. Below is outlined recommended procedure for assembly.
Doc 90-032020004
Page 4
RECOMMENDED ASSEMBLY
1. Lay the contracted Tripod on the floor at a safe distance from the opening.
2. Extend all three legs (5) to full length, securing each with the attached lock pins (4), and
leg latch(9) inside leg. Leg latch will click and button (9)will be seen when done properly..
3. Lift the Tripod to the vertical position and pull all three legs (4) away from the Tripod
center point, making sure that the lock (2) where each leg is hinged to the head (1) is fully
engaged.
4. Check to make sure that:
• All extended legs (5) are secured with lock pins (4), and leg latch (9).
• Each leg (5) is set at the furthest point from the center and locked by the head hinge
lock pins(2) and leg latch (9).
• The leg chain (7) is in place and adjusted to the right length.
5. Place the Tripod over the confined space opening.
6. Make sure that the Tripod is in a stable position with each foot (6) flat on the floor.
Disassembly
1. Remove all AO Safety/SafeWaze Fall Protection equipment from the Tripod.
2. Remove the Tripod from the confined space opening.
3. After unlocking leg hinges (2) in the Tripod head (1) by pressing each leg button (2),
press leg release button (9), and gradually push each leg (5) to the Tripod center point
and embrace all three legs (5). Lower the Tripod to the ground.
Pull the leg lock pins (4) and push leg latch release button (9), and lower leg sections into
the upper leg sections. Lock the contracted legs (5) in the storing position with the lock
latch buttons (see Figure 2).
2
5
4
9
Figure 2
Doc 90-032020004
Page 5
Storage and Maintenance Log for Tripod Model M10
A written log of all servicing and inspection dates for this
device should be Maintained by the company safety officer.
1.
2.
Always dismount the devices from the Tripod. Store the Tripod in
Transport mode (figure 2) in an area free of corrosive elements and
excessive heat.
Do NOT store this unit in environments corrosive to aluminum.
Additionally, avoid use in areas that may contain high concentrations of
ammonia. Avoid use with acids, alkaloids, or other caustic chemicals
especially at elevated temperatures.
3.
Clean exterior of case with water and mild soap detergent, rinse, and
thoroughly air dry. Do NOT use harsh chemicals. Clean labels as required.
4.
Never attempt to lubricate, adjust, repair, or modify any part or
Components. Repair MUST be performed by AO Safety/SAFEWAZE, 322 Industrial Ct,
Concord, NC 28025. Return unit, properly packaged, with contact information.
AO Safety/SafeWaze Customer Service
Phone 800-560-1094 , Fax 800-560-1290
WARNINGS
Employer: Instruct employee as to proper use and warnings before use of this Equipment.
Read, understand, and follow all instructions and warnings provided with this unit.
For use by properly trained personnel only.
Always use the buddy system (two workers) while operating.
Insure that the Tripod is positioned on a hard, stable surface before use.
To insure compatibility, use only AO Safety/SafeWaze components.
Do NOT use the Personnel and Material winch at the same time. Use only one
device per pulley assembly per eyebolt.
Inspect before use. If any part or component shows damage or excessive wear, or
does not function properly, the entire unit should be removed from service.
Never use any occupational protective equipment for anything other than its
intended use.
All occupational protective equipment must be inspected and thoroughly tested
before each use.
Do NOT use this unit if the total workload exceeds 310 lbs.
Doc 90-032020004
Page 6
INSPECTION PROCEDURES
WARNING: NEVER use the Tripod Model M10 without prior inspection
1.
Inspect the work area for debris and other material that could cause injuries or
Interfere with the operation of the unit. Be sure that the Tripod is positioned on
stable, hard ground before setting it up.
2.
The leg chain and all locking pins must again be checked to see they are correctly
securing equipment. Never use the Tripod without the chain.
3.
A competent person, for example a safety director, must schedule regular
safety inspections based on amount for use and working conditions.
4.
Remove from service immediately if any function, component or part does not
pass this inspection, or whenever subjected to a severe free fall.
5.
Never use the Tripod in conjunction with safety devices not manufactured by
SAFEWAZE or designed specifically for use with this Tripod.
WARRANTY
AO Safety/SafeWaze
SAFEWAZE Warrants mechanical devices against factory defects in
workmanship and materials for a period of one year from the date of shipment.
SAFEWAZE reserves the right to have any defective item returned to its
Plant for inspection before making a repair or replacement.
This warranty does not cover damage resulting from abuse, damage in transit,
Or other damage beyond the control of SAFEWAZE.
AO Safety/SafetWaze.
Doc 90-032020004
Page 7