1
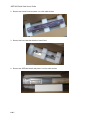
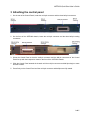
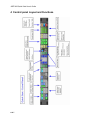
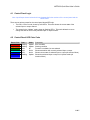
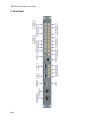
Jazz-800 Universal Signal Processor
Quick Start User’s Guide
874-08M00-100
July 31, 2007
1 Useful Information
1.1 Getting assistance with the JAZZ-800
This Quick Start Guide will help in the setup of the Miranda JAZZ-800. For additional details, refer to the
JAZZ-800 User’s Manual.
However, if you need further assistance, please contact the Miranda Technical support centre
nearest you:
Americas
Telephone:
+1-800-224-7882
e-mail:
[email protected]
Asia
Telephone:
+81-3-5730-2987
e-mail:
[email protected]
Europe, Middle East,
Africa, UK
Telephone:
+44 (0) 1491 820222
e-mail:
[email protected]
France (only)
Telephone:
+33 (0) 1 55 86 87 88
e-mail:
[email protected]
Visit our web site at www.miranda.com
1.2 Servicing
Only authorized service personnel should open the unit. Disconnect AC sources to the power supply(ies)
before servicing.
2 Unpacking the JAZZ-800
1. Open the shipping box, and remove the top foam insert.
1 of 7
JAZZ-800 Quick Start User’s Guide
2. Remove the Control Panel and place it on a flat, stable surface.
3. Remove the foam insert that held the Control Panel.
4. Remove the JAZZ-800 chassis and place it on a flat, stable surface.
2 of 7
JAZZ-800 Quick Start User’s Guide
3 Attaching the control panel
1. On the rear of the Control Panel, locate the multi-pin connector and the three ball-pin connectors.
2. On the front of the JAZZ-800 chassis, locate the multi-pin connector and the three ball-pin mating
connectors.
3. Orient the Control Panel so that the multi-pin connector and the ball-pin connectors of the Control
Panel line up with their respective mates on the front of the JAZZ-800 chassis.
4. Slide the Control Panel towards the chassis until the multi-pin connector and ball-pins begin to mate
with the Chassis.
5. Press firmly on the Control Panel until the multi-pin connector and ball-pins are fully seated.
3 of 7
JAZZ-800 Quick Start User’s Guide
4 Control panel Layout and Functions
4 of 7
JAZZ-800 Quick Start User’s Guide
4.1 Control Panel Logic
Note: Input/Output channel selection drives the state of all other sections of the control panel and the
MENUTREE.
There are two primary states for the control panel button/LED logic.
•
The first is “Active” mode, shown by solid LED’s. This mode shows the current state of the
selected input or output channel.
•
The second is the “Update” mode, shown by flashing LED’s. This mode allows the user to
change the state of the currently selected input or output channel.
4.2 Control Panel LED Color Code
Button Color
Red
Orange
Green
Cyan
Blue
Blue
State
Flashing
Flashing
Solid
Solid
Solid
Flashing
Mode
Update
Update
All
Active
Active
Update
Comments
Error condition
Warning condition
Function is available, but not selected
Shows association with currently selected input or output
Shows current state of selected input or output (all sections follow)
Shows that selected input or output is in Update mode (all
sections follow)
5 of 7
JAZZ-800 Quick Start User’s Guide
5 Rear Panel
6 of 7
JAZZ-800 Quick Start User’s Guide
6 Setup
6.1 Detail Enhance & Sharpness
There is a known issue with the default setting for Detail Enhance & Sharpness that cause the output
image to be soft. To correct this set the Detail Enhance slider to ‘0’ and the Sharpness slider to ‘63’. This
will be corrected in the next software release.
To Adjust, press the Menu button to the Right of the LCD display on the Control Panel
To ensure that these values are reloaded should the JAZZ-800 be turned off or lose power, save them to
the ‘Default’ Preset. This Preset is automatically recalled when the JAZZ-800 is powered on.
7 of 7