1
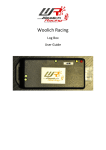
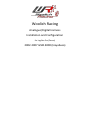
Woolich Racing
Analogue/Digital Harness
Installation and Configuration
for Log Box Pro (Denso)
2002-2007 GSX1300R (Hayabusa)
1) Introduction
To Log Engine Data on the 2002-2007 Suzuki GSX1300R Hayabusa an additional Analogue/Digital
Harness needs to be installed. This Installation Guide will describe the installation of the AD Harness
and the configuration of the AD Inputs on the Log Box Pro (Denso)
2) Hardware
Woolich Racing AD Harness (RJ45 harness)
5 * wire taps
3) Tools
The following tools will be useful when installing the WoolichRacing.com bike harness:
1) Pliers to crimp wire taps
2) Side cutters to trim AD Harness wires
4) AD Sensor Calibration
Before connecting the AD Inputs to the bike harness, the AD inputs should be calibrated. Please refer
to the Log Box Pro (Denso) user guide for calibration instructions. The Log Box Pro (Denso) User
Guide can be found on the User Guides and Installation Instructions page.
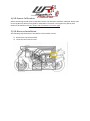
5) AD Harness Installation
The following steps describe the installation of the on bike harness:
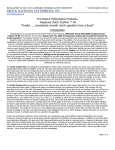
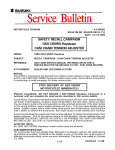
1) Remove the seat from the bike.
2) Locate the ECU under the seat.
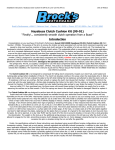
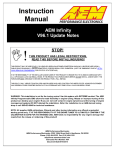
6) AD Harness – ECU Harness connection
Function
AD Channel
AD Harness Wire Colour
ECU Pin
TPS
AD1
Blue
49 (Pink/Black)
RPM
AD2
Green
43 (Green)
Atmospheric Pressure AD3
Orange
52 (Green/Yellow)
Manifold Pressure
AD4
White
58 (Green/Black)
Ground
Black
35 (Black/White)
Note: Bike Harness wire colours are a guide only and may differ depending on year of bike.
AD1 – TPS
Locate pin 49 on the ECU, this pin is for the Throttle Position Sensor (TPS).
Trim the blue wire from the AD Harness to a suitable length
Use the supplied wiretap to connect the blue wire from the AD Harness to the
(pink/black) wire on the bike main harness connected to ECU pin 49
AD2 – RPM
Locate pin 43 on the ECU, this pin is for the crank angle + sensor and will be used as
the AD input to measure RPM.
Trim the green wire from the AD Harness to a suitable length
Use the supplied wiretap to connect the green wire from the AD Harness to the
(Green) wire on the bike main harness connected to ECU pin 43.
AD3 – Atmospheric Pressure
Locate pin 52 on the ECU, this pin is for the Atmospheric Pressure Sensor.
Trim the orange wire from the AD Harness to a suitable length
Use the supplied wiretap to connect the orange wire from the AD Harness to the
(green/yellow) wire on the bike main harness connected to ECU pin 52
AD4 – Manifold Pressure
Locate pin 58 on the ECU, this pin is for the Manifold Pressure sensor.
Trim the white wire from the AD harness to a suitable length
Use the supplied wiretap to connect the white wire from the AD harness to the
(green/black) wire on the bike main harness connected to ECU pin 58.
Ground
Locate pin 35 on the ECU, this pin is a ground
Trim the black wire from the AD Harness to a suitable length
Use the supplied wiretap to connect the black wire from the AD sensor harness to
the (black/white) wire on the bike main harness connected to ECU pin 35.
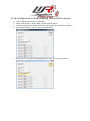
5) AD Configuration in Woolich Racing Tuned (WRT) software
Connect Log Box Pro (Denso) to USB cable
Move mode switch to “Engine Data” position (Yellow LED on)
Connect RJ45 plug from AD Harness to AD1 RJ45 connector on Log Box Pro (Denso)
Open WRT and select “Tools”->”Device Configuration”
Check box for “Only Log Analogue/Digital Data” then click the “Save” button
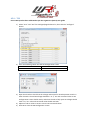
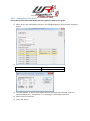
AD1 – TPS
Ensure AD input has been calibrated as per the Log Box Pro (Denso) user guide
1) Select “0-5v” and “TPS” for Analogue/Digital Channel 1, then click the “Configure”
button
2) Enter the following values into the AD Configuration screen
1.1v
0.00
4.3v
100.00
3) Open the throttle to check that the voltage and output for throttle position match i.e.
when throttle is closed AD voltage should be 1.1v +/- 0.1 and converted value on AD
Configuration screen should read 0, and when throttle is fully open AD voltage should
read 4.3 +/- 0.1 volts and converted value should read 100.
4) Adjust 0v and 5v values to ensure correct TPS converted values.
5) Click OK to close the AD Configuration screen.
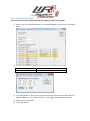
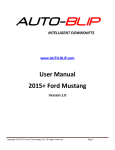
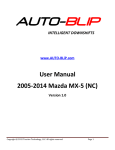
AD2 – RPM
1) Select “Frequency (Rising Edge) and RPM for Analogue/Digital 2 from the Device
Configuration Screen, then click the “Configure” button.
2) Enter the following values into the AD Configuration Screen
Pulses per Sample
Conversion Factor
23
60.000
Teeth on Crankshaft Sensor
Converts Hz to RPM
3) Start the bike to confirm that the converted value corresponds to the RPM of the bike.
4) Click the “OK” button to close the AD configuration screen.
AD3 – Atmospheric Pressure
Ensure AD input has been calibrated as per the Log Box Pro (Denso) user guide
1) Select “0-5V” and “Atmospheric Pressure” for Analogue/Digital 3, then click the “Configure”
button
2) Enter the following values into the AD Configuration Screen
0v
0.0
3.6v
76.00 (cmHg)
3) Turn Bike Ignition on (do not start engine) and check voltage and converted values are
approximately 3.6v +/- 0.1 and 76.0 +/- 1.0 (cmHg) (i.e. Atmospheric Pressure)
4) Adjust values as required.
5) Clock “OK” button
AD4 – Manifold Pressure
Ensure AD input has been calibrated as per the Log Box Pro (Denso) user guide
1) Select “0-5V” and “Manifold Pressure” for Analogue/Digital 4, then click the “Configure”
button
2) Enter the following values into the AD Configuration Screen
0v
0.00
3.6v
76.00 (cmHg)
3) Turn Bike Ignition on (do not start engine) and check voltage and converted values are
approximately 3.6 +/- 0.1 volts and 76.0 +/- 1.0 (cmHg) (i.e. Atmospheric Pressure)
4) Adjust values as required.
5) Clock “OK” button
Save Settings to Log Box Pro (Denso)
Once the AD values have been configured, click the “Save” button on the “Device Configuration”
screen, the AD configuration values will be saved to the Log Box Pro (Denso)
Click the “Close” button to complete the AD input configuration.
Warranty
Woolich Racing Warranty obligations are limited to the terms set forth below.
Woolich Racing warrants this product against defects in material and workmanship for the period of one (1) year. The
warranty period begins with the date of original retail purchase.
This limited warranty is made only to the original end user purchaser ("you") of the product and does not extend to any
subsequent purchasers or owners of the product. The "original end user" is the first user to put the product into service in
any fashion. It is your responsibility to establish the warranty period by verifying the original purchase date.
If you discover a defect, Woolich Racing will, at its option, repair or replace this product with a new or reconditioned
product at no charge to you, provided you return it during the warranty period, with transportation charges prepaid, to
Woolich Racing. Please attach your name, address, telephone number, and a copy of the receipt from Paypal as proof of
date of original purchase, as well as a detailed description of the problem for which service is requested. You are
responsible for packing the product to be returned. If the repairs are covered by the Limited Warranty and if the product
was properly shipped to Woolich Racing, Woolich Racing will pay the return shipping charges. This warranty applies only to
Woolich Racing products. This warranty does not cover damaged resulting from accident, misuse, abuse, or neglect and/or
damage during any type of transportation resulting from improper packaging; damage to any product which has been
altered in any fashion, including damage resulting from causes other than product defects, including and not by way of
limitation, lack of technical skill, competence, or experience of the user, and/or failure to use the product in accordance
with the instructions provided in the User's Manual or Installation Manual; and service performance by an unauthorized
person or entity. Any implied warranties including fitness for use and merchantability are limited to the period of the
expressed warranty set forth above. The remedies provided under this warranty are exclusive and in lieu of all others.
Disclaimer
This product is meant for Off-Road use only and is not street legal. Owner assumes responsibility for his or her own actions
when using this product. Woolich Racing hereby expressly disclaims liability and shall not be responsible for incidental,
consequential and contingent damages or any kind or nature, including, without limitation: damages to persons or
property, whether a claim for such damages is based upon warranty, contract, tort or otherwise; damages due to or arising
out of the loss of time; or loss of profits. Woolich Racing shall not be responsible for any damages caused by the presence
of error or omission in any of its manuals, instructions or related materials.