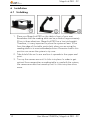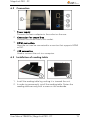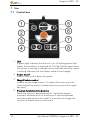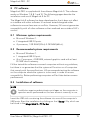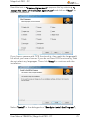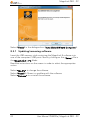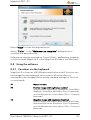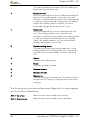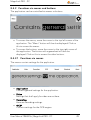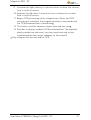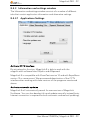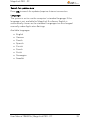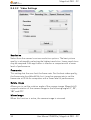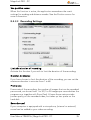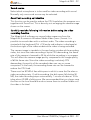
1
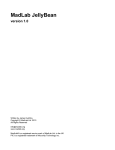
User Manual MagniLink PRO - PC LVI Low Vision International Verkstadsgatan 5 Tel: +46 470-727700 [email protected] SE-352 46 Växjö Faks: +46 470-727725 www.lvi.se MagniLink PRO - PC Table of Contents 1 2 3 4 About LVI......................................................................................... 5 Introducing MagniLink PRO........................................................... 6 Safety information .......................................................................... 8 Unpacking ....................................................................................... 9 4.1 Packaging .................................................................................... 9 5 Accessories ................................................................................... 10 6 Installation ..................................................................................... 12 6.1 Unfolding ................................................................................... 12 6.2 Connection ................................................................................ 13 6.3 Installation of reading table ..................................................... 13 7 Use ................................................................................................. 14 7.1 Control box ............................................................................... 14 7.2 Menu .......................................................................................... 15 7.3 Reading table ............................................................................ 17 7.4 Camera ...................................................................................... 18 7.5 Battery ....................................................................................... 18 8 PC software ................................................................................... 19 8.1 Minimum system requirements ............................................... 19 8.2 Recommended system requirements ..................................... 19 8.3 Installation of software ............................................................. 19 8.4 Using the software .................................................................... 23 9 Ergonomics ................................................................................... 42 10 Troubleshooting ........................................................................... 43 11 Technical information ................................................................... 44 12 Declaration of Conformity ........................................................... 45 User Manual 7944070a | MagniLink PRO - PC 3 MagniLink PRO - PC 4 User Manual 7944070a | MagniLink PRO - PC MagniLink PRO - PC 1 About LVI LVI Low Vision International AB was founded in 1978 and is one of the world's leading manufacturers of equipment for persons with visual impairments. Development of new products takes place in close cooperation with users and professional staff within the low vision rehabilitation industry. LVI is quality-certified in accordance with ISO 9001 and environmentally-certified in accordance with ISO 14001. The information in this manual has been carefully checked and is believed to be accurate. However, LVI assumes no responsibility for any inaccuracies that may be contained in this manual. In no event will LVI be liable for direct, indirect, special, exemplary, incidental, or consequential damages resulting from any defect or omission in this manual. In the interest of continued product development, LVI reserves the right to make improvements in this manual and the products it describes at any time, without notice or obligation. User Manual 7944070a | MagniLink PRO - PC 5 MagniLink PRO - PC 2 Introducing MagniLink PRO Thank you for choosing this video magnifier. Our aim is for you to be satisfied with your choice of supplier and reading aid. MagniLink PRO is a video magnifier designed for people with visual impairment. The video magnifier offers features including the potential to set the magnification, autofocus, several artificial colours, the option of switching the magnifier between reading mode, mirror mode and distance mode and the option of adjusting the brightness. MagniLink PRO can be connected to any monitor, a PC or a Mac. It is also possible to collapse the system when it is not being used or for transportation. MagniLink PRO offers genuine full-HD quality. Available accessories comprise a dockable reading table, battery as well as software for OCRprocessing and reading text aloud. 6 User Manual 7944070a | MagniLink PRO - PC MagniLink PRO - PC Table of additions to the product code MLPRO-FHD- depending on which accessories have been ordered. A Dockable reading table with friction brake X/Y B Pre-installed battery C Text To Speech for PC D Text To Speech for Mac MagniLink PRO meets all the requirements for CE marking of medical devices in accordance with Directive 93/94/EEC. Our products comply with MDD 93/94/EEC with additions from Directive 2007/47/EC. User Manual 7944070a | MagniLink PRO - PC 7 MagniLink PRO - PC 3 Safety information Only use the power adaptor supplied with the product. Using an incorrect type of power adapter may cause damage to the system. Place the power cord in such a way that you can neither trip over it or that crush damages can occur. If the product is moved from the cold into a warm room, condensation (moisture) can form inside the unit or on the camera lens. To prevent problems with condensation, the apparatus should be installed in the room at least 30 minutes prior to usage. Never operate the product if it has been exposed to water or other liquids. Damaged or wet product can cause electric shocks or fire. Only use the battery supplied with the product. If the battery needs to be changed, please contact LVI. Be careful not to catch your fingers when collapsing your MagniLink PRO. When MagniLink PRO is to be moved, collapse it and lift from beneath. If MagniLink Pro has a dockable reading table, this must be anchored and locked before moving the system. If the system requires cleaning, pull out all cables and use a slightly damp (not wet) cloth. Use only water or a cleaning agent that is intended for monitors and computers. Make no further adjustments, even if the product does not function normally after following the functional descriptions. Pull out the power cable and contact service staff or the product distributor. Only use spare parts that are specified by LVI. Always switch off the power when the system is not being used. If in doubt, contact your supplier. Warning The product is supplied packed in a plastic bag. To avoid risk of suffocation, keep the bag out of the reach of children and infants. 8 User Manual 7944070a | MagniLink PRO - PC MagniLink PRO - PC 4 Unpacking The system is supplied in a box with the following contents: Reading camera Power adaptor Carrying case User Guide USB memory stick with software USB cable HDMI to DVI cable HDMI to HDMI cable Check first that the box has no external damage. In the event of damage, contact the delivery company and file a notification of damage. Open the box and take out the MagniLink PRO; remove the packaging. For further information, please see Installation page 12. 4.1 Packaging The packaging consists of the following packaging material (LVI recommends that the packaging be kept in case you have to return the system or you need to move it): Packing material (EPEL E) Box (corrugated cardboard) Polyethylene (LDPE4) For sorting and collection of packaging material, please call the packaging collection customer service department for information on the rules that apply in your municipality. Note that the product and its accessories must be recycled as electronic waste. A worn-out battery is recycled as electronic waste. User Manual 7944070a | MagniLink PRO - PC 9 MagniLink PRO - PC 5 Accessories Dockable reading table with friction brake X/Y (MLRT-XY). Battery (ML-BAT). 10 User Manual 7944070a | MagniLink PRO - PC MagniLink PRO - PC LVI Monitor 19" (MLV-A103) and 23" (MLV-A104). Text To Speech for PC (MLS-A102) or Mac (MLS-A102-MAC). User Manual 7944070a | MagniLink PRO - PC 11 MagniLink PRO - PC 6 Installation 6.1 Unfolding 1. Place your MagniLink PRO on the table in front of your seat. Remember that the reading table can be pulled out approximately 30 cm in three directions. MagniLink PRO has a low total weight. Therefore, it is very important to place the system at least 10 cm from the edge of the table, particularly when you are using the reading table in its most extended position. Excessive load in this position can cause the system to tip over. 2. Take hold of the unit's arm and turn it upwards to the upper end point. 3. Turn up the camera arm until it clicks into place. In order to get optimal focus range when a reading table is used with the system, the camera arm must be turned up until it clicks into place once more. 12 User Manual 7944070a | MagniLink PRO - PC MagniLink PRO - PC 6.2 Connection 1. Power supply Connect the mains adapter to the socket on the rear. 2. Connection for control box Connect the control box to this socket. 3. HDMI connection Here the unit can be connected to a monitor that supports HDMI or DVI. 4. USB connection Used to connect the unit to a computer. 6.3 Installation of reading table 1. Install the reading table by pushing it in towards the unit. 2. In order to permanently install the reading table. Fasten the reading table securely with a screw on the underside. User Manual 7944070a | MagniLink PRO - PC 13 MagniLink PRO - PC 7 Use 7.1 Control box 1. LED A green light indicates that the unit is on. A flashing yellow light means that autofocus is switched off. The light flashes green when the system is starting. A red light for five seconds when the system is starting indicates that the battery needs to be charged. 2. Power on/off Press to start or shut down the system. 3. Magnification control Used to set the magnification. To reduce the zoom, press the lower key (minus) and to increase the zoom, pressure the upper key (plus). 4. Programmable function buttons When the system is delivered, button 1 switches between automatic and manual focus and button 2 switches between overview mode and normal mode. It is possible to change the function of these buttons via the menu. 14 User Manual 7944070a | MagniLink PRO - PC MagniLink PRO - PC 5. Lighting configuration or navigation control Used to configure the light intensity in order to optimise reading conditions. Press the upper half to increase the light intensity and the lower half to decrease it. Also used to navigate in the menu. 6. Function button When this button is pressed, a menu appears in which further settings can be made. 7. Picture mode Press the button to switch the picture mode between natural colours and grey scale. 8. High contrast mode with artificial colours Press the button to switch between the various colour combinations. 7.2 Menu The menu is opened by pressing the function button. In order to navigate in the menu, press the navigation control. There thirteen main modes in the menu. The current mode is displayed on the screen. After 30 seconds of inactivity, the system returns to normal mode. If you use the menu at the same time as the system is showing USB video on a computer. Press the short cut command to return to the program's standard values (F11 on PC and Alt + F11 on Mac). This causes the program to set the maximum window size and normal rotation, which is necessary in order for the menu to be displayed correctly. 1. Autofocus ("AF-ON" or "AF-OFF" is displayed on the screen) In this mode, you can press the function button to turn autofocus on and off. Autofocus off can be used when you wish to write by hand. In this way, focus is not affected by the pen or your hand. 2. Mirroring ("MIRROR" is displayed on the screen) In this mode, you can press the function button to mirror the image. 3. Overview ("VIEW" is displayed on the screen) In this mode, you can press the function button to reduce the magnification to overview mode Press the button again to restore the magnification. 4. Focus ("FOCUS" is displayed on the screen) In this mode, you can press the function button. When you do so, "F-SET" is displayed on the screen and it is then possible to set the focus mode manually by pressing the navigation control. User Manual 7944070a | MagniLink PRO - PC 15 MagniLink PRO - PC 5. 6. 7. 8. 9. 10. 16 Manual focus may, for example, be useful for inspection. When this has been done, press the function button again to return to the menu. Reference line/Bar ("REFLINE" is displayed on the screen) In this mode, you can press the function button. When you do so, "R-SET" is displayed on the screen and it is then possible to set the position of the reference line or the bar by pressing the navigation control. When you are satisfied with the position, press the function button again to save the position. Lighting ("LAMP" is displayed on the screen) Press the function button in this mode to access the settings for the lamp's brightness. "L-SET" is displayed on the screen and it is possible to reduce or increase the brightness by pressing the navigation control. When you are satisfied with the brightness, press the function button again to return to the menu. Shut-off time for screen and lamp ("SLEEP" is displayed on the screen) In this mode, you can set whether and after what length of time the system will turn off the lamp and the screen if the camera has not detected any movement. Press the button. It is then possible to select the time with the navigation control. When you are satisfied with the setting, press the function button again. To turn on the lamp and screen again, it is sufficient to move your hand under the camera. Shut-off time ("SH-OFF" is displayed on the screen) It is possible to set whether and after what length of time the system will be turned off if the camera has not detected any movement. Press the button. It is then possible to select the time with the navigation control. When you are satisfied with the setting, press the function button again. Programming of button 1 ("PRG-F1" is displayed on the screen) In this mode, you can programme which function button 1 is to have. Press the function button. It is then possible to select the function with the navigation control. When you are satisfied with your choice, press the function button again to save the setting. Programming of button 2 ("PRG-F2" is displayed on the screen) In this mode, you can programme which function button 2 is to have. Press the function button. It is then possible to select the function with the navigation control. When you are satisfied with your choice, press the function button again to save the setting. User Manual 7944070a | MagniLink PRO - PC MagniLink PRO - PC 11. Battery status (Battery symbol is displayed on the screen) In this mode, the current battery status is displayed on the screen. 12. Language ("OSD" is displayed on the screen) In this mode, you can set the language in the menu. Press the function button. It is then possible to select the language with the navigation control. There are four languages: English (ENG), German (DEU), French (FRA) and Spanish (SPA). When the desired language is displayed, press the function button again to save the language setting. 13. Normal mode ("EXIT" is displayed on the screen) If you press the function button in this mode, you exit the menu and return to normal mode. 7.3 Reading table 1. Side way direction friction adjustment Set the side way friction by moving this handle. With the brake in the left end position, the reading table is unlocked. To increase friction, push the side way brake to the right (at the far right, the brake clicks into locked mode). 2. Depth way direction friction adjustment Set the depth way friction by moving this handle. With the brake in the near end position, the reading table is unlocked. To increase friction, push the depth way brake towards the back. Push the brake in as far as possible to lock the reading table. User Manual 7944070a | MagniLink PRO - PC 17 MagniLink PRO - PC 7.4 Camera The camera has two modes. Reading mode and distance mode. Turn the camera to switch it from reading mode (1) to distance mode (2). When the camera is in distance mode, it can be angled laterally, depending on what you want to look at. In distance mode, the camera can also be turned to a mirror mode. The settings for both modes are automatically saved when you switch from one to the other. Settings that are automatically saved for these modes are: Negative/Positive/Natural colours Magnification level Brightness/Contrast Reference line/Bar Mirroring of camera image Focus settings 7.5 Battery The following applies to the MagniLink PRO models that are equipped with a battery. If the battery charge level falls below 10 or 5%, a red battery symbol is displayed to indicate that it is time to connect the mains adapter and charge the battery. To remove the symbol, press the function control. Maintenance charging The MagniLink PRO models with a battery are also equipped with a smart battery charger that uses maintenance charging to keep the battery in good condition. To further extend battery life, we recommend that you use your MagniLink PRO twice a year with just the battery (disconnect the mains adapter) until the battery is completely discharged. 18 User Manual 7944070a | MagniLink PRO - PC MagniLink PRO - PC 8 PC software MagniLink PRO is supplied with the software MagniLink S. The software works on Windows 7, 8, 8.1 and 10. The following pages describe the installation and use of MagniLink S for PC. The MagniLink S software has been developed so that it does not affect or interfere with other software. It has been tested alongside other software to ensure there are no conflicts. However, LVI cannot guarantee compatibility with all other software as their methods are outside of LVI's control. 8.1 Minimum system requirements Microsoft Windows 7. 2 integrated USB 2.0 ports. i3 processor, 1 GB RAM (32 bit) 2 GB RAM (64 bit). 8.2 Recommended system requirements Microsoft Windows 7. 1 integrated USB 3.0 port. i5 or i7 processor, 4 GB RAM, external graphics card with at least 512 MB inbuilt memory. LVI has tested the software on several computers without any problems, but there is no guarantee that the system will function on all computers that comply with the specifications. LVI recommends testing the software on the computer where the system is to be used, in order to ensure compatibility. Better performing computers will facilitate better camera performance. 8.3 Installation of software NOTE Installation requires administrator privileges on the computer in question and is performed on the user account currently in use. Insert the USB stick containing the software into one of the computer's USB ports. Start the installation by clicking on the "Setup" file, which can be found in the MagniLink S - PC folder. User Manual 7944070a | MagniLink PRO - PC 19 MagniLink PRO - PC When the installation program starts, follow the instructions on the screen to complete installation of the software, or see below for a more detailed description. Select "Next" in the dialogue box "Welcome to the InstallShield Wizard for LVI MagniLink S". 20 User Manual 7944070a | MagniLink PRO - PC MagniLink PRO - PC Read the text in ”License Agreement”, approve this by selecting “I accept the terms of the license agreement” and click on “Next” to start the installation. If you have a camera with OCR functionality, then mark the language(s) for which you have a license. If you do not have OCR functionality, then do not select any languages. Then click "Next" to continue with the installation. Select “Install” in the dialogue box "Ready to Install the Program". User Manual 7944070a | MagniLink PRO - PC 21 MagniLink PRO - PC Select "Finish" in the dialogue box "InstallShield Wizard Complete". 8.3.1 Updating/removing software Insert the USB memory stick containing the MagniLink S software into one of the computer's USB ports. Start by clicking on the "Setup" file in the MagniLink S - PC folder. Read the instructions on the screen in order to select the appropriate action. Select “Modify” to change the software. Select “Repair” if there is a problem with the software. Select “Remove” to uninstall the software. 22 User Manual 7944070a | MagniLink PRO - PC MagniLink PRO - PC Select "Next" to start the required action. Select "Finish" in the "Maintenance complete" dialogue box to complete the desired action. Software can also be removed via Control Panel – add/remove programs, or from Uninstall MagniLink S in the MagniLink S folder in the Start menu. 8.4 Using the software 8.4.1 Functions via the keyboard MagniLink S is shown as a MS Windows application and all functions can be managed via the keyboard. Various menus allow the short cut commands to be changed. Below are the standard settings for the short cut commands. F1 Natural colours F2 Positive image with heightened contrast Artificial colours; White/Black, Yellow/Black, Green/Black, Red/Black, Yellow/Blue, White/Blue. Press F2 repeatedly to switch between the various colours. (Shift + F2 to cycle backwards) F3 Negative image with heightened contrast Artificial colours; White/Black, Black/Yellow, Black/Green, Black/Red, Blue/Yellow, Blue/White. Press F3 repeatedly to switch between the various colours. (Shift + F3 to cycle backwards) User Manual 7944070a | MagniLink PRO - PC 23 MagniLink PRO - PC F5 Take a "snapshot" Press F5 to open the ”Save pictures” dialogue box. A file name (with the day's date and time) and a folder (My Pictures) are automatically suggested. Just press Enter to save the picture. If you wish to save the picture somewhere else, or with another name or in another format, (the standard is JPG), you can change this manually. Shift + F5 Take a quick "snapshot" Press Shift + F5 to quickly take a picture and save it, without specifying a name or folder. This function saves the picture in My Pictures or in the folder most recently used for the F5 function. Ctrl + F5 Start/stop video recording Press Ctrl + F5 to open the ”Save video clip” dialogue box. A file name (with the day's date and time) and a folder (My video clips) are automatically suggested. Press Enter to save with the suggested name. If you wish to save the video in a different folder, or with another name, you can change this in the dialogue box. Stop the recording by pressing Ctrl + F5. See Recording Settings page 35 for more information. Ctrl + Shift + F5 Quickly start/stop video recording. Press Ctrl + Shift + F5 to quickly start video recording, without specifying a name or folder. The video is saved under ”My video clips” or in the folder most recently used for the function. See Recording Settings page 35 for more information. F6 Display mode for “snapshots” Press F6 to view the saved pictures. Mark the picture you wish to view and press Enter or select Open. The picture is normally opened in Windows' standard picture-viewing program where, amongst other things, the picture can be enlarged. Shift + F6 Immediately show the most recently taken "snapshot" Press Shift + F6 to immediately show the most recently taken picture. If no pictures have been taken previously whilst the program has been running, the button will have the same function as F6. Ctrl + F6 Display mode for video Press Ctrl + F6 to view saved video files. Mark the video you wish to view and press Enter or select Open. The video is normally opened in Windows' standard media 24 User Manual 7944070a | MagniLink PRO - PC MagniLink PRO - PC player software. See Recording Settings page 35 for more information. Shift + Ctrl + F6 Immediate playback of the most recently recorded video. Press Shift + Ctrl + F6 to immediately play back the most recently recorded video. If no video has been recorded previously whilst the program has been running, the button will have the same function as Ctrl + F6. F8 Preset split screen mode Press F8 repeatedly to switch between the preset split screen modes. If multiple screens are being used, the split screen modes will switch consecutively between all of the screens. The window can also be controlled via mouse or with Windows standard commands. F9 Information and settings window Under this window, different settings for the application can be applied. See the section Information and settings window page 32 for more information. F11 Return to the program's standard values Press F11 to return to the program's standard values (normal window, natural colours, normal brightness). Up arrow Increase magnification Down arrow Decrease magnification Ctrl + O Overview Reduces magnification to overview mode. Press the button again to restore the magnification. When overview mode is active, a sight is displayed in the middle of the video window. Left arrow Reduce light intensity/contrast Right arrow Increase light intensity Ctrl + Left arrow Reference line left/up Ctrl + Right arrow Reference line right/down Ctrl + A Deactivate/activate "always on top" Short cut command activates the ”Always on top” function for the application window. If "Always on top" is activated, the camera image will be placed over other open applications. This means that another program can be in focus and that you can for example use Word whilst looking at the camera image. User Manual 7944070a | MagniLink PRO - PC 25 MagniLink PRO - PC Ctrl + M Minimises the application window to the taskbar. Ctrl + R Rotate the camera image clockwise Every time this key combination is pressed, the camera image will rotate 90° clockwise (90°, 180°, 270° and 0°). Shift + Ctrl + R Rotate the camera image anticlockwise Every time this key combination is pressed, the camera image will rotate 90° anticlockwise (270°, 180°, 90° and 0°). Ctrl + I Reflect camera image Reflects the camera image. This is a handy function if, for example, you want to use the camera as a magnified cosmetic mirror. F Freeze camera image By pressing this key combination, the camera image freezes; to release the image, press the same key combination again. To save a frozen image, press F5. Ctrl + J Lock autofocus Locks the autofocus mode. This can be used when you wish to write by hand. In this way, autofocus is not affected by the pen or your hand. Press the button a second time, to reactivate autofocus. Ctrl + Up arrow Reduce focus distance Ctrl + Down arrow Increase focus distance Ctrl + Alt + S Global short cut command (quick activation of MagniLink S) This command does not work immediately after the program has been installed. It is necessary to log out and then log in again in order for it to work. If it still does not work, this may be due to a conflict with another installed program. You can change this short cut command by right-clicking on the MLS icon on the desktop, selecting Properties and then changing the last letter in the short cut commands field. The following functions are only available together with cameras that support OCR. F4 26 OCR-process This command takes a picture for OCR-processing. The program then switches to text view and the OCR- User Manual 7944070a | MagniLink PRO - PC MagniLink PRO - PC processed text is read aloud. If the text view already contains text, this is replaced by the text from the OCR conversion. It is possible to OCR-process a whole A4 page by turning the paper 90 degrees. See OCR Settings page 37 for more information. Ctrl + F4 Process with OCR and add text Works like the previous command, but the text from the OCR conversion is added to the existing text. See OCR Settings page 37 for more information. Ctrl + S Switch column selector Activates or deactivates the column selector. When the column selector is active, only those columns that are intersected by the column selector are OCR-processed. Ctrl + C Copy image or text Copies the camera image or all text in the text view to Windows Clipboard. If the text view is active, its text will be copied; otherwise the camera image is copied. It is then possible to paste the content of the Clipboard into another program, such as Word. Ctrl + V Paste text If the user has copied text from another program, this text can be pasted into the text view. This command replaces the existing text. Ctrl + Shift + V Paste and add text Works like the previous command, but the text is added to the existing text. Alt + F6 Open text document A dialogue box opens. Select the .txt file in the dialogue box that is to be opened and press Enter or select Open. V Switch between camera view and text view If a text has been OCR-processed, this command switches between camera view and text view. B Display mode Switches to display mode for OCR-processed text. The available display modes are: Side view, line view, word view and a silent mode where the text moves sideways on the screen. 1 Start/Pause reading If no reading is currently in progress, reading starts, otherwise reading is paused. 2 Stop reading User Manual 7944070a | MagniLink PRO - PC 27 MagniLink PRO - PC This command stops the reading. The next reading will begin from the start of the text. 3 Read previous With this command, the user can go backwards through the text. If the reading mode is set to character, one character is read for each keystroke. If the reading mode is word, you move backwards through the text word by word. If the reading mode is sentence, you move backwards through the text one line at a time. 4 Read next With this command, the user can move forward in the text. If the reading mode is set as character, one character is read for each keystroke. If the reading mode is word, you move forward through the text word by word. If the reading mode is line, you move forward through the text one line at a time. 5 Switch reading mode This command selects the reading mode that is to be employed when the "Read previous/next" command is entered. There are three modes: character, word and line. 6 Slower Reduces the reading speed. 7 Faster Increases the reading speed. 8 Reduce volume 9 Increase volume 0 Next voice Switches to the next installed voice. This command also changes the OCR engine's language to the new voice's language. The following functions are available when MagniLink S is used together with ZoomText or SuperNova: Shift + Up arrow Moves the split screen mode to the left/up. Shift + Down arrow Moves the split screen mode to the right/down. 28 User Manual 7944070a | MagniLink PRO - PC MagniLink PRO - PC 8.4.2 Functions via menus and buttons The application can be controlled via menus or buttons. To access the menus, move the cursor to the top left corner of the application. The "Menu" button will then be displayed. Click on this to access the menus. To access the buttons, move the cursor to the top right corner of the application. The button with a gearwheel will then be displayed. Click on this to access the other buttons. 8.4.2.1 Functions via menus The menus contain settings for the application. Application Contains general settings for the application. Video Settings that shall apply for video are set here. Recording Here are recording settings. OCR* Contains settings for the OCR engine. User Manual 7944070a | MagniLink PRO - PC 29 MagniLink PRO - PC Speech* Here you can access settings for reading. Short cut commands Click here to change the short cut commands. About Click here if you require information regarding the software version in use and your license. * Only cameras that are licensed for OCR. 8.4.2.2 Functions via buttons The buttons let the user control the program. Below is a description of what they do. 1. 2. 3. 4. 5. 6. 7. Shows the camera image in natural colours or in black and white. Shifts between the MagniLink camera's artificial colours. Switches between autofocus and locked focus modes. Zooms out. Zooms in. Switches between the pre-set split screen modes. Starts the reading of OCR-processed text. Press once - the text will be read aloud. Press again - reading is paused*. 8. Stops the reading of OCR-processed text. The next reading will begin from the start of the text*. 30 User Manual 7944070a | MagniLink PRO - PC MagniLink PRO - PC 9. Increases the light intensity in natural colours or raises the contrast level in artificial colours. 10. Reduces the light level in natural colours or lowers the contrast level in artificial colours. 11. Begins OCR-processing of the image shown. When the OCRprocessing is complete, the program switches to text mode and the OCR-processed text is read aloud*. 12. This button switches between camera view and text view*. 13. Switches to display mode for OCR-processed text. The available display modes are side view, line view, word view and a silent mode where the text moves sideways on the screen*. * Only cameras that are licensed for OCR. User Manual 7944070a | MagniLink PRO - PC 31 MagniLink PRO - PC 8.4.3 Information and settings window The Information and settings window consists of a number of different tabs that contain application information and alternative settings. 8.4.3.1 Applications Settings Activate CCTV interface By activating this function, MagniLink S is able to work with the magnification software from Dolphin and AiSquared MagniLink S is compatible with ZoomText version 10 and with SuperNova version 12 or more recent. We recommend deactivation of the CCTV interface when working with older versions of the programs mentioned above. Activate automatic updates MagniLink S will automatically search for new versions of MagniLink S software. You can also deselect this and update manually instead (note: Internet connection is required for both automatic and manual updating). 32 User Manual 7944070a | MagniLink PRO - PC MagniLink PRO - PC Search for updates now Press OK to search for updates (requires Internet connection. Language The system is set to use the computer's standard language. If the language is not available for MagniLink S software, English is automatically chosen as the standard. Languages can be changed manually under Application Settings. Available languages: English German Danish Spanish Finnish French Dutch Norwegian Swedish User Manual 7944070a | MagniLink PRO - PC 33 MagniLink PRO - PC 8.4.3.2 Video Settings Resolution Select from the camera's various resolution options. The best picture quality is achieved by selecting the highest resolution. Lower resolutions may be required if the application is used on a computer with a lower level of performance. Frame rate This setting lets the user limit the frame rate. For the best video quality, the frame rate should be 60 Hz, but it may be appropriate to set the frame rate at 30 Hz for computers with a lower level of performance. Rotate image Allows you to set the rotation angle of the camera image. MagniLink S supports rotation of the camera image to the following angles: 0°, 90°, 180° and 270°. Mirror image When this function is active, the camera image is mirrored. 34 User Manual 7944070a | MagniLink PRO - PC MagniLink PRO - PC Use position sensor When this function is active, the application remembers the user's settings for reading and distance modes. See the Position sensor for more information. 8.4.3.3 Recording Settings Limit the duration of recording Activate this function if you wish to limit the duration of the recording. Duration in minutes If you have chosen to limit the duration of the recording, you can set the maximum duration in minutes from 1 to 60. Frame rate Frame rate of the recording, the number of images that can be recorded per second, can be set from 1 to 30 (1 to 24 images per second when the program runs together with ZoomText). A lower frame rate provides poorer quality on the recorded video, but takes up less space on the hard disk. Record sound If your computer is equipped with a microphone, (internal or external) sound can be added to your video recording. User Manual 7944070a | MagniLink PRO - PC 35 MagniLink PRO - PC Sound source Select which microphone is to be used for video recording with sound. Normally only one sound source may be selected. ZoomText recording optimization This function can be used to reduce the CPU load when the program runs together with ZoomText. This is done by not enlarging the camera image shown on the screen. Carefully read the following information before using the video recording function. The MagniLink S software can record video sequences from the MagniLink S camera in Windows Media Video (.wmv ) format. It is possible to record video with or without audio. The video recording is started with the keyboard (Ctrl + F5) and a red indicator is displayed at the bottom right of the video window while video is being recorded. The camera image is viewable in the application window while recording video, but since the video recording is quite CPU demanding, the frame rate of the camera is lowered to 30 Hz while the recording is in progress. This will affect the camera image quality compared to the image quality of 60 Hz frame rate. Since the video recording is relatively CPU demanding, the quality of the recorded video can vary on some computers. In that case, the recording frame rate can be lowered to reduce the CPU load. There must be 50 MB of free disk space in which to save the file when a video recording starts. If, while recording, the disk space falls below 50 MB, the video recording stops automatically. 1 minute of video at 10 Hz takes about 20 MB of disk space. We recommended that you always save the files on the local hard disk and not move them to another folder until the video is finished. 36 User Manual 7944070a | MagniLink PRO - PC MagniLink PRO - PC 8.4.3.4 OCR Settings This settings tab is only visible if the camera supports OCR. Typeface Here the user can set the typeface used for viewing text that has been OCR-processed. The typeface in use has no effect on the OCRprocessing. Column mode When this setting is active, the OCR engine processes the text in columns, which is appropriate if it is a newspaper text that is to be processed. Start speech after OCR If this box is ticked, text will automatically be read aloud after an image has been OCR-processed. Smart start Smart start works as follows. If a text has already been read aloud and a new OCR conversion is starting, the reading will start from the position where the reading of the old text stopped. User Manual 7944070a | MagniLink PRO - PC 37 MagniLink PRO - PC Automatic language detection When this function is active, the application will try to detect the language of the text and change the voice to the detected language. Automatic language detection will only work for those languages for which the application has licensed voices. If a text on a different language is to be OCR-processed, then this function needs to be deactivated. 8.4.3.4.1 Quality of OCR processing In order to optimize the results of the OCR conversion, you should bear in mind the following. Ensure the magnification is sufficient. Very small text produces poor results in the OCR software. A minimum of 12pt is recommended for the lowest magnification on the reading camera. Avoid glossy paper as this results in reflections in the image. This impairs the results of the OCR conversion. If you intend to use glossy paper, we recommend that the light on the unit is switched off. Certain fonts can be difficult for the OCR engine to interpret. It is important that the text contrast is sufficient. It is important that the OCR engine's language is the same as that of the text. The camera's resolution should be set to at least 1280x720, see Video settings for more information. 38 User Manual 7944070a | MagniLink PRO - PC MagniLink PRO - PC 8.4.3.5 Speech Settings This settings tab is only visible if the camera supports OCR. Voice If several voices are available, the user may select from these Volume Set the sound level for the voice. Speed Set the speed of the voice. User Manual 7944070a | MagniLink PRO - PC 39 MagniLink PRO - PC 8.4.3.6 Settings for short cut commands Here the short cut commands used for the application can be changed. To change a short cut command, tab to the command that is to be changed and enter the new keyboard combination. If a combination already being used for another command is entered, the second command will be erased. A new keyboard combination will need to be entered in order to change the command. 40 User Manual 7944070a | MagniLink PRO - PC MagniLink PRO - PC 8.4.3.7 About the application Information regarding the software version and copyright can be found under this tab. If there is no Internet connection, press the "Enter license" button to license the software. User Manual 7944070a | MagniLink PRO - PC 41 MagniLink PRO - PC 9 Ergonomics Your reading camera is now ready to use. It is important that the workplace around your MagniLink is comfortable, and that you sit correctly. This is so that you can use the camera for as long as possible without putting undue strain and stress on your neck and back. You should bear the following in mind: Your chair should be positioned close to the table on which the equipment is located, and you should not sit in the chair for too long. We recommend a good office chair with adjustable height. The seat of the chair should be at a height that does not cause your legs to become numb; legs should be at an angle of 90 degrees and you should rest your feet on the floor. The reading table should be at a height at which you can rest your lower arm horizontally on it. It is important that the table is neither too high nor too low for you. The ideal solution is if the screen is slightly below eye level and in as straight a line in front of you as possible. Shield off daylight. Lights in the ceiling, table lamps and light from windows can cause reflections on the monitor. For this reason, avoid placing lights where they shine directly at the screen or at yourself. If you use the device for long periods of time, there is a risk of repeated movements causing you pain in your neck, shoulders and back. Your eyes can also get tired from looking at a screen for too long. 42 User Manual 7944070a | MagniLink PRO - PC MagniLink PRO - PC 10 Troubleshooting No image is displayed on the screen after you start the system: Check that the power is on. Check that all connectors are properly connected as explained in the 'Installation' section. The LED shines red for five seconds. The battery needs to be charged. Connect the mains adapter to the units to charge the battery. It is not possible to start the system and the On/Off button flashes (orange/red). Press the On/Off button for more than six seconds to reset the system. Never remove any panels or the casing in order to attempt to repair the system yourself. In the event of problems, contact your local dealer. User Manual 7944070a | MagniLink PRO - PC 43 MagniLink PRO - PC 11 Technical information Magnification, reading camera 1.1-70x (23" screen) Camera resolution Full HD (1920x1080) Monitor, resolution 1366x768 (18.5") widescreen (16:9) 1920x1080 (23") widescreen (16:9) Computer, resolution 1280x720, 60Hz 1920x1080 30 Hz Battery, operating time 5-9 hours Battery, charging 2.5 hours Battery, warranty period 1 year Dimensions, collapsed 33x47x17 cm (13x18.5x6,7 in) Dimensions, opened up 33x38x52 cm (13x15x20,5 in) Weight 4.2 kg (9 lb 15 oz) Power source Battery or AC Acceptable temperature ranges Transport and storage -20°C - +60°C 68°F - 140°F Operation: +5°C – +35°C 41°F - 95°F Disposal of old electrical and electronic equipment (applies for EU countries and all other European countries that have specific collection systems) If the product or its packaging has this symbol on it, it is not to be handled as regular domestic waste. It should instead be deposited at a suitable collection centre for the recycling of electrical and electronic equipment. By ensuring that this product is properly taken care of, you are helping to prevent the negative impact on health and the environment that might otherwise result from inappropriate disposal of this product. Recycling helps in the management of our natural resources. For more detailed information regarding the recycling of this product, you can contact your municipality, your waste management company or the store where you purchased the product. 44 User Manual 7944070a | MagniLink PRO - PC MagniLink PRO - PC 12 Declaration of Conformity User Manual 7944070a | MagniLink PRO - PC 45 MagniLink PRO - PC Alphabetical index About LVI ................................................................................................ 5 About the application .......................................................................... 41 Accessories ........................................................................................... 10 Applications Settings ........................................................................... 32 Battery ................................................................................................... 18 Camera .................................................................................................. 18 Connection ........................................................................................... 13 Control box ........................................................................................... 14 Declaration of Conformity ................................................................... 45 Ergonomics ........................................................................................... 42 Functions via buttons ........................................................................... 30 Functions via menus ............................................................................. 29 Functions via menus and buttons ....................................................... 29 Functions via the keyboard.................................................................. 23 Information and settings window ........................................................ 32 Installation ............................................................................................. 12 Installation of reading table................................................................. 13 Installation of software ......................................................................... 19 Introducing MagniLink PRO .................................................................. 6 Menu ..................................................................................................... 15 Minimum system requirements ........................................................... 19 OCR Settings ........................................................................................ 37 Packaging................................................................................................ 9 PC software ........................................................................................... 19 Quality of OCR processing .................................................................. 38 Reading table ....................................................................................... 17 Recommended system requirements ................................................. 19 Recording Settings ............................................................................... 35 Safety information .................................................................................. 8 Settings for short cut commands ........................................................ 40 Speech Settings .................................................................................... 39 Technical information........................................................................... 44 Troubleshooting ................................................................................... 43 Unfolding .............................................................................................. 12 Unpacking ............................................................................................... 9 Updating/removing software .............................................................. 22 Use ......................................................................................................... 14 Using the software ................................................................................ 23 Video Settings ...................................................................................... 34 46 User Manual 7944070a | MagniLink PRO - PC