1
m9 DECT
m9 DECT Administrator Guide
Copyright © 2011 snom technology, Inc.
All rights reserved.
This document is supplied by snom technology. No part of this document may be reproduced, republished or
retransmitted in any form or by any means whatsoever, whether electronically or mechanically, including, but
not limited to, by way of photocopying, recording, information recording or through retrieval systems, without
the express written permission of snom technology. snom technology reserves the right to revise this document
and make changes at any time and without the obligation to notify any person and/ or entity of such revisions
and/or changes.
Product specifications contained in this document are subject to change without notice.
Safety Precautions
Safety Precautions
Please read these precautions and the instructions on setting up and using the base and the phone thoroughly
before using the device. Do not give the device to third parties without this guide accompanying the device.
See also separate general safety information and country-specific safety and warranty information for the USA,
Australia, and New Zealand.
Power Supplies/Adapters, Rechargeable Battery
Use only the power converters (AC/DC adapters) delivered with the base station and the phone or those
power supplies expressly recommended by snom (“Power Supplies/Adapters” on page 79). Other power
supplies may damage or even destroy the device(s). Use only the rechargeable battery pack delivered with the
handset or those rechargeable battery packs expressly recommended by snom (see “Rechargeable Batteries”
on page 79).
Placement of Base, Charger, Cables, and Cords
Avoid placing the devices’ cables and cords where people may trip over them. Avoid placing the
cables and cords where they may be exposed to mechanical pressure as this may damage them. If
the power supply cord or the plug is damaged, disconnect the device and contact qualified service
personnel.
Base station, chargers, handsets, power adapters, and cables are for indoor installation with a temperature range between +5°C and +45°C. Not for outdoor installation!
Do not install product in rooms with high humidity (for example, in bathrooms, laundry rooms, damp
basements). Do not immerse product in water and do not spill or pour liquids of any kind onto or into
any parts of it.
Do not install product in surroundings at risk for explosions and do not use the handset in such surroundings (paint shops, for example). Do not use the phone if you smell gas or other potentially
explosive fumes!
Medical devices might be adversely affected. Please consider the technical ramifications when installing the devices in a doctor’s office, for example.
FOR THE USA: Do not use near medical equipment or if you have a pacemaker.
Health Precautions
Implanted Pacemakers
FOR THE USA: Do not use if you have a pacemaker.
Do not use if you have an implanted pacemaker unless the pacemaker manufacturer’s directions
expressly permit the use of devices emitting pulsating radio frequency signals. Always follow the
manufacturer’s directions!
iii
snom m9 DECT Administrator Guide
Recommended MINIMUM distance to the handset: 20 cm (7.9”).
Do not carry the handset in a breast pocket.
Hold the handset to the ear opposite the medical device to minimize the potential for interference.
Turn the handset off immediately if there is any reason to suspect that interference is taking place.
Hearing-Related
Do not hold the loudspeaker at the back of the handset against your ear when the phone is ringing or when
speakerphone is switched on. Danger of serious, irreversible damage to your hearing!
If you are wearing a hearing aid, please note that the handset may cause an annoying background noise.
Medical Devices
Operation of any equipment emitting radio frequency signals may interfere with the functionality of inadequately
shielded medical devices. Consult a physician or the manufacturer of the medical device to determine if they
are adequately shielded from external RF energy or if you have any other questions concerning this topic.
Switch off your device in health care facilities when signs posted in these areas instruct you to do so. Hospitals or health care facilities may be using equipment that could be sensitive to external RF energy.
Implanted Medical Devices
Manufacturers of medical devices recommend that a minimum distance of 20 centimeters (7.8 inches) should
be maintained between a wireless device and an implanted medical device, such as pacemakers or cardioverter defibrillators, to avoid potential interference with the medical device. Persons who have such devices should:
Always keep the wireless device more than 20 centimeters (7.8 inches) from the medical device when
the wireless device is turned on.
Avoid carrying the wireless device in a breast pocket.
Hold the wireless device to the ear opposite the medical device to minimize the potential for interference.
Turn the wireless device off immediately if there is any reason to suspect that interference is taking
place.
Read and follow the directions of the medical device‘s manufacturer.
If you have any questions about using your wireless device with an implanted medical device, consult your
health care provider.
iv
Safety Precautions
Additional Safety Information
Small Children
Your device and its enhancements may contain small parts. Keep them out of the reach of small children.
Operating Environment
Remember to follow any special regulations in force in any area, and always switch off your device when its use
is prohibited or when it may cause interference or danger. Use the device only in its normal operating positions.
Do not place credit cards or other magnetic storage media near the device, because information stored on
them may be erased.
SELV (Safety Extra Low Voltage) Compliance
Safety status of input/output connections comply to safety extra-low voltage (SELV) requirements.
Warning: To avoid electric shock, do not connect SELV circuits to telephone-network voltage (TNV) circuits. LAN ports contain SELV circuits, and PSTN ports contain TNV circuits. Some LAN and PSTN ports
both use RJ-45 (8P8C) connectors. Use caution when connecting cables.
Potentially Explosive Environments
Switch off your device when in any area with a potentially explosive atmosphere and obey all signs and instructions. Sparks in such areas could cause an explosion or fire resulting in bodily injury or even death. Switch off
the device at refuelling points such as near gas pumps at service stations. Observe restrictions on the use of
radio equipment in fuel depots, storage, and distribution areas; chemical plants; or where blasting operations
are in progress. Areas with a potentially explosive atmosphere are often but not always clearly marked. They
include below deck on boats, chemical transfer or storage facilities, vehicles using liquefied petroleum gas, and
areas where the air contains chemicals or particles such as grain, dust, or metal powders.
Sensitive Electronic Equipment
The current state of research concludes that operational DECT phones normally do not adversely affect electronic equipment. Nevertheless, you should take some precautions if you want to operate DECT phones in the
immediate vicinity of such equipment like sensitive laboratory equipment. Always keep a minimum distance of
10 cm (3.94“) to the equipment even when the phone is in standby.
Electrical Surges
We recommend the installment of an AC surge arrester in the AC outlet to which this device is connected to
avoid damage to the equipment caused by local strikes of lightening or other electrical surges.
v
snom m9 DECT Administrator Guide
Cleaning and Disposal
Cleaning
Use an anti-static cloth. Please avoid water and liquid or solid cleaning products as they might damage the
surface or internal electronics of the base, charger, and handset.
Disposal of Phone
This product is subject to European Directive 2002/96/EC and may not be disposed of
with general household garbage.
If you do not know where you may dispose of the device at the end of its lifespan, contact
your municipality, your local waste management provider, or your seller.
Disposal of Battery
This battery is subject to European Directive 2006/66/EC and may not be disposed of with
general household garbage.
If you do not know where you may dispose of the battery at the end of its lifespan, contact
your municipality, your local waste management provider, or your seller. Do not incinerate
batteries.
Countries Outside the European Union
Disposal of electrical and electronic products in countries outside the European Union should be done in line
with local regulations. Please contact local authorities for further information.
vi
snom m9 DECT Administrator Guide
Contents
Safety Precautions . . . . . . . . . . . . . . . . . . . . . . . . . . . . . . . . . . . . . . . . . . . . . . . . . . . . . . . . . . . . . . . . . . . . . . . . . . . . . . . . . . . iii
Cleaning and Disposal. . . . . . . . . . . . . . . . . . . . . . . . . . . . . . . . . . . . . . . . . . . . . . . . . . . . . . . . . . . . . . . . . . . . . . . . . . . . . . . vi
About m9 DECT . . . . . . . . . . . . . . . . . . . . . . . . . . . . . . . . . . . . . . . . . . . . . . . . . . . . . . . . . . . . . . . . . . . . . . . . . . . . . . . . . . . . . . 1
Equipment Contents . . . . . . . . . . . . . . . . . . . . . . . . . . . . . . . . . . . . . . . . . . . . . . . . . . . . . . . . . . . . . . . . . . . . . . . . . . . . . . . . . 2
SECTION I: Administrator Functions
Installation. . . . . . . . . . . . . . . . . . . . . . . . . . . . . . . . . . . . . . . . . . . . . . . . . . . . . . . . . . . . . . . . . . . . . . . . . . . . . . . . . . . . . . . . . . . . . . 3
Finding the IP Address of the Base Station . . . . . . . . . . . . . . . . . . . . . . . . . . . . . . . . . . . . . . . . . . . . . . . . . . . . . 5
Setting up the Handsets for Use
..................................................................
6
Example Setups. . . . . . . . . . . . . . . . . . . . . . . . . . . . . . . . . . . . . . . . . . . . . . . . . . . . . . . . . . . . . . . . . . . . . . . . . . . . . . . . . . . . . . 11
Network Settings . . . . . . . . . . . . . . . . . . . . . . . . . . . . . . . . . . . . . . . . . . . . . . . . . . . . . . . . . . . . . . . . . . . . . . . . . . . . . . . . . . . . 16
Security . . . . . . . . . . . . . . . . . . . . . . . . . . . . . . . . . . . . . . . . . . . . . . . . . . . . . . . . . . . . . . . . . . . . . . . . . . . . . . . . . . . . . . . . . . . . . . . . 18
System Status. . . . . . . . . . . . . . . . . . . . . . . . . . . . . . . . . . . . . . . . . . . . . . . . . . . . . . . . . . . . . . . . . . . . . . . . . . . . . . . . . . . . . . . . 24
Base Station Firmware Update. . . . . . . . . . . . . . . . . . . . . . . . . . . . . . . . . . . . . . . . . . . . . . . . . . . . . . . . . . . . . . . . . . . . 28
Handset Firmware Update . . . . . . . . . . . . . . . . . . . . . . . . . . . . . . . . . . . . . . . . . . . . . . . . . . . . . . . . . . . . . . . . . . . . . . . . . 30
Auto Configuration and Firmware Update
Dial Plans
......................................................
32
.............................................................................................
35
LDAP. . . . . . . . . . . . . . . . . . . . . . . . . . . . . . . . . . . . . . . . . . . . . . . . . . . . . . . . . . . . . . . . . . . . . . . . . . . . . . . . . . . . . . . . . . . . . . . . . . . 39
IPv6 and m9 DECT
.................................................................................
42
SECTION II: The m9 in Action
Handset Overview . . . . . . . . . . . . . . . . . . . . . . . . . . . . . . . . . . . . . . . . . . . . . . . . . . . . . . . . . . . . . . . . . . . . . . . . . . . . . . . . . . . 45
Idle Screen Display Symbols . . . . . . . . . . . . . . . . . . . . . . . . . . . . . . . . . . . . . . . . . . . . . . . . . . . . . . . . . . . . . . . . . . . . . . 46
Setting the Date and Time . . . . . . . . . . . . . . . . . . . . . . . . . . . . . . . . . . . . . . . . . . . . . . . . . . . . . . . . . . . . . . . . . . . . . . . . . 49
Basic Calling . . . . . . . . . . . . . . . . . . . . . . . . . . . . . . . . . . . . . . . . . . . . . . . . . . . . . . . . . . . . . . . . . . . . . . . . . . . . . . . . . . . . . . . . . 51
Using Voicemail . . . . . . . . . . . . . . . . . . . . . . . . . . . . . . . . . . . . . . . . . . . . . . . . . . . . . . . . . . . . . . . . . . . . . . . . . . . . . . . . . . . . . . 52
Hands-Free Speaker Mode . . . . . . . . . . . . . . . . . . . . . . . . . . . . . . . . . . . . . . . . . . . . . . . . . . . . . . . . . . . . . . . . . . . . . . . . 52
Speed Dialing . . . . . . . . . . . . . . . . . . . . . . . . . . . . . . . . . . . . . . . . . . . . . . . . . . . . . . . . . . . . . . . . . . . . . . . . . . . . . . . . . . . . . . . . 54
Transferring Calls . . . . . . . . . . . . . . . . . . . . . . . . . . . . . . . . . . . . . . . . . . . . . . . . . . . . . . . . . . . . . . . . . . . . . . . . . . . . . . . . . . . . 54
Conferencing . . . . . . . . . . . . . . . . . . . . . . . . . . . . . . . . . . . . . . . . . . . . . . . . . . . . . . . . . . . . . . . . . . . . . . . . . . . . . . . . . . . . . . . . . 55
Forwarding Calls/Redirection . . . . . . . . . . . . . . . . . . . . . . . . . . . . . . . . . . . . . . . . . . . . . . . . . . . . . . . . . . . . . . . . . . . . . 56
Do Not Disturb . . . . . . . . . . . . . . . . . . . . . . . . . . . . . . . . . . . . . . . . . . . . . . . . . . . . . . . . . . . . . . . . . . . . . . . . . . . . . . . . . . . . . . . 57
Setting the Alarm Clock . . . . . . . . . . . . . . . . . . . . . . . . . . . . . . . . . . . . . . . . . . . . . . . . . . . . . . . . . . . . . . . . . . . . . . . . . . . . 58
Intercom . . . . . . . . . . . . . . . . . . . . . . . . . . . . . . . . . . . . . . . . . . . . . . . . . . . . . . . . . . . . . . . . . . . . . . . . . . . . . . . . . . . . . . . . . . . . . . . 59
vii
snom m9 DECT Administrator Guide
Call Waiting Indication . . . . . . . . . . . . . . . . . . . . . . . . . . . . . . . . . . . . . . . . . . . . . . . . . . . . . . . . . . . . . . . . . . . . . . . . . . . . . . 60
Calling and Called Party ID . . . . . . . . . . . . . . . . . . . . . . . . . . . . . . . . . . . . . . . . . . . . . . . . . . . . . . . . . . . . . . . . . . . . . . . . 61
CLIP/CLIR . . . . . . . . . . . . . . . . . . . . . . . . . . . . . . . . . . . . . . . . . . . . . . . . . . . . . . . . . . . . . . . . . . . . . . . . . . . . . . . . . . . . . . . . . . . . 62
Call History . . . . . . . . . . . . . . . . . . . . . . . . . . . . . . . . . . . . . . . . . . . . . . . . . . . . . . . . . . . . . . . . . . . . . . . . . . . . . . . . . . . . . . . . . . . 63
Address Book/Directory. . . . . . . . . . . . . . . . . . . . . . . . . . . . . . . . . . . . . . . . . . . . . . . . . . . . . . . . . . . . . . . . . . . . . . . . . . . . 63
vCards . . . . . . . . . . . . . . . . . . . . . . . . . . . . . . . . . . . . . . . . . . . . . . . . . . . . . . . . . . . . . . . . . . . . . . . . . . . . . . . . . . . . . . . . . . . . . . . . . 64
Caller Picture Display . . . . . . . . . . . . . . . . . . . . . . . . . . . . . . . . . . . . . . . . . . . . . . . . . . . . . . . . . . . . . . . . . . . . . . . . . . . . . . . 67
Using the Stopwatch. . . . . . . . . . . . . . . . . . . . . . . . . . . . . . . . . . . . . . . . . . . . . . . . . . . . . . . . . . . . . . . . . . . . . . . . . . . . . . . . 69
Using the Calculator . . . . . . . . . . . . . . . . . . . . . . . . . . . . . . . . . . . . . . . . . . . . . . . . . . . . . . . . . . . . . . . . . . . . . . . . . . . . . . . . 69
Using the Notepad . . . . . . . . . . . . . . . . . . . . . . . . . . . . . . . . . . . . . . . . . . . . . . . . . . . . . . . . . . . . . . . . . . . . . . . . . . . . . . . . . . 70
Setting an Appointment (Calendar) . . . . . . . . . . . . . . . . . . . . . . . . . . . . . . . . . . . . . . . . . . . . . . . . . . . . . . . . . . . . . . 70
RSS Feeds . . . . . . . . . . . . . . . . . . . . . . . . . . . . . . . . . . . . . . . . . . . . . . . . . . . . . . . . . . . . . . . . . . . . . . . . . . . . . . . . . . . . . . . . . . . 72
Customizing the Handset . . . . . . . . . . . . . . . . . . . . . . . . . . . . . . . . . . . . . . . . . . . . . . . . . . . . . . . . . . . . . . . . . . . . . . . . . . 73
Action URLs . . . . . . . . . . . . . . . . . . . . . . . . . . . . . . . . . . . . . . . . . . . . . . . . . . . . . . . . . . . . . . . . . . . . . . . . . . . . . . . . . . . . . . . . . . 77
Appendix
viii
79
About m9 DECT
About m9 DECT
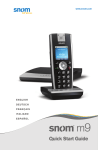
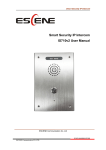
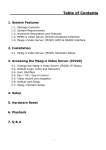
The snom m9 is the next-generation DECT (Digital Enhanced Cordless Technology) hand-held that empowers
users with the convenience of wireless communication along with the widely accepted benefits and features of
Voice over IP (VoIP) telephony.
The DECT-based snom m9 provides interference-free communication by making use of the dedicated DECT
frequency band. In addition, the snom m9 delivers the typical benefits of the DECT world such as high standby
time and superior speech quality in addition to Internet application integration, thus providing a decisive edge
over WLAN hand-helds.
DECT
IP-PBX
SIP Signaling
Base Station
Voice Media
The working range of the snom m9 access point is roughly 50 meters indoors and approximately 300 meters
outdoors (depending on the actual topology of a building and/or outdoor premise).
1
snom m9 DECT Administrator Guide
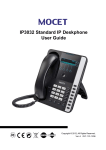
Equipment Contents
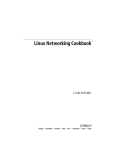
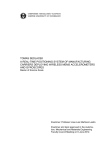
The m9 DECT phone is shipped with the following equipment and supplies:
3
2
1
4
5
6
7
9
8
2
1
DECT/GAP Base Station
2
DECT/GAP Handset
3
Handset Belt Clip
4
3.7V Lithium-Ion Rechargeable Battery
5
Handset Charger
6
One CAT5 Ethernet cable
7
One Interchangeable Power Adapter for Base Station
8
One Power Adapter for Handset
9
Four Plug Adapters for Base Station
—
U.K. (three flat pins)
—
European (two round pins)
—
Australian (two flat pins)
—
U.S. (two flat pins)
Installation
SECTION I: Administrator Functions
Installation
Warning: Use only the batteries approved by snom technology, as this may lead to leakage, fire, explosion, or other dangerous situations. Use the battery only for its intended
purpose. Do not short-circuit the battery. Short-circuiting the terminals may damage the
battery or the connecting object. Do NOT use a damaged charger or battery. Using a
damaged battery may cause it to explode.
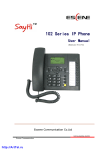
Handset Preparation
The base station, chargers, handsets, power adapters, and cables are designed for indoor installation with a
temperature range between +5°C and 45°C (41°F and 113°F). They are not intended for outdoor installation!
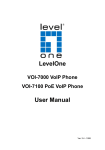
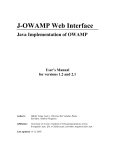
1.
Lift off the battery cover (image A).
2.
Insert the battery pack with the electrodes in the top left corner. Replace the cover (image B).
Note: Do not place or store the battery, whether inside or outside the handset, in the immediate vicinity
of open fire or other heat sources. Leaving the battery in hot or cold places will reduce its capacity and
lifetime. For short-term storage, store batteries in a dry location with low humidity, no corrosive gases,
and at a temperature range of -20° C to 45° C (-4° F to 113° F). For long-term storage, store at temperature ranges between +10° C and +30° C (50° F to 86° F).
3.
Connect the 5.9 V power supply of the charger to the wall outlet, then connect it to the charger.
4.
Place the handset into the charging cradle (image C).
A
B
C
om able
snrechargehium-Ion y
Lit
er
batt
3
snom m9 DECT Administrator Guide
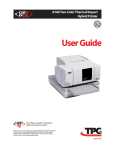
Handset Overview
Belt clip
Volume adjust key+Adjust volume of:
Ringer (when call is ringing)
Speaker (when in call)
Speakerphone
Battery cover
Speakerphone key (on/off)
Headset jack connector 2.5 mm
Recharging the Battery
The handset is powered by a rechargeable battery. The full performance of a new battery is achieved only after
two or three complete charge and discharge cycles. The battery will eventually wear out even though it can
be charged and discharged hundreds of times. If the phone is left unused, a fully charged battery will lose its
charge over time. If the battery is completely discharged, it may take a few minutes before the charging indicator appears on the display.
Charge batteries within an ambient temperature range of 0° C to 40° C (32° F to 104° F). A device with a hot
or cold battery may temporarily be non-working, even when the battery is fully charged. Avoid overcharging.
Repeated overcharging can lead to deterioration in battery performance. Never attempt to charge the battery
with reversed polarity as this may cause the gas pressure inside the battery to rise and lead to leakages.
Setting up the Base Station
The base station and handsets are designed for indoor installation with a temperature range between +5°C
and +45°C (between 41°F and 113°F). They are not intended for outdoor installation!
DECT handsets have a range of around 300 feet from the base station.
1.
Once the handset is ready for use, insert one end of the Ethernet cable into the redundant network
port of the base station, then connect the other end of the Ethernet cable to a LAN port in your network
(e.g., switch, router, etc.).
Warning: Safety status of input/output connections comply to safety extra-low voltage
(SELV) requirements. To avoid electric shock, do not connect SELV circuits to telephonenetwork voltage (TNV) circuits. LAN ports contain SELV circuits, and PSTN ports contain
TNV circuits. Some LAN and PSTN ports both use RJ-45 (8P8C) connectors. Use caution when connecting cables.
4
Finding the IP Address of the Base Station
2.
Connect the 5V power converter to the wall outlet first, THEN to the base station.
Reset
button
RESET
5V
DC
Power
connector
NET
Net port
The power indicator lights and the base station begins to initialize.
3.
Once the base station has booted up, the Call LED on the face of the base station will begin blinking,
indicating that the base station is waiting for a handset registration.
Finding the IP Address of the Base Station
You can get the IP address of the base station either from the handset itself or via HTTP.
Handset
1.
Press the center navigation button, followed by
g System Info, then OK.
The IP address of the base station is displayed on the screen. Make a note of it (image A below).
2.
Using the bottom edge of the navigation wheel, page down twice. Make a note of the handset ID (image B). Do not include the “h.”
Note: If DHCP failed, the IP address, netmask, and IP gateway of the base station will need to be
assigned from the handset. To apply the settings, the base must be rebooted. After reboot, the base
should be reachable at the IP address assigned through the handset.
5
snom m9 DECT Administrator Guide
HTTP
HTTP allows you to access the m9 base station without looking at the handset. This is helpful in cases where
the handset has problems registering to the base station or when the handset is simply not available.
Note: The steps described here assume that you have an operating system that supports IPv6 (Windows 7,
Vista, Mac, Linux) and the device is in the same LAN as the computer being used to access it.
1.
Find the MAC address of the base. The MAC address of the base station can be found on the label at
the back of the m9 base station. For example, a MAC address could be 00:04:13:30:12:34.
2.
Open a web browser and enter the following address: http://[fe80::204:13ff:fe30:1234],
where the 1234 corresponds to the last four digits of the MAC address from Step 1. You should see
the login screen of the m9.
3.
Log in using the default username and password (admin and password).
4.
Navigate to the status web page. The IP address of the phone is listed as shown below.
Note: The IPv6 interface requires an upgraded Linux Kernel on the device. If the IPv6 interface is not working,
upgrade the device to the latest Linux Kernel which can be found at http://provisioning.snom.com/download/
fw/m9-os.bin.
Setting up the Handsets for Use
Registering the Handsets to the Base
1.
Press
(red phone key). The display will say “Searching for Base.” Once the handset has found the
base station, it will display the PIN prompt.
2.
Enter the default PIN of 0000.
3.
Press OK.
6
Setting up the Handsets for Use
Note: If the handset fails to register automatically, a manual registration can also be performed. Instructions are as follows:
g Handset g Register handset g
1.
Press the center navigation button, followed by
Base 1.
2.
Enter your PIN, and press OK to register the handset.
Once the handset has registered with the base, the idle screen is displayed.
4.
Repeat these steps for each handset.
Setting the Server Type
This section allows you how to set the server type and specify SIP settings (instructions for Microsoft® Lync
2010 are also provided).
1.
From the m9 web interface, click SIP from the top navigation bar:
2.
Configure the settings as detailed below:
Server Type: Server profiles provide support for non-standard functionality of some of the most
popular VoIP platforms in the market, enabling snom m9 product ease of use and integration with
third-party IPBXs. Server-type supported platforms include:
Microsoft Lync 2010
Cisco Call Manager
Broadsoft
Asterisk
snom ONE
Metaswitch
Telepo BCS
Advoco NetPBX
Avaya CM
7
snom m9 DECT Administrator Guide
Note: TAHI (Broken Register) performs the same function as Broken Registrar on the snom 3xx.
3.
RTP Encryption: Enables media encryption on the m9 (toggles between SAVP/AVP). Enable this
setting if Media Encryption (SRTP) functionality is desired
Offer ICE: Allows the snom m9 to offer ICE candidates for outgoing calls (Microsoft Lync functionality)
Dial Plan String: See “Dial Plans” on page 35.
Proposed Expiry (sec): SIP registration expiry in seconds.
DTMF via SIP INFO: Enables DTMF for IVR function with SIP INFO method.
Conference URI: URI for server hosted call conference.
Click Save.
Assigning Handsets to Extensions
This section shows you how to register an extension to the m9 handset (instructions for Microsoft® Lync 2010
are also provided). Registering a handset to an extension is done from the m9 web interface. To access the
interface, the IP address of the base station is required (see Page 5).
1.
Enter the base station’s web interface by opening a browser window and entering the IP address of
the base station (e.g., http://192.168.4.38), then press Enter.
2.
Log in using the default login credentials:
Default user name: admin
Default password: password
Important: The device will be inaccessible if both the
DECT PIN and the Web portal password of the snom
m9 are forgotten. Under these circumstances, the
base station can be reverted back to factory default by
dialing the recovery code **0000** from any registered handset.
8
Setting up the Handsets for Use
3.
Click Identity 1 from the left navigation panel, and configure the following parameters (see next page).
Note: An Identity on the device corresponds to a single a user. Each identity provides its own preferences and behavior desired by the individual user.
Identity active: Set to on.
Display Name: This name will be displayed on the handset, e.g., John Smith.
Account: PBX extension number.
Registrar: IP address or domain name of the PBX.
Outbound Proxy: IP address or domain name of the PBX. When using a domain name, prefix the
domain name with sip: (e.g., sip:mycompany.com).
Authentication Name: If no authentication name is provided, the Account setting is used.
Password: Use the SIP password that belongs with the extension that was configured in the IPBX
or SIP server.
Microsoft® Lync 2010 Integration
Disclaimer: The Microsoft Lync 2010 Server functionality of the snom m9 is still under
development, and snom cannot guarantee functionality in all user environments.
Identity active: Set to on.
Display Name: This name will be displayed on the handset, e.g., John Smith
Account: The user's OCS usermame, e.g., John.Smith.
Registrar: The OCS domain, e.g., company.com.
Outbound Proxy: The server address, e.g., sip:ocs.company.com
Note: It is also possible to specify the port and transport layer: e.g.,
sip:ocs.company.com:5060;transport=tcp (Use TCP/Port 5060)
sip:ocs.company.com:5061;transport=tls (Use TLS/Port 5061)
Authentication Name: Domain name\account name (e.g., mycompany\John.
Smith).
Password: Use the password that belongs with the extension.
9
snom m9 DECT Administrator Guide
4.
Click Handsets, then select the handset ID from the Handset ID (IPUI) dropdown list. Click Save.
The user’s name will be displayed on the phone display. This is considered the “idle display.”
5.
Repeat these steps for each handset.
Note: Each handset can be assigned up to nine SIP accounts (identities). When there is only one
handset per account, that handset will use the same account for incoming and outgoing calls. When
one handset has been assigned to multiple accounts, the same handset will ring whenever a call comes
in on any of the SIP accounts for incoming calls. For outgoing calls, the user will need to select the
Outgoing SIP account by using the “Allow Line Switching” setting (shown below), which allows users to call numbers with an <index>*Number format (e.g., to call 499 from Identity 3, the user will dial
3*499).
10
Example Setups
Verifying the Registration(s)
1.
Log in to the m9 web interface, and click the Status from the left navigation bar.
2.
Click Registration. A 200 Ok indicates a successful registration. The “(90 s),” as shown in the image
below, indicates that the registration will be complete in 90 seconds. Other possible values include
“408 Timeout,” which indicates the user could not be found in time, and “409 Authentication Required,”
which indicates a password issue.
Example Setups
Single SIP Account with Multiple Handsets
1.
Configure the SIP account on the base station as shown below:
11
snom m9 DECT Administrator Guide
2.
Click the Handsets tab, and assign all registered handsets to the Identity.
Each handset should reflect the display name (or username) of the configured account.
Incoming calls to the SIP account will alert all handsets, and outgoing calls can be placed from any
handset.
12
Example Setups
Multiple SIP Accounts with a Single Handset
1.
Use Identity 1-9 for configuring all available SIP accounts one by one on the base station as shown
below:
2.
Click the Handsets tab of each Identity and assign the registered handset to the Identity.
Each Identity should have the same Handset IPUI assigned to it.
13
snom m9 DECT Administrator Guide
3.
Click the Behavior tab of each Identity, and set the Allow Line Switching setting to on as shown
below:
The handset displays the display name/username of the first registered Identity in order of priority 1-9.
Incoming calls to any of the configured SIP accounts will alert the handset.
For outgoing calls, use the dial format of <Identity Index> * <Number> for selecting an outgoing line:
14
Example Setups
Multiple SIP Accounts with Multiple Handsets
1.
Use Identity 1-9 for configuring all available SIP accounts on the base station as shown below:
2.
Click the Handsets tab of each Identity, and assign a unique handset IPUI to each Identity.
3.
Each handset should reflect the display name/username of the Identity to which it has been assigned:
15
snom m9 DECT Administrator Guide
Incoming calls to any of the configured SIP accounts will alert the corresponding handset for that SIP
account
Outgoing calls from a handset must be placed from the SIP account to which it has been assigned.
Network Settings
To specify the network settings for your system, click Network from the left navigation panel.
16
Phone Name: This is the device “Network Host name” as seen in DHCP requests.
Asset ID: This specifies the llpd_asset_id parameter.
DHCP: The on/off options correspond to your network configuration (DHCP or static). Default is
DHCP.
IP Address: This is the static IP address of the device, if DHCP is switched off.
Network Settings
Netmask: This is the netmask for the network, if DHCP is switched off.
IP Gateway: This is the default gateway of the network, if DHCP is switched off.
DNS Server: Multiple DNS servers can be used for DNS redundancy. If one of them fails, a backup
will be available.
DNS Domain: This is the DNS domain of the device, if DHCP is switched off.
NTP Server: NTP Time Server IP Address of hostname.
VLAN/ID: VLAN ID is the identification of the VLAN, which is basically used by the standard 802.1Q.
It has 12 bits and allows the identification of 4096 VLANs. Possible values range from 0 to 4095.
VLAN Priority: VLAN Priority lets the user assign a priority to outbound packets containing the specified VLAN-ID (VID). Possible values range from 0 to 7.
Provisioning Server: This field takes an auto configuration URL (links to a configuration XML file)
Settings refresh timer: This field indicates the number of seconds after which the m9 will refresh its
settings from the setting server periodically (0 = don’t refresh).
SIP client port: Allows the m9 to bind the device to a fixed SIP UDP port (e.g., 5060). By default, the
m9 selects a random UDP port for SIP signaling.
RTP Type of Service (ToS/Diffserv): Enables the m9 to support quality of service (QoS) for RTP traffic in the network via Diffserv.
SIP Type of Service (ToS/Diffserv): Enables the m9 to support quality of service (QoS) for SIP traffic
in the network via Diffserv.
Allow Check-Sync: Allows reboot/re-sync with SIP NOTIFY.
STUN server: STUN (Simple Traversal of UDP through NAT) server and port.
STUN refresh interval in seconds: Interval for STUN refresh.
NAT Traversal
NAT is typically used by a router or firewall to allow devices that are on a LAN (Local Area Network) and have
private IP addresses to share a single, public IP address. To maintain the session, the NAT’ed snom m9 behind
the firewall must keep sending messages to keep the session open. These messages are called “NAT Keep
Alive” messages. The snom m9 provides the following provisionable settings for NAT Keep Alive:
outbound_method: crlf or stun
outbound_tcp: Refresh interval in seconds for TCP connections (default is 60)
outbound_udp: Refresh interval in seconds for UDP connections (default is 20)
17
snom m9 DECT Administrator Guide
Security
X.509 Certificates
In Cyberspace, “certificates” are electronic documents that use digital signatures to bind a public key with an
identity and include information such as the name of a person or an organization, their address, and so forth.
The certificate can be used to verify that a public key belongs to an individual, thus establishing the identity of
the certificate owner. We are trying to verify that the device/ID is who they say they are, which is vital for plug
and play when authenticating over the WAN.
Certificate Authorities
A certificate authority (CA) is an entity that issues digital certificates. It is a third party that is trusted by both
the owner of the certificate and the party relying upon the certificate. The m9 phone has a built-in CA that is
owned by snom.com. The IPBX software can use the certificate to be assured that it is talking to a snom m9
base station with MAC address 000413xxxxxxx. The m9 base station automatically performs server identity
verification based on trusted X.509 certificate chains when SSL/TLS is used. Servers that present certificates
signed by CAs unknown to the base are rejected. To deactivate the Server Verification functionality:
1.
Log in to the m9 web interface, and select Security.
2.
From the Certificate Policy dropdown, select Don’t validate certificates.
18
Security
Note: The snom m9 is also able to present its X.509 Certificate for Client Identity Verification (CIV), a critical
risk mitigation measure that gives all participants confidence about who they are dealing with. For the Client/
Server verification to function, the validation server must have a valid certificate with a domain name as the CN.
Also, the same domain name must be provided to the snom m9 as the SIP server or auto-configuration server.
To view the trusted root CAs on the base, click Status > Network.
Client Certificates
Each snom m9 base station comes equipped with a unique X.509 certificate signed by snom CA.
19
snom m9 DECT Administrator Guide
These client certificates are used by the snom m9 to provide servers proof-of-identity based on the
MAC address and to generate private-key-based signatures. Client certificates allow an SSL/TLS
server to verify the identity of a connecting client. The verifying server can be co-located within a SIP
server or a configuration server or it can be an independent network entity. This mechanism of identity
verification also eliminates the need for standard authentication mechanisms such as username/password authentication
Authentication/Provisioning Server
(provisioning.mycompany.com)
m9 Base Station
Set up TLS connections.
Prove your identity.
X.509 Certificate
Sign something with your certficate.
Signature
Authenticated
Encrypted connection
20
Security
The client certificate of the snom m9 can also be customized by provisioning a custom client certificate/private
key. To provision a customized client certificate and private key to the snom m9, encapsulate the <cert> and
<key> tags within a <certificates> XML tag as shown below:
Certificate Authority (CA) Setup
To auto-provision trusted root CAs to the m9 base, enclose each trusted root CA within a <ca> tag as shown
below:
21
snom m9 DECT Administrator Guide
Encrypted Calls
The snom m9 supports media and SIP signaling encryption for making secure VoIP calls using TLS/SRTP.
These features are provided via RFC 4346 (TLS), RFC 3711 (SRTP), and Internet draft draft-ietf-mmusic-sdescriptions-12 (SDP Security Descriptions for Media Streams)
Signaling Encryption
Transport Layer Security or TLS is a cryptographic protocol that provides communications security over the
Internet. TLS enables a device and server to use a secure connection for communication which is not susceptible to eavesdropping or data thefts on the Internet. TLS is analogous to HTTPS.
The snom m9 provides the user with the option to use TLS functionality for SIP signaling (also known as
SIPS), thereby providing a high level of call control security on the Internet as well as in other security-sensitive
networks. The TLS/SIPS functionality can be enabled on the snom m9 by appending the transport=tls
parameter to the SIP outbound proxy. E.g. the following Outbound Proxy setting would enable the snom m9 to
use TLS (port 5061) for registration and call setup with sip:myserver.com.
Outbound Proxy: sip:myserver.com:5061;transport=tls
Note: TLS usage can also be configured via DNS SRV setup. In this case, the snom m9 will automatically
select the port and transport provided by DNS SRV lookup.
This signaling is used between the base station and the IPBX, so it must also support these protocols to protect the conversation between the base station and the handset.
Media Encryption
For media encryption, the snom m9 relies on RFC 3711 (SRTP) for Packet Encryption and Internet draft draftietf-mmusic-sdescriptions-12 for Key Exchange. The Key Exchange protocol allows the snom m9 to exchange
RTP Keying information with its peer in SIP signaling messages when a call is placed or answered. This exchanged information is then used to establish an “encrypted” audio stream between the snom m9 and its peer.
Media encryption can be switched on using the RTP Encryption setting. This setting toggles between SAVP/
AVP). In summary, TLS encrypts the signalling or call setup and teardown messages, and SRTP encrypts and
protects the audio steam or voice packets.
22
Security
Secure call status is indicated on the snom m9 handset. If the phone successfully registered a TLS/SRTP session, the closed padlock icon will be displayed.
Certificate Authority Setup
Custom configured CAs can be viewed by clicking Status > Network > Root Certificate Authorities from
the snom m9 web interface. (Additional CAs can be added, but you cannot delete select CAs. However, doing
a factory reset from the base will clear all the configured CAs.)
23
snom m9 DECT Administrator Guide
System Status
You can see what’s going on in the system and with the handsets using the Status links in the left navigation
panel of the m9 web interface, as shown below (once logged into the base station).
Status of System
The Status link gives you the status of the network, including the IP address information. The registrations
show the registration status of each identity, and the DECT link shows the status of each DECT handset.
The system’s information is also available from the handset:
g Handset g System Info.
1.
Press the center navigation button, followed by
2.
Page through the different screens using the bottom edge of the navigation wheel.
The Network page displays the MAC and IP addresses of the base station, the Gateway page displays
the firmware version, and the Handset page displays the identification number of the handset.
24
System Status
Logging
The Log link gives you the SIP logging messages. Following are a few types:
Registration Log
Roaming Provisioning
Location Profile
Calls
The Calls link indicates the status of active calls on the snom m9 base station. Reminder: You can have only
four active calls on one base station.
DNS Cache
DNS is used to MAP IP addresses to domain names. To reduce DNS traffic across the network and increase
performance, snom m9 stores DNS query results for a period of time. The contents of the DNS cache, which
is typically the IP address of the SIP server or IPBX, can be viewed under this section.
Network Analyzer
The network analyzer allows administrators to capture network traffic on the snom m9 base station. Captured
files can be viewed in packet capture tools such as Wireshark, which is a free open source packet-capturing
and analysis tool (www.wireshark.org). You would use this for troubleshooting network or call quality issues.
1.
In order to manually capture traffic on the snom m9, click the Start button.
Note: The PCAP on Bootup function automatically turns on packet capture on bootup.
25
snom m9 DECT Administrator Guide
2.
After the desired amount of time, click the Stop button to end the packet capturing.
3.
To open the capture file in a packet capturing tool, click the here link at the bottom of the Network
Analyzer page.
Diagnostics
The Diagnostics link displays memory usage.
It also provides access to the Linux /proc folder for checking version, uptime, sockets, etc. For example, you
can view the current open TCP sockets on a device by doing the following:
1.
Enter net/tcp into the input box.
2.
Click Submit Query.
26
System Status
The open TCP sockets are listed as shown below:
Settings
The Settings page lists the setting and configuration parameters of the snom m9 base station. Settings can be
stored as an XML file and exported for duplication/provisioning.
27
snom m9 DECT Administrator Guide
Base Station Firmware Update.
HTTP Firmware Update
Before you can update the firmware from the m9 web interface, you will need to retrieve the software from the
snom wiki (provisioning.snom.com).
1.
Go to http://wiki.snom.com and click Firmware Guide as shown below:
2.
Click your phone model, then click the firmware version.
3.
Right-click the link and copy the link location.
28
Base Station Firmware Update.
4.
Log into the m9 web interface and click Maintenance, and paste the link as shown below:
5.
Click Update.
The update status is indicated on the Web Interface
6.
Click Reboot.
TFTP Firmware Update
1.
Install a TFTP Server, e.g. Tftpd32, or check to see whether your IPBX has one built in.
2.
Download the firmware from wiki.snom.com, as detailed on Page 80.
3.
Put the firmware file into the tftproot directory of the TFTP Server.
4.
Start the TFTP server on your PC.
5.
Log into the m9 web interface and click Maintenance from the left navigation pane.
6.
Enter the string shown below into the Software Update field, replacing TFTP Server IP with the IP
address of your TFTP server.
7.
Click Update.
29
snom m9 DECT Administrator Guide
Handset Firmware Update
Over-the-Air Update
Over-the-air update refers to updating the handsets over the DECT (radio) interface. Each m9 firmware version
includes a corresponding updated handset firmware version. After the base station has been upgraded to the
new firmware, the handsets can be upgraded using this procedure.
1.
From the handset, press the center navigation button, followed by
2.
The words “On charger” are displayed on the handset display.
3.
Place Handset on charger.
g Handset g FW Update.
Upload progress is indicated on the handset display. The handset firmware update takes approximately
5 minutes.
4.
For future firmware updates, select Handset Reset (
g Handset g Handset Reset).
Note: Up to four handsets can be updated in parallel.
Firmware Update via USB Port
Handsets can also be upgraded via the USB port located underneath the battery cover. USB (Universal Serial
Bus) is a standard cable connection interface on personal computers and consumer electronics. USB ports
allow standalone electronic devices to be connected via cables to a computer (or to each other). USB can
connect peripherals such as mice, keyboards, digital cameras, phones, printers, personal media players, flash
drives, network adapters, and external hard drives.
1.
To locate the USB port on the handset, remove the battery cover.
2.
Connect a USB cable to the PC, and plug the other end into the USB receptacle on the handset.
30
Handset Firmware Update
3.
As Windows displays New Hardware Found, note the COM port assigned to the handset.
4.
Before you can connect to the snom m9 handset, you need to download the snom m9 Update Tool.
Download it at http://provisioning.snom.com/m9/snomm9UpdateTool.zip (available
only in Windows).
5.
Once downloaded, extract the ZIP file, then run the executable.
6.
In the COM ports dropdown, select or enter the assigned COM port.
7.
Click Connect at the top of the dialog box. If you entered the correct COM port, the Connect button
will gray out.
8.
Click File > Load, then select Software file.
9.
From the file selection box, select the handset*.BIN file downloaded from the snom m9 web GUI.
31
snom m9 DECT Administrator Guide
10. Click Open to select the file.
11. To begin the firmware update, click Download at the top of the Update Tool screen.
12. The update status is displayed on the handset.
Auto Configuration and Firmware Update
To administer a large pool of snom m9 devices, the device provides the option to configure settings and upgrade device firmware with zero-touch interaction from the user. These mechanisms allow the administrator to
manage and monitor all snom m9 devices in the network remotely.
The snom m9 Auto Provisioning feature allows multiple devices to be configured and upgraded automatically in
parallel. Auto configuration is enabled by providing a settings server URL to the base station. This can be done
manually or via DHCP. Three files are required when using Auto Configuration. The required syntax structure
for each of the files is as follows:
Base file
Firmware file
Settings file
000413231325.xml
firmware-000413231325.xml
settings-000413231325.xml
An example of the base file (i.e., the provisioning URL) is shown below:
http://server.example.com/m9/000413231325.xml
The base file contains links to the firmware and settings files, as shown below:
32
Auto Configuration and Firmware Update
A base setting file may also be used with PHP to force devices to provide their MAC addresses. The server
can then return the actual settings for each device based on its MAC address.
The firmware settings file links to the snom m9 base station firmware (the file pointed to in the link contains the
base and handset firmware bundle).
33
snom m9 DECT Administrator Guide
Address Book Provisioning with XML
Using XML files for the address book allows you to upload contacts into the snom m9 base station. Following
is an example XML-based address book for the snom m9:
Each contact must be within its own <item> </item> begin and end tags and must include parameters
such as item context, type, name, and number. These tags must be individually specified for all entries. There are no default values for tags that are left empty.
XML Tag
item context
Description
Indicates which outgoing line/identity/account will be used to call the contact.
type
Defines the type of contact.
index
Represents the contact’s position within
the list of entries. This value must be
unique for each item.
The contact’s name.
name
number
tbook complete
Phone number
Defines whether previous address book
entries are deleted before new entries are
loaded
Valid Values
<line 1> ... <line 9>
<global>
none, friends, colleagues,
family, vip, deny
Between 0 and 99 (maximum is
500 directory entried)
Use alpha-numerical and/or special characters, like *, #, etc.
All numbers (e.g., 9781234567)
true
Address book XML files can also be uploaded manually by clicking Maintenance from the left navigation panel.
If item context is set to <global>, the contact is added to all lines.
34
Dial Plans
Dial Plans
A dial plan establishes the expected number and pattern of digits for a telephone number. This includes country
codes, access codes, area codes, and all combinations of digits dialed.
On the snom m9, dial plans may provide the following functions:
Automatic termination of emergency numbers at an emergency service provider
Automatic recogition of number completion (e.g., ten-digit number in the U.S.)
Automatic conversion of local numbers into global numbers (e.g., dialing 398330 in Berlin, Germany
gets converted into +4930398330)
Automatic appending of the local domain (e.g., dialing 398330 gets converted into sip:398330@
company.com;user=phone)
35
snom m9 DECT Administrator Guide
Each identity on the snom m9 can be configured to include these dial patterns.
Configuration
Dial plan entries consist of three parts (pattern, result, and flags), each of which may be separated by any character. Typically, the characters “!” or “|” are used as field separators.
Pattern: The pattern field is used to interpret digit sequences that will be used to decide on routing.
In most cases, simplified expressions consisting of literals, prefixes, and fixed patterns will suffice.
—
Literals: If you want to match a specific number, just enter the exact number (e.g., 911). The
literal will be the first match in the expression.
—
Prefixes: Prefixes allow you to route numbers that begin with identical prefixes through the
same trunk. For example, by specifying the common prefix 9011 in the pattern field, all international numbers will be routed through the same trunk. To indicate that a prefix is being using, an
asterisk must be entered after the prefix (e.g., 9011*).
—
Fixed patterns: If you use an x in a pattern, the system will treat it as a wildcard for 0-9. For
example, 978xxxxxxx will route all calls beginning with the area code 978 through the same
trunk.
Replacement: The replacement string is used to convert digit sequences into a dial string for outbound calling. It is used in the To header as well as in the Request-URI. Replacement strings are
found in the second part of the dial plan entry and are marked by a leading \
Replacement
d
Definition
The d replacement inserts the name of the registrar.
Example: !*!sip:\1@\d!
This replacement string inserts the domain name behind the @ symbol.q
36
Dial Plans
Numbers are back references to match-groups of the regEx part according to RFC2915.
Example: !(.+)!sip:\1! inserts a sip: before the string (which is
the first match).
Flags: Flags set additional processing attributes. The following flags are available:
Flag
Definition
d
Indicates that the number is complete and can be dialed.
i
Example: |([0-9]{5})|sip:\[email protected]|d means that a number
with five digits will be dialed automatically.
Indicates that the comparisons should be done case-insensitive.
Dail Plan Examples
Table 1 Examples of Dial Plans
Goal
To make the phone dial a number when the pound (#) key is
pressed.
To match an international number
Pattern and Result
!([^#]+)#!sip:\1@\d!d
The dial plan entry will look for a pattern ending in a pound (#)
symbol and will use this as the user name in a SIP URI (not including the # symbol).
Put the 011 pattern at the front of the pattern:
|^011([0-9]*)$|sip:+\1@\d;phone=yes|
To add area codes
Example 1: If the phone number has digits between 3 and 6,
then use an area code:
|^([0-9]{3,4})$|sip:030\1@\d””|^([0-9]
{5,6})$|sip:030\1@\d
Example 2: Use an area code all the time:
To call a complete URI
|^([0-9])$|sip:030\1@\d
This is a little bit more difficult because of the number of allowed
characters in the user name. The following characters can be a
base for such a dial plan entry:
|^([a-zA-Z0-9&=+\$,;?\-_.!~*‘()%]+@.+)|sip:\1|
37
snom m9 DECT Administrator Guide
Goal
To use leading zeros
Pattern and Result
If a number starts with 9 and has at least 8 further digits, then use
a leading zero.
|^9([0-9]{8})$|sip:09\1@\d
If a number has 2 digits, don’t use a leading zero. When more
than 2 digits, use the leading zero:
To separate star (*) codes from
standard numbers
|^([0-9]{3,})$|sip:0\1@\d
Sometimes a dial plan is needed to add a leading 0 to an outgoing number not starting with 0 (e.g., 3039833104) so that
it will be dialed as 03039833104, but you want to make sure
that if the number were 03039833104, that it’s not converted to
003039833104. When this is the case, you could use the following string for this purpose:
|^([1-9]{2})([0-9]{6,})$|sip:0\1\2@\d
But if a star code is followed by a destination, e.g., *7939833452,
it is not desired to convert it to 07939833452 because the PBX
is expected to get the whole string and use it accordingly. Hence,
we can concatenate a plan to the one above to make provision for
such exceptions:
|^\*([0-9]*)$|sip:*\1@\d””|^([1-9]{2})([0-9]
{6,})$|sip:0\1\2@\d
To concatenate dial plans
To dial a certain number with
another outgoing identity
Separated by the exclamation mark, it contains the pattern for the
911 and the resulting SIP URI.
To concatenate dial plans, just write them one after another
including “” quotes. You will get the following after concatenating
the above two dial plans:
|^9([0-9]{8})$|sip:09\1@\d” “|^([0-9]
{3,})$|sip:0\1@\d
|^911|^112|sip:[email protected]|d
Emergency Calling
Dial plans can also be particularly useful for providing emergency calling services (e.g., 911, 112, 999) in VoIP
networks. The following examples indicate how dial plans may be used on the snom m9 to provide emergency
calling services.
38
LDAP
Table 2 Examples of Dial Plans for Emergency Dialing
Goal
Convert an emergency
number into a SIP URL
Dial a certain number with
another outgoing identity
Pattern and Result
This pattern could look like this:
!^911$!sip:emergency@local!d
Separated by the exclamation mark, it contains the pattern for the 911
and the resulting SIP URI.
^911|sip:[email protected]|d
LDAP
LDAP, or Lightweight Directory Access Protocol, is an Internet protocol that clients can use to look up information from a server. The snom m9 base station supports LDAP server configuration for each SIP identity (shown
below). This enables the base station to perform LDAP look-ups for incoming calls. Configuration details are
outlined in Table 3.
39
snom m9 DECT Administrator Guide
Table 3 LDAP Parameters and Values
Parameter
<user_ldap_
outgoing_
phonebook>
<user_ldap_
username>
<user_ldap_
password>
<user_ldap_
password>
<user_ldap_
server_name>
<user_ldap_
port>
<user_ldap_
base>
<user_ldap_
name_filter>
40
Function/Description
Valid Value
Default
Enable LDAP—If enabled, LDAP will be used; <on>, <off>
otherwise, the normal vCard phone book will
be used.
Username—Here you can set a user name to
String to be used
know what LDAP contacts are related to this
user.
Password—Here you can set a user password. Password string
<off>
Password repeat—Here you can set a user
password.
Server address—This setting refers to the
DNS name or IP address of the LDAP server.
Port—This setting specifies the LDAP server
port. In case the setting is not configured, the
default LDAP port (389) is taken.
Base—This setting specifies the LDAP search
base (the distinguished name of the search
base object) which corresponds to the location in the directory from which the LDAP
search is requested to begin. The search
base narrows the search scope and decreases directory lookup time. If you have
multiple organizational units in your directory
(for example, OU=Sales in O=COMPANY
and OU=Development in O=COMPANY),
but the “OU=Sales” organization never uses
AOL AIM, you can restrict the lookup to only
the OU=Development subtree by providing
the following search base: OU=Development,
O=COMPANY.
Name filter—The LDAP name filter is the
search criteria for name look-ups. The format
of the search filter is compliant to the standard string representations of LDAP search
filters (RFC 2254). The name prefix for search
entered by the user is represented by the “%”
symbol in the filter.
Blank
Password string
Blank
Blank
IP address or domain Blank
0-65535
Blank
String such as
the following:
o=UNIVERSITY
OF NEW
ORLEANS,c=US
Blank
Standard LDAP filters, e.g., (&(sn=%)
(telephoneNumber=*))
Blank
LDAP
Parameter
Function/Description
<user_ldap_
Number filter—The LDAP number filter is the
number_filter> search criteria for number look-ups. The format
of the search filter is compliant to the standard
string representations of LDAP search filters
(RFC 2254). The number prefix for search
entered by the user is represented by the “%”
symbol in the filter.
<user_ldap_
Maximum hits—This setting specifies the maximax_hits>
mum number of search results to be returned
by the LDAP server. Note that a very large
value of the “Max. Hits” will slow down the
LDAP lookup, so the setting should be configured according to the available bandwidth.
<user_ldap_
Name attributes—This setting can be used to
name_attrispecify the “name” attributes of each record
butes>
that is to be returned in the LDAP search
results. This setting compresses the search
results, as the server returns only the attributes
which are requested by the snom phone. The
setting allows the user to configure multiple
space-separated name attributes. Please consult your system administrator regarding the
name attributes that are to be configured.
<user_ldap_
Number attribute—This setting can be used
number_attri- to specify the “number” attributes of each
butes>
record that is to be returned in the LDAP
search results by the LDAP server. This setting
compresses the search results, as the server
returns only the attributes that are requested.
The user can configure multiple space-separated number attributes by using this setting. Please consult you system administrator
regarding the number of attributes that are to
be configured.
<user_ldap_
Display name—This setting specifies the
display_name> format in which the “name” of each returned
search result is to be displayed on the snom
phone. The setting allows combinations of
various “name attributes” along with special
characters.
Valid Value
Default
Blank
Standard LDAP filters, e.g., (|(telephoneNumber=%)
(Mobile=%)(ipPhone=%))
Numbers
50
Space-separated
name attributes
Blank
Space separated
number attributes,
e.g., telephoneNumber Mobile
ipPhone Home
Blank
Any combination of
Blank
LDAP name attributes
with special characters.
41
snom m9 DECT Administrator Guide
Parameter
Function/Description
<user_ldap_
Country code—This setting is used for specicountry_code> fying standard country codes that are to be
substituted in LDAP search requests.
<user_ldap_
Area code—This setting is used for specifying
area_code>
standard country codes that are to be substituted in LDAP search requests.
<user_ldap_
Lookup for incoming call—This setting can be
lookup_incom- used to enable calling line identification using>
ing LDAP. When this setting is turned on, the
phone performs an LDAP number search for
the incoming number and displays the name of
the calling party accordingly.
Valid Value
Default
Standard country
codes
Blank
Standard country
codes
Blank
<on>, <off>
Blank
Table 4 Sample LDAP XML Configuration
<user_ldap_outgoing_phonebook idx=”INDEX” perm=”PERMISSIONFLAG”>VALIDVALUE</user_ldap_outgoing_phonebook>
<user_ldap_username perm=”PERMISSIONFLAG”>VALIDVALUE</user_ldap_username>
<user_ldap_password perm=”PERMISSIONFLAG”>VALIDVALUE</user_ldap_password>
<user_ldap_password perm=”PERMISSIONFLAG”>VALIDVALUE</user_ldap_password>
<user_ldap_server_name perm=”PERMISSIONFLAG”>VALIDVALUE</user_ldap_server_name>
<user_ldap_port perm=”PERMISSIONFLAG”>VALIDVALUE</user_ldap_port>
<user_ldap_base perm=”PERMISSIONFLAG”>VALIDVALUE</user_ldap_base>
<user_ldap_name_filter perm=”PERMISSIONFLAG”>VALIDVALUE</user_ldap_name_filter>
<user_ldap_number_filter perm=”PERMISSIONFLAG”>VALIDVALUE</user_ldap_number_filter>
<user_ldap_max_hits perm=”PERMISSIONFLAG”>VALIDVALUE</user_ldap_max_hits>
<user_ldap_name_attributes perm=”PERMISSIONFLAG”>VALIDVALUE</user_ldap_name_attributes>
<user_ldap_number_attributes perm=”PERMISSIONFLAG”>VALIDVALUE</user_ldap_number_attributes>
<user_ldap_display_name perm=”PERMISSIONFLAG”>VALIDVALUE</user_ldap_display_name>
<user_ldap_country_code perm=”PERMISSIONFLAG”>VALIDVALUE</user_ldap_country_code>
<user_ldap_area_code perm=”PERMISSIONFLAG”>VALIDVALUE</user_ldap_area_code>
<user_ldap_lookup_incoming perm=”PERMISSIONFLAG”>VALIDVALUE</user_ldap_lookup_incoming>
IPv6 and m9 DECT
IPv6 was developed by the Internet Engineering Task Force (IETF) during 1991–1997 to deal with the longanticipated IPv4 address exhaustion; however, the advantages of IPv6 exceed the increased address space
(from 32-bit to 128-bit). The primary advantages are detailed below:
42
IPv6 and m9 DECT
Goal
Pattern and Result
Larger address space
128-bit addresses instead of the 32-bit addresses of IPv4
Multicast
Transmission of a packet to multiple destinations as part of the base
specification
Neighbor Discovery and address auto configuration allow hosts to
operate in any location without any special support (PnP)
Security features are mandated in IPv6 (IPSEC)
No triangle routing—IP mobility is native to IPv6
Efficient and extensible IP datagram
Auto-configuration
Network security
IPv6 mobility
Extensibility options
Address Assignment and Auto Configuration
The snom m9 is IPv6-ready so it can automatically assign an IPv6 address to the device over DHCPv6, and
when connected to an IPv6 network, it can configure itself automatically using Internet Control Message Protocol version 6 (ICMPv6) router discovery messages. The Dual IP Stack allows the snom m9 to maintain IPv4
and IPv6 interfaces in parallel.
Dual IP Stack
The ability to perform DHCPv6/ICMPv6 queries simultaneously with the IPv4 DHCP queries allows the snom
m9 to maintain multiple IPv4 and IPv6 interfaces in parallel.
43
snom m9 DECT Administrator Guide
DNS
Support for IPv6 naturally allows the snom m9 to perform AAAA queries for IPv6 address lookups. For routing
packets to IPv6 destinations, snom m9 uses its local IPv6 interface, if available.
SIP
Depending on the type of address returned (IPv4 or IPv6) for a SIP server, the snom m9 automatically selects
the corresponding IP interface for registration. SIP packet addresses and headers are also automatically substituted with the appropriate IP interface. Following is a REGISTER sample:
REGISTER sip:cs410.snom.com SIP/2.0
Via: SIP/2.0/TLS fe80::6dff:f2df:d3bf:1e2 :2077;branch=z9hG4bK-rib4emgq;rport
From: “Hanna Flanders” <sip:[email protected]>;tag=fwxg2s0u4i
To: “Hanna Flanders” <sip:[email protected]>
Call-ID: 3c267028e8ad-q7dwiql86rvc
CSeq: 6134 REGISTER
Max-Forwards: 70
Contact: <sip:520@fe80::6dff:f2df:d3bf:1e2 :2077;transport=tls;line=ibeyjpgk>;
reg-id=1;q=1.0;+sip.instance=”<urn:uuid:0fe6493a-4223-49f7-9aa6-4fb5e5198e0f>”
[7] 2010/04/14 16:05:16:
SIP/2.0 200 Ok
44
SIP Tx tls:fe80::6dff:f2df:d3bf:1e2 :2077:
Handset Overview
SECTION II: The m9 in Action
Handset Overview
Earpiece
Color display
Left function key
In idle mode:
Call lists
Right function key
Green phone key
Accept calls
Dial number
Confirm actions
Red phone key
Terminate calls
Cancel actions
Power on/off
Star key
Change input mode
(numbers, small/
capital letters)
Alphanumerical
keypad
R key
Lock/unlock keypad
Navigation
key
Navigation
wheel
Navigation key: In idle mode, press the center navigation key to get to the main menu. In other contexts, press
this key to navigate the menus and lists.
Navigation wheel: In idle mode, press the top/bottom/right/left edge of the navigation wheel (depicted in this
guide by higf, respectively) to open the following menus or functions:
i
f
g
h
Directory
Intercom
Settings menu
Preferences menu
In other contexts, press h or i to navigate in menus and lists.
45
snom m9 DECT Administrator Guide
Idle Screen Display Symbols
Symbols on the phone display when the phone is in idle mode are considered idle screen display symbols.
These symbols indicate the status of DND and call forwarding. They also indicate whether a user has voicemail, the battery needs to be recharged, or an alarm has been set. These and other symbols are outlined
below:
DND is activated
Call forwarding is activated
User has voicemail
Alarm has been set
Signal strength:
Green = High
Gray = Low
Handset ID:
Call lists:
Missed
Received
Dialed
Main menu (press center button)
Status bar
Battery charging status
Red = Critical
Yellow = <50% charge
Green = >50% charge
Time and date
Function key line
Activate the displayed feature
(VM or RSS*) by pressing the
right function key.
*RSS (Really Simple Syndication) feeds are used to stream data to the phone. Example are displayed on Page
72.
46
Idle Screen Display Symbols
Navigating the Phone Menus
With the phone in idle status, press the center navigation key. Six different menu options are displayed:
Office Tools
Current menu selection
Phone Directory
Settings
Preferences
Intercom
Alarm Clock
Current function of function key
underneath
Navigating the Phone
To navigate to a menu option:
–
1.
Press the center navigation
key on the phone.
2.
To select a menu option, press the top/bottom/right/left edge of the navigation wheel (indicated in this
guide by higf).
3.
Press the center navigation key again to open the submenu functions.
4.
Navigate by using higf.
5.
Make your selection by pressing the center navigation key.
6.
To cancel or to return to the idle screen, press the red phone button or press Cancel.
Phone Tree
Icon
Main Menu
Sub-Menus
Page Reference
Phone Directory
None
Page 63
Office Tools
Stopwatch
Page 69
Calculator
Page 69
Notepad
Page 70
Calendar
Page 70
RSS Reader
Page 72
Voicemail
Page 52
47
snom m9 DECT Administrator Guide
Settings
Date/Time
Page 49
VoIP
Display Name
Account
Password
Registrar
Outbound Proxy
Mailbox
Network
VLAN
DHCP
Handset
Register handset
Select base
Deregister handset
Reset handset
Reset base
FW update
Version
Change PIN
System Info
MAC address
Preferences
IP address
Language
Page 73
Display
Screen Saver
Page 74
Wallpaper
Page 74
Contrast
Backlight
Audio Settings
Ringer Settings
Advisory Tones
48
Page 24
Page 74
Page 74
Page 75
Page 76
Auto Answer
Page 76
Call Forwarding
Alarm Clock
Page 76
Page 58
Intercom
Page 59
Setting the Date and Time
Setting the Date and Time
It’s critical that the handset shows the correct time so that incoming calls will show this and so that the alarm
clock can be used. While the system should automatically get its time from a time server, the time can also be
changed manually from the handset.
1.
Press the center navigation button, followed by
2.
Make the appropriate changes:
g Date/Time.
Time Server: If you have a local time server in your network or if you want to use some other public
time server, you can change the time server here. The default time server is pool.ntp.org. Your SIP
server may also act as a time server.
Timezone: To get the GMT offset for your region, open your computer’s control panel and click Date
and Time (or go to dateandtime.com).
Format:
Date Format: Choose between two formats: Day, MM DD (Monday, Feb. 02) or
DD/MM/YYYY (02/02/2011).
Time Format: Choose between the 12-hour format (06:00 P.M.) and the 24-hour format (18:00).
Daylight Saving Time (DST)
Daylight Saving Time or DST is the practice of temporarily advancing clocks during summertime so that afternoons have more daylight and mornings have less. The snom m9 also allows users to set up DST according to
their time zone and adjust DST shifts as needed. To set up DST:
1.
Select Time/Language from the left navigation panel.
2.
From the Time Zone dropdown, select Specify Details.
49
snom m9 DECT Administrator Guide
The page is expanded:
3.
50
Use the following table to familiarize yourself with the configurable parameters for DST:
Basic Calling
Basic Calling
Making Calls
1.
Enter the extension or number followed by
(the green key).
Ending a Call
Press
(the red key).
Accepting a Call
Incoming calls are identified in two ways: through the ringing of the phone and via the handset display. To accept the call, press
.
Note: If Auto Answer (Page 59) has been activated, the handset will automatically take the call once it has
been lifted out of the cradle. If the handset is not in the cradle, the call will be connected immediately.
Call Hold
1.
While connected to a call, press Options to bring up Options menu (image A).
2.
Select Hold Call (image B).
The call will be placed on hold (image C):
3.
Press Resume to re-connect the held call.
51
snom m9 DECT Administrator Guide
Using Voicemail
Voicemail is indicated in two ways: (1) by an envelop icon at the top of the display and (2) a VM in the lower
right-hand corner (see image A).
To listen to the voicemail:
1.
Press the VM softkey (image B).
2.
At the Mailbox screen, press OK (image B). Your messages are read out during the Calling screen (image C).
Note: If you are using a voicemail system (such as Microsoft Exchange Server) that does not notify the voicemail status, you can access your mailbox using Office Tools:
1.
Press the center navigation button, followed by
2.
Press the VM softkey.
g Voicemail.
Hands-Free Speaker Mode
To switch the handset to speaker mode for hands-free usage, simply press the speaker key on the side of the
handset to enable speaker mode.
Note: The handset can be switched back to normal mode by pressing the green “call” button.
Note: To place a call in hands free mode, enter the desired number, press the OK key to dial, and then press
the speaker key (Page 4) to enable hands-free mode.
52
Speed Dialing
Changing the Volume in Speaker Mode
The Ear Protection setting activates lower speaker volumes on connected snom m9 handsets. By default this
setting is turned off. To re-enable the normal speaker levels on the connected handsets:
1.
Log in to the m9 web interface.
2.
Click the identity that belongs to the handset.
3.
Click Behavior, then set Ear Protection to off.
Switch to Mute
To mute an ongoing call, press the Mute softkey on the handset. To unmute the call, press Resume.
53
snom m9 DECT Administrator Guide
Speed Dialing
This feature allows the m9 handset to perform single-digit dialing to SIP URIs or E164 numbers. This function
is particularly useful for phone users who dial certain numbers on a regular basis. Every SIP Identity provides
up to 10 speed dials for the handset.
To use the speed dialing feature of the snom m9, simply configure a number or SIP URI in one of the speed
dial entries. To place a call to the speed dial destination, simply dial the corresponding digit on the handset.
E.g., in the example shown below, the user would dial “1” on the handset to call sip:[email protected]
Note: SIP URIs used as speed dial destinations must be configured with a “sip:” prefix.
Note: Speed dials can be set up only through the web portal, so often the administrator is the one who sets
them up.
Transferring Calls
Call Transfer (Blind)
1.
While connected, press Options to bring up the Options menu.
2.
Select Transfer Call.
54
Conferencing
3.
Enter transfer destination number, and press OK.
The handset performs the transfer and returns to idle mode.
Note: The function uses SIP REFER for Call Transfer.
Call Bridging (Attended Transfer)
1.
While connected, press Options to bring up Options menu.
2.
Select New Call.
3.
Enter number and press OK.
4.
When “Connected, press Options to bring up Options menu.
5.
Select Bridge Calls.
The handset performs transfer and returns to idle mode. (The function uses SIP REFER for Attended
Transfer. Make sure your IPBX supports this.)
Note: Call Bridging can also be performed with the Hangup key by enabling the setting Identity >
Behavior > Transfer on Onhook.
Conferencing
1.
While connected, press Options to bring up the Options menu.
2.
Select New Call.
3.
Enter number and press OK.
55
snom m9 DECT Administrator Guide
4.
When connected, press Options to bring up Options menu.
5.
Select Conference.
All three parties are now connected and can send and receive audio to one another.
Forwarding Calls/Redirection
Call Forward
You can forward your calls to another number. As shown in the following image, the settings that can be used
for forwarding calls are Never, Always, On Busy, and Timeout.
1.
Click Identity from the left panel.
2.
Click Behavior as shown below.
3.
Choose a call forwarding mode from the Call forwarding mode dropdown.
4.
Enter a forwarding destination into the Call forwarding number dropdown.
5.
From the Call forwarding timeout dropdown, select a timeout.
56
Do Not Disturb
The forwarding status is indicated on the handset:
Do Not Disturb
Activating DND will reject all incoming calls for the SIP Identity and its associated handset will not be alerted.
1.
Click Identity from the left panel.
2.
Click Behavior as shown below.
3.
Set DND to on.
DND status is indicated on the handset.
57
snom m9 DECT Administrator Guide
Setting the Alarm Clock
Setting the Wakeup Time
Important: The date and time must already be set (see Page 49).
1.
Press the center navigation button, followed by
2.
To set the time, select Time and press OK.
3.
Enter the wakeup time.
.
12-hour format: If you are using the 12-hour format, enter the wakeup time in 12-hour format (e.g.,
05:00 PM for 5 p.m.). To switch between A.M. and P.M., use the top/bottom edges ( hi) of the
navigation wheel before pressing OK.
If you are using the 24-hour format, enter the wakeup time in 24-hour format (e.g., 15:00 for 3:00
p.m.).
4.
Press OK.
5.
If you want to select a new volume or ring melody, select Alarm Ringer.
Volume: Set the volume (1–6).
Ringtone: Ten different ringtones are available.
6.
Press OK to save the settings.
7.
To activate the alarm, check the Activate box.
The
is displayed in idle status:
Deactivating the Wakeup Call
To deactivate a wakeup call that has already been set:
1.
Press the center navigation button, followed by
2.
Click OK to deactivate the wakeup call, and press OK.
3.
Press
.
The same steps can be used to activate a wakeup call.
58
.
Intercom
Intercom
Intercom is used to talk to other handsets on the same base station, just by dialing the extension (e.g., 40).
However, the handsets cannot be registered to the same extension. Each handset must have its own extension
if you want to intercom between the handsets.
1.
Press left cursor on phone, or press the center navigation button, followed by
2.
Select handset to call or press OK.
.
Intercom/Auto Answer (SIP)
Activating “Intercom Incoming” for a SIP Identity enables the associated snom m9 Handset to automatically accept incoming calls. The Intercom feature requires SIP Alert-Info functionality from the calling party.
1.
Enter a star code prefix into the Intercom Starcode Prefix field.
Parties called with this prefix will receive intercom calls.
59
snom m9 DECT Administrator Guide
Call Waiting Indication
When a new call rings your extension while you are on a current call, the phone display will reflect a Call waiting indication (“CWI”) toward the bottom of the phone display (see second image):
To accept the waiting call:
1.
Click the Options menu.
2.
Click Accept to accept the call. (This places the current call on hold and accepts the waiting call.)
To reject the waiting call:
1.
Click the Options menu.
2.
Click Reject to deny the call. (This rejects the waiting call and continues with the active call.)
60
Calling and Called Party ID
Calling and Called Party ID
By default, the snom m9 handset displays only the Calling Party ID (CLIP). This behavior can be altered
through the Called-Party-ID setting (Identity > Behavior > Show), as shown below. When this setting is
switched on, the handset displays both the Calling and Called Party number or name.
The Number Display Style setting allows users to display the name or number of the calling party as desired.
61
snom m9 DECT Administrator Guide
CLIP/CLIR
The CLIP property sets the state of the calling line identification presentation service on the m9. If set to Show,
the m9 presents its number to the called party. If set to Hide, the m9 places the call from an anonymous account.
The CLIR property sets the state of the calling line identification restriction service on the m9. If set to Accept,
the m9 accepts calls from anonymous users who do not present the calling-party number. If set to Reject, calls
received from anonymous users are rejected.
62
Call History
Call History
Calls lists can be accessed by pressing the CHist soft button as shown below:
The CHist button offers three options: Missed, Received, and Dialed calls (image A). Each option will present
a list of contacts (image B). Once a contact has been selected, more options are presented: Detail, Delete,
and Save to directory (image C). Once Detail has been selected, the contact’s name and number and date/
time are presented (image D).
Address Book/Directory
Each SIP identity on the snom m9 can have a unique address book, and those address books can be built using any or all of the following methods:
Manually—Contacts can be added on a one-by-one basis (detailed below).
vCards—Contacts can be added using vCard 3.0 format via the snom m9 web interface (see Page
64). (Administrators only)
snom ONE—Address books from snom ONE are automatically added to the m9 handset if the user
has opted to include those names from the snom ONE web interface.
Adding Contacts Manually
1.
Log in to the m9 web interface.
2.
Click the identity (at the left), then click Address Book.
3.
Enter the contact’s information in the Add/Edit fields.
63
snom m9 DECT Administrator Guide
4.
Click Save.
Accessing Contacts from the m9 Handset
1.
Press the center navigation button, followed by
. The contacts are displayed.
2.
To edit or delete a contact, select the contact and click Options, then follow the prompts.
vCards
A vCard, or “virtual business card,” is a means of allowing users to exchange personal information with each
other. vCards carry vital directory information about the user, such as name, address, telephone number, etc.,
so vCards can be especially helpful when creating address books in applications, like the m9 DECT phone,
that support the vCard format. The following instructions show you how to save Microsoft Outlook information
into the vCard format (.vcf) and then import it to a SIP identity on the m9.
Note: If the vCard includes the calling party’s picture, the picture will be displayed on the snom m9 handset
when the contact calls. See Page 67 for more information.
64
vCards
1.
In a Contact folder, select the contacts for which you want to create a vCard.
2.
Click Forward Contact > As a Business Card, as shown below:
3.
Select all the contacts by holding down the shift key, then right-click and copy.
4.
Paste them into a folder:
65
snom m9 DECT Administrator Guide
5.
To upload the files to the m9 web interface, log in to the interface, click the identity, click Addressbook,
then Browse (as shown below). Locate the file, then click Upload. Repeat this step for each .vcf file
you would like to upload.
6.
Once each .vcf file has been uploaded, click the link shown below to merge all contacts into one file.
7.
Open the file with Notepad, or save it to a folder so that it can be used later on for other handsets.
66
Caller Picture Display
The contacts will be separated by BEGIN:VCARD and END:VCARD tags.
Caller Picture Display
The caller picture feature allows the snom m9 handset to display the picture of the calling party. All photo pictures provided to the snom m9 base station must be in 40 × 50 pixels JPEG format.
The snom m9 provides two mechanisms for providing the calling party’s picture to the snom m9 base station.
vCards
SIP Call-Info Header
vCards
The caller’s picture can be displayed on the snom m9 handset as long as the snom m9 has a vCard in the
user’s address book and it includes the calling party’s picture.
If the .vcf file includes the caller’s picture, the m9 handset will display the picture of the calling party. The picture can be a URI or an embedded photo as shown below:
PHOTO;VALUE=uri:http://www.mycompany.com/photos/kelly.jpg
PHOTO;ENCODING=b;TYPE=JPEG:MIICajCCAdOgAwIBAgICBEUwDQYJKoZIhvcN
AQEEBQAwdzELMAkGA1UEBhMCVVMxLDAqBgNVBAoTI05ldHNjYXBlIENvbW11bm
ljYXRpb25zIENvcnBvcmF0aW9uMRwwGgYDVQQLExNJbmZvcm1hdGlvbiBTeXN0
67
snom m9 DECT Administrator Guide
<...remainder of “B” encoded binary data...>
To use this feature, follow these steps:
1.
In Microsoft® Outlook, select a Contact Card from Contacts or create a new contact under File >
New > Contact.
2.
Click Add Contact Picture and upload the picture of the contact in 40 × 50 pixels JPEG format.
3.
Click Save and Close to save the contact.
4.
Right-click the contact and click Send as Business Card.
5.
Right-click the .vcf file, and copy/paste the file onto your computer.
6.
Log on to the snom m9 Web portal.
7.
Select the identity for which you want to add the vCard.
8.
Upload the vCard through the “VCARD(s) Upload” section
9.
The newly added vCard should be visible under Contacts.
The picture of contact will be displayed on the handset associated with the identity whenever a call is received
from the contact.
SIP “Call-Info” Header
The snom m9 can also display the calling party’s picture on the handset via HTTP links. For this purpose, the
snom m9 base station supports the icon parameter of the SIP Call-Info header. For this feature to work,
the calling party must provide a picture in the Call-Info header of the SIP INVITE, and the picture link must
be sent in the icon parameter of the Call-Info header.
68
Using the Stopwatch
The snom m9 then downloads the picture from the link and displays it on the handset (Image A). In the absence of a real picture, a default avatar is displayed (image B):
Using the Stopwatch
The stopwatch allows you to measure the time between activation and deactivation time. The format is
minutes:seconds:tenths of a second. The timing functions are controlled by the Start and Cancel
buttons on the handset. Pressing Cancel a second time resets the stopwatch.
1.
Press the center navigation button, followed by
2.
Press Start to begin the time.
3.
Press Stop to end the time.
4.
Press Reset to begin again.
g Stopwatch.
Using the Calculator
The calculator allows you to perform the basic operations of arithmetic.
g Calculator.
1.
Press the center navigation button, followed by
2.
Enter the necessary digit(s).
3.
Choose an arithmatic operation using the navigation key, as shown below.
+
×
–
÷
–
4.
Enter digit(s).
5.
Press the right function key for the answer.
69
snom m9 DECT Administrator Guide
Using the Notepad
The notepad allows you to review notes you’ve entered into the m9 while on phone calls. Once you’re on a call,
do the following:
1.
Press the left function key.
2.
Using the navigation wheel, navigate to Note.
3.
Press the center navigation button or the right function key.
4.
Begin typing. To backspace, use the left function key.
5.
When finished, press OK. The message will be saved to the m9 notepad.
6.
To receive the note, press the center navigation button, followed by
will be displayed.
Setting an Appointment (Calendar)
Setting the Appointment
Important: The date and time must already be set (see Page 49).
1.
Press the center navigation button, followed by
2.
Select a date using the navigation wheel.
g Calendar.
Previous months
Left
–
Right
Later months
3.
Press Set (right function key).
4.
Select <New Item>, then press OK.
5.
Enter a subject (e.g., Sales Meeting), then press OK.
6.
Enter a note if you wish (e.g., “Bring new sales leads”), then press OK.
70
g Notepad. The message
Setting an Appointment (Calendar)
7.
In the Property menu, select the frequency with which you’d like to be notified of this event, then click
OK.
Property
Deactivate
Once
Daily
Weekly
Monthly
Yearly
Depending on the frequency that is chosen, additional information is required. For example, if you choose
“Weekly,” a day of the week and the time of day is required.
Once
Date
Time
Cancel
23-11-10
22:48
Daily
Time
OK
Monthly
22:48
Cancel
Day
Time
23
22:48
Weekly
Week
OK Time
Yearly
[7]
22:48
Cancel
Cancel
OK
Month
OK
Day
Time
[11]
23-11-10
22:48
Cancel
OK
Figure 1 Frequency of Notification
8.
Decide upon a volume. The volume ranges from 1 to 6 (from most quiet to loudest).
9.
Use the navigation wheel (i) to move down to the Ringtone.
10. Select a ringtone using the navigation wheel (gf). Ten ring tones are available.
11. Press OK.
12. The calendar entry is now saved, and the Calendar menu is played.
Editing the Appointment
g Calendar.
1.
Press the center navigation button, followed by
2.
Click Set. The list of calendar entries is displayed.
3.
Select an entry, then click Options.
4.
Click Edit.
5.
Edit the entry using the instructions from the previous section.
71
snom m9 DECT Administrator Guide
RSS Feeds
RSS (Really Simple Syndication) is a family of standardized web feed formats used to publish blog entries,
news headlines, weather updates, and other frequently updated works. Users can subscribe to a maximum of
ten RSS feeds through the phone user interface and then view them from their snom m9 handset.
To add RSS feeds, click the Identity, followed by RSS Feeds as shown below. Then specify a name and URL:
To read RSS feeds from the handset:
1.
Press the center navigation button, followed by
2.
From the list of configured RSS feeds, select a feed.
3.
From the list of items, select an item.
g RSS Feeds.
The contents of the selected feed item will be displayed:
72
Customizing the Handset
Customizing the Handset
Your handset is preconfigured, but you can change some of the settings to suit your individual needs.
Customizing the Home Page
The snom m9 web portal home screen can be customized to any valid www address. To customize the home
screen:
1.
Create an XML file as shown below, and enter the website address into the <advertisement_url>
tag:
2.
Save the file as XML, and upload the file to the base station under Maintenance > Settings Upload.
73
snom m9 DECT Administrator Guide
Changing the Language Display
1.
Press the center navigation button, followed by
played according to the following firmware packages:
g Language. Pre-installed languages are dis-
Firmware version A: English, German, French, Spanish, Italian
Firmware version B: English, German, Swedish, Russian, Slovenian
2.
Use the h and i keys to select a language for the handset.
3.
Press OK to save the setting.
Setting the Display
Setting the Screen Saver
A screen saver runs when the user’s computer is idle. The m9 includes a selection of pre-installed screen
saver images that the user can choose from.
g Display g Screen Saver g Select Pic-
1.
Press the center navigation button, followed by
ture.
2.
Use the h and i keys to navigate through the different screen savers.
3.
Press OK to save it.
Setting the Wallpaper
Wallpaper is the picture or background that is displayed when the m9 is in active mode. The m9 includes a
selection of pre-installed wallpaper images (custom wallpaper cannot be uploaded).
g Display g Wallpaper.
1.
Press the center navigation button, followed by
2.
Use the h and i keys to navigate through the different wallpapers.
3.
To change the color of the date and time that is displayed on top of the wallpapers, use the gf keys to
navigate through the options.
4.
Click OK to to save your settings.
Setting the Contrast
g Display g Contrast.
1.
Press the center navigation button, followed by
2.
Use the h and i keys to navigate through the five different levels of intensity.
3.
Press OK to save your setting.
Setting the Backlight
1.
74
Press the center navigation button, followed by
g Display g Backlight..
Customizing the Handset
2.
Select a setting. The three options are described below:
3.
Activate: The display goes to power-saving mode after 10 seconds, and the keypad LED is
switched off to save power.
Deactivate: The display turns off completely after 10 seconds, and the keypad LED lights up intermittently.
Always: The display stays on permanently (high battery consumption mode), and the keypad LED
stays lit.
Press OK to save the setting.
Changing Ring Tones
You can set the volume and ring tones for external calls and internal calls.
Volume: You can choose between six volumes (1–6, from low to high). You can also turn the ringer
off (0).
Ring tones: Ten different ring tones are available, including traditional, jazz, rambler music, space
music, and classical dance.
In idle status:
g Audio Settings g Ringer Settings.
1.
Press the center navigation button, followed by
2.
Select a setting, e.g., External Calls.
3.
Set the volume (1–6), then scroll to the next line and select a melody.
4.
Press OK to save the settings.
Changing the Volume in Speaker Mode
The Ear Protection setting activates lower speaker volumes on connected snom m9 handsets. By default this
setting is turned on. To re-enable the normal speaker levels on the connected handsets:
1.
Log in to the m9 web interface.
2.
Click the identity that belongs to the handset.
3.
Click Behavior, then set Ear Protection to off.
75
snom m9 DECT Administrator Guide
Changing Advisory Tones
Your handset uses advisory tones to inform you of different activities and statuses. You can activate/deactivate
the following advisory tones independently of each other. With the exception of the confirmation tone, the ring
tone and volume of all advisory tones can also be customized.
Key tones: Plays when a user presses the handset keys.
Charging tones: Plays when the phone is placed in the charger.
Low battery: Plays when the battery requires charging.
MWI: Plays when the user has voicemail.
Confirmation tone: Plays when the user selects an option on the handset, e.g., when changing the
language.
To change an advisory tone:
g Audio Settings g Advisory Tones.
1.
Press the center navigation button, followed by
2.
Select a tone, then choose Select Tone and press OK.
3.
Use the gf keys to select a volume.
4.
Scroll down to Ringtone and use the gf keys to select a ringtone.
5.
Press OK to save your settings.
Activating/Deactivating Auto Answer
When auto answer is activated, when you receive a call, you can simply lift the handset out of the charging
cradle without having to press the start key. If the handset is not in the cradle to begin with, the phone will automatically answer the call and become connected.
1.
Press the center navigation button, followed by
2.
Press OK to activate/deactivate (checkmark = on).
g Auto Answer.
Call Forwarding
This setting activates call forwarding on the handset.
g Call Forwarding.
1.
Press the center navigation button, followed by
2.
Enter your PIN (default is 0000).
3.
Choose from Never, Always, or Busy and click OK.
4.
Select After timeout/sec., and specify a timeout (the default is 10 seconds). Click OK.
5.
Select Fwd. target and enter the forwarding number. Click OK.
76
Action URLs
DND (No Not Disturb)
1.
Press the center navigation button, followed by
2.
Enter your PIN (default is 0000).
3.
Click OK to activate/deactivate.
g DND.
Action URLs
Action URLs are HTTP GET Requests that allow the m9 to interact with web servers or CTI applications. Action URLs can be triggered by predefined events such as DND, Call Forwarding, Hold, Transfer, etc. Provisionable action URL setting action_setup_url enables the base station to notify the configuration server over
HTTP once settings provisioning is complete.
77
snom m9 DECT Administrator Guide
78
Appendix
Rechargeable Batteries
Use only snom brand batteries that came with the handset or replacement batteries approved by snom technology:
Rechargeable Lithium-Ion battery
3.7V, 650mAh.
P/N: 60020438 or 60020438
Power Supplies/Adapters
Use only the power converters (AC/DC adapters) delivered with the base station and the phone or those
power supplies expressly recommended by snom. Other power supplies may damage or even destroy the
device(s).
Base Power supply:
Input: 100-240V~ 50/60Hz 0.2A
Output: 5V---1A
Charger Power supply:
Input: 100-240V~ 50/60Hz 0.2A
Output: 5.9V---0.8A
Europe without UK
UK
USA & Canada
Australia
Elementech Power Adapters (Model Numbers)
Base Station
Handset Charger
AU1050507e
AU1050607e
AU1050505b
AU1050605b
AU1050507u
AU1050607u
AU1050505s
AU1050605s
79
snom m9 DECT Administrator Guide
Downloading the Recovery Image
1.
Go to http://wiki.snom.com and click Firmware Guide as shown below:
2.
Click your phone model, then click the firmware version.
3.
Click the recovery image.
4.
Click the download link, and save the file.
80
Index
INDEX
A
Action URLs 77
adapters 79
address book. See also vCards.
accessing contacts 64
adding contacts manually 63
provisioning with XML 33–35
Advoco NetPBX 7
alarm clock 58
asset-ID 16
Asterisk 7
auto answer 76
Avaya CM 7
B
backlight
setting the 74
base station
certificate authorities 18
client certificates 19
firmware update 28
IP address 5
MAC address 6
registering handsets to base 6
setup 4
basic calling
accepting a call 51
ending a call 51
forwarding calls 56
making calls 50
speed dialing 53
transferring calls 54
voicemail 52
batteries 3, 79
Broadsoft 7
Broken Registrar 8
C
calendar 70
called party ID 61
caller picture display 67
calling party ID 61
call lists 62
calls
status of calls 25
call waiting 59
certificates 18–20
certificate authorities 18
client certificates 19
check-sync 17
Cisco Call Manager 7
CLIP 62
CLIR 62
contrast
setting the 74
D
DECT 1, 42
DHCP 16
dialing
when user has multiple identities 10
dial plans 35–37
dial plan string 8
directory. See address book.
DND (Do Not Disturb) 57, 77
DNS 17
and IPv6 43
dual IP stack 43
E
encrypted calls
media encryption 22
encryption
encrypted calls 22
signaling encryption 22
extensions
assigning handsets to 8
F
81
82
snom m9 DECT Administrator Guide
firmware update
downloading the image 80
handset (over-the-air update) 30
handset (via USB port) 30
http firmware update 28
forwarding calls 76
H
handset. See also basic calling.
firmware update 30–31
identities 9
idle screen display symbols 46
installation 3
navigating the phone menus 47
nine SIP identities 10
overview 45
hands-free speaker mode 53
I
admin 8
M
Metaswitch 7
Microsoft Lync server option 9
mute
switching to 53
N
NAT traversal 17
notepad 70
NTP server 17
P
password
reverting to factory default 8, 9
web interface 8
phone menus 47
phone tree 47
identities 9
address book 34
and dial plans 36
and LDAP 39
defined 9
dialing with multiple identities 10
multiple identities 10
picture
caller picture display 67
SIP “Call-Info” header 68
installation 3–4
handset preparation 3
setting up the base station 4
registration
status 24
intercom 59
IP address 16
finding for base station 5
IP gateway 17
IPv6 42
address assignment 43
and dual IP stack 43
auto configuration 43
finding IP address via HTTO 6
L
LDAP 39–42
login
PIN 6
power supplies 79
R
registrations
verifying the registration 11
RSS feeds 46, 72
RTP
Type of Service (ToS) 17
RTP encryption 8
media encryption 22
S
screen saver 74
security 18–21
certificate authorities 18–19
client certificates 19
encrypted calls 22
Index
X.509 certificates 18
server
NTP server 17
setting up the server
conference URI 8
dial plan string 8
DTMF 8
ICE 8
proposed expiry 8
RTP encryption 8
server types
Advoco NetPBX 7
Asterisk 7
Avaya CM 7
Broadsoft 7
Cisco Call Manager 7
Metaswitch 7
Telepo BCS 7
SIP
and IPv6 44
speed dialing 53
status of system 24. See also calls.
logging 25
network status 24
registration status 24
stopwatch 69
STUN server 17
T
Telepo 7
transferring calls
attended 55
blind 54
troubleshooting
diagnostics 26
network analyzer 25
V
vCards 64
caller picture display 67
VLAN 17
voicemail 52
volume
changing in speaker mode 53, 75
W
wakeup time 58
wallpaper 74
Wireshark. See also troubleshooting.
83
84
snom m9 DECT Administrator Guide