1
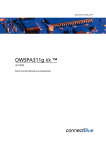
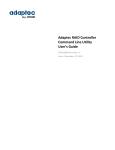
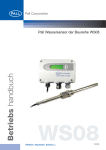
X500 Expansion Unit with RAID Function QUICK START GUIDE Rugged Mobile Computing Solutions 1. Overview ······································································· 1 2. Software Installation ···················································· 2 Installing the Controller Driver ···································· 2 Installing Adaptec Storage Manager ··························· 2 3. Creating Arrays ····························································· 3 Using Adaptec Storage Manager to Create Arrays ····· 3 Using the ARC Utility to Create Arrays ························ 7 4. Notes and Hints ···························································· 8 1. Overview This Expansion Unit, a housing attached to the bottom of X500, provides up to 5TB extra storage space with RAID support. By default, the Expansion Unit comes with three 1TB disk drives configured as RAID5. Five indicator LEDs for five physical drives You can easily swap a drive by loosening the screws to open the protection door and then pulling the drive out of its slot. Three drives at the front Two drives at the back (optional) The Expansion Unit features include: Adaptec RAID 6805 controller Hard disk drive slot x 5, with three drives pre-installed by default Indicator LED x 5 Multiple options for creating and managing RAID arrays RAID levels supported: RAID0, RAID1, RAID1E, RAID 5, RAID 5EE, RAID 6, and RAID 10 Power-management of disk drives Audible alarm I/O statistics logging Disk drive hot-swapping 1 2. Software Installation Installing the Controller Driver 1. Start Windows. The Found New Hardware Wizard opens and searches for the driver. 2. Insert X500 Driver Disc in the DVD drive. Select Locate and Install Driver Software.... and Don’t Search Online. 3. Browse to the driver location as below and click OK. \Option DRV\Raid_6805\Driver\windows-ws08-7-vist 4. When the Adaptec driver is found, click Next. 5. Follow the on-screen instructions to complete the installation. 6. Continue with Adaptec Storage Manager installation. Installing Adaptec Storage Manager NOTE: You need administrator or root privileges to install Adaptec Storage Manager. 1. Insert X500 Driver Disc in the DVD drive. 2. Browse to one of the below folders depending on your OS version. For 64-bit OS: \Option DRV\Raid_6805\AP\amd64\manager For 32-bit OS: \Option DRV\Raid_6805\AP\i386\manager 3. Run the Setup program for the OS as described below. For 64-bit OS: setup_asm_x64.exe For 32-bit OS: setup_asm_x86.exe 4. Click Next to begin the installation, click I accept..., then click Next. 5. Select GUI and Agent. Then click Next. 2 3. Creating Arrays NOTE: This document provides only basic information. It is assumed that you are an advanced user familiar with RAID. You can create arrays using either Adaptec Storage Manager or ARC Utility. Using Adaptec Storage Manager to Create Arrays Adaptec Storage Manager is a software application that helps you build a storage space for your data. You can group disk drives into logical drives and build in redundancy to protect your data and improve system performance. With Adaptec Storage Manager, you can also monitor and maintain the controller and disk drives. NOTE: If your system includes a firewall, you must unblock these ports: 8003 (TCP), 34580 (TCP), 34570 to 34579 (TCP), 34570 (UDP), and 34577 to 34580 (UDP). To create arrays using this tool: 1. In Windows, click Start Adaptec Storage Manager. 2. Expand Direct Attached Storage and select the local system. 3. The Log In window opens. Enter the Administrator password and click Connect. 3 4. Double-click Controller 1 RAID controller Adaptec 6805. 5. The physical drives are shown on the screen. Click Create on the toolbar. 4 6. The wizard screen appears, offering two configuration methods: Express configuration and Custom configuration. Use the express method when you want to use all available disk drives in the most efficient manner. Use the custom method when you want to create specific logical drives with any or all available disk drives and configure advanced settings manually. Click Next after selecting a method. 7. Configure the settings if you selected Custom configuration in the previous step. 8. Review the information that is displayed. Click Apply and then Yes. 5 9. Adaptec Storage Manager builds the logical drive(s), indicated by a magnifying glass moving across the new logical drive icon in the Logical Devices View. The building process takes at least 4 hours. The magnifying disappears once the logical drive has been created. 10. The logical drives you create appear as physical disk drives on your operating system. You must partition and format these logical drives before you can use them to store data. Refer to your operating system documentation for information on partitioning and formatting. NOTE: Adaptec Storage Manager online Help includes conceptual information as well as step-by-step instructions for completing tasks. To open the online Help, click the Help button (shown at right). In addition to the online Help, you can refer to the Adaptec Storage Manager User’s Guide (in the \User Manual\Raid_6805 folder of X500 Driver Disc) for comprehensive and detailed information. 6 Using the ARC Utility to Create Arrays The Adaptec RAID Configuration (ARC) utility is a BIOS-based utility that you can use to create arrays and manage controllers, disk drives and other devices. The utility is primarily intended for preoperating system installation configuration. The utility comprises these tools: Array Configuration Utility (ACU) – For creating and managing arrays, and initializing and rescanning disk drives. SerialSelect – For modifying your controller and disk drive settings. Disk Utilities – For formatting or verifying disk drives. To create arrays using this tool: 1. Run the BIOS Setup program of your X500. Make sure that the “Boot-time Diagnostic Screen” item in the “Advanced” menu is enabled. 2. Start your computer. When you see the message “Press <Ctrl><A> for Adaptec RAID Configuration Utility,” press Ctrl + A. 3. Select Array Configuration Utility, then press Enter. 4. Select Initialize Drives if needed. 5. Select Create Arrays. 6. Disk drives that can be used in a new array are available for selection. Use the up or down arrow key to highlight a physical drive and press Ins to select the drive for the array. Repeat with other physical drives. Press Enter. 7. Use the Array Properties menu to modify the array’s RAID level, size, name, stripe size, cache settings, and maxCache settings. 8. Reboot the computer. You can then run Adaptec Storage Manager to check the array building process. The process takes at least 4 hours. 9. Partition and format your logical drives. Refer to your operating system documentation for information on partitioning and formatting. NOTE: For complete information on the ARC utility, refer to the Installation and User’s Guide for the RAID controller (in the \User Manual\Raid_6805 folder of X500 Driver Disc). 7 4. 8 Notes and Hints You can use only the hard disk drive model tested and approved by Getac for this Expansion Unit. Each time the system is powered on, X500 has to initialize the Expansion Unit before starting the OS. The initialization takes about 1 minute. Also, it takes about 1 minute for X500 with the Expansion Unit to wake up from S3 (Sleep) or S4 (Hibernation) state. When you want to delete an existing RAID, use the ARC utility instead of Adaptec Storage Manager. When you log in to Adaptec Storage Manager, your permission level is identical to your operating system permission level. For example, if you have Administrator permissions on your operating system, you also have Administrator permissions in Adaptec Storage Manager. If you want to know the location of a physical drive, start Adaptec Storage Manager, right-click the drive and click Blink physical drive in the popup menu. The LED of the chosen drive will blink. When there is an error with a drive, the system beeps. To stop the beeping, start Adaptec Storage Manager and click Silence on the toolbar. 5 6 1 5 1 2 8 0 0 0 0 7 R 0 0