1
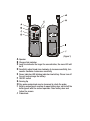
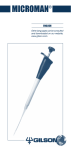
99 Washington Street
Melrose, MA 02176
Phone 781-665-1400
Toll Free 1-800-517-8431
Visit us at www.TestEquipmentDepot.com
NGD8800
User’s Manual
Combustible
Gas Detector
INTRODUCTION
This instrument detects combustible gases. It includes a rechargeable
battery pack and charger. It is an excellent instrument to use to
pinpoint combustible gas, vapor, residue or leaks and verify safety
situation of potential hazardous locations.
SOME APPLICATIONS ARE:
• Gas lines and pipes
• Propane gas refill station
• Fuel in marine bilges
• Exhaust and fuel leaks
• Liquid or gas fired heating systems
• Check manholes for safety
Note: Although the unit will respond to high levels of Carbon
Monoxide, it should not be used as a detector for this gas in normal
room or working atmospheres. It is used to pinpoint a leak as
described in the Operating Instructions.
HOW IT WORKS:
After the automatic warm up, when the sensor of the instrument
detects vaporous and gas from combustible compound, the LED signal
will light up and change with the increasing tick rate to locate the
combustible leaks. This helps the user to take effective measures or
actions to clear potential hazard.
FEATURES:
• Leak size indication (Audial and Visible)
• Auto fast warm-up
• Adjustable sensitivity
• Low battery indication
• Rechargeable battery
• Charge protection to prevent overcharge or over current
• Double color LED indicates charge state
• ON/OFF switch
• Sensing tip
• 14" Flexible gooseneck probe - unfasten probe knob to readjust
rotation
Includes: Rechargeable battery, charger and hard carry case
(Figure 1)
A Speaker
B Charge state indicator
C Leak size indicator-the larger the concentration, the more LED will
be lit
D Sensitivity adjust knob-turn clockwise to increase sensitivity, turn
counter clockwise to decrease sensitivity
E Power indicator-LED blinking indicates low battery. Please turn off
the unit and recharge the battery.
F ON/OFF switch
G Sensing tip
H Flex probe-probe knob may be loosened to rotate the probe
I Battery compartment-unscrew to open battery door and install the
J
battery pack with the contact upwards. Close battery door and
fasten the screws.
Probe knob
OPERATION INSTRUCTIONS:
1. Turn the unit off and turn the sensitivity knob fully counter
clockwise.
2. Turn the unit on in a non-contaminated atmosphere with the slide
switch, the power indicator will light up. Power indicator shows the
battery power is sufficient, it ensures precise detection.
3. After the unit is turned on, it will auto warm-up within 110
seconds, a ticking sound will be heard.
4. Adjust the sensitivity control until the first leak indicator lights up,
and the ticking frequency increases.
5. Approaching known leak source, the leak size indicate lights will
increase with the rapid ticking. Above steps are necessary to
ensure the unit is working correctly. Now the unit is ready for use.
If the battery power is in sufficient state, but the sensor
approaches known leaks without any responses, do not use the
instrument, please return for repair.
6. In conjunction with the increased tick rate, the leak size indicator
will light from bottom to top as combustible gas concentration
grows.
7. Search the general area of the leak. When a detectable compound
enters the sensor, the tick rate speeds up.
8. If you are searching for a heavy leak source, please lower the
sensitivity in a clear air by turning the adjustable knob (until the
leak size indicator turns off).
TO CHARGE BATTERY:
1. During operation, if the power indicator is blinking, it is necessary
to charge the battery.
2. Install the battery into the battery compartment properly, cover
battery door and fasten screws.
3. Turn off the instrument, connect the charger into a power socket of
50-60 Hz and insert the plug into the jack on the bottom of the
instrument. A green charge indicator indicates that the battery
power is low and still under charge(a new battery needs to be
charged for 16 hours before usage)
4. When the charge indicator turns from green to orange the battery
is fully charged. Please take it off the charger.
Visit us at www.TestEquipmentDepot.com