1
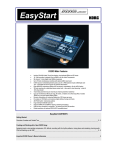
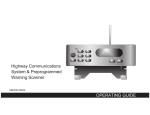
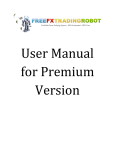
USER MANUAL
Forex Bullet Proof
Version 1.00
1
Disclaimer and risk warnings
All contents of this manual are neither an endorsement, nor a solicitation of any sort, and
cannot be considered as a promotional offer. All information you receive is unsolicited, private
encoded communications of privileged, proprietary, and confidential information for you only
and by purchasing the given product you agree to keep this information private, confidential,
and protected from any disclosure. You also agree to indemnify and hold harmless the authors
of this product, their employees, contractors, and service providers. Should any of the practices
described herein turn out to be unlawful in any jurisdiction, individuals pursuant to its
legislation should restrain from any intentions or attempts to apply them in any manner, either
personally or in partnership with other individuals or entities. Unauthorized copying and
distribution of all or any parts of this manual or product are strictly prohibited and will result in
civil liability and criminal charges brought against the violators and their aides.
U.S. Government Required Disclaimer - Commodity Futures Trading Commission. Futures and
Options trading has large potential rewards, but also large potential risk. You must be aware of
the risks and be willing to accept them in order to invest in the futures and options markets.
Don't trade with money you can't afford to lose. This is neither a solicitation nor an offer to
Buy/Sell futures or options. No representation is being made that any account will or is likely to
achieve profits or losses similar to those discussed on this web site. The past performance of
any trading system or methodology is not necessarily indicative of future results.
CFTC RULE 4.41 - HYPOTHETICAL OR SIMULATED PERFORMANCE RESULTS HAVE CERTAIN
LIMITATIONS. UNLIKE AN ACTUAL PERFORMANCE RECORD, SIMULATED RESULTS DO NOT
REPRESENT ACTUAL TRADING. ALSO, SINCE THE TRADES HAVE NOT BEEN EXECUTED, THE
RESULTS MAY HAVE UNDER-OR-OVER COMPENSATED FOR THE IMPACT, IF ANY, OF CERTAIN
MARKET FACTORS, SUCH AS LACK OF LIQUIDITY. SIMULATED TRADING PROGRAMS IN GENERAL
ARE ALSO SUBJECT TO THE FACT THAT THEY ARE DESIGNED WITH THE BENEFIT OF HINDSIGHT.
NO REPRESENTATION IS BEING MADE THAT ANY ACCOUNT WILL OR IS LIKELY TO ACHIEVE
PROFIT OR LOSSES SIMILAR TO THOSE SHOWN.
2
Index
1. Foreword
2. Getting started
3. Step 1 - Installing Forex Bullet Proof
- 1st Method
- 2nd Method
4. Step 2 - MetaTrader4 Configuration
5. Step 3 - attaching Forex Bullet Proof to a chart
6. Forex Bullet Proof settings explained
7. Forex Bullet Proof on-chart messages
8. Forex Bullet Proof Strategy Test
9. Troubleshooter
10. How to stop trading
3
1. Foreword
Thank you for purchasing Forex Bullet Proof. This manual will help you install, activate,
and use your robot with maximal profit and minimal trouble.
With the purchase of your Forex Bullet Proof expert advisor, you gained access to our
members’ area, with this manual and all required robot files available for download there. It is
of a high importance that you download all required robot files to your computer and save
them in a handy place to be able to use them during the installation process. The Forex Bullet
Proof robot can be installed in two different ways – to facilitate finding the necessary files for
both methods you can check with this list:
For the 1st method:
ForexBulletProofSetup.exe
For the 2nd method:
ForexBulletProof.ex4
ForexBulletProof.dll
You can choose only one method, which suits you better. It is also essential that you
have these files to proceed with setting up your Forex Bullet Proof expert advisor. We
recommend saving them to your desktop for your convenience.
4
2. Getting Started
The first thing you need to do after downloading the robot files is deciding which broker
you are going to trade with. For this purpose we highly recommend IamFX, which is a fair STP
broker with market execution. In this manual, we will describe the installation on the example
of IamFX, but should you choose a different broker, don’t worry, as Forex Bullet Proof robots
work fine with other brokers too, and the installation is rather similar.
Before running your robot on a live account, we recommend you to get acquainted with
it on a demo account beforehand. The subsequent pages of this manual describe how to
register a demo account first.
To
open
a
DEMO
account
with
IamFX,
please,
go
to
https://www.iamfx.com/freedemo.php, enter your full name and e-mail address and then click
the
“Submit”
button,
as
shown
below:
5
Next, you will be transferred to the page where you can download the IamFX MetaTrader4
platform. A link to this page will also be dispatched to your email, so that if you have to
download the platform again anytime in the future, you could quickly access the required page.
As soon as the page loads on your screen, a dialogue box will appear prompting you to save the
setup file to your computer. You can either save it to your computer and resume the
installation later or run it straight away by clicking on “Run”:
If you decide to save it to your computer, you will also have to select a directory where to save
the setup program. For your convenience, we recommend you to save it to your desktop:
6
After the installer file downloads to your computer, you will most likely be asked for a
permission to run it. This is the Windows built-in security, and you should confirm any messages
for the program to be able to install correctly.
You might also see warnings from your antivirus system – since such software is heavily coded
to prevent reverse engineering, it might be taken as a virus by some security systems, which are
for some reason unable to detect the difference between such security measures and true
malware.
During the installation process you should be prompted consequently to such windows:
Make sure you select your preferred language and click on “Next”
7
Next, you will be propted to select the path into which you wish to install your MetaTrader4
platform. We recommend that you leave it default, which is the most convenient path option.
Important: Make a note of the installation folder path – you will need to know the location
later in order to install any other robots.
Click “Next” after you have decided on your path, and the setup program will place all the
necessary MetaTrader4 files into the selected directory. After the installation is finished, click
on “Finish”, and run your MetaTrader4.
When MetaTrader4 starts up for the very first time, you will need to create a Demo (Practice)
account.
8
First, make sure that you provide all of the details shown in red, and check the box “I agree to
subscribe to your newsletters”. Then, select the desired “Deposit” and “Leverage” values. We
recommend that you use the same leverage and deposit features that you wish to see on you
live account.
Currently, the maximal leverage option for IamFX is 400:1, and minimal deposits start with
500$. You can find additional information about the IamFX conditions by visiting their site:
www.iamfx.com
After you fill in all the required fields, click on “Next”.
9
The following window is designed to select a demo server for your trading. In most cases, there
is only one option – feel free to select any demo server available and click on “Next”.
After selecting your server, you will be able to access your demo account login details.
We highly recommend noting them down to be able to access your demo account later from
other platforms. Do not use the “Investor” password while logging in – with an investor
password you will not be able to trade on your account, as it is a read-only access feature.
Investor passwords can be used, for example, if you want to show your account results to a
third party, but you will not be able to trade with it!
10
Finally, click the “Finish” button to complete the account registration process.
Normally, you will be logged into your account right after clicking on “Finish”. Should you need
to log in again, you can click on “File” > “Login”.
After doing that, please ensure that you CLOSE the MetaTrader4 window. All EA installations
should be performed when your trading platform is closed, otherwise you might face a series of
different problems in the installation process.
11
3. Step 1 - Installing Forex Bullet Proof
1st Method
This is the recommended and most convenient method to install the Forex Bullet Proof robot.
To install it this way you will need only one file:
- ForexBulletProofSetup.exe
First of all, you will need to find the ForexBulletProofSetup.exe file on your computer and run it
by double left-clicking on the respective file icon:
The first window of the installation will prompt you to agree to the Software License
Agreement. Confirm it by clicking on “I agree”:
At the next stage, the setup program will try to find any existing copies of MetaTrader4 on your
computer, and provide you with a list of such. If you do not see your MetaTrader4 on the list,
you can add it manually, by clicking on “Add”, and selecting the folder in which it is located, in
12
our case – IamFX MT4. Please bear in mind that it is crucial to select only the root folder of your
MetaTrader4 – not the experts or libraries folders.
After you add your MetaTrader4 folder to the list, make sure it is highlighted and displayed in
the top field as well:
Finally, click on “Install”, and you will see the “Installation was completed successfully” window.
13
Just click on “Close” at the bottom of the window and you are ready to proceed to the second
step.
14
2nd Method
Important: Use the second method of the Forex Bullet Proof installation only if the first method
doesn’t work. Though it is a classic method of robots installation, it is more complicated and is
used only in cases where the automated setup doesn’t work.
To use this method, you should find the following two files on your computer:
- ForexBulletProof.ex4
- ForexBulletProof.dll
Do not open any of these files – they are not executable and should be pasted according to the
following instructions:
First of all, you need to copy the ForexBulletProof.ex4 file into the necessary folder. You can
begin by right-clicking on the file icon and selecting “Copy” in the drop-down menu that will
pop up:
Next, you will have to remember the folder where your MetaTrader4 is installed. For IamFX,
with the default installation options you can find it at C:/Program Files/IamFX MT4/. This path
varies with different brokers, so we highly recommend noting down the path during the
respective stage of your MetaTrader4 installation process.
Also, in some cases, and in particular, if you are running a 64-bit Windows version, the Program
Files folder might look like “Program Files(x86)” or “Program Files(x32)”.
If you experience any problems locating your platform, you can move your mouse cursor over
the MetaTrader4 icon for a few seconds, and a yellow pop-up will show you the correct path.
15
Now that you have found the necessary path to your MetaTrader4 folder, you can open “My
Computer” or “Computer” for Windows 7 or Vista. That should open the built-in Windows
Explorer application, which allows you to browse your computer files system.
On this example, you can see how we proceed to the “experts” folder by double-clicking on all
subsequent folders specified in the path we determined earlier.
Local Drive C:\ Program Files:
The IamFX MT4 folder:
16
And, the “experts” folder:
After you get to the MetaTrader4 folder, it is very important that you open the “experts” folder.
Here, you can paste the file by right-clicking on any empty space and selecting “Paste” in the
dropdown menu.
17
After you paste the ForexBulletProof.ex4 file into the “experts” folder, in the same folder locate
the “libraries” folder. Proceed into that folder, and repeat the previous instructions with the
ForexBulletProof.dll file.
18
4. Step 2: MetaTrader4 Configuration
Once you have finished installing the Forex Bullet Proof files, the next thing to do is to go to the
Tools –> Options menu:
This step is critically important for any Expert Advisors to work on backtests as well as for saving
much trouble with setting up your EA every time you run it.
All you have to do here is click on the Expert Advisors tab and ensure that the boxes are
checked exactly as shown below:
Do not overlook the “Confirm DLL function calls” option (which should be unchecked) otherwise the robot will not be able to function properly.
You may also wish to uncheck “Disable experts when the account has been changed” and
“Disable experts when the profile has been changed” options, though this is more of a
convenience rather than a requirement. After you have checked all needed fields, click “OK”.
19
5. Step 3: Attaching Forex Bullet Proof to
a Chart
Having installed the robot, restart your MetaTrader4 platform and check the Navigator panel
on the left-hand side of the MetaTrader4 window. Clicking the small [+] to the left of “Expert
Advisors” will expand that section to display all installed Expert Advisors:
Do not worry that the ForexBulletProof icon
is gray in this list, whilst all other icons are
colored. This is normal for all commercial
Expert Advisors. A colored icon means that
you have the “source code” for that
particular expert.
If you cannot find the Forex Bullet Proof
icon on this list, it is most probable that you
have installed the robot into an incorrect
directory. In that case, we would
recommend carefully going through step 1
of the installation process again. Also, this
happens very often when you have several MetaTrader4 platforms installed on your computer.
Check the folders and reinstall the robot into the correct folder. Or you might have simply
forgotten to restart your MetaTrader4.
After you install all of the robot files, and locate the
Forex Bullet Proof icon on the Navigator panel, you
need to open the chart with the feed necessary for
your robot to trade. For Forex Bullet Proof, it is the
EURUSD and USDJPY charts. To open a new chart,
simply click on “File” and select “New Chart”. You will
then be prompted to select the desired currency pair
in the drop-down menu that will instantly appear.
20
After opening the required chart (EURUSD or USDJPY), you need to select the M1 timeframe. To
do this, click on the chart, then on the M1 button in the top part of your MetaTrader4 window:
After you have the necessary chart opened and the M1 timeframe selected, you can start
attaching the robot to the chart.
In this manual, we will explain how to attach the Forex Bullet Proof robot to the EURUSD chart
only, but if you wish to use it with the USDJPY currency pair too, you can follow the same
instructions for that chart.
Note1: Minimal Account Balance to trade USDJPY is $4000
Note2: Minimal Account Balance to trade EURUSD is $450
To attach the robot, select the necessary chart and follow the subsequent instructions:
On the Navigator panel, right-click on the Forex Bullet Proof Expert Advisor icon and select
“Attach to a chart” in the menu as it is shown below:
When you attach the robot to the chart, the “Properties” dialog window will open. The dialog
window contains two tabs – “Common” and “Inputs”.
21
The “Common” tab looks like this:
It is crucial that all three of the settings highlighted with the red frame are matching the image
above or the Forex Bullet Proof robot will not be able to function properly.
Also, pay special attention to the “Confirm DLL function calls” checkbox which should be
unchecked.
Assuming that everything else is correct, the “Inputs” tab looks like this:
22
If you scroll down this inputs section, you will be able to see a number of adjustable settings,
which are explained in the following several pages of the manual. If you wish to change any of
the settings, just double-click in the “Value” field of the desired setting, and enter the new
value. To apply the changes, click OK, this will restart the robot with the new settings.
Now we are ready to start trading.
Depending on how well you have followed our instructions so far, there will be one of three
possible things displayed in the top-right corner of the chart to which the robot is attached:
- Smiley face indicates that the robot is correctly installed and ready to trade.
- X means that you forgot to enable the Expert Advisor trading in MetaTrader4.
Make sure that the big Expert Advisors button
MetaTrader4 is hit.
on the top toolbar of
- Sad face indicates that you did not allow live trading. Just press F7 and make
sure that the “ALLOW LIVE TRADING” checkbox is checked!
23
6. Forex Bullet Proof Settings Explained
Main settings:
Receipt – This is your license number and ClickBank receipt number at the same time and it is
used by the Forex Bullet Proof expert advisor to ensure that you are not using a pirated copy of
this product. You can find this code in the e-mail message from ClickBank, which was
dispatched to you immediately after you made the purchase. It is very important that you have
a valid Receipt Code, as without this setting the robot will not be able to function at all.
Money Management settings:
EURUSDLots – The base lot value for accounts with deposits above $4000 on the EURUSD
currency pair.
USDJPYLots - The base lot value on the USDJPY currency pair.
EURUSDLiteLots – The base lot value for accounts with deposits between 450$ and 4000$. If
AdaptLots is set to true, the current lot size will be increased by this value for every 450$
earned until the account balance reaches $4000.
AdaptLots – If set to True (default), the robot uses its built-in Money Management system,
which will set the trading lot size according to your current deposit size. The Bullet Proof money
management will add an additional base lot specified in the EURUSDLots and USDJPYLots field
to the current lot size for every additional $4000 on the account balance.
For EURUSD, when your account balance is lower than $4000, AdaptLots will use
EURUSDLiteLots as the base lot value which will be increased by this value for every $450 until
the account balance reaches $4000.
If it is set to False, it will automatically revert to the fixed lot size specified in the EURUSDLots or
EURUSDLiteLots field depending on account balance (or in the USDJPYLots field if the robot is
attached to the USDJPY currency chart).
GMTOffset settings:
UseAutoGMToffset – When set to True (default), the robot will calculate the GMT offset of
your broker’s server automatically. This is often the safest approach as it can automatically
adjust for the Daylight Savings. Unfortunately, this is not possible when you’re using the
Strategy Tester and a manually specified value is therefore required in order to achieve the
correct backtest results.
ManualGMToffset – defines the time offset of your broker in relation to GMT. This should be
set to 1 for IamFX. If in doubt, your broker will confirm their GMT offset to you upon your
24
inquiry. This parameter is primarily used for Strategy Testing or in the event the automatic
computation of the GMT Offset is not appropriate.
Visual settings:
TopPadding – This specifies the distance in pixels (Default = 20) below the top edge of the chart
at which the status information block should be displayed.
LeftPadding – This specifies the distance in pixels (Default = 20) from the left edge of the chart
at which the status information block should be displayed.
TextColor1 – This specifies the color (Default = Gold) of the text titles/labels within the status
information block.
TextColor2 – This specifies the color (Default = Dark Orange) of the text within the status
information block.
25
7. Forex Bullet Proof On-chart Messages
If you installed the Forex Bullet Proof correctly, the following on-chart message should
automatically appear in the top left part of your chart:
The version number displayed and the general content above will change over time as new
versions are released and additional features are incorporated.
Authentication status: This message should display “Authenticated” if the robot has verified
the AuthCode successfully and is functioning properly
Status: “Active” – means that your robot is set up and working properly
“Error” – means that some error has occurred and until fixed, the robot will not be able
to function properly. In this case, the subsequent string usually provides the actual error
clarification – an error number or a message explaining the error.
GmtOffset: If you have enabled “UseAutoGMTOffset” in your robot settings, this should display
the difference between your broker’s server time and the GMT (UTC) time. If the
“UseAutoGMTOffset” setting is disabled, it will simply display the value specified under the
“Inputs” tab of your settings.
Money Management: If you have decided to enable the built in MoneyManagement system of
your robot (set AdpatLots – True), this field will display “On”. Otherwise – “Off”.
Lot: Displays the lot size of the next trade that will be opened.
Trades open: Displays the number of trades that are currently opened, recognized and
monitored by the Forex Bullet Proof robot.
26
8. Forex Bullet Proof Strategy Test
If you want to do the strategy testing of the EA, you will need to have the historical data.
Now let’s learn how to make a backtest with the IamFX broker.
Warning1: IamFX uses a special low spread Micro feed with the “iam” prefix (for example
EURUSDiam) - that’s why you can’t download the price history using the standard method
(Tools -> History ->Download won’t work). You will get following error:
Warning2: MetaTrader4 does not store the spread values for the historical data. That’s why it is
always using the current spread for the whole history period. For this reason it is very
important to make sure you backtest during the low spread period. Otherwise you will not get
any good results.
1. Close all charts in MetaTrader4.
2. Close MetaTrader4.
3. Open Windows Explorer and go to the IamFX history folder (C:\Program Files\IamFX
MT4\history for example), then to /IamFX-Demo2 folder and delete all files there.
4. Follow this link to the IamFX web site: https://www.iamfx.com/trading_tools.php and
scroll down.
Input “Symbol extension” iam and set GMT +1, then download the data in CSV files. You need
to do this several times for each timeframe and for each currency pair you plan on backtesting
or trading with.
27
Each file will be saved in CSV. Name the file: EURUSDiam1.csv for 1 Minute history.
5. Open the IamFX MetaTrader4 again.
6. Go to Tools - > History - > then DOUBLE-Click EURUSDiam, click 1Minute, then click
IMPORT and select the file EURUSDiam1.csv
Then click OK. Now we have the full history for EURUSDiam M1.
7. When you finish the importing, the left tree will look like this:
28
All the timeframes are green (except H4) – that means you have loaded the history.
DONE! Now it is time to do the backtest!
Click the Strategy Tester button in the MetaTrader4 toolbar to open the window.
The Strategy Tester will appear at the bottom of MetaTrader4.
You should select the Expert Advisor from the list, Symbol, M1 Period (Timeframe). Choose the
“Every Tick” model.
Also set “Use Date” to test over a specific period in the past.
We recommend you not to use the “Visual mode” for long time spans because the back-test
will take much more time, but you will see a simulation of the trades being made.
Important: To perform a backtest correctly, you need to set the Automatic GMT Offset to
“false” and specify the GMT Offset value manually in the Expert Properties menu as it is shown
below. GmtOffset for IamFX is “1”, so you can leave the ManualGMToffset default.
29
Click START to begin the test.
You may switch between the various tabs at the bottom of the Strategy Tester window during
the testing.
You can see the trades here:
You can learn the detailed information about the current backtest in the “Report” Tab.
Right-clicking in this window and selecting “Save as report” will create a detailed report of your
testing.
If your Strategy Test showed no trades, it means there were some errors. Check the Journal Tab
to discover the problem.
30
9. Troubleshooter
The expert advisor is not working
First of all, please, make sure that all installation steps from the manual were performed
correctly. If you did not locate any errors in the installation process, have a look under the
“experts” and “journal” tabs in the “terminal” window of your MetaTrader4 to identify your
problem.
DLL calls are not allowed
Please, make sure that under the Tools->Options->Expert advisors tab of your MetaTrader4
platform the “Allow DLL imports” box is checked. If not, check it, confirm changes, and reattach
your robot to the chart. Also, make sure that “Allow live trading” is checked and “Confirm DLL
function calls” is unchecked, as these settings are also crucial for your robot’s trading.
Error 160: Unable to retrieve authentication code
This means that you have forgotten to enter your authentication code. Click the smiley face
icon or press F7 to open the Inputs tab and enter the code.
Error code 126 (“Authentication…” on the chart)
Please
check
the
following
with
the
MetaTrader4
platform
being
closed:
1) Please make sure that the .dll library file of your expert advisor exists in the
“experts/libraries” directory of your MetaTrader4 folder.
2) Ensure that under the Tools->Options->Expert advisors tab of your MetaTrader4 the “Allow
DLL imports” box is checked. If not, check it, confirm changes, and reattach your robot to the
chart. Also, make sure that “Allow live trading” is checked, and “Confirm DLL function calls” is
unchecked, as these settings are also crucial for your robot to function properly.
Error 4096: Authorization declined
Please, make sure that you have entered your purchase receipt number correctly – if not, click
the smiley face icon or press F7 to open the “Inputs” tab and enter the code again.
Other errors
If you are experiencing any issues that are not covered in the knowledgebase or the user’s
manual, please submit a support ticket providing as much detail as possible. Any screenshots or
additional information will be appreciated.
31
10. How to stop trading
There are several ways to stop the robot’s trading.
1) In case you use several robots on your account and want to completely stop the trading
of all EAs, click the green “Expert Advisors” button in the toolbar. Please, be aware that
this will also stop any other Expert Advisors that you may be running on your account.
2) If you want to remove only one robot, you can do so by right-clicking on the Smiley Face
and choosing “REMOVE” in the Expert Advisors menu.
3) If you don’t want to remove the EA, you can simply disable its live trading ability by
pressing F7 and un-checking the “Allow live trading” checkbox:
32