1
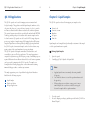
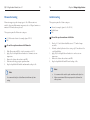
QX-102
Applications Manual
© QuantomiX Ltd. 2005. All rights reserved.
UQX003 Issue 2.1
November 2005
QX-102 Applications Manual, Issue 2.1
2
This publication is the copyright of QuantomiX Ltd. and contains information
that may not be used or reproduced unless agreed in writing. QuantomiX Ltd.
reserves the right to alter without notice the specifications, design or supply of
any product or service.
The information provided in this Application Manual is believed to be accurate.
It is the user’s responsibility to confirm the technical aspects and the suitability
of the technology for any particular application.
Cited registered trademarks: Coulter counter is a registered trademark of
Beckman Coulter Corp, Triton is a registered trademark of Union Carbide
Corp., and Tween of Uniquema, a business unit of ICI Americas Inc.
QuantomiX Ltd., 12 Hamada Street, Tamar Science Park, Rehovot
POB 4037, Nes-Ziona 70400, Israel
Tel: +972-8-9462244, Fax: +972-8-9465874
http://www.quantomix.com
3
QX-102 Applications Manual, Issue 2.1
Table of Contents
Safety
Chapter 1: Introduction
Manual Scope and Contents
References
Sites
Technical Support
QX-102 Applications
Chapter 2: Liquid Samples
Chapter 3: Particles in Solutions
Membrane Coating
Poly-L-lysine coating
Poly (sodium-4-styrenesulfonate) coating
Sample Application
Chapter 4: Biological Applications
General Protocols
QX-102 Membrane Coating Protocols
Fibronectin Coating
Gelatin Coating
Poly-L-lysine Coating
Sample Application Protocols
Cell Culture Growth
Adherent Cells
Cells in Suspension and Microorganisms
Handling Native, Non-treated Samples
Fixation Protocols
Aldehydes
Glutaraldehyde Fixation
Paraformaldehyde Fixation
Organic Solvents
Methanol Fixation
5
7
7
7
7
7
8
9
11
11
11
12
13
15
15
17
18
19
1
21
21
22
23
25
26
26
27
28
29
29
QX-102 Applications Manual, Issue 2.1
4
General Staining Protocols
30
Uranyl Acetate Staining
PTA (Phosphotungstic Acid) Staining
Osmium Tetroxide Staining
Immunogold Labeling Protocols
Immunogold Labeling Reaction
Preparing the Samples for Imaging
30
32
33
35
37
40
Appendix A: Glossary
Appendix B: Troubleshooting Instructions
41
43
List of Figures
Figure 1
Figure 2
General Protocol Flowchart
Immunolabeling Protocol Flowchart
16
36
List of Tables
Table 1
Guidelines for Cell Dilution
22
QX-102 Applications Manual, Issue 2.1
5
Safety
!
a.
b.
Warnings
Appropriate safety protocols should be used when handling
biological samples, especially human or primate derived cell lines
and pathogenic microorganisms.
Many of the reagents used in fixation and staining protocols are
toxic. Heavy metal stains (such as Uranium and Osmium) are
long-term cumulative poisons. Observe the following cautionary
rules when handling toxic materials:
Read carefully the labels and MSDS (Material Safety Data
Sheet) and proceed accordingly.
In general, work with toxic materials should be preformed in a
fume hood, wearing laboratory gloves, goggles and lab-coats.
All toxic waste should be disposed of according to the
guidelines of local authorities.
QX-102 Applications Manual, Issue 2.1
6
Chapter 1: Introduction
7
Chapter 1: Introduction
Manual Scope and Contents
This manual provides protocols for preparing material and biological samples
for imaging in QX-102 capsules.
The Applications Manual consists of the following chapters and appendices:
Chapter/
Appendix
Heading
Provides
1
Introduction
2
Liquid Samples
3
Particles in Solution
4
Biological Applications
A
Glossary
B
Troubleshooting
The manual scope and contents and
introduction to QX-102 capsule
applications.
General protocol for applying
liquid samples.
Protocols for coating the capsule
membrane for attaching particles.
The theory and protocols for various
biological applications, including
sample handling application, fixation,
staining and immunolabeling.
The terms and abbreviations of the
Applications Manual.
Troubleshooting instructions.
For detailed description of the QX-102 capsule technology components and
general guidelines for handling the capsules and accessories, please refer to the
QX-102 User Manual.
Technical Support
For technical support please contact [email protected].
QX-102 Applications Manual, Issue 2.1
8
Chapter 2: Liquid Samples
9
QX-102 Applications
Chapter 2: Liquid Samples
The QX-102 capsules can be used for imaging various wet material and
biological samples. The applications include liquid samples (emulsions, foods,
oils, paints, inks, drugs etc.), pastes and foams (cosmetics, foods, etc.), particles
in solutions, adherent and non-adherent cultured cells, and microorganisms.
The contrast between water and fat is especially well visualized with WETSEM
Technology, enabling analysis of fat structure and content in samples such as
food and cosmetics. QX capsules can also be used for EDS (energy dispersive
spectroscopy) analysis of samples using a SEM equipped with an EDS system.
Samples in liquid form can be imaged directly simply by placing them inside
the QX-102 capsule. Some material samples, such as beads in solutions, may
require coating of the capsule membrane for proper attachment.
The QX-102 capsules are designed as miniature cell culture dishes, and
are suitable for various cell biology applications. The sample preparation is
comparable to light microscopy, and no drying, coating or embedding steps are
required. Adherent and non-adherent cultured cells, as well as microorganisms,
can be processed for imaging in the QX-102 capsules. The samples can
be imaged either following an appropriate contrast enhancement staining,
immunolabeling procedures, or without any treatment.
The QX-102 capsule can be used for imaging any wet sample such as:
Various foods
Cosmetics, creams
Emulsions
Oil, grease
Paint, ink
Liquid samples can be imaged directly, and usually no treatment of the sample
or of the capsule membrane is required.
To image liquid samples
1.
2.
Open the capsule.
Carefully apply 15 µl of liquid to the liquid dish.
Notes
The sample preparation protocols provided in the Application Manual are
divided into the following categories:
a.
b.
Liquid Samples
Particles in Solution
Biological Applications
c.
3.
4.
Applying liquids is most conveniently done using standard
lab pipettes.
Care should be taken not to touch the capsule membrane with
the pipette tip.
When applying viscous solutions, creams, pastes, foams or
similar samples, take care that no air bubbles are trapped
between the sample and the capsule membrane.
Close the capsule.
Proceed to imaging according to guidelines provided in the QX-102 User
Manual Chapter 3.
QX-102 Applications Manual, Issue 2.1
10
Chapter 3: Particles in Solutions
11
Chapter 3: Particles in Solutions
QX-102 capsules are suitable for imaging various particles such as
macromolecules, beads and fibers in solutions. The sample part imaged with
the QX capsules is the part proximal to the capsule membrane, and thus,
for optimal imaging the sample must be in close contact with the capsule
membrane. When the capsule is inverted in the SEM during imaging, some
particles, depending on their size, weight and the composition of the solution
they are suspended in, may not stay attached to the membrane. In these cases,
treating the capsule membrane by coating agents may be useful.
Membrane Coating
The coating that provides best attachment depends on the type of specimen
and the nature of the experiment. Coating protocols suitable for biological
applications are provided in chapter 4. Below are protocols for coating the
membrane with Poly-L-Lysine, a positively charged polymer, and with Poly
(sodium-4-styrenesulfonate), a negatively charged polymer. These are suitable
for attaching negatively or positively charged particles respectively. Other
coating reagents may also be used, however, one should take into account that
in order not to interfere with the imaging, the coating layer must be thin and
should not contain electron-dense materials.
For coating procedures for specific applications, please see our website
www.quantomix.com or consult [email protected].
Poly-L-lysine coating
Poly-L-lysine is a positively charged polymer, to which negatively charged
particles can attach.
The reagents required for Poly-L-lysine coating are:
0.1% w/v Poly-L-lysine in water (for example Sigma Cat. No. P8920)
Distilled water
QX-102 Applications Manual, Issue 2.1
1.
2.
3.
12
To coat the capsule membrane with Poly-L-lysine
Sample Application
Apply 15 µl of 0.1% Poly-L-lysine solution to the liquid dish and
incubate for one hour at room temperature. Longer incubation times,
up to overnight, also give good results.
Remove the solution and rinse the liquid dish twice with distilled water.
Keep the liquid dish filled with water until applying the sample.
Alternatively, remove the water and dry the liquid dishes for later use.
Particles can be attached to the coated membranes either by adsorption or
by centrifugation. QX Imaging Buffer is the recommended imaging medium
when applicable, since it is specially formulated to minimize damage to the
samples by electron beam during imaging in the SEM. In applications where
the particles can be firmly attached to the membrane and do not require to be
suspended in a specific solution, we recommend changing the solution to
QX-102 Imaging Buffer prior to imaging.
Poly (sodium-4-styrenesulfonate) coating (PSS)
PSS is a negatively charged polymer, to which positively charged particles can
attach.
The reagents required for PSS coating are:
30% w/v Poly(sodium-4-styrenesulfonate) in water (for example Aldrich,
Cat. No. 527483)
Distilled water
To coat the capsule membrane with PSS
1.
2.
3.
4.
Chapter 3: Particles in Solutions
13
Dilute the 30% stock solution to 0.3% w/v in distilled water
Apply 15µl of the diluted solution to the liquid dish and incubate for one
hour at room temperature. Longer incubation times, up to overnight, also
give good results.
Remove the solution and rinse the liquid dish twice with distilled water.
Keep the liquid dish filled with distilled water until applying the sample.
Alternatively, remove the water and let the liquid dishes dry for a
later use.
To apply the sample on a coated membrane
1.
2.
3.
4.
5.
Prepare a suspension of particles at the appropriate dilution.
Apply 15 µl of the suspension into the liquid dish and incubate for
one hour at room temperature, or centrifuge at 500 g for five minutes in a
centrifuge equipped with 96 well plate holders.
If applicable, wash with water several times and exchange to 15 µl
QX-102 Imaging Buffer prior to imaging.
Seal the capsule.
Proceed to imaging according to guidelines provided in the QX-102 User
Manual Chapter 3.
QX-102 Applications Manual, Issue 2.1
14
15
Chapter 4: Biological Applications
Chapter 4: Biological Applications
This chapter provides detailed protocols for preparing biological samples to
be imaged using the QX-102 capsules. The samples can be imaged either
untreated, fixed, stained or immunolabeled.
These protocols have been found to be widely applicable. However, since the
results obtained depend on the type of application, the user should optimize
the protocol for each application.
For latest protocol updates, please refer to our website: www.quantomix.com.
General Protocols
Many of the sample preparation steps, including cell attachment, fixation and
immunolabeling, are similar to protocols generally used in cytological staining
for light and fluorescent microscopy.
General staining protocols make use of heavy metals and are derived from
protocols used in electron microscopy. The protocols are fast and easy to
perform. No embedding or drying steps are needed and typical sample
preparation periods are shorter than half a day, as shown in Figure 1.
The liquid dish can serve as a miniature cell culture dish, and cell attachment,
spreading and growth on the electron-transparent capsule membrane have
characteristics and requirements similar to standard cell culture dishes. Nonadherent cells may also be deposited on pre-coated membranes by adsorption
or centrifugation.
QX-102 Applications Manual, Issue 2.1
16
QX-102 Membrane Coating Protocols
Membrane Coating (optional)
0.5 - 1 h
The capsule membrane supports growth of most cell types without additional
treatments. However in most cases, to ensure optimal growth, pre-coating
of the capsule membrane is recommended. The attachment factors that can
be used vary from extra-cellular matrix components such as Fibronectin,
Collagen or Gelatin to charged polymers such as Poly-L-lysine. The factors
that provide best attachment depend on the type of specimen and the nature
of the experiment. In choosing the most suitable coating protocol, one should
take into account that the coating layer should be thin and should not contain
electron-dense material.
Cell Attachment
1 h - overnight
Fixation 15 min
General Staining
0.5 - 2 h
Immunolabeling
3-4h
Imaging
Figure 1: General Protocol Flowchart
After a specimen is applied to the capsule, it can be imaged in its native form
or fixed. General staining using heavy metals can improve contrast. Labeling of
specific proteins or cellular structures can be done using immunogold labeling
protocols. Immunolabeled samples can also be counterstained to visualize
cellular details. For examples of images obtained using the technology, refer to
our website, www.quantomix.com.
The following protocols for preparing samples are described below:
QX-102 membrane coating
Sample application to the QX-102
Handling native, non-treated samples
Sample fixation
General staining
Immunogold labeling
Chapter 4: Biological Applications
17
The following coating protocols are provided below:
Fibronectin
Gelatin
Poly-L-lysine
QX-102 Applications Manual, Issue 2.1
18
Chapter 4: Biological Applications
19
Fibronectin Coating
Gelatin Coating
Fibronectin supports growth of many types of cells. If Fibronectin is not
suitable, other extracellular matrix components, such as Collagen, Laminin or a
mixture of ECM molecules may be used.
The reagents required for Gelatin coating are:
Gelatin (for example, Sigma Cat. No. G6144)
Distilled water
PBS
The reagents required for Fibronectin coating are:
To coat the capsule membrane with Gelatin
0.1% Fibronectin solution (for example, Sigma F-1141)
PBS
1.
To coat the capsule membrane with Fibronectin
2.
1.
2.
3.
4.
5.
Dilute Fibronectin with PBS to a final concentration of 0.01%.
Apply 15 µl to the liquid dish and incubate for 30 minutes at room
temperature.
Remove the solution and wash twice with PBS.
Wash twice with the appropriate growth medium.
Keep the liquid dish filled with the medium until seeding of cells.
3.
4.
5.
Dissolve 0.1 % w/v Gelatin in distilled water at 37ºC until no lumps
are visible.
If desired, sterilize by filtration before coating or by UV irradiation of the
coated liquid dishes.
Apply 15 µl to the liquid dish and incubate for one hour at room
temperature.
Remove the solution and wash twice with PBS.
Keep the liquid dish filled with PBS until seeding of cells.
Notes
Note
It is recommended to plate cells on fibronectin within one day from
coating.
a.
b.
It is recommended to coat the capsule membrane on the day of use.
Higher concentration of Gelatin may improve the attachment for
some specimens.
QX-102 Applications Manual, Issue 2.1
20
Chapter 4: Biological Applications
21
Poly-L-lysine Coating
Sample Application Protocols
Poly-L-lysine is a positively charged polymer, to which cells that carry overall
negative charge can attach. Since it interferes with the growth and other
physiological functions of some cells, it is not the first choice to be used as a
coating agent for growing adherent cells in the QX-102 capsule. However, it is
well suited for attachment of non-adherent cells or microorganisms.
Cell Culture Growth
The reagents required for Poly-L-lysine coating are:
0.1% w/v Poly-L-lysine in water (for example Sigma Cat. No. P8920)
Distilled water
To coat the capsule membrane with Poly-L-lysine
1.
2.
3.
Apply 15 µl of 0.1% Poly-L-lysine solution to the liquid dish and
incubate for one hour at room temperature. Longer incubation times, up
to overnight, also give good results.
Remove the solution and wash twice with distilled water.
Following the wash, keep the liquid dish filled with water until applying
the sample. Alternatively, remove the water and dry the dishes in a sterile
environment.
For adherent cells, the QX-102 capsule is used as a tissue culture dish for
direct attachment and growth of cells. A large number of cell lines (for
example, HeLa, CHO, A431 and NIH3T3) are grown in their regular growth
medium and no special growth conditions are required. Assays or treatments of
cells can be performed directly on the cells grown in the capsule. If desired, the
cells can be grown and treated first in tissue culture dishes and then attached
to the capsule membrane prior to imaging.
Cells grown in suspension can be attached to the capsule membrane by coating
it with attachment factors such as Poly-L-lysine. Treatment of non-adherent
cells, such as staining or labeling can be done in the capsule on attached cells,
or alternatively, cells can be first treated in sample tubes and attached to the
capsule membrane prior to imaging.
!
Cautions
a.
For growing cells, it is important to use clean, sterile MP-10
multi-well plates.
Do not reuse multi-well plates that have been used for staining
with toxic materials.
b.
QX-102 Applications Manual, Issue 2.1
22
Adherent Cells
5.
6.
The reagents required for seeding adherent cells are:
To maintain a humid atmosphere and avoid sample drying, it is important
to fill the reservoirs along the edges of the MP-10 multi-well plate. For
detailed instructions, refer to QX-102 User Manual.
To seed an adherent cells culture
2.
3.
4.
Inoculate 15 µl of the cell suspension on the capsule membrane.
Fill the reservoirs along the edges of the MP-10 multi-well plate with
distilled water.
Note
Normal growth medium
Trypsin or non-enzymatic detachment reagent
PBS
1.
Chapter 4: Biological Applications
23
Coat the capsule membrane with Fibronectin or other suitable
attachment factor prior to use. For details, refer to QX-102 Membrane
Coating Protocols.
Detach the cells from their growth flask, for example by using Trypsin.
Wash with PBS or a growth medium and resuspend in a fresh growth
medium. Count the cells.
Dilute the cells so that 15 µl of seeding medium in the dish contains
the desired amount of cells. For example, use the guidelines supplied
in Table 1.
Note
Usually, seeding 1000 to 2000 cells in each dish renders a sub-confluent
density of adherent cells after overnight growth. The optimal cell density
should be adjusted according to the application.
7. Incubate in the normal growth environment (for example, an incubator
with a humid, 5% CO2 atmosphere) overnight or until the cells are attached.
Typical protocol outline for growing adherent cells, found to be widely
applicable to many cell types, is provided below:
Typical protocol outline for applying a sample of adherent cells
1.
2.
3.
4.
5.
6.
Coat with 0.01% Fibronectin for 30 minutes at room temperature.
Wash twice with PBS.
Wash twice with culture medium.
Seed 2000 cells in each capsule.
Fill each lateral reservoir of the multi-well plate with 200 µl of water.
Close the lid and incubate at 37ºC until the cells are attached
(usually overnight).
Cells in Suspension and Microorganisms
Table 1: Guidelines for Cell Dilution
Cells/Dish
Cell Concentration
Seeding Volume
1000
6.6 x 10⁴/ml
15 µl
1500
2000
1x
105/ml
1.3 x
105/ml
15 µl
15 µl
QX-102 capsules can be used for imaging cells and microorganisms grown in
suspension, such as lymphocytes, bacteria or protozoa. Since these organisms
usually do not attach directly onto the capsule membrane, coating is required.
Preferred attachment protocols make use of Poly-L-lysine or Gelatin coating.
Cells are attached to the coated capsule membranes by incubating or by
centrifuging. The specimens can be imaged, either in their unstained form or
fixed and stained according to the protocols provided below.
QX-102 Applications Manual, Issue 2.1
24
The suspension of cells can be maintained in a culture medium or buffer and
may be fixed to the membrane before application. The dilution factor of the
suspension depends on the type of organism and culture used and should be
determined experimentally. Labeling of specific antigens can be performed
using immunolabeling, either before or after attachment to the capsule
membrane.
The following protocol is applicable for attaching cells in suspension, such as
bacteria or other unicellular organisms to the capsule membrane.
For application of a suspension of cells or microorganisms
1.
2.
3.
4.
Coat the capsule membrane with either Poly-L-lysine or Gelatin. For
details, refer to QX-102 Membrane Coating Protocols.
Wash the membrane with PBS and keep it filled with PBS until use or
alternatively, wash with distilled water and dry overnight.
Prepare a suspension of cells, microorganisms or particles at the
appropriate dilution (for example, for the E.coli, 1:100 dilution of an
over-night culture renders the appropriate number of bacteria in
a capsule).
Apply 15 µl of the diluted culture into the liquid dish and incubate for
one hour at room temperature, or centrifuge at 500 g for five minutes at
room temperature in a centrifuge equipped with 96 well plate holders.
!
Caution
To avoid interference with cell adsorption onto the membrane, it is
recommended not to include Serum or Formaldehyde in the suspension.
5.
6.
Optional: To stabilize the binding after cell adsorption, fix the cells briefly
with 4% Formaldehyde/PBS for 10 minutes or 2.5% Glutaraldehyde/PBS
for five minutes.
Wash with PBS, or water if the cells are fixed, and proceed to staining
or imaging.
25
Chapter 4: Biological Applications
Handling Native, Non-treated Samples
The wet environment of the QX-102 capsule enables visualizing cells in their
native, non-fixed conditions. Even in unstained samples, the differences
between the various constituents of the cell often generate sufficient contrast
to distinguish some level of details. High-density materials such as salts,
phosphorous or iron concentrated in different regions of the cells may improve
the contrast.
The level of radiation absorbed by the cells during imaging at high
magnification is expected to affect their viability. On short time imaging, no
obvious structural damage is apparent and several repeated scans of cells give
the same images. Thus, short time imaging of living cells may be possible. Live
cells can be attached to the capsule according to the protocols provided above
and imaged directly in growth medium or in PBS.
QX-102 Applications Manual, Issue 2.1
26
Fixation Protocols
Most of the general staining and immunolabeling protocols are carried out after
fixation of the specimen. The purposes of the fixation are:
To preserve the cellular structures as close to the living state as possible.
To protect the sample from morphological alteration and damage during
the subsequent treatments.
A wide range of fixatives commonly used in cytological, immunostaining and
electron microscopy studies can be applied to the QX-102 capsule samples.
Since no fixative preserves all the cellular structures, an appropriate choice
of fixatives depends on the specimen, and the cellular details of interest. For
immunolabeling, the choice of the most suitable fixation protocol is also
affected by the nature of the antigen and antibody.
fixation depend on the application and should be determined experimentally.
Samples fixed for subsequent immunolabeling require special precautions to
avoid damaging the relevant epitopes. For some applications, a mixture of
Paraformaldehyde and Glutaraldehyde may render improved results.
Glutaraldehyde Fixation
The reagents for Glutaraldehyde fixation are:
25% Glutaraldehyde solution EM grade (for example, Agar Cat. No. R1020)
PBS
To fix the specimen with Glutaraldehyde
1.
!
Warning
Since all fixatives are toxic to some extent, all work should be performed
in a fume hood using gloves and protective clothing. Handling and waste
disposal should be according to guidelines of the local authorities.
Chapter 4: Biological Applications
27
2.
3.
4.
5.
Dilute the Glutaraldehyde stock solution to a 2% final concentration
in PBS.
Wash the sample four times with PBS.
Incubate with 2% Glutaraldehyde/PBS at room temperature for 30 minutes.
Wash four times with PBS.
Proceed to staining or labeling reaction.
Note
Aldehydes
Fixation in protein-crosslinking Aldehyde reagents, such as Paraformaldehyde
or Glutaraldehyde, is usually the first choice. Fixation with Glutaraldehyde
is permanent, whereas Paraformaldehyde may be partially reversed during
long incubation times with solutions. Glutaraldehyde penetrates slower than
Paraformaldehyde and thus requires longer fixation times.
The following two sections provide standard fixation protocols for
Paraformaldehyde and Glutaraldehyde. The optimal concentration and time of
For some applications, better results can be obtained with lower
concentrations of Glutaraldehyde (0.2% to 1%) and longer incubation
periods.
QX-102 Applications Manual, Issue 2.1
28
Chapter 4: Biological Applications
29
Paraformaldehyde Fixation
Organic Solvents
The reagents required for Paraformaldehyde fixation are:
Organic solvents such as alcohols are also commonly used fixatives. Since these
reagents dehydrate the cell and remove lipids, they can destroy some of the
cell architecture. These fixatives may be preferred if immunolabeling is desired,
since in some cases they may preserve target epitopes better than Aldehyde
fixatives.
Paraformaldehyde, EM grade (for example, a 16% solution, Electron
Microscopy Sciences, Cat. No. 15710)
PBS
To fix the specimen with Paraformaldehyde
1.
2.
3.
4.
5.
!
Prepare 4% Paraformaldehyde solution in PBS.
Wash the sample four times in PBS.
Fix with 4% Paraformaldehyde/PBS at room temperature for 15 minutes.
Wash four times with PBS.
Proceed to staining or labeling reaction.
Note
For some staining and labeling protocols, 2% Paraformaldehyde may give
better results.
Caution
Please note that the QX-102 capsule is not compatible with Acetone and
Toluene. For other organic solvent please consult with [email protected].
Methanol Fixation
The reagents for Methanol fixation are:
Methanol cooled to –20°C
PBS
To fix the specimen with Methanol
1.
2.
3.
4.
5.
Wash the sample four times with PBS at room temperature.
Change to pre-cooled (-20°C) 100% Methanol.
Incubate for five minutes at 4°C or at room temperature.
Wash four times with PBS at room temperature.
Proceed to staining or labeling reaction.
QX-102 Applications Manual, Issue 2.1
30
General Staining Protocols
The imaging contrast in QX-102 capsules is created from variations in atomic
numbers of the sample constituents. Thus, heavy metal stains, such as
Uranium and Osmium compounds, are best suited for improving the general
contrast of the biological samples, whose main constituents are Carbon,
Hydrogen, Oxygen and Nitrogen. Heavy metal stains attach, generally nonspecifically, to cellular constituents. However, different affinities to various
molecules enable visualization of some cellular structures.
Chapter 4: Biological Applications
31
PBS
Distilled water
0.45 µm syringe filters
To stain the specimen with Uranyl Acetate
1.
Before starting, prepare fresh 1% Tannic Acid in distilled water and acidic
0.5% Uranyl Acetate (diluted in water from stock and filtered through
0.45 µm syringe filters).
The following staining materials are described below:
Notes
Uranyl Acetate
Phosphotungstic Acid (PTA)
Osmium Tetroxide
a.
b.
Since Uranyl precipitates in the presence of Phosphate, samples
must be rinsed thoroughly to remove traces of Phosphates before
Uranyl staining.
Perform all the following steps at room temperature.
Uranyl Acetate Staining
Uranium is the heaviest metal used in staining and can be used as a general
contrast agent. Uranyl Acetate binds to nucleic acids, to proteins and to
membranous structures.
!
Warning
Uranium compounds are toxic and radioactive. Contact your safety officer
or local authorities for appropriate handling and disposal protocols.
2.
3.
4.
5.
6.
7.
8.
Wash the sample four times with PBS.
Fix with 4% Paraformaldehyde/PBS for 15 minutes. For details, refer to
Fixing Protocols.
Wash the sample four times with PBS.
Wash four times, five minutes each wash, with distilled water.
Incubate with 1% Tannic Acid for 5 minutes.
Wash twice, five minutes each wash, with distilled water.
Incubate with 0.5 % Uranyl Acetate for 30 minutes.
Note
The reagents required for Uranyl Acetate staining are:
Uranyl Acetate (5% stock, pH 3.5 with HCl, kept at 4°C in the dark)
Tannic Acid (2% stock in water)
4% PFA in PBS
The optimal concentration and incubation time may vary depending on
the specimen.
9.
Wash twice, five minutes each wash, with distilled water.
QX-102 Applications Manual, Issue 2.1
32
Chapter 4: Biological Applications
33
10. Prepare the sample for imaging according to Preparing the Samples
for Imaging Section (Page 40).
Notes
Fixation can also be done with a combination of 2% Paraformaldehyde and
1% Glutaraldehyde in PBS for 30 minutes.
PTA (Phosphotungstic Acid) Staining
Phosphotungstic acid (PTA) is an anionic stain. PTA positively stains charged
structures such as basic proteins associated with nuclear DNA and nucleoli and
intensely stains mitochondrial matrix.
The reagents required:
3.
4.
5.
6.
7.
Wash three times with PBS.
Wash three times with double distilled water.
Incubate the sample with 2% PTA for 30 minutes.
Wash five times with double distilled water.
Prepare the samples for imaging according to Preparing the Samples for
Imaging (Page 40).
Phosphotungstic acid (for example Sigma Cat. No. P4006), 2% stock
solution in double distilled water, pH 1.5.
!
Osmium Tetroxide Staining
Warning
PTA solution is acidic. Appropriate personal protective clothing should be used.
Double distilled water
2% Glutaraldehyde in PBS
Notes
Osmium Tetroxide is traditionally used in electron microscopy both as
a fixative and heavy metal stain. Osmium Tetroxide is a good fixative and
excellent stain for lipids in membranous structures and vesicles. The most
prominent staining in adherent human cells (HeLa) is seen on lipid droplets
(see www.quantomix.com, gallery). Some intracellular structures are also
visualized. Visualized cellular structures depend on the fixation protocols;
in Glutaraldehyde fixation nucleoli are visible, but overall nuclear staining is
weak. In Paraformaldehyde fixation nuclear staining becomes more prominent,
but some intracellular structures are lost. As a first choice, fixating with a
combination of Glutaraldehyde and Paraformaldehyde is recommended.
The stock can be stored at room temperature for approximately one month.
1.
2.
Warning
Procedure:
!
Wash the cells four times with PBS.
Fix cells with 2% Glutaraldehyde in PBS for 30 minutes.
Since OsO4 is toxic and volatile, all work should be performed in a fume
hood using gloves and protective clothing. Handling and waste disposal
should be done according to the guidelines of the local authorities.
QX-102 Applications Manual, Issue 2.1
34
The reagents for Osmium Tetroxide staining are:
4% OsO4 (for example, Sigma Cat. No. 75632)
2% Paraformaldehyde/0.1% Glutaraldehyde in PBS
Distilled water
PBS
To stain cells with Osmium Tetroxide
Note
All the following steps should be performed at room temperature.
1.
2.
3.
4.
5.
6.
Wash the cells four times with PBS.
Fix with 2% Paraformaldehyde/0.1% Glutaraldehyde/PBS for 30 minutes.
Wash four times with PBS.
Wash four times with distilled water.
Prepare 0.1% OsO4 solution by diluting the 4% stock solution in
distilled water.
Incubate the sample with 0.1% OsO4 for 30 minutes.
Note
The optimal incubation time may vary between samples and should be
experimentally determined.
7.
8.
Wash four times with distilled water.
Prepare the samples for imaging according to Preparing the Samples
for Imaging Section (Page 40).
Chapter 4: Biological Applications
35
Immunogold Labeling Protocols
Colloidal gold particles are readily visualized in the QX-102 capsules.
Gold beads conjugated to a variety of molecules, such as Protein A,
Immunoglobulins and Streptavidin, are commercially available and can be used
to immunolabel specific antigens. Since immunogold labeling combined with
QX-102 capsules allows visualization of single gold particles attached to single
molecules, the following unique advantages are offered:
Imaging receptors in the context of the cell membrane
Extremely low detection limit, allowing detection at single label sensitivity
Ultra-fine localization and distribution studies are possible due to the
10 nm resolution range
Labeling quantification by counting the individual particles
Immunolabeling protocols consist of four main steps:
Fixation
Blocking
Antibody binding
Detection with gold conjugate
For the immunolabeling protocol flowchart, refer to Figure 2.
Surface antigens can be labeled on live or fixed cells. Intracellular antigens can
be labeled on fixed, permeabilized cells. Since fixation protocols can mask or
change some epitopes, the optimal fixation protocol for each antibody should
be experimentally determined.
In addition, optimal blocking for non-specific backgrounds, concentrations
and incubation time with the primary antibody depend on the antigen and
antibody in question. Since in some cases, specific incubation and wash buffers
are required to avoid non-specific binding, there is no standard protocol that
works for all labeling reactions. Optimal conditions may be established based
on prior experience with the particular antibody and antigen or on preliminary
experiments using immuno-fluorescence.
QX-102 Applications Manual, Issue 2.1
36
This section provides the outline and general guidelines, which should be
modified according to the user-defined optimal conditions.
Commercial conjugated gold particles are available in different sizes, varying from
0.8 nm to 100 nm. Smaller particles have the advantage of more efficient labeling,
but silver enhancement is required for their visualization. Larger particles can be
visualized without further treatment. To obtain optimal conditions for each gold
conjugate, refer to the manufacturer’s recommendations.
To assess the labeling characteristics, the reactions should be compared using
appropriate controls. Control reaction, in which the primary antibody has been
omitted, should always be included.
Immunogold Labeling Reaction
The reagents required for the immunolabeling reaction are:
PBS
Fixative
0.2% Triton® X-100 in PBS (for intracellular antigens)
Blocking agent (BSA, normal Serum or other)
Primary antibody
Gold particle conjugate
Distilled water
Silver staining kit (for example, AURION R-GENT SE-EM, Cat. No. 500.033)
Specimen
Fixation
Live
cells
Surface
antigens
0.5 h
Permeabilization
10 min
Chapter 4: Biological Applications
37
Internal
antigens
To immunogold label a sample in a QX-102 capsule
Blocking
1.
0.5 h
2.
Primary antibody attachment
Coat the membrane with Fibronectin or another appropriate
attachment factor.
Attach the cells to the membrane.
1h
Note
Gold conjugate attachment
1h
All the following steps should be performed at room temperature.
Silver enhancement
3.
4.
Imaging
5.
Figure 2: Immunolabeling Protocol Flowchart
Wash four times with PBS.
Fix the cells, referring to Fixation Protocols. Omit the fixation step when
live cells are labeled.
Wash four times with PBS.
For intracellular antigens:
QX-102 Applications Manual, Issue 2.1
38
a.
6.
7.
For Paraformaldehyde or Glutaraldehyde fixed cells, permeabilize
the cells by incubating with 0.2% Triton® X-100/PBS for 10
minutes. If Methanol fixation is used, no additional permeabilization
is required.
b. Wash twice with PBS - 5 minutes each wash.
To avoid non-specific background, incubate with a blocking solution,
such as 1% BSA and 5% normal Serum from the species of the secondary
antibody in PBS for 30 minutes.
Incubate with primary antibody in 1% BSA in PBS.
In parallel, carry out the control reaction without the primary antibody.
Chapter 4: Biological Applications
39
Notes
For optimal dilution and conditions, refer to the manufacturer’s
recommendations.
10. To remove unbound antibodies, wash four times with PBS.
11. For gold beads smaller than 30 nm, perform silver enhancement.
Note
Notes
a.
b.
c.
8.
Carry out and test serial dilutions to determine the optimal
concentration of the antibody.
Incubation periods of 30 to 60 minutes at room temperature usually
render good results.
For some antibodies, labeling can be improved by incubating at 37ºC
or by longer incubation periods (several hours to overnight) at 4ºC.
Wash four times with PBS, with BSA 1%.
Notes
a.
b.
9.
In case of background problems, a mild detergent such as 0.05% to 0.1%
Tween® 20 can be added to the wash buffer.
For surface staining or labering, do not use detergents.
Incubate with the gold-labeled secondary reagent (gold conjugated
secondary antibody or Protein A or G) in protein containing solution,
such as 1% BSA or 5% normal Serum.
The AURION R-GENT SE-EM kit is recommended. However, other
comparable kits are also available.
12. Wash six to ten times with distilled water.
13. Prepare the sample for imaging according to Preparing the Samples
for Imaging Section (Page 40).
QX-102 Applications Manual, Issue 2.1
40
Appendix A: Glossary
41
Preparing the Samples for Imaging
Appendix A: Glossary
The QX Imaging Buffer is specially formulated to minimize the damage to
the samples by the electron beam during imaging in SEM and should be used
when ever applicable, especially for biological samples. Prolonged storage of
the specimens in the imaging buffer is not recommended. For imaging live
specimens, growth buffer of the samples or PBS should be used instead of the
QX Imaging Buffer.
Term
Description
SEM
Scanning electron microscope
MP-10
Multi-well plate, a sterile, transparent holder for parallel
handling of up to 24 individual QX-102 capsules, serving
as a cell culture apparatus and holds the capsules during
various manipulations
MA-4
Multi-well aspirator, a parallel drainage system designed
to safely aspirate liquids from the QX-102 capsules
without damaging the capsule's membrane
QX-102
Capsule used for SEM-imaging of a variety of liquids and
wet samples
Liquid Dish
QX-102 capsule base designed as miniature cell culture
dish for applying samples
Sealing Stub
Part of QX-102 capsule used for sealing the capsule and
for holding the capsule in SEM
!
Caution
Solutions containing DMSO are not suitable for imaging in QX-102 capsules.
To prepare the samples for SEM-imaging
1.
2.
When the sample is ready, exchange the liquid in the liquid dish to 15 µl
QX-102 Imaging Buffer.
Seal the capsule.
Calibration Capsule QX-capsule with control sample used for optimization of
imaging conditions
Notes
For optimal imaging results, we recommend to proceed directly to imaging.
If required, the closed samples can be stored at 4ºC for short periods.
Refrigerated capsules should be equilibrated to room temperature before
inserting them to the SEM.
3.
Place the QX-102 capsule in the SEM with the capsule membrane facing
upwards and proceed to imaging according to the guidelines provided in
the QX-102 User Manual Chapter 3.
QX Imaging Buffer
Buffer optimized for imaging samples in SEM with
QX-102 capsules
BSA
Bovine Serum Albumin
BSED
Back-scattered electrons detector
BSE
Back-scattered electrons
PBS
Phosphate-Buffered Saline
ECM
Extracellular Matrix
PFA
Paraformaldehyde
GA
Glutaraldehyde
w/v
Weight to volume
QX-102 Applications Manual, Issue 2.1
42
Appendix B: Troubleshooting Instructions
43
Appendix B: Troubleshooting Instructions
Phase
Problem
Possible Cause
Solution
Liquid
Handling
Liquid is
leaking out
of the liquid
dish.
The capsule
a. Avoid touching the capsule
membrane has been membrane at any time.
damaged.
b. Always place the capsules in
the MP-10 multi-well plate.
c. Do not use means other
than the MA-4 multi-well
aspirator for aspirating liquids.
Cell
Growth
Sample
particles/cells
are detached
during liquid
handling,
especially
from the
center of the
liquid dish.
The cells do
not attach to
the capsule
membrane.
The cells do
not grow well.
Vacuum used for
liquid handling is
too strong.
Use weaker vacuum for liquid
handling.
See Instructions for MA-4.
Sample particles/
cells are not
attached well.
Increase the concentration of
the attachment factor or try
other factors.
The attachment
Use other attachment factors.
factor in use does
not support cell
growth.
The growth
Adjust the density of the cells
conditions are not
or the incubation period.
optimal. Some cells
may require specific
conditions for growth
in a QX-102 capsule.
Traces of toxic
materials spilled
onto the MP-10
multi-well plate
affect the cell
growth.
An MP-10 multi-well plate that
has been used for staining with
toxic reagents should not be
used for cell growth.
QX-102 Applications Manual, Issue 2.1
44
Phase
Problem
Possible Cause
Solution
Cell
Staining
The cells look
damaged
after the
staining/
labeling
procedures.
Samples have dried Do not leave liquid dishes with
while being handled. low liquid levels for prolonged
periods of time.
Imaging
No signal is
observed.
The sample is not
in contact with the
capsule membrane.
The image is
not clear.
There is no
sufficient
contrast between
constituents of the
sample.
For protocols of sample
attachment, see Chapter
3 (Particles in Solution)
or Chapter 4 (Biological
Applications).
The sample may require
contrast enhancement, such as
heavy metal staining.
For staining of biological
samples, see Chapter 4.
QuantomiX Ltd., 12 Hamada Street, Tamar Science Park, Rehovot
POB 4037, Nes-Ziona 70400, Israel
Tel: +972-8-9462244, Fax: +972-8-9465874