1
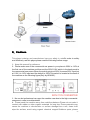
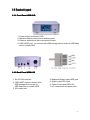
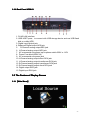
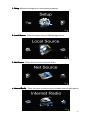
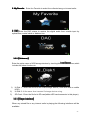
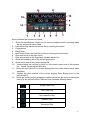
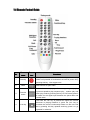
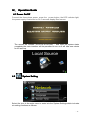
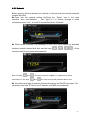
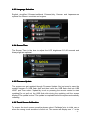
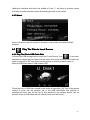
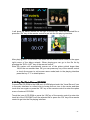
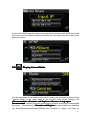
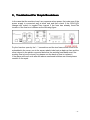
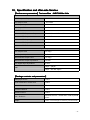
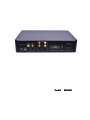
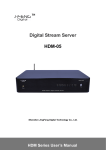
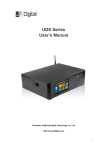
Digital Stream
Master Music Server
·HDM-01D
·HDM-03
·HDM-03S
Shenzhen JingFeng Digital Technology Co., Ltd.
http://www.jfdigital.com/
HDM Series User
User’’s Manual
Contents
........................................................................... ..................
3
Ⅰ、Introduction
Introduction...........................................................................
..................3
.................................................................................................... 4
Ⅱ、Cautions
Cautions....................................................................................................
....................................................................................................
5
....................................................................................................5
Ⅲ、Features
Features....................................................................................................
.................................................................................. 5
3.1 Main Features
Features..................................................................................
................................................................................
6
................................................................................6
3.2 Product Layout
Layout................................................................................
.............................................................................. 6
3.2.1 Front Panel HDM-01D
HDM-01D..............................................................................
............................................................................... 6
3.2.2 Back Panel HDM-01D
HDM-01D...............................................................................
S...............................................................................
6
3.2.3 Front Panel HDM-03
HDM-03S
...............................................................................6
............................................................................... 7
3.2.4 Back Panel HDM-03S
HDM-03S...............................................................................
03
................................................................................. 7
3.2.5 Front Panel HDMHDM-03
03.................................................................................
6 Back Panel HDM-03
..................................................................................
7
3.2.
3.2.6
HDM-03..................................................................................
..................................................................................7
....................................................
8
....................................................8
3.3 The Feature of Display Screen
Screen....................................................
...................................................................................................
8
3.3.1 Main Menu
Menu...................................................................................................
...................................................................................................8
...................................................................................................
10
3.3.2 Submenu
Submenu...................................................................................................
...................................................................................................1
....................................................................................... 10
3.3.3 Player Interface
Interface.......................................................................................
.................................................................
3.4 Remote Control Guide
12
.................................................................1
Guide.................................................................
................................................................................
..
14
................................................................................1
Ⅳ、Operation Guide
Guide..
..................................................................................
..................................................................................
14
..................................................................................1
4.1 Power On/Off
On/Off..................................................................................
.............................................................................. 14
4.2 System Setting
Setting..............................................................................
..................................................................................................... 15
4.2.1 Network
Network.....................................................................................................
................................................................................................ 16
4.2.2 Brightness
Brightness................................................................................................
.................................................................................................. 16
4.2.3 Language
Language..................................................................................................
............................................................................................. 17
4.2.4 Screen Time
Time.............................................................................................
........................................................................................................
17
4.2.5 Update
Update........................................................................................................
........................................................................................................1
....................................................................................................
17
4.2.6 Calibrate
Calibrate....................................................................................................
....................................................................................................1
..........................................................................................................
18
4.2.7 About
About..........................................................................................................
..........................................................................................................1
................................................. 18
4.3 Play The Files in Local Source
Source.................................................
3.1 Play The File In USB Falsh Disk.........................................................18
4.
4.3
3.2 Play The File In External CD-ROM.....................................................19
4.
4.3
-1-
....................................... 19
4.4 Play The Files Shared over Network
Network.......................................
.......................................................................
20
.......................................................................2
4.5 Play Internet Radio
Radio.......................................................................
.....................................................................................
21
.....................................................................................2
4.6 My Favorite
Favorite.....................................................................................
.......................................... 21
4.7 Copy Cut Paste Delete File(folder)
File(folder)..........................................
..................................................................................
21
..................................................................................2
4.8 DA Converter
Converter..................................................................................
....................................................................................... 22
4.9 Recording
Recording.......................................................................................
....................................................... 22
4.10 Descriptions for USB Port
Port.......................................................
1 Derect WiFi......................................................................... 23
4.1
4.11
..............................................
24
..............................................2
Ⅴ、Troubleshoot for Simple Breakdown
Breakdown..............................................
............................................... 25
vice
Ⅵ、Specification and afer-sale Ser
Serv
ice...............................................
-2-
Congratulations on your perchase of the HDM Stream Player.We hope you
can enjoy aesthetic feeling of music through this device.To enable you to get
more informations,we propose you to spent a little time to read the manual
before operating the device.You will find that ,in almost all the matters you care
about have been considered.
Ⅰ、Introduction
The audio source of next generation - a multifunctional digital stream master with
music play, network access,D/A converter and digital music recording integrated all
together.
The HDM stream player adopts the specialized 32-bit high-performance multimedia
processor and DSP solution.The reference clock system is the industrial grade
digital phase-locked loop(DPLL)system,which effectively reduces clock jitter in
transmission of digital audio signals and achieves an ultra-low Jitter.In addition,by
proprietary technology the audio coding and decoding software can process
32bit/384Khz high bit rate digital master tape audio stream at a high speed and
support the decoding of all kinds of digital audio formats(WAV/WMA/
APE/FLAC/ALAC/ACC).In the future,through firmware upgrading,the device can
support more audio formats.
The audio D/A decoding part adopt the flagship-level decoding chip -WM8741 with
digital filter from Wolfson of the UK.Known as a D/A chip with the best hearing
impression,this chip can produce “simulated feel”sounds more natural than those
produced with traditional digital simulated converters.What’s more,the reference
circuit has been specially optimized and calibrated by engineers from the plant of
Wolfson,as well as passing the factory test made by Wolfson.As a result it can
provide SNR of 128dB(monophony) which guarantees a high quality of digital
audio rendering.
The device can be easily adopted into the DAC modes by the screen operation;it
can be used as a high-performance DAC.Connect with your CD device or other
machine which has coaxial cable,optical fiber or even balance digital output directly
it also can be used as high-performance external decoder.
As a device of a relatively perfect function,the HDM Player can also be used as
a network music server.With powerful network processing function,it can support
NAS and can share network resources through WI-FI/LAN.Besides,it can also
be used as an Internet radio.With the built-in channel list,it receives signals from
more than 10,000 digital Internet radio stations from all over the world.
-3-
Ⅱ、Cautions
This player’s design and manufacturer has your safety in mind..In order to safely
and effectively use this player,please read the following before usage.
1、Keep this manual for reference.
2、Please make sure if the commercial-use power in your place is 220V or 110V at
the first use of the machine and then set the 220V/110V switch in the back panel to
the commercial-use power.When the switch points at 220V,it means 220V input,but
at 110V,it is 110V input and the default is 220V.This switch is located at the back of
the machine as the following figure(Only by HDM-03):
3、No one but professional can open the machine case due to the high commercialuse power,in order to avoid accident!
4、Please send the machine away from volatile substance.Please do not make it
contact with rubber or other organic materials for long time.These materials may
cause the machine to discoloration or surface damage.Use a soft, clean cloth
wipe the surface, avoid using organic chemical reagent.Stubborn spots, please
-4-
use the soft cloth with neutral detergent to clean, then use dry cloth to clean
again.Do not let water or other liquid splashing into the machine or the surface, do
not let small pieces of metal fall into the inner.
5、Do not use this machine in cases that the power line wear and failure.When
unplug the power line from the power socket,please hold the plug,do not pull the
electric wire.
6、Keep the machine in a dry environment,don’t use the machine in a thunderstorm.
7、The device will not be placed in close to the furnace, heating or other heat sources.
8、Do not let the machine exposure to direct sunlight for long time.
9、Do not place heavy objects upon the machine.
Ⅲ、Features
3.1 Main Features
】
Features】
【Key Features
� Digital music player(32Bit/384KHz WAVE/FLAC)
� High-performance independent D/A converter(24Bit/192KHz)
� Digital stream recorder(24Bit/192KHz)
� WI-FI/LAN Internet radio
】
Features】
【Audio Technical Features
� Support decoding of all kinds of main stream digital audio formats,including
WAV,WMA,APE and FLAC etc;
� High-performance linear power supply system with independent power
supplies for digital/analog parts;
� Adopt Hi-END parts such as all-solid-state Low ESR capacitor;
� RCA,XLR S/P DIF digital audio output port(for digital CD output);
】
Features】
【Network Features
� Support cable network:Ethernet cable network 10/100Mbps,RJ-45
interface;
� Support wireless network:IEEE 802.11 b/g/h with a maximum transmission
speed of 54Mbps;
� Support TCP/IP,UPNP,UDP,RTSP,DHCP,PPPOE and HTTP network
protocols and media sharing between NAS(Network Attached Storage) and
PC;
� Support MMS,RTSP and HTTP stream media protocols;
� More than 10,000 radio channels from all over the world are built internally
and you can hear anywhere of the world;
� Support two USB2.0 HOST and external hard disk;
� 5 inch TFT true-color touch screen operation;
� Advanced IR remote-control;
� IPhone or Android mobile device remote control.
-5-
3.2 Product Layout
1 Front Panel HDM-01D
3.2.
3.2.1
1. Power button and power LED.
2. Machine display screen,touch display panel.
3. Receive window with infra-red remote control.
4. USB HOST port,to connect with USB storage device such as USB flash
disk or mobile HDD.
3.2.
2 Back Panel HDM-01D
3.2.2
1. RJ-45 LAN interface
2. USB HOST ports,to connect with
USB storage device such as
USB flash disk or mobile HDD.
3. I2S output port
4. Balanced Digital output AES jack
5. Digital output RCA jack
6. Power Fuse block(250V/1A)
7. AC commercial-use power jack
-6-
3 Front Panel HDM-03S
3.2.
3.2.3
1.
2.
3.
4.
Power button and power LED.
Machine display screen,touch display panel.
Receive Window with infra-red remote control.
6.3mm earphone export,connect to the earphone of high impedance
above 50 ohmic.
3.2.4 Back Panel HDM-03S
1. RJ-45 LAN interface
2. USB HOST ports,to connect with
USB storage device such as USB
flash disk or mobile HDD.
3. Digital input Optical jack
4. Digital output RCA jack
5. Digital input RCA jack
6. R-Channel analog output jack
7. L-Channel analog output jack
8. Power Fuse block(250V/1A)
9. AC commercial-use power jack
3.2.5 Front Panel HDM-03
1. Power button and power LED.
2. Machine display screen,touch display panel.
3. Receive Window with infra-red remote control.
4. 6.3mm earphone export,connect to the earphone of high impedance above
50 ohmic.
-7-
6 Back Panel HDM-03
3.2.
3.2.6
1. RJ-45 LAN interface
2. USB HOST ports,to connect with USB storage device such as USB flash
disk or mobile HDD.
3. Digital input Optical jack
4. Balanced Digital output AES jack
5. R-Channel analog output AES jack
6. L-Channel analog output AES jack
7. AC commercial-use power input options switch:220V or 110V
8. Power Fuse block(250V/1A)
9. AC commercial-use power jack
10. L-Channel analog output direct RCA jack
11. L-Channel analog output transformer RCA jack
12. R-Channel analog output transformer RCA jack
13. R-Channel analog output direct RCA jack
14. Digital output RCA jack
15. Digital input RCA jack
3.3 The Feature of Display Screen
【Main Menu
】
3.3.1
3.3.1【
Menu】
-8-
Once getting the player powered on,the icon interface will show up as per the
above figure,with six in total.Three icons can be seen each time and switched
simply by touch or by remote control.For example,you can switch the icons from
left to right by touching the leftmost icon,this icon will become larger,at the central
location and display the function word; conversely, if touching the rightmost icon,
the interface will move from right to left in order to switch.Do switch once by touch
one time.As long as you touch the icon in the center,the player will get into the
function that the icon indicates.
The icons of this interface indicate the following functions to:
-9-
:System settings list or view system properties.
1. Setup
Setup:
2. Local Source
Source:Enter the option menu of USB storage device.
3. Net Source
Source:Enter the source list of network share.
4. Internet Radio
Radio:Enter the menu for selecting any available internet radio station.
- 10 -
5. My Favorite
Favorite:Enter the Favorite to select the collected song or internet radio。
6. DAC:
DAC:Enter the DAC status to receive the digital audio from outside input by
optical fiber,coaxial cable or balance line.
【Submenu
】
3.3.2
3.3.2【
Submenu】
Local Source
Enter the option menu of USB storage devices by touching the“Local
Source”icon,which
includes the below functions to:
1)
2)
3)
U-Disk 1:Enter the file list of the USB storage device (USB flash disk or mobile
HDD).
U-Disk 2: At the same time inserted 2 storage device using.
SD Card:Enter the file list in SD card(without SD card connector in this player).
【Player Interface
】
3.3.3
3.3.3【
Interface】
When any stored file or any internet radio is playing,the following interfaces will be
available.
- 11 -
Each indicates the function as follows:
1. Record button:Remote control on the current playback audio recording when
the key red dot will zoom flash.
2. Last button:Play back the previous file by touching the button.
3. Progress bar
4. Play/Pause
5. Next button:Select the next file to play by touching the next button.
6. Stop and return to the main menu.
7. Stop and go back to the file(folder) list/radio station list.
8. Show the sampling rate of the current playing file.
9. Show the bit rate of the current playing file.
10. Volume:Adjust the volume by touch or the remote control and it will become
the lowest if pressing the Mute key.
11. Show the track name of the current playing file(or the radio station name when
available).
12. Display the play duration of the current playing file(or Beijing time for the
internet radio).
13. Show the current playing programme status,which can be set by touching this
icon or by the remote control .Different icon indicates different status:
Single Cycle Play
List Cycle Play
Non-repetitive Play
Random Play
Sequence Play
14.
Mute:Mute sounds or open audio by touching this icon.
- 12 -
3.4 Remote Control Guide
No.
Button
name
1
Standby
2
Mute
3
4
Button
icon
Functions
After powered on,the remote control will get into standby
status until powered off.It will take 3 seconds to power off by
pressing this key(Not support use)
Mute sounds or open audio.
Function
switch
Switch for the playing file among single play,list
cycle,non-repetitive play,sequence play , random play and
other play mode by pressing this key.In DAC status,press it
to switch for the signal input between the optical fiber and
coaxial cable.
Vol+/Up
The more the Vol+ key is pressed the higher the volume
becomes in playing interface or press the Vol+ key to
increase the volume continuously.Select one file in the file
list by pressing this key upwards and long press it to go
upwards for selection.
- 13 -
The more the Vol- key is pressed the lower the volume
becomes in playing interface or press the Vol- key to lower
the volume continuously.Select one file in the file list by
pressing this key downwards and long press it to go
downwards for selection.
5
Vol-/Down
6
Last
Press this key to play the last file or internet radio.
7
Next
Press this key to play the next file or internet radio.
8
Play/Paus
e
9
Stop
Press this key to stop playing and return to the main menu
10
OK
Serve as an enter key for system settings,operation or file
selection.
11
Timing
mode
Press this key to select timing mode:in order or reverse
order.
12
Fast
backward
13
Fast
Forward
14
Back
Press this key to pause in play status and press it again to
keep playing.
Get the playback progress fast backward.
Get the playback progress fast forward.
Go back to the previous menu or list operation.
15
Record
Press this key to record the current playing file in high
quality for the internet radio or DAC digital audio and store
the recorded file that is automatically named in USB flash
disk by touching this button.
16
Add/open
Favorite
Press this key to add the current playing file or internet radio
to the Favorites for the purpose of direct playback next time.
17
To play
interface
Turn to the file list.interface from playing interface by
pressing this key.
18
Functional
key
The menu for Copy,Paste,Cut,Delete,etc.
19
DAC
Press this key in the main menu,will switch to the interface
for decoding the external digital audio signal .When the file
is playing,press this key turns to the five effects of filter
response.
20
Shielding
pictures
Shielding pictures by pressing this key in the playing
interface,press one more time to show the pictures.
- 14 -
Ⅳ、 Operation Guide
4.1 Power On/Off
Connect the three-phase power, press the power button, the LED indicator light,
the power supply is switched on for 5 seconds display Boot screen:
The screen will indicate “SYSTEM STARTING” , and once the system starts
completely,the main interface will be permitted to run on.It will take one minute
for full start-up.
4.2
System Setting
Select the icon in the main menu to enter into the System Settings,which includes
six setting functions as follows:
- 15 -
4.2.1 Network
Before playing the files shared over network or internet radio,you should setup the
network links frist.
● Enter into the network setting list:Touch the “Setup” icon in the main
interface ,then click“Network” , “Net Type”,if it is chosen through a wired
connection,select “Lan”; a via WI-FI connection,select “Wireless”.
● When select “Wireless”,it is necessary to click “Wi-fi Set”to search for available
wireless network around and then use the keys
remote control to set connection password
Note:The keys
and
lowercase a~z.The keys
/
/
/
of the
are used to select the digital 0~9, uppercase A~Z and
and
are used to move the password last or next。
● No matter what type of network selected,should get into“DHCP”and select “On”,
otherwise enter into “IP Set”to set IP address and DNS server address.
- 16 -
● In the case that the “DHCP”is turned “On”but it is unable to connect to the
network,it is helpful for network connection to set IP address manually.
● .After setting up the internet,go back to the main interface,it will display icon
in the lower right corner of the screen.If choose lan,the icon is
choose wireless the icon will like this
smooth connection and can be used.
, if
. It means the network has a
4.2.2 Backlight Brightness
There are 4 levels of LCD brightness and select the suitable level by touch or by the
remote control.
- 17 -
4.2.3 Language Selection
English, simplified Chinese,traditional Chinese,Italy, German and Japanese.are
optional for different countries and regions.
4.2.4 Screen Time
The Screen Time is the time to adjust the LCD brightness:5,10,30 seconds and
Always light are optional.
4.2.5 Firmware Update
The system can get updated through Firmware Update.You just need to save the
update firmware in USB flash disk and then insert the USB flash disk into USB
HOST port.Then select “Update”by touch or pressing the remote control to start
updating.Do not pull out the USB flash disk during the updating until the screen
displays“The update is done”.The update is completed before the system automatically
restarting.
4.2.6 Touch Screen Calibration
To ensure the touch screen sensitive,please select “Calibrate”prior to initial use or
when the wrong touch sensitive is found out .The screen will display one “+” in the
- 18 -
calibration interface and touch the middle of it,the “+” will jump to another corner
and then one after another corner and finally get back to the center.
4.2.7 About
l
Select the item to see the product’s firmware version,date and network MAC
address.
4.3
Play The Files In Local Source
3.1 Play The File In USB Falsh Disk
4.
4.3
Connect the USB storage device,touch the “Local Source” icon
in the main
interface in a direct way to locate such an icon in the center and then touch this icon
again or press the “Ok” key of the remote control to enter the option menu of
external USB flash disk or USB mobile HDD.
l
Touch the icon of USB disk located in the center or press the “Ok” key of the remote
control to enter into the partition list of the USB disk.When one partition is
selected,will enter into the file list of this partition.If the storage device has no
partition such as USB flash disk will directly enter into the file list.
- 19 -
It will show the album artwork on the right of the file list. Touch the selected file or
press the “Ok” key of the remote control to get into the file playing interface.
After playing about 10 seconds,it will enter into the screen saver mode,for the upper
right corner of the album artwork .When playing,you can go to the file list by
pressing the “RCLL LIST” key of the remote control.
Note:The system will automatically screen out of the picture which larger than
1M,for the one smaller than 1M ,you can press any key of the remote control
or touch the screen to exit screen saver mode,back to the playing interface
press the key “F1” to shield picture.
3.2 Play The File In External CD-ROM
4.
4.3
Connect the CD-ROM to the USB port of HDM player,touch the “Local Source” icon
in the main interface in a direct way to locate such an icon in the center and then
touch this icon again or press the “Ok” key of the remote control to enter the option
menu of external CD-ROM.
Touch the icon of CD-ROM or press the “OK”key of the remote control to enter into
track list of the CD-ROM.Touch the selected file or press the “Ok” key of the remote
control to get into the file playing interface.
- 20 -
When you want to change the CD,press “exit”key to the main interface,then press
“exit”key again,the CD will pop up automatically,then you should change and
warehouse the CD manually.
4.4
Play The Files Shared Over Network
1.Set the network share
share:In order to realize network share
,first partition the
PC disk which store music files or set the file to the shared state.
2.Set the network links
links:Connect the LAN or via WI-FI to the HDM player,setting
method for 4.2.1 Network.
: After setting network up ,go back to main
3.Play the file shared over network
network:
menu interface to enter into the “Net Source”,there are two shared types are
available:Samba or UPNP files sharing.
If select the Samba Share, the system will automatically search the LAN for the IP
address of the computer which has shared music,or you can choose “Input IP ”to
input the known IP address manually .
- 21 -
If select the UPNP share,the system will automatically search to the UPNP server,and
then enter into the network resources list.Now you can select any file to play in the
playing interface.
4.5
Playing Internet Radio
It is also necessary to set network first well for playing internet radio and then select
“Internet Radio” in the main menu to get into the radio station category list:
>-<Countries and Regions
>-<Genres
>-<Languages
>.
<Recommended
Recommended>
Regions>
Genres>
Languages>
Recommended contains 85 popular radio stations domesitc and foreign recommended
by system;Classification by Countries and Regions
Regions,the radio stations are classified
into Africa,America,Asia,Europe,MidEast and Oceania by region, and then by
- 22 -
country or district,finally by radio station name list.;As regards the classification by
Type,
Type,the radio stations are classified into Music and Talks-based;by Language
Language,the
radio stations should be distinguished from each other by the first letter of their
languages.
You can choose the list path as you like and enter into the play interface after the
selection.There are more than10,000 radio stations collected in the radio station
list,resulting in the inconvenience to search radio station by pressing Up and Down
key.But you can press any number of the remote control to input this number in the
radio station,for this number is designed corresponding to the number on the left of
the radio station name in the list.
Internet radio also has the function of network clock calibration,the time displays on
the radio interface is the current time when play.
4.6
My Favorite
Select your favorite file in the file list or radio station in the internet radio and then lick
add to favorite,choose their suitable type file and then press “Ok” key to
finish.From then on,you can play the file or radio station in the Favorite just by
selecting it
.You can create one play list through the function of Quick Play and
you just need to select this list to play it next time.
4.7
Copy,Cut,Paste,Delete File(Folder)
Select the file from the file list for operation.Then press the key
icon
or touch the
on the top right of the list in shield symbol pattern to pop up “Copy,
Paste, Cut ,Delete” menu.The selection of “Copy” or ”Cut” will result in one file icon
on the top of the list.Then get into the path of the file to paste and repeat the above
operation and choose “Paste” and that will do.If you select “Delete”,one tooltip will
pop up for the deleting operation by clicking ”Ok” or pressing the “Ok” key of the
remote control.Where there is no Copy or Cut selected ,the function of Paste will
be unavailable.
4.8
D/A Converter
When the icon “DAC” is positioned in the center of the main interface,select it by
touch or pressing the “Ok” key of the remote control or switch to DAC interface
directly by pressing “DAC” key of the remote control in the main interface.Switch
between the optical fiber and coaxial signal,pressing “SWITCH” key of the remote
control in the DAC interface or touching the icon
.
- 23 -
4.9
Record
Long press the key
of the remote control to start recording for the internet
radio or DAC input.The recorded file that is automatically named will be saved in the
USB flash disk or the FAT32 formatted mobile disk.The recording will stop once
pressing the Record key again.
4.10 Descriptions For USB Ports
Two USB HOST ports are combined on the back panel. ( HDM-01D has another
USB HOST port set on the lower right of the player).All this USB HOST ports can
be connected with USB storage devices,such as USB flash disk,USB mobile HDD.
1 Wi-Fi Direct
4.1
4.11
Connect the Wi-Fi adaptor to the USB port of the HDM palyer. It will appear an
icon
on the left corner in the main interface.It means that now the
HDM palyer can be seen as a virtual router,now can use the Media controller in the
iPhone/iPad or Andriod device. But firstly the mobile device should connect to the
virtual WLAN.Open your mobile device and go to “Setting”->”WLAN” select “ON”,it
will appear the WLAN device.Find a device which is named of the MAC of the HDM
player and connect it.The access code is “12345678”.After connecting ,you can use
the Media Controller on your Android or IOS device to search the file in the local
source of HDM player,and let it play on the HDM player.
- 24 -
Ⅴ、Troubleshoot For Simple Breakdown
In the case that the machine hasn’t any response when power, first make sure if the
power supply is connected well at each end and then check if the 220V/110V
change-over switch is toggled.Then inspect if the fuse has already fused.The
location of the fuse box is shown as the following figure.
Pry the fuse box open by the“—” screwdriver and the two fuses will be found to be
embedded in the cover, one in the square plastic tube kept as back-up fuse and the
other inlayed in the plastic connector below as the working fuse.Make sure if the
working fuse is burnt out,and if so,please use the back-up fuse to replace it.
If the player still can’t work after the above mentioned troubles are solved,please
contact us for repair.
- 25 -
Ⅵ、Specification and after-sale Service:
】Test condition
:24BIT/96KHz-1kHz
【Performance parameters
parameters】
condition:
Analogue Outputs
RCA Frequence Response
10Hz-20KHz
RCA Output Level
2. 35V RMS
RCA Output Impedance
200 Ohm
RCA Output S/N
115dB
RCA THD+N
0.003%
Balanced AES Frequence Response
10Hz-20KHz
Balanced AES Output Level
1.18V RMS
Balanced AES Output Impedance
600 Ohm
Balanced AES Output S/N
115 dB
Balanced AES THD+N
0.002%
+0 dB /-0.2dB
+0 dB /-0.2dB
Digital Outputs
RAC Output Level
1.6V Vp-p
RAC Output Impedance
75 Ohm
Balanced AES Output Leve
1.4V Vp-p
Balanced AES Output Impedance
110 Ohm
RAC Digital Input Impedance
75 Ohm
Jitter
≤100ps(player)
≤120ps(S/P DIF Input)
】
parameters】
【Package contents and parameters
HDM player HOST
1 Piece
Three-Terminal AC Power Line
1 Piece
Remote Control
1 Piece
Operation Manual
1 Piece
Speed Via WI-FI
1 Piece
Size(D×W×H)
430X300X100 mm(Actual size in order to prevail
in kind)
Weight
7.5KG(Actual weight in order to prevail in kind)
- 26 -
Guarantee&Disclaimers
Guarantee&Disclaimers:
Ⅰ.The user can get warranty service within one year from the date of signing this Warranty
card,however,in the case that the user does not return the Warranty card;Thirty days shall be
added to the release date for the warranty date to start.
Ⅱ.Please ensure the filled information in the Warranty card completed and it shall not come
into effect until it is signed by the person who hand over this product with the chop of the
distributor and taken back by the distributor or its staff.
- 27 -
Ⅲ.Please present the Warranty card and any proof of purchase such as invoice to ask for the
guarantee service.
Ⅳ.As for the following situation, the free maintenance is unavailable.
1、Warranty period has expired on the product(s);
2、The user can’t present the Warranty card or invoice or other proof of purchase;
3、The original seal has been damaged due to the man-made factors such as un-authorized
disassemble ,repair or change in configuration;
4、The machine does not work due to the force majeure;
5、For the consumable parts and wearing parts, such as the remote control, the warranty
period is three months;
6、There is any damage caused by unauthorized move or misuse;
7、We will charge for repairing any damage arised from the man-made factors.
Ⅴ、Any modification on the product without any authorization belongs to infringing act.Out
company will not be responsible for any failure or accident that may be caused by any
modification except that the product is not covered by the warranty.
Ⅵ、This Warranty card is available within China and the users overseas should please contact
with the local distributors.
Ⅶ、The blank in the Warranty card is kept to sick the body barcode which is tore off from the
outer packing-box.Once getting the barcode pasted,it will be not necessary to fill in the
product information.
Ⅷ、Please contact with your distributor or out after-sales service department directly in the case
that the product get in trouble.
Ⅸ、With the continuous optimization of products function, please login our website
http://www.jfdigital.com
updates.
to concern about our products dynamic, download the latest
- 28 -
Warranty Card
(Kept with the manufacturer after being returned)
Customer
name
Customer
address
Contact
department
Postal
code
Contact
person
Email
Tel
Fax
Distributor
Contact
department
Contact
person
Tel
Email
Fax
Model
purchased
Date
purchased
Serial
number
Customer code(filled by manufacturer)
:
manufacturer):
Servicing
time
Fault descriptions:
Servicing
time
Fault descriptions:
Shenzhen Jingfeng digital technology Co.,Ltd.
Address: 3rd floor,Building B9, Shahe industrial area,Baishizhou,Nanshan district, Shenzhen China
Tel:+86-755-83225760
Fax:+86-755-86093355 Code:518031
http://www.jfdigital.com
- 29 -
- 30 -
Ver3.
Ver3.88
201
20133/03