1
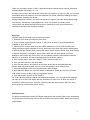
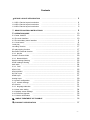
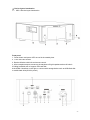
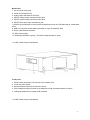
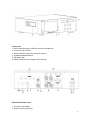
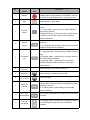
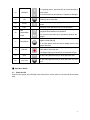
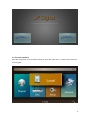
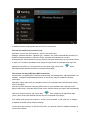
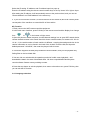
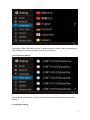
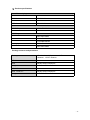
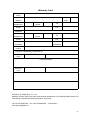
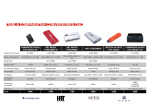
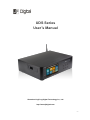
UDS Series User’s Manual Shenzhen JingFeng Digital Technology Co., Ltd. http://www.jfdigital.com -1- Thank you for using a series of UDS- a high-performance network player made by Shenzhen JingFeng Digital Technology Co., Ltd. We hope you can enjoy the high quality music from our products. In order to make you get more information about our products, we recommend that you spend a little time reading the user’s manual before operating the device. Having bought our products, you are recommended to register your basic information through our company website http://www.jfdigital.com, which can provide you better service. The firmware will update and add new functions. Please refer to the new firmware and instructions issued by the company's website. Warnings Carefully read the following notes to ensure the safety : 1. Preserve the manual for reference at any time. 2. There is power supply inside the player. In case of an accident, non-professionals are forbidden to open the case. 3. Please put the machine away from the volatile substances. Do not make it contact with rubber and other organic materials for a long time which may cause the machine discoloration or surface damage. Please gently cleanse the player surface with a soft and clean cloth instead of organic chemicals. For stubborn spots, please wipe with soft cloth dipped by neutral detergent, then use the dry cloth to wipe. No not splash the water or other liquids inside the player or on its surface. No little metal fragments are inside the machine . 4. Don’t use the player under the condition of worn and torn power line. 5. Don’t put the machine on the damp base. 6. Don’t use the player in the dead air or the place where heat is dissipated difficultly. Please place the machine away from the stove, the heating or other heat sources. 7. Don’t put the player in the room exposed under direct sunlight. 8. Don’t place the player in a room with steam or lampblack. Please do not put the machine near a dust or high humidity or strong magnetized objects. 9. Don’t place heavy objects on this machine. 10. In the following cases,the player may absorb the moisture: in a room where the heating is just open up or a room with steam and high humidity or a warm room to which the player is moved from cold environment. If there is moisture inside the player, please place it in a dry environment for several hours before using it. Important notes: For all the recorded files including CD Ripper/ ripping files and recording files, users are advised to backup some important files. Due to various reasons for lost documents, we will not bear any responsibility. -2- Contents Ⅰ.DEVICE LAYOUT INTRODUCTION .................................................................... 4 1.1 UDS-1 Device layout introduction 1.2 UDS-3 Device layout introduction 1.3 UDS-5 Device layout introduction 4 5 6 .......................................................................... ............................................................................ ................................................................. Ⅱ. REMOTE CONTROL INSTRUCTIONS ................................................................ 8 Ⅲ.OPERATION GUIDE ............................................................................................ 3.1 Power ON/OFF ......................................................................................... 3.2 The main interface ................................... ........................................................ 3.3 The secondary menu interface ....................................................................... 3.3.1 local music ............................................................................................. Local play ........................................... ......................................................... recording function .................................................................................... CD play/ripping function .................. ........................................................ Document retrieval function ................ ........................................................ 3.3.2 playlist ................................................................................................... Create a custom folder ............................................................................. 3.3.3 Network Music ................................................................................... Samba settings Sharing ........................................................................... UPNP settings Sharing .............................................................................. web radio ................................................................................................... 3.3.4 DAC ..................................................................................................... UDS-1 D/A .............................................................................................. UDS-3/UDS-5 .......................................................................................... S/P DIF input .......................................................................................... HDMI input ............................................................................................. Analog input .......................................................................................... 3.4 system configuration ............................................................................. 3.4.2 network settings ................................................................................. AP function ................................................................................................. 3.4.3 language selection ............................................................................... 3.4.4 time zone setting ................................................................................. 3.4.5 display screen settings ........................................................................... 3.4.6 Firmware Upgrade ................................................................................ 3.4.7 Version information ................................................................................ 10 10 10 11 11 12 17 17 17 18 20 22 22 23 24 25 25 25 27 27 29 30 31 31 33 34 34 35 36 Ⅳ、SIMPLE TREATMENT OF TROUBLE Ⅴ、PRODUCT SPECIFICATION ......................................................... ...................................................................... 36 37 -3- Ⅰ. Device layout introduction 1.1 UDS-1 Device layout introduction Front panel 1. Power button and power LED are red in the standby time. 2. 7-inch true color screen 3. Receive Window with infra-red remote control. 4. 6.5mm earphone export,connect to the earphone of high impedance above 50 ohmic. 5.Pulling hard disk rack to support 4TB hard disk. 6.the USB2.0 interface on the right, to connect with storage device such as USB flash disk or mobile hard drive(5V/0.5A power) -4- Back Panel 1. the AC power input jack 2. Power fuse box(250V/1A) 3. analog output transformer RCA jack 4. S/PDIF coaxial output transformer RCA jack 5. S/PDIF coaxial output transformer RCA jack 6. S/PDIF Fiber optics input transformer jack 7.USB2.0 input interfaces,to connect with storage device such as USB flash disk or mobile hard drive 8. USB-PC Computer access built-in hard disk to copy or delete the files 9. RJ-45 100M network interface 10. WIFI antenna plug 11. HDMI input interface*2 group,BY PASS output interface*1 group 1.2 UDS-3 Device layout introduction Front panel 1. Power button and power LED are red in the standby time. 2. 7-inch true color screen 3. Receive Window with infra-red remote control. 4. 6.5mm earphone export,connect to the earphone of high impedance above 50 ohmic. 5. Pulling hard disk rack to support 4TB hard disk. 1.3 UDS-5 Device layout introduction -5- Front panel 1.Power button and power LED are red in the standby time. 2. 7-inch true color screen 3. Receive Window with infra-red remote control. 4. up/down/Last/Next/OK/exit 5. CD Ripper disk 6.Pulling hard disk rack to support 4TB hard disk. UDS-3/UDS-5 Back Panel 1. AC power input socket 2. Power fuse box (250V/2A) -6- 3. left/right Channel analog output RCA jack left/right Channel analog output RCA jack 4.left/right Channel analog input RCA jack left/right Channel analog balanced RCA jack 5. S/PDIF RCA jack 6. S/PDIF output balanced RCA jack 7. USB 2.0 Input interfaces to connect with storage device such as USB flash disk or mobile hard drive 8. USB-PC Computer access built-in hard disk to copy or delete the files 9. RJ-45 100M network interface 10. WIFI antenna plug 11. HDMI input interface*4 group,BY PASS output interface*1 group (match) 12. S/PDIF input RCA jack*4 group S/PDIF input balanced jack2 group S/PDIF input optical fiber jack*2 group 3.2 Remote control instructions: -7- No. Button name 1 Standby 2 Mute 3 4 Button icon Functions After powered on,the remote control will get into standby status until powered off.It will take 3 seconds to power off by pressing this key(Not support use) Mute sounds or open audio. Function switch 1. In the player interface, press this key to switch play mode. 2. In DAC status, press this key to switch different Input signal sources. wireless WPS key. In the menu screen, press this key to directly connect with a router without having to enter a password. Picture switch 1.In file status, press this key to reveal or conceal the pictures. 2. In screen-protecting status, press this key to switch between level meter and pictures. 1. The menu for Copy, Paste, Cut, Delete, etc. 2. In playing status,press this key to delete collected 5 Functional key files. 3.In playing status,press this key to quickly switch to the audio settings interface. 4.In playing status,press this key to switch the functions between WIFI and AP.(AP--the built-in virtual router) 6 numerical keyboard Press this key to Input the numbers 0-9 7 search key Press this key to Search the list of files. 8 The key of exit or enter CD exit or enter 9 ADD FAV Favorite 1. Press this key to add the current playing file or internet radio to the Favorites for the purpose of direct playback next time. 2. In playing status, press this key to enter folder custom interface. 10 RCLL LIST home button In any state, press this key to return to the main menu interface. 11 Vol+/Up Vol-/Down 1.In playing status, press this key to adjust the sound 2.In other states, press this key to operate as up/down. -8- 1.In playing status,press this key to choose the last or next songs. 2.In other states, press this key to operate as left/right. 12 Last/Next 13 OK 14 STOP Press this key to stop playing and return to the main menu 15 EXIT Go back to the previous menu or list operation. 16 Fast Forward/bac kward This key as an enter key 1.In playing status,press this key to get the playback progress fast backward or backward. 2.in the list, press this key to operate as up/down the pages. Play/Pause 1Press this key to pause in play status and press it again to keep playing. 2. in other states, press this key to rapidly return to the player interface 18 Record Press this key to record the current playing songs or web radio in the local disc. CD-Ripper/ripping function/DAC record/radio record 19 DAC 20 web radio 17 In the menu,press this key to enter previous DAC. In the menu,press this key to enter previous web radio lists. Ⅲ. Operation Guide 3.1 Power On/Off Switch on the power, the LED light color will turn from red to green, the screen will be as shown belo -9- 3.2 The main interface After the completion of the machine starting to enter the main menu, a total of five functional icons appear: - 10 - Local Music Including built-in disk, USB device, CD play function Playlist Display local, radio, network sharing collection function Network music Internet radio , UPNP, Samba sharing documents DAC Input external signal options, including S/P DIF input,analog input,HDMI input selection Setting contain system settings, audio parameters,etc 3.3 The secondary menu interface 3.3.1 Local music Select the corresponding storage device icon, press the OK button to enter the storage partition file list. If no partition storage, such as U disk, enters directly. Local hard disk Machine with a built-in hard disk support 4 TB (support for NTFS, FAT, FAT32 hard disk format) USB 1 external USB storage devices(U disk or mobile hard disk,etc.) ,support 4 TB hard disk USB 2 Insert two storage devices at the same time CD drives CD music resources (UDS - 5 is equipped with a built-in optical drive, and other models can connect external mobile drive that support CD playback, CD -Ripper/Ripping function) Note: If the above option name is gray font, showing that the interface is not connected to external devices - 11 - Instructions: Press on the remote control up/ down / left / right, you can select the menu list Press the remote's fast-forward / rewind key to select the previous or next page Press the remote's "ADD FAV" ,it can add document to the playlist Press the remote's "F1" to enter the file search interface Press the "TIME" button on the remote ,album pictures can be hidden or displayed Press the remote's "FUN" key to cut, copy, delete, paste and so on Select the music needs to be played, press “OK” on the remote controller, then the play interface as shown below: - 12 - 1. File name and album art 2. File details ,such as artist, album, genre, sampling rate, etc. 3.The current playback volume 4.The time and the progress of file 5.Control buttons, they are:recording, previous, play / pause, next page, stop, playback modes shift from left to right . Press the remote's "SWITCH" ,it can switch the playback modes with four categories: single play,list play, random play Loop play Single play List play Random play After playing 5 seconds, the display screen will enter a state of screen saver, shown as follows: (if needing to cancel the level meter display, press the “TIME” switch to album pictures) - 13 - Note: PCM format can switch pictures or level meter, DSD format can only display pictures Audio Setup function In the play interface, press FUN key to enter the audio setup,set the parameters ,then press the escape key to return to the current state Recording - 14 - 1. In the playback interface, press the record button on the remote control, the system will enter the path save interface 2. Select the storage device, press the OK button 3. During recording,the playback interface font turns yellow,indicating that it is recording, press the record button again to stop recording 4. The system automatically create Recordings folder "Record",the recording file named after the date, and save in the external U disk or hard drive by FAT32 formatted Note: recommend to automatically obtain the current time after networking CD Player 1. Enter the local music interface, press "F2" key on the remote control, the disc tray will pop up 2. Insert the CD-ROM 3. Press the "F2" key to hide the tray 4. The player will read the disc information, enter the CD information list 5. Press the Up / Down / Left / Right and OK button to select the contents you want to play CD Ripping / Ripping 1. On the list screen of the CD file , press the record button on the remote control,it will enter the recording save path, press the OK button to confirm. 2.Display the CD ripping progress 3.After ripping the complete CD, it gets into the storage disc, find "CD Ripping" folder, the file named as the current time (If connecting to the network ,it obtains the current time automatically) 4.If you only need to record a single track, press FUN key to copy the file to hard disk directory for saving - 15 - Special note: 1.When recording or CD ripping, the current storage device needs to have enough space, otherwise it will be inoperable or interrupting operation because of insufficient memory 2.CD information (such as cover, album, artist, etc.) function will show after upgrading Document retrieval functions When entering the local and network resources, press F1 key to enter the retrieval keyboard input interface,input the keyword of files, select the Search key, press the OK button to confirm ,when the contents of relevant documents retrieved, select the file you want to play, and press the OK button to play Keyboard has three input modes: digital input, English input, pinyin input 1.The mode selection of input:use the remote control to move the cursor to the switch key, press the OK button to switch the input mode 2.Digital Input: select the corresponding number key on the remote control with up / down / left / right, press the OK button to confirm,or just press the number keys on the remote control .After input, move the cursor to the Create button,and press the OK button 3.The letter input: select the corresponding letter keys on the remote control with up / down / left / right, press the OK button; select ** key, then you can switch uppercase and lowercase letters,after input ,move the cursor to Create key and press the OK button 4. Pinyin Input: select the corresponding letter key on the remote control with up/ down / left / right , press the OK key; the corresponding words appear in input box ,then select the text with the right and left key . Use the up / down keys to turn the page, when looking back to the desired text, move the cursor to the enter key and press the OK. When entering of all the text finished ,move the cursor to the Create button and press the OK. Copy,Cut,Paste,Delete File(Folder) In the document list modes, please select the document you want to operate, press FUN key,pop up "copy, cut, paste, delete" function menu. If you select the Copy or Cut, enter the path you want to paste, repeat the operation and select the Paste - 16 - 3.3.2 Play list You can view and create lists of network resources, Internet radio and local resources in play list favorites. In the state of the local music, the network sharing and network radio, press “ADD FAV” button, each document can be stored in the play list. Network sharing you can view a list of favorite files via UPNP, Samba Radio sharing you can view the favorite and history radio stations Local sharing You can view a list of favorite files via removable storage devices - 17 - Operating Instructions: Press the remote's "Up / Down / Left / Right" key, you can select the menu list, Press the remote's fast-forward / rewind key to select the previous or next Press the remote's "FUN" key to delete the list In the play list screen, press the remote control "ADD FAV", You can customize the favorites files, and it is easy to search for users Create user-defined folder: 1. Select your favorite document or the radio station in each list, and then press the remote control ADD FAV key, the icon behind document turns yellow from gray , which means file added to favorites, and press ADD FAV key, you can cancel it . Favorites can also be operated during playback with pressing ADDFAV. 2. Create a personalized list document, first, enter the play list, open the corresponding list of options, press the remote control of the key “ADD FAV” to enter the interface,as follows :( keyboard operation method, see page 12) - 18 - 3. After the folder name is created, the system will enter the list selection screen, select the documents needing to be classified , press the remote control ADD FAV key document,then plus sign turns yellow from gray , after the document selection, press EXIT interface and it has been created successfully. If it does not,just directly press EXIT selection. 4. When you need to add other documents to favorites next time , the system will display the file that user-created , you can add the same type of file directly to the favorites folder. Note: The list of documents in the local share is a shortcut stored in the machine's memory, if you change the mobile storage devices and it will not be able to read the current list of documents - 19 - 5. Delete the list: In the list screen,find the document needing to be deleted, press FUN button on the remote control, the system pop up boxes, press the OK button to confirm the deletion, or choose to cancel. 3.3.3 Network music You can view the displayed Internet radio on the internet music , UPNP and Samba share, as follows: Before the use of network resources, we must first set up the network (see the network settings), and then operate Internet Radio You can listen to many radio stations all over the world, and it supports to add radio stations manually, the logo and other information display SAMBA share display all network sharing files UPNP share only show the sharing multimedia files (music, video, picture), the system will filter some special music formats, including resources on the network server, APE, DSD, etc. Samba share 1. Set up network share: partition the disk with music files in PC or set the file folder to the shared state 2. Set up network connection: plug the network cable or WI-FI antenna, select settings in the main menu- Network selection - set the network 3. Select Network music: after the network setup is completed, press the return key to the main menu, select the Network music -Samba share - 20 - You can view the current shared IP address of the computer within a local area network(LAN) , select the IP address prompted for a password, if the sharing file is not set the password ,then click OK, and find the shared file for playback. You can manually enter the specified IP address, the shared IP address can connect network equipment The method of entering the IP address: With the up / down keys to select the number of changes on the remote control , with the left / right to control the cursor to move back and forth UPNP share - 21 - 1.Set up network share: first, make sure the UPNP function of router is turned on,connect the streaming server that stores shared documents with UPNP function to network. Streaming media server can be NAS device with UPNP function, also can be PC machines fitted with UPNP streaming media software 2. Set up network connection: In the main menu, select Settings - Network,and set Network 3. Select network music: after network setup is completed returning to the main menu, select online music - UPNP share, the system will automatically search for the UPNP server.You can have access to shared network resources after selecting. About SAMBA, UPNP share SAMBA sharing is relatively simple.It does not require the third-party software to support. It actually sets shared folder in the operating system ,and then visits shared files folder by built SAMBA in the player,to achieve the purpose of sharing files. Advantages and disadvantages: We need to have some simple setup to network sharing device, for win XP and PC system of win 7 have different setup. All audio files can be shared, as long as formats that the player supported can play. UPNP Share UPNP is a common network protocol, the device does not need to do any settings, the device can automatically connect to each other and share multimedia (including audio, video, image), and other files. Advantages and disadvantages: It does not require any setup for Network sharing device,and it is easy to use. Since the standard UPNP is a common protocol, currently only supports conventional audio format, the system will filter out some special formats including APE, DSD / ISO and other formats Play Internet radio - 22 - 1.Before playing Internet radio, make sure the network is connected, in the main menu to select online music - Internet radio 2.Go to the Radio category list: "Recommend" - "Region" - "Type" - "Language" - "User-defined radio stations." "Recommend" contains system recommended 85 domestic and foreign popular radio stations "Region" has Africa, the American, Asia, Europe, Middle East, Oceania, and the country or region, and finally the station name list "Type" has two categories : talks and music "Language" has various languages,Chinese, Ukrainian, Russian ,English and so on " User-defined radio stations" can add any station list 3.You can choose list of path for preference, select the desired station to enter the playing interface. More than ten thousand radio stations in the list , therefore it is not convenient to turn down and find the radio station ,then you can use the number key on the remote control, on the station list, press the number keys on the remote control to input a number, which corresponds to each left number of every radio station in the list ,then you can easily select the station you want. 4.In any mode, press @ key to enter the station list of the history and in history radio where you can view a list of 10 stations visited recently, and it is convenient for users to have access to the Internet radio quickly 5.During the radio broadcast, press the record button on the remote control, you can save the contents of the radio recording.The system automatically creates audio files folder "Record", and the file named after "the station name@ date" 6.During the radio playback, press ADD FAV button on the remote control, it can add the current stations to the playlist . and it is easy to search next time 3.3.4 DAC In the main menu, select DAC icon, or press the shortcut key to enter the DAC function,and it provides many ways of decoding function, namely: S / P DIF input, HDMI input, analog input, as follows: - 23 - S / P DIF Input Support coaxial * 4 groups , optical fiber * 2 groups, balance * 2 groups.There are some differences between different models HDMI Input Support HDMI * 4 groups input, HDMI * 1 module loop output Analog Input Support balanced input, unbalanced input (optional) Operation Instructions 1.Connect an external signal to the input port on the rear panel 2.Press the DAC key in any state,return to the last DAC state directly. If it is the first time to use, defaulting to S / P DIF- coaxial 1 status; if you need to select the device,press the DAC to enter to select different channel interface 3.Select the corresponding signal option, press the OK button to enter the DAC playback interface 4.In DAC player interface, press the SWITCH on the remote control, to switch between various input signals in order. 5.Press the Return key to exit the current DAC status and return to the previous menu, press the Home key (RCLL LIST key) to exit the DAC function, return to the main menu. Display interface and the corresponding rear panel interface map UDS-1 S/P DIF input interface 1.When RCA digital inputs, entering the DAC interface to select S/PDIF - coaxial 1 DAC option 2.When optical digital inputs, entering the DAC interface to select S / PDIF - coaxial 2 DAC option - 24 - HDMI input connector Features: Support the decoding formats of PCM and DSD Support*2 HDMI signal input , 1 HDMI direct output (1080P/3D) Support PCM and DSD format source signal recording Save PCM as wav format Save DSD as dff format UDS-3/UDS-5 S/P DIF input interface - 25 - 1. When RCA inputs,entering the DAC interface to select S / PDIF corresponding to coaxial 1-4 input respectively 2. When the optical inputs,entering the DAC interface to select S / PDIF corresponding to the optical fiber 5-6 input respectively 3. When the balanced inputs, entering the DAC interface to select S / PDIF corresponding to equilibrium 7-8 input respectively HDMI input connector Features: Support the decoding formats of PCM and DSD Support 4 HDMI signal input , 1 HDMI direct output (1080P/3D) Support PCM and DSD format source signal recording Save PCM as wav format Save DSD as dff format Operation Instructions: 1. Please first enter settings - Audio settings -HDMI setting, open the HDMI 2. With HDMI cable connecting set-top boxes, mobile phones, video cameras and the like external signal source to the HDMI input port 1-4,then use the other HDMI cable to connect the Pass-Through and connect the monitor with an HDMI input 3.Entering the DAC interface to choose the HDMI input, select the corresponding HDMI1-4 4.HDMI Pass-Through Interface is to output signal through HDMI input connecting a TV or other display devices, while supporting audio signal of local playback to output native DSD and PCM signal via HDMI interface, the input and output support 1080P / 3D formats, Support HDMI signal source recording 24Bit / 192KHz HD Master format Note: Pass-Through --HDMI output interface, when HDMI is set to - 26 - <ON>, which can achieve Pass-Through function, and can output audio resources in an external storage device ,if set to <OFF>, only output Pass-Through signal source When not using this function, select close, to extend the life of the machine HDMI signal Recording In the DAC interface, select HDMI1-4 option in HDMI input, press the OK button to get the signal. During playback, press the record button on the remote control, the system will enter the path to save the interface, press the OK button to confirm. Recording file will be saved in the" Digital "file folder, the file named after" D1 @ date ", when stop recording,please press the record button again. Note: HDMI input port, only supports transparent PCM and DSD signals ,which does not support formats not decoded , DTS, Dolby,etc.We suggest users set output mode of video player to LPCM output Analog Inputs (optional): Features: Support analog signal transferring PCM and DSD formats output Support PCM and DSD format source signal recording (save as wav and dff format) Support RCA and XLR / balance 2 inputs PCM save as WAV format DSD save as DFF format Operation Instructions: 1. When signal inputs through RCA connectors ,entering the DAC interface ,choose the analog input-an unbalanced input; 2. When signal inputs by balancing interface,entering the DAC interface, choose the analog - 27 - input-an balanced input Analog signal recording When needing analog signal recording, please first enter the settings - Audio settings - select file formats to be saved in the analog output (saved as WAV and DFF). Analog recording ---the format for the first time into the default is DSD2.822M. In the DAC input interface,select the balanced or unbalanced input in analog inputs, press the record button on the remote control, the system will choose the path to save the screen, press the OK button to confirm. The analog signal recording files are saved in the Analog folders, files named after"A1 @ date" , when stop recording,please press the record button again. Note: Please make sure the selected storage device has sufficient memory,otherwise the recording will be interrupt. 3.4 System settings In the main menu, select the setup option, as follows: Audio setting They are: ES9018 D/A setting, WM8741 D/A setting, analog input, S/PDIF input, HDMI output, the default setting. Network setting Network type, IP setting, DHCP, WIFI switch Language option support English, simplified Chinese, traditional Chinese, German, Italian, Japanese and other languages Time zone setting support global 27 kinds of time zone settings Display setting the brightness of display setting, the background light time setting - 28 - Firmware upgrade support online and local upgrade Version information product names, firmware version, software version, release date, MAC address 3.4.1 Audio Settings In the music playback or DAC player interface, press the remote control FUN key, you can go directly to the audio settings, select D / A chip to set various parameters, which will achieve a better sound experience. ES9018 setting the digital filter parameters, de-emphasis filter, phase adjustment, DPLL phase-locked loop bandwidth and jitter suppression WM8741 setting PCM mode, DSD Direct mode, DSD PLUS mode Analog Input PCM output format, DSD output format, digital filter parameters S / PDIF Input pre-emphasis control, de-emphasis control HDMI Output on and off (if not use this function, please select to close, to extend the life of the machine) The default setting the system restores factory settings - 29 - The system default parameters, as follows: ES9018 settings De-emphasis --- Off Jitter suppression ---- On (other items unchanged) Digital filter: DSD bandwidth of standard Digital filter: FIR attenuation fast Screen brightness --- 2 Analog recordings --- default output format is DSD2.822M 3.4.2 Network settings Network settings: network type, IP settings, DHCP, WIFI switch 1.Wired network priority settings: insert the home computer network cable directly into a LAN interface, select in the main menu: settings - Network Settings - Network type - wired network icon , the icon turns to in the lower right corner , which indicates that the network has been successfully connected - 30 - 2.Wireless network settings:there are two kinds of connections. The first: the traditional connection way Operation: connect the Wi-Fi antenna , select in the main menu: Settings - Network selection - Network type - wireless. The system automatically searches for wireless network equipment. Select the router, and enter the password to connect. Enter password: If the password is a pure number, press the number keys on the remote control to input, if it is numbers and letters, then switch the input mode on the display,then input the password, press OK key. The network icon in the lower right corner turns indicates that the wireless network is connected successfully. ,which The second: the way of Wireless WPS connection WPS function: to simplify Wi-Fi wireless security setup and management, with WPS button, not needing configure complicated parameters, it can be fast, easy to establish a wireless connection Operation: Firstly make sure your wireless router to be connected with a WPS function button, turn on the player and connect WIFI antenna. Press the WPS button on your wireless router, and then in the player's main menu, press the SWITCH key on the remote control, the system will automatically search for wireless devices, the screen turns from a flashing icon behind the right corner ,which shows the wireless device has been connected to the player 3.No matter what the type of network is, "DHCP" is on by default, or will enter the "IP Setting", IP address and DNS server address settings. 4.If the router does not turn on the DHCP function, you need to set the IP address manually to connect the network. - 31 - Select the IP setting -IP address, and IP address input box pops up. Enter the IP address using the remote control number keys or the up / down / left / right to input. After setting the IP address ,it will automatically return to the previous level, and you can set "Router Address" and "DNS address" in the same way. 5. If you do not use WIFI function ,we recommend to set the switch off,which can reduce power consumption of the machine. to extend the life of the machine AP Function 1.Firstly connect the WIFI antenna and the equipment 2.In the main menu interface, press FUN key on the remote control and the display icon change from to in the bottom of right corner. 3.Open the phone or tablet computer, choose Network settings icon to open WIFI search device, choose the device name in the search list which shows a serial number, for instance: 20: 59: a0: 10: a6 : 31, the serial number of each machine is different , entering the settings and view in the version information or can be found in the back of the chassis.Touch the link,and input the default password "12345678", then enter the player's built-in router. 4.This device supports the third-party broadcast control software, and you can playback only finding files on the local hard disk. 5.You can visit our website with the operation method of mobile control playback , and download the data in the area of download office. We have a specialized Android system control software -Stream server,providing to users. 6.Press the stop button to exit the playback, then return to themain menu, press FUN key ,then you can exit the AP function. 3.4.3 Language selection - 32 - Languages: English, Simplified Chinese, Traditional Chinese, German, Italian, Japanese and other languages to match with different countries and regions. 3.4.4 Time zone settings Provide global zone selection, get the current time automatically in different countries and regions 3.4.5 Display settings - 33 - The brightness of background light : three different display brightness adjustment, you can use the remote control to select the appropriate brightness, and the third is the brightest. The background light time: there are 4 modes available setting the display light time,including:5 seconds,10 seconds,30 seconds and always keeping brightness. 3.4.6 Firmware Upgrade 1.Network upgrade: when the network connection is OK, the backstage has the latest firmware, the system will pop up a dialog which shows if you need to upgrade the program,If you press the button of confirmation, the system will automatically download the new firmware and - 34 - upgrade, or else you select to cancel. You can also enter the settings - firmware update network upgrade and press OK to upgrade 2.Local upgrade: find the latest firmware in our website, download it to the root directory of U disk and insert it into . the machine's USB HOST interface, and then use the remote control to select the item, enter the firmware update status.We mustn’t plug U disk while being the update status, otherwise the machine can not turn on. you can not pull out the U disk until the update is successful,and the system will automatically reboot 3.4.7 Version Information Enter this item, you can examine the device name, software version, hardware version number, release date and network MAC address code. Ⅳ.Simple Troubleshooting If the machine has no any response with power, firstly check whether the power is plugged in both edges; secondly the Indicator next to the power switch is illuminated or not, or whether it has fused .Fuse box position is as follows: With "-" screwdriver gently pry the fuse lifted lid, the fuse is embedded in the lid.There are two insurance tubes,one above the plastic pipe is backup, embedded in the bottom of the plastic card is working fuse.Please check whether the working fuse is burned out,if it is burned ,with a spare fuse to replace.If all the ways have been carried out,the machine still does not work,please contact the manufacturer to wait to be repaired. UDS-1 fuse is 1A, UDS-3/5 fuse is 2A - 35 - Ⅴ. Product specifications Local/Network play DSD/ISO format DSD 1Bit/5.6MHz PCM format 32Bit/768KHz DXD format 32Bit/384KHz DTS format 24Bit/192KHz DAC INPUT S/P DIF Input PCM 24Bit/192KHz DTS format 24Bit/192KHz HDMI Input DSD 1Bit/5.6MHz PCM 24Bit/192KHz DTS 24Bit/192KHz Analog Input PCM 24Bit/192KHz DSD 1Bit/5.6MHz Package contents and parameters Package contents 1*Product host 1*AC power cord 1*Remote control 1*Manual 1*WI-FI antenna UDS-1 Size 285(W)*310(D)*150(H)mm Weight 5KG/11B UDS-3/5 Size(D×W×H) 435(W)*310(D)*150(H)mm Weight 11KG/23B - 36 - Warranty & Disclaimer: Ⅰ.The user can get warranty service within one year from the date of signing this Warranty card,however,in the case that the user does not return the Warranty card;Thirty days shall be added to the release date for the warranty date to start. Ⅱ.Please ensure the filled information in the Warranty card completed and it shall not come into effect until it is signed by the person who hand over this product with the chop of the distributor and taken back by the distributor or its staff. Ⅲ.Please present the Warranty card and any proof of purchase such as invoice to ask for the guarantee service. Ⅳ.As for the following situation, the free maintenance is unavailable. 1、Warranty period has expired on the product(s); 2、The user can’t present the Warranty card or invoice or other proof of purchase; 3、The original seal has been damaged due to the man-made factors such as un-authorized disassemble ,repair or change in configuration; 4、The machine does not work due to the force majeure; 5、For the consumable parts and wearing parts, such as the remote control, the warranty period is three months; 6、There is any damage caused by unauthorized move or misuse; 7、We will charge for repairing any damage arised from the man-made factors. Ⅴ、Any modification on the product without any authorization belongs to infringing act.Out company will not be responsible for any failure or accident that may be caused by any modification except that the product is not covered by the warranty. Ⅵ、This Warranty card is available within China and the users overseas should please contact with the local distributors. Ⅶ、The blank in the Warranty card is kept to sick the body barcode which is tore off from the outer packing-box.Once getting the barcode pasted,it will be not necessary to fill in the product information. Ⅷ、Please contact with your distributor or out after-sales service department directly in the case that the product get in trouble. Ⅸ、With the continuous optimization of products function, please login our website http://www.jfdigital.com to concern about our products dynamic, download the latest updates. - 37 - Warranty Card Customer name Customer address Contact department Postal code Contact person Tel Email Fax Distributor Contact department Contact person Tel Email Fax Model purchased Date purchased Serial number Customer code(filled by manufacturer): Servicing time Fault descriptions: Servicing time Fault descriptions: Shenzhen JF Digital Tech. Co., Ltd. Address: B Room,30th Floor,Haiyi Ge,Sceneway Ambassy.No.10 of Kexing Road,Science and Technology Park,Nanshan District,Shenzhen City,China Tel:+86-755-83225760 Fax:+86-755-86093355 http://www.jfdigital.com Code:518031 - 38 -