1
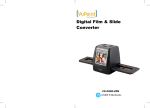
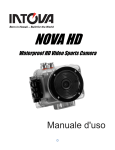
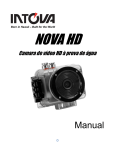
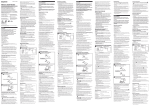
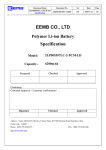
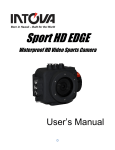
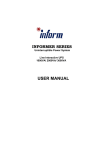
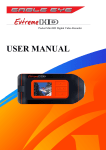
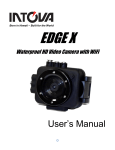
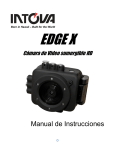
Born in Hawaii – Built for the World NOVA HD Waterproof HD Video Sports Camera User’s Manual 0 Table of Contents: Preface…………………………………………… ……………….2 System requirements for 1080P HD video ……………………3 Getting to know your camera …………………………………..4 G e t t i n g S t a r te d … … … … … … … … … … … … … … … … … … … … 5 Using NOVA HD…………………………………………………….7 Basic Operations of NOVA HD camera………………………….8 C a m e r a S e tt i n g s … … … … … … … … … … … … … … … … … … … . 9 Video Menu……………………………………………………….9 P h o t o M e n u … … … … … … … … … … … … … … … … … … … … … 12 Setting Menu………………………………………………..14 View Photos or Playback Videos ………………………………15 Deleting Files …………………………… ………………………..16 To operate RF remote control……………………………………..16 Spec i fic ati ons …………… … …………… … …………… … …….16 1 PREFACE Thank you for purchasing the Intova NOVA HD waterproof sports camera! The rugged, durable and waterproof NOVA HD will help you capture high quality video and photos in many different venues and environments. Visit www.intova.net to view the wide range of mount and system options available. Enjoy!! Main features: Video Resolution: 1080p@30fps, 720p@60fps, 720p@30fps (WVGA)848x480p@60fps, 848x480p@30fps VGA Photo Resolution: 12MP, 8MP, 5MP and 3MP Rugged polycarbonate housing Waterproof to 200 feet / 60M 140 degree Wide-angle lens 4x Digital Zoom Uses same filters and lenses as EDGE X and CONNEX Waterproof RF remote controller 1.5” / 3.8cm TFT-LCD 480x240 Rechargeable Li-ion battery 1450mAh Micro USB charger/download port Battery life: 2.0 hrs (LCD on), 3 hrs (LCD off) Diving Mode Motion Detection Mode Time Lapse mode Self-capture mode Burst Mode: 3, 5, 10 photos Video Rotation Mode (rotate video 180° when camera is mounted upside down) Manual White Balance Picture in Video (take photo at same time as video recording by pressing OK button) Video recording LED indicator- blinking blue light Audible record alert Camera floats High Definition TV output Video format: H.264 / Photo format: JPEG Supports Micro SD Card up to 32GB with class 10 required for HD video recording (not included) 2 Important notice: Do not attempt to take apart the camera as there are high voltage parts and dangerous electric shock can occur. If the camera is dropped or smashed and internal parts are exposed, do not touch as there is a danger of electric shock. Do not leave the camera in direct sunlight or near heat sources as these can damage the camera. If camera becomes hot during use, turn off the power immediately. For storage, remove the memory card and keep camera in a cool, dry place with housing door slightly open. Before each use, clean and maintain O-ring by removing any dirt, sand and other debris and lightly lubricating with silicone grease to prevent drying and cracking. Use float strap as extra precaution for water use. If camera stops responding to button controls, reset camera by inserting the end of a paper clip into the reset hole (please see page 4). System requirements for 1080P HD video (minimum) PC Mac Windows® 7, 8 Mac OSR X 10.6.3 or later Intel® Core 2 DuoTM or faster Intel® Core 2 DuoTM or faster DirectX 10.0 or later Minimum 2GB of system RAM Recommended: 4GB Minimum 2GB of system RAM Recommended: 4GB Video card with minimum 256MB of RAM Video card with minimum 256MB of RAM Recommended screen resolution 1920x1080 (minimum 1024x768) Recommended screen resolution 1920x1080 (minimum 1024x768) Included Accessories: User’s manual mini CD, Micro USB cable, waterproof RF remote controller, wrist strap, lens cap, silicone grease, Quick Start Guide, optional accessory brochure. 3 GETTING TO KNOW YOUR CAMERA 8 10 1 7 12 11 9 2 13 3 6 4 5 17 16 18 19 20 14 21 15 22 ITEM FUNCTION POWER ON/OFF, MODE, MENU 1 SCROLLING button ITEM 12 FUNCTION MODE button 2 Lens port ring 13 3 Lens port 14 MENU button, DELETE file (press to be able to delete file while in view mode) Wrist Strap hole 4 5 Lens Tripod mount 15 16 O-ring LCD screen 6 Lock latch 17 Micro USB charging/downloading port 7 Video recording in progress light (blue), Li-ion battery charging in progress (red) 18 High Definition TV out port 8 SHUTTER button UP, ZOOM OUT and LCD ON/OFF button DOWN, ZOOM IN button 19 Micro SD card port 20 RESET hole 21 TV out port 22 Thumb press backdoor opening system in case of vacuum; see page 5. 9 10 11 OK, Picture in Video (press to take photo during video recording), and File Viewing button 4 GETTING STARTED Opening the housing: Follow the steps below to open the housing. Sometimes a vacuum seal may occur, use thumb press system to open. STEP 1 STEP 2 STEP 3 STEP 4 IMPORTANT: Before each use, clean and maintain O-ring by removing any dirt, sand and other debris and lightly lubricating with silicone grease to prevent drying and cracking. Inserting the Micro SD card: Make sure that camera is turned OFF when inserting or removing Micro SD card. Locate Micro SD card port on your camera (refer to page 4). Insert card with gold contacts facing towards LCD screen. Push down until card clicks into place. To remove, press down on inserted card to click and then release. NOVA HD uses Micro SD card up to 32 GB. For HD video, speed class 10 is required. 1. 2. 3. 4. The camera cannot record video or take photos without a properly inserted memory card. Format the Micro SD card before use. If the card does not work with the camera, please try another card. When recording video in 1080p resolution, card speed class 10 is required. 5 Rechargeable Li-ion Polymer battery: 1) The included lithium-ion battery comes partially charged. 2) To fully charge, connect the included Micro USB cable to the camera and a power source such as a computer or Intova Universal USB charger/AC adapter. Please note: no damage will occur to the camera or battery if used prior to a full charge. 3) Important: DO NOT allow Li-ion battery to become fully discharged. If not using camera for a prolonged period, recharge every 3 months to prevent battery from becoming fully discharged. USB charging and transferring: Connect your computer to NOVA HD with the Micro USB cable. After connection, camera will turn on, use UP / DOWN buttons to select MSDC / CHARGE / OPEN. MSDC: Enter to download video or image files. When this choice is selected, the screen shown below will appear and NOVA HD will be detected by computer and files can be transferred by dragging and dropping. CHARGE: Recharge the Li-ion battery power. Full charging time is around 6 hours. When this choice is selected, LCD will turn off. OPEN: Recharge the battery power and operate the camera at the same time. When this choice is selected, LCD will show live view. If none of the above choices is selected, the camera will automatically go to MDSC mode after 20 seconds and the USB CONNECTED screen will appear. Status LED light when camera is charging will show: • Red light ON when charging. • Red light OFF when charging is complete. 6 USING NOVA HD Insert Micro SD memory card (class 10 required for HD video) before turning on. NOVA HD cannot be used if a properly inserted Micro SD card is not present. To turn camera on, press and hold power ON/OFF button for 2 seconds and then release (if camera is in sleep mode, short press once to waken) Camera Default Settings: The NOVA HD camera powers up with the following default settings: Video Resolution 1080p@30fps Photo Resolution 5 MP (megapixels) Auto Power Off is OFF Video Mode LCD Monitor Display Video mode idle screen Video mode Video resolution White Balance mode Motion detection Battery level Micro SD card inserted Quality AF mode Digital zoom (not in 1080p) Exposure value Date Date/Time stamp on Time Recording time remaining To start video recording, press the shutter button while in video mode. To take a photo while recording video (picture in video), press OK button (color of icon will change to orange). Recording video screen Blinking red dot (recording in progress) Time Picture in video (icon changes to orange color when photo is taken) Video recording time 7 Photo Mode LCD Monitor Display To switch to photo mode, press and quickly release MODE. To take a photo, hold camera steady while pressing and releasing SHUTTER button. Photo Mode Screen Photo file size Self capture (10 sec) White balance mode Photo mode Battery level Quality Micro SD card inserted Digital zoom AF mode Date/Time stamp on Exposure value Date Photos remaining Time Basic Operations of NOVA HD camera BUTTON POWER BASIC OPERATION PROCEDURES Press and hold for 2 seconds and release button to turn on or turn off camera. SHUTTER button Press “SHUTTER” button to start and stop video recording or to take a photo. UP, ZOOM OUT button 1) Press button to scroll up through sub-menu selections. 2) Press and hold to ZOOM OUT digital zoom. 3) LCD ON/OFF button. DOWN, ZOOM IN button MODE button 1) Press button to scroll down through sub-menu selections. 2) Press and hold to ZOOM IN digital zoom. 1) Press button to confirm menu selection 2) During video recording, press button to take photos (Picture in Video). 3) In video or photo mode, press to go to view file(s) mode. Press to switch between video and photo modes. MENU, DELETE file button 1) To bring up MENU, press and release button. 3) While in File Viewing mode, press button to DELETE single or all files. OK button 8 CAMERA SETTINGS To change camera settings, press the MENU button and press UP or DOWN button to scroll through main menu selections and press OK button to enter sub-menu selections. Shown below are the three main menu selections screens. VIDEO Menu: In video mode, press MENU button. With VIDEO menu icon highlighted, press OK button to enter video settings sub-menu. Use the UP or DOWN button to scroll through the sub-menu and press OK button to select from QUALITY, RESOLUTION, MOTION DETECTION, VIDEO DURATION, LOOP VIDEO, UPSIDE DOWN, MUTE, IMAGE EFFECT, SCENE MODE, FLICKER, CONTRAST, SHARPNESS, ISO, WHITE BALANCE, EXPOSURE VALUE, and AF MODE. After selecting submenu, use UP or DOWN to scroll through choices, press OK button to select and press MENU button 2 times to go back to main screen. 1) VIDEO QUALITY: Setting sub-menu choices are explained in chart below. SETTING DESCRIPTION Super Fine Produces best quality video for selected resolution. Fine Produces good quality video for selected resolution. Normal Produces regular quality video for selected resolution. 2) RESOLUTION: Setting sub-menu choices are explained in chart below. DESCRIPTION Highest resolution 16:9 HD video @ 1920x1080 pixels. 30/25 frames per second rate for both action and when mounted on stable object. High resolution 16:9 HD video @ 1280x720 pixels. 60/50 frames per second rate for hand held, action shooting and good slow motion effect*. Produces larger file size than 30/25 fps selection below. RESOLUTION 1080P30 NTSC/PAL fps 30/25 720P60 60/50 720P30 30/25 High resolution 16:9 HD video @ 1280x720 pixels. 30/25 frames per second rate for action shooting, when mounted on stable object and for lower light conditions. Produces smaller file size than 60/50 fps. 848x480/60F (WVGA) 60/50 848x480/30F (WVGA) 30/25 Wide standard resolution 16:9 video @ 848x480 pixels produces small file size. 60/50 frames per second rate for hand held, action shooting and slow motion effect*. Wide standard resolution 16:9 video @ 848x480 pixels produces small file size. 30/25 frames per second rate for hand held, action shooting. 9 VGA 30/25 Standard resolution 4:3 video @ 640x480 pixels produces small file size. 30/25 frames per second rate for hand held, action shooting. *Slow motion effect is produced in video editing software (not included) which includes that feature. 3) MOTION DETECTION: Video will start recording automatically when motion is detected in field of view. Video will be recorded for 5 seconds and stop if no other motion is detected. Setting choices are ON or OFF. 4) VIDEO DURATION: Allows the camera to record a video clip for a selected time length in minutes and to continue recording video clips of the same time length one after another unless operator stops recording manually by pressing SHUTTER button. Setting choices are 3 min, 5 min, 10 min, 15 min, and ANY DURATION. 5) LOOP VIDEO: Allows camera to continue capturing video after memory card has become full by recording over previous video files from the beginning. Setting choices are ON or OFF. 6) UPSIDE DOWN: This setting allows video to be played back in correct orientation for videos that are recorded with camera mounted upside down. Setting choices are ON to activate and OFF to deactivate feature. 7) MUTE: This feature allows audio recording to be turned off. Select YES to mute audio and select NO to restore audio recording. 8) IMAGE EFFECTS: This setting allows selection of image altering effects as shown below. EFFECT DESCRIPTION OFF Deactivates Image effects. ART Changes background sharpness and contrast. SEPIA Adds yellow-brown tint to video/photo. NEGATIVE BLACK & WHITE VIVID Reverses imagery to make it appear like a film negative. Removes color to create a monochrome video/photo. Enhances colors. 9) SCENE MODE: This setting selects the below scene modes. SCENE MODE SELECTION AUTO NIGHT SCENE SPORTS LANDSCAPE SUNSET DESCRIPTION Select AUTO when you want to record videos or photos without manual adjustments described below. For video/photography in low light and at night. Due to slower shutter speed, mounting on stable object such as a tripod is recommended. For video/photography of fast moving subjects or during action activities. Camera uses faster shutter speeds to improve imagery. For video/photography of distant subjects such as mountains, cityscape, etc. For video/photography of scenes that include sunrise or sunset in the background. Camera uses faster shutter speed to improve imagery. 10 SAND & SNOW For video/photography where bright background causes subject to appear dark (silhouetted). Camera uses slower shutter speed to improve imagery. SPOTLIGHT For video/photography where bright spotlight causes subject to appear too bright. Camera uses faster shutter speed to improve imagery. DIVING Activates an electronic red filter to add back warm colors while diving at depths between10’-30’/ 3 M-10 M in salt water. Below 30’/10 M, it is recommended to deactivate DIVING mode and use a physical red filter such as Intova IFRED SP1. 10) FLICKER: This setting allows the camera to be adjusted to AUTO, 60Hz or 50Hz to prevent video flickering caused by fluorescent lights. For USA, the setting is 60Hz. 11) CONTRAST: This setting increases or reduces the difference between dark and light areas. Default setting is STANDARD. To make dark areas blacker and light areas brighter in videos/photos, select ENHANCE. To make dark areas less black and light areas darker, select SOFT. 12) SHARPNESS: This setting increases or decreases video/photo sharpness. Default setting is STANDARD. Select SHARP to sharpen or SOFT to blur. 13) ISO: This setting adjusts the camera’s sensitivity to light. A higher ISO value will result in a lighter video/photo and is useful in low light conditions. The choices are AUTO, 100, 200, 400, and 800. 14) WHITE BALANCE: This setting improves color accuracy when the ambient light is either too cool (blue or green) or too warm (yellow/orange). Examples of cool lighting situations are cloudy day, diving at depths below 20 feet / 6 meters in either fresh or salt water, fluorescent light, or scenes in shade. Examples of warm lighting situations are candlelight and tungsten light. Setting choices are AUTO, SUNNY (daylight situations), CLOUDY (cool light situations), FLUORESCENT (under fluorescent lighting), INCANDESCENT (under filament lamp lighting) and MANUAL. To use MANUAL white balance: a) Select MANUAL and press OK button to activate. b) Press MENU button 2 times to go back to main screen. The manual white balance icon will be blinking at the top of the LCD screen. c) Aim camera at white balance board or a white object and press SHUTTER button. White balance is now set to current ambient light. d) To reset manual white balance for a new ambient light situation, turn camera off and on to reactivate blinking manual white balance icon and repeat step c. 15) EXPOSURE VALUE: This setting adjusts the brightness or darkness of the video/photo between ±2 f stops. Setting to positive values will brighten imagery, while negative values will darken imagery. 16) AF MODE: This feature selects the general area in a scene that the cameras uses when calculating image exposure. Selecting AVERAGE causes camera to adjust exposure to light coming from the overall area as viewed in LCD. Selecting CENTER will decrease this area towards the middle of the scene. Selecting SPOT will cause camera to adjust exposure based on light coming from a very concentrated area in the middle of the scene. 11 PHOTO (Picture) Menu: In photo mode, press the MENU button. With PICTURE menu icon highlighted, press OK button to enter photo settings sub-menu. Use the UP or DOWN button to scroll through the sub-menu and press OK button to select from QUALITY, SIZE, SELF CAPTURE, CONTINUOS, TIME LAPSE, UPSIDE DOWN, IMAGE EFFECT, SCENE MODE, FLICKER, CONTRAST, SHARPNESS, ISO, WHITE BALANCE, EXPOSURE VALUE and AF MODE. After selecting sub-menu, use UP or DOWN to scroll through choices, press OK button to select and press MENU button 2 times to go back to main screen. 1) QUALITY: Setting sub-menu choices are explained in chart below. SETTING DESCRIPTION Super Fine Produces best quality photo for selected size. Fine Produces good quality photo for selected size. Normal Produces regular quality photo for selected size. 2) SIZE: Setting sub-menu choices are explained in chart below. PHOTO FILE SIZE PIXEL DIMENSIONS DESCRIPTION 12MP 4000 x 3000 Largest file size (by interpolation) 8MP 3264 x 2448 Large file size (by interpolation) 5MP 2592 x 1944 Medium file size (true) 3MP 2048 x 1536 Small file size (true) 3) SELF CAPTURE: Allows time delay in seconds between pressing of SHUTTER button and taking of photo. The setting choices are OFF, 5 sec, 10 sec, 30 sec and 60 sec. 4) CONTINUOUS: This feature allows 3, 5 or 10 “burst” photos per shutter button press. 5) TIME LAPSE: Allows the camera to continually take a photo with delays between each photo corresponding to selected time interval in seconds. This produces a high quality time lapse effect. The setting choices are OFF, 2 sec, 3 sec, 5 sec, 10 sec, 30 sec, and 60 sec. 6) UPSIDE DOWN: This setting allows video to be played back in correct orientation for photos that are taken with camera mounted upside down. Setting choices are ON to activate and OFF to deactivate feature. 7) IMAGE EFFECTS: This setting allows selection of image altering effects as shown below. EFFECT DESCRIPTION OFF Deactivates Image effects. ART Changes background sharpness and contrast. SEPIA Adds yellow-brown tint to video/photo. 12 NEGATIVE BLACK & WHITE VIVID Reverses imagery to make it appear like a film negative. Removes color to create a monochrome video/photo. Enhances colors. 8) SCENE MODE: This setting selects the below scene modes. SCENE MODE SELECTION AUTO NIGHT SCENE SPORTS LANDSCAPE DESCRIPTION Select AUTO when you want to record videos or photos without manual adjustments described below. For video/photography in low light and at night. Due to slower shutter speed, mounting on stable object such as a tripod is recommended. For video/photography of fast moving subjects or during action activities. Camera uses faster shutter speeds to improve imagery. For video/photography of distant subjects such as mountains, cityscape, etc. SUNSET For video/photography of scenes that include sunrise or sunset in the background. Camera uses faster shutter speed to improve imagery. SAND & SNOW For video/photography where bright background causes subject to appear dark (silhouetted). Camera uses slower shutter speed to improve imagery. SPOTLIGHT For video/photography where bright spotlight causes subject to appear too bright. Camera uses faster shutter speed to improve imagery. DIVING Activates an electronic red filter to add back warm colors while diving at depths between10’-30’/ 3 M-10 M in salt water. Below 30’/10 M, it is recommended to deactivate DIVING mode and use a physical red filter such as Intova IFRED SP1. 9) FLICKER: This setting allows the camera to be adjusted to AUTO, 60Hz or 50Hz to prevent video flickering caused by fluorescent lights. For USA, the setting is 60Hz. 10) CONTRAST: This setting increases or reduces the difference between dark and light areas. Default setting is STANDARD. To make dark areas blacker and light areas brighter in videos/photos, select ENHANCE. To make dark areas less black and light areas darker, select SOFT. 11) SHARPNESS: This setting increases or decreases video/photo sharpness. Default setting is STANDARD. Select SHARP to sharpen or SOFT to blur. 12) ISO: This setting adjusts the camera’s sensitivity to light. A higher ISO value will result in a lighter video/photo and is useful in low light conditions. The choices are AUTO, 100, 200, 400, and 800. 13) WHITE BALANCE: This setting improves color accuracy when the ambient light is either too cool (blue or green) or too warm (yellow/orange). Examples of cool lighting situations are cloudy day, diving at depths below 20 feet / 6 meters in either fresh or salt water, fluorescent light, or scenes in shade. Examples of warm lighting situations are candlelight and tungsten light. Setting choices are AUTO, SUNNY (daylight situations), CLOUDY (cool light situations), FLUORESCENT (under fluorescent lighting), INCANDESCENT (under filament lamp lighting) and MANUAL. 13 To use MANUAL white balance: a) Select MANUAL and press OK button to activate. b) Press MENU button 2 times to go back to main screen. The manual white balance icon will be blinking at the top of the LCD screen. c) Aim camera at white balance board or a white object and press SHUTTER button. White balance is now set to current ambient light. d) To reset manual white balance for a new ambient light situation, turn camera off and on to reactivate blinking manual white balance icon and repeat step c. 14) EXPOSURE VALUE: This setting adjusts the brightness or darkness of the video/photo between ±2 f stops. Setting to positive values will brighten imagery, while negative values will darken imagery. 15) AF MODE: This feature selects the general area in a scene that the cameras uses when calculating image exposure. Selecting AVERAGE causes camera to adjust exposure to light coming from the overall area as viewed in LCD. Selecting CENTER will decrease this area towards the middle of the scene. Selecting SPOT will cause camera to adjust exposure based on light coming from a very concentrated area in the middle of the scene. SETTING Menu: SETTING menu is the same for both video and photo (picture) modes. Press the MENU button and use UP or DOWN button to highlight SETTING menu icon. Press OK button to enter SETTING submenu. Use the UP or DOWN button to scroll through the sub-menu and press OK button to select from LCD OFF, TIME SETUP, AUTO POWER OFF, VOLUME, RESET SYSTEM SETTINGS, FORMAT, LANGUAGE, TV SYSTEM, STAMP, BEEP SOUND, and FIRMWARE VERSION. After selecting sub-menu, use UP or DOWN to scroll through choices, press OK button to select and press MENU button to go back to main screen. 1) LCD OFF: This setting turns off LCD screen after a specific time period when 30 sec, 1 min or 3 minutes is selected. Select OFF to deactivate LCD OFF function and keep LCD on. Use this feature to conserve battery power. 2) TIME SETUP: This setting allows current date and time to be set. With sub-menu item highlighted, press OK button to enter setting. Press UP or DOWN button to change number and press MENU button to scroll to next. When done, press OK button to confirm and go back to sub-menu. 3) AUTO POWER OFF: This setting turns off camera after a specific time period when 30 sec, 1 min or 3 minutes is selected. Select OFF to deactivate AUTO POWER OFF function. Use this feature to conserve battery power. 4) VOLUME: This setting allows beep sound volume to be turned off when set to 00 or adjusted from level 01 through 13. 5) RESET SYSTEM SETTINGS: This function allows camera settings to be reset to factory default. 6) FORMAT: This feature allows Micro SD card to be formatted. WARNING, formatting card will erase all data! Press OK to enter function. Press UP or DOWN button to highlight YES and press OK to execute format. 14 7) LANGUAGE: This setting allows MENU language to be selected between English, Chinese (Traditional), Chinese (simplified), Japanese, French, German, Dutch, Portuguese, Spanish, Korean and Italian. 8) TV SYSTEM: This setting configures the video file for playback on either an NTSC or PAL system device. 9) STAMP: This feature places both date and time on the photo file which is visible viewed or printed. Setting choices are OFF or DATE and TIME. 10) BEEP SOUND: This setting turns Beep sound ON or OFF. 11) FIRMWARE VERSION: This indicates installed firmware version. Please note when updating firmware in order to confirm new firmware has been installed. VIEW PHOTOS OR PLAYBACK VIDEOS Using LCD screen to playback videos: 1. Go to View Files mode by pressing OK button in Video mode. 2. Press UP or DOWN button to scroll through files. 3. Press the OK button to enlarge thumbnail. 4. Press OK button to play video file. 5. Press OK button to stop video file. 6. Press MODE button 2 times to go back to the main screen. Using LCD screen to view photos: 1. Go to View Files mode by pressing OK button in Photo (picture) mode. 2. Press UP or DOWN button to scroll through files. 3. Press the OK button to enlarge thumbnail. 4. Press UP or DOWN button to scroll through files or press OK button to start slide show. 5. Press MODE button 2 times to go back to the main screen. Playback using High Definition TV Output: To view HD videos on a High Definition TV, use a mini High Definition TV cable to connect camera to the TV. Plug the High Definition mini plug into the camera’s HD output port and the other end with USB plug into the HDTV. Turn camera on and press OK button to get to the file viewing mode. Use UP or DOWN buttons to scroll through thumbnail images and press OK button to select a video file. Press OK button again to begin playback and view on HDTV. 15 DELETING FILES To delete a single file: 1. Go to View Files mode by pressing OK button in Video or Photo mode. 2. Press UP or DOWN button to select a file and then press the MENU button. 3. Press the UP button to highlight YES. 4. Press OK to execute deletion. To delete all files: 1. Go to View Files mode by pressing OK button in Video or Photo mode. 2. Press UP or DOWN button to select a file and then press the MENU button. 3. Press the UP button 2 times to highlight ALL. 4. Press the OK button then press the UP button to highlight YES. 5. Press OK to execute deletion of all files. To operate RF remote control 1) To start and stop video recording, long press (about 3 seconds) the button with video icon. 2) To take a photo, long press (about 3 seconds) the button with the camera icon. 3) To turn camera off, long press (about 3 seconds) the OFF button. 4) To replace batteries, please unscrew back cover and remove spent batteries and replace with two fresh CR2016, 3V batteries. 5) Please do not lose this remote as each remote control is specific to its camera. SPECIFICATIONS Effective Sensor 1/ 2.5" 5.0MP CMOS SENSOR LCD Screen 1.5" TFT-LCD 480*240 Photo Resolution & Possible number of shots 12M 4000*3000 JPG about 1000pcs /4GB 8M 3200*2400 JPG about 1300pcs/4GB 5M 2592*1944 JPG about 1800pcs/4GB 3M 2048*1536 JPG about 3100pcs/4GB 16 Video Resolution & possible recording time Mode of Video QUALITY: Super Fine QUALITY: Fine QUALITY: Normal 1920*1080P 30 fps,MP4 format About 42 min (4GB) About 50 min (4GB) About 63 min (4GB) 1280*720P 60 fps,MP4 format About 50 min (4GB) About 56 min (4GB) About 84min (4GB) 1280*720P 30 fps,MP4 format About 63min (4GB) About 84 min (4GB) About 127 min (4GB) 848 x 480P 60 fps,MP4 format About 63min (4GB) About 84min (4GB) About 127min (4GB) Lens specification F/2. 4 f=3. 35 mm 140° wide angle Built-in microphone Yes Operation Tone Available Battery capacity 3.7V/ 1450mAh Battery life About 2.5 hrs (LCD on), 3 hrs (LCD off) Power consumption 1.6W Charging spec. Charging time DC 5V, 1A About 6 hrs USB port USB2.0 High Speed Type of Memory Micro SD card (class 6 minimum, class 10 required for HD video) Capacity of Memory 4GB-32GB Depth rating Waterproof to 200 ft / 60M Weight 6 oz / 170g Dimension (2.8x3.3x2.4)in / (7x8.4x6)cm Standard Accessories RF Remote Controller, USB Cable, User Manual, Lens cap NOTE: As a result of continual improvements, the design and specifications of the product within may differ slightly to the unit illustrated on the packaging. © 2014 Intova • All Rights Reserved 1100 Alakea St., 18th Floor Honolulu, Hawaii 96813 USA For questions or customer service please call: (808) 837-0074 or (877) 837-0074 toll free USA only www.intova.net 17