1
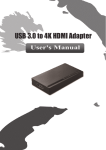
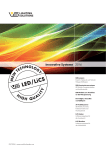
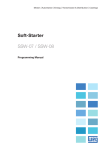
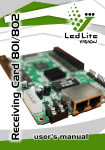
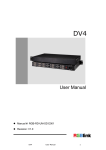
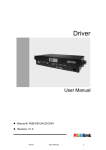
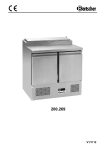
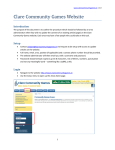
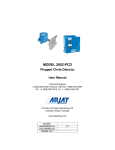
digiLED Navigator User Manual V 2.0 digiLED Navigator Manual Page 1 Copyright and Legal ......................................................................................... 3 Introduction .................................................................................................... 3 Features ......................................................................................................... 4 Neutrik Connectors........................................................................................ 5 Active DVI Loop Through ............................................................................... 6 USB Control ................................................................................................. 6 Internal Memory ........................................................................................... 6 Connections to Navigator. ................................................................................. 6 Power .......................................................................................................... 6 Control ........................................................................................................ 7 digiDATA to Screen ....................................................................................... 8 DVI Video .................................................................................................... 8 Indicators ....................................................................................................... 9 Front Panel................................................................................................... 9 Rear Panel ..................................................................................................10 Operation ......................................................................................................10 Repair ...........................................................................................................10 Maintenance...................................................................................................10 digiLED Navigator Manual Page 2 Copyright and Legal The following document is copyright of Display LED Ltd 2010. Registered office: 20 THE CODA CENTRE • 189 MUNSTER ROAD • LONDON • SW6 6AW T +44 (0) 20 7381 7840 • F +44 (0) 20 7381 7844 Registered in England & Wales 4969679 No part of this document may be reproduced or repurposed without the express permission of Display LED Ltd. digiLED Navigator is a registered trade mark of Display LED Screens Ltd. DigiLED Navigator is protected by international patents, valid worldwide. While Display LED makes every effort to ensure the details of this document are up to date, they are only guaranteed to be so at the time of publication. Display LED reserves the right to make any changes it deems necessary at any given time. Please check our website www.displayLED.com for the latest version. digiLED Navigator is covered by international patents and registered designs. digiLED Navigator is CE compliant, certification available from Display LED on request. digiLED Navigator meets current European RoHS legislation. Certification is available from Display LED on request at the above address. Introduction The digiLED Navigator is the device that provides the gateway between Video World and LED World in a big screen scenario. The Navigator takes in a DVI video feed and converts it into “digiDATA” – the data stream that can then be transmitted and distributed out to the LED Screens. The operation of the Navigator goes hand in hand with the control software “LED Studio”. Although the Navigator will function without the software, it’s not until LED Studio is up and running that control or changes to the Screen can be made. This document should be read in conjunction with the document “LED Studio User Manual v3.6” All digiLED documentation is available for download from the digiLED Support Website. http://www.digiLED.com/support.php digiLED Navigator Manual Page 3 Features The Navigator is a 19 inch rack mount unit manufactured to meet CE and FCC specifications. Containing three possible variations of Sender Card, there are three base models available: Navigator 12-12 Navigator 20-12 Navigator 20-20 The "12" and "20" suffix refer to the type of Sender Card installed. 12 = TS801 (max DVI resolution 1280x1024) 20 = TS802 (max DVI resolution 2048x1280) For example a Navigator 12-12 will contain two TS801 cards while a Navigator 20-12 will contain one of each type. Figure 1 - front view of a DigiLED Navigator digiLED Navigator Manual Page 4 Figure 2 - Front Panel diagram of the Navigator Figure 3 - Rear panel connections of the Navigator. Neutrik Connectors Wherever possible, high quality Neutrik connectors have been used on digiLED devices. This is especially true of the Navigator which uses the ruggedized RJ45 from Neutrik called "Ethercon" In addition, both the DVI and USB connectors are premium grade to ensure trouble free long-term operation. digiLED Navigator Manual Page 5 Active DVI Loop Through Both of the DVI inputs to the Navigator are buffered by an internal DA. This means that a DVI signal can loop out of the Navigator and be fed to a DVI monitor for observation. In the case of HD Screen Builds, it is also possible to loop out of one Sender Card and into the next. In this way, HD or greater LED screens can be programmed by giving the second Sender Card a vertical offset, hence showing the lower part of the image. USB Control With the advancement of laptops and PCs, old fashioned serial ports have become a rarity. While still using RS232 protocol, the digiLED Navigator now uses USB as the control connection medium between Navigator and PC. Internal Memory With the addition of USB to the Navigator, Plug-and-Play has been implemented. This has allowed for an internal drive to be included in the Navigator. Whenever a PC (or even Mac) is connected, an additional drive will appear on the computer. Stored on this drive are all of the files related to digiLED Screens and Navigators including: Instruction Manuals Software Installers Firmware Since this memory is internal to the Navigator and permanent, this means that the software and Navigator can never be separated. If a technician has a Navigator, he also has the software to operate it. Connections to Navigator. Power AC Mains power should be connected to the Navigator via the provided IEC power cable. The PSU inside the Navigator is a universal voltage PSU so both American and European voltages may be used. Please see the specification for the exact voltage ratings. It is critical for the protection of both the equipment and personnel that the earth connection of the power cable is maintained. All video equipment relies on having a digiLED Navigator Manual Page 6 good 0v earth. If a provided power source is suspected of having a missing or faulty earth, it should not be used. Control digiLED Navigators can be connected to the control PC either via RS232 or USB depending on the model. RS232 can be plugged into the control PC at will but USB connections should only be made after LED Studio has been fully installed on the control PC. This is due to Windows Plug and Play commencing as soon as a USB connection is made. If the USB connection is plugged in before LED Studio is installed, Plug and Play may cause incorrect driver initialisation. digiLED Navigator Manual Page 7 digiDATA to Screen The Cat5e or Cat6 cables that take the DigiDATA to the LED screen can be plugged in at will. As soon as the Navigator detects valid DVI video, it will start transmitting digiDATA irrespective of whether the cables are plugged in or not. DVI Video DVI Video can be connected to the Navigator at any time as long as one simple rule is followed. For the protection of the Navigator and external video devices, please ensure the power switch is OFF before making/breaking a DVI video cable connection. It is not necessary to unplug the power cable to the Navigator to do this. Simply switching off the switch on the front panel is sufficient. digiLED Navigator Manual Page 8 Indicators Front Panel The AC Power Switch contains a neon indicator to show when AC power is plugged in and available. A Valid DVI input signal to Sender Card #1 is indicated by the fast flashing red LED in the Sender Card #1 indicator. Please note, a valid DVI signal will produce a steady flash of approximately 4Hz. If the flashing is irregular or much slower this could indicate a poor quality or wrong format DVI signal is being applied. Figure 4 - Front Panel Indicators A solid red LED to the top right of the 7 segment display indicates that Sender Card #1 has a good DC power feed. In the same panel, a 7-segment display will show the manual brightness settings for that particular Sender Card. This normally shows a value from 1 - 16 however the advanced LED Studio controls may also allow for this to change to 1 - 64. All of the above controls are duplicated for the second Sender Card installed in the Navigator. digiLED Navigator Manual Page 9 Rear Panel On the rear of the Navigator, the "valid DVI" flashing LED has been duplicated. This is due to the fact that technicians may be working at the front or the rear of a rack but are equally likely to want to check this LED. Operation The majority of functions of the digiLED Navigator are controlled from the software “LED Studio”. Please see the LED Studio user guide for all further operational instructions of the Navigator. The only exception to this is the manual brightness + / - controls on the front panel of the Navigator. These will increase or decrease the brightness of a screen in 16 different steps. Each Sender Card within the Navigator has its own brightness + / - control and corresponding brightness display. Repair All digiLED components including the Navigator are covered by the standard digiLED warranty. If a Navigator is suspected of incorrect operation or failure, it should be returned to DigiLED via the RMA system. Details of the online RMA system will have been provided at the commissioning of your screen. Only DigiLED certified engineers are advised to open the Navigator. No user serviceable parts are contained inside. Maintenance The Navigator normally requires no maintenance. In dirty or dusty operating environments however, an annual check should be made to ensure all ventilation holes on the front and back are clear and free from obstruction. digiLED Navigator Manual Page 10