1
Owner’s Manual
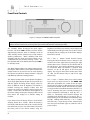
The rotary “volume” control determines the gain
setting, which ranges from ‘0.0dB’ (no output) to
’80.0dB’ (full output). This control does not function like
a typical volume: When you rotate the dial, either
clockwise to raise the volume or counter-clockwise to
lower the volume, you are actually engaging a precision
optical encoder which selects very high quality metalfilm resistors that the audio signal passes through. The
result is a proprietary gain circuit, called M-eVOL2 that
doesn’t degrade the audio signal regardless of the
setting, unlike all potentiometer based circuits. Since
this circuitry operates in a fully balanced differential
mode, no noise is introduced to the audio signal.
Furthermore, there are no actual moving parts, so this
technology has a minimum life expectancy of one
million rotations.
The MOON 740P Preamplifier provides a range of fivehundred and thirty (530) unique volume settings. This is
achieved as follows: Within the 0.0dB to 30.0dB range,
you can increase and decrease the volume in 1.0dB
steps. From the 30.0dB to 80.0dB range, you can
increase and decrease the volume by either 0.1dB or
1.0dB steps; By rotating the volume control slowly, the
level will change by 0.1dB increments. A quicker
rotation will change the volume in 1.0dB increments.
The “Setup” and “OK” buttons are used for
programming the numerous software functions
available on this preamplifier. The next section, entitled
“Software Setup”, explains their usage in detail.
When you are in Setup mode, there are three (3) front
panel items used to program this preamplifier; The
“Setup” button for navigating up and down through the
various menu levels, the rotary volume control for
scrolling through the available choices within each
programmable item, and the “OK” button for
confirming and saving your selections.
What follows are step-by-step examples of how to
configure an input, assign the two 12 Volt triggers and
reset the software back to the factory default. We will
begin by walking through all 5 available options for the
“B1” input:
1.
To enter the Setup mode, begin by pressing the
“Setup” button; “SETUP” will appear in the display
window.
2.
Rotate the volume control clockwise until “INPUTS”
appears in the display. Press “OK”.
3.
Rotate the volume control clockwise until “B1”
appears in the display. Press “OK”.
4.
“LABEL” will appear in the display. Press “OK”.
5.
“AUX1” will appear in the display. By rotating the
volume control clockwise, you will scroll through
more than 25 generic choices appearing in
alphabetical order (AUX1 … CD … TUNER, etc.),
various MOON source model names (i.e.
ANDROMEDA … 650D, etc) and finally a choice
called “CUSTOM” which allows you to create your
own text label of up to 8 characters in length (refer
to the example at the end of this section for more
details). When you assign the ‘’B1’ input label to
“MiND” (for the MOON intelligent Network Device
music streamer), you are also automatically
configuring this component’s internal software
which will allow it to operate with the MiND app,
provided that the proper SimLink connections have
been made with your other MOON components.
Functions available using the MiND app are
discussed in the next section.
6.
When the label name you wish to assign to the B1
input appears in the display, press the “OK” button.
“SAVED” will briefly appear in the display followed
by “LABEL”.
Software Setup
The MOON 740P preamplifier includes powerful
software that allows you to configure it to meet your
specific needs. For each of the five (5) inputs, you can
assign a label to replace the factory assigned name (i.e.
B1, S1, etc.), assign a maximum volume level of less than
80.0dB, create an offset volume level ranging from –
10.0dB to +10.0dB, bypass the volume control (to
exclusively use the source component’s volume instead)
and disable the input completely when it’s not in use.
As well, you can assign any and all inputs to activate the
740P’s 12 Volt trigger. Finally, there’s a facility to reset all
software settings back to their factory defaults.
Please refer to the accompanying quick reference
diagram for a snapshot of the entire Setup menu.
9