1
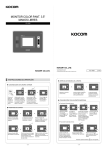
KDL-C1
User's Manual
KDL-T1
KDL-C1
KDL-T1
Features
Open the door without key!
Using access code or i-Button (RF card), you can open the door. In
addition, you can input control code against possible exposure of
access code to an outsider, so you can use the product with
confidence.
Input your own access code and i-Button (RF-card)!
For multi-user conditions, the product offers individual password
and i-Button (RF card) input function to each user. You can easily
change or delete the input access code. (Even when batteries are
replaced, the input access code and i-Button (RF card) are retained in
the system).
Automatic door locking!
When the door is shut, the system automatically locks the door.
No further manual locking!
Lock and lock!
Enjoy more security through dual lock function!
Dual Lock function ensures you more security at night when you
should take good care of security and offers you more convenience.
Anti-prank function!
When anyone from outside inputs any number more than 15 digits
long or incorrect access codes more than 3 times, the system
automatically shuts down the power.
1
Contents
Before Use
Warning for Safety
3
Main Parts
5
Components
8
Essentials
How to Register Your Access Code
9
How to Register i-Button (RF card)
11
How to Register Remote Controller
12
How to Unlock from Inside
13
How to Unlock from Outside (How to Use Emergency Key)
14
Applications
Warning Alarm/Dual Lock Function
16
Silence (Manner) Mode
17
Auto Lock Error
18
Warning Alarm Function
19
Keep Unlocking & Dual Lock Function
20
Miscellaneous
When and How to Replace Batteries
21
Check Points Before Trouble Notice
22
Product Specifications
22
Attention
Do not fail to keep the emergency key outside!!
2
Warning for Safety
▶ These warnings are to secure user's safety and prevent from the possible
loss of property.
Please read carefully to use the product in a correct manner.
Warning!
Not to follow the instruction may lead a user
to injuries or even to death.
Signs
indicates "Prohibition."
indicated
"Do not disassemble."
Attention!
Not to follow the instruction may incur injuries
or the loss of property.
indicates "Indication that
a user must comply with."
Warnings
Do not operate the device with wet
hand. Be careful that the liquids
(water, beverage, etc.) should not
seep into the inside of the device.
● It may cause
mechanical
troubles.
Install the device at the places free
from moisture and with good
ventilation.
●Installing the device at the place free
from snow, rain and direct
sunlight, which
may cause
mechanical
troubles.
3
Do not disassemble, repair or
modify the device by any
unauthorized person.
● It may cause mechanical troubles.
For necessary repairs,
please contact
the company.
When mechanical troubles or
other problems occur, please
call the company's nearest
service center or agency.
Attentions
Do not impact on the device with
any tool.
●It may cause mechanical
troubles or damages.
Be careful to keep and manage
your access codes.
●Leakage of access code threatens to
possible burglaries. Change your
access code
from time to
time.
Keep the gap between the door
and its frame less than 5mm.
●Gap over 5mm may hinder auto lock
from functioning normally.
When you go outside, do not fail
to check that the door is closed.
Do not operate the device forcefully
(eg. Press the button with excessive
strength).
●It may cause
mechanical troubles.
Do not use water, benzene, thinner
and alcohol when washing the
device.
●It may cause an electric shock or a fire.
Be careful that button part cover
should not be damaged or
broken.
Be careful not to lose the
emergency key or i-Button
(RF card).
4
Main Parts
Outside (model KDL-C1)
Button Part Cover
Operation LED
Button Part
Input Button
Set/Confirm Button
RF Card Contact Part
Start / End Button
Emergency
Power Supply
Door handle
Keyhole
5
Outside (model KDL-T1)
Button Part Cover
Emergency
Power Supply
Button Part
Input Button
Set/Confirm Button
Operation LED
I-Button Contact part
Door handle
Keyhole
6
Main Parts
Inside
Battery Chamber
Cover
Battery Chamber
●AA size 1.5V Alkaline
battery 8EA
memory Button
Manual/Auto
Selection Button
Door handle
7
How to open the cover of
battery chamber:
● Press
part lightly and at
the same time, push the cover
in the direction of arrow mark.
Components
Locking Device
(1 EA)
Installation
Components
(Type A: 1 EA,
Type B: 1 EA)
RF-Card
i-Button
( for Model or ( for Model
KDL-C1; 4 EA) KDL-T1; 4 EA)
AA size
Latch Stick
Alkaline
Stopper
Batteries (8 EA)
(1 EA)
Convexoconcave
Components
Rubber Pad
(1 set; 2 EA)
(LH: 1 EA, RH: 1 EA)
Screws
Screws
Screws
(for fixing the
main frame;
4 EA)
(for locking
device; 2 EA)
(for installation;
2 EA)
Latch Stick
Washer
Emergency
Keys
(1 EA)
(1set; 3EA)
User's Manual
(1 Copy)
Remote Controller (Option)
In door RC
Out door RC
8
How to Register Your Access Code
▶ User can register a total of 6 access codes including an initial access code
and 5 additional ones using the numbers with 1 to 10 digits.
To register an initial access code (address #0)
(eg. To input an access
code 35612)
When the product is shipped, the default access code is set as 0.
1
Press the
memory
button
2
Push up the button part cover
Access Code
Press the buttons in order.
●When the access code is successfully
registered, operation LED flickers and a signal
sound is heard.
※ In the event of input errors, operation LED flickers and a signal sound is heard.
In this case, restart the above registration process. When user inputs any number
more than 15 digits long or incorrect access codes more than 3 times,
the registration process is automatically stopped for 30 seconds.
To change the registered access code
According to the same procedure as above access code registration, input
new access code to the address where an existing access code is registered.
In this case, the existing access code is automatically changed to new one.
●The initial access code can be changed but cannot be deleted from
the system. For the rest addresses (#1 to 5), however, access codes
registered there can be freely changed and deleted.
9
To add access codes
(eg. To input an additional access code 4701604)
The system provides a total of 5 additional access codes (address #1 to 5).
1
2
Press the
memory
button
Push up the button part cover
(Select the address to be registered)
~
Access Code
Press the buttons in order.
●When the access code is successfully registered,
operation LED flickers and a signal sound is
heard.
※ In the event of input errors, operation LED flickers and a signal sound is heard.
In this case, restart the above registration process.
When user inputs any number more than 15 digits long or incorrect access
codes more than 3 times, the registration process is automatically stopped
for 30 seconds.
To delete all the registered access codes
This function is used to delete access codes registered at address #1 to 5,
except for the initial access code in address #0. In this case, however, please note
that the control code is also deleted.
1
2
3
Push up the button
part cover
Press
Press
Press the
memory button.
Press
buttons in order.
●When access codes are
successfully deleted, operation
LED flickers and a signal sound
is heard.
10
How to Register i-Buttons or RF cards
▶ User can register a total of 100 i-Buttons or RF cards at address #0 to #99.
▶ To register other i-buttons(RF cards) than are initially provided in the system,
please purchase additional ones.
To register an initial i-Button or RF card (address #0)
1
Press the
memory button
2
Push up the button part cover
Press
buttons in order.
Then, put the i-Button or RF card to be
registered to the i-Button or RF card contact
part.
●When the i-Button (RF card) is successfully
registered, a signal sound is heard.
To register additional i-Buttons (RF cards)
1
Press the
memory button
2
Push up the button part cover
select the address to be registered
~
Press
buttons in order. Then, put the i-Button
(RF card) to be registered to the i-Button
(RF card) contact part.
●When the i-Button (RF card) is successfully
registered, a signal sound is heard.
To delete a registered i-button or RF card (individual deletion)
For example, follow the instructions below to delete an i-Button or RF card registered in address #2.
1
Press the
memory button.
2
Push up the button part cover
(An address where an i-Button
or RF card to be deleted is being
registered) Press the buttons in order.
●When the i-Button(RF card) is successfully
deleted, a signal sound is heard.
To delete all the registered i-Buttons or RF cards (lump-sum deletion)
1
11
Press the
memory button.
2
Push up the button part cover
Press the buttons in order.
●When all the i-Buttons or RF cards are
successfully deleted, a signal sound is heard.
How to Register Remote Controller (Option)
▶ User can register a total of 5 remote controllers at address #1 to #5.
▶ Our remote controllers adopt FM method and are duly authorized by
governmental authorities in Korea.
To register an initial remote controller (address #1)
1
Press the
memory button
2
Push up the button part cover
Press the buttons in order
and press the remote controller button.
●When the remote controller is successfully
registered, a signal sound is heard.
To register additional remote controllers
1
Press the
memory button
2
Push up the button part cover
select the address to be registered
~
Press the buttons in order and press the
remote controller button.
●When the additional remote controller is
successfully registered, a signal sound is heard.
To delete a registered remote controller (individual deletion)
For example, follow the instructions below to delete a remote controller registered in address #2.
1
2
Push up the button part cover
(An address where a remote
controller to be deleted is being registered)
Press the
memory button.
Press the buttons in order.
●When the remote controller is successfully deleted,
a signal sound is heard.
●When a user do not use remote control function, delete all the registered. And it helps to
extend the product's life cycle.
To delete all the registered remote controllers (lump-sum deletion)
1
2
Push up the button part cover
Press the buttons in order.
Press the
memory button.
●When all the remote controllers are successfully
deleted, a signal sound is heard.
12
How to Unlock from Inside
▶ Follow the instruction to unlock the door and go outside. User can easily open
the door only by putting down the door handle. No need for special actions.
▶ Using remote controller, you can open the door only by pressing the remote
controller button without approaching the door.
(Option)
Push down the door handle to
open the door.
Press the remote
controller button.
How to Lock the Door from Inside
Shut the door, and the door will be automatically locked.
How to unlock the Door from Inside using
Video phone (Dry contact type)
●Please connect 2 wire from the digital door lock to
the door lock terminal on the video phone.
●When there is call from the out door Camera.
Press door open key on the video phone.
●If the side locking device looks as shown
in the picture when you open the door,
the door is in a normal condition. Although
the uppermost dead bolt projects outside
about 3mm, this projection neither affect
the normal operation of the system nor
cause you inconvenience in using it.
Do not worry. It is not a kind of mechanical
trouble.
13
●In case that the gap between a locking
device and door frame is more than 5mm,
replace flat components (B) with convexoconcave ones. In this case, convexoconcave components should be installed
at right place according to the installation
direction of door lock. Do not confuse lefthand component with right-hand one.
installation component (A)
An installation example of
convexo-concave components
How to Unlock from Outside
▶ Follow the instructions below to open the door from outside.
To unlock the door using an access code
1
(eg. To input an access code
35612)
2
Push up the button part cover or press
access code
Pull down the button part cover or
press
Press the buttons in
order.
● After inputting an access code and
hearing a signal sound, push down
the door handle to open the door.
● In some case,
button functions to push
up and pull down the button part cover.
●If you do not open the door within 5 seconds after inputting an access code, the door is
automatically locked again for security. In this case, input an access code again to open
the door.
To unlock the door using an i-Button or RF card
1
2
Press
the start /
End Button
and put a
registered
RF card to
the RF card
contact part.
Put a
registered
i-Button
to the
i-Button
contact
part.
● After putting the
i-Button or RF card,
push down the door
handle to
open the door.
●If you do not open the door within 5 seconds after putting the i-Button or RF card, the
door is automatically locked again for security. In this case, put the i-Button or RF card
again to open the door.
●In case of forgetting access code or loss of i-Button or RF card, You can open the door
with the emergency key(see p.15)
14
How to Unlock from Outside(continued)
▶ Follow the instructions below to open the door from outside.
To unlock the door using a remote controller
1
2
Press the button
on remote
controller.
●After pressing the remote controller button
and hearing a signal sound, push down
the door handle to open the door.
●If you do not open the door within 5 seconds after pressing the remote controller button,
the door is automatically locked again for security. In this case, press the remote
controller button again to open the door.
How to Replace the Battery for Remote Controller
2
Indoor Remote Controller
1.Open the cover of battery chamber at the rear side
of remote controller.
2.Pull out the consumed battery and put into the new
one (6F22x(Fc-1)9V).
1
1
Outdoor Remote Controller
2
1.Unscrew the rear side of remote controller.
2.Pull out the consumed battery and put into the
new one (12V/23A).
To unlock the door using emergency key
1
2
Open the keyhole
cover at the upper
side of door handle.
15
(If you forget your access code, you can
unlock the door using emergency key.)
Insert key and turn it
to the left or right
about 90 degrees.
3
When giving the key a
turn, push down the door
handle to open the door.
●Open the door when the giving the key a turn. If you remove the key from the hole
before you open the door, the door is automatically locked.
●You are recommended to keep emergency key outside (your car or office) or always
carry it.
●In case that dual lock function is set, warning alarm goes off. (See p. 16)
Warning Alarm Function
▶ If anyone tries to unlock the door in a forceful manner when it is being locked,
warning alarm will go off. If you input a proper access code, warning signal is
automatically cleared.
To set the warning alarm function
1
Press the
memory button.
2
Push up the button part cover
Press the buttons in order.
●When the warning alarm function is successfully
set, operation LED flickers and a signal sound is
heard.
To cancel the warning alarm function
1
Press the
memory button.
2
Push up the button part cover
Press the buttons in order.
●When the warning alarm function is successfully
cancelled, operation LED flickers and a signal
sound is heard.
●When the product is shipped from factory, warning alarm function is set
cancelled.
Dual Lock Function
▶This function offers dual control by access code and i-Button or RF card. This
function is available only when both access code and i-Button or RF card are
registered in the system. In other cases, error signal will go off. (This function
gives you convenience especially when you are out for a long time or take a trip.)
▶Dual lock function is automatically cancelled once you use it, so you should set
this function every time you want to use it.
To set dual lock function
1
Press the
memory button.
To use dual lock function
2
Push up the button
part cover
A Signal sound
1
Push up the button part cover or press
i-Button
Access Code
or RF card
● In some case,
button functions to push up
and pull down the button part cover.
When you press
button, operation LED starts flickering.
16
Silence (Manner) Mode
▶Silence mode is useful if you feel that the signal sound of button is too loud
when you unlock the door using access code. If you press the button in
silence mode, button signal sound is not heard but only operation LED
flickers. Follow the instructions below to set and cancel this function.
To set the silence (manner) mode
1
Press the
memory
button.
2
Push up the button part cover
Press the buttons in order.
●When the silence mode is successfully set,
operation LED flickers and a signal sound is
heard.
To cancel the silence (manner) mode
1
Press the
memory
button.
2
Push up the button part cover
Press the buttons in order.
●When the silence mode is successfully cancelled,
operation LED flickers and a signal sound is heard.
●When the product is shipped from factory, this function is set cancelled.
●Even if silence mode is being set, warning alarm sound goes off normally.
17
Auto Lock Error Warning Alarm Function
▶Using this function, warning alarm goes off when door is shut but not
automatically locked.
Follow the instructions below to set and cancel this function.
To set the auto lock warning alarm function
1
Press the
memory
button.
2
Push up the button part cover
Press the buttons in order.
●When this function is successfully set, operation
LED flickers and a signal sound is heard.
●If the door is not shut well, warning alarm will go
off after 2 seconds.
●When you are using keep unlocking function,
if you push down the door handle for 2 seconds,
warning alarm will go off. In this case, the system
is in the normal condition.
To cancel the auto lock warning alarm function
2
1
Press the
memory
button.
Push up the button part cover
Press the buttons in order.
●When this function is successfully cancelled,
operation LED flickers and a signal sound is
heard.
●When the product is shipped from factory, this function is set up.
●Keep this function cancelled to prevent warning alarm from going off when
keep unlocking function is on.
●Even the door is shut, but if the warning alarm will go off, i means the door is
not shut well. In this case, shut the door again.
18
Control Function
▶If you feel that an access code alone is not enough for security when you are
out for a long time, set this control function. Setting this function, you should
input control and access code to open the door. (Control and access code
should not be the same. For control code, only 7-digit number is available.)
(e.g. To register control code
1234567)
To register the control code
1
2
Press the
memory
button.
Push up the button part cover
Control Code
Control Code
Press the buttons in order.
●When this function is successfully set, operation LED
flickers and a signal sound is heard.
Press the button in order
(to confirm the setting)
※To change the control code, input new code following the above procedure.
※To delete the control code, refer to "To delete all the registered access codes" at
p.10. Deletion of control code automatically cancels the control function. In this case,
all access codes (address #1 to 5), except for the initial code at address #0, are
cleared.
To unlock the door in control mode
1
(When control function is on, follow the
instructions below to unlock the door.)
2
Push up the button part cover or press
Control Code
Press the buttons in order.
● In some case,
button functions to push
up and pull down the button part cover.
19
Access Code
Pull down the cover or
press
Keep Unlocking Function
▶The door is locked immediately after it is shut. Using this function, however,
you can keep the door always unlocked. This function gives you convenience
when a lot of people come in and go out (e.g. family events).
To set the keep unlocking function
When the door is being
opened, press the manual
/auto selection button.
●When this button is being
pressed back, this function is
successfully set and activated.
To cancel the keep unlocking function
Pull this button out and
place it to the initial
position.
Compulsory Lock Function
▶Using this function, an outsider cannot open the door even with access codes
and emergency keys. compulsory lock function gives you more security at
night when special attention to security is needed.
To set the compulsory lock function
When the door is being
shut, press the manual
/auto selection button.
●When this button is being
pressed back, this function
is successfully set and
activated.
To cancel the compulsory lock function
Pull this button out
and place it to the
initial position.
20
When and How to Replace Batteries
▶When battery power gets low, the operation LED blinks and 'beep' sounds.
This indicates that the batteries need to be replaced.
Follow the instructions below to replace batteries.
1
2
Press
part lightly
and, at the same time,
push the cover in the
direction of arrow
mark to open.
Pull out consumed
batteries and put into
new ones.
●8 AA-type alkaline batteries
(1.5V) is required.
●Before putting into new
batteries, check their
positive and negative poles
correctly.
3
Pull down the cover to
close till 'click' sounds.
●After replacing batteries,
you are recommended to
ensure that the system
normally works by
inputting access code
once and more.
Warning
●Before putting into new batteries, check their positive and negative poles correctly.
●For digital door lock products, AA-type alkaline batteries must be used.
Do not mix and used other kinds of batteries.
●Incorrect insertion of batteries may cause disruption, leakage and heating.
●If batteries are not replaced with new ones even when their power gets low, the system
converts the door into compulsory lock mode before batteries are completely
discharged. In this case, unlock the door using 9V battery or emergency key and
(RF card) replace the consumed batteries.
●Even when batteries are replaced, the registered access codes, i-Buttons (RF cards),
control code and remote controller are retained in the system.
●When replacing batteries, replace all of them(8 EA) at once (not a part of them).
●If batteries are abruptly discharged and you do not hold any emergency key, connect a
9V battery to emergency power supply to supply emergency power to the system.
(In this case, battery's poles do not affect
the emergency power supply; any direction
9V emergency
is all right).
power supply terminal
●For the battery replacement for remote
controllers, please see p. 15.
DC 9V
Battery
21
Check Points Before Trouble Notice
▶Do not fail to check following points before your trouble notice to our agencies.
Troubles
Check Point
Actions
Does operation LED flickers?
Batteries are completely
discharged. Open the door with
emergency key and replace the
consumed batteries (see p. 21)
Are you sure that you open
the door within 5 seconds after
inputting the access code?
The door is automatically locked
5 seconds after access code is
input. Input access code again to
open the door. (see p.14)
Are you sure that control
function is in off mode?
To open the door when the control
function is activated, you should press
the control code before inputting access
code. Press the control code first and
input access code. (see p. 19)
Are you sure that you open
the door within 5 seconds after
contacting the i-Button(RF card)?
The door is automatically locked
5 seconds after i-Bitton(RF card) is input.
Contact i-Button(RF card) to the right
place again to open the door. (see p.14)
Are you sure that you use
the registered i-Button (RF card)?
Check whether the i-Button (RF card) is
normally registered and try again.
Otherwise, register i-Button (RF card).
(see p. 11)
The door isn't locked
automatically.
Are you sure that keep unlocking
function is in off mode?
When the keep unlocking function is on,
the door cannot be shut automatically.
Cancel the keep unlocking function
(see. p. 20)
When the door is shut,
warning alarm goes off.
Don't you activate the keep
unlocking function?
When auto lock error warning alarm
function is on, it is normal that a signal
sound is heard. It's not a kind of
mechanical trouble.(see. p. 18)
I pressed the button,
but the system
doesn't work.
I input the access code,
but the door isn't
unlocked.
I contact i-Button (RF
card) to the system, but
the door
isn't unlocked.
Product Specifications
Model Name
KDL-C1
KDL-T1
Power
AA-type alkaline batteries
(1.5V, 8 EA)
Operation
Electronic Control Method
Weight
Size
3.5Kg
3.2Kg
Outside 80x 305x 45(mm) 75x 310x 34(mm)
(WXLXH) I n s i d e 86 x 278 x 40(mm)
●This product cannot cover whole range of security
functions. To ensure your security, you are
recommended to install the dedicated security product.
●Any disassembly, re-assembly or modification of the
product and use of the disassembled, re-assembled or
modified product for technical purpose without approval
from KOCOM Co., Ltd. may cause legal
sanctions.
●All the intellectual property rights including trademark
and copyrights in this manual belong to KOCOM Co.,
Ltd. Illegal copy, duplication or reproduction, partly or
entirely, of this manual is not permitted.
22
Warranty
To receive after-Sale service, have the following ready when you
contact our branches
1. Name of the product
2. Model number of the product
3. The area of problem
4. Phone number and address at which you can be contacted.
Warranty Card
PRODUCT
MODEL
DATE PURCHASED
WARRANTY PERIOD
AGENCY ADDRESS
KOCOM Warranties the original purchaser of this product as follows.
1) This product is produced under strict quality control and inspection procedures.
2) If this product breaks down during proper use as a result of product defect,
KOCOM will repair it within one year from date of purchase free of charge.
3) The following cases will be subject to charge, even during warranty period:
a. Breakdown during transport, or through careless treatment, by consumer.
b. Breakdown cause by unauthorized repair, or system modification.
c. Breakdown cause by natural disaster or power disorder.
KOCOM Product
Home Network System / Home Automation / Home Videophone
CCTV System / Interphone & Doorphone / Multimedia
Head Office
KOCOM Bldg., 260-7 Yumchang-Dong, Kangseo-Gu,
Seoul 157-040, Korea
TEL
+82-2-6675-2211
FAX
+82-2-6675-2000
Homepage http://www.kocom.co.kr
E-mali
[email protected]
DIGITAL DOOR LOCK
05. 08