1
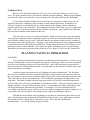
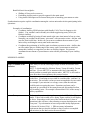
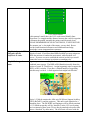
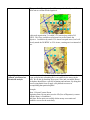
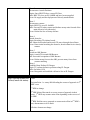
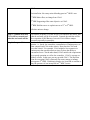
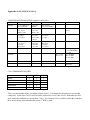
Decisive Action©
Operations Planning
BY
© SFC (RET) Vincent “TJ” Taijeron
INTRODUCTION
Because of the detail and complexity of Decisive Action (DA) the learning curve can be very
steep. The game mechanics force you into more detailed operations planning. Without proper planning
you will never achieve your objectives, and your enjoyment of the game will be greatly diminished.
DA accurately simulates modern Division and Corps-level operations, which means you can
apply the same tactics, techniques, and procedures as those found in these units. Remember it is a
“tactical” simulation, as indicated by the size of the units doing the fighting, which are battalions,
brigades, and in some cases companies. Do not approach this game in the same way you’ve approached
others. The “free” movement system (no hexes), and the way the units “must” interact with each other,
has rarely been simulated in this manner at this level.
This is the first in a series of “Operations Manuals” which are meant to get you up and running,
and is geared towards the casual or beginning wargamer as well as more experienced gamers who may
not be familiar with this type of system. Note this manual is not meant to replace the user’s manual or
the references that come with the game. For those of you in the military this is not a complete treatment
of the Military Decision Making Process (MDMP) or Troop Leading Procedures (TLP), think of it as a
introductory course to those methods. This a quick start guide, something to get you up and running.
Remember, the information presented in this primer serves as a guide; it is in no way the “bottom line”.
PLANNING TACTICAL OPERATIONS
PLANNING
Everyone knows that planning is essential to conducting successful operations. DA forces you to
develop a detailed plan in order to accomplish your mission. Figuring out what you want to accomplish
is the easy part; figuring out a plan to do it can be difficult. One of the first things you must realize is
that no one unit in DA can dominate the battle—you must adhere to the concept of combined arms, and
plan your operations accordingly.
Another concept you must be aware of is fighting two battles simultaneously. The first battle
that everyone is familiar with is the close battle; this battle is characterized by your maneuver units (in
this case maneuver refers to Armor or Infantry units) being in direct contact with enemy maneuver units.
This is the battle we do the most planning for. The second battle (not common in other games) is the
deep battle. This battle is fought with your long range Artillery (ATACMS), Attack Helicopter units,
and Air Strikes (also referred to as Battlefield Air Interdiction or BAI). The goal of the deep battle is to
disrupt, neutralize, or destroy follow-on enemy forces, C2 (Command and Control), and logistics units.
The deep battle directly influences the close battle. For example, if you were defending and you
successfully neutralized the enemy’s follow-on forces he could not continue the attack, or maybe you’ve
successfully taken out his logistics, thus taking away his supplies and halting his advance.
Probably the most difficult aspect of planning an operation is synchronizing the actions of your
units. Synchronizing is the arrangement of battlefield activities in time, space, and purpose to produce
the maximum relative combat power at the decisive point. This is the Army definition of
synchronization. Let’s break it down in layman’s terms:
Battlefield activities might be:
• Shifting of forces such as reserves
• Positioning Artillery units to provide support for the main attack
• Using Attack Helicopters to hit forward units prior to launching your maneuver units.
Synchronization requires explicit coordination among the various units and activities participating in the
operations.
Examples of coordination:
• Coordinate Artillery SEAD missions with friendly CAS (Close Air Support or Air
Strikes). You wouldn’t send in friendly air without suppressing enemy ADA (Air
Defense Artillery)
• Coordinate an attack by having all units attack at the same time instead of one at a time.
Normally you wouldn’t hit the enemy “piecemeal” with one unit at a time—hit him with
your fist, don’t tickle him. In this case you want to coordinate the movement of your
units so they are hitting the enemy units at the same time.
• Coordinate the positioning of Artillery units in relation to maneuver units. Artillery has
no effect unless they are within range of the enemy, and if your maneuver units have
outrun their Artillery coverage then you have no Artillery support. So you must
coordinate the movement of your maneuver units with the positioning of your Artillery
units.
MISSION PLANNING
Step 1: Estimate of the
situation.
•
Mission
•
Enemy
1. ANALYZE THE MISSION
In the Army we use the following acronym to make an estimate of the
situation:
METT-T, which stands for: Mission, Enemy, Troops (Friendly), Terrain,
and Time. We use METT-T to summarize the facts concerning the
tactical problem as stated in the mission order. METT-T is also used to
assess how these factors influence the course of action.
The mission statement defines who, what, where, when, and why. You
decide How. Visualizing success could be considered the “end state” of
the mission. The end state is what you must accomplish to be successful.
For example if your mission is to occupy a town, then the end state
would be units occupying that town. Sometimes end state can be
expressed in a percentage of the enemy destroyed; this method is often
used in artillery units. An example is destruction of 50% of the enemy’s
artillery capabilities.
The best tool to use in analyzing the enemy is the OOB (Order Of
Battle). Take a look at what you’re facing, figure out how he will deploy
his forces. Remember to take note of the terrain in the AO (Area of
Operations); this will have a direct bearing on enemy deployment as well
as on yours. Try to determine at least two possible enemy deployments
or Courses Of Action (COA). ). PIRs are enemy information
requirements that you need to confirm or deny in order to accomplish
your mission (see the Intel section for more details).
•
Terrain and
Weather
To be successful you must analyze the effects of terrain for both the
enemy and friendly operations. The acronym used to analyze terrain is
OCOKA.
Observation and Fields of Fire - Observation is the condition of weather
and terrain that permits a force to see friendly, enemy, and neutral
personnel and systems and key aspects of the environment.
Cover and Concealment - Cover is protection from fire (in DA, usually
terrain marked red or yellow in the Combined Obstacle Overlay, or
COO). Concealment is the protection from enemy surveillance.
Obstacles – Any physical characteristics of the terrain that impede
movement
Key and Decisive Terrain – Any locality or area, the seizure or retention
of which affords a marked advantage to either combatant
Avenue Of Approach – An air or ground route leading to an objective or
key terrain that an attacking force can use.
The number, type, and condition of the troops available. Remember
• Troops
morale plays a big factor in DA. Ensure you aren’t assigning troops with
low morale priority missions.
In game terms this is the time available as specified in the scenario.
• Time
2. ANALYZE THE SITUATION AND DEVELOP A COURSE OF ACTION
This is your Recon plan. It’s very important that you get a good look at
Step 1: Devise a plan to
how the enemy is deployed. Without this knowledge you are blind—not
confirm your analysis of
a great way to start an operation. You have several resources available to
the enemy.
conduct a thorough recon plan: ground recon such as cavalry units or in
some cases maneuver units; air recon in the form of helicopters and
UAVs (Unmanned Aerial Vehicles); and NAIs (Named Areas of
Interest). With thorough planning and coordination your recon efforts
should be fairly successful.
RECOMMENDATIONS:
• Use ground recon in the counter-recon fight. In other
words, defeat enemy recon efforts using your groundbased recon units. Ground-based recon should also be
employed as security for the main force; this is usually a
direct result of a successful counter-recon fight.
• Use UAVs to recon enemy forward positions and deep
areas. Please note that at some point enemy air or ground
units will take out your UAV. The search pattern for
UAV missions must be planned to take into account their
limited peripheral vision—remember, they must fly
directly over units to acquire them
Step 2: Assign each BDE
(Brigade) specific
objectives or tasks.
Step 3: Task organize
units.
UAV Search Pattern
In this pattern I usually have the UAV work toward friendly lines.
Please note I’ve exaggerated the distance between the vertical waypoints
to illustrate the pattern, normally the points would be much closer.
PLEASE REMEMBER RECON IS CONTINOUS, IT NEVER STOPS.
The moment you’ve lost sight of the enemy, you are dead. Recon
provides both situational awareness and situational knowledge,
knowledge is more important than awareness.
Based on your mission objectives and analysis assign each BDE an
objective or task. If you have three BDEs available you may assign two
BDEs the mission to conduct the main attack, while the third is in
reserve. If you use a reserve establish the criteria in which you would
commit the reserve or change its mission to something else.
Organize your units to accomplish their missions. Remember the
combined arms concept. The BDE or BN (Battalion) usually forms the
nucleus of a unit TF (Task Force). Assign supporting units to support the
BDE’s or BN’s mission. If you have a limited number of supporting
units this step is critical. A task-organized unit might look like this:
1st BDE Task Organized
Notice 1-22 Mech contains the ADA unit, DS (Direct Support) Artillery
BTRY (BaTteRY), and the engineers. This unit is task organized as a
Breaching force. The DS BTRY and Engineers will be directly attached
to 1-22 which means they will be “absorbed” in the 1-22 icon creating
one icon instead of three (note I’ll use directly attached to describe units
that are “absorbed” by other units). The ADA unit will travel with the
TF to provide ADA support. I could have opted to directly attach the
ADA unit as well but decided against it.
TF Tiger
In this task organization I’ve added 2-34 Armor along with its DS
BTRY. This force could be used to breach as well as attack the
objective. I could directly attach 2-34 Armor but opted not to, but I will
directly attach the DS BTRY to 2-34 Armor, creating one icon instead of
two.
Step 4: Develop a
“phased” plan based on
the mission analysis
1st BDE ready to cross the LD
Now that you’ve done your analysis and developed some COAs, it’s time
to put your plan into something that’s executable by the troops in the
field. We do this by breaking down your COAs into executable Phases.
Each phase should have a specific beginning and end state. By doing this
you are using battle focus to apply your planned resources in
accomplishing that particular phase.
Example:
Phase 1: Recon/Counter Recon
Beginning State: Recon units cross the LD (Line of Departure); contact
with the enemy is Established.
End State: Recon units successfully defeat enemy recon units and
establish a screen for the main body.
Counter-Recon fight
Phase 2: Main body LDs (forms a LD) to PL (Phaseline) Hammer and
establishes Attack Positions.
Beginning State: Main body LDs and moves to PL Hammer.
End State: All units in position vic (vicinity) PL Hammer.
Phase 3: Movement to Contact.
Beginning State: Main body crosses PL Hammer and establishes contact
with forward enemy defensive positions.
End State: Forward enemy positions have been breached; main body
moves through the breach to conduct their attacks on enemy positions.
Phase 4: Main Attack
Beginning State: Main and supporting attacks initiated.
End State: Defeat of enemy forces and occupation of the objective.
Phase 5: Consolidation and Reorganization.
Beginning State: Units move out to take defensive positions in
anticipation of enemy counter-attacks.
End State: Units in position conducting a deliberate defense.
This is just an example of what a phased plan might look like. By
defining beginning and end states you focus your energy on
accomplishing tasks necessary to complete that phase. By successfully
completing all the phases of your plan you will be successful at
accomplishing the end state of your mission. Remember: don’t fight the
plan, fight the enemy. If the plan isn’t working, call your audible, or
make adjustments.
3. ANALYZE COURSES OF ACTION (WARGAME)
Step 1: Develop at least two At this point you should have an idea of what your first COA will be.
COAs (Courses Of Action). You’ve been formulating this course during the last five steps. Now
you need to develop at least one and preferably two more COAs. What
you are doing is wargaming how the enemy will fight or react to one of
your COAs. For example, what happens when the enemy doesn’t react
in a way you expected, or maybe the enemy is deployed differently?
You must be able to react to those situations. By developing other
COAs you can cope with change more confidently because you’ve
already developed a COA for that situation. Think of a COA as a play
in Football (my apologies to anyone who isn’t familiar with American
Football): when the QB (Quarterback) comes to the line of scrimmage
Step 2: Visualize how each
COA will be executed and
what the end result will be.
Step 3: Compare COAs
he will usually survey the defense and determine if the offensive play
he called in the huddle will work against it; if not, he then calls an
“audible,” changing the play. The same applies to COAs. Your first
COA is the play you call in the huddle and is based on the best analysis
of the enemy, while an audible could be COA2 or COA3 (this is based
on what you “see” after a successful recon). Remember—COA1 may
still be valid, but it my require some “tweaking”.
The end result should always be the accomplishment of the mission.
Figure out which one of your COAs has the most potential for success,
then prioritize the others based on the most likely enemy COAs. For
example, we’ve determined that COA1 is the best one based on
enemy’s most likely COA. Now you need to figure out what the next
enemy COA will be and match it to the best COA to defeat it.
PLANNING TACTICAL OPERATIONS WALK-THRU
Scenario: NTC1 Tutorial
Designer Notes for NTC1 Tutorial:
1. All of the Division Artillery or DIVARTY units have been broken down to BTRY level. The DIVARTY BNs
are 1-72 FA, 2-72 FA, and 3-72 FA. Each BTRY has the same strength as a BN. The DIVARTY MLRS BN is
represented by its respective batteries: A, B, and C of the 2-51 FA (MLRS). Although the MLRS BTRYs are not
in direct support of a maneuver unit they could operate within a BDE’s area of operations. The primary mission
of the MLRS units is SEAD and CF or Counter-Fire.
2. I opted not to task organize the units, and let the player do it. Normally the DS ARTY BTRY would be
attached directly to the BDE. To facilitate the rapid movement through a breach you may also consider attaching
the Engineer BN directly to your “breaching” unit.
3. BDE HQs have been changed from “flag and staff” icons to actual BDE units. The HQ has a combat rating of
“1” and serves as a “container” for task organizing.
5. Scenario parameters that have changed (BLUE/RED)
Turns = 16
NAI/TAI = 10/6
Air superiority = 70/30
Daily Air strike = 40/40
1. ANALYZE THE MISSION
Step 1: Estimate of the
situation.
•
Mission
55 ID(M) attacks 100600 May to seize OBJ BANDIT (BARSTOW) in order to
restore the international boundary.
This is pretty straightforward for a Division mission. As the division
commander it’s up to me to assign objectives to my units. The objectives I
choose support the division’s mission, the end state being the seizure of OBJ
Barstow.
•
•
•
Enemy
Occupy OBJ BARSTOW
Establish a defensive line at PL DRAGON
The division intelligence officer (G-2) reports the following about the
enemy forces:
•
•
•
•
•
•
Area to large for the number of units available
Expect a “shallow” static defense with minimal depth
World Class Opposing Force (WCOPFOR) usually means high
morale
Force ratios are about equal, do not expect a counter-attack
Enjoys the advantage of interior lines, this will make it easy to
reinforce any part of his line
Expect main defense to be in 3rd BDE’s OPAREA
•
Terrain and
Weather
Avenues of approach are clearly defined and critical to the success of this
operation. Unlike the open areas of SWA (Southwest Asia), maneuver
area in NTC must be “earned.” We earn the freedom to maneuver by
controlling the avenues of approach—that means controlling the passes.
1st BDE:
• Mountainous area (look for the big “4” in 1BDE area) in the
southwestern portion of the Operations Area (OPAREA) will
impede movement to PL SABER
• Units will move through the small severely restricted one at a
time slowing deployment to the assault position just forward of
PL SABER
• Units vulnerable to air attack
2nd BDE:
• Long, narrow avenue of approach
• Units will have to move single file until they reach PL Dagger
• Once past Dagger they will be free to maneuver
3rd BDE:
• One chokepoint at PL Dagger
• Once through the chokepoint will be free to maneuverable to the
objective
Objective:
• Unrestrictive terrain is in the 3rd BDE’s OPAREA
• Terrain in 1st and 2nd BDEs area is severely restricted which
means RED can defend with fewer units using the terrain to his
advantage.
• 2nd BDE can maneuver along a narrow corridor in their area but
they will be constantly harassed and subject to attack from the left
flank.
•
Troops
•
•
•
•
•
•
•
Time
•
•
Force ratios are nearly equal
I have the advantage of ARTY as well as Air
MLRS units can stand-off, thereby reducing the effectiveness of
enemy counter-fire
My ability to hit him from the flanks and rear with my helicopters
will be a great combat multiplier
Control of the airspace over the objective may be the edge I need
to win.
In order to win I must use speed and momentum to make contact
and push through his defense.
Although it looks like I’ll have enough time I’m still concerned
about units moving through restrictive terrain and how long it
will take to get them into their assault positions.
Another concern is the breaching of his obstacles, which always
takes time.
2. ANALYZE THE SITUATION AND DEVELOP A COURSE OF ACTION
I need to confirm my analysis on how the enemy will defend. One of my
Step 1: Devise a plan to
first PIRs is to determine if he has units in the passes and along the
confirm your analysis of
avenues of approach. My second PIR will be to determine where his
the enemy.
main defenses are. IMO they will be in 3rd BDE’s OPAREA because of
the size of the area and the unrestricted terrain. My third PIR is to find
out where his reserves are. I want to attrit them as much as possible so
they’ll have no influence on the battle.
PIRs
•
•
•
Are the passes being defended? In what strength?
Where is his main defensive effort focused?
Where are his reserves?
PLAN
• Use the AIRCAV units to recon the passes.
• Use the UAVs for a deep recon and to trace his frontlines.
• Use 1-1 CAV to screen the movement of 3rd BDE. Use one BN
from each BDE to screen their movements.
Step 2: Assign each BDE
(Brigade) specific
objectives or tasks.
This will be Phase 1 for all courses of action (COAs). Which COA I
select will based on the answers to my PIRs. Remembering that recon
never stops the need for situational knowledge will always be uppermost
in my mind.
COA1 (Base Plan)
1st BDE
• Attack the northern-most enemy units, into the narrow pass that
leads to the main objective
• Secure the pass and threaten the enemy rear.
• Not the main effort.
2nd BDE
• Division reserve
• Demonstrate as if to attack with the intent to freeze the enemy
and prevent him from reinforcing in the 3rd BDE OPAREA
• Not the main effort, but may assume the main effort after being
committed
3rd BDE
• Main effort
• Breach the enemy obstacles in the southern-most area in an
attempt to outflank them
• Once through the obstacles they will attack into the objective.
• 2nd BDE may assume the main effort in the event 1st BDE is not
able to continue.
Corps Arty (CARTY)
• Shoot SEAD and Counter-Fire.
•
Destroy 30% of enemy artillery and ADA strength.
Army Aviation
• Attack deep targets
• Hight Value Targets are CSS (combat service support) and C2
• On Order (o/o) support maneuver units
Close Air Support (CAS)
• Isolate units in 3rd BDE’s OPAREA
• Destroy units identified as reserves
• Strike CSS and C2
Step 3: Task organize
units.
Because of the severely restrictive terrain in 1st and 2nd BDEs’
OPAREAs I decided the main effort would be 3rd BDE. The
disadvantage is that I expect this area to be heavily defended. My plan is
to use air strikes to isolate the area, preventing units from reinforcing it.
With 1st BDE threatening in the north he will not enjoy the freedom to
concentrate in 3rd BDE’s area. With CARTY shooting SEAD I’ll task
organize my DS ARTY units to their respective battalions (BNs). Army
aviation will be used to strike deep targets, causing confusion and
denying them the ability to resupply.
Each BDE will be organized as follows (see task organization matrix):
Breaching TF
1 x Mech Infantry BN, 1 x Engineer BN, 1 x DS Artillery Battery
(BTRY), and 1 x DS ADA unit.
Assault TF
2 x Maneuver units (armor or infantry) with respective DS Artillery
BTRYs.
CARTY
Division HQ will maintain control of supporting CARTY units.
Army Aviation will also remain under control of Division.
Corps ADA units will provide coverage to BDE and Division Support
Areas (BSAs and DSAs).
Step 4: Develop a
“phased” plan based on
the mission analysis
COA1 (Base Plan)
Phase 1
Recon/Counter-Recon fight.
Begins: Once units cross PL Dart (LD).
Ends: Never
Focus: Defeat enemy recon efforts and protect the main body units from
contact with enemy ground forces.
Phase 2
Movement to Assault Positions.
Begins: Once BDE TFs have crossed PL Dart.
Ends: BDE TFs close on PL SABER and have been resupplied.
Focus: Re-supply and the deployment of directly attached units.
Phase 3
Movement to contact.
Begin: BDE TFs cross PL SABER.
Ends: Forward TF makes contact and defeats enemy units forward of the
main defensive belt (obstacles).
Focus: Defeat first line of enemy defense.
Phase 4
Breach obstacles.
Begin: Breaching TFs initiate breach.
End: Obstacles breached and Assault TFs move through cleared lanes.
Focus: Protect units breaching the obstacles, breach obstacles in a timely
manner.
Phase 5
Assault on OBJ Barstow
Begin: Assault TFs assault OBJ Barstow.
End: Successful occupation of OBJ Barstow.
Focus: Defeat enemy forces at the OBJ, prevent enemy forces from
counter-attacking.
Phase 6
Establish Hasty Defense PL Dragon
Begin: TF assumes defensive positions along PL Dragon.
Ends: On Order (O/O)
Focus: Reorganize and establish a defensive line at PL Dragon.
3. ANALYZE COURSES OF ACTION (WARGAME)
Step 1: Develop at least two COA2
COAs (Courses Of Action).
Decision Point: 1 x enemy BN defending the avenue of approach in 2nd
BDE’s area.
1st BDE no change.
2nd BDE Main effort attacks to secure avenue of approach in their
sector. 3rd BDE may assume main effort depending on the success of
2nd BDE.
3rd BDE Held in reserve prepared to assume main effort in 2nd BDE’s
area, demonstrates as if to attack.
All other elements no change.
COA3
Decision Point: No enemy units defending pass in 1st BDE’s area.
1st BDE Main effort, no change from COA1.
2nd BDE Supporting effort same objective as COA2.
3rd BDE Held in reserve to exploit success of 1st or 2nd BDE.
All other units no change.
Step 2: Visualize how each
COA will be executed and
what the end result will be.
Step 3: Compare COAs
Envision the sequence of events for all COAs and how they differ, and
what the end state will be if successful. Granted, the end state will be
the occupation of OBJ Barstow, but each COA will have unique
outcomes especially in casualties.
Decide what you consider to be the most important aspects of the
mission, i.e., speed, low casualties, concentration of combat power, etc.
Then compare each COA to the criteria. How does the COA rank
given the criteria? For example, COA1 might be less expensive in
combat power but speed becomes an issue, as does the ability to
concentrate forces. On the other hand, COA2 satisfies the requirement
for a speedy operation as well as low casualties. COA3 is average on
all three criteria. In this case you may go with COA2. The Decision
Point for executing COA2 is that only one enemy armor or infantry
unit opposes 2nd BDE. With that in mind revise your PIR to confirm or
deny the presence of one enemy BN in 2nd BDE’s sector.
Appendix A (PLANNING TOOLS)
TASK ORGANIZTION MATRIX (Applies to all COAs)
1ST BDE
OPCON
Recon
Breach
Assault
2nd BDE (res)
A/1-72 ADA A/251 FA (MLRS)
3-22 Mech
C/1-72 FA
Phase 1 only
1-22 Mech
1-31 Egr
A/1-72 FA
3-22 Mech
C/1-72 FA
2-34 AR
B/1-72 FA
B/2-51 FA
(MLRS)
3-22 Mech
C/2-72 FA
Phase 1 only
3-88 AR
A/2-72 FA
B/2-72 ADA
2-31 Egr
4-88 AR
B/2-72 FA
3-22 Mech
C/2-72 FA
3rd BDE
Division
C/2-72 ADA
C/2-51 FA (MLRS)
1-1 CAV
UAV1
UAV2
2-2 Mech
A/3-72 FA
3-31 Egr
1-34 AR
B/3-72 FA
1-2 Mech
C/3-72 FA
Arty
Aviation
ADA
CSS
D/1-1 CAV
E/1-1 CAV
2nd FSB
1sr FSB
Corps
3rd FSB
D/2-72 ADA
55 DASB
1-39 FA (Corps)
3-27 FAR (MLRS)
3-39 FA
A/1-29 AHB
B/1-29 AHB
C/1-29 AHB
111 FSB
993 CSB
COA COMPARISON MATRIX
Speed
Low Casualties
Maneuver
Momentum
Total
COA1
3
3
3
3
12
COA2
2
3
2
2
9
COA3
3
3
2
2
10
This is just an example of how you might compare COA’s. You determine what factors to use and the
rating scale. In this case COA1 is the best choice followed by COA3, then COA2. Remember you still
must satisfy the conditions to execute these COA’s. For example COA3 would be used in the event that
there are no enemy units defending the pass in 1st BDE’s sector.
APPENDIX B (Decisive Action Player Turn Checklist)
Things to consider before you hit that advance turn button:
Unit movements coordinated
Resupply conducted prior to major engagement
Artillery in place to support maneuver units
Artillery modes set to support maneuver units
ADA units in place to support maneuver units
CSS units in position to provide responsive support
Logistics tail extended by using division/corps CSS units
Automatic resupply set after manually resupplying units
Close Air Support targets plotted
Decisive Action is a Copyright of HPS Simulations.
© Vincent R. Taijeron 2001. Although this publication is free, it is not in the public domain. You may
distribute this publication in a number of ways including posting it to Websites, CD’s or DVD’s, you
may print out any number of copies on your personal printer. You may not sell or re-sell this
publication for any reward, modify or re-modify the publication or pdf, without the written consent of
the author.