1
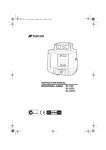
70285 LaserLink LLNTR Fiber Optic Transmitter 1550nm, 5-210 MHz INSTALLATION AND OPERATION MANUAL (This page intentionally left blank) LaserLink LLNTR Fiber Optic Transmitter 1550nm, 5-210 MHz INSTALLATION AND OPERATION MANUAL Data, drawings and other material contained herein are proprietary to ANTEC Network Technologies and may not be reproduced or duplicated in any form without the prior written permission of ANTEC Network Technologies. When ordering parts from ANTEC Network Technologies, be sure to include the equipment model number, equipment serial number and a description of the part. In all correspondence with ANTEC Network Technologies regarding this publication, please refer to: 70285 First Edition –12/98 1998 by ANTEC Network Technologies. All rights reserved. No part of this book may be reproduced in any form or by any means, without permission in writing from ANTEC Network Technologies. (This Page Intentionally Left Blank) Table of Contents Chapter 1 General Information.............................................................................................1-1 Overview..........................................................................................................................1-1 How to Contact ANTEC Network Technologies ..............................................................1-2 We Welcome Your Comments..........................................................................................1-3 Safety...............................................................................................................................1-4 Equipment Description ...................................................................................................1-10 Equipment Specifications................................................................................................1-13 List of Abbreviations ......................................................................................................1-15 Chapter 2 Installation ............................................................................................................2-1 Overview..........................................................................................................................2-1 Section A Preparing for Installation..............................................................................2-A-1 Overview......................................................................................................................2-A-1 Unpacking ....................................................................................................................2-A-2 Inspection.....................................................................................................................2-A-3 How to Return Equipment............................................................................................2-A-4 Recommended Tools and Equipment ............................................................................2-A-6 Section B Installing the LLNTR....................................................................................2-B-1 Installation....................................................................................................................2-B-1 Section C Care and Cleaning of Optical Connectors....................................................2-C-1 Overview......................................................................................................................2-C-1 Cleaning .......................................................................................................................2-C-3 Continued on next page 70285 LLNTR Installation and Operation v Table of Contents - continued Chapter 3 Setup and Operation ............................................................................................3-1 Overview..........................................................................................................................3-1 Section A Activating the LLNTR ..................................................................................3-A-1 Activation.....................................................................................................................3-A-1 Section B Controls and Indicators.................................................................................3-B-1 Overview......................................................................................................................3-B-1 Front Panel Controls and Indicators..............................................................................3-B-2 Rear Panel Connectors .................................................................................................3-B-4 Section C Status Monitoring .........................................................................................3-C-1 Overview......................................................................................................................3-C-1 User Panel ....................................................................................................................3-C-2 EMIC ...........................................................................................................................3-C-3 Third Party ...................................................................................................................3-C-4 Section D Troubleshooting.............................................................................................3-D-1 Troubleshooting ...........................................................................................................3-D-1 vi LLNTR Installation and Operation 70285 Chapter 1 General Information Overview Introduction This manual describes installation and operation of the Laser Link Narrowcast Return Transmitter (LLNTR). Manual Contents This manual contains three chapters. • Chapter 1 - General Information • Chapter 2 - Installation • Chapter 3 - Setup and Operation How to Use this Manual This manual is divided into the chapters listed above. Major topics in each chapter are listed at the beginning of the chapter. Use these lists to find the desired information. In this Chapter This chapter contains these major topics. Topic How to Contact ANTEC Network Technologies We Welcome Your Comments Safety Equipment Description Equipment Specifications List of Abbreviations 70285 LLNTR Installation and Operation See Page 1-2 1-3 1-4 1-10 1-13 1-15 1-1 Chapter 1 - General Information How to Contact ANTEC Network Technologies Overview How to Contact ANTEC Network Technologies ANTEC Network Technologies is ready to assist you as necessary. Here’s how to contact us. In the USA . . . By phone, call 1-800-FIBERME and follow the voice prompts. By mail, write to: ANTEC Network Technologies Attention: Technical Service 11450 Technology Circle Duluth, GA 30097 1-2 Outside the USA . . . Contact your ANTEC Network Technologies sales office for assistance. Sales offices are listed on the back cover of this manual. LLNTR Installation and Operation 70285 Chapter 1 - General Information We Welcome Your Comments Overview We welcome your comments on this manual. User comments are an important source of ideas to improve our manuals. How to Comment You can contact us by mail or e-mail. By Mail . . . Write to: ANTEC Network Technologies Attention: Technical Publications 11450 Technology Circle Duluth, GA 30097 70285 By E-mail: Send a message to: [email protected] LLNTR Installation and Operation 1-3 Chapter 1 - General Information Safety Overview Safety of personnel is the primary concern during all procedures. This section describes typical safety considerations. All of them may not apply to you or your installation/operation environment. Additional Requirements Admonishments Your organization may have additional safety requirements. These recommendations in no way supersede any safety requirements of your organization. Dangers, warnings, cautions and notes appear in the text immediately before the procedure step or other text to which they apply. Observe all these admonishments. The table below describes each category of admonishment. Admonishment Category DANGER WARNING CAUTION NOTE Description DANGER refers to a situation hazardous to personnel if the information in the DANGER is not observed. Possible consequences are severe injury or death. WARNING refers to a situation in which customer service may be interrupted if the WARNING is not observed. CAUTION refers to a situation in which equipment may be damaged if the CAUTION is not observed. NOTE highlights critical information about a procedure or description. A NOTE does not describe hazards to personnel, equipment or service. Continued on next page 1-4 LLNTR Installation and Operation 70285 Chapter 1 - General Information Safety, Continued Admonishment Symbols A graphic symbol and title denote each type of admonishment. The table below lists typical admonishments, their graphic symbol and meaning. All of these admonishments may not be used in this manual. Admonishment Graphic Symbol Meaning DANGER Electrical hazard. DANGER Laser light hazard. DANGER Lifting object hazard. DANGER Mechanical hazard. DANGER Chemical Hazard WARNING Possible interruption of customer service. CAUTION Possible damage to equipment. NOTE none Highlights critical information. No personnel or equipment hazards. Continued on next page 70285 LLNTR Installation and Operation 1-5 Chapter 1 - General Information Safety, Continued Emergency Plan Have an emergency plan. Know the procedures for obtaining first-aid and firefighting assistance. Plan your work and maintain good housekeeping. Your safety and the quality of the product depend on it. Resuscitation Personnel working with or near hazardous voltages or chemicals should be familiar with modern methods of resuscitation. Electrical Safety Summary These are general electrical safety precautions that are not related to any specific procedure. These are recommended precautions that personnel should understand and apply. Electrical Danger DANGER Avoid shorting circuits when using metal tools. Some circuits have high current capability. When shorted, these circuits will flash and may cause burns or eye injury. Remove all jewelry and exposed metal objects from body and clothing before performing maintenance, adjustments or troubleshooting. Before working inside the equipment, remove all power unless power is required to perform the procedure. Failure to observe these dangers may result in death or severe injury. Continued on next page 1-6 LLNTR Installation and Operation 70285 Chapter 1 - General Information Safety, Continued Electrical Danger - continued DANGER Replacement of fuses or other parts must be with identical types and ratings. Substitution of non-identical parts may cause safety and fire hazards. Servicing this equipment may require working with protective covers removed and ac power connected. Use extreme caution during these procedures. Failure to observe these dangers may result in death or severe injury. Mechanical Safety Summary These are general mechanical safety precautions that are not related to any specific procedure. These are recommended precautions that personnel should understand and apply. Mechanical Danger DANGER Overhead hazards, either because items may fall or because personnel may strike them unintentionally, are typical around industrial sites. Never stand underneath anything while it is hoisted. Always wear a hard hat, especially if someone is above you. Failure to observe this danger may result in death or severe injury. Continued on next page 70285 LLNTR Installation and Operation 1-7 Chapter 1 - General Information Safety, Continued Laser Safety Summary These are general safety precautions associated with a class 1B laser. They are not related to any specific procedure. These are recommended precautions that personnel must understand and apply. Radiation from semiconductor laser diodes feeding this detector may be sufficiently intensive to cause almost instantaneous damage to the eye. Consider each application hazardous until proven safe. Carefully consider power emitted, radiation angle of divergence or confinement of radiation within optical fibers or other physical constraints. Since the radiation is in the non visible (infra red) portion of the spectrum, take precautions to avoid the accidental viewing of the light source. Laser Danger DANGER Laser hazard. This product contains a class 1B laser with no safety interlocks. Under no circumstances should connectors be viewed with equipment enabled. Direct viewing of connectors can cause eye damage. Failure to adhere to this danger may result in serious injury to the eye(s) or even blindness. Continued on next page 1-8 LLNTR Installation and Operation 70285 Chapter 1 - General Information Safety, Continued Labels A safety label is affixed to this equipment in plain view. The safety label is shown below. ANTEC Network Technologies 5720 Peachtree Parkway Norcross, GA 30092 U.S.A S/N: DANGER Invisible laser radiation - Avoid direct exposure to beam. operate only with proper optical fiber installed in connector. Refer to user's manual. This product complies with 21 CFR 1040.10. FDA - Class 1B Invisible laser radiation -Avoid exposure to Beam. MAX. output power: Wavelength: Refer to user's manual. This product complies with IEC 825-1, 1993 as a laser product. Class 1B 70285 9848N40000001230 LLNTR Installation and Operation P/N: Manf: Month Assembled in Manufacturing Site ATTENTION Observe precautions for handling electrostatic sensitive devices 1-9 Chapter 1 - General Information Equipment Description Overview This section contains a high-level physical and functional description of the LLNTR. LLNTR features are listed below: • Front Panel Accessible Test Points Optical Output Power (1 V dc/10mW) RF Laser Drive Level (-30dB) • Front Panel Accessible Controls Power on/off key switch. Attenuation Adjust (-8 to +2 dB min.) • Front Panel Accessible Indicators Green/Red power LED Green/Red optical power status LED Green/Red laser temperature status LED Green/Red laser bias status LED Green/Red fan status LED • Front panel mounted SC/APC connector Physical Description The LLNTR consists of a metal chassis and internal electrical and optical components. The chassis installs into a Laser Link II Mainframe. Continued on next page 1-10 LLNTR Installation and Operation 70285 Chapter 1 - General Information Equipment Description, Continued Diagram The diagram below illustrates the LLNTR . XMTR LLNTR 15XX.XX nm 5-210 MHz POWER OPTICAL POWER LASER TEMP LASER BIAS FAN RF ATTENUATOR ADJUST OPTICAL POWER (1Vdc/10mW) ON TEST -30dB Functional Diagram The diagram below shows how the LLNTR functions. Laser Status Alarms Laser Status LEDs Laser Current Monitor Optical Power Test Point Laser Monitor Attenuator Adjust RF Input Supply A Supply B Power Status Alarm Power Status LED Fan Status LED General Alarm RF Signal Control Laser Optical Output Power Supply RF Test Point Continued on next page 70285 LLNTR Installation and Operation 1-11 Chapter 1 - General Information Equipment Description, Continued Functional Description Refer to the LLNTR functional diagram. The RF input requires a nominal 32 dBmV/channel signal for 6 channel loading. This signal is amplified and then passed through a variable attenuator circuit. The variable attenuator has a range of –8 to +2 dB and is controlled by a front panel potentiometer. The output of the attenuator is coupled to the laser board and to a calibrated -30 dB test point mounted on the front panel. The RF signal is applied to the laser board where it modulates the light source for transmission over the output fiber. The laser board consists of a DFB laser diode package. A laser monitor circuit provides constant temperature and output power control of the diode package over the full range of ambient temperature. This monitor circuit also provides a calibrated 1V dc/10 mW optical power test point to the front panel, controls the front panel optical power, laser temperature and laser bias status LEDs. It also provides analog signals and alarms to the telemetry connector on the Laser Link II Mainframe. The A/B power select circuit is an integral part of the LLNTR. In the event of a failure of the primary power supply, an optional redundant power supply wired to the Laser Link power distribution board can provide power to the LLNTR automatically. The POWER LED on the front panel displays power status. During normal operation, the LED is green. It is red when the +24V A supply (primary) has failed and power is supplied by the +24V B supply (backup). The LED is off when the LLNTR receives no power. The LLNTR also provides power alarms and status indicators to the Laser Link user panel or the Element Management Interface Card (EMIC). The Laser Link EMIC collects the vital signs signals from the modules in the Laser Link II Mainframe and provides the communications interface between the mainframe and the Track Link Element Management System. The Laser Link II Mainframe user panel receives information from the LLNTR through the mainframe general operational alarm (GOALN). The alarm LED on the mainframe turns red if any of the following occur: redundant power supply is selected; optical output power drops by 25%; laser temperature is out-of-range; laser bias is out-of-range; or fan failure. 1-12 LLNTR Installation and Operation 70285 Chapter 1 - General Information Equipment Specifications Overview This section describes specifications of the LLNTR. Optical Specifications The table below lists optical specifications. Characteristic Output power Connector return loss Wavelength RF Specifications Specification +9 ±1 dBm >65 dB SC/APC 1560.61 ±0.1 nm 1558.98 ±0.1 nm 1557.36 ±0.1 nm 1555.75 ±0.1 nm 1554.13 ±0.1 nm 1552.52 ±0.1 nm 1550.92 ±0.1 nm 1549.32 ±0.1 nm The table below lists RF specifications. Characteristic Input and test point impedances Frequency range Flatness Input and test point return losses Input level Level adjustment Test point level CNR CSO Specification 75 Ohms 5-210 MHz ±0.75 dB >14 dB +32 dBmV per channel1, 5 -8 to +2 dB -30 ±1 dB6 >49 dB1, 2 < -48 dB1, 2 Continued on next page 70285 LLNTR Installation and Operation 1-13 Chapter 1 - General Information Equipment Specifications, Continued RF Specifications (continued) Characteristic Specification < -59 dB1, 2 15 dB for 35 MHz2, 3, 7 > 40 dB4 CTB NPR dynamic range Crosstalk Notes: 1. Six CW carriers. 7, 13, 19, 25, 31 and 37 MHz 2. Optical path 10 dB fiber, 6 dB passive. Receiver: LLDR 3. Estimated input dynamic range levels for 35 MHz noise load: -45 to –29 dBmV/Hz 4. 8 optical channels launched into 10 dB of fiber at 7 dBm 5. Performance estimates based on 10% ±1% OMI 6. Relative to laser drive level 7. At 40 dB NPR level Power Specifications The table below lists power specifications. Characteristic Input power Power consumption Current drain Physical Specifications The table below lists physical specifications. Characteristic Operating temperature Relative humidity Optical connector Mounting Dimensions Weight 1-14 Specification +24 V dc provided by Laser Link II Mainframe 20 W maximum 850 mA maximum LLNTR Installation and Operation Specification 32 to 122 ºF (0 to 50 ºC) 5 to 95%, non-condensing SC/APC Requires Laser Link II Mainframe Height: 5.21 in (13.2 cm) Width: 2.17 in (5.5 cm) Depth 13.5 in (34.3 cm) 2.19 lb (1 kg) 70285 Chapter 1 - General Information List of Abbreviations Overview This table lists non-standard abbreviations in this manual. Abbreviations Abbreviation CDM C/N CNR CSO CTB dB dBm dBmV DC DFB DSO EMIC EQ FDM GOALN LLDR LLNTR NPR nsec NTSC RDL RDU RVD RVL RR RRU 70285 Definition companded delta modulation carrier-to-noise Carrier to noise ratio composite second order composite triple beat decibel decibel referenced to 1 milliwatt decibel-millivolt directional coupler distributed feedback discrete second order Element management interface card equalizer frequency division multiplex Global alarm Laser Link Reverse Data Receiver Laser Link Narrowcast Return Transmitter Noise power ratio nanosecond National Television Standards Committee non-cooled, Fabry-Perot data laser non-cooled/isolated distributed feedback laser cooled/isolated distributed feedback laser cooled Fabry-Perot video laser return for repair reverse receiver unit LLNTR Installation and Operation 1-15 Chapter 1 - General Information (This Page Intentionally Blank) **END OF CHAPTER** 1-16 LLNTR Installation and Operation 70285 Chapter 2 Installation Overview Introduction This chapter describes installation of the Laser Link Narrowcast Return Transmitter (LLNTR). In this Chapter This chapter contains these sections. Topic Preparing for Installation Installing the LLNTR Care and Cleaning of Optical Connectors 70285 LLNTR Installation and Operation See Section A B C 2-1 Chapter 2 - Installation (This Page Intentionally Blank) 2-2 LLNTR Installation and Operation 70285 Section A Preparing for Installation Overview Introduction This section describes preparing to install the LLNTR. In this Section This section contains the following topics. Topic Unpacking Inspection How to Return Equipment Recommended Tools and Equipment 70285 LLNTR Installation and Operation See Page 2-A-2 2-A-3 2-A-4 2-A-6 2-A-1 Chapter 2 - Installation Unpacking Overview ANTEC Network Technologies thoroughly inspects and carefully packs all equipment before shipment. At the time of shipment, the carrier assumes responsibility for its safe delivery; therefore, do not return damaged units to ANTEC Network Technologies. Procedure Unpack the LLNTR according to the procedure below. Step 1 2 3 4 5 2-A-2 Action Inspect shipping carton for visible damage. Open the shipping carton. (Do not destroy shipping cartons until installation is complete.) Remove all packing material. Inspect unit for visible damage. Using packing list, check for missing items (see "How To Inventory Equipment Received"). LLNTR Installation and Operation 70285 Chapter 2 - Installation Inspection What to do about Visible Loss or Damage Report visible loss or damage as follows. NOTE Failure to adequately describe external evidence of loss or damage may result in the carrier refusing to honor a damage claim. Step 1 2 3 What to do about Concealed Damage Concealed damage is not apparent until after unpacking. The contents may be damaged in transit due to rough handling even though the carton may not show external damage. The carrier is responsible for hidden damage caused in transit. If you follow these instructions carefully, ANTEC Network Technologies guarantees its full support of your claims to protect you against loss from concealed damage. Step 1 2 How to Inventory Equipment Action If you discover damage after unpacking, make a written request for inspection by the carrier's agent within 15 days of delivery date. File any claims with the carrier, not ANTEC Network Technologies. Follow this procedure to inventory equipment. Step 1 2 3 4 70285 Action Obtain a claim form from the carrier. Make a note of any loss or evidence of external damage on the freight bill or receipt. Have freight bill or receipt signed by the carrier's agent Action Check off each item received against the list on the packing slip included with the shipment. Verify this list matches the purchase order. If any items are missing, please notify ANTEC Network Technologies immediately by calling 1-800-FIBERME (in the US) or calling your local sales office (outside of the US).. Return a copy of the packing slip with the missing item(s) circled. LLNTR Installation and Operation 2-A-3 Chapter 2 - Installation How to Return Equipment Overview ANTEC Network Technologies makes every effort to ensure parts and equipment arrive in working condition. Occasionally, it may be necessary to return parts or equipment that are not in working condition. Procedure Follow this procedure to return equipment. Step 1 2 3 Action Contact ANTEC Network Technologies . . . In the US Outside the US By phone, call Contact your sales office for 1-800-FIBERME and follow assistance. Sales offices are the voice prompts. listed on the back cover of this manual. Tag or otherwise identify the defective equipment. Be sure to write the RR number on the tag. If possible, please reference the sales order, purchase order, and date the equipment was received. 4 CAUTION Do not use Styrofoam chips (peanuts). Use of Styrofoam chips (peanuts) will void the warranty. Pack the equipment in the original container and protective packing material, if possible. If the original packing material is not available, use a sturdy corrugated box and appropriate protective packing material. Continued on next page 2-A-4 LLNTR Installation and Operation 70285 Chapter 2 - Installation How to Return Equipment, Continued Procedure (continued) Step 5 Action Be sure to include this information: Your Name Company Name Street Address City, State, Country and Zip/Postal Code Telephone Number RR Number Problem Description 6 NOTE Ship equipment prepaid. ANTEC Network Technologies will not accept freight collect. Ship equipment to ANTEC Network Technologies as directed by Customer Service. 70285 LLNTR Installation and Operation 2-A-5 Chapter 2 - Installation Recommended Tools and Equipment Tools and Equipment These recommended tools and equipment are required for installation. Quantity 1 1 2-A-6 Description 1/4-inch flat-blade screwdriver Optical connector cleaning supplies LLNTR Installation and Operation 70285 Section B Installing the LLNTR Installation Introduction This section describes installing the LLNTR. The LLNTR is shipped assembled with the exception of the 15-pin male-tofemale shielded cable assembly and keys for the ON/OFF switch. Install the LLNTR in any slot, one through seven, of the mainframe. After installation, refer to the procedures in Chapter 3, Setup and Operation, to activate the LLNTR. Procedure Follow this procedure to install the LLNTR. Step 1 Action CAUTION Static sensitive devices. Always wear a properly grounded wrist strap when working on this equipment. The shelf has a grounding jack that may be used to plug the wrist strap into. Failure to observe this caution may result in equipment damage or premature equipment failure. Open the front cover of the mainframe by turning the front panel latch handles counterclockwise. Continued on next page 70285 LLNTR Installation and Operation 2-B-1 Chapter 2 - Installation Installation, Continued Procedure (continued) Step 2 Action NOTE When installing in a mainframe bay that is equipped with 14 rails, remove the rail in the “B” position to accommodate the LLNTR. 3 4 5 6 7 8 9 10 11 12 2-B-2 Carefully insert the LLNTR into an empty slot of the Laser Link II Mainframe. Align the flange on the top and bottom of the LLNTR with the top and bottom slide rail on the mainframe. Locate the optical connector mounted on the front panel. Clean the connector as described in Care and Cleaning of Fiber Optic Connectors. Secure the LLNTR in the shelf with the two captive screws located on the top of the LLNTR front face plate. The screws are provided with the LLNTR. Connect the 15-pin D-type shielded cable assembly: • one end to the connector labeled POWER on the rear of the LLNTR. • other end to the connector on the power distribution board of the mainframe, J1- J7. Secure both cable connectors with screws. Verify shelf power is on and turn the key switch of the LLNTR to the ON position. Verify that the POWER and LASER STATUS LEDs are green before proceeding. Note that while the LLNTR is stabilizing during initial startup, the LASER STATUS LED will be red Turn the key switch to the OFF position. Clean outgoing fiber connector as described in Care and Cleaning of Fiber Optic Connectors. Connect the LLNTR to the outgoing fiber connector. Continue to Chapter 3 to activate the LLNTR. LLNTR Installation and Operation 70285 Section C Care and Cleaning of Optical Connectors Overview Introduction Fiber optic connectors are cleaned at assembly, but require recleaning when the equipment is installed. Both the connector attached to the bulkhead adapter in the equipment and the jumper connector that will be attached to the bulkhead adapter must be cleaned. This section describes recommended cleaning instructions for both halves of the connection. Guidelines Proper care and cleaning of optical connectors is critical to equipment operation. Follow these guidelines when working with optical connectors. DANGER Laser light hazard. Never look into the end of an optical fiber or connector. Use an indirect imageconverting device such as the “Find-R-Scope.” Failure to observe this danger can result in eye damage or blindness. • The working surfaces of optical connectors are highly-polished and designed for precision alignment. Keep them microscopically-clean and free of scratches. • Optical power readings and signal quality can seriously degrade if optical connectors or bulkheads are mishandled or allowed to become dirty. • Optical bulkheads on transmitters and receivers and the connector faces of optical cables are shipped with protective caps. Do not remove caps until ready to make connections. • Do not touch unprotected optical connector faces. Do not allow dirt to touch the connector or the bulkheads. Small scratches, minute traces of dirt or skin oils can degrade signal quality. Continued on next page 70285 LLNTR Installation and Operation 2-C-1 Chapter 2 - Installation Overview, Continued Consumable Materials These consumable materials are required for the cleaning procedure. • Lint Free Wipes (tissues) • Ethyl or Isopropyl Alcohol, >91% purity (Do not use a lesser grade. Do not use common rubbing alcohol.) • Filtered Canned Air • Lint Free Swabs 2-C-2 LLNTR Installation and Operation 70285 Chapter 2 - Installation Cleaning Overview This section describes cleaning two types of optical connectors: • Connectors installed in a bulkhead adapter • Connectors not installed in a bulkhead adapter Cleaning of Connectors in a Bulkhead Adapter Follow this procedure to clean optical connectors installed in an equipment bulkhead adapter. Step 1 2 Action Remove protective cap from bulkhead connector. Blow dust particles from the interior surface of the bulkhead adapter using filtered canned air as follows: CAUTION Be sure to hold air can in upright position so that liquid from the can cannot enter the air tube. Do not shake the can. Do not blow air directly on the fiber. Failure to observe this caution may damage the connector or cause contaminates to be placed on the surface being cleaned. Step 1 2 Action Hold air can upright. Position the can extension tube approximately 6 in (15.3 cm) from the surface to be cleaned. Gently blow into the adapter. Continued on next page 70285 LLNTR Installation and Operation 2-C-3 Chapter 2 - Installation Cleaning, Continued Cleaning of Connectors in a Bulkhead Adapter (continued) Step 3 Action Swab the bulkhead adapter using a lint-free swab as follows: CAUTION Do not use alcohol less than 91% pure. Do not use common rubbing alcohol. Failure to observe this caution will deposit contaminates on the fiber surface. Step 1 2 3 4 5 Action Moisten a lint-free swab with >91% pure ethyl or isopropyl alcohol. Insert the moistened swab into the bulkhead adapter until it touches the interior connector face. Apply light pressure and rotate the swab approximately eight to ten turns. Remove the swab. Insert a dry lint-free swab and gently turn several times. Continued on next page 2-C-4 LLNTR Installation and Operation 70285 Chapter 2 - Installation Cleaning, Continued Cleaning of Connectors in a Bulkhead Adapter(continued) Step 4 Action Blow dust particles from the interior surface of the bulkhead adapter using filtered canned air as follows: CAUTION Be sure to hold air can in upright position so that liquid from the can cannot enter the air tube. Do not shake the can. Do not blow air directly on the fiber. Failure to observe this caution may damage the connector or cause contaminates to be placed on the surface being cleaned. Step 1 2 5 Action Hold air can upright. Position the can extension tube approximately 6 in (15.3 cm) from the surface to be cleaned. Gently blow air into the adapter. Insert a recently cleaned connector into the bulkhead adapter. Continued on next page 70285 LLNTR Installation and Operation 2-C-5 Chapter 2 - Installation Cleaning, Continued Cleaning of Connectors Not in a Bulkhead Adapter Follow this procedure to clean optical connectors not installed in an equipment bulkhead adapter. Step 1 Action NOTE Do not reinstall protective cap after cleaning procedure. Protective caps are designed to protect the connector ferrule from damage, not to keep the connector clean. Remove protective cap from bulkhead connector. 2 CAUTION Avoid contamination of lint-free wipes. Handle wipes by the edges. Discard each wipe immediately after use. Failure to observe this caution may result in contaminates on the surface being cleaned. 3 4 Place a dry lint-free wipe on a solid surface. Place another dry lint-free wipe on top of the first wipe. CAUTION Do not use alcohol less than 91% pure. Do not use common rubbing alcohol. Failure to observe this caution will deposit contaminates on the fiber surface. Moisten the top wipe with >91% pure ethyl or isopropyl alcohol. Continued on next page 2-C-6 LLNTR Installation and Operation 70285 Chapter 2 - Installation Cleaning, Continued Cleaning of Connectors Not in a Bulkhead Adapter (continued) Step 5 6 7 8 Action Gently wipe the connector ferrule and endface. For APC connectors only, wipe with one continuous motion in the direction of the angle. Discard the wipes. Place a dry lint-free wipe on a solid surface and gently slide the connector endface across the wipe. For APC connectors only, wipe with one continuous motion in the direction of the angle. Blow dust particles from connector using filtered canned air as follows: CAUTION Be sure to hold air can in upright position so that liquid from the can cannot enter the air tube. Do not shake the can. Do not blow air directly on the fiber. Failure to observe this caution may damage the connector or cause contaminates to be placed on the surface being cleaned. Step 1 2 9 70285 Action Hold air can upright. Position the can extension tube approximately 6 in (15.3 cm) from the surface to be cleaned. Gently blow air across the connector end or surface to be cleaned. Promptly insert connector into cleaned bulkhead adapter. LLNTR Installation and Operation 2-C-7 Chapter 2 - Installation (This Page Intentionally Blank) **END OF CHAPTER** 2-C-8 LLNTR Installation and Operation 70285 Chapter 3 Setup and Operation Overview Introduction This chapter describes how to set up and operate Laser Link Narrowcast Return Transmitter (LLNTR). These procedures assume the LLNTR is installed according to the procedures in Chapter 2 of this manual. In this Chapter This chapter contains the following sections. Topic Activating the LLNTR Controls and Indicators Status Monitoring Troubleshooting 70285 LLNTR Installation and Operation See Section A B C D 3-1 Chapter 3 – Setup and Operation (This Page Intentionally Blank) 3-2 LLNTR Installation and Operation 70285 Section A Activating the LLNTR Activation Introduction This section describes activating the LLNTR. Activation consists of connecting the RF input signal to the LLNTR. When the input signal is connected, the LLNTR automatically produces an optical output. RF Signal Input Check Check the RF input signal with a spectrum analyzer prior to connecting the cable to the RF IN jack of the LLNTR. In the case of a 6 NTSC channel load, the laser drive level is optimized during manufacture to achieve the specified link performance of the LLNTR with an RF input level of 32 dBmV/channel. After verifying the 32 dBmV/channel RF level, connect the 75-Ohm cable to the RF input port on the rear of the LLNTR. 70285 LLNTR Installation and Operation 3-A-1 Chapter 3 – Setup and Operation (This Page Intentionally Blank) 3-A-2 LLNTR Installation and Operation 70285 Section B Controls and Indicators Overview Introduction This section describes the controls and indicators of the Laser Link Narrowcast Return Transmitter (LLNTR). In this Section This section contains the following topics. Topic Front Panel Controls and Indicators Rear Panel Connectors 70285 LLNTR Installation and Operation See Page 3-B-2 3-B-4 3-B-1 Chapter 3 – Setup and Operation Front Panel Controls and Indicators Overview The front panel of the Laser Link Narrowcast Return Transmitter (LLNTR). provides access to the optical and RF test points, RF attenuator and LED diagnostic indicators and the optical output connector. Diagram This diagram shows the front panel of the LLNTR. 1 2 3 4 XMTR 5 LLNTR 15XX.XX nm 5-210 MHz POWER OPTICAL POWER LASER TEMP LASER BIAS FAN 6 RF ATTENUATOR ADJUST OPTICAL POWER (1Vdc/10mW) 7 ON TEST -30dB 8 9 10 Continued on next page 3-B-2 LLNTR Installation and Operation 70285 Chapter 3 – Setup and Operation Front Panel Controls and Indicators, Continued Description The table below describes the front panel controls and indicators. Reference Control/Indicator 1 POWER LED 2 3 4 5 6 7 8 9 10 70285 Description Displays status of power to the LLNTR: • Green indicates normal operation of the +24 V dc primary power supply • Red indicates the LLNTR is powered by the +24 V dc backup supply • Off (not lit) indicates no power to the LLNTR. OPTICAL POWER • Green indicates normal operation LED • Red indicates optical power has dropped by >25% of initial value. LASER TEMP LED • Green indicates normal operation • Red indicates laser temperature is out of range LASER BIAS LED • Green indicates normal operation • Red indicates laser bias current is out of range FAN LED • Green indicates normal operation • Red indicates fan failure RF ATTEN ADJUST Provides –8 to +2 dB level adjustment to the laser RF drive level OPTICAL POWER Optical power test point. Provides a 1 V dc/10 mW scaled dc voltage of the LLNTR’s optical output power. 1 V dc represents 10 mW of optical power at 1550 nm OFF/ON Key Switch Key switch turns power on and off to activate and deactivate the LLNTR TEST -30 dB A -30 dB sample of the laser RF drive level SC Adapter Optical output SC/APC connector LLNTR Installation and Operation 3-B-3 Chapter 3 – Setup and Operation Rear Panel Connectors Overview The rear panel of the LLNTR provides access to the RF input connector and the power interface. Diagram This diagram shows the rear panel of the LLNTR. 2 1 3 Continued on next page 3-B-4 LLNTR Installation and Operation 70285 Chapter 3 – Setup and Operation Rear Panel Connectors, Continued Description The table below describes the rear panel controls and indicators. Reference Connector 1 RF IN 2 POWER 3 70285 FAN Description RF input F-type connector 15-pin D-type connector. Provides power and alarm connector to the Laser Link II Mainframe power distribution board. • Pin 1 - GND • Pin 2 - NC • Pin 3 - NC • Pin 4 - GOALN (general alarm) • Pin 5 - Redundant power alarm • Pin 6 - +24 V dc supply A • Pin 7 - +24 V dc supply B • Pin 8 - GND • Pin 9 - NC • Pin 10 - NC • Pin 11 - Optical output power calibrated 1 V/10 mW • Pin 12 - Laser bias current calibrated 1 V/50 mA • Pin 13 - LIM current limit alarm • Pin 14 - +24 V dc supply A • Pin 15 - GND 4-pin connector. Allows fan removal. LLNTR Installation and Operation 3-B-5 Chapter 3 – Setup and Operation (This Page Intentionally Blank) 3-B-6 LLNTR Installation and Operation 70285 Section C Status Monitoring Overview Introduction This section describes status monitoring for the LLNTR. In addition to the front-panel LEDs, LLNTR vital parameters are also privided to the mainframe EMIC or user panel and to the mainframe telemetry port. Depending on the configuration purchased, the mainframe is shipped to the customer with either the EMIC or the user panel installed. Should the user desire to upgrade to the EMIC in the future, an upgrade kit is available. Refer to the Laser Link II Mainframe manual. In this Section This section contains the following topics. Topic User Panel EMIC Third Party 70285 LLNTR Installation and Operation See Page 3-C-2 3-C-3 3-C-4 3-C-1 Chapter 3 – Setup and Operation User Panel Description The Laser Link user panel receives information from the LLNTR through the mainframe’s general operation alarm, GOALN. The ALARM LED on the panel illuminates red to signal an alarm condition for any of the modules housed in the mainframe (transmitters, receivers, and amplifiers). Conditions of the LLNTR which would trip this alarm include: operation by redundant power supply, laser temperature out of range, laser bias out of range, optical power output out of range (drop by 25%), and/or a fan failure. 3-C-2 LLNTR Installation and Operation 70285 Chapter 3 – Setup and Operation EMIC Description The optional Element Management Interface Card (EMIC) • collects the vital signs signals of the modules in a Laser Link II Mainframe • provides the communications interface between the mainframe and the Track Link system (if used) Parameters monitored by this system include: power supply status, +5 V dc status, optical output power, laser bias current, and laser temperature (via GOALN signal). The actual optical output power and laser bias values are provided to the user through a graphical interface. 70285 LLNTR Installation and Operation 3-C-3 Chapter 3 – Setup and Operation Third Party Description For use with third-party network management systems, such as AM Communications and Superior Electronics products, the LLNTR may be monitored via the telemetry port on the Laser Link II Mainframe. The 25-pin connector interface is located on the power distribution board and provides non-proprietary network management signals (see mainframe user manual). The telemetry alarm parameters, vital sign designation, and DB-15 connector pin numbers are provided in the table below. Alarm Vital Sign (VS #/Pin #) #1 / 5 #2 / 11 #3 / 12 #4 / 4 3-C-4 Description Logic Redundant power alarm +5 V = alarm 0 V = normal Optical output power Analog 1 V/10 mW Laser bias current Analog 1 V/50 mA GOALN general alarm, +24 V = normal +5 V dc fault, RPAN, 0 V = alarm laser temp out of range, laser bias out of range, optical power out of range, or fan alarm LLNTR Installation and Operation 70285 Section D Troubleshooting Troubleshooting Overview The LLNTR is designed for continual reliable service in a communications network. There is no recommended maintenance required to be performed on the LLNTR. Routine network preventative maintenance such as monitoring performance can be achieved from the front panel diagnostics or through element management systems such as Track Link or third party providers. Chart Use this chart as an aid in the trouble analysis of the LLNTR. If you require assistance, call ANTEC Technical Services at 1-800-FIBER ME. Technical Service is available between 8 am and 6 pm est. Twenty-four hour emergency service is available on a callback basis within 30 minutes. Indicator Power LED red or extinguished OPTICAL POWER LED red Trouble Condition Recommended Action Power failure Check the +24 V A and B LED status on the user panel. • If red, replace the appropriate power supply and contact Technical Services for an RR#. • If extinguished, check the 15-pin cable from the LLNTR to the mainframe power distribution board for +24 V. Replace as needed. • If the cable is normal and +24 V is present, replace the LLNTR and contact Technical Services for an RR#. Optical output Replace the LLNTR and contact power is out of Technical Services for an RR# range Continued on next page 70285 LLNTR Installation and Operation 3-D-1 Chapter 3 – Setup and Operation Troubleshooting, Continued Chart (continued) Indicator LASER TEMP LED red LASER BIAS LED red FAN LED red Trouble Condition Recommended Action Laser temperature is If the operating environment is out of range within normal range, replace the LLNTR and contact Technical Services for an RR# Laser bias current is Replace the LLNTR and contact out of range Technical Services for an RR# Fan failure The LLNTR will continue to operate properly up to 50 ºC. Replace or repair as necessary. Disconnect fan by removing fan screw and power adapter. Contact Technical Services for an RR# or replacement fan. **END OF CHAPTER** 3-D-2 LLNTR Installation and Operation 70285 (This Page Intentionally Left Blank) 70285 United States Global Headquarters 11450 Technology Circle Duluth, GA 30097 USA P. 678-473-2000 F. 678-473-8454 Canada Toronto 1458 Epping Road Burlington, Ontario L7M IP4 P. 905-332-5166 F. 905-332-9630 Europe Milan C&S S.R.L. Strada Malaspina, 12 20090 S. Felice-Segrate Milan, Italy P. +39-2-70301049 F. +39-2-70301049 United Kingdom Watermeadow House Watermeadow Chesham, Bucks HP5 1LF United Kingdom P. +44-1494-776060 F. +44-1494-773397 Internet www.antec.com Asia Pacific Latin America Beijing Miami Unit 876 8578 NW 23rd Street Poly Plaza Miami, FL 33122 USA no. 14 Dongzhimen Nandajie P. 305-592-3948 Dongcheng District F. 305-592-9646 Beijing 100027, People’s Republic of China P. 86-10-6501-1876 Argentina F. 86-10-6501-1296 Av. Juan de Garay 840 3 Piso Buenos Aires, Argentina 1153 Shanghai P. 541-300-2333 2004 Nanjing West Road F. 541-300-0083 Shanghai International Business Centre Suite 412 Brazil Shanghai 200040 Rua Luiz Carlos Prestes, 350 People’s Republic of China Suite 205-206 P. 86-21-6248-4589 Barra Trade II, Barra da Tijuca F. 86-21-6248-1018 Rio de Janeiro, RJ Brasil 22793 P. 5521-430-8829 Hong Kong F. 5521-430-8930 Unit 1814, Miramar Tower 1-23 Kimberley Road Venezuela TST, Kowloon, Hong Kong Ave. Rio de Janeiro P. 852-2735-3131 Edf. ELE - Piso 1 Ofic. No. 2 F. 852-2736-7171 Las Mercedes Caracas, Venezuela Singapore P. 582-993-2340 Block 105, #09-2182 F. 582-993-1468 Bedok North Avenue 4 Singapore 460105 Mexico P. 65-245-1175 Leona Vicario 710-A desp. 001 F. 65-245-1165 Col. La Purisima Metepec, Edo. de Mexico C.P. 52140, Mexico P. 52-72-12-45-93 F. 52-72-12-45-94