1
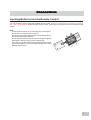
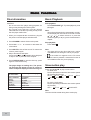
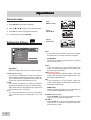
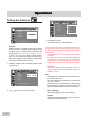
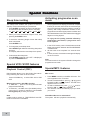
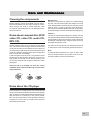
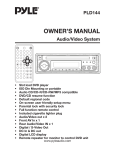
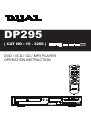
DP295 ( CAT NO : 16 - 3266 ) DVD / VCD / CD / MP3 PLAYER OPERATION INSTRUCTION OPEN CLOSE DVD/VCD/CD/MP3 PLAYER POWER PLAY PAUSE STOP STANDBY WARNING - TO PREVENT FIRE OR SHOCK HAZARD, DO NOT USE THIS PLUG WITH AN EXTENSION CORD, RECEPTACLE OR OTHER OUTLET UNLESS THE BLADES CAN BE FULLY INSERTED TO PREVENT BLADE EXPOSURE. - TO PREVENT FIRE OR SHOCK HAZARD, DO NOT EXPOSE THIS APPLIANCE TO RAIN OR MOISTURE. The lightning flash with arrowhead symbol, within an equilateral triangle, is intended to alert the user to the presence of uninsulated “dangerous voltage ” within the products enclosure that may be of sufficient magnitude to constitute a risk of electric shock to persons. WARNING: TO REDUCE THE RISK OF ELECTRIC SHOCK, DO NOT REMOVE COVER (OR BACK) NO USERSERVICEABLE PARTS INSIDE. REFER SERVICING TO QUALIFIED SERVICE PERSONNEL. The exclamation point within an equilateral triangle is intended to alert the user to the presence of important operating and maintenance (servicing) instructions in the literature accompanying the appliance. IMPORTANT SAFETY INSTRUCTIONS 1) 2) 3) 4) 5) 6) 7) 8) 9) 10) 11) 12) 13) Read these instructions. Keep these instructions. Heed all warnings. Follow all instructions. Do not use this apparatus near water. Clean only with dry cloth. Do not block any ventilation openings. Install in accordance with the manufacturers instructions. Do not install near any heat sources such as radiators, heat registers, stoves, or other apparatus (including amplifiers) that produce heat. Do not defeat the safety purpose of the polarized or grounding-type plug. A polarized plug has two blades with one wider than the other. A grounding type plug has two blades and a third grounding prong. The wide blade or the third prong are provided for your safety. If the provided plug does not fit into your outlet, consult an electrician for replacement of the obsolete outlet. Protect the power cord from being walked on or pinch particularly at plugs, convenience receptacles, and the point where they exit from the apparatus. Only use attachments/accessories specified by the manufacturer. Unplug this apparatus during lightening storms or when unused for long periods of time. Refer all servicing to qualified service personnel. Servicing is required when the apparatus has been damaged in any way, such as power-supply cord or plug is damaged, liquid has been exposed to rain or moisture, does not operate normally, or has been dropped. This appliance shall not be exposed to dripping or splashing water and that no object filled with liquid such as vases shall be placed on the apparatus. (810-00000S-190) 2 TABLE OF CONTENTS Introduction page 4 ~ 5 * Remote control * Front panel * Back panel Connections * * * * * * page 17 * Cleaning the components * Notes about compact disc ( DVD video CD, video CD, audio CD, MP3 CD) * Notes about the CD player page 6 ~ 7 * Direct connection with a TV * Inserting batteries into the remote control Basic Functions Care and maintenance Troubleshooting page 18 Electrical specifications page 19 page 8~ 9 Basic play Basic playback Slow motion play Fast search Picture zooming Angle selection Operations page 10 ~ 15 * General setup * Setting the picture * Setting the sound * Setting the language * Setting the features * Special DVD / VCD features * Changing subtitle language * Changing sound track language * Display the disc information during playback * Moving to another chapter / title * Playback from a selected point * Repeat play * Repeat A-B * Program play Special Functions * * * * page 16 Sleep timer setting Special VCD / SVCD features Activating progressive scan mode Special MP3 - CD features 3 Introduction Please refer to PAGE 5 for remote control functioning details. Remote control Front Panel POWER OPEN CLOSE PLAY DVD/VCD/CD/MP3 PLAYER Back Panel CR CB Y COMPONENT VIDEO OUT AC~110-220 V 50/60 Hz R AUDIO L OUT 4 VIDEO S-VIDEO OUT COAXIAL PAUSE STOP STANDBY Introduction Remote Control POWERkey Turn the system POWER ON or STANDBY NUMBER keys (0~9 ) Select the items or settings directly. SETUP key Display or exit the SETUP menu. key / / Plays backward quickly (fast search). / key PREV key Select and move the screen cursor to desired option. Press to select the previous title, chapter or track. VOLUME (+ / -) keys Increase / decrease the master volume level. ANGLE key Select the angles cyclicity. VCD / PBC key Switch to set the PBC function on or off. P-SCAN key Switch on or off progressive scan feature. OPEN / CLOSE key Open or close the disc tray. MENU key To enter or exit the disc contents menu. key Plays forward quicky NEXT key Press to select the next title, chapter or track. ZOOM key Zoom in the playing picture. SLOW key In disc mode, do the slow-motion playing. STOP key Press to stop the playback. SLEEP key Activate the sleep timer. MUTE key Shut off all of the sound. / PALY / PAUSE key Start or pause the playing disc. Front panel DISC TRAY Place a disc on the tray. OPEN / CLOSE Open or close the disc tray. / PLAY / PAUSE Play or pause a disc. STOP Stop playing a disc. PREV In disc mode hold down to fast reverse the disc. NEXT In disc mode hold down to fast forward the disc. POWER Turn on and off to switch the main power of the system. Back panel AC POWR CORD Connect to a standard AC outlet. COMPONENT VIDEO OUT Connect to TV with Pr / Cr / Pb / Cb Y inputs. AUDIO OUT Connect to a TV set, or other stereo receiver. VIDEO OUT Connect to a TV Video input connector. S -VIDEO OUT Connect to a TV S - VIDEO input connector. DIGITAL OUT- COAXIAL Connect to audio equipment with digital-coaxial audio input. 5 Connections Direct Connection with a TV CR CB Y COMPONENT VIDEO OUT AC ~ 110-220V 50/60Hz R AUD IO L OU T VID EO S-VIDEO OUT COAXIAL You must connect a TV to the DVD system in order to use DVD player. You can connect other audio and audio / visual components to the DVD system in order to use the Home Cinema Audio system’ s surround sound capabilities. Important! - There are various ways to connect the system to a TV (as shown in the illustration). You only need to make one of best connections. - Always refer to the instruction manual of the connected equipment to make an optical connection 1 Use the supplied audio cables to connect AUDIO IN jacks to the corresponding AUDIO OUT jacks on the TV or other audio/visual components. 2 Use the supplied CR/CB/Y cables to connect CR/CB/Y jacks to the corresponding video input jacks on a TV. If your TV is not equipped with CR/CB/Y video input jacks, you can select one of the following alternative connections: Optical 1 Connect the S-VIDEO OUT jack to the S-Video input jack on the TV using a S-Video cable (not supplied). Optical 2 Connect the VIDEO OUT jack to the video input jack on the TV using a video cable (not supplied). - 6 Use the AUDIO OUT jacks For connecting to an amplifier, audio system or TV with analogue audio inputs. For connecting to a CD or Type recorde to make an analogue recording. Use the COAXIAL jacks For connecting to an amplifier with DTS, Dolby Digital decoder or CD recorder. You will need to set the DVD system’ s digital output to “ ALL ” . Connections Inserting Batteries into the Remote Control You can control the system using the supplied remote control. Insert two AA batteries (not include) by matching the + and - on the batteries. When using the remote control, point it at the remote sensor on the front panel of this system. Note - Do not leave the remote in an extermely hot or humid place. - Do not use a new battery with an old one. - Do not drop any foreign object into the remote casing, particularly when replacing the batteries. - Do not expose the remote sensor to direct sunlight or lighting apparatuses. Doing so many cause a malfunction. - If you will not use the remote for an extended period of time, remove the batteries to avoid possible damage from battery leakage and corrosion. -- + + -- 7 Basic Functions Disc information Basic Playback CAUTION! - Do not move the disc player during playback, as doing so may damage the DVD system. - Do not push on the disc tray or put any objects other than disc on the disc tray. Doing so may cause the disc player malfunction. Start playback Press PLAY/PAUSE /ll . To pause playback, press /ll again. 1 When you complete all the connections, plug the AC power cord of the player and subwoofer. Note: Some discs will start playing automatically, and others will display the menu on the TV screen. use the / / / to select the track, or press the number keypad ( 0 ~ 9 ) to go to the desired track / chapter. 2 Press POWER to switch ON the main power. 3 Press VOL volume level. / to increase or decrease the 4. Press MUTE to shut off the sound. To restore the volume, press it again. 5. Skip to another track/chapter / repeatedly during playback Press remote to skip to next or previous track / chapter. 6. Press OPEN/CLOSE to open the disc tray, press again to close the disc tray. The player begin to loading disc. The operating message will appear on the TV screen or on the front panel display see the following list. On TV screen On front panel display DISC LOADING OPEN CLOSE PLAY NO DISC BAD DISC LOADING OPEN CLOSE PLAY NO DISC BAD DISC DVD/ SVCD/VCD/CD/MP3 Stop playback Press STOP . Note - You player will not play discs that have a region code different fron the region code of your player. - If the inhibit icon appears on the TV screen when a button is pressed, it means the function is not available on the disc you are playing. Slow motion play Press remote SLOW to play in slow motion. For DVD discs Press it repeatedly to select the slow motion speed: SF (forward) SR (reverse) SF x 2 SF x 4 SF x 8 SR x 2 SR x 4 SR x 8 SLOW OFF For VCD / SVCD discs Press it repeatedly to select the slow motion speed: SF (forward) : SFx 1 SF x 2 SF x 3 SLOW OFF. Note The sound will be muted during slow-motion play. 8 Basic Functions Fast search Angle selection 1 Press and hold / more than 1 second to fast reverse or fast forward. For DVD / MP3 discs FF(fast forward) : FF x 2 FF x 4 FF x 6 FF x 8 FF OFF. FR(fast reverse) : FR x 2 FR x 4 FR x 6 FR x 8 FR OFF. Some DVD discs contain scenes which have been taken photos simultaneously from a number of different angles. For these discs, the same scenes can viewed from each of the different angles. (The recorded angles differ from disc to disc.) You should set the angle mark to ON or press ANGLE key to set angle mark. For VCD / CD /SVCD discs FF(fast forward) : FF x 1 FF x 2 FF x 3 FR(fast reverse) : FR x 1 FR x 2 FR x 3 FF x 4 FR x 4 PLAY. PLAY. 2 In any FF or FR state, press PLAY/PAUSE /ll to normal play. ♦ While playing a title shot from different angles, the angle mark : appears on the TV screen. This angle mark will disappear automatically after 5 seconds. ♦ Press the remote ANGLE button to change the scenes from one angle to other angle(s). For example: 1/4, 2/4, 3/4, 4/4. Note The sound will be muted during fast reverse of forward search. Picture Zooming This function allows you to enlarge the picture on the TV screen and to pan through the enlarged image. 1 Press ZOOM repeatedly to select a zoom factor as below: ZOOM x 1.5 ZOOM x 2 ZOOM X 3 ZOOM OFF Note The maximum number of angle stipulated by the manufacturers is 9/9 2 To pan through the enlarge image, press ok to confirm the zoom selection and use / / / keys to move the zoomed picture left, right, up or down. 3 Some discs may not respond to the zoom feature. 9 Operations General setup 1 Press SETUP to enter SETUP MENU. 2 Use / / / 16:9 (Wides creen) to select your preferred option. 3 Press OK to confirm a highlighted selection. 4:3 LB (Letter Box) 4 To exit setup menu, press SETUP. 4:3 PS (Pan Scan) Setting the Picture TV SHAPE 4:3 PS VIDEOOUT AUTO TV SHAPE S-VIDEO SCR SAVER OFF GO TO PICTURE SETUP PAGE * TV Shape Select the aspect ratio of the TV to be connected. 4:3 PS (default setting) - If you have a conventional TV set and your DVD is not formatted for widescreen viewing, use this setting. A wide picture is displayed on the whole TV screen with a portion automatically cut off. 4:3 LB - If you have a conventional TV set and your DVD is formatted for widescreen viewing, use this setting. wide bands will be is displayed on the upper and whole portions of the TV screen. 16:9 - If you have a widescreen TV set, use this setting (you must also set your widescreen TV to “ full size” ). 10 Note If your DVD is not encoded to allow you to change the aspect ratio, TV shape cannot be changed. * TV System Allows you to select the colour system matching the connected TV set. AUTO - If the connected TV is multi system, select this mode. The output format will be in accordance with the video signal of the disc. NTSC (defaut setting ) - If the connected TV is NTSC system, select this mode. It will change the video signal of a PAL disc and output in NTSC format. PAL - If the connected TV is PAL system, select this mode. It will change the video signal of a NTSC disc and output in PAL format. * Video Out Video out selection enables you to choose the type of video output suitable for your receiver. S-VIDEO (defaut setting ) - Select S-VIDEO if you have connected the video output to your TV using S-VIDEO jack. PR PB Y - Select PR PB Y , if you have connected the video output to your TV using the component Video out (Pr/Cr Pb/Cb Y) jacks. Operations * Screen Saver If set to ON, when you leave the system in stop or pause mode for more than one minute, the screen saver will be activated. The default setting is “ OFF” . Setting the sound * Test Tone (disc mode only) If set to ON, the system will test the speaker settings. The test signal is generated through the left , right speakers. The default setting is “ OFF ” . Setting the Language DIGITAL OUTPUT ALL NIGHT MODE OFF AUDIO ENGLISH CENTER DELAY OFF SUBTITLE ENGLISH DISC MENU ENGLISH TEST TONE GO TO SOUND SETUP PAGE GO TO LANGUAGE SETUP PAGE * - - - * Digital Output Digital output selection enalbes you to specify the type of digital output (COAXIAL) suitable for your amplifier or reciever. ALL (defaulting setting ) Select this item , if you have connected the digital output to a multichannel decoder receiver. PCM 96K Select this item, if the external component is capable of processing digital signal input with sampling rates of 96 kHz. PCM 48K Select this item, if the external component is incapable of processing 96kHz digital signal input, then convert to standard signal with sampling rates of 48 kHz. OFF Select this item, to deactivate the digital output (COAXIAL output ). 1. Audio Subtitle Disc Menu This is to select the audio language, subtitle language and the language used on TV screen menus or DVD menus that will always be used for every disc to be played back. The default setting is “ ENGLISH ” . 2. If the language selected is not available on the disc, the original language designated by each disc will be selected. Night Mode Set night mode to on to level out the volume. For example, the disc will play at the same sound level throughout the movie. The default setting is “ OFF” . 11 Operations Setting the Features PARENTAL PASSWORD MENULANG DEFAULTS PARENTAL 1G PASSWORD CHANGE MENULANG ENGLISH DEFAULTS RESET Parental Enables setting of playback limitation level. Some DVDs may have a parental level assigned to the complete disc or to certain scenes on the disc. The rating levels are 1G, 3G, 4PG-13, 6PG-R, 7NC-17, 8 ADULT, NO PARENTAL and are country dependent. You can prohibit the playing of certain discs that are not suitable for your children or have certain discs played with alternative scenes. 1 Enter the 4-digital code. If necessary enter the code a second time. PARENTAL PASSWORD ENTER CODE MENULANG DEFAULTS ENTER PARENTAL PASSWORD 2 Use 12 / SELECT PARENTAL GRADE 3 Press OK to confirm. The default setting is “ NO PARENTAL ” . GO TO FEATURE SETUP PAGE * 1G 3G 4PG13 6PG-R 7NC-17 8ADULT NO PARENTAL keys to select a rating level . Playing some DVD discs can be limited depending on the age of the users. The parental control function in this system allows playback limitation level to be set by the parent. 1 The lower the level is set, the stricter the limitation is offerred. 2 If the parental control level of the loading DVD disc is higher than the setting level, the “PARENTAL VIOLATION” message will be shown on the TV screen, and the system will refuse to play the disc. * Password To set a new password for the parental control or to change the password. The password supplied as defualt is “ 1234 ” . Note - This password is used to unlock the resetting function of parental control. - The new password must be easy to memories for you. Don’ t lose it ! - some DVDs are not encoded with a rating though the movie rating is printed on the disc jacket. The rating level feature does not work for such discs. * Menu language Select the language for on-screen display. * Defaults If RESET is selected, all the items in the setup menu will be reset to default setting. Operations Changing sound track language Special DVD / VCD features This operation works only on DVDs with multiple soundtrack language. A number of operations can be carried out directly via the multiple menu bars on the TV screen without interrupting disc playback. From the left, SETUP MENU --> SUBTITLE --> LANGUAGE --> INFORMATION --> CHAPTER SEARCH --> TITLE SEARCH --> TIME SEARCH key to For VCD : Press key to select the desired audio channels for sound: LEFT VOCAL --> RIGHT VOCAL --> MONO LEFT -> MONO RIGHT --> STEREO --> LEFTVOCAL For CD: Press key to select the desired audio channels for sound: MONO LEFT --> MONO RIGHT --> STEREO --> MONO LEFT Note When the desired language is not selected even after pressing the button several times, it means the language is not available on the disc. From the left, REPEAT --> A-B --> PROGRAM IMPORTANT! Some operations may be different or restricted, depending on the disc format. Refer to the jacket or case of the disc you are playing . Changing subtitle Language This operation works only on DVDs with multiple subtitle languages. from the menu bar and press Select select the desired language. from the menu bar and press Select select the desired language. Display the disc information during playback Select from the menu bar and press key to select the following display informations : key to DVD VCD (PBC ON) CD TITLE 01/06 ELAPSED 06/19 00:36:15 SINGLE ELAPSED 00:01:23 SINGLE ELAPSED 00:01:23 TITL ELAPSED 00:34:56 SINGLE REMAIN 00:03:21 SINGLE REMAIN 00:03:21 CHAPTER ELAPSED 00:01:23 OFF 00:03:21 TOTAL ELAPSED 00:03:21 CHAPTER REMAIN 00:03:32 TOTAL REMAIN 00:03:21 OFF 00:03:21 OFF 00:03:21 13 Operations Moving to another chapter / title Repeat play Some discs may contain more than one title or chapter. If the disc has a title or chapter menu recorded on it, you can start playback from the selected item. You can only select the repeat play mode during playback. 1 Select (chapter) or (title) from the menu bar. REPEAT 2 Use number keypad (0~9) to select a desired title / chapter number and press OK to start playback. Note - If the playing disc is VCD, SVCD, MP3 or CD, this menu item is useless. - If in the program playing mode this item is useless. Playback from a selected point This function allows you to start playing at any chosen time on the disc. - Select from the menu bar and press key to select the following repeat type cyclically: CHAPTER REPEAT ON --> TITLE REPEAT ON --> REPEAT OFF. - For VCD/SVCD/CD /MP3 repeat track / disc key to select the following repeat type Press cyclically: REPEAT ONE --> REPEAT ALL --> REPEAT OFF Note - For VCD, repeat play is not possible during PBC playback. - When operating this function, the OSD and VFD will display the operating information. -- : --: -- 1 Select For DVD repeat chapter / title / disc from the menu bar. 2 Enter hours, minutes and seconds from left to right in the time edit box using the number keypad (0~9). Each time an item has been entered, the next item will be highlighted. Repeat A - B You can play a specific section in a chapter / track repeatedly. 3 Press /ll to start playback. Note This function is not available for MP3. A-B 1 Select from the menu bar and press key at the starting you want . key again at the end portion you want. 2 Press The specific section will now repeat continuously. 3 press key the third time to cancel this function. Note: The A-B can be set only within the same chapter / track. 14 Operations Program play You can play the contents of the disc in the order you want by programming the order of the tracks to be played. Up to 99 tracks can be stored. PROGRAM 1 Select in the menu bar and press key to enter program mode. ” is displayed. - “ 2 Use the number keypad (0~9) to input the track number in the order you want. - If you attempt to program more than 99 tracks, “ ” is displayed. 3 Press OK to store the track. - Repeat steps 2-3 to store other tracks. 4 To start program play, press /ll 5 To stop playback, press once . 6 To cancel the program , press again. Note If playing DVD or MP3 disc, this function is useless. 15 Special Functions Sleep timer setting The sleep timer enables the system to switch to standby mode automatically at a preset time . 1 Press SLEEP repeatedly to select a preset time. - The selections are as follows (time in minutes) 15 30 45 60 90 120 OFF 15... 2 When you reach the desired length of time, stop pressing the SLEEP button. 3 To check the remaining length of time after sleep timer is activated. Press SLEEP once. 4 To change the preset sleep timer Press SLEEP again while the remaining sleep timer is shown. - The display will show the next sleep timer options. 5 To deactivate the sleep timer Press SLEEP repeatedly until “ OFF” is displayed, or press the POWER button. Special VCD / SVCD features Playback Control (PBC) PBC playback allows you to play Video CDs interactively, following the menu on the TV screen. - Press VCD/PBC key to select PBC ON or PBC OFF. When playing a disc with PBC function 1 If “ PBC OFF ” , press / the system will start playback automatically. 2 If “ PBC ON ” , the PBC menu (if available) will appear on the TV screen for selection. Use the number keypad (0~9) to enter your choice Note If PBC mode is switch on, TIME SEARCH and REPEAT functions are not available. 16 Activating progressive scan mode The progressive-scan display presents 60 complete frames per second, rather than the 30 frames per second of interlaced scanning (ordinary normal TV system). With nearly double the numbers of line, progressive scan offers higher picture resolution and eliminates bothersome motion artifacts those jagged edges on moving objects. To enjoy the full quality potential offered by progressive scan feature, a progressive scan TV is required. 1 In the STOP mode, press P-SCAN button and OK button can to switch between the PROGRESSIVE or INTERLACE. 2 All this action must complete in 5 seconds duration. 3 If witch success, the relevant message will display on the TV screen. Note You need to switch the system off before change the progressive scan mode. Special MP3 features MP3 meun 1 Press MENU to switch on the MP3-CD menu. The menu appears on the TV screen. 2 To select a desired album, press / / / and followed by OK or to confirm. The title menu appears on the TV screen. 3 To select a desired title, press / / / and followed by OK or to start playback. 4 You can also use the number keys (0~9) to enter your choice. If the MP3-CD menu is switched off The system will start playback automatically. Care and Maintenance Cleaning the components Before cleaning, switch off the DVD receiver and unplug the subwoofer from the mains. Clean all components using a wet cloth or a tittle synthetic clean er. Solvents, spirits, dilutents, etc, can damage the surface of the device. Notes about compact disc (DVD video CD, video CD, audio CD, MP3 CD) Always keep the CD in its cover and touch the edges only. The surface shimmering in rainbow colours must not be touched and should always be kept clean. Do not stick paper or adhesive tape onto the labeled side of the CD. Keep the CD away from direct sunlight and heat sources such as heatings . A CD must also never be left in a car parked in direct sunlight as the temperature inside the car gets very high. Clean the CD with a cloth before playing it. Do not use any solvents such as petrol, dilutions or other detergents. Maintenance Electronic components ar subject to a natural aging process. The mechanical parts are subject to normal wear. Dust particles inside the device may also cause faults to occur, e.g.due to dirtying of the laser lens. Consult your authorised dealer in the case of any faults. For transporting the set use the original packaging only. Caution ! The device is powered by dangerous voltage. The set may therefore be opened by authorised specialists only. All maintenance and service work must be carried out authorised companies only. Inexpert repair work may endanger the operator’ s life. Any work on the set done by non-authorised persons on their own account causes the guarantee to expire. Note To help identifying the device in case of after- sales service, always mention the number of the ID on the inscription plate on the rear of the device. Clean the CD in a straight line form the centre outwards. Never clean the CD using circular cleaning movements. Notes about the CD player If the CD player is not being used, the CD tray should always remain closed to protect the mechanism against dust. However, it is still possible that the lents becomes dirty form dust or is covered by a thin, hardly visible, film. The CD system is then no longer able to scan the inserted CD. In this case you need to have the lens cleaned by a technician. 17 Tr oub leshooting oubleshooting If you experience any of the following difficulties while using the system, use this troubleshooting guide to help you remedy the problem. Should any problem persist, consult your nearest service center. No power • Is the power cord firmly plugged into the power outlet? • One of the safety mechanisms may be operating. In this event, unplug the player from the power outlet briefly and then plug it in again. No picture • Check that the system is connected securely. • The video connecting cord is damaged. Replace it with a new one. • Make sure you connect the system to video input connector on the TV. • Make sure you turn on the TV. • Make sure you select the video input on the TV so that you can view the pictures from this system. The picture noise appears • Clear the disc. • If video from this system has to go through your VCR to get to your TV, the copy-protection applied to some DVD programs could affect picture quality. If you still experience problems after checking your connections, please try connecting your DVD system directly to your TV S-Video input, if your TV is equipped with this input. No Colour in picture • The disc format is not according to the TV set used (PAL / NTSC) • Ensure DVD player is not connected through VCR. 18 Severe hum or noise is heard • Check that the speakers and components are connected securely. • Check that the connecting cords are away from a transformer or motor, and at least 3 meters away from a TV set or fluorescent light. • Move your TV away from the audio components. • The plugs and jacks are dirty. Wipe them with a cloth slightly moistened with alcohol. • Clear the disc. The language for the subtitles cannot be changed when you play a DVD • Multilingual subtitles are not recorded on the DVD. • Changing the language for the subtitles is prohibited on the DVD. The subtitles cannot be turned off when you play a DVD • Depending on the DVD, you may not be able to turn the subtitles off. The angles cannot be changed when you play a DVD • Multi-angles are not recorded on the DVD. • Change the angles when the angle mark appears on the TV screen. • Changing the angles is prohibited on the DVD. The system does not operate properly • Static electricity, etc., may affect the system’ s operation. Press the POWER button to turn off, then press again to turn on. Electrical Specification DVD Player Pickup ......................................................................................... Semiconductor laser, Wavelength 650 mm Signal system ............................................................................................................................. NTSC / PAL Video signal horizontal resolution ......................................................................................... 480 lines (DVD) Video signal-to-noise ratio .......................................................................................................... 50 dB (DVD) Audio frequency response (at 2 CH stereo mode) .......................... DVD (PCM): 20 Hz ~ 20 kHz (+/- 3.0 dB) ................................................................................................................... CD: 20 Hz ~ 20 kHz (+/- 3.0 dB) Audio signal-to-noise ratio .................................................................................................................... 60 dB Dynamic range ...................................................................................................... DVD : 80 dB ; CD: 80 dB Video outputs CVBS Video .......................................................................................................................... 2 Vp-p 75 ohms S-video ............................................................................................................................ Y: 1 Vp-p 75 ohms ................................................................................. C: PAL 0.3 Vp-p 75 ohms / NTSC 0.286 Vp-p 75 ohms Component video out ............................................................................................................. 1 Vp-p 75 ohms Audio line outputs Audio.L/R ............................................................................................................................1 Vrms, 1k ohms Coaxial out ............................................................................................................................ 1 Vp-p 75 ohms Main Unit Power supply............................................................ ......................................... 110 ~ 220V AC 50/ 60Hz power consumption.......................................................... .................................................. 15W maximum Dimensions .......................................................................................................... W 330 x H 53 x D 250mm Weight ..................................................................................................................................................... kg Operation Temperature .........................................................................................32 F ~19.4 F (0° C ~ 45° C) Design and specifications are subjected to change without notice. Weight and dimensions are approximate. 19 Limited Ninety-Da y War Ninety-Day arrr anty This product is warranted by RadioShack against manufacturing defects in material and workmanship under normal use for ninety (90) days from the date of purchase from RadioShack companyowned stores and authorized RadioShack franchisees and dealers. EXCEPT AS PROVIDED HEREIN, RadioShack MAKES NO EXPRESS WARRANTIES AND ANY IMPLIED WARRANTIES, INCLUDING THOSE OF MERCHANTABILITY AND FITNESS FOR A PARTICULAR PURPOSE, ARE LIMITED IN DURATION TO THE DURATION OF THE WRITTEN LIMITED WARRANTIES CONTAINED HEREIN. EXCEPT AS PROVIDED HEREIN, RadioShack SHALL HAVE NO LIABILITY OR RESPONSIBILITY TO CUSTOMER OR ANY OTHER PERSON OR ENTITY WITH RESPECT TO ANY LIABILITY, LOSS OR DAMAGE CAUSED DIRECTLY OR INDIRECTLY BY USE OR PERFORMANCE OF THE PRODUCT OR ARISING OUT OF ANY BREACH OF THIS WARRANTY, INCLUDING, BUT NOT LIMITED TO, ANY DAMAGES RESUL TING FROM INCONVENIENCE, LOSS OF TIME, DATA, PROPERTY, REVENUE, OR PROFIT OR ANY INDIRECT, SPECIAL, INCIDENTAL, OR CONSEQUENTIAL DAMAGES, EVEN IF RadioShack HAS BEEN ADVISED OF THE POSSIBILITY OF SUCH DAMAGES. Some states do not allow limitations on how long an implied warranty lasts or the exclusion or limitation of incidental or consequential damages, so the above limitations or exclusions may not apply to you. In the event of a product defect during the warranty period, take the product and the RadioShack sales receipt as proof of purchase date to any RadioShack store. RadioShack will, at its option, unless otherwise provided by law: 1) correct the defect by product repair without charge for parts and labor. 2) replace the product with one of the same or similar design. 3) refund the purchase price. All replaced parts and products, and products may be used in the performance of warranty service. Repaired or replaced parts and products are warranted for the remainder of the original warranty period. You will be charged for repair or replacement of the product made after the expiration of the warranty period. This warranty does not cover: 1) damage or failure caused by or attributable to acts of God, abuse, accident, misuse, improper or abnormal usage, failure to follow instructions, improper installation or maintenance, alteration, lightning or other incidence of excess voltage or current. 2) any repairs other than those provided by a RadioShack Authorized Service Facility. 3) consumables such as fuses or batteries. 4) cosmetic damage. 5) transportation, shipping or insurance costs. 6) costs of product removal, installation, set-up service adjustment or reinstallation. This warranty gives you specific legal rights, and you may also have other rights which vary from state to state. RadioShack Customer Relations, 200 Taylor Street, 6th Floor, Fort Worth, TX 76102 12/99 20