1
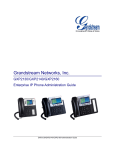
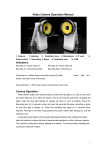
SWING Quick User’s Guide (EURO ISDN)
1
6
2
7
3
4
8
5
9
10
1) Turning the Equipment On:
• Before connecting the power supply to the equipment make sure that the Power On
switch (7) is on the OFF position.
• Once the power supply’s threaded connector is properly connected to the equipment (6),
then the power supply can be connected to the outlet.
• After all previous steps have been completed it is now save to turn on the equipment
using the Power On switch (7). The LCD screen should be on, indicating that all is
working properly.
2) Connection to the “S” Interface Jack:
• Make sure that the DIP micro switch 8 is up. Switch 1 selects between the basic ISDN
standards (down = Europe and other countries, up = USA & Canada). If they are not in
the rigth position, place them in the up position and restart the equipment.
• In most cases the connection to ISDN will be done through the RJ-45 ETSI connector (2).
Use the cable supplied with the equipment to connect it to the “S” interface jack (if the
ISDN jack installed by the ISDN service provider is RJ-11, “U” type, please refer to the
User’s Manual for further explanation).
3) Configuring the ISDN Terminal Adapter. In order for the Swing to receive or place any
calls the Terminal Adapter must be configured correctly, this is accomplished by entering
MSN numbers, in the following manner:
• Press the Set Up button on the keypad to access the Set Up menu.
• You will see the “1. ISDN” option on the LCD screen, press the Yes button to enter into
this option and set up the MSN numbers.
• Press the (Á À) keys to navigate between NUMBER LINE 1 and NUMBER LINE 2.
Press the Yes button to enter into the desired option.
• NUMBER LINE 1 and 2 are entered by pressing the corresponding numbers from the
keypad. Press the Á key to erase any mistakes. Press the Yes button once the number is
correct to save it.
Note: the three digit area code should not be included when entering these numbers.
• The equipment should be restarted at this point. Any changes and entries will be saved
even when the equipment is turn off.
AEQ SWING Quick User’s Guide (EURO ISDN) - Revision 02/07
4) Choosing a Coding Mode:
• The Swing usually comes ready to place a call in G.722 Statistical mode, but other
modes can be selected. Press the Coding button on the keypad to access the list of
coding modes that can be selected.
• The coding method used on the last call will appear on the LCD screen. By pressing the
(Á À) keys all other methods will be accessed.
Note: G.722 and G.711µ are the most commonly used, so all other modes can be found
under the ADVANCED option.
• Press the Yes button to select the coding method desired. The coding method will be
saved even after the equipment is turned off.
5) Placing a call on ISDN:
• Press the ISDN button on the keypad, the LCD screen will show the lines that are
available depending on the coding mode being used. Example: If MPEG128 or LD-2 is
being used, two lines will be available, but in all other modes only one line will be
available.
• There will be a ‘>’ over the line on which the call will be placed, the (Á À) keys allow
movement between the lines. Usually the > will be pointing at the line on which the call
should be placed on.
• Once the line has been selected press the Yes button, which will allow entering the
targeted phone number. The number will be entered using the keypad, and erasing can
be accomplished by using the Á key.
• Finally, when the targeted phone number is in correctly press the Yes button and the call
will be placed.
Note: both the codec that is placing the call and the one that is receiving have to be in
the same coding mode.
• In 128 modes, the call should be placed on L1 first, then after L1 connects and
synchronizes, the call on L2 can be placed.
• Press the No button to end the call.
6) Using the Analog Line:
• The swing allows an ISDN communication and an analog communication to be
established simultaneously, or individually if desired. Connect the RJ-11 cable in the
Analog Tel. Line connector (9) on the back of the equipment.
• Press the ℡ button on the keypad: this will connect the phone line and the dial tone
should appear on headphones.
• Press the Dial Pad button to activate the keypad, this will allow the target phone number
to be entered.
• Press the ℡ button again to end the call.
• For other analog line options please refer to the User’s Manual.
AEQ SWING Quick User’s Guide (EURO ISDN) - Revision 02/07