1
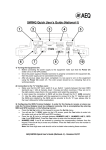
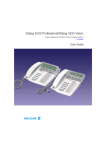
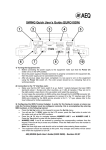
KE2100 INSTALL GUIDE
Table of Contents
1
Check Items in Box........................................................................................................................ 2
2
Before Installation ........................................................................................................................ 2
3
Picture and connection .................................................................................................................. 2
4
Installation.................................................................................................................................... 2
5
Buttons and input .......................................................................................................................... 2
6
Authentication ............................................................................................................................... 3
7
Use phone to set net work parameters .......................................................................................... 3
8
Automatically get configuration .................................................................................................... 3
9
Ready for use ................................................................................................................................ 3
10
Use phone LCD programming to set .............................................................................................. 3
11
Set though the web based programming page .............................................................................. 4
11.1
Network Settings............................................................................................................................ 4
11.2
Set time and SNTP server ................................................................................................................ 4
11.3
SIP Settings .................................................................................................................................. 4
11.4
Save Settings and Reboot................................................................................................................ 4
12
LCD menu ...................................................................................................................................... 4
13
WEB menu ..................................................................................................................................... 7
14
FAQ ............................................................................................................................................... 8
15
Performance and Features............................................................................................................. 8
15.1
The Electronic Specifications ............................................................................................................ 8
15.2
Operating/storing Environment......................................................................................................... 8
15.3
Dimensions ................................................................................................................................... 8
15.4
Features ....................................................................................................................................... 8
15.5
Standards and Agreements .............................................................................................................. 9
1
Check Items in Box
• KE2100
• Handset
• Rj11 handset line
• User manual
• One power adapter
• Ethernet (RJ45) cable(Pass through cable)
2
Before Installation
Please check to be sure that you have all of the following
POWER:
LAN:
WAN:
Connect
Connect to local
Connect to
to power
network e.g. PC.
Internet, may
adapter
components:
Default work
type: Router.
• An AC power socket
need special RJ45
cable; please ask
your network
• Broadband internet access that can reach the VoIP
administrator or
service provider’s platform
ISP.
• PC with network card (not required)
• Network connection to the VoIP service provider’s
platform must have:
Network delay less than 400ms
Network Jitter less than 100ms
Packet loss less than 10%
Bandwidth: more than 30Kbps
3
4
Installation
• Connect KE2100 and handset with Rj11 handset line
• Power off your network device e.g. ADSL Modem,Cable
Modem and PC
• Connect cables as shown in chapter 3, suggestion: do
not use KE2100 as your main router of your network
• Power on your KE2100, then power on your network
Picture and connection
device and PC
• Change your PC’s IP to DHCP (server assigned). (Please
ask your network administrator how to set your PC)
5
Buttons and input
• SET/OK: Get into control menu, confirm
•
/
: Select
•
/
: Volume increase/ decrease; while in input
mode: delete/ blank
• ESC: Exit, cancel
• M1~M8: Speed dial key
• XFER: Call transfer function key
• MUTE: Mute function key
• REDIAL: Redial key
• CONF: 3-way calling function key
• CALLLIST: Call list function key
• PHONEBOOK: Phone book function key
• CALL: Call out
• HOLD: Hold function key, VoIP do not disturb function
programming: Network Æ WAN Setup Æ Fixed IP
key
setting to set IP address, subnet mask and default
gateway. After then get into LCD programming: DNS Æ
• SPEAKER: Hands free key
Primary DNS and Secondary DNS to set DNS server
Use Keypad to set this device:
Key
1
1-,!?
2
2abcABC
3
3defDEF
4
4ghIGHI
5
5jklJKL
6
6mnoMNO
7
7pqrsPQRS
8
8tuvTUV
9
9wxyzWXYZ
0
0 ‘空格’
*
*. : @
#
6
If your device should use PPPoE, e.g. ADSL, please use
Input Character
LCD programming: Network Æ WAN Setup Æ PPPoE
setting to set the PPPoE account and Password.
• Press ESC repeatedly till it show ‘Please Reboot’, then
power off the device and power on it.
8
Automatically get configuration
If your VoIP service provider has pre-set your device, it
should automatically get configuration from the Internet
after it is powered on. And then it will reboot automatically
and ready for use.
9
Ready for use
Your device should be ready for use now, it will show these
information on LCD.
Date
Authentication
Time
MM-DD
XX:XX
< XXXXXXX >
For admin user:
1st account
Account: root
Password: test
For normal user:(With this account you can not set
some parameters, e.g. SIP setting)
If your device isn’t the ready to use status, it means you
should set it your self. Please see chapter10 and 11 if you
should set if yourself.
Account: user
Password: test
10 Use phone LCD programming to set
Attention: if your password be changed when you
Refer to chapter 12 to learn how to set LCD programming:
get your device, please contact with the distributor
SIP Settings and NAT transversal, then ask your VoIP
of this device.
service provider how to set/select these parameters. Keep
the default parameters if you haven’t got the answer for
7
Use phone to set net work parameters
Please check chapter 12 to know how to use the LCD and
keypad for programming.
At first, please ask for your network administrator or ISP
to know your IP type. The default network setting of this
device is DHCP IP type, if your network can not accept
DHCP access, please set it as follows:
• LCD programming: Network Æ WAN Setup Æ IP type to
select your IP type.
• If your device should use static IP, please use LCD
how to set/select some of these parameters.
• LCD programming: Administrator Æ System Authent,
input the password of root account. (See chapter 6)
• LCD programming: SIP Setting and set all parameters
here.
• LCD programming: NAT transversal Æ STUN setting and
set all parameters here.
• LCD programming: Phone setting Æ Date/Time set set
all parameters here.
• Press ESC repeatedly till it show ‘Please Reboot’, then
11.2 Set time and SNTP server
power off the device and power on it.
Click and into the menu Phone SettingÆ SNTP Settings
11 Set though the web based programming
to set your NTP server and time zone.
page
After your PC getting correct IP, open an Internet Explorer
browser on a PC that is connected to
Important: If your service provider has pre-programmed
some settings such as User Name, Register Name,
Register Password, Domain Server, Proxy Server
http://192.168.123.1 You will see the login screen.
and so on, you will not need to program these items.
Please see chapter 6 for account and password.
11.3 SIP Settings
11.1 Network Settings
After you have the IP setting completed as above, you
Click and into the menu NetworkÆ WAN Settings and
NetworkÆ LAN Settings to set the network parameters.
Please ask your ISP or network administrator about it.
should set these parameters which are required to login
SIP server: User Name, Register Name, Register
Password, Domain Server, Proxy Server, SIP Port,
DHCP is default network type; your terminal will get the
RTP Port, DTMF setting.
required network parameters such as IP, subnet mask
11.4 Save Settings and Reboot
automatically. If your network uses static IP, you should
set local IP, subnet mask, gateway IP, DNS and DNS2 first.
Simply click the Save button in Save Changes and exit
If your network uses PPPoE, you should set PPP ID, PPP
the browser after the Configure OK screen appears, and
password first
then click Reboot button in Reboot.
12 LCD menu
1st layer
2nd layer
Phone book
Search
3rd layer
4th layer
Usage
Add entry
Call history
Speed dial
Set M1~M8 speed dial number
Erase all
1.
Yes
2.
No
Incoming calls
Check incoming call list
Dialed numbers
Check dialed call list
Erase record
All
Incoming
Dialed
Phone setting
Call forward
All forward
Activation
1.
Enabled
2.
Disable
Number
Busy forward
Activation
1.
Enabled
2.
Disable
1.
Enabled
2.
Disable
1.
Enabled
2.
Disable
1.
Enabled
2.
Disable
Number
No answer fwd
Activation
Number
Do Not disturb
Always
By Period
Period Time
If the end time is earlier than the
begin time, it means the DO NOT
DISTURB duration will from beginning
time to next day’s end time.
Alarm setting
Activation
1.
Enabled
2.
Disable
Alarm time
Date/Time set
Date & Time
If SNTP disabled then can set local
date and time
SNTP setting
SNTP
1.
Enabled
2.
Disable
Primary SNTP
Primary SNTP server
Secondary SNTP
Secondary SNTP server
Time zone
Adjustment Tim
Time display model 12 hour or 24
hour
Volume & Gain
Handset volume
Speaker volume
Handset gain
Speakser gain
Ringer
Ringer volume
Ringer type
Auto dial
After this time, the dialed number will
be automatically send out
Show Balance
1. Enabled, only support VoIP
provider who use INFINET
plateform
2.
Network
WAN Setup
IP Type
Disable
1.Fixed IP client
2.DHCP client
3.PPPoE client
Fixed IP setting
IP Address
Subnet mask
Default Gateway
PPPoE setting
User name
Password
LAN Setup
1. Bridge, work as a bridge
2. NAT, work as a router
DNS
VLAN
Primary DNS
Primary DNS server
Secondary DNS
Secondary DNS server
Activation
1. Enabled
2. Disable
VID
Priority
CFI
Router mode:1st line shows LAN IP,
Status
2nd line shows WAN IP, press △/▽ to
show MAC address
Bridge mode: 1st line shows WAN IP,
2nd line shows MAC address
SIP Setting
Service domain
First realm
Activation
1.
Enabled
2. Disable
User name
Number
Display name
Codec
RTP setting
Register name
User name
Register passw
Password
Proxy server
SIP server address
Domain server
SIP realm
Outbound proxy
Outbound proxy server
Second realm
…
Third realm
…
Codec type
Select codec
VAD
1.
Enabled
2.
Disable
RTP
Outband DTMF
1.Enabled, use RFC2833 as DTMF
type
2. Disable use inband as DTMF typr
Duplicate RTP
RPort
Hold by RFC
Status
NAT
STUN setting
1.
No duplicate
2.
One duplicate
3.
Two duplicate
1.
Enabled, use RTP port setting
2.
Disable, use random RTP port
1.
Enabled
2.
Disable
Check accounts register status
STUN
transversal
1.
Enabled
2.
Disable
1.
Disable
2.
TFTP, use TFTP mode
3.
FTP, use FTP mode
4.
HTTP, use HTTP mode
1.
Yes
2.
No
STUN server
Administrator
Auto config
Upgrade
Upgrade Now
system
Upgrade via
Status
1.
Disable
2.
TFTP, use TFTP mode
3.
FTP, use FTP mode
4.
HTTP, use HTTP mode
Version status
Reset Time
Default setting
1.
Load default, Attention: the
device will lose account and
server setting
2.
System Authent
Abort
Input root account’s password, see
chapter 6
Version
Version status
Watch dog
1. Enabled, device will auto reset if it
there is a software problem
2. Disable
Restart
13 WEB menu
1st layer
2nd layer
Description
Phonebook
Phone Book
Add, edit, delete phone book
Speed Dial Settings
Set M1~M8 speed dial number, suggestion: do not change the settings
of 0 and 9
Phone Setting
Call Forward
Set all forward, busy forward and no answer forward here.
No answer forward is based on the ring time. You can set duration of a
ring tone in: Others Æ Tones Setting
SNTP Settings
Use SNTP server to set your time, set SNTP sever and time zone
Volume Settings
Handset, speaker and ringer volume setting
Melody Settings
Select the melody of the ringer
DND Settings
VoIP do not disturb setting, if the end time is earlier than the begin
time, it means the DO NOT DISTURB duration will from beginning time
to next day’s end time
Dial Plan Settings
See reference guide chapter 1.10
Call Waiting Settings
Attention: Call waiting function can not work when you use busy
forward function
Hotline Settings
Alarm Settings
Network
Status
Check the status of your network connection
WAN Settings
Select router/ bridge mode and set WAN network parameters
LAN Settings
Set LAN network parameters if use router mode
DDNS Settings
Set a DDNS server parameter, please ask your network administrator
or your VoIP service provider
SIP Settings
VLAN Settings
Please let your network administrator set it
Service Domain
Set VoIP service account information and server information.
If it request to define a special port on the server, please set it as the
following example:
xxx.xxxxxx.xxx(server address):xxxxx(port number)
Port Settings
Set the local SIP port and RTP port of your device
Codec Settings
Please ask your VoIP service provider
Codec ID Settings
Please ask your VoIP service provider
DTMF Settings
Please ask your VoIP service provider
Attention: If the setting is not correct, you may not dial a extension
number
Other Settings
Set Call Hold type, SIP and RTP Qos parameters and SIP expire time
NAT
STUN Settings
Please ask your VoIP service provider
Others
Auto Config
Set auto config server and mode
Tones Settings
Advanced Settings
Set ICMP feed back signal on/off, Private call on/off, Flash signal on/off,
encrypt type, PPPoE retry period and log parameter
System Auth.
Save Change
Update
New Firmware
Auto Update
Set auto new version check and upgrade parameters
Default Settings
Attention: You will lose all the settings in the device especially
including account and server information
Reboot
14 FAQ
Problem
Possible Cause
Solution
Your internet connection bandwidth is less
Unacceptable voice
quality under VoIP
than 30Kbps
Please use your phone in a good quality
Unstable network connection:
Network delay > 400ms or network trembling
network.
> 100ms or network packet loss > 10%
The network is blocked
You haven’t set any account/ service
Please contact network service provider
information
The connection to the server’s SIP port is
modified or filtered
Your network has a proxy server which is
blocking the terminal’s connection to the
Show ‘No Service’ on
internet.
the LCD
The data to the terminal’s SIP port is modified
or network administrator to ensure the
network and ports are available, and
the data is not modified or filtered. If
there are problems left, please contact
your service provider for technical
support.
or filtered
Please correctly enter account and
Your terminal is configured with incorrect
password. If there are problems left,
account information.
please contact your service provider for
technical support.
Your terminal is configured with an incorrect
Please contact your service provider for
server address.
technical support
15 Performance and Features
etc.) or 220~240V (China, Europe etc.) or 100~240V,
47-63Hz
15.1 The Electronic Specifications
z
Voltage: 5V DC, 1A
z
Power adapter: AC input 100~120V (USA, Japan etc.)
or 220~240V (China, Europe etc.) or 100~240V,
z
Log-in to specific soft-switch platform
z
Automatic searching for soft-switch platform
z
Supports DHCP: Automatically obtain local IP, subnet
mask, gateway IP
47-63Hz
z
Network interface: IEEE 802.3 10/100 Base-T
z
Supports PPPoE
z
EMC: FCC Part15 CLASS B /CE
z
Automatic Gain Control
z
Voice Active Detection
15.2 Operating/storing Environment
z
Operating temperature: 0 to 50° C
z
Comfortable Noise Generation
z
Storing temperature: -10° to 65° C
z
Echo Cancellation
z
Humidity: 10% to 90% non-condensing
z
Half duplex speaker
z
Dynamic Buffer Management—minimize effect to
15.3 Dimensions
z
z
Support NAT Traversal
z
Supports SIP
802.3 10/100 Base-T, can be use as
z
Supports Remote Upgrade
ROUTER/BRIDGE.
z
Lightning proof
Power adapter— AC input 100~120V (USA, Japan
z
Support Tos
15.4 Features
z
z
voice quality caused by audio delay jitter
208 × 197 × 68mm (L × W × H)
Basic Port——two RJ45 ports compatible with IEEE
z
Support G.711 fax
z
VAD/CNG Voice active detection/comfortable noise
generation
15.5 Standards and Agreements
z
G.165 Echo cancellation
z
DTMF Tone Generate and Detection:Inbound
G.729
z
DHCP: Dynamic Host Configuration Protocol
z
Impedance: Can be Selected
z
PPPoE: Point to Point Protocol of Ethernet
z
SIP
z
DNS: Domain Name Server
z
TCP/IP: Internet Transport and Control Protocol
z
FTP: File Transfer protocol
z
RTP: Real-time Transport Protocol
z
HTTP: Hyper Text Transfer protocol
z
RTCP: Real-time Control Protocol
z
TFTP
z
AGC: Automatic Gain Control
z
DDNS
z
IEEE 802.3 10/100 Base-T
z
G.711A, G.711µ, G.723.1 5.3K/6.3 Kbps,G.726 and