1
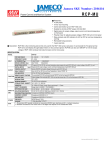
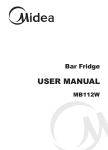
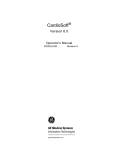
INDUSTRIAL ULTRASONIC CLEANER
USER MANUAL
FEATURES
2.0 thickness stainless steel tank for acid-proof, anti-corrosive
Ultrasonic power can be adjusted from 0-100%
Temperature control: 30-110
With free lid and stainless steel SUS304 basket
Industrial grade for 24 hours continuous working
Thank you for purchasing the ultrasonic cleaner. Please take the time to read these
operating instructions before using and retain them for future reference. Failure to
follow these instructions may lead to serious personal injury and damage to property.
INTRODUCTION
Ultrasonic cleaning is based on the cavitation effect caused by high
frequency ultrasonic wave vibration signal in the fluid. Microscopic
bubbles are formed, and they implode violently causing the cavitation
which create an intense scrubbing action on the surface of the item
being cleaned. The bubbles are small enough to penetrate microscopic
crevices, cleaning them thoroughly and consistently.
Ultrasonic cleaning is extremely effective at removing dirt and grime
which would normally require tedious manual cleaning by hand. It has
been used to clean a wide variety of instruments and mechanical parts
such as carburetors, returning them to almost “like new” condition
without damage to delicate parts.
PREPARATION:
1. Carefully unpack the cleaner and remove all traces of packing materials from it.
Visually inspect the cleaner for any parts that may have become loose or damaged
during transit.
Contents:
a: Main machine
b: lid.
c: Power lead
d: Generator
e: Basket
2.
Place the cleaner on a flat, clean surface where the cooling fans will receive adequate
ventilation and ensure all controls are set to off. Also ensure the drain tap is in the
closed position.
3.
Ensure the power lead is securely plugged into the cleaner and that no part of the lead
is likely to come into contact with moisture.
4.
Carefully fill at least 1/2 of the tank with a solvent solution. For demanding cleaning we
recommend suitable solution, this will help increase the cleaning performance. The
cleaner is now ready for use.
Attention
a)While the machine is working normally, ultrasonic and tank syntony gives a well-proportioned sound,
and no shudder on the surface of the water, yet there is spray made by the tiny bubbles. If there are
discontinuous surges, please add or release a little of washing solution in the tank, stopping the surges is
better for the objects cleaning.
SAFETY PRECAUTIONS
Keep it away from children !
This device is not intended to use by individuals with restricted physical sensory or
metal capacities or those with lack of experience or knowledge, include children,
unless they are supervised by an individual who is responsible for their safety or have
received training in operating the device.
PLEASE READ THE FOLLOWING VERY CAREFULLY AS FAILURE
TO COMPLY MAY INVALIDATE YOUR GUARANTEE
1)
DO NOT operate the unit without fluid in the tank. Always ensure the fluid is no
higher than the max mark, Always ensure that cleaning items immersed well in the
water.
2)
DO NOT drop any item into the tank as this may cause damage to the transducer.
Always place the items gently into the tank and use the basket whenever possible.
3)
The more items that you place in your cleaning bath the less efficient it will clean.
It is not advised to overlap items. Always allow plenty of clear space between the
items.
4)
Do keep the lid on during use. This will prevent splashes and reduce evaporation
of the fluid.
5)
Never immerse the machine or power cord in water or other liquid.
6)
DO NOT touch the power plug with wet hands, especially when inserting or
removing the plug.
7) DO NOT touch the unit if the machine has fallen into water during operation.
Remove the power plug from the socket first.
8) DO NOT disassemble the machine, except by professionals.
9)
UNPLUG the power source while filling or emptying the tank.
10) DO NOT spray water or liquid over the device and the control panel
11) DO NOT operate the cleaner without proper grounding.
12) DO NOT place the device on a soft surface, where the vents could be blocked.
13) Always turn the heater off after using as leaving it on can cause the fluid to
evaporate and damage the internal components.
14) Upon completion of the cleaning cycle, turn the heater knob off and isolate the
machine from the electrical supply.
15) Take care when adding or removing items from the cleaning tank as the fluid is
likely to be hot and displaced fluid can damage the internal components. Any
displaced fluid must be dried up immediately.
16) In the event of failure/emergency, disconnect the mains supply by removing the plug
from the mains socket.
APPLICATIONS
This list is almost endless, provided the product is non porous and can normally be
immersed in water anything can be thoroughly cleaned. Here are some examples:
● Engine/model parts
● Electrical components
● Diesel injection pumps
● Printer heads and toner cartridges
● Motorcycle radiators
● Vehicle differentials
● Golf club&grips&golf balls
● Horse bits&stirrups&horse brasses
● Motorcycle engine crank cases
● Engine cylinder heads
● Bicycle derailleurs
● Gun and gun components
INDUSTRIAL ULTRASONIC CLEANER STRUCTURE
Generator’s front panel
OPERATION
1) Place cleaning items in the machine basket, Fill stainless steel tank with
solution(better 2/3 of the tank, cleaning items should be immersed in the
solution )
2) Connect lines: Make sure the wires of the generator and machine are
connected.
3) Press the “Power” Button on the Generator, the left indicator light will turn on.
4) Ultrasonic Power Setting:
Ultrasonic cleaner’s power can be adjusted, press the left”power” button to
reduce/increase ultrasonic power.
5) Time Setting:
Timer is 0-60minutes adjustable, Press time button to reduce/increase working
time.
If need Sweep function, just press the according button on the Generator, after time
and power setting, press the button”on/off” to start work. During working, you will
hear the “ sizzling” voice ,that means the cleaner running properly.
START UP HEATING FUNCTION:
1) Set temperature (if need): Turn the “Heater” switch for setting temperature
30°C-110°C, the indicator on the machine will turn on. Please set the temperature
switch to the degree that needed, normally 40-60℃.
STOP ULTRASONIC & HEATING PROCESS:
1) Press “Power” button(On the Generator), the cleaner will stop working, indicator
light will turn off. And then disconnect the power supply.
2) Switch “Heater” button(On the machine) to stop the heating function.
3) Empty the tank and clean both the outside and inside of the cleaner with clean and
dry cloth for next use.
SPECIFICATIONS
Tank Size
Volume
power
Frequency
Heating power
Temperature
L*W*H(mm)
(L)
(W)
(KHz)
(W)
( C)
SONICA-36L
510×300×250
36
720
28/40
500
30-110
SONICA-57L
470×340×360
57
1080
28/40
3000
30-110
SONICA-90L
590×400×400
90
1440
28/40
1200
30-110
SONICA -112L
600×470×400
112
1800
28/40
4000
30-110
SONICA -145L
650×500×450
145
2160
28/40
6000
30-110
SONICA -235L
650×600×600
235
2520
28/40
6000
30-110
Model
������ ���
���������������������
MRC.4.15
O
������